Toyota bZ4X (2023 year). Manual in english - page 7
 

  Index      Toyota     Toyota bZ4X (2023 year). Manual in english


Search            copyright infringement  


Content      ..     5      6      7      8     ..


Toyota bZ4X (2023 year). Manual in english - page 7


111

2-2. Charging

2

Elec

tric 
V

ehi
cle s
ys

tem

1

Unlock the doors to unlock 
the charging connector. 
(

P.93)

The charging connector will be 

unlocked and the AC charging inlet 

light will illuminate when the doors 

are unlocked.

2

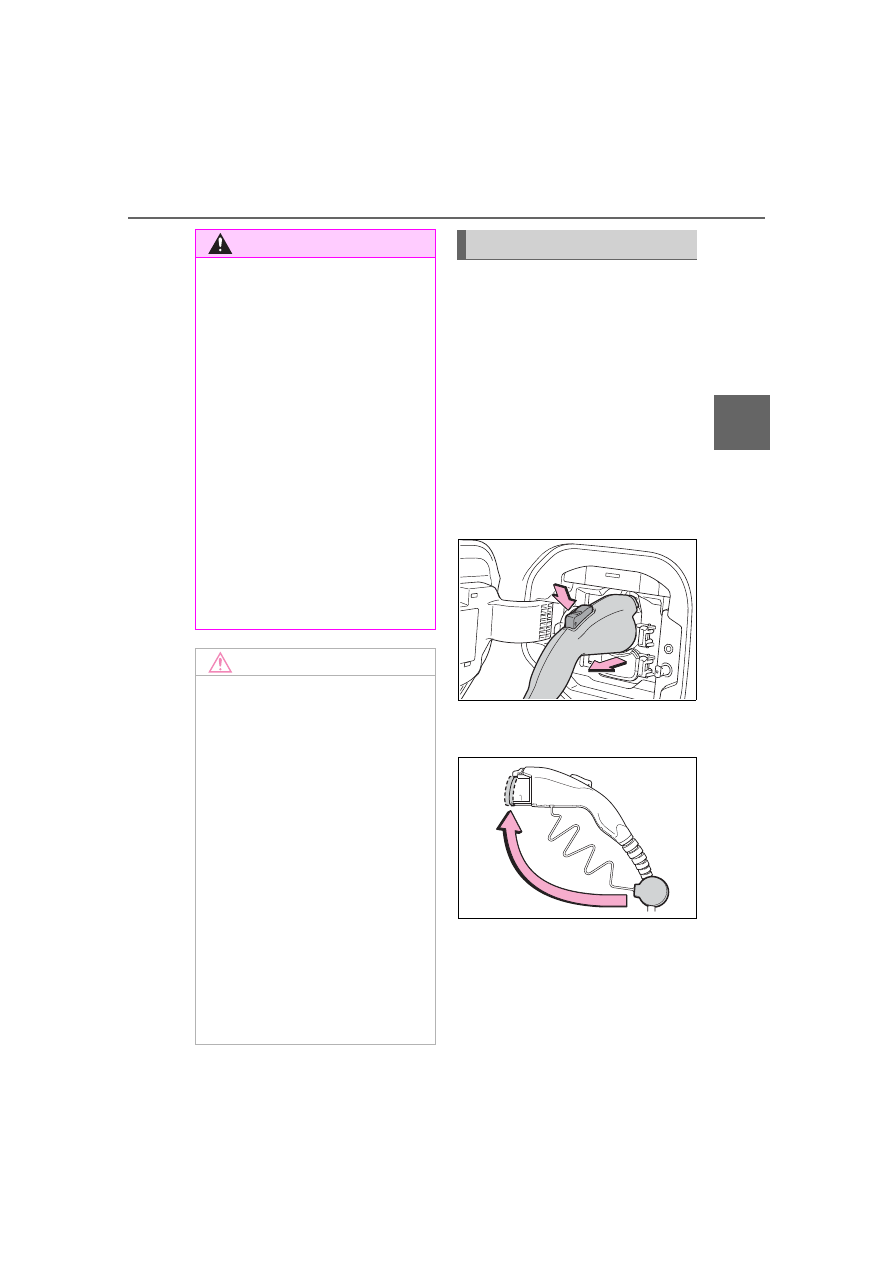
Pull the charging connector 
towards you while pressing 
the latch release button.

If the latch release button is 

pressed during charging (while the 

charging indicator is illuminated), 

charging will be interrupted.

3

Attach the charging connec-
tor cap.

WARNING

Onboard traction battery 

charger

The onboard traction battery char-

ger is located in the motor com-

partment. Make sure to observe 

the following precautions regard-

ing the onboard traction battery 

charger. Failure to observe these 

precautions may result in death or 

serious injury such as burns and 

electric shocks.

The onboard traction battery 

charger is hot during charging. 

Do not touch the onboard trac-

tion battery charger, as doing so 

may result in burns.

Do not disassemble, repair or 

modify the onboard traction bat-

tery charger. When the onboard 

traction battery charger needs 

to be repaired, consult your Toy-

ota dealer.

NOTICE

When charging

Do not insert the plug into the AC 

charging inlet.

The AC charging inlet may be 

damaged.

Using private power genera-

tor

Do not use private power genera-

tors as a power source for 

charging.

Doing so may make charging 

unstable, the voltage may be 

insufficient, and the charging 

operation may stop.

Charging station

Due to the environment in which 

the power equipment is located, 

charging may be unstable due to 

noise, the voltage may be insuffi-

cient, and the charging operation 

may stop.

After charging

112

2-2. Charging

4

Close the AC charging inlet 
cap and close the charging 
port lid.

5

Remove the plug from the 
outlet when the charging 
equipment will not be used 
for a prolonged period of 
time.

Hold the body of the plug when 

removing.
Make sure to put the cable away 

immediately after disconnecting. 

(

P.112)

When leaving the plug inserted, 

inspect the plug and connector 

once a month to check if dirt or dust 

has accumulated.

When the outside temperature 

is low or high

The level shown on the SOC (State 

of Charge) gauge (

P.152) may 

drop slightly when the power switch 

is turned to ON, even if charging 

has been completed and the trac-

tion battery is fully charged. How-

ever, this does not indicate a 

malfunction.

When removing the charging 

connector

Press the latch release button, 

check that the lever raises up, and 

then pull the charging connector 

towards you.
If the lever does not raise up even 

after the latch release button is 

pressed, the charging connector is 

locked. If this occurs, unlock the 

doors using the smart key system or 

wireless remote control to unlock 

the charging connector. (

P.167)

If the charging connector can-

not be unlocked

P.95

WARNING

After charging

Remove the plug if it will not be 

used for a long time.
Dirt and dust may accumulate 

plug or outlet, which could cause 

a malfunction or fire, possibly 

leading to death or serious injury.

NOTICE

After charging

Store the AC charging cable out 

of reach from infants and chil-

dren.

113

2-2. Charging

2

Elec

tric 
V

ehi
cle s
ys

tem

P.102

1

Open the charging port lid. 
(

P.85)

The charging inlet light will illumi-

NOTICE

After removing the plug from the 

outlet, keep it in a safe place 

free from moisture and dust. 

The AC charging cable or plug 

may be damaged if the cable is 

stepped on or ridden over by 

the vehicle.

After disconnecting the charging 

connector from the AC charging 

inlet, make sure to close the AC 

charging inlet cap and close the 

charging port lid.

If the AC charging inlet cap is 

left open, water or foreign 

objects may enter the AC 

charging inlet, which could lead 

to vehicle damage.

How to use DC 

charging

This section explains the 
DC charging procedure for 
the traction battery.
When using a DC charger, 
make sure to check the 
operation instructions of 
the DC charger.

WARNING

When using a DC charger

Observe the following precau-

tions.

Failure to do so may cause an 

unexpected accident, resulting in 

death or serious injury.

Use a SAE J 1772 compliant 

DC charger.

Do not use the charging cable 

longer than 30 meters.

Confirm the following 
before charging

When charging

114

2-2. Charging

nate.

2

Open the AC charging inlet 
cap, and then open the DC 
charging inlet cap.

3

Insert DC charging connector 
firmly and fully into the 
charging inlet

Insert the DC charging connector 

and it will lock automatically.
The DC charging connector shape 

and treatment will differ depending 

on the type of DC charger. Perform 

the operations in accordance to 

handling procedures of the DC 

charger.

4

Operate the DC charger and 
start the charging.

Follow the handling procedures of 

the DC charger to start charging.
Charging starts after a system 

check is done.

5

Confirm that the charging 
indicator on the charging port 
lights up.

When the charging indicator is not 

lit, charging has not started.
Stop the charging in accordance to 

the handling procedures of the DC 

charger when it is desired to inter-

rupt the DC charging.

Charging time may increase 

when

P.104

When the DC charging connec-

tor cannot be inserted into the 

DC charging inlet

P.95

If a message indicating vehicle 

error on the DC charger side is 

displayed

Even if a message indicating vehicle 

error on the DC charger side (ex. 

vehicle error found, vehicle error 

occurred, etc.) is displayed, there is 

no vehicle fault but possibly a com-

munication error between the DC 

charger and vehicle. In this case, 

there may be terminal damage (bad 

contact) in the DC charging connec-

tor. If there is no error with the vehi-

cle, contact the facility manager of 

the DC charger.

During DC charging

The current charging condition 

can be checked on the multi-infor-

mation display.

The actual charging time may dif-

fer from that displayed on the DC 

charger during charging.

There may be occasions the radio 

115

2-2. Charging

2

Elec

tric 
V

ehi
cle s
ys

tem

cannot be heard due to noise 

occurrence during DC charging

As the battery approaches full 

charge, the charging speed will 

decrease and it will take longer to 

complete charging.

The time to complete charging 

may change, or charging may 

stop before reaching the upper 

limit of the charge capacity, due to 

the remaining charge of the trac-

tion battery, the outside tempera-

ture, the specifications of the 

charger (stand), etc.

It is recommended to avoid fre-

quent DC charging to prevent a 

decline in the traction battery 

capacity.

Quickly move from the DC 

charging space for other users 

after the DC charging is com-

pleted.

How to set the DC charging 

power

You can change the DC charging 

power limit on the multi-information 

display or multimedia.

Setting operations on multi-infor-

mation display

1

Press 

 or 

 of the meter 

control switches to select 

.

2

Press 

 or 

 of the meter 

control switches to select “Vehi-
cle Settings”, and then press and 
hold 

.

3

Press 

 or 

 of the meter 

control switches to select 
“Charging Settings”, and then 
press 

.

The “Charging Settings” screen will 

be displayed.

4

Press 

 or 

 of the meter 

control switches to select “DC 

charging power”, and then press 

.

The “DC charging power” screen 

will be displayed.

5

Press 

 or 

 of the meter 

control switches to select the 
charging power from “MAX”, 
“125kW”, “100kW”, “75kW”, 
“50kW” and then press 

.

*

The maximum power when 

charging is limited to the selected 

power or less.
If “MAX” is selected, the vehicle will 

be charged with the maximum 

power that can be charged.

Setting operations on multimedia

1

Select 

.

2

Select “Vehicle customize”.

3

Select “Charging”.

4

Select “DC charging power”.

5

Select from “MAX”, “125kW”, 

“100kW”, “75kW”, “50kW”.

*

The maximum power when 

charging is limited to the selected 

power or less.
If “MAX” is selected, the vehicle will 

be charged with the maximum 

power that can be charged.

Changing the “Charging Limit” 

settings

P.108

If “Check Charging System 

Close Charging Port Lid See 

Owner’s Manual” is displayed 

on the multi-information display

If the system check after DC 

charging is not completed success-

fully, the EV system will not start 

even if the power switch is pressed 

while depressing the brake pedal.
Perform a system check with the fol-

lowing procedures.

116

2-2. Charging

1

Be sure to engage the parking 

brake and then turn the power 

switch off.

2

Close the charging inlet cap, 

close the charging port lid.

3

Check if “Checking Charging 

System” is displayed on the 

multi-information display when 

the power switch is turned to ON.

Do not open the charging port lid 

while the charging system is check-

ing.
When the system check is com-

pleted, the power switch automati-

cally turns off.

4

Press the power switch while 

depressing the brake pedal. The 

“READY” indicator turns on.

Contact your Toyota dealer if the 

charging system check is done and 

the message on the multi-informa-

tion display does not go off.

WARNING

Warnings for DC charging

Be sure to observe the following 

when using DC charging.
Failure to do so may cause an 

accident that could lead to death 

or serious injury.

Check that the DC charger and 

DC charging inlet are not dam-

aged. If there is any damage to 

the DC charging inlet, do not 

perform a DC charge and have 

it inspected immediately at your 

Toyota dealer.

Do not touch the terminals of 

the DC charging connector or 

inlet with metallic sharp tips 

(wires and needles), or allow a 

short circuit to occur with foreign 

objects.

Do not insert anything other 

than the DC charging connector 

into the DC charging inlet.

Check that the DC charging 

cable is not coiled up or pinned 

underneath heavy objects.

Be sure the DC charging inlet 

makes direct contact with the 

DC charging connector.

Do not connect conversion 

adapters, extension cords, etc., 

between the DC charging con-

nector and DC charging inlet.

When DC charging is inter-

rupted, follow the handling pro-

cedures of the DC charger. 

Immediately stop the DC 

charging when there is an out-

break of heat, smoke, strange 

noises or smells, etc., during 

charging.

Check that the DC charging 

connector and DC charging inlet 

do not have foreign objects or 

snow or ice attached to it. If any-

thing is attached to the inlet, be 

sure to completely remove the 

material before connecting the 

DC charging connector.

Do not charge the vehicle when 

there is a possibility of lightning. 

If you notice lightning while 

charging the vehicle, do not 

touch the vehicle and the DC 

charging cable.

Do not get the DC charging inlet 

terminals wet.

Close the hood when using DC 

charging. The cooling fan may 

suddenly start to run. Keep 

hands and clothing (especially a 

tie, a scarf or a muffler) away 

from the fan. Failure to do so 

may cause the hands or cloth-

ing to be caught, resulting in 

serious injury.

117

2-2. Charging

2

Elec

tric 
V

ehi
cle s
ys

tem

1

Operate the DC charger to 
stop the charging.

DC charging connector will be 

unlocked automatically when 

charging is completed.

2

Remove the DC charging 
connector.

The DC charging connector shape 

and treatment will differ depending 

on the type of DC charger. Perform 

the operations in accordance to 

handling procedures of the DC 

charger.
Return the removed DC charging 

connector to its original position.

3

Close the AC charging inlet 
cap and close the DC 
charging inlet cap, and then 
close the charging port lid.

When DC charging cannot be 

stopped

If charging cannot be stopped from 

the DC charger side due to a mal-

function, etc.
You can also stop DC charging by 

pressing the door unlock button (on 

the electronic key, or driver’s door) 

three times at 1 to 2 seconds inter-

vals.

WARNING

When connecting the DC 

charging connector

Follow the handling procedures 

of the DC charger to connect 

the DC charging connector. If 

the connector is not connected 

properly, the system cannot rec-

ognize the connection, and it 

may be possible to start the EV 

system.

After charging is completed, make 
sure to remove the DC charging 
connector from the DC charging 
inlet before starting the EV sys-
tem.
If the vehicle is started off with the 
connector still connected, it could 
lead to an accident, possibly 
resulting in death or serious injury.

Do not remove the DC charging 

connector from the DC charging 

inlet during DC charging. After 

operating the DC charger to 

stop charging, remove the DC 

charging connector from the DC 

charging inlet.

NOTICE

When using DC charging

Make sure to follow the handling 

procedures of the DC charger. If 

the procedures are not followed 

properly, the vehicle and the DC 

charger may be damaged.

After charging

118

2-2. Charging

If the DC charging connector 

cannot be unlocked

P.95

After DC charging

Even if the traction battery is 

charged to the upper limit value that 

is set, the level of charge displayed 

on the DC charger may be lower 

than the actual one.

Calendar settings

Charging schedule is performed 

according to the date and time 

shown on the multi-information dis-

play. Refer to the “Settings display” 

(

P.158)

If the calendar settings check 

screen is displayed when an 

attempt was made to register a 

charge schedule, check that the cor-

rect date is set. If it is incorrect, be 

sure to correct it.
If the calendar information is wrong, 

the charging schedule function will 

not operate normally.

When registering the charging 
schedule, the following settings 
can be changed.

Select the charging mode

One of the two following 
charging modes can be 
selected.

“Start”

Starts charging at the set time

*


and finishes charging when fully 
charged.

“Start-Stop”

AC charging is performed 

NOTICE

Caution after DC charging

Be sure to attach the DC 

charging inlet cap to the DC 

charging inlet and then close 

the charging port lid after 

removing the DC charging con-

nector from the inlet. If the DC 

charging inlet cap is not closed, 

foreign materials may get into 

the inlet and the EV system may 

be malfunctioning.

Using the charging 

schedule function

AC charging can be carried 
out at the desired time by 
registering the charging 
schedule.

Settings of the charging 
schedule function

119

2-2. Charging

2

Elec

tric 
V

ehi
cle s
ys

tem

according to the set start time 
and stop time.

*

*

: There might be a slight error in 

the timing when charging starts 
due to the state of the traction 
battery.

Repeated setting

The periodic charging schedule 
can be set by selecting your 
desired day of the week. Select 
one or more day of the week to 
do the charging schedule.

Turning “Charge Now” on 
and off

To start charging without chang-
ing the charging schedule set-
ting, turn “Charge Now” on to 
temporarily cancel the charging 
schedule and enable charging 
after connecting the AC 
charging connector.

*

*

: If the charging connector is 

removed during charging while 
the charging schedule is regis-
tered and “Charge Now” is on, 
“Charge Now” turns off.

“Next Event”

Of the registered charging 
schedules, the closest charging 
schedule after the current time 
is called the “Next Event”.
For charging schedule, AC 
charging will be performed 
according to the Next Event.

The charging schedule can be 
registered on the multi-informa-
tion display or multimedia.

Multi-information display 
operation: 

P.121

Multimedia operation: 

P.125

Charging schedule

The charging schedule cannot be 

set while driving.

A maximum of 15 charging sched-

ules can be registered.

If the charging mode is set to “Start-

Stop” and the start time and stop 

time are set to the same time, 

charging will be performed for 24 

hours from the start time.
The charging schedule function can 

not be used when using DC 

charging.

To make sure that the charging 

schedule function operates cor-

rectly

Check the following items.

Adjust the clock to the correct time 

(

P.158)

The calendar is set to the correct 

date (

P.158)

Check that the power switch is 

turned off

After registering the charging 

Registering the charging 
schedule

120

2-2. Charging

schedule, connect the AC 

charging connector

The charging start time is deter-
mined based on the charging 
schedule at the time that the AC 
charging connector was connected.

Connect the AC charging connec-

tor before the start time

When the charging mode is set to 
“Start”, if you connect the AC 
charging connector after the set 
start time, the next charging sched-
ule will be referenced.
When the charging mode is “Start-
Stop”, if you connect the AC 
charging connector after the start 
time, charging will start immediately 
and charging will be performed until 
the stop time.

After connecting the AC charging 

connector, check that the charging 

indicator of the charging port 

flashes (

P.86)

Do not use an outlet that has a 

power cut off function (including a 

timer function)

Use an outlet that constantly sup-
plies electricity. For outlets where 
the power is cut off due to a timer 
function, etc., charging may not be 
carried out according to plan if the 
power is cut off during the set time.

When the AC charging connec-

tor remains connected to the 

vehicle

When the charging mode is set to 

“Start”, even if multiple consecu-

tive charging schedules are regis-

tered, the next charge will not be 

carried out according to the 

charging schedule until the AC 

charging connector is removed 

and reconnected after charging 

completes. Also, when the traction 

battery is fully charged, charging 

according to the charging sched-

ule will not be carried out.

If the charging stop time is 

reached before the traction bat-

tery is fully charged and the 

charging mode is set to “Start-

Stop”, the nearest charging 

schedule after the stop time is 

updated as the next charging 

schedule, and charging is 

repeated until the battery is fully 

charged.

Smartphone-linked operation

After applying to Toyota App, it is 

possible to use the smartphone 

application to change charging 

schedule settings.
For details about Toyota Apps, refer 

to http://www.toyota.com/

connected-services in the United 

States and http://www.toy-

ota.ca/connected in Canada.

When charging schedules are 

ignored

When the following operations are 

performed while the charging 

schedule is on standby, charging 

schedule is temporarily canceled 

and charging is started.

When the Remote Air Condition-

ing System (

P.409) is operated

When turning “My Room Mode” 

on (

P.129)

When turning “Charge Now” on 

(

P.124, 128)

When an operation that temporar-

ily cancel charging using the 

charging schedule (

P.107)

Battery heater (

P.99)/“Battery 

Cooler” (

P.99)

Depending on the temperature of 

the traction battery, the traction bat-

tery heater or traction battery cooler 

may be activated and the charging 

indicator may light up while the timer 

is waiting for charging.

121

2-2. Charging

2

Elec

tric 
V

ehi
cle s
ys

tem

When operating charging 
schedule, use the meter control 
switches.

Meter control switches 
(

P.156)

Multi-information display

Registering the charging 
schedule

1

Press 

 or 

 of the meter 

control switches to select 

.

2

Press 

 or 

 of the meter 

control switches to select 
“Vehicle Settings”, and then 

press and hold 

.

3

Press 

 or 

 of the meter 

control switches to select 
“Charging Settings”, and then 

press 

.

The “Charging Settings” screen will 

be displayed.

4

Press 

 or 

 of the meter 

control switches to select 
“Charging Schedule”, and 

then press 

.

The “Charging Schedule” screen 

will be displayed.

5

Press 

 or 

 of the meter 

control switches to select 
“Scheduled Events”, and 

then press 

.

The “Scheduled Events” screen will 

be displayed.

6

Press 

 or 

 of the meter 

control switches to select 

“+add”, and then press 

.

The “Charging Mode” screen will be 

displayed.

Setting operations on 
multi-information display

122

2-2. Charging

7

Press 

 or 

 of the meter 

control switches to select the 
item to change with the cur-
sor, and then press 

 or 


to change the setting.
When the charging mode is 
“Start”, set the charging start 
time.
When the charging mode is 
“Start-Stop”, set the charging 
start time and stop time.
After changing the settings to 
the desired settings, press 

.

8

Press 

 or 

 of the meter 

control switches to select the 
desired day to activate for the 
repeated setting, and then 

press 

.

Each time 

 is pressed, the 

repeated setting switches 
between on and off.
When set to on, the charging 
schedule is repeated on that 
day. It is possible to set more 
than one day to on.
After changing the settings to 
the desired settings, select 

“Done”, and then press 

.

A screen where the settings 
can be saved will be dis-
played.

9

Select “Save” and press 


to save the settings.
The settings will be saved.
If you wish to change the set-
tings, press 

 and perform 

the setting procedure again.
After setting operations are 
complete, when the AC 
charging connector is con-
nected to the vehicle, 
charging will be carried out 
according to the charging 
schedule settings.

Switching charging sched-
ules between on and off

The registered charging sched-
ules can be turned on and off.

1

Perform step 

1

 to 

5

 of the 

“Registering the charging 
schedule” procedure 
(

P.121) and display 

“Scheduled Events” screen.

A list of the registered charging 

schedule will be displayed.

2

Press 

 or 

 of the meter 

control switches to select the 
item to turn ON/OFF, and 

123

2-2. Charging

2

Elec

tric 
V

ehi
cle s
ys

tem

then press 

.

Each time 

 is pressed, the 

selected charging schedule 
switches between on and off.
When set to off, a charging 
schedule is ignored and 
charging according to the 
charging schedule is not car-
ried out.

Changing the registered 
charging schedules

The registered charging sched-
ules can be modified or deleted.

1

Perform step 

1

 to 

5

 of the 

“Registering the charging 
schedule” (

P.121) proce-

dure and display “Scheduled 
Events” screen.

A list of the registered charging 

schedule will be displayed.

2

Press 

 or 

 of the meter 

control switches to select the 
item to change, and then 

press and hold 

.

The “Edit Event” screen will be dis-

played.

3

Press 

 or 

 of the meter 

control switches to select the 

item to operate, press 


and perform the necessary 
operation.

“Edit”

Change the desired settings as 
described starting from step 

7

 of 

the “Registering the charging 
schedule” procedure. (

P.121)

Press 

 to return to the previous 

screen.

“Delete”

A deletion confirmation screen will 
be displayed.

Press 

 or 

 of the meter con-

trol switches to select “Yes”, and 

then press 

 to delete the 

selected charging schedule.

To cancel deletion, select “No” and 

124

2-2. Charging

then press 

.

Press 

 to return to the previous 

screen.

Setting “Charge Now” to on

The “Charge Now” setting can 
be changed by performing one 
of the two following procedures.

Operation on “Charging 
Schedule” screen

1

Perform step 

1

 to 

4

 of the 

“Registering the charging 
schedule” procedure 
(

P.121) and display 

“Charging Schedule” screen.

2

Press 

 or 

 of the meter 

control switches to select 
“Charge Now”, and then 

press 

.

Each time 

 is pressed, 

“Charge Now” switches between 
on and off.

Operation on “Closing Dis-
play” screen

*

*

: If “Closing Display” is not set to 

“Charging Schedule” on the 


screen of the multi-information 
display, the “Closing Display” is 
not displayed. In this case, check 
the settings on the multi-informa-
tion display.

1

Turn the power switch off. 
The “Closing Display” screen 
is displayed on the multi-

information display.
(If the door is opened while 
waiting for charging sched-
ule, the same screen will be 
displayed.)

2

Press 

 to set “Charge 

Now” to on.

After setting operations are 
complete, charging starts when 
the AC charging connector is 
connected.

Displaying “Next Event”

1

Perform step 

1

 to 

4

 of the 

“Registering the charging 
schedule” procedure 
(

P.121) and display 

“Charging Schedule” screen.

2

Press 

 or 

 of the meter 

control switches to select 
“Next Event”, and then press 

.

The “Next Event” screen will be dis-

played.

When charging schedule set-

ting operations are canceled

When the vehicle is in the following 

conditions, charging schedule set-

ting operations are canceled.

The power switch is operated 

before the settings are confirmed

The vehicle starts off

A display with a higher priority 

than that of the charging schedule 

setting is shown

125

2-2. Charging

2

Elec

tric 
V

ehi
cle s
ys

tem

For details on how to operate 
the audio system screen, refer 
to “MULTIMEDIA OWNER’S 
MANUAL”.
Setting operations related to the 
charging schedule are per-
formed on the “Charging sched-
ule” screen.

Displaying the “Charging 
schedule” screen

1

Turn the power switch ON 
and display the menu screen.

It is not possible to control the 

Charging Schedule settings in 

Accessory Mode.

“POWER ON”

2

Select 

 and “Charging 

schedule”, in that order. The 
“Charging schedule” screen 
will be displayed.

How to read the “Charging schedule” screen

NOTICE

While performing the setting 

operation

When performing the setting 

operation while the EV system is 

stopped, be careful that the 

12-volt battery will not be dis-

charged.

Setting operations on 
multimedia

126

2-2. Charging

Charging schedules

Displays the week-long registered charging schedule in a list using icons.

“Add” button

Press to add a new item to the charging schedule. (

P.126)

“Edit” button

Press to change or delete registered items on the charging schedule. 
(

P.127)

“Charge now” button

Each time the button is pressed, “Charge now” switches between on and 
off. (

P.128)

Return button

Press to close the “Charging schedule” screen.

Registering the charging 
schedule

1

Display the “Charging sched-
ule” screen. (

P.125)

2

Press “Add”.

The “Add event” screen will be dis-

played on the screen.

3

Change the schedule to the 
desired time.

Charging mode

Press “Start at set time” or “Start 
and stop at set times” to set the 
desired charging mode.
• When “Start at set time” is 

selected

Set the charging start time, and 

press “OK”.

• When “Start and stop at set 

times” is selected

Set the charging start time and stop 
time, and press “OK”.


Content      ..     5      6      7      8     ..