Toyota Camry (2023 year). Manual in english - page 7
 

  Index      Toyota     Toyota Camry (2023 year). Manual in english


Search            copyright infringement  


Content      ..     5      6      7      8     ..


Toyota Camry (2023 year). Manual in english - page 7


113

2. Instrument cluster

2

Instru

me
nt clu

ster

Using the content display area

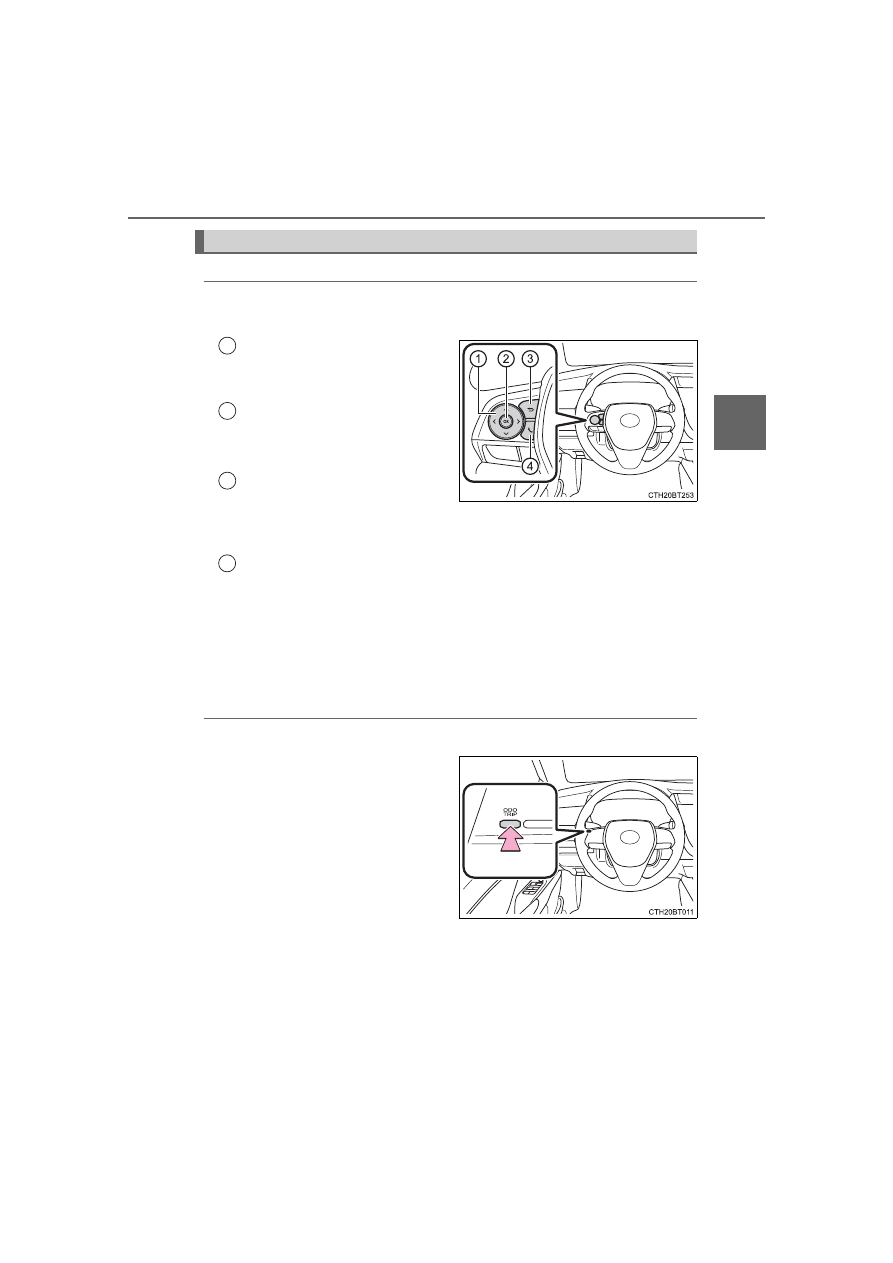
The  content  display  area  is  operated  using  the  meter  control
switches.

Scroll  screens

*

,  change  the

displayed content

*

 and move

the cursor
Press: Enter/Set
Press  and  hold:  Reset/Dis-
play the next screen
Return  to  the  previous
screen

Pressing  and  holding  the  switch  will  display  the  first  screen  of  the
selected menu icon.

Call sending/receiving and history display

Linked  with  the  hands-free  system,  sending  or  receiving  call  is  dis-
played. For details regarding the hands-free system, refer to “NAVIGA-
TION AND MULTIMEDIA SYSTEM OWNER’S MANUAL”.

*

: When the screen can be scrolled or different content can be displayed,

a mark, such as an arrow, will be displayed to suggest which switch to
operate.

Using the odometer/trip meter 

Items in this area are operated using the “ODO/TRIP” switch. 
Press: Change displayed item

Each time the switch is pressed,
the  displayed  item  will  be
changed.

Press and hold: Reset

Display  the  desired  trip  meter
and press and hold the switch to
reset the trip meter.

Using the multi-information display

1

2

3

4

114

2. Instrument cluster

Select a menu icon to display its content.

Warning message display (

P. 538)

This menu icon will be displayed only when a warning message can be
displayed.
Select to display warning messages and measures to be taken if a mal-
function is detected.

Eco-friendly driving information (

P. 115)

Select to display fuel consumption data in various forms.

Driving assist system information

Select to perform the following: 
Display the operational status of the following systems:

• Dynamic radar cruise control with full-speed range (if equipped) 

(

P. 290)

• Dynamic radar cruise control (if equipped) (

P. 306)

• LTA (Lane Tracing Assist) (

P. 270)

• RSA (Road Sign Assist) (if equipped) (

P. 285)

Display the following navigation system-linked information (if equipped):

• Route guidance
• Compass display

Audio system-linked display

Select  to  enable  selection  of  an  audio  source  or  track  on  the  meter
using the meter control switches.

Vehicle information

Select to perform the following: 
Display the following information:

• Tire inflation pressure (

P. 474)

Enable/Disable the following systems: 

• Intuitive parking assist (if equipped) (

P. 336)

• BSM (Blind Spot Monitor) function (if equipped) (

P. 330)

• RCTA (Rear Cross Traffic Alert) function (if equipped) (

P. 345)

This function can also be enabled/disabled on 

.

Settings display (

P. 117)

Select to change the meter display settings and other settings.

Menu icons

115

2. Instrument cluster

2

Instru

me
nt clu

ster

Fuel consumption

Current fuel consumption

Displays  the  instantaneous  cur-
rent fuel consumption.

Average  fuel  economy  (after
start)

Displays  the  average  fuel  con-
sumption since engine start.

*

1

Driving range

Displays the driving range with remaining fuel.

*

2, 3

Gadget

*

4

The following items can be displayed by changing the settings for gad-
get content and fuel economy type on 

. (

P. 117)

Eco-friendly driving information (

)

1

2

3

4

Displayable item

Content

Gadget 
content

Fuel economy 

type

Average
vehicle
speed

Trip 
(after start)

Displays  the  average  vehicle  speed  since
engine start.

Total 
(after reset)

Displays the average vehicle speed since the
display was reset.

*

5

Distance

Trip 
(after start)

Displays  the  distance  driven  since  vehicle
start.

Total 
(after reset)

Displays the distance driven since the display
was reset.

*

5

Elapsed
time

Trip 
(after start)

Displays the elapsed time since engine start.

Total 
(after reset)

Displays  the  elapsed  time  since  the  display
was reset.

*

5

116

2. Instrument cluster

Average fuel economy

Displayed item (listed below) can be changed on the fuel economy type
screen of 

. (

P. 117)

Total (after reset)

Displays the average fuel consumption since the display was reset.

*

1, 5

Tank (after refuel)

Displays  the  average  fuel  consumption  since  the  vehicle  was  refu-
eled.

*

1, 2

*

1

: Use the displayed fuel consumption as a reference only.

*

2

: When only a small amount of fuel is added to the tank, the display may

not be updated.
When refueling, turn the engine switch off. If the vehicle is refueled with-
out turning the engine switch off, the display may not be updated.

*

3

: This distance is computed based on your average fuel consumption. As

a result, the actual distance that can be driven may differ from that dis-
played.

*

4

: The default setting is no display.

*

5

: This display can be reset by pressing and holding 

 while it is dis-

played.

Eco indicator

• Eco Driving Indicator 

P. 126

• Driving range

Displays the driving range with remaining fuel.

When only a small amount of fuel is added to the tank, the display may
not be updated. 
When refueling, turn the engine switch off. If the vehicle is refueled with-
out turning the engine switch off, the display may not be updated.
This distance is computed based on your average fuel consumption. As
a result, the actual distance that can be driven may differ from that dis-
played.

5

117

2. Instrument cluster

2

Instru

me
nt clu

ster

Speedometer display/Driving range

Speedometer display

Displays the vehicle speed.

Driving range

Displays  the  driving  range  with
remaining fuel.
When  only  a  small  amount  of
fuel is added to the tank, the dis-
play may not be updated.
When refueling, turn the engine
switch  off.  If the  vehicle  is  refu-
eled  without  turning  the  engine
switch  off,  the  display  may  not
be updated.
This distance is computed based on your average fuel consumption. As
a result, the actual distance that can be driven may differ from that dis-
played.

Changing settings

Use  the  meter  control  switches  on  the  steering  wheel  to  change
settings.

Press 

 or 

 to select 

.

Operate the switches to select a desired item.

Press or press and hold 

.

The  available  settings  will  differ  depending  on  if 

  is  pressed  or

pressed and held. Follow the instructions on the display.

1

2

Settings display (

)

1

2

3

118

2. Instrument cluster

Setting items

 LTA (Lane Tracing Assist) (

P. 270)

Press and hold 

 to change the settings of the following items:

 PCS (Pre-Collision System) (

P. 254)

Press and hold 

 to change the settings of the following items:

 DRCC (Dynamic Radar Cruise Control) (

P. 290, 306)

Press and hold 

 to change the settings of the following item:

Item

Settings

Details

Lane center

On

Select to enable/disable the lane
centering function.

Off

Alert sensitivity

High

Select  to  set  the  warning  sensi-
tivity.

Std.

Sway warning

On

Select to enable/disable the vehi-
cle sway warning.

Off

Sway sensitivity

High

Select  to  set  the  vehicle  sway
warning sensitivity.

Std.

Low

Item

Settings

Details

PCS

On

Select to enable/disable the pre-
collision system.

Off

Warning sensitivity

 Early

Select  to  change  the  warning
timing.

 Middle

 Late

Item

Settings

Details

Curve 

speed

reduction

 Strong

Select  to  change  the  vehicle
speed reduction strength.

 Weak

Off

119

2. Instrument cluster

2

Instru

me
nt clu

ster

 BSM (Blind Spot Monitor) (if equipped) (

P. 330)

Press 

 to enable/disable the Blind Spot Monitor function.

Press and hold 

 to change the settings of the following item:

 RCTA (Rear Cross Traffic Alert) (if equipped) (

P. 345)

Press 

 to enable/disable the Rear Cross Traffic Alert function.

Press and hold 

 to change the settings of the following item:

Item

Settings

Details

BSM

On

Select  to  enable/disable  the
Blind Spot Monitor function.

Off

Item

Settings

Details

Outside  rear  view
mirror 

indicator

brightness

Bright

Select  to  change  the  brightness
of  the  outside  rear  view  mirror
indicators.

Dim

Notification  timing
for  presence  of
approaching  vehi-
cle (sensitivity)

 Early

Select  to  change  the  notification
timing  for  an  approaching  vehi-
cle.

 Middle

 Late

Only when vehicle
detected  in  blind
spot

Item

Settings

Details

RCTA

On

Select to enable/disable the Rear
Cross Traffic Alert function.

Off

Item

Settings

Details

RCTA  buzzer  vol-
ume

1 (Low)

Select  to  change  the  volume  of
the RCTA buzzer.

2 (Medium)

3 (Loud)

120

2. Instrument cluster

RCD (Rear Camera Detection) function (if equipped) (

P. 354)

Press 

 to enable/disable the rear camera detection function.

 PKSB (Parking Support Brake) (if equipped) (

P. 360)

Press 

 to enable/disable the Parking Support Brake.

 Intuitive parking assist (if equipped) (

P. 336)

Press 

 to enable/disable the Intuitive parking assist.

Press and hold 

 to change the settings of the following item:

Item

Settings

Details

RCD

On

Select to enable/disable the rear
camera detection.

Off

Item

Settings

Details

PKSB

On

Select  to  enable/disable  the
Parking Support Brake system.

Off

Item

Settings

Details

Intuitive 

parking

assist

On

Select to enable/disable the intui-
tive parking assist.

Off

Item

Settings

Details

Volume

1 (Low)

Select  to  change  the  volume  of
the  intuitive  parking  assist
buzzer.

2 (Medium)

3 (Loud)

121

2. Instrument cluster

2

Instru

me
nt clu

ster

 HUD (Head-up display) (if equipped) (

P. 128)

Press 

 to enable/disable the head-up display.

Press and hold 

 to change the settings of the following items:

Item

Settings

Details

HUD

On

Select  to  enable/disable  the
head-up display.

Off

Item

Settings

Details

HUD Brightness/Position

Select  to  adjust  the  brightness/
position of the head-up display.
• Press  the 

/

  switch  to

adjust the display brightness.

• Press  the 

/

  switch  to

adjust the display position.

HUD  Driving  sup-
port

Tachometer  set-
tings

Select  to  change  the  display
between the following: 
• Eco Driving Indicator
• Tachometer
• No content

Navigation 

sys-

tem (if equipped)

Select to enable/disable head-up
display content.

Driving Assist

Compass 
(if equipped)

Rotation

Select to adjust the angle of the
head-up display. 
Press  the 

/

  switch  to

adjust the display angle.

122

2. Instrument cluster

 RSA (Road Sign Assist) (if equipped) (

P. 285)

Press and hold 

 to change the settings of the following items:

Item

Settings

Details

RSA

On

Select  to  enable/disable  the
RSA.

Off

Notification method

Excess 

speed

notification

Select a notification method used
to  warn  the  driver  if  the  vehicle
speed  exceeds  the  speed  dis-
played on the speed limit sign on
the multi-information display.
Available methods:
• No notification
• Display only
• Display and buzzer

Other notifications

Select a notification method used
to  warn  the  driver  if  the  system
detects  the  vehicle  approaching
to  the  no-entry  road  when  a  do
not enter sign is displayed on the
multi-information display.
Available methods:
• No notification
• Display only
• Display and buzzer

Excess speed noti-
fication level

5 mph (10 km/h)

Select  a  speed  threshold  over
which the excess speed notifica-
tion  will  start  to  operate  when  a
speed  limit  sign  is  displayed  on
the multi-information display.

3 mph (5 km/h)

1 mph (2 km/h)

123

2. Instrument cluster

2

Instru

me
nt clu

ster


Vehicle settings

Press and hold 

 to change the settings of the following items:

Item

Settings

Details

TPWS (Tire pressure warning system) (

P. 474)

Set pressure (tire pressure warning sys-
tem initialization)

Select  to  initialize  the  tire  pres-
sure  warning  system.  To  per-
form initialization, press and hold
the 

 switch.

Before  performing  initialization,
make sure to adjust the inflation
pressure of each tire to the spec-
ified level. (

P. 475)

Change  wheel  (change  the  tire  pres-
sure  warning  system  sensor  ID  code
set) 
(vehicles  without  a  tire  inflation  pres-
sure display function)

Select  to  change  the  tire  pres-
sure  warning  system  sensor  ID
code set.
To enable this function, a second
set of tire pressure warning sys-
tem  sensor  ID  codes  must  be
registered  by  a  Toyota  dealer.
For information regarding chang-
ing  the  registered  ID  code  set,
contact your Toyota dealer. 
(

P. 477)

Change  wheel  (register  tire  pressure
warning system sensor ID codes) (vehi-
cles with a tire inflation pressure display
function)

Select to register the ID codes of
the  tire  pressure  sensors  to  the
tire pressure warning system. To
register the ID codes, press and
hold the 

 switch. 

(

P. 477)

Rear seat reminder
(

P. 154)

On

Select to enable/disable the rear
seat reminder.

Off

Scheduled maintenance display (if equipped)

Maintenance data reset

Select to reset the message indi-
cating  maintenance  is  required,
after the required maintenance is
performed. (

P. 448)

124

2. Instrument cluster


Meter settings

Press and hold 

 to change the settings of the following items:

*

1

: Selecting this item will only change the gadget.

*

2

: Selecting this item will turn the display of the gadget off.

Item

Settings

Details

Language

Select  to  change  the  language
displayed.

Units

Select  to  change  the  units  of
measure displayed.

  (Eco  Driving

Indicator Light)

On

Select to enable/disable the Eco
Driving Indicator Light. (

P. 126)

Off

Speedometer

On

Select  to  enable/disable  the
speedometer display.

Off

Gadget content

Off

No display

Average  vehicle
speed

Select  to  turn  the  display  of  a
gadget.

Distance

Elapsed time

Fuel economy type

Trip (after start)

*

1

Select  to  change  the  average
fuel consumption display and an
item to be displayed as gadget.

Total (after reset)

Tank 
(after refuel)

*

2

Multi-information display off

Select  to  turn  the  multi-informa-
tion display off.
To turn the multi-information dis-
play  on  again,  press  any  direc-
tion switch (

/

/

/

).

Pop-up display

Intersection  guid-
ance (if equipped)

Select to enable/disable the pop-
up display.

Incoming calls

Brightness adjust-
ment 

Default setting

Select to reset the meter display
settings to the default setting.

125

2. Instrument cluster

2

Instru

me
nt clu

ster

Odometer

Displays the total distance the vehicle has been driven.

Trip meter A/trip meter B

Displays the distance the vehicle has been driven since the meter
was last reset. Trip meters A and B can be used to record and dis-
play different distances independently. 

To reset, display the desired trip meter and press and hold the “ODO/
TRIP” switch.

Displays suggestions to the driver in the following situations. To select
a response to a displayed suggestion, use the meter control switches.

The suggestion function can be turned on/off. 
(Customizable features:



P. 606)

Suggestion to turn off the headlights

If  the  headlights  are  left  on  for  a  certain  amount  of  time  after  the
engine switch has been turned off, if the headlight switch is in the
“AUTO” position, a suggestion message will be displayed asking if
you wish to turn the headlights off. To turn the headlights off, select
“Yes”.

If a front door is opened after the engine switch is turned off, this sug-
gestion message will not be displayed.

Odometer/trip meter

Suggestion function

126

2. Instrument cluster

Eco Driving Indicator

Eco Driving Indicator will not operate under the following conditions:

The shift lever is in any position other than D.

A paddle shift switch (if equipped) is operated.

Neither normal mode nor Eco drive mode is selected. (

P. 375)

The vehicle speed is approximately 80 mph (130 km/h) or higher.

Suspension of the settings display

Some  settings  cannot  be  changed  while  driving.  When  changing  settings,
park the vehicle in a safe place.

If a warning message is displayed, operation of the settings display will be
suspended.

Tire pressure

It  may  take  a  few  minutes  to  display  the  tire  inflation  pressure  after  the
engine switch is turned to IGNITION ON mode. It may also take a few min-
utes  to  display  the  tire  inflation  pressure  after  inflation  pressure  has  been
adjusted.

“---” may be displayed if the tire position information cannot be determined
due to unfavorable radio wave conditions.

Tire inflation pressure changes with temperature. The displayed values may
also be different from the values measured using a tire pressure gauge.

Liquid crystal display

Small  spots  or  light  spots  may  appear  on  the  display. This  phenomenon  is
characteristic of liquid crystal displays, and there is no problem continuing to
use the display. 

Customization

Some functions can be customized. (

P. 117, 606)

Eco Driving Indicator Light 
During  Eco-friendly  acceleration  (Eco
driving), the Eco Driving Indicator Light
will  turn  on.  When  the  acceleration
exceeds  the  Zone  of  Eco  driving,  or
when  the  vehicle  is  stopped,  the  light
turns off.
Eco Driving Indicator Zone Display 
Suggests  the  Zone  of  Eco  driving  with
current  Eco  driving  ratio  based  on
acceleration.
Eco driving ratio based on acceleration 
If the acceleration exceeds the Zone of
Eco  driving,  the  right  side  of  the  Eco
Driving  Indicator  Zone  Display  will  illu-
minate.
Zone of Eco driving

1

2

3

4

127

2. Instrument cluster

2

Instru

me
nt clu

ster

WARNING

Caution for use while driving

When  operating  the  multi-information  display  while  driving,  pay  extra
attention to the safety of the area around the vehicle.

Do not look continuously at the multi-information display while driving as
you  may  fail  to  see  pedestrians,  objects  on  the  road,  etc.  ahead  of  the
vehicle.

The information display at low temperatures

Allow the interior of the vehicle to warm up before using the liquid crystal
information display. At extremely low temperatures, the information display
monitor may respond slowly, and display changes may be delayed. 
For example, there is a lag between the driver’s shifting and the new gear
number appearing on the display. This lag could cause the driver to down-
shift  again,  causing  rapid  and  excessive  engine  braking  and  possibly  an
accident resulting in death or injury.

Cautions during setting up the display

As the engine needs to be running during setting up the display, ensure that
the vehicle is parked in a place with adequate ventilation. In a closed area
such as a garage, exhaust gases including harmful carbon monoxide (CO)
may  collect  and  enter  the  vehicle.  This  may  lead  to  death  or  a  serious
health hazard.

NOTICE

While setting up the display

To prevent battery discharge, ensure that the engine is running while setting
up the display features.

128

2. Instrument cluster

The head-up display is linked to the meters and navigation system (if
equipped) and projects a variety of information in front of the driver,
such as the current vehicle speed.

Driving assist system status/navigation system-linked display area
(if equipped) (

P. 130)

The following pop-up displays will be displayed in certain situations:

• Pre-collision warning (pre-collision system)
• Alert from the Parking Support Brake system (if equipped)

Shift position/speed limit/RSA (Road Sign Assist) display area

• Shift position (

P. 217)

• Speed limit (vehicles with a navigation system) (U.S.A. only)
• RSA (Road Sign Assist) display (if equipped) (

P. 285)

Vehicle speed display
Eco Driving Indicator/Tachometer (

P. 131)

Information display area (

P. 131)

The following pop-up displays will be displayed in certain situations:

• Warning/message
• Hands-free system status
• Audio system operation status

Head-up display

: If equipped

Summary of functions

1

2

3

4

5


Content      ..     5      6      7      8     ..