Toyota 4Runner (2023 year). Manual in english - page 31
 

  Index      Toyota     Toyota 4Runner (2023 year). Manual in english


Search            copyright infringement  


Content      ..     29      30      31      32     ..


Toyota 4Runner (2023 year). Manual in english - page 31


500

7-2. Steps to take in an emergency

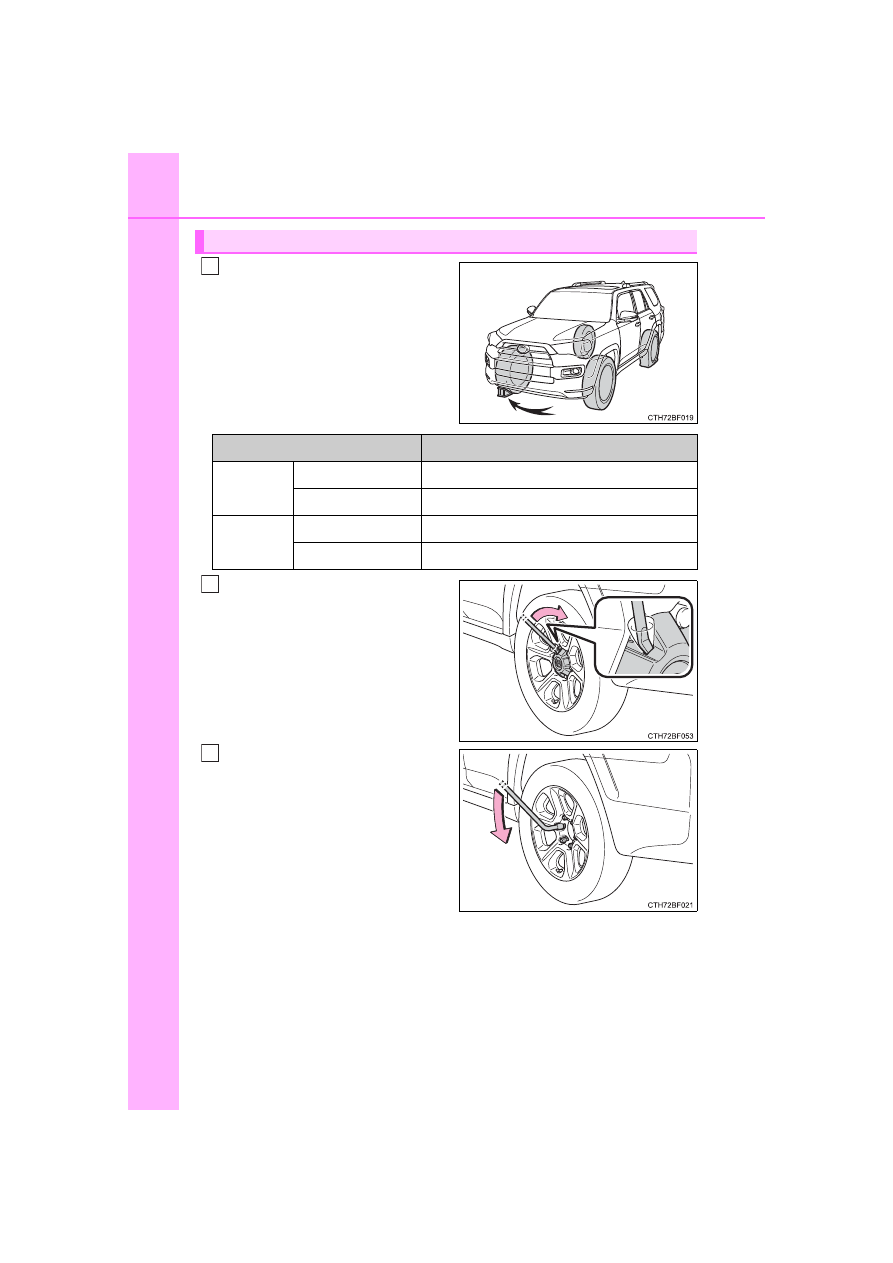
Chock the tires.

Remove  the  wheel  ornament
using  the  wheel  ornament
remover.

To  protect  the  wheel  ornament,

place  a  rag  between  the  wheel

ornament remover and the wheel

ornament,  as  shown  in  the  illus-

tration.

Slightly  loosen  the  wheel  nuts
(one turn).

Replacing a flat tire

1

Flat tire

Wheel chock positions

Front

Left-hand side

Behind the rear right-hand side tire

Right-hand side

Behind the rear left-hand side tire

Rear

Left-hand side

In front of the front right-hand side tire

Right-hand side

In front of the front left-hand side tire

2

3

501

7-2. Steps to take in an emergency

7

Wh
en tro

uble

 a

ris

es

Vehicles  without  Jack  handle: Assembling  the  wheel  nut  wrench
(used with jack handle).

Remove  the  wheel  nut  wrench,  jack  handle  extension  bar  and  jack

handle bar from the tool bag and assemble by following these steps.

Loosen  the  bolt  using  a
wheel nut wrench.

Assemble  the  jack  handle
bar,  jack  handle  extension
bar  and  wheel  nut  wrench
and tighten the bolts.

Check that the bolts are firmly

tightened.

4

1

2

502

7-2. Steps to take in an emergency

Vehicles with Jack handle: Assembling the jack handle.

Remove  the  jack  handle,  jack  handle  extension  bar  and  jack  handle

bar from the tool bag and assemble by following these steps.

Loosen  the  bolts  and  the
screw  using  either  the  jack
handle or a screwdriver.

Assemble  the  jack  handle
extension  bars  and  the  jack
handle  bar  and  tighten  the
bolts.

Check that the bolts are firmly

tightened.

Assemble  the  jack  handle
extension  bar  and  the  jack
handle and tighten the screw.

Check  that  the  screw  is  firmly

tightened.

4

1

2

3

503

7-2. Steps to take in an emergency

7

Wh
en tro

uble

 a

ris

es

Position  the  jack  at  the  jack
points as shown.
Front - Under the chassis frame
side rail
Rear  -  Under  the  rear  axle
housing

Raise the vehicle until the tire is
slightly raised off the ground.

When  positioning  the  jack  under

the rear axle housing, make sure

the groove on the top of the jack

fits with the rear axle housing.

Remove all the wheel nuts and
the tire.

When  resting  the  tire  on  the

ground, place the tire so that the

wheel  design  faces  up  to  avoid

scratching the wheel surface.

5

6

7

504

7-2. Steps to take in an emergency

WARNING

Replacing a flat tire

Observe the following precautions. 

Failure to do so may result in serious injury:
• Lower  the  spare  tire  completely  to  the  ground  before  removing  it

from under the vehicle.

• Do not try to remove the wheel ornament by hand. Take due care in

handling the ornament to avoid unexpected personal injury.

• Do not attach a heavily damaged wheel ornament, as it may fly off

the wheel while the vehicle is moving.

• Do not touch the disc wheels or the area around the brakes immedi-

ately after the vehicle has been driven.

After  the  vehicle  has  been  driven  the  disc  wheels  and  the  area

around the brakes will be extremely hot. Touching these areas with

hands, feet or other body parts while changing a tire, etc. may result

in burns.

Failure  to  follow  these  precautions  could  cause  the  wheel  nuts  to

loosen and the tire to fall off, resulting in death or serious injury.
• Have the wheel nuts tightened with a torque wrench to 83 ft•lbf (112

N•m, 11.4 kgf•m) steel wheels, 76 ft•lbf (103 N•m, 10.5 kgf•m) alumi-

num wheels, as soon as possible after changing wheels.

• When installing a tire, only use wheel nuts that have been specifi-

cally designed for that wheel.

• If  there  are  any  cracks  or  deformations  in  the  bolt  screws,  nut

threads  or  bolt  holes  of  the  wheel,  have  the  vehicle  inspected  by

your Toyota dealer.

• When  installing  the  wheel  nuts,  be  sure  to  install  them  with  the

tapered ends facing inward.

505

7-2. Steps to take in an emergency

7

Wh
en tro

uble

 a

ris

es

Remove any dirt or foreign mat-
ter from the wheel contact sur-
face.

If  foreign  matter  is  on  the  wheel

contact  surface,  the  wheel  nuts

may loosen while the vehicle is in

motion,  causing  the  tire  to  come

off.

Install the spare tire and loosely tighten each wheel nut by hand by
approximately the same amount.
When  replacing  an  aluminum
wheel  with  a  steel  wheel,
tighten the wheel nuts until the
tapered  portion  comes  into
loose  contact  with  the  disc
wheel seat.

When  replacing  an  aluminum
wheel with an aluminum wheel,
tighten the wheel nuts until the
washers  comes  into  contact
with the disc wheel.

Installing the spare tire

1

2

Tapered 
portion

Disc wheel seat

Washer

Disc wheel

506

7-2. Steps to take in an emergency

Lower the vehicle.

Firmly  tighten  each  wheel  nut
two  or  three  times  in  the  order
shown in the illustration.

Tightening torque

Steel wheels: 

83 ft•lbf (112 N•m, 11.4 kgf•m)

Aluminum wheels: 

76 ft•lbf (103 N•m, 10.5 kgf•m)

3

4

WARNING

Stowing the flat tire

Failure to follow steps listed under stowing the tire may result in damage

to the spare tire carrier and lose of the tire, which could result in death or

serious injury.

507

7-2. Steps to take in an emergency

7

Wh
en tro

uble

 a

ris

es

Lay down the tire with the outer
side  facing  up,  and  install  the
holding  bracket,  inserting  the
claw into the wheel lug nut hole.
Turn  the  jack  handle  extension
clockwise  to  take  up  slack  in
the chain.
Then, check to ensure the claw
is in the wheel lug nut hole and
the holding bracket is centered
in the wheel hub.

Holding bracket
Claw

Vehicles 

without 

kinetic

dynamic  suspension:  While
raising,  secure  the  tire,  taking
care  that  the  tire  goes  straight
up without catching on any sur-
rounding part to prevent it from
flying forward during a collision
or sudden braking.
Vehicles  with  kinetic  dynamic  suspension:  While  raising,  pull  the
tire towards the rear of the vehicle, taking care that the tire goes up
without  catching  on  any  surrounding  part  to  prevent  it  from  flying
forward during a collision or sudden braking.

Tightening torque:

34.4 ft

lbf (46.6 N

m, 4.8 kgf

m)

Confirm that the tire is not loose
after tightening:

Push and pull the tire
Try rotating

Vishually check to ensure the tire

is not hung on surrounding parts.
If  looseness  or  misassembly

exists,  repeat  step 

  and  step

.

Stowing the flat/spare tire, jack and tools

1

1

2

2

1

2

1

2

508

7-2. Steps to take in an emergency

Repeat step 

 any time the tire is lowered or disturbed.

Stow the tools and jack securely.

After completing the tire change

The tire pressure warning system must be reset. (

P. 430)

When using the spare tire (vehicles without P245/60R20 tires)

As the spare tire is not equipped with a tire pressure warning valve and

transmitter, low inflation pressure of the spare tire will not be indicated by

the tire pressure warning system. Also, if you replace the spare tire after

the tire pressure warning light comes on, the light remains on.

NOTICE

Do not drive the vehicle with a flat tire

Do not continue driving with a flat tire.

Driving even a short distance with a flat tire can damage the tire and the

wheel beyond repair.

When stowing the flat tire

Ensure that there is no object caught between the tire and the vehicle

underbody.

When replacing the tires

When removing or fitting the wheels, tires or the tire pressure warning

valve and transmitter, contact your Toyota dealer as the tire pressure

warning  valve  and  transmitter  may  be  damaged  if  not  handled  cor-

rectly.

Replace the grommets for the tire pressure warning valves and trans-

mitters as well.

To avoid damage to the tire pressure warning valves and transmit-

ters

When  a  tire  is  repaired  with  liquid  sealants,  the  tire  pressure  warning

valve  and  transmitter  may  not  operate  properly.  If  a  liquid  sealant  is

used, contact your Toyota dealer or other qualified service shop as soon

as possible. Make sure to replace the tire pressure warning valve and

transmitter when replacing the tire. (

P. 430)

3

2

4

509

7-2. Steps to take in an emergency

7

Wh
en tro

uble

 a

ris

es

One of the following may be the cause of the problem:

There may not be sufficient fuel in the vehicle’s tank. 
Refuel the vehicle.

The engine may be flooded. 
Try to restart the engine again following correct starting procedures.
(

P. 199)

There may be a malfunction in the engine immobilizer system. 
(

P. 78)

One of the following may be the cause of the problem:

The battery may be discharged. (

P. 515)

The battery terminal connections may be loose or corroded.

The engine starting system may be malfunctioning due to an electrical
problem such as an open circuit or a blown fuse. However, an interim
measure is available to start the engine. (

P. 510)

If the engine will not start

If  the  engine  will  not  start  even  though  correct  starting  proce-
dures are being followed (

P. 199), consider each of the follow-

ing points:

The engine will not start even though the starter motor operates
normally.

The starter motor turns over slowly, the interior lights and head-
lights  are  dim,  or  the  horn  does  not  sound  or  sounds  at  a  low
volume.

The starter motor does not turn over

510

7-2. Steps to take in an emergency

One of the following may be the cause of the problem:

One or both of the battery terminals may be disconnected.

The battery may be discharged. (

P. 515)

Contact your Toyota dealer if the problem cannot be repaired, or if repair
procedures are unknown.

When the engine does not start, the following steps can be used as an
interim measure to start the engine if the engine switch is functioning
normally:

Set the parking brake.
Shift the shift lever to P.
Turn the engine switch to ACCESSORY mode.
Press  and  hold  the  engine  switch  for  about  15  seconds  while
depressing the brake pedal firmly.

Even if the engine can be started using the above steps, the system
may  be  malfunctioning.  Have  the  vehicle  inspected  by  your  Toyota
dealer.

The starter motor does not turn over, the interior lights and head-
lights do not turn on, or the horn does not sound.

Emergency start function

1

2

3

4

511

7-2. Steps to take in an emergency

7

Wh
en tro

uble

 a

ris

es

Remove the cover on the back
door trim.

Tear  the  plastic  film.  Remove
the cover.

Pull the lever.

If you cannot operate back door opener

If the back door opener does not operate, there may be a prob-
lem  with  the  back  door  opener  system.  Have  the  vehicle
inspected by your Toyota dealer immediately. 
The following steps may be used as an emergency measure to
ensure that the back door can be opened from the inside.

1

2

3

512

7-2. Steps to take in an emergency

Use the mechanical key 
(

P. 103) in order to perform the

following operations:

Locks all the doors
Closes  the  windows  and  moon
roof (turn and hold)

*


(

P. 156, 163)

Unlocks all the doors

Turning the key rearward unlocks the driver’s door. Turning the key once
again unlocks the other doors.

Opens the windows and moon roof (turn and hold)

*


(

P. 156, 163)

*

: This setting must be customized at your Toyota dealer.

If the electronic key does not operate 

properly

If  communication  between  the  electronic  key  and  vehicle  is
interrupted  (

P.  117)  or  the  electronic  key  cannot  be  used

because the battery is depleted, the smart key system and wire-
less  remote  control  cannot  be  used.  In  such  cases,  the  doors
can  be  opened  and  the engine  can  be  started  by  following  the
procedure below.

Locking and unlocking the doors

1

2

3

4

513

7-2. Steps to take in an emergency

7

Wh
en tro

uble

 a

ris

es

Ensure that the shift lever is in P and depress the brake pedal.
Touch  the  Toyota  emblem  side
of  the  electronic  key  to  the
engine switch.

When  the  electronic  key  is
detected, a buzzer sounds and the
engine switch will turn to IGNITION
ON mode.
When  the  smart  key  system  is
deactivated  in  customization  set-
ting,  the  engine  switch  will  turn  to
ACCESSORY mode.

Firmly depress the brake pedal and check that 

 is displayed

on the multi-information display.
Press the engine switch shortly and firmly.

In the event that the engine still cannot be started, contact your Toyota
dealer.

Stopping the engine

Shift the shift lever to P and press the engine switch as you normally do when
stopping the engine.

Replacing the key battery

As the above procedure is a temporary measure, it is recommended that the
electronic key battery be replaced immediately when the battery is depleted.
(

P. 447)

Changing engine switch modes

Within 10 seconds of the buzzer sounding, release the brake pedal and press
the engine switch.
The engine does not start and modes will be changed each time the switch is
pressed.(

P. 200)

When the electronic key does not work properly

Make sure that the smart key system has not been deactivated in the cus-
tomization setting. If it is off, turn the function on. 
(Customizable features: 

P. 549)

Check if battery-saving mode is set. If it is set, cancel the function. 
(

P. 116)

Starting the engine

1

2

3

4

514

7-2. Steps to take in an emergency

WARNING

When  using  the  mechanical  key  and  operating  the  power  windows,
power back window or moon roof

Operate the power windows, power back window or moon roof after check-
ing to make sure that there is no possibility of any passenger having any of
their body parts caught in the window or moon roof. 
Also, do not allow children to operate the mechanical key. It is possible for
children and other passengers to get caught in the power windows, power
back window or moon roof.

515

7-2. Steps to take in an emergency

7

Wh
en tro

uble

 a

ris

es

If you have a set of jumper (or booster) cables and a second vehicle
with a 12-volt battery, you can jump start your vehicle by following the
steps below.

Confirm  that  the  electronic  key
is being carried.

When  connecting  the  jumper  (or
booster) cables, depending on the
situation,  the  alarm  may  activate
and doors locked. (

P. 80)

Open the hood (

P. 412)

If the vehicle battery is discharged

The following procedures may be used to start the engine if the
vehicle’s battery is discharged.
You can also call your Toyota dealer or a qualified repair shop.

1

2


Content      ..     29      30      31      32     ..