Toyota Yaris Cross (2022 year). Manual in english - page 11
 

  Index      Toyota     Toyota Yaris Cross (2022 year). Manual in english


Search            copyright infringement  


Content      ..     9      10      11      12     ..


Toyota Yaris Cross (2022 year). Manual in english - page 11


177

4

n

4-2. Driving procedures

D

riv

ing

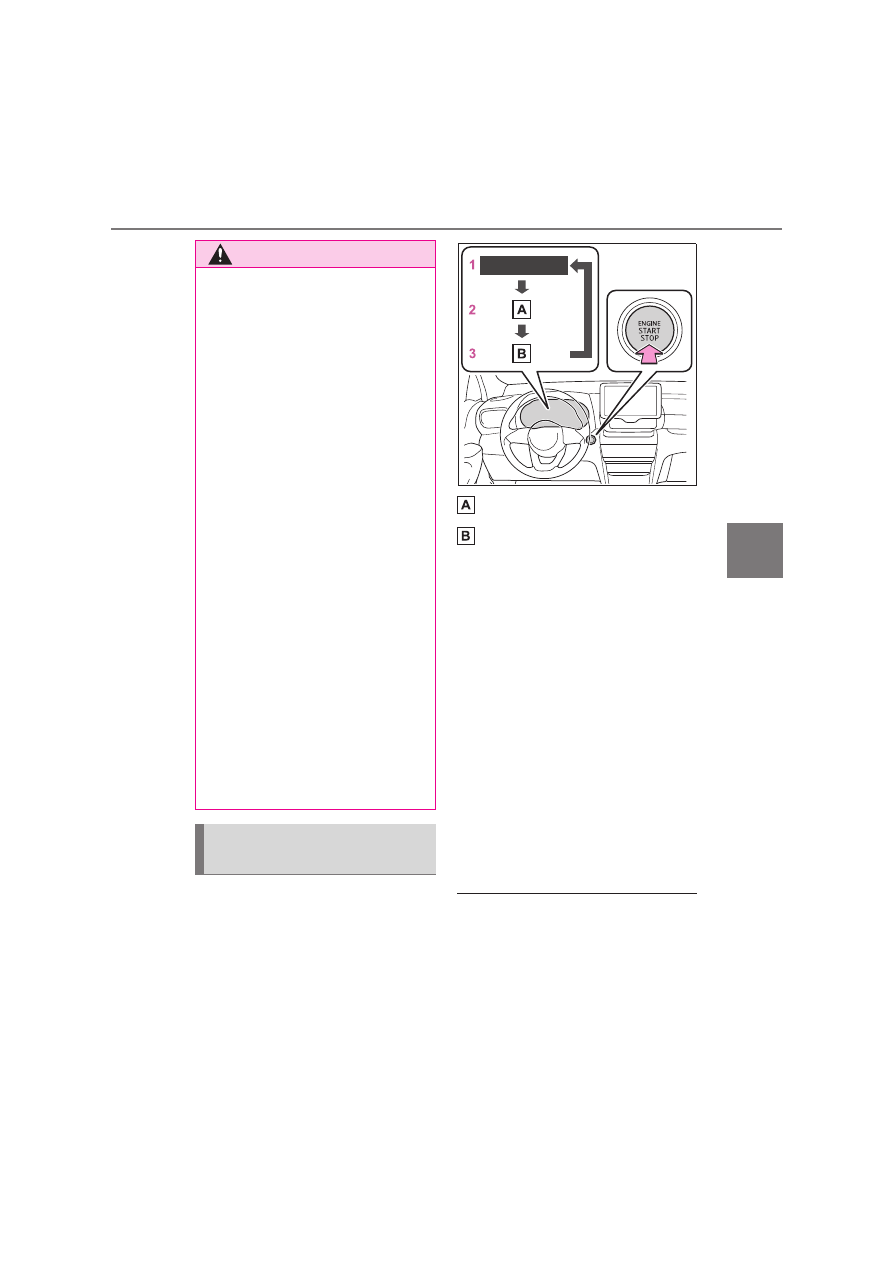
Modes can be changed by pressing 
the engine switch with brake pedal 
(Multidrive) or clutch pedal (man-
ual transmission) released. (The 
mode changes each time the 
switch is pressed.)

“ACCESSORY”

“IGNITION ON”

1

OFF

*

The emergency flashers can be used.

2

ACC

Some electrical components such as 
the audio system can be used.
“ACCESSORY” will be displayed on the 
multi-information display.

3

ON

All electrical components can be used.
“IGNITION ON” will be displayed on the 
multi-information display.

*

: Vehicles with a Multidrive: If the shift 

lever is in a position other than P 
when turning off the engine, the 
engine switch will be remained to 
ON, not to off.

Auto power off function

Multidrive: If the vehicle is left in ACC or 

ON (the engine is not running) for more 

than 20 minutes with the shift lever in P, 
the engine switch will automatically turn 

off. 

Also, if the remaining battery is low with 
the shift lever in P and the engine switch 

WARNING

Stopping the engine in an emer-

gency

If you want to stop the engine in an 

emergency while driving the vehi-

cle, press and hold the engine 
switch for more than 2 seconds, or 

press it briefly 3 times or more in 

succession. (

P.394)

However, do not touch the engine 

switch while driving except in an 

emergency. Turning the engine off 
while driving will not cause loss of 

steering or braking control, but the 

power assist to these systems will 
be lost. This will make it more diffi-

cult to steer and brake, so you 

should pull over and stop the vehi-
cle as soon as it is safe to do so.

If the engine switch is operated 
while the vehicle is running, a warn-

ing message will be shown on the 

multi-information display and a 
buzzer sounds.

Vehicles with a Multidrive: To restart 
the engine after performing an 

emergency shutdown, shift the shift 

lever to N and then press the 
engine switch.

Vehicles with a manual transmis-
sion: To restart the engine after per-

forming an emergency shutdown, 

depress the clutch pedal and then 
press the engine switch.

Changing engine switch 
modes

178

n

4-2. Driving procedures

in ACC or ON (engine is not running), a 
buzzer sounds and a message is dis-

played in the multi-information display. If 

left in this state, the engine switch auto-
matically turns to off. 

However, this function cannot entirely 

prevent battery discharge. Do not leave 
the vehicle with the engine switch in 

ACC or ON for long periods of time 

when the engine is not running.
Manual transmission: If the vehicle is left 

in ACC or ON (the engine is not running) 

for more than 20 minutes, the engine 
switch will automatically turn off. 

Also, if the remaining battery is low with 

the shift lever in N and the engine switch 
in ACC or ON (engine is not running), a 

buzzer sounds and a message is dis-

played in the multi-information display. If 
left in this state, the engine switch auto-

matically turns to off. 

However, this function cannot entirely 
prevent battery discharge. Do not leave 

the vehicle with the engine switch in 

ACC or ON for long periods of time 
when the engine is not running.

If the engine is stopped with the 
shift lever in a position other than P, 
the engine switch will not be turned 
off. Perform the following procedure 

to turn the switch off:

1

Check that the parking brake is 
set.

2

Shift the shift lever to P.

3

Check that “IGNITION ON” is 
displayed on the multi-informa-
tion display and press the 
engine switch shortly and firmly.

4

Check that “ACCESSORY” or 
“IGNITION ON” on the multi-
information display is off.

NOTICE

To prevent battery discharge

Do not leave the engine switch in 
ACC or ON for long periods of time 

without the engine running.

If “ACCESSORY” or “IGNITION 

ON” is displayed on the multi-infor-

mation display, the engine switch is 
not off. Exit the vehicle after turning 

the engine switch off.

When stopping the engine 
with the shift lever in a posi-
tion other than P (vehicles 
with a Multidrive)

NOTICE

To prevent battery discharge

Do not stop the engine when the shift 

lever is in a position other than P. If 
the engine is stopped in another shift 

lever position, the engine switch will 

not be turned off and remained to ON. 
If the vehicle is left in ON, battery dis-

charge may occur.

179

4

n

4-2. Driving procedures

D

riv

ing

*

: If equipped

*

: To improve fuel efficiency and reduce 

noise, shift the shift lever to D for nor-
mal driving.

To protect the Multidrive

If the Multidrive fluid temperature is 
high, “Transmission Oil Temp. High Stop 

in a Safe Place and See Owner’s Man-

ual” will be displayed on the multi-infor-
mation display and the vehicle will go 

into transmission protection mode auto-

matically. Have the vehicle inspected by 
any authorized Toyota retailer or Toyota 

authorized repairer, or any reliable 

repairer.

When driving with dynamic radar 
cruise control or dynamic radar 

cruise control with full-speed range 

(if equipped)

Even when switching the driving mode 

to power mode with the intent of 

enabling engine braking, engine braking 
will not occur because dynamic radar 

cruise control or dynamic radar cruise 

control with full-speed range will not be 
canceled. (

P.299)

Restraining sudden start (Drive-

Start Control)

P.165

G AI-SHIFT

G AI-SHIFT automatically selects a suit-

able gear for sporty driving according to 

driver’s input and driving conditions. G 
AI-SHIFT operates automatically when 

the shift lever is in D and power mode is 

selected for the driving mode. (Selecting 
other than power mode or shifting the 

shift lever to the other position cancels 

this function)

After recharging/reconnecting the 
battery

P.440

Multidrive

*

Select the shift position 
depending on your purpose 
and situation.

Shift position purpose and 
functions

Shift posi-

tion

Objective or function

P

Parking the vehicle/start-

ing the engine

R

Reversing

N

Neutral

(Condition in which the 

power is not transmitted)

D

Normal driving

*

M

10-speed sport sequen-

tial shiftmatic mode driving 

(

P.182)

WARNING

When driving on slippery road 
surfaces

Do not accelerate or shift the shift 

gears suddenly. 
Sudden changes in engine braking 

may cause the vehicle to spin or skid, 

resulting in an accident.

180

n

4-2. Driving procedures

: While the engine switch is in 

ON and the brake pedal 

depressed

*

, shift the shift lever 

while pushing the shift release but-
ton on the shift knob.

: Shift the shift lever while push-

ing the shift release button on the 
shift knob.

: Shift the shift lever normally.

When shifting the shift lever between P 
and D, make sure that the vehicle is 
completely stopped and the brake 
pedal is depressed.

*

: For the vehicle be able to be shifted 

from P, the brake pedal must be 
depressed before the shift release 
button is pushed. If the shift release 
button is pushed first, the shift lock 

will not be released.

Shift lock system

The shift lock system is a system to pre-

vent accidental operation of the shift 
lever in starting.

The shift lever can be shifted from P 

only when the engine switch is in ON 
and the brake pedal is being depressed.

If the shift lever cannot be shifted 

from P

First, check whether the brake pedal is 
being depressed.

If the shift lever cannot be shifted with 

your foot on the brake pedal, there may 
be a problem with the shift lock system. 

Have the vehicle inspected by any 

authorized Toyota retailer or Toyota 
authorized repairer, or any reliable 

repairer immediately.

The following steps may be used as an 
emergency measure to ensure that the 

shift lever can be shifted.

Releasing the shift lock:

1

Set the parking brake.

2

Turn the engine switch off.

3

Depress the brake pedal.

4

Ply the cover up with a flathead 
screwdriver or equivalent tool.

To prevent damaging the cover, 

wrap the tip of the flathead screw-
driver with a tape.

5

Press and hold the shift lock override 

button and then push the button on 

the shift knob.

The shift lever can be shifted while the 

both buttons are pressed.

Shifting the shift lever

181

4

n

4-2. Driving procedures

D

riv

ing

P.299

To drive using temporary shift 
range selection, operate the “-” or 
“+” paddle shift switch.
When the “-” paddle shift switch is 
operated, the gear step switches to 
a range that enables engine brak-
ing force that is suitable to driving 
conditions. When the “+” paddle 
shift switch is operated, the gear 
step switches to a step that is one 
step higher than the current step.
Changing the gear step allows 
restriction of the highest gear step, 
preventing unnecessary upshifting 

and enabling the level of engine 
braking force to be selected.

1

Upshifting

2

Downshifting

The selected gear step, from D1 to 
D10, will be displayed on the multi-
information display.

Gear step functions

10 levels of accelerating force and 

engine braking can be selected.

A lower gear step will provide greater 

engine braking force than a higher 
gear step, and the engine speed will 

also increase.

Deactivation of temporary 10-speed 

Sport Sequential Shiftmatic mode

In the following situations, temporary 10-

speed Sport Sequential Shiftmatic mode 

will be deactivated:

When the vehicle is stopped

If the accelerator pedal is depressed 

continuously for more than a certain 

amount of time while in one gear step

If the accelerator pedal is depressed 
abruptly and heavily

When the shift lever is shifted to a 
position other than D

When the “+” paddle shift switch is 
operated for a certain amount of time 

continuously

Downshifting restriction warning 

buzzer

To help ensure safety and driving perfor-

WARNING

To prevent an accident when 

releasing the shift lock

Before pressing the shift lock override 

button, make sure to set the parking 

brake and depress the brake pedal.
If the accelerator pedal is accidentally 

depressed instead of the brake pedal 

when the shift lock override button is 
pressed and the shift lever is shifted 

out of P, the vehicle may suddenly 

start, possibly leading to an accident 
resulting in death or serious injury.

Selecting the driving mode

Selecting gear steps in the D 
position

182

n

4-2. Driving procedures

mance, downshifting operation may 
sometimes be restricted. In some cir-

cumstances, downshifting may not be 

possible even when the paddle shift 
switch is operated. (A buzzer will sound 

twice.)

To enter 10-speed sport sequential 
shiftmatic mode, shift the shift lever 
to M position. Gear steps can then 
be selected by operating the shift 
lever or paddle shift switches (if 
equipped), allowing you to drive in 
the gear step of your choosing.

1

Upshifting

2

Downshifting

The gear step changes once every time 
the shift lever or paddle shift switches (if 
equipped) is operated.
The selected gear step, from M1 to 
M10, will be displayed on the multi-
information display.

However, even when in the M posi-
tion, the gear steps will be automat-
ically changed if the engine speed 

is too high, or too low.

Gear step functions

10 levels of accelerating force and 

engine braking can be selected.

A lower gear step will provide greater 

engine braking force than a higher 
gear step, and the engine speed will 

also increase.

When the vehicle comes to a stop 

with the shift lever in the M position

The transmission will automatically 

downshift to M1 once the vehicle is 
stopped.

After a stop, the vehicle will start off in 
M1.

When the vehicle is stopped, the 
transmission is set at M1.

Downshifting restriction warning 

buzzer

To help ensure safety and driving perfor-
mance, downshifting operation may 

sometimes be restricted. In some cir-

cumstances, downshifting may not be 
possible even when the shift lever or 

paddle shift switch is operated. (A 

buzzer will sound twice.)

If the 10-speed sport sequential 
shiftmatic mode indicator does not 

come on even after shifting the 

shift lever to M

This may indicate a malfunction in the 

Multidrive system. Have the vehicle 

inspected by any authorized Toyota 
retailer or Toyota authorized repairer, or 

any reliable repairer immediately.

(In this situation, the transmission will 
operate in the same manner as when 

the shift lever is in D.)

Changing gear steps in the 
M position

183

4

n

4-2. Driving procedures

D

riv

ing

*

: If equipped

Shifting the shift lever

1

Depress the clutch pedal firmly.

2

Shift the shift lever to the 
desired gear.

Make sure to only shift gears sequen-
tially.

3

Gradually release the clutch 
pedal.

If it is difficult to shift in R, shift the lever 
to N, release the clutch pedal momen-
tarily, and then try again.

Shifting the shift lever to R (6-
speed transmission)

Shift the shift lever to R while lifting 
up the ring section.

Maximum allowable speeds

Observe the following maximum allow-
able speeds in each gear when maxi-

mum acceleration is necessary.

Manual transmission

*

Operating instructions

Shift position

Maximum speed

km/h (mph)

1

50 (31)

2

86 (53)

3

126 (78)

4

171 (106)

184

n

4-2. Driving procedures

The iMT optimally controls the 
engine speed to suit the driver’s 
operation of the clutch pedal and 
shift lever, helping the driver to shift 

gears more smoothly. Additionally, 
when the clutch pedal is operated, 
the iMT helps reduce shift shock, 
allowing for lighter shift operations 
when driving on a winding road or 
incline.
Press the “iMT” switch.

The iMT indicator will illuminate in 
green. 
Press the switch again to cancel iMT.

The iMT may not operate when

In the following situations, iMT may not 

operate. However, this does not indicate 
a malfunction.

The clutch pedal is not fully depressed

The clutch pedal is not fully released, 
such as if a foot is resting on the 
clutch pedal

*

Shift operation is performed after the 
vehicle has been coasting with the 

shift lever in N

The shift lever is not operated for a 

long time after the clutch pedal is 

depressed

*

: After the shift lever is moved, unless 

your foot is completely removed from 
the clutch pedal, the iMT may not 
operate and the engine speed may 
not be controlled optimally for the next 
gear change. 
To enable the iMT, release the clutch 
pedal completely and then depress it 

NOTICE

To prevent damage to the vehicle

When shifting gears, observe the fol-
lowing precautions. Failure to do so 

may cause damage to the engine, 

manual transmission, and/or clutch.

Do not shift the shift lever to R with-

out depressing the clutch pedal.

Do not lift up the ring section except 

when shifting the lever to R.

Shift the shift lever to R only when 

the vehicle is stationary.

Do not rest your hand on or hold the 

shift lever any time other than when 

shifting.

In order not to cause the engine to 

overrev, make sure to only shift 
gears sequentially.

Do not release the clutch pedal 
suddenly.

iMT (Intelligent Manual 
Transmission)

185

4

n

4-2. Driving procedures

D

riv

ing

again before operating the shift lever.

If the warning message for iMT is 

shown on the multi-information 
display

The iMT may be temporarily unavailable 

or malfunctioning. Have the vehicle 
inspected at any authorized Toyota 

retailer or Toyota authorized repairer, or 

any reliable repairer.

The Gear Shift Indicator is a guide 
to help the driver achieve improved 
fuel economy and reduced exhaust 
emissions within limits of engine 
performance.

Shift-up indicator

Shift-down indicator

Gear Shift Indicator display

Gear Shift Indicator may not be dis-

played when your foot is placed on the 
clutch pedal.

WARNING

Limitations of the iMT

iMT is not a system that prevents shift 

lever operation error or engine over-
revving. 

Depending on the situation, iMT may 

not operate normally and the shift 
position may not be changed 

smoothly. Overly relying on iMT may 

cause an unexpected accident.

Gear Shift Indicator

WARNING

Gear Shift Indicator display

For safety, the driver should not look 
only at the display. Refer to the dis-

play when it is safe to do so while 

considering actual traffic and road 
conditions.

Failure to do so may lead to an acci-

dent.

186

n

4-2. Driving procedures

1

Right turn

2

Lane change to the right (move 
the lever partway and release it)

The right hand signals will flash 3 times.

3

Lane change to the left (move 
the lever partway and release it)

The left hand signals will flash 3 times.

4

Left turn

Turn signals can be operated when

The engine switch is in ON.

If the indicator flashes faster than 
usual

Check that a light bulb in the front or 

rear turn signal lights has not burned 
out.

Using the manual mode

The parking brake can be set and 
released manually.

1

Pull the switch to set the parking 
brake

The parking brake indicator and parking 
brake light will turn on.
Pull and hold the parking brake switch if 
an emergency occurs and it is neces-
sary to operate the parking brake while 
driving.

2

Push the switch to release the 

Turn signal lever

Operating instructions

Parking brake

The parking brake can be set 
or released automatically or 
manually.
In automatic mode, the parking 
brake can be set or released 
automatically. Also, even in 
automatic mode, the parking 
brake can be set or released 
manually.

Operating instructions

187

4

n

4-2. Driving procedures

D

riv

ing

parking brake

• Operate the parking brake switch 

while depressing the brake pedal.

• Using the parking brake automatic 

release function, the parking brake 
can be released by depressing the 
accelerator pedal. When using this 
function, slowly depress the acceler-
ator pedal.

Make sure that the parking brake indi-
cator and parking brake light turn off.

Turning automatic mode on

While the vehicle is stopped, pull 
and hold the parking brake switch 
until 

 “EPB Shift Interlock Func-

tion Activated” is shown on the 
multi-information display (vehicles 
with a Multidrive) or auto EPB OFF 
indicator 

 turn off (vehicles with a 

manual transmission)

When the automatic mode is turned 
on, the parking brake operates as 
follows.

Vehicles with a Multidrive

When the shift lever is moved out 
of P, the parking brake will be 
released, and the parking brake 
indicator and parking brake light 
will turn off.

When the shift lever is moved 
into P, the parking brake will be 
set, and the parking brake indi-
cator and parking brake light will 
turn on.

Operate the shift lever with the 
vehicle stopped and the brake 
pedal depressed.

The parking brake may not operate 
automatically if the shift lever is moved 
quickly.
In this case, it is necessary to operate 
the parking brake switch. (

P.186)

Vehicles with a manual transmis-
sion

When the engine is off, the parking 
brake will be set, and the parking 
brake indicator and parking brake 
light turn on.

Turning automatic mode off

While the vehicle is stopped and 
depressing the brake pedal, press 
and hold the parking brake switch 
until 

 “EPB Shift Interlock Func-

tion Deactivated” is shown on the 
multi-information display (vehicles 
with a Multidrive) or auto EPB OFF 
indicator 

 comes on (vehicles 

with a manual transmission)

188

n

4-2. Driving procedures

Parking brake operation

When the engine switch is not in ON, 

the parking brake cannot be released 

using the parking brake switch.

When the engine switch is not in ON, 

automatic mode (automatic brake set-
ting and releasing [vehicles with a 

Multidrive]) is not available.

Parking brake automatic release 

function

The parking brake is automatically 

released when slowly depress the accel-

erator pedal.
The parking brake will be released auto-

matically under the following conditions:

The driver’s door is closed

The driver is wearing the seat belt

The shift lever is a forward or reverse 

position.

The malfunction indicator lamp or 

brake system warning light is not illu-
minated.

If the automatic release function does 

not operate, manually release the park-
ing brake.

Parking brake automatic lock func-

tion

The parking brake will be set automati-

cally under the following conditions:

The driver does not operate the brake 

pedal.

The driver’s door is not closed.

The driver is not wearing the seat belt.

The shift lever position is not in P or N.

The malfunction indicator lamp or 
brake system warning light is not illu-

minated.

If “Parking Brake Temporarily 

Unavailable” is displayed on the 
multi-information display

If the parking brake is operated repeat-

edly over a short period of time, the sys-
tem may restrict operation to prevent 

overheating. If this happens, refrain from 

operating the parking brake. Normal 
operation will return after about 1 min-

ute.

If “Parking Brake Unavailable” is 

displayed on the multi-information 
display

Operate the parking brake switch. If the 

message does not disappear after oper-
ating the switch several times, the sys-

tem may be malfunctioning. Have the 

vehicle inspected by any authorized 
Toyota retailer or Toyota authorized 

repairer, or any reliable repairer.

Parking brake operation sound

When the parking brake operates, a 
motor sound (whirring sound) may be 

heard. This does not indicate a malfunc-

tion.

Parking brake operation

Depending on the engine switch 

mode, the parking brake indicator and 
parking brake light will turn on and 

stay on as described below:

ON: Comes on until the parking brake 
is released.

Not in ON: Stays on for approximately 

15 seconds.

When the engine switch is turned off 

with the parking brake set, the parking 
brake indicator and parking brake light 

will stay on for about 15 seconds. This 

does not indicate a malfunction.

When the parking brake switch 
malfunctions

Automatic mode (automatic brake set-

ting and releasing) will be turned on 
automatically.

189

4

n

4-2. Driving procedures

D

riv

ing

Parking the vehicle

P.186

Parking brake engaged warning 

buzzer

A buzzer will sound if the vehicle is 
driven with the parking brake engaged. 

“Parking Brake ON” is displayed on the 

multi-information display. (with the vehi-
cle reached a speed of 5 km/h [3 mph])

If the brake system warning light 

comes on

P.403

Usage in winter time

P.308

WARNING

When parking the vehicle

Do not leave a child in the vehicle 
alone. The parking brake may be 

released unintentionally and there is 

the danger of the vehicle moving that 
may lead to an accident resulting in 

death or serious injury.

Parking brake switch

Do not set any objects near the park-

ing brake switch.
Objects may interfere with the switch 

and may lead the parking brake to 

unexpectedly operate.

NOTICE

When parking the vehicle

Before you leave the vehicle, set the 

parking brake, shift the shift lever to P 

and make sure that the vehicle does 
not move.

When the system malfunctions

Stop the vehicle in a safe place and 

check the warning messages.

When the parking brake cannot 

be released due to a malfunction

Driving the vehicle with the parking 
brake set will lead to brake compo-

nents overheating, which may affect 

braking performance and increase 
brake wear.
Have the vehicle inspected by any 

authorized Toyota retailer or Toyota 
authorized repairer, or any reliable 

repairer immediately if this occurs.

190

n

4-2. Driving procedures

Turn the brake hold system on

The brake hold standby indicator 

(green) 

 comes on. While the system 

is holding the brake, the brake hold 

operated indicator (yellow) 

 comes 

on.

Brake hold system operating con-

ditions

The brake hold system cannot be turned 

on in the following conditions:

The driver’s door is not closed.

The driver is not wearing the seat belt.

The parking brake is engaged.

If any of the conditions above are 
detected when the brake hold system is 

enabled, the system will turn off and the 

brake hold standby indicator light will go 
off. In addition, if any of the conditions 

are detected while the system is holding 

the brake, a warning buzzer will sound 
and a message will be shown on the 

multi-information display. The parking 

brake will then be set automatically.

Brake hold function

If the brake pedal is left released for a 

period of about 3 minutes after the 
system has started holding the brake, 

the parking brake will be set automati-

cally. In this case, a warning buzzer 
sounds and a message is shown on 

the multi-information display.

To turn the system off while the sys-

tem is holding the brake, firmly 
depress the brake pedal and press 

the button again.

The brake hold function may not hold 

the vehicle when the vehicle is on a 

steep incline. In this situation, it may 
be necessary for the driver to apply 

the brakes. A warning buzzer will 

sound and the multi-information dis-
play will inform the driver of this situa-

tion. If a warning message is shown 

Brake Hold

Vehicles with Multidrive: 
The brake hold system keeps 
the brake applied when the 
shift lever is in D, M or N with 
the system on and the brake 
pedal has been depressed to 
stop the vehicle. The system 
releases the brake when the 
accelerator pedal is depressed 
with the shift lever in D or M to 
allow smooth start off.

Vehicles with manual transmis-
sion: 
The brake hold system keeps 
the brake applied when the 
shift lever is not in R with the 
system on and the brake pedal 
has been depressed to stop 
the vehicle. The system 
releases the brake when the 
accelerator pedal is depressed 
with the shift lever in forward to 
allow smooth start off.

Enabling the system

191

4

n

4-2. Driving procedures

D

riv

ing

on the multi-information display, read 
the message and follow the instruc-

tions.

When the parking brake is set auto-

matically while the system is hold-
ing the brakes

Perform any of the following operations 

to release the parking brake.

Depress the accelerator pedal. (The 

parking brake will not be released 
automatically if the seat belt is not fas-

tened.)

Operate the parking brake switch with 

the brake pedal depressed.

Make sure that the parking brake indica-
tor light goes off. (

P.186)

When an inspection at any autho-

rized Toyota retailer or Toyota 

authorized repairer, or any reliable 
repairer is necessary

When the brake hold standby indicator 

(green) does not illuminate even when 
the brake hold switch is pressed with the 

brake hold system operating conditions 

met, the system may be malfunctioning. 
Have the vehicle inspected at any 

authorized Toyota retailer or Toyota 

authorized repairer, or any reliable 
repairer.

If “Brake Hold Malfunction Press 

Brake to Deactivate Visit Your 

Dealer” or “Brake Hold Malfunction 
Visit Your Dealer” is displayed on 

the multi-information display

The system may be malfunctioning. 
Have the vehicle inspected by any 

authorized Toyota retailer or Toyota 

authorized repairer, or any reliable 
repairer.

Warning messages and buzzers

Warning messages and buzzers are 

used to indicate a system malfunction or 
to inform the driver of the need for cau-

tion. If a warning message is shown on 

the multi-information display, read the 
message and follow the instructions.

If the brake hold operated indicator 
flashes

P.410

WARNING

When the vehicle is on a steep 
incline

Take care when using the brake hold 

system on a steep incline, exercise 
caution. The brake hold function may 

not hold brakes in such situations.

Also, the system may not activate 
depending on the angle of the slope.

When stopped on a slippery road

The system cannot stop the vehicle 

when the gripping ability of the tires 

has been exceeded. Do not use the 
system when stopped on a slippery 

road.

NOTICE

When parking the vehicle

The brake hold system is not 

designed for use when parking the 
vehicle for a long period of time. Turn-

ing the engine switch off while the 
system is holding the brake may 

release the brake, which would cause 

the vehicle to move. When operating 
the engine switch, depress the brake 

pedal, shift the shift lever to P and set 

the parking brake.

192

n

4-3. Operating the lights and wipers

4-3.Operating the lights and wipers

Operating the 

 switch turns 

on the lights as follows:

Type A

1

 The headlights, daytime 

running lights (

P.192) and all 

the lights listed below turn on 
and off automatically.

2

 The front position, tail, 

license plate and instrument 
panel lights turn on.

3

 The headlights and all the 

lights listed above (except day-
time running lights) turn on.

Type B

1

 The headlights, daytime 

running lights (

P.192) and all 

the lights listed below turn on 
and off automatically.

2

 The front position, tail, 

license plate and instrument 
panel lights turn on.

3

 The headlights and all the 

lights listed above (except day-
time running lights) turn on.

4

 The daytime running lights 

turn on (

P.192)

AUTO mode can be used when

The engine switch is in ON.

Daytime running light system

To make your vehicle more visible to 
other drivers during daytime driving, the 
daytime running lights turn on automati-
cally whenever the engine is started and 
the parking brake is released with the 

Headlight switch

The headlights can be oper-
ated manually or automatically.

Operating instructions


Content      ..     9      10      11      12     ..