Toyota Yaris Cross (2022 year). Manual in english - page 5
 

  Index      Toyota     Toyota Yaris Cross (2022 year). Manual in english


Search            copyright infringement  


Content      ..     3      4      5      6     ..


Toyota Yaris Cross (2022 year). Manual in english - page 5


80

n

2-1. Instrument cluster

2-1.Instrument cluster

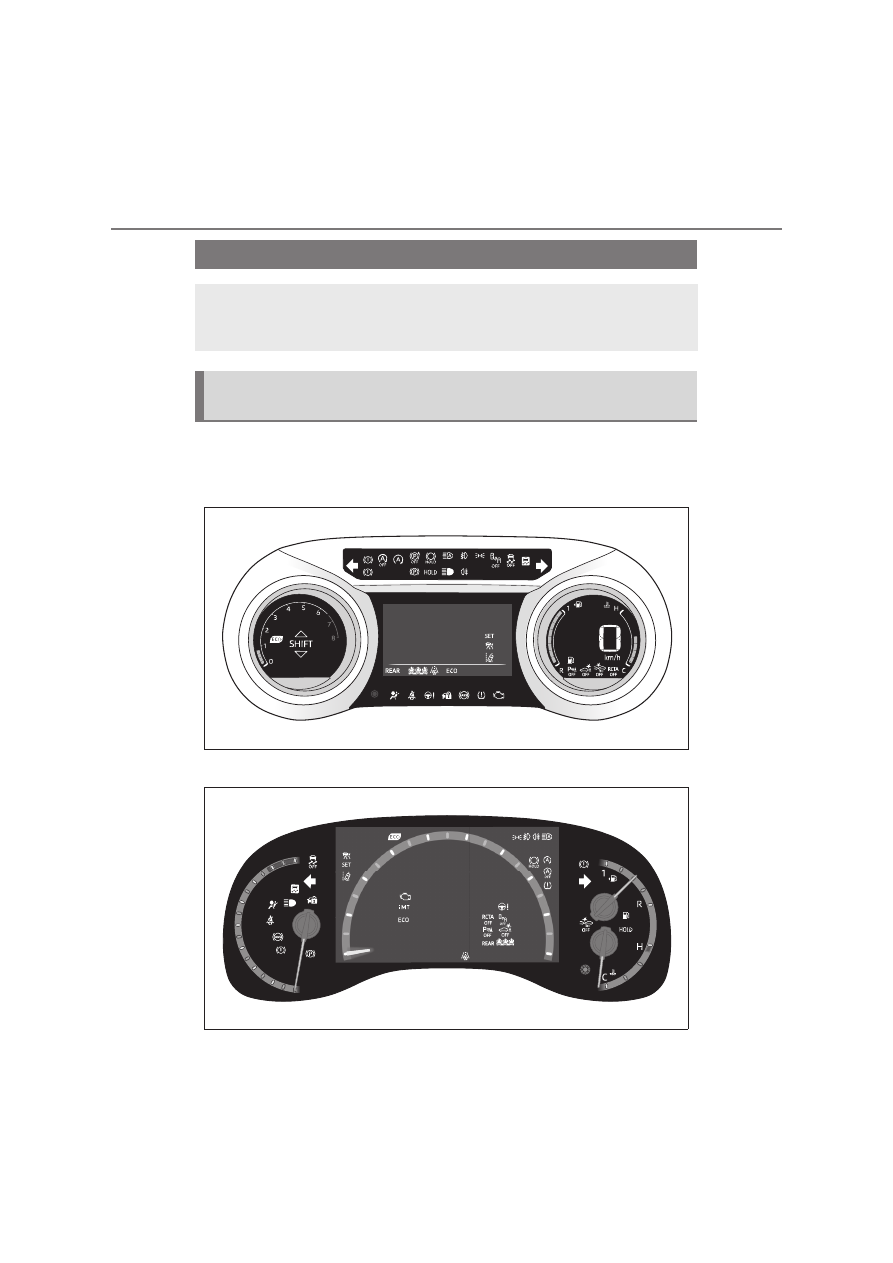
For the purpose of explanation, the following illustrations display all warning 
lights and indicators illuminated.

Vehicles with 4.2-inch display

Vehicles with 7-inch display (when analog speedometer is displayed)

Warning lights and indicators

The warning lights and indicators on the instrument cluster, center 
panel and outside rear view mirrors inform the driver of the status of 
the vehicle’s various systems.

Warning lights and indicators displayed on the instrument 
cluster

81

2

n

2-1. Instrument cluster

Vehi

cle s
tatus

 informati

on and indi

cators

Vehicles with 7-inch display (when digital speedometer is displayed)

Warning lights inform the driver of 
malfunctions in the indicated vehi-
cle’s systems.

Warning lights

(Red)

Brake system warning light

*1


(

P.403)

(Yellow)

Brake system warning light

*1


(

P.403)

High coolant temperature 
warning light

*2

 (

P.403)

Charging system warning 
light

*2

 (

P.404)

Low engine oil pressure 
warning light

*2

 (

P.404)

Malfunction indicator lamp

*1, 

3

 (

P.404)

SRS warning light

*1


(

P.404)

ABS warning light

*1


(

P.405)

Inappropriate pedal opera-
tion warning light

*2

 (

P.405)

(Red)

Electric power steering sys-
tem warning light

*1, 3


(

P.406)

(Yellow)

Electric power steering sys-
tem warning light

*1, 3


(

P.406)

Low fuel level warning light 
(

P.406)

Driver’s and front passen-
ger’s seat belt reminder light 
(

P.406)

Rear passengers’ seat 
belt reminder lights

*2


(

P.406)

Tire pressure warning light

*1, 

3

 (

P.407)

(Orange)

LTA indicator

*2

 (if equipped) 

(

P.407)

(Flashes)

Stop & Start cancel indica-
tor

*1, 3

 (if equipped) 

(

P.407)

(Flashes)

Toyota parking assist-sensor 
OFF indicator

*1, 3

 (if 

equipped) (

P.408)

82

n

2-1. Instrument cluster

*1

: These lights come on when the 

engine switch is turned to ON to indi-
cate that a system check is being 
performed. They will turn off after the 
engine is started, or after a few sec-
onds. There may be a malfunction in 
a system if the lights do not come 
on, or turn off. Have the vehicle 
inspected by any authorized Toyota 
retailer or Toyota authorized repairer, 
or any reliable repairer.

*2

: This light illuminates on the multi-

information display.

*3

: This light illuminates on the multi-

information display (with 7-inch dis-
play only).

The indicators inform the driver of 
the operating state of the vehicle’s 
various systems.

(Flashes)

RCTA OFF indicator

*1, 3

 (if 

equipped) (

P.408)

PKSB OFF indicator

*1, 3

 (if 

equipped) (

P.409)

(Flashes or 
illuminates)

PCS warning light

*1

 (if 

equipped) (

P.409)

Slip indicator

*1

 (

P.410)

(Flashes)

Parking brake indicator 
(

P.410)

(Flashes)

Brake hold operated indica-
tor

*1

 (

P.410)

WARNING

If a safety system warning light 

does not come on

Should a safety system light such as 

the ABS and SRS warning light not 

come on when you start the engine, 
this could mean that these systems 

are not available to help protect you in 

an accident, which could result in 
death or serious injury. Have the vehi-

cle inspected by any authorized 

Toyota retailer or Toyota authorized 
repairer, or any reliable repairer 

immediately if this occurs.

Indicators

Turn signal indicator 
(

P.186)

Tail light indicator

*1

 (

P.192)

Headlight high beam indica-
tor (

P.194)

AHS indicator

*1

 (if equipped) 

(→P.198)

AHB indicator

*1

 (if equipped) 

(→P.201)
Front fog light indicator

*1

 (if 

equipped) (

P.204)

Rear fog light indicator

*1


(

P.204)

PCS warning light

*2, 3

 (if 

equipped) (

P.221)

Cruise control indicator

*4

 (if 

equipped) (

P.238, 250)

Dynamic radar cruise control 
indicator

*4

 (if equipped) 

(

P.238, 250)

83

2

n

2-1. Instrument cluster

Vehi

cle s
tatus

 informati

on and indi

cators

*1

: This light illuminates on the multi-

information display (with 7-inch dis-
play only).

*2

: These lights come on when the 

engine switch is turned to ON to indi-
cate that a system check is being 
performed. They will turn off after the 
engine is started, or after a few sec-
onds. There may be a malfunction in 
a system if the lights do not come 
on, or turn off. Have the vehicle 
inspected by any authorized Toyota 
retailer or Toyota authorized repairer, 
or any reliable repairer.

*3

: This light comes on when the system 

is turned off.

*4

: This light illuminates on the multi-

information display.

*5

: Depending on the operating condi-

tion, the color and illuminating/flash-
ing state of the light change.

Cruise control “SET” indica-
tor

*4

 (if equipped) (

P.238, 

250)

*5

LTA indicator

*4

 (if equipped) 

(

P.218, 234)

BSM outside rear view mirror 
indicators

*2, 6

 (if equipped) 

(

P.273, 284)

BSM OFF indicator

*1, 3

 (if 

equipped) (

P.273)

Toyota parking assist-sensor 
OFF indicator

*1, 2, 3

 (if 

equipped) (

P.278)

RCTA OFF indicator

*1, 2, 3

 (if 

equipped) (

P.284)

PKSB OFF indicator

*1, 2, 3

 (if 

equipped) (

P.291)

Stop & Start indicator

*1, 2

 (if 

equipped) (

P.267)

Stop & Start cancel indica-
tor

*1, 2, 3

 (if equipped) 

(

P.268)

Speed limiter indicator (if 
equipped) (

P.261)

(Flashes)

Slip indicator

*2

 (

P.302)

VSC OFF indicator

*2, 3


(

P.302)

Smart entry & start system 
indicator

*4

 (if equipped) 

(

P.174)

iMT indicator (if equipped) 
(

P.184)

Gear Shift Indicator (if 
equipped) (

P.185)

Parking brake indicator 
(

P.186)

Auto EPB OFF indicator

*1, 2, 

3

 (if equipped) (

P.186)

Brake hold standby indica-
tor

*1, 2

 (

P.190)

Brake hold operated indica-
tor

*2

 (

P.190)

Eco Driving Indicator Light

*1, 

2

 (if equipped) (

P.96, 102)

Low outside temperature 
indicator

*4, 7

 (

P.86, 91)

Security indicator (

P.75, 

77)

“PASSENGER AIR 
BAG” indicator

*2, 8


(

P.47)

Eco drive mode indicator

*4

 (if 

equipped) (

P.299)

Power mode indicator

*4

 (if 

equipped) (

P.299)

84

n

2-1. Instrument cluster

*6

: This light illuminates on the outside 

rear view mirrors.

*7

: When the outside temperature is 

approximately 3°C (37°F) or lower, 
this indicator will flash for approxi-
mately 10 seconds, then stay on.

*8

: This light illuminates on the center 

panel.

85

2

n

2-1. Instrument cluster

Vehi

cle s
tatus

 informati

on and indi

cators

Locations of gauges and meters

The units of measure may differ depending on the intended destination of the vehi-
cle.

Tachometer

Displays the engine speed in revolutions per minute

Multi-information display

Presents the driver with a variety of vehicle data (

P.94)

Displays warning messages if a malfunction occurs (

P.413)

Clock (

P.87, 88)

Speedometer

Displays the vehicle speed

Engine coolant temperature gauge

Displays the engine coolant temperature

Fuel gauge

Displays the fuel level. In the following situations, the actual fuel level may not be 
displayed correctly:
• After refueling only a small amount (approximately 5 L or less)

Gauges and meters (4.2-inch display)

The meters display various drive information.

Meter display

86

n

2-1. Instrument cluster

• When stopped on a hill or other slope
• When driving on a slope or around a curve

Odometer and trip meter display (

P.87)

Outside temperature

Displays the outside temperature within the range of -40°C (-40°F) to 60°C (140°F)

Display change button (

P.87)

Shift position and shift range/gear step indicator (Multidrive) (

P.179)

Gear Shift Indicator (manual transmission) (

P.185)

Outside temperature display

In the following situations, the correct 

outside temperature may not be dis-
played, or the display may take longer 

than normal to change:

• When stopped, or driving at low 

speeds (less than 25 km/h [16 mph])

• When the outside temperature has 

changed suddenly (at the 
entrance/exit of a garage, tunnel, etc.)

When “--” is displayed, the system 
may be malfunctioning. Take your 

vehicle to any authorized Toyota 

retailer or Toyota authorized repairer, 
or any reliable repairer.

Fuel gauge and driving range dis-

play

The fuel gauge and driving range dis-
play are linked. If the fuel gauge and 

driving range display do not update after 

refueling a small amount, they can be 
updated by performing the following pro-

cedure:

1

Stop the vehicle on a level surface.

Wait until the fuel in the fuel tank stabi-
lizes.

2

Press the display change button to 

change the odometer and trip meter 

display to the odometer.

3

Turn the engine switch off.

4

While pressing and holding the dis-
play change button, turn the engine 

switch to ON.

5

Continue holding the display change 

button for approximately 5 seconds.

Release the button when the odometer 
begins blinking.
Updating will be complete when the 
odometer blinks for approximately 5 

seconds and then returns to the normal 

display.

Liquid crystal display

P.95

Customization

The gauges and meters can be custom-

ized in 

 of the multi-information dis-

play. (

P.457)

WARNING

The information display at low 

temperatures

Allow the interior of the vehicle to 
warm up before using the liquid crys-

tal information display. At extremely 

low temperatures, the information dis-
play monitor may respond slowly, and 

display changes may be delayed.

For example, there is a lag between 

the driver’s shifting and the new gear 

number appearing on the display. 
This lag could cause the driver to 

downshift again, causing rapid and 

excessive engine braking and possi-
bly an accident resulting in death or 

injury.

87

2

n

2-1. Instrument cluster

Vehi

cle s
tatus

 informati

on and indi

cators

Changing the display

Press the display change button 
until the desired item is displayed.

Display items

Odometer

Displays the total distance the vehicle 
has been driven.

Trip meter A/Trip meter B

Displays the distance the vehicle has 
been driven since the meter was last 
reset. Trip meters A and B can be used 
to record and display different distances 
independently.
To reset, display the desired trip meter 

and press and hold the display change 
button.

Distance until next engine oil 
change

Displays the distance the vehicle can 
be driven until an oil change is neces-
sary.
The distance until the next engine oil 
change will also be displayed in the fol-
lowing situations:
• When the engine switch is turned to 

ON.

• When a warning message indicating 

that oil maintenance should be per-
formed soon or is required is dis-
played.

• Resetting: 

P.356

Adjusting the minute to “00”

1

Press 

 or 

 to select 

 of 

the multi-information display.

2

Press 

 or 

 to select 

.

Press the 

 to set the clock to the 

beginning of the nearest hour.

e.g.

1:00 to 1:29 

 1:00

1:30 to 1:59 

 2:00

Changing the clock

1

Press 

 or 

 to select 

 of 

the multi-information display.

NOTICE

To prevent damage to the engine 

and its components

Do not let the indicator needle of 

the tachometer enter the red zone, 

which indicates the maximum 
engine speed.

The engine may be overheating if 
the engine coolant temperature 

gauge is in the red zone (H). In this 

case, immediately stop the vehicle 
in a safe place, and check the 

engine after it has cooled com-

pletely. (

P.442)

Odometer and trip meter 
display

Adjusting the clock (vehi-
cles without 7-inch/8-inch 
display multimedia system)

88

n

2-1. Instrument cluster

2

Press 

 or 

 to select 

.

3

Press and hold the 

.

4

Press 

 or 

 to select an 

item to be changed.

5

Press 

 or 

 to change the 

setting.

The following can be changed:

12-hour/24-hour format

Hour

Minute

The clocks on the following can be 
adjusted on the multimedia system 
screen.

Multi-information display

Multimedia system screen

For details, refer to “Navigation and 
multimedia system Owner’s man-
ual”.

Clock settings screen (vehicles 
with 7-inch/8-inch display multime-

dia system)

If 

 is displayed when 

 is 

selected on the multi-information dis-
play, the system may be malfunctioning. 
Have the vehicle inspected by any 
authorized Toyota retailer or Toyota 
authorized repairer, or any reliable 
repairer.

The brightness of the instrument 
panel lights can be adjusted on 

select 

 to the multi-information 

display.

The brightness of the instrument panel 
lights can be adjusted separately for 
when the tail lights are on and off.

1

Press 

 or 

 to select 

 of 

the multi-information display.

2

Press 

 or 

 to select 

and then press and hold the 

.

3

Press 

 or 

 to change the 

brightness.

Instrument cluster brightness 

adjustment

The instrument cluster brightness levels 

when the tail lights are on and off can be 

adjusted individually.
However, when the surroundings are 

bright (daytime, etc.), turning on the tail 

lights will not change the instrument 
cluster brightness.

Adjusting the clock (vehi-
cles with 7-inch/8-inch dis-
play multimedia system)

Adjusting the instrument 
panel light control

89

2

n

2-1. Instrument cluster

Vehi

cle s
tatus

 informati

on and indi

cators

The display of the speedometer can be selected from two types, analog or 
digital. (

P.104)

When analog speedometer is displayed

The units of measure may differ depending on the intended destination of the vehi-
cle.

Tachometer

Displays the engine speed in revolutions per minute

Speedometer

Displays the vehicle speed

Clock (

P.93)

Fuel gauge

Displays the fuel level. In the following situations, the actual fuel level may not be 
displayed correctly:
• After refueling only a small amount (approximately 5 L or less)
• When stopped on a hill or other slope
• When driving on a slope or around a curve

Engine coolant temperature gauge

Gauges and meters (7-inch display)

The meters display various drive information.

Meter display

90

n

2-1. Instrument cluster

Displays the engine coolant temperature

Display change button (

P.92)

Odometer and trip meter display (

P.92)

Outside temperature

Displays the outside temperature within the range of -40°C (-40°F) to 60°C (140°F)

Shift position and shift range/gear step indicator (Multidrive) (

P.179)

Gear Shift Indicator (manual transmission) (

P.185)

Multi-information display

Presents the driver with a variety of vehicle data (

P.100)

Displays warning messages if a malfunction occurs (

P.413)

When digital speedometer is displayed

The units of measure may differ depending on the intended destination of the vehi-
cle.

Tachometer

Displays the engine speed in revolutions per minute

Speedometer

Displays the vehicle speed

Clock (

P.93)

Fuel gauge

Displays the fuel level. In the following situations, the actual fuel level may not be 
displayed correctly:

91

2

n

2-1. Instrument cluster

Vehi

cle s
tatus

 informati

on and indi

cators

• After refueling only a small amount (approximately 5 L or less)
• When stopped on a hill or other slope
• When driving on a slope or around a curve

Engine coolant temperature gauge

Displays the engine coolant temperature

Display change button (

P.92)

Odometer and trip meter display (

P.92)

Outside temperature

Displays the outside temperature within the range of -40°C (-40°F) to 60°C (140°F)

Shift position and shift range/gear step indicator (Multidrive) (

P.179)

Gear Shift Indicator (manual transmission) (

P.185)

Multi-information display

Presents the driver with a variety of vehicle data (

P.100)

Displays warning messages if a malfunction occurs (

P.413)

When the drive mode is changed

The speed meter display changes color 
in accordance to the drive mode 

selected. (

P.299)

Outside temperature display

In the following situations, the correct 

outside temperature may not be dis-

played, or the display may take longer 
than normal to change:

• When stopped, or driving at low 

speeds (less than 25 km/h [16 mph])

• When the outside temperature has 

changed suddenly (at the 

entrance/exit of a garage, tunnel, etc.)

When “--” is displayed, the system 

may be malfunctioning. Take your 
vehicle to any authorized Toyota 

retailer or Toyota authorized repairer, 

or any reliable repairer.

Fuel gauge and driving range dis-
play

The fuel gauge and driving range dis-
play are linked. If the fuel gauge and 

driving range display do not update after 

refueling a small amount, they can be 
updated by performing the following pro-

cedure:

1

Stop the vehicle on a level surface.

Wait until the fuel in the fuel tank stabi-

lizes.

2

Press the display change button to 

change the odometer and trip meter 
display to the odometer.

3

Turn the engine switch off.

4

While pressing and holding the dis-

play change button, turn the engine 

switch to ON.

5

Continue holding the display change 
button for approximately 5 seconds.

Release the button when the odometer 

begins blinking.
Updating will be complete when the 

odometer blinks for approximately 5 

seconds and then returns to the normal 
display.

Liquid crystal display

P.100

Customization

The gauges and meters can be custom-

ized in 

 of the multi-information dis-

92

n

2-1. Instrument cluster

play. (

P.457)

Changing the display

Press the display change button 
until the desired item is displayed.

Display items

Odometer

Displays the total distance the vehicle 
has been driven.

Trip meter A/Trip meter B

Displays the distance the vehicle has 
been driven since the meter was last 
reset. Trip meters A and B can be used 
to record and display different distances 
independently.
To reset, display the desired trip meter 
and press and hold the display change 
button.

Distance until next engine oil 
change

Displays the distance the vehicle can 
be driven until an oil change is neces-
sary.
The distance until the next engine oil 
change will also be displayed in the fol-
lowing situations:
• When the engine switch is turned to 

ON.

• When a warning message indicating 

that oil maintenance should be per-
formed soon or is required is dis-
played.

• Resetting: 

P.356

WARNING

The information display at low 
temperatures

Allow the interior of the vehicle to 

warm up before using the liquid crys-
tal information display. At extremely 

low temperatures, the information dis-

play monitor may respond slowly, and 
display changes may be delayed.

For example, there is a lag between 
the driver’s shifting and the new gear 

number appearing on the display. 

This lag could cause the driver to 
downshift again, causing rapid and 

excessive engine braking and possi-

bly an accident resulting in death or 
injury.

NOTICE

To prevent damage to the engine 

and its components

Do not let the indicator needle of 
the tachometer enter the red zone, 

which indicates the maximum 

engine speed.

The engine may be overheating if 

the engine coolant temperature 
gauge is in the red zone (H). In this 

case, immediately stop the vehicle 

in a safe place, and check the 
engine after it has cooled com-

pletely. (

P.442)

Odometer and trip meter 
display

93

2

n

2-1. Instrument cluster

Vehi

cle s
tatus

 informati

on and indi

cators

Adjusting the minute to “00”

1

Press 

 or 

 to select 

 of 

the multi-information display.

2

Press 

 or 

 to select “Clock 

: 00”.

Press the 

 to set the clock to the 

beginning of the nearest hour.

e.g.

1:00 to 1:29 

 1:00

1:30 to 1:59 

 2:00

Changing the clock

1

Press 

 or 

 to select 

 of 

the multi-information display.

2

Press 

 or 

 to select “Clock 

: 00”.

3

Press and hold the 

.

4

Press 

 or 

 to select an 

item to be changed.

5

Press 

 or 

 to change the 

setting.

The following can be changed:

12-hour/24-hour format

Hour

Minute

The clocks on the following can be 
adjusted on the multimedia system 
screen.

Multi-information display

Multimedia system screen

For details, refer to “Navigation and 
multimedia system Owner’s man-
ual”.

Clock settings screen (vehicles 

with 7-inch/8-inch display multime-
dia system)

If “Clock : 00” is displayed when 

 is 

selected on the multi-information dis-
play, the system may be malfunctioning. 
Have the vehicle inspected by any 
authorized Toyota retailer or Toyota 
authorized repairer, or any reliable 
repairer.

The brightness of the instrument 
panel lights can be adjusted on 

select 

 to the multi-information 

display.

The brightness of the instrument panel 
lights can be adjusted separately for 
when the tail lights are on and off.

1

Press 

 or 

 to select 

 of 

the multi-information display.

Adjusting the clock (vehi-
cles without 7-inch/8-inch 
display multimedia system)

Adjusting the clock (vehi-
cles with 7-inch/8-inch dis-
play multimedia system)

Adjusting the instrument 
panel light control

94

n

2-1. Instrument cluster

2

Press 

 or 

 to select 

and then press and hold the 

.

3

Press 

 or 

 to change the 

brightness.

Instrument cluster brightness 

adjustment

The instrument cluster brightness levels 
when the tail lights are on and off can be 

adjusted individually.
However, when the surroundings are 
bright (daytime, etc.), turning on the tail 

lights will not change the instrument 

cluster brightness.

Display

Driving support system status 

display area

Displays an image when the following 
systems are operating and a menu icon 

other than 

 is selected:

• LTA (Lane Tracing Assist) (if 

equipped) (

P.228)

• Dynamic radar cruise control with full-

speed range (if equipped) (

P.238)

• Dynamic radar cruise control (if 

equipped) (

P.250)

• RSA (Road Sign Assist) (if equipped) 

(

P.263)

Content display area

Multi-information display 

(4.2-inch display)

The multi-information display 
is used to display fuel effi-
ciency related information and 
various types of drivingrelated 
information. The multi-informa-
tion display can also be used 
to change the display settings 
and other settings.

Display and menu icons

95

2

n

2-1. Instrument cluster

Vehi

cle s
tatus

 informati

on and indi

cators

By selecting menu icons on the multi-
information display, a variety of driving-
related information can be displayed. 
The multi-information display can also 
be used to change display settings and 
other vehicle settings.
Warning or advice pop-up displays are 
also displayed in certain situations.

Menu icons

The menu icons will be displayed 

by pressing the 

 or 

 meter 

control switch.

Liquid crystal display

Small spots or light spots may appear 

on the display. This phenomenon is 
characteristic of liquid crystal displays, 

and there is no problem continuing to 

use the display.

The multi-information display is 
operated using the meter control 
switches.

/

: Select menu icons, 

scroll the screen and move the 
cursor

/

: Change displayed con-

tent, scroll the screen and move 
the cursor

Press: Enter/Set

Press and hold: Reset/Display 
customizable items

Return to the previous screen

Call sending/receiving and his-

tory display

Linked with the hands-free system, 
sending or receiving call is displayed. 

Driving information display 
(

P.96)

Driving support system infor-
mation display (if equipped) 
(

P.97)

Audio system-linked display 
(if equipped) (

P.97)

Vehicle information display 
(

P.98)

Settings display (

P.98)

Warning message display 
(

P.413)

WARNING

Caution for use while driving

When operating the multi-informa-

tion display while driving, pay extra 
attention to the safety of the area 

around the vehicle.

Do not look continuously at the 

multi-information display while driv-

ing as you may fail to see pedestri-
ans, objects on the road, etc., 

ahead of the vehicle.

The information display at low 

temperatures

P.86

Changing the meter display


Content      ..     3      4      5      6     ..