Toyota Prius Prime (2022 year). Manual in english - page 7
 

  Index      Toyota     Toyota Prius Prime (2022 year). Manual in english


Search            copyright infringement  


Content      ..     5      6      7      8     ..


Toyota Prius Prime (2022 year). Manual in english - page 7


113

2-2. Charging

2

Plug-

in hybrid system

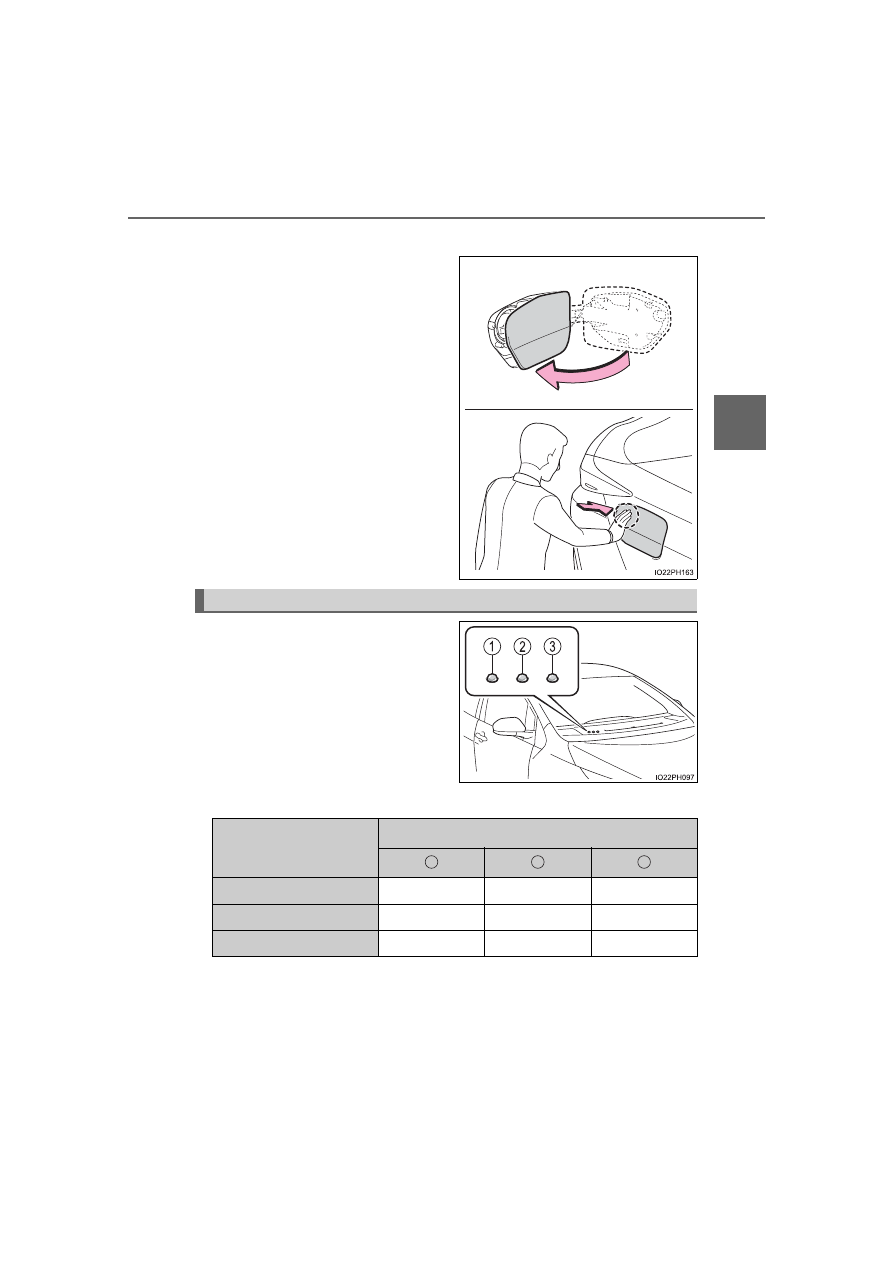
Closing the charging port lid

Close the charging port lid and
press  the  rear  edge  of  the
charging  port  lid  (the  position
shown in the illustration).

Vehicles  with  smart  lid  &  con-
nector locking system:

• When  the  doors  are  locked

with  the  smart  key  system,
wireless  remote  control  or
door lock switch, the charging
port lid is also locked. 
(

P. 279, 281)

• If  the  charging  port  lid  is

closed with the doors locked,
the charging port lid locks.

When  the  charging  cable  is  con-
nected  to  the  charging  inlet,  the
user  is  informed  of  the  charging
status  of  the  hybrid  battery  (trac-
tion  battery)  by  the  statuses  of  3
indicators  (turned  off,  illuminated
or flashing).

During charging

Hybrid battery (traction battery) status indicator

Charging status of the 

hybrid battery 

(traction battery)

Hybrid battery (traction battery) status indicator

About less than half

Flashes

Not illuminated Not illuminated

About more than half

Illuminated

Flashes

Not illuminated

Full

Illuminated

Illuminated

Flashes

1

2

3

114

2-2. Charging

Except during charging

The  hybrid  battery  (traction  battery)  status  indicators  illuminate

*

1

while the charging port lid is open and any of the followings are per-
formed.

When an electronic key is carried near the effective range

*

2, 3


(

P. 291)

When the doors are unlocked

*

1

: The indicators illuminate for a maximum of approximately 15 seconds.

*

2

: Excluding the effective range of the charging port lid.

*

3

: Vehicles with smart lid & connector locking system only

When the hybrid battery (traction battery) is fully charged

When the charging cable is connected, all 3 hybrid battery (traction battery)
status indicators illuminate to inform the user that the hybrid battery (traction
battery) is fully charged.

*

*

: If the push lifter (

P. 153) is pushed in, the hybrid battery (traction battery)

status indicators may flash.

Charging status of the 

hybrid battery 

(traction battery)

Hybrid battery (traction battery) status indicator

About less than half

Illuminated

Not illuminated Not illuminated

About more than half

Illuminated

Illuminated

Not illuminated

Full

Illuminated

Illuminated

Illuminated

1

2

3

115

2-2. Charging

2

Plug-

in hybrid system

The  illumination/flashing  pattern
changes to inform the user of the
charging  status  in  the  following
ways.

*

: Turns off after flashing for a certain period of time.

Charging indicator

When a system malfunction occurs while charging or using the Remote Air
Conditioning  System,  the  charging  indicator  rapidly  flashes  for  a  certain
period of time, and then turns off.
If this occurs, the next time the hybrid system is started, a message is dis-
played on the multi-information display. When a message is displayed, follow
the instructions displayed on the screen.

Charging indicator

Illumination/flashing 

pattern

Vehicle condition

Illuminated

• Charging is in progress
• Charging is possible
• “Traction Battery Heater” (

P. 136) is operating

• “Traction Battery Cooler” (

P. 137) is operating

Flashing 
(normally)

*

When charge schedule is registered (

P. 158) and

charging cable is connected to vehicle

Rapidly flashing

*

When  charging  cannot  be  carried  out  due  to  mal-
function in a power source or the vehicle etc. 
(

P. 183)

Not illuminated

• Charging  connector  is  not  inserted  into  charging

inlet

• When  the  charging  schedule  (

P.  158)  is  on

standby

• When charging is completed

116

2-2. Charging

Charging cable

The  function,  correct  operating,  etc.  of  the  charging  cable  are
written.

The names of each part of the charging cable

Charging connector
Latch release button
Plug
Plug-cord
CCID  (Charging  Circuit  Inter-
rupting Device)

Power indicator (

P. 118)

Charging indicator (

P. 118)

Error warning indicator 
(

P. 118)

1
2
3
4
5

6
7
8

117

2-2. Charging

2

Plug-

in hybrid system

The  CCID  (Charging  Circuit  Interrupting  Device)  has  the  following
safety features.

Electrical leakage detection function

If  an  electrical  leakage  is  detected  during  charging,  the  power
source  will  be  automatically  interrupted,  thus  preventing  fires  or
electrical shocks caused by electrical leakage.

If the power source is interrupted, the error warning indicator flashes.
If the power source is interrupted: 

P. 119

Automatic check function

This  is  an  automatic  system  check  that  is  run  before  charging
begins to check for problems in the operation of the electrical leak-
age detection function.

If a malfunction is found in the electrical leakage detection function as a
result  of  the  check,  the  error  warning  indicator  flashes  to  inform  the
user. (

P. 119)

Temperature detection function

A  temperature  detection  function  is  equipped  to  the  plug.  While
charging, if heat is generated due to looseness on the outlet side
etc., this function suppresses heat by controlling the charging cur-
rent.

Conditions for supplying current to the vehicle

The CCID (Charging Circuit Interrupting Device) is designed to pre-
vent electrical current from being supplied to the charging connec-
tor  when  it  is  not  connected  to  the  vehicle,  even  if  the  plug  is
inserted into the outlet.

Safety functions

118

2-2. Charging

Indicator operation

3 indicators are used to indicate the following conditions.

Power indicator

Illuminates  when  electricity  is
flowing  to  the  CCID  (Charging
Circuit Interrupting Device).

Charging indicator

Illuminates  when  charging  is  in
progress.

Error warning indicator

Flashes when there is an electri-
cal leakage or when a malfunc-
tion  occurs  in  the  CCID
(Charging  Circuit  Interrupting
Device).

CCID (Charging Circuit Interrupting Device) indicators

1

2

3

119

2-2. Charging

2

Plug-

in hybrid system

When a malfunction occurs during charging

The indicators on the CCID (Charging Circuit Interrupting Device)
use a combination of different statuses (not illuminated, illuminated
or flashing) to inform the user of internal malfunctions.

When the error warning indicator is illuminated or flashing, temporarily
remove  the  plug  from  the  outlet  and  then  reconnect  it  to  check  if  the
error indicator turns off.
If the error warning indicator turns off, charging is now possible.
If it does not turn off, perform the correction procedure in the following
chart.

Status

Power 

indicator

Error 

warning 

indicator

Cause/Correction procedure

Charging 

system error

Not 

illuminated

Not 

illuminated 

or 

illuminated

An 

electrical 

leakage 

is

detected  and  charging  is  can-
celed, or there is a malfunction
in the charging cable.

Consult your Toyota dealer

Illuminated

Flashes

Plug 

temperature 

detection 

malfunction

Flashes

Flashes

There  is  a  malfunction  in  the
plug  temperature  detection
part.

Consult your Toyota dealer

Plug 

temperature 

increase 

detection

Flashes

Not 

illuminated

An increase in the temperature
of the plug is detected due to an
improper  connection  between
the outlet and plug.

Check  that  the  plug  is
securely  connected  to  the
outlet.

Charging 

cable life 

span notice

Illuminated

Flashes

The  number  of  charges  using
the  charging  cable  is  nearing
the end of its usable life span.

Consult your Toyota dealer

Charging 

cable life 

span

Illuminated

Illuminated

The  number  of  charges  using
the 

charging 

cable 

has

exceeded  its  usable  number  of
charges.

Consult your Toyota dealer

120

2-2. Charging

WARNING

When using the charging cable and CCID (Charging Circuit Interrupt-
ing Device)

Observe the following precautions.
Failure to do so may cause an unexpected accident, resulting in death or
serious injury.

Do not attempt to disassemble or repair the charging cable, charging con-
nector, plug or CCID (Charging Circuit Interrupting Device).
If a problem arises with the charging cable or the CCID (Charging Circuit
Interrupting  Device), stop charging immediately and contact your Toyota
dealer.

Do  not  subject  the  charging  cable,  charging  connector,  plug  or  CCID
(Charging Circuit Interrupting Device) to strong force or impact.

Do  not  apply  excessive  force  to  the  charging  cable  by  forcefully  folding,
twisting, pulling or dragging the charging cable.

Do not damage the charging cable with sharp objects.

Do  not  fold  the  charging  connector  or  plug  or  insert  foreign  objects  into
them.

Do not put the charging connector and plug into water.

Do not bring the charging cable to a high-temperature item such as a heat-
ing device.

Do not apply a load to the charging cable and plug-cord (such as wrapping
the charging cable around the CCID (Charging Circuit Interrupting Device)
and the charging connector).

Do  not  use  or  leave  the  charging  cable  in  situations  where  a  load  is
applied to the outlet and the plug (such as when the CCID (Charging Cir-
cuit  Interrupting  Device)  is  hanging  in  the  air  without  contacting  the
ground).

NOTICE

When use the charging cable and related parts

P. 156

Precautions for low temperatures

In low temperatures, the charging cable and plug-cord may become hard.
Therefore, make sure to not apply excessive force when they are hard. If
excessive  force  is  applied  to  the  hardened  charging  cable  and  plug-cord,
they may be damaged.

121

2-2. Charging

2

Plug-

in hybrid system

For safety, inspect the charging cable on a routine basis.

Inspecting and maintaining the charging cable

WARNING

Routine inspection

Check the following points regularly.
Failure to do so may cause an unexpected accident, resulting in death or
serious injury.

The  charging  cable,  plug,  charging  connector,  CCID  (Charging  Circuit
Interrupting Device) etc. have not been damaged

The outlet has not been damaged

The plug can be securely inserted into the outlet

The plug does not get extremely hot during use

The tip of the plug has not been deformed

The plug is not dirtied by dust etc.

Remove  the plug from  the outlet before  inspecting it. If  any abnormalities
are found in the charging cable as a result of the inspection, immediately
stop use and consult your Toyota dealer.

Maintaining the charging cable

When the charging cable is dirty, first remove the dirt with a hard, wringed
cloth, and then wipe the cable with a dry cloth. 
However,  never  wash  it  with  water.  If  the  charging  cable  is  washed  with
water, fire or electric shock may occur during charging, possibly resulting in
death or serious injury.

When not using the charging cable for a long time

Remove the plug from the outlet. Dust could accumulate on the plug or in
the outlet, possibly causing overheating which could lead to a fire.
Also, keep the cable in a place free from moisture.

122

2-2. Charging

Smart lid & connector locking system

Smart lid system
Operating the charging port lid carrying the electronic key on your
person, for  example  in your  pocket, can unlock only  the charging
port lid with the doors of the vehicle locked.
Charging connector locking system
Operating  the  charging  connector  lock  switch  carrying  the  elec-
tronic key on your person, for example in your pocket, can lock and
unlock the charging connector.

It  can  be  used  to  prevent  the  charging  cable  removed  or  stolen  while
charging.

Antenna location

P. 290

Effective range (areas within which the electronic key is detected)

P. 291

: If equipped

When carrying the electronic key on your person, for example in
your pocket, only the charging port lid can be unlocked, and the
charging connector can be locked or unlocked with the doors of
the vehicle locked.

Smart lid & connector locking system operation

1

2

123

2-2. Charging

2

Plug-

in hybrid system

Unlocking the charging port lid

Pressing  the  rear  edge  of  the
charging  port  lid  (the  position
shown  in  the  illustration)  carry-
ing  the  electronic  key  on  your
person,  for  example  in  your
pocket, can unlock the charging
port lid.

Push  and  take  your  hand  away
to slightly open the charging port
lid.

Locking the charging port lid

Close  the  charging  port  lid
and  press  the  rear  edge  of
the  charging  port  lid  (the
position shown in the illustra-
tion).

Using the smart lid system

1

124

2-2. Charging

Locking the doors using the smart key system or wireless remote
control. (

P. 279, 280)

The charging port lid will be locked.
If the charging port lid is closed with the doors locked, the charging port
lid locks.

Charging port lid

If the rear edge of the charging port lid (the position shown in the illustra-
tions on P. 112 and 123) is pressed when the doors are locked and you are
not  carrying  the  electronic  key,  the  charging  port  lid  opens  slightly,  but
remains locked. Carry an electronic key or unlock the doors, and then press
the charging port lid twice to open it.

If the charging port lid is opened and closed repeatedly, the charging port lid
lock may not operate in order to protect the system. In this case, press the
charging port lid twice after a while.

If the smart key system has been deactivated in a customized setting

The smart lid & connector locking system will also be deactivated. If the smart
key system has been deactivated in a customized setting, the charging port
lid can be locked and unlocked by performing the following procedures.

Locking the charging port lid

Close the charging port lid. (

P. 113)

Locking the doors using the wireless remote control or door lock switch. 
(

P. 280, 281)

The charging port lid can be locked if the steps   and   are performed in
reverse.

Unlocking the charging port lid

Unlocking  the  doors  using  the  wireless  remote  control  or  door  lock
switch. (

P. 280, 281)

Open the charging port lid. (

P. 112)

2

1

2

1

2

1

2

125

2-2. Charging

2

Plug-

in hybrid system

If the charging port lid does not open

If the charging port lid does not open when using the normal procedure, it can
be opened in an emergency by performing the following steps.

Open the back door. (

P. 285)

Prepare the wheel nut wrench. (

P. 627)

Insert a wheel nut wrench as shown in the illustration.

Press the center of the rear edge of the charging port lid to open it. 
(

P. 112)

This  unlocking  method  is  a  temporary  correction  procedure  for  emergency
use only. If the problem persists, have the vehicle inspected by your Toyota
dealer immediately.

Pull  the  knob  and  remove  the  cover
shown in the illustration.

Insert  the  end  of  the  wheel  nut
wrench along the cutout of the cover
installation area.
Temporarily  place  the  L-shaped  part
of the wheel nut wrench where it con-
tacts the deck board.
(Place the wheel nut wrench so that it
is perpendicular to the work hole.)

From the condition in step  , insert the
wheel  nut  wrench  upwards  into  the
vehicle.
Pressing  the  emergency  release  lever
inside  the  work  hole  will  unlock  the
charging port lid.

1

2

3

4

1

2

5

4

6

126

2-2. Charging

Locking and unlocking the charging connector

Carry  the  electronic  key  on  your  person,  for  example  in  your
pocket.

Insert the charging connector
into the charging inlet. 
(

P. 148)

Press the charging connector
lock switch.

The  charging  connector  is
locked  and  unlocked  each  time
the switch is pressed.

Using the charging connector locking system

1

2

127

2-2. Charging

2

Plug-

in hybrid system

Changing the charging connector lock settings

The method for locking and unlocking the charging connector can
be  changed  as  follows  in  the  “Vehicle  Settings”  settings  on  the
multi-information display.

Refer to P. 246 for details on how to change the settings.

*

1

: Carrying the electronic key and unlocking the doors is not necessary.

*

2

: The charging connector can be locked and unlocked by similar operations

to that of “Manual Lock”.

*

3

: The charging connector will be unlocked if power supply is interrupted due

to a power outage etc. after the charging connector is automatically locked.

Setting

Operation description

“Manual Lock” 

(Default setting)

The charging connector  is locked and  unlocked by
pressing  the  charging  connector  lock  switch  when
carrying  the  electronic  key  or  after  unlocking  the
doors.

“Auto Lock”

The  charging  connector  is  automatically  locked
when the charging connector is connected.

*

1, 2

“Auto Lock & Auto 

Unlock”

The  charging  connector  is  automatically  locked
when  the  charging  connector  is  connected  and
automatically  unlocked  when  charging  is  com-
pleted.

*

1, 2, 3

128

2-2. Charging

Charging connector locking system

If  the  charging  connector  lock  switch  is  operated  repeatedly,  the  charging
connector locking system may not work to protect the system. In this case,
wait for a while before operating the switch again.

The charging connector locking system does not guarantee to prevent theft
of the charging cable, and is not necessarily effective for all the situations.

When the charging connector cannot be inserted into the charging inlet

If the smart key system has been deactivated in a customized setting

The  smart  lid  &  connector  locking  system  will  also  be  deactivated.  If  the
smart  key  system  has  been  deactivated  in  a  customized  setting,  the
charging connector can be locked and unlocked by performing the following
procedure.

Unlock the doors using the wireless remote control or door lock switch.
(

P. 280, 281)

Insert the charging connector into the charging inlet (only when locking
the charging connector).
Press the charging connector lock switch.
The charging connector will lock or unlock.

When the charging connector lock setting (

P. 127) is set to “Auto Lock”,

the  above  procedures  are  only  necessary  when  unlocking.  When  set  to
“Auto Lock & Auto Unlock”, the connector lock function operates, even if the
smart key system is deactivated.

Check  that  the  connector  lock  pin  is  not
lowered.
If  the  connector  lock  pin  is  lowered,  the
connector  lock  is  operating.  Carry  an
electronic  key  or  unlock  the  doors,  and
then  press  the  charging  connector  lock
switch  to  unlock  the  connector  lock  and
check  that  the  connector  lock  pin  is  not
lowered.

Connector lock pin

1

2

3


Content      ..     5      6      7      8     ..