Toyota 86 (2023 year). Manual in english - page 9
 

  Index      Toyota     Toyota 86 (2023 year). Manual in english


Search            copyright infringement  


Content      ..     7      8      9      10     ..


Toyota 86 (2023 year). Manual in english - page 9


141

4-1. Before driving

4

Dr

iv

ing

750 (5 

 150) = 650 lbs.)

(5) Determine the combined 
weight of luggage and cargo 
being loaded on the vehicle. 
That weight may not safely 
exceed the available cargo and 
luggage load capacity calcu-
lated in Step 4.
(6) If your vehicle will be towing 
a trailer, load from your trailer 
will be transferred to your vehi-
cle. Consult this manual to 
determine how this reduces the 
available cargo and luggage 
load capacity of your vehicle. 
(

P.143)

Toyota does not recommend towing 
a trailer with your vehicle. Your 
vehicle is not designed for trailer 
towing.

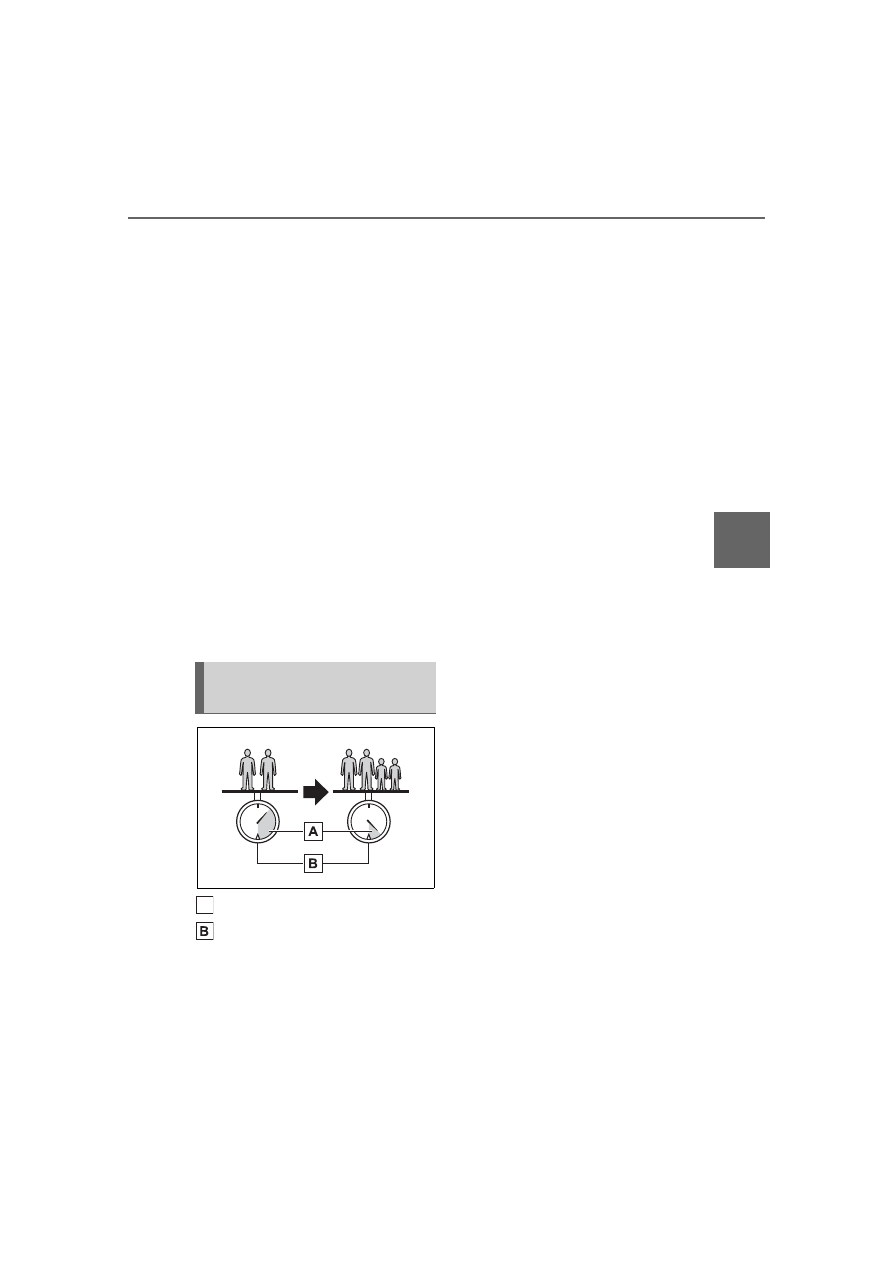
Cargo capacity
Total load capacity (vehicle 
capacity weight) (

P.380)

When 2 people with the com-
bined weight of A lb. (kg) are rid-
ing in your vehicle, which has a 

total load capacity (vehicle 
capacity weight) of B lb. (kg), 
the available amount of cargo 
and luggage load capacity will 
be C lb. (kg) as follows:

B

*2

 lb. (kg) - A

*1

 lb. (kg) = C

*3

 lb. 

(kg)

*1

:A =Weight of people

*2

:B =Total load capacity

*3

:C =Available cargo and luggage 

load

In this condition, if 2 more passen-
gers with the combined weight of D 
lb. (kg) get on, the available cargo 
and luggage load will be reduced E 
lb. (kg) as follows:

C lb. (kg) - D

*4

 lb. (kg) = E

*5

 lb. 

(kg)

*4

:D =Additional weight of people

*5

:E =Available cargo and luggage 

load

As shown in the example above, 
if the number of occupants 
increases, the cargo and lug-
gage load will be reduced by an 
amount that equals the 
increased weight due to the 
additional occupants. In other 
words, if an increase in the num-
ber of occupants causes an 
excess of the total load capacity 
(combined weight of occupants 
plus cargo and luggage load), 
you must reduce the cargo and 
luggage on your vehicle.

Calculation formula for 
your vehicle

A

142

4-1. Before driving

WARNING

Things that must not be car-

ried in the trunk

The following things may cause a 

fire if loaded in the trunk:

Receptacles containing gaso-

line

Aerosol cans

Storage precautions

Observe the following precau-

tions.

Failure to do so may result in 

death or serious injury.

Stow cargo and luggage in the 

trunk whenever possible.

To prevent cargo and luggage 

from sliding forward during 

braking, do not stack anything in 

the enlarged trunk. Keep cargo 

and luggage low, as close to the 

floor as possible.

When you fold down the rear 

seats, long items should not be 

placed directly behind the front 

seats.

Never allow anyone to ride in 

the enlarged trunk. It is not 

designed for passengers. They 

should ride in their seats with 

their seat belts properly fas-

tened. Otherwise, they are 

much more likely to suffer death 

or serious bodily injury, in the 

event of sudden braking, sud-

den swerving or an accident.

Do not place cargo or luggage 

in or on the following locations 

as the item may get under the 

clutch (manual transmission), 

brake or accelerator pedal and 

prevent the pedals from being 

depressed properly, block the 

driver’s vision, or hit the driver 

or passengers, causing an acci-

dent:

• At the feet of the driver

• On the front passenger or rear 

seats (when stacking items)

• On the package tray

• On the instrument panel

• On the dashboard

Secure all items in the occupant 

compartment, as they may shift 

and injure someone during sud-

den braking, sudden swerving 

or an accident.

Capacity and distribution

Do not exceed the maximum 

axle weight rating or the total 

vehicle weight rating.

Even if the total load of occu-

pant’s weight and the cargo 

load is less than the total load 

capacity, do not apply the load 

unevenly. Improper loading may 

cause deterioration of steering 

or braking control which may 

cause death or serious injury.

143

4-1. Before driving

4

Dr

iv

ing

Total load capacity and seating 

capacity

These details are also described on 

the tire and loading information 

label. (

P.323)

Vehicle load limits

Vehicle load limits include 
total load capacity, seating 
capacity, towing capacity 
and cargo capacity.

Total load capacity (vehicle 
capacity weight): 

P.380

Total load capacity means the 
combined weight of occupants, 
cargo and luggage.

Seating capacity: 

P.380

Seating capacity means the max-
imum number of occupants 
whose estimated average weight 
is 150 lb. (68 kg) per person.

Towing capacity

Toyota does not recommend tow-
ing a trailer with your vehicle.

Cargo capacity

Cargo capacity may increase or 
decrease depending on the 
weight and the number of occu-
pants.

WARNING

Overloading the vehicle

Do not overload the vehicle.

It may not only cause damage to 

the tires, but also degrade steer-

ing and braking ability, resulting in 

an accident.

Trailer towing

Toyota does not recom-
mend towing a trailer with 
your vehicle. Toyota also 
does not recommend the 
installation of a tow hitch or 
the use of a tow hitch carrier 
for a wheelchair, scooter, 
bicycle, etc. Your vehicle is 
not designed for trailer tow-
ing or for the use of tow 
hitch mounted carriers.

144

4-1. Before driving

Dinghy towing

Your vehicle is not designed 
to be dinghy towed (with 4 
wheels on the ground) 
behind a motor home.

NOTICE

To avoid serious damage to 

your vehicle

Do not tow your vehicle with the 

four wheels on the ground.

145

4-2. Driving procedures

4

Dr

iv

ing

4-2.Driving procedures

1

Check that the parking brake 
is set.

2

Check that the shift lever is in 
P (automatic transmission) or 
N (manual transmission).

3

Firmly depress the brake 
pedal (automatic transmis-
sion) or clutch pedal (manual 
transmission).

 ,

 and a message will be dis-

played on the multi-information dis-

play. 

If it is not displayed, the engine 

cannot be started.

4

Press the engine switch 
shortly and firmly.

When operating the engine switch, 

one short, firm press is enough. It is 

not necessary to press and hold the 

switch.
The engine will crank until it starts 

or for up to 10 seconds, whichever 

is less.
Continue depressing the brake 

pedal (automatic transmission) or 

clutch pedal (manual transmission) 

until the engine is completely 

started.
The engine can be started from any 

engine switch mode.

If the engine does not start

The engine immobilizer system 

may not have been deactivated. 

(

P.80)

Contact your Toyota dealer.

If a message related to start-up is 

shown on the multi-information 

display, read the message and fol-

low the instructions.

If the battery is discharged

The engine cannot be started using 

the smart key system. Refer to 

P.372to restart the engine.

Electronic key battery depletion

P.102

Conditions affecting operation

P.112

Notes for the entry function

P.113

Steering lock function

After turning the engine switch off 

and opening and closing the 

doors, the steering wheel will be 

locked due to the steering lock 

function. Operating the engine 

switch again automatically can-

cels the steering lock.

When the steering lock cannot be 

released, “Locked. Push Ignition 

Switch While Turning Steering 

Wheel” will be displayed on the 

multi-information display.

Check that the shift lever is in P 

(automatic transmission) or N 

(manual transmission).  Press the 

Engine (ignition) 

switch

Performing the following 
operations when carrying 
the electronic key on your 
person starts the engine or 
changes engine switch 
modes.

Starting the engine

146

4-2. Driving procedures

engine switch while turning the 

steering wheel left and right.

To prevent the steering lock motor 

from overheating, operation of the 

motor may be suspended if the 

engine is turned on and off repeat-

edly in a short period of time. In 

this case, refrain from operating 

the engine switch. After about 10 

seconds, the steering lock motor 

will resume functioning.

When “Keyless Access System 

Disabled Check Owner's Man-

ual” is displayed on the 

multi-information display

The system may be malfunctioning. 

Have the vehicle inspected by your 

Toyota dealer immediately.

Electronic key battery

P.328

Operation of the engine switch

If the switch is not pressed shortly 

and firmly, the engine switch 

mode may not change or the 

engine may not start.

If attempting to restart the engine 

immediately after turning the 

engine switch off, the engine may 

not start in some cases. After turn-

ing the engine switch off, please 

wait more than 10 seconds before 

restarting the engine.

If the smart key system has 

been disabled

If the smart key system has been 

disabled, refer to P.370.

Immediately after reconnecting 

the battery terminals due to 

replacing the battery and so 

forth

The engine may not start. If this 

occurs, turn the engine switch to 

ON, and start the engine after wait-

ing at least 10 seconds. Idling may 

be unstable immediately after the 

engine starts, however, this is not a 

malfunction.

WARNING

When starting the engine

Always start the engine while sit-

ting in the driver’s seat. Do not 

depress the accelerator pedal 

while starting the engine under 

any circumstances.

Doing so may cause an accident 

resulting in death or serious injury.

Caution while driving

If engine failure occurs while the 

vehicle is moving, do not lock or 

open the doors until the vehicle 

reaches a safe and complete 

stop. Activation of the steering 

lock in this circumstance may lead 

to an accident, resulting in death 

or serious injury.

NOTICE

When starting the engine

Do not race a cold engine.

If the engine becomes difficult to 

start or stalls frequently, have 

your vehicle checked by your 

Toyota dealer immediately.

Vehicles with an automatic 

transmission: Do not shift the 

shift lever while the starter is 

operating.

147

4-2. Driving procedures

4

Dr

iv

ing

Automatic transmission

1

Stop the vehicle completely.

2

Set the parking brake 
(

P.156), and shift the shift 

lever to P.

Check the parking brake indicator 

is illuminated.

3

Press the engine switch.

The engine will stop, and the meter 

display will be extinguished.

4

Release the brake pedal and 
check that “ACCESSORY” or 
“IGNITION ON” is not shown 
on the meters.

Manual transmission

1

Stop the vehicle completely.

2

Set the parking brake. 
(

P.156)

Check the parking brake indicator 

is illuminated.

3

Shift the shift lever to N. 
(

P.153)

4

Press the engine switch.

The engine will stop, and the meter 

display will be extinguished.

5

Release the brake pedal and 
check that “ACCESSORY” or 
“IGNITION ON” is not shown 
on the meters.

Modes can be changed by 

NOTICE

Symptoms indicating a mal-

function with the engine 

switch

If the engine switch seems to be 

operating somewhat differently 

than usual, such as the switch 

sticking slightly, there may be a 

malfunction. Contact your Toyota 

dealer immediately.

Stopping the engine

WARNING

Stopping the engine in an 

emergency

If you want to stop the engine in 

an emergency while driving the 

vehicle, press and hold the engine 

switch for more than 2 seconds, 

or press it briefly 3 times or more 

in succession. (

P.338)

However, do not touch the engine 

switch while driving except in an 

emergency. Turning the engine off 

while driving will not cause loss of 

steering or braking control, but the 

power assist to these systems will 

be lost. This will make it more dif-

ficult to steer and brake, so you 

should pull over and stop the 

vehicle as soon as it is safe to do 

so.

If the engine switch is operated 

while the vehicle is running, a 

warning message will be shown 

on the multi-information display 

and a buzzer sounds.

Vehicles with an automatic 

transmission: To restart the 

engine after performing an 

emergency shutdown, shift the 

shift lever to N and then press 

the engine switch.

Vehicles with a manual trans-

mission: To restart the engine 

after performing an emergency 

shutdown, depress the clutch 

pedal and then press the engine 

switch.

Changing engine switch 
modes

148

4-2. Driving procedures

pressing the engine switch with 
brake pedal (automatic trans-
mission) or clutch pedal (manual 
transmission) released. (The 
mode changes each time the 
switch is pressed.)

1

OFF

*

The emergency flashers can be 
used.

2

ACC

Some electrical components such 
as the audio system can be used.
“ACCESSORY” will be displayed 
on the meters.

3

ON

All electrical components can be 
used.
“IGNITION ON” will be displayed on 
the meters.

*

: Vehicles with an automatic trans-

mission: If the shift lever is in a 
position other than P when turn-
ing off the engine, the engine 

switch will be turned to ACC, not 
to off.

Auto power off function

Automatic transmission: If the vehi-

cle is left in ACC for more than 20 

minutes or ON (the engine is not 

running) for more than an hour with 

the shift lever in P, the engine switch 

will automatically turn off. However, 

this function cannot entirely prevent 

battery discharge. Do not leave the 

vehicle with the engine switch in 

ACC or ON for long periods of time 

when the engine is not running.
Manual transmission: If the vehicle 

is left in ACC for more than 20 min-

utes or ON (the engine is not run-

ning) for more than an hour, the 

engine switch will automatically turn 

off. However, this function cannot 

entirely prevent battery discharge. 

Do not leave the vehicle with the 

engine switch in ACC or ON for long 

periods of time when the engine is 

not running.

If the engine is stopped with the 
shift lever in a position other 

NOTICE

To prevent battery discharge

Do not leave the engine switch 

in ACC or ON for long periods of 

time without the engine running.

If “ACCESSORY” or “IGNITION 

ON” is displayed on the meters 

while the engine is not running, 

the engine switch is not off. Exit 

the vehicle after turning the 

engine switch off.

When stopping the engine 
with the shift lever in a 
position other than P 
(vehicles with an auto-
matic transmission)

149

4-2. Driving procedures

4

Dr

iv

ing

than P, the engine switch will not 
be turned off but instead be 
turned to ACC. Perform the fol-
lowing procedure to turn the 
switch off:

1

Check that the parking brake 
is set.

2

Shift the shift lever to P.

3

Check that “ACCESSORY” is 
displayed on the meters and 
press the engine switch 
shortly and firmly.

4

Check that “ACCESSORY” 
or “IGNITION ON” on the 
meters are off.

*

: If equipped

*1

:To improve fuel efficiency and 

reduce noise, shift the shift lever 
to D for normal driving.

*2

:Any gear range can be fixed 

when driving in Manual mode.

To protect the automatic trans-

mission

If the automatic transmission fluid 

temperature is high, “Transmission 

Oil Temperature Check Owner's 

Manual” will be displayed on the 

multi-information display and the 

NOTICE

To prevent battery discharge

Do not stop the engine when the 

shift lever is in a position other 

than P. If the engine is stopped in 

another shift lever position, the 

engine switch will not be turned 

off but instead be turned to ACC 

mode. If the vehicle is left in ACC, 

battery discharge may occur.

Automatic transmis-

sion

*

Select the shift position 
depending on your purpose 
and situation.

Shift position purpose 
and functions

Shift posi-

tion

Objective or function

P

Parking the vehi-

cle/starting the engine

R

Reversing

N

Neutral

(Condition in which the 

power is not transmit-

ted)

D

Normal driving

*1

Temporary manual 

mode driving (

P.151)

M

Manual mode driving

*2


(

P.152)

150

4-2. Driving procedures

vehicle will go into transmission pro-

tection mode automatically. Have 

the vehicle inspected by your Toyota 

dealer.

When driving with Adaptive 

Cruise Control or Conventional 

Cruise Control activated

Downshifting can be performed 

even when using Adaptive Cruise 

Control or Conventional Cruise Con-

trol. After downshifting, the set 

speed continues. (

P.151, 152)

Automatic gear selection when 

the vehicle is stopped

When the vehicle is idling at high 

rpm in order to warm up, and the 

vehicle is on a slippery road, the 

transmission may automatically shift 

to 2nd gear for stopping and starting 

off.

AI-SHIFT

The AI-SHIFT automatically 

selects the suitable gear accord-

ing to driver performance and driv-

ing conditions. The AI-SHIFT 

automatically operates when the 

shift lever is in D. (Shifting the shift 

lever to the M position cancels the 

function.)

G AI-SHIFT automatically selects 

a suitable gear for sporty driving 

according to driver’s input and 

driving conditions. G AI-SHIFT 

operates automatically when the 

shift lever is in D and sport mode 

is selected for the driving mode. 

(Selecting normal mode with the 

driving mode select switch or shift-

ing the shift lever to the M position 

cancels this function.)

After recharging/reconnecting 

the battery

P.373

 While the engine switch is in 

ON, move the shift lever with the 
brake pedal depressed.

When shifting the shift lever 
between P and D, make sure that 
the vehicle is completely stopped.

Shift lock system

The shift lock system is a system to 

prevent accidental operation of the 

shift lever in starting.

The shift lever can be shifted from P 

only when the engine switch is in 

ON and the brake pedal is being 

depressed.

If the shift lever cannot be 

shifted from P

First, check whether the brake pedal 

is being depressed.
If the shift lever cannot be shifted 

WARNING

When driving on slippery 

road surfaces

Be careful of downshifting and 

sudden acceleration, as this could 

result in the vehicle skidding to 

the side or spinning.

Shifting the shift lever

151

4-2. Driving procedures

4

Dr

iv

ing

with your foot on the brake pedal, 

there may be a problem with the 

shift lock system. Have the vehicle 

inspected by your Toyota dealer 

immediately.

The following steps may be used as 

an emergency measure to ensure 

that the shift lever can be shifted.
Releasing the shift lock:

1

Set the parking brake.

2

Turn the engine switch off.

3

Depress the brake pedal.

4

Pry the cover up with a flathead 

screwdriver or equivalent tool.

To prevent damage to the cover, 

cover the tip of the screwdriver with 

a rag.

5

Press the shift lock override but-

ton.

The shift lever can be shifted while 

the button is pressed.

P.258

Temporary manual mode driving 
can be changed to by operating 
the paddle shift switches while 
the shift lever is in the D posi-
tion.
When this occurs, the selected 
gear and “M” are displayed on 
the shift position and shift range 
indicator.
(When engine speed rises close 
to the red zone, upshifting will 
be automatically performed.)

WARNING

To prevent an accident when 

releasing the shift lock

Before pressing the shift lock 

override button, make sure to set 

the parking brake and depress the 

brake pedal.

If the accelerator pedal is acci-

dentally depressed instead of the 

brake pedal when the shift lock 

override button is pressed and the 

shift lever is shifted out of P, the 

vehicle may suddenly start, possi-

bly leading to an accident result-

ing in death or serious injury.

Selecting the driving 
mode

Temporary manual mode 
driving

152

4-2. Driving procedures

1

Upshifting

2

Downshifting

The selected shift range, from M1 
to M6, will be displayed on the 
meter.

Automatic deactivation of tem-

porary manual mode driving in 

the D position

Temporary manual mode driving in 

the D position will be deactivated in 

the following situations:

When the vehicle speed is too 

low.

When the accelerator pedal is 

depressed for more than a certain 

period of time.

When the accelerator pedal is 

fully, or near-fully, depressed.

When the shift lever is shifted to a 

position other than D.

When the “+” paddle shift switch is 

operated for a certain amount of 

time continuously

Downshifting restriction warn-

ing buzzer

If downshifting operations are per-

formed at a vehicle speed by which 

downshifting is not possible (when 

downshifting will cause the engine 

speed to enter the red zone), a 

buzzer will sound to warn the driver 

that downshifting cannot be per-

formed.

To enter manual mode, shift the 
shift lever to the M position.
While the upshift/downshift indi-
cator light is illuminated, gears 
can be selected by operating the 
shift lever or paddle shift 
switches, allowing you to drive 
in the gear of your choosing.

Even if upshifting operations are 
performed, if vehicle speed is too 
low for the requested gear, the gear 
will not change.

Upshift indicator
Downshift indicator

1

Upshifting (+)

2

Downshifting (-)

WARNING

To prevent incorrect opera-

tion

Do not attach items such as 

accessories to the paddle shift 

switches. Doing so may uninten-

tionally move the paddle shift 

switches.

Manual mode driving

A

153

4-2. Driving procedures

4

Dr

iv

ing

Each time the shift lever or paddle 
shift switches are operated, the 
gear changes up or down one gear 
and the selected gear, “1” through 
“6”, will be set.
The selected gear, from M1 to M6, 
will be fixed and displayed on the 
meter.

When in manual mode, the gear 
will not change unless the shift 
lever or paddle shift switches 
are operated.
However, even when in the 
manual mode, the gears will be 
automatically changed in the fol-
lowing situation:

When vehicle speed drops 
(downshift only).

When engine oil temperature 
is high and engine speed 
rises close to the red zone.

Downshifting restriction warn-

ing buzzer

If downshifting operations are per-

formed at a vehicle speed by which 

downshifting is not possible (when 

downshifting will cause the engine 

speed to enter the red zone), a 

buzzer will sound to warn the driver 

that downshifting cannot be per-

formed.

*

: If equipped

Shifting the shift lever

1

Depress the clutch pedal 
firmly.

2

Shift the shift lever to the 
desired gear.

Make sure to only shift gears 

sequentially.

3

Gradually release the clutch 
pedal.

If it is difficult to shift in R, shift the 
lever to N, release the clutch pedal 
momentarily, and then try again.

Shifting the shift lever to R

Shift the shift lever to R while lift-
ing up the ring section.

WARNING

To prevent incorrect opera-

tion

Do not attach items such as 

accessories to the paddle shift 

switches. Doing so may uninten-

tionally move the paddle shift 

switches.

Manual transmission

*

Operating instructions

154

4-2. Driving procedures

Maximum allowable speeds

Observe the following maximum 

allowable speeds in each gear when 

maximum acceleration is necessary.

The selected shift position will 
be displayed on the multi-infor-
mation display.

The indicator can be turned on/off. 
(

P.400)

Shift posi-

tion

Maximum speed

mph (km/h)

1

29 (46)

2

48 (76)

3

68 (108)

4

86 (138)

5

104 (167)

6

136 (218)

NOTICE

To prevent damage to the 

vehicle

When shifting gears, observe the 

following precautions. Failure to 

do so may cause damage to the 

engine, manual transmission, 

and/or clutch.

Do not shift the shift lever with-

out depressing the clutch pedal.

Do not lift up the ring section 

except when shifting the lever to 

R.

Shift the shift lever to R only 

when the vehicle is stationary.

Do not rest your hand on or hold 

the shift lever any time other 

than when shifting.

In order to not cause the engine 

to overrev, make sure to only 

shift gears sequentially.

Do not release the clutch pedal 

suddenly.

Shift position indicator

155

4-2. Driving procedures

4

Dr

iv

ing

Shift position indicator display

The selected shift position will not 

appear in the following situations:

When the shift lever is in N.

When the vehicle speed is 6 mph 

(10 km/h) or less (except when the 

shift lever is in R).

When the clutch pedal is 

depressed.

To help enable fuel-efficient driv-
ing, shift-up indicator illuminate 
to indicate upshift timing.

The indicator can be turned on/off. 
(

P.400)

The lever will return to its origi-
nal position immediately after 
operation.

1

Right turn

2

Lane change to the right 
(move the lever partway and 
hold it

*

)

The right turn signal lights will blink 
until the lever is released.

3

Lane change to the left 
(move the lever partway and 
hold it

*

)

The left turn signal lights will blink 
until the lever is released.

4

Left turn

*

: When the turn signal lever is 

operated to position 

2

 or 

3

, if the 

lever is released immediately, the 

Shift-up indicator

Turn signal lever

Operating instructions

156

4-2. Driving procedures

turn signal lights will blink 3 times.

If the turn signals do not 
stop flashing after turning 
left or right, or if you want 
to stop them flashing

Operate the lever in the oppo-
site direction to either position 

2


or 

3

. If you move the lever to 

either position 

1

 or 

4

, the 

selected turn signals will flash.

Turn signals can be operated 

when

The engine switch is in ON.

If the indicator flashes faster 

than usual

Check that a light bulb in the front or 

rear turn signal lights has not 

burned out.

If the turn signals stop flashing 

before a lane change has been 

performed

Operate the lever again.

Customization

Some functions can be customized. 

(

P.400)

U.S.A.
Canada

1

To set the parking brake, fully 
pull the parking brake lever 
while depressing the brake 
pedal.

2

To release the parking brake, 
slightly raise the lever and 
lower it completely while 
pressing the button.

Parking the vehicle

P.132

If the brake system warning 

light comes on

P.348

Usage in winter time

P.266

Parking brake

Operating instructions

A


Content      ..     7      8      9      10     ..