Toyota RAV4 (2022 year). Manual in english - page 33
 

  Index      Toyota     Toyota RAV4 (2022 year). Manual in english


Search            copyright infringement  


Content      ..     31      32      33      34     ..


Toyota RAV4 (2022 year). Manual in english - page 33


533

6-3. Using the storage features

6

Interior

 featur

es

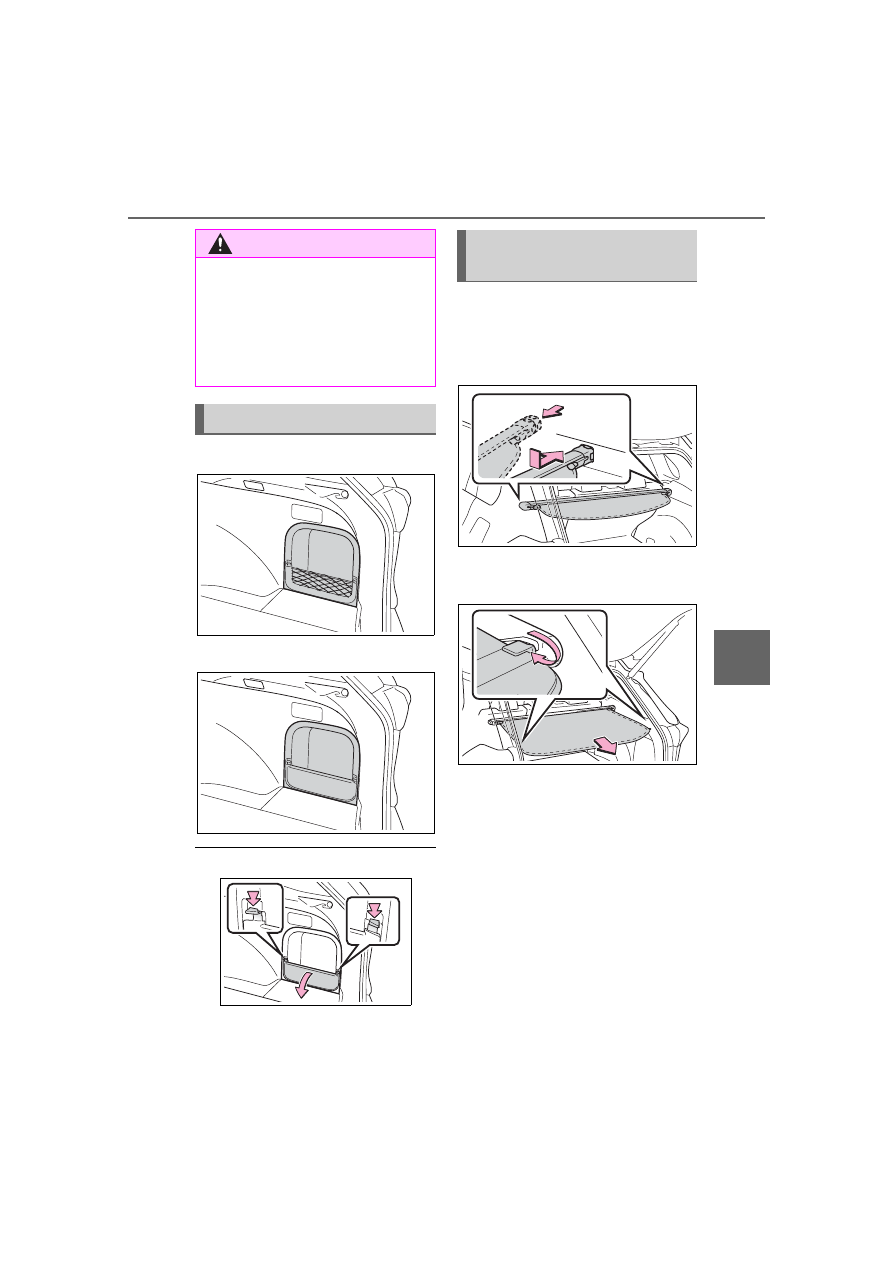
Type A

Type B

Removing the partition plate

Disengage the claws

Installing the luggage cover

1

Compress the both ends of 
the luggage cover and insert 
into the recess to install.

2

Pull out the luggage cover 
and hook it onto the anchors.

WARNING

Caution while driving

Keep the deck board closed.
In the event of sudden braking, an 

accident may occur due to an 

occupant being struck by the deck 

board or the items stored under 

the deck board.

Side auxiliary box

Luggage cover (if 
equipped)

534

6-3. Using the storage features

Removing the luggage 
cover

1

Release the cover from the 
left and right anchors and 
allow it to retract.

2

Compress the end of the lug-
gage cover and lift the lug-
gage cover up.

Stowing the luggage cover

1

Open the rear deck board 
and remove the side deck 
covers.

When the back surface (resin sur-

face) of the deck board is facing up, 

remove the deck board.

2

Place the both ends of the 
luggage cover into the 
holder.

WARNING

Luggage cover

When installing/stowing the lug-

gage cover, make sure that the 

luggage cover is securely 

installed/stowed. Failure to do 

so may result in serious injury in 

the event of sudden braking or a 

collision.

Do not place anything on the 

luggage cover. In the event of 

sudden braking or turning, the 

item may go flying and strike an 

occupant. This could lead to an 

unexpected accident, resulting 

in death or serious injury.

Do not allow children to climb 

on the luggage cover. Climbing 

on the luggage cover could 

result in damage to the luggage 

cover, possibly causing death or 

serious injury to the child.

535

6-3. Using the storage features

6

Interior

 featur

es

NOTICE

To prevent damage to the lug-

gage cover

Do not place anything on top of 

the luggage cover. When rolling 

up the luggage cover, objects 

may be caught in the cover, dam-

aging the cover and generating 

noise.

536

6-4. Using the other interior features

6-4.Using the other interior features

1

To set the visor in the forward 
position, flip it down.

2

To set the visor in the side 
position, flip down, unhook, 
and swing it to the side.

3

To use the side extender (if 
equipped), place the visor in 
the side position, then slide it 
backward.

Slide the cover to open.

The light turns on when the cover is 
opened.

Automatic light off to prevent 

battery discharge

If the vanity lights remain on when 

the engine switch is turned to OFF, 

the lights will go off automatically 

after 20 minutes.

The power outlet can be used 
for the following components:
12 V: Accessories that run on 
less than 10 A.
120 VAC: Accessories that use 
less than 100 W.

12 V

Front

Open the lid.

Rear (if equipped)

Open the lid.

Other interior features

Sun visors

Vanity mirrors

NOTICE

To prevent battery discharge

Do not leave the vanity lights on 

for extended periods while the 

engine is off.

Power outlet

537

6-4. Using the other interior features

6

Interior

 featur

es

Luggage compartment (if 
equipped)

Open the lid.

120 VAC (if equipped)

Open the lid.

The power outlet can be used 

when

12 V

The engine switch is in ACC or ON.

120 VAC

The engine switch is in ON.

When turning the engine switch 

to OFF

Disconnect electrical devices with 

charging functions, such as mobile 

battery packs.

If such devices are left connected, 

the engine switch may not be turned 

off normally.

NOTICE

To avoid damaging the power 

outlet

Close the power outlet lid when 

the power outlet is not in use. 

Foreign objects or liquids that 

enter the power outlet may cause 

a short circuit.

To prevent the fuse from 

being blown

12 V

Do not use an accessory that 
uses more than 12 V 10 A.

120 VAC

Do not use a 120 VAC appliance 
that requires more than 100 W. If 
a 120 VAC appliance that con-
sumes more than 100 W is used, 
the protection circuit will cut the 
power supply.

To prevent battery discharge

Do not use the power outlet lon-

ger than necessary when the 

engine is not running.

Appliances that may not 

operate properly (120 VAC)

The following 120 VAC appli-

ances may not operate properly 

even if their power consumption is 

under 100 W.

Appliances with high initial peak 

wattage

Measuring devices that pro-

cess precise data

538

6-4. Using the other interior features

The USB Type-C charging ports 
are used to supply 3 A of elec-
tricity at 5 V to external devices.
The USB Type-C charging ports 
are for charging only. They are 
not designed for data transfer or 
other purposes.
Depending on the external 
device, it may not charge prop-
erly. Refer to the manual 
included with the device before 
using a USB charging port.

Using the USB Type-C 
charging ports

Console box

Rear (if equipped)

Open the lid.

The USB Type-C charging ports 

can be used when

The engine switch is in ACC or ON.

Situations in which the USB 

Type-C charging ports may not 

operate correctly

If a device which consumes more 

than 3 A at 5 V is connected

If a device designed to communi-

cate with a personal computer, 

such as a USB memory device, is 

connected

If the connected external device is 

turned off (depending on device)

If the temperature inside the vehi-

cle is high, such as after the vehi-

cle has been parked in the sun

About connected external 

devices

Depending on the connected exter-

nal device, charging may occasion-

ally be suspended and then start 

again. This is not a malfunction.

NOTICE

Other appliances that require an 

extremely stable power supply

USB Type-C charging 
ports

NOTICE

To prevent damage to the 

USB Type-C charging ports

Do not insert foreign objects into 

the ports.

Do not spill water or other liq-

uids into the ports.

539

6-4. Using the other interior features

6

Interior

 featur

es

A portable device can be 
charged by just placing Qi stan-
dard wireless charge compatible 
portable devices according to 
the Wireless Power Consortium, 
such as smartphones and 
mobile batteries, etc., on the 
charge area.
This function cannot be used 
with portable devices that are 
larger than the charging tray. 

Also, depending on the portable 
device, it may not operate as 
normal. Please read the opera-
tion manual for portable devices 
to be used.

The “Qi” logo

The “Qi” logo is a trademark of 
the Wireless Power Consortium.

Name for all parts

Charge area

*

Charging tray

Power supply switch

Operation indicator light

*

: Portable devices and wireless 

chargers contain charging coils. 
The charging coil in the wireless 
charger can be moved within the 
charge area near the center of 
the charging tray. If the charging 
coil inside a portable device is 
detected in the charge area, the 
charging coil inside the wireless 

NOTICE

When the USB Type-C charging 

ports are not in use, close the 

lids. If a foreign object or liquid 

enters a port may cause a short 

circuit.

Do not apply excessive force to 

or impact the USB Type-C 

charging ports.

Do not disassemble or modify 

the USB Type-C charging ports.

To prevent damage to exter-

nal devices

Do not leave external devices in 

the vehicle. The temperature 

inside the vehicle may become 

high, resulting in damage to an 

external device.

Do not push down on or apply 

unnecessary force to an exter-

nal device or the cable of an 

external device while it is con-

nected.

To prevent battery discharge

Do not use the USB Type-C 

charging ports for a long period of 

time when the engine is off.

Wireless charger (if 
equipped)

A

B

C

D

540

6-4. Using the other interior features

charger will move toward it and 
start charging. If the charging coil 
inside a portable device moves 
outside of the charge area, 
charging will automatically stop. 
If 2 or more portable devices are 
placed on the charging tray, their 
charging coils may not be prop-
erly detected and they may not 
be charged.

Using the wireless charger

1

Press the power supply 
switch of the wireless char-
ger.

Switches on and off with each 

press of the power supply switch.
When turned on, the operation indi-

cator light (green) comes on.
Even with the engine off, the on/off 

state of the power supply switch is 

memorized.

2

Place the portable device on 
the charging tray

Place the charging side of the por-

table device down with the center of 

the device in the center of the 

charge area.
When charging, the operation indi-

cator light (orange) comes on.
If charging is not occurring, try plac-

ing the portable device as close to 

the center of the charging area as 

possible.
When charging is complete, the 

operation indicator light (green) 

comes on.

Recharging function

When charging is complete 
and after a fixed time in the 
charge suspension state, 
charging restarts.

When the portable device is 
moved, charging is stopped 
for a moment and then it 
restarts.

Rapid charging function

The following portable 
devices support rapid 
charging.

• Portable devices compliant with 

WPC Ver1.2.4 and compatible 
with rapid charging

• iPhone’s with an iOS version that 

supports 7.5 W charging (iPhone 
8 and later models)

To switch to the rapid 
charging function, press the 
power supply switch 3 times 
while charging. When rapid 
charging is possible, the oper-
ation indicator light will switch 
from orange to flashing 
between green and orange.

When charging is complete, 
the rapid charging function 

541

6-4. Using the other interior features

6

Interior

 featur

es

will stop. Switch again to the 
rapid charging function to use 
rapid charging again.

Lighting conditions of oper-
ation indicator light

*1

:Charging power will not be out-

put during standby. A metallic 
object will not be heated, if it is 
placed on the charging tray in 
this state.

*2

:Depending on the portable 

device, there are cases where 
the operation indicator light will 
continue being lit up orange even 
after the charging is complete.

When the operation indica-
tor light flashes

When an error occurs, the oper-
ation indicator light flashes an 
orange color.
Handle the error based on the 
following tables.

Flashing repeatedly once 
every second (Orange)

Repeatedly flashes 3 times 
continuously (Orange)

Operation 

indicator 

light

Conditions

Turning off

When the Wireless 
charger power supply 
is off

Green 
(comes 
on)

On Standby (charging 
possible state)

*1

When charging is com-
plete

*2

Orange 
(comes 
on)

When placing the por-
table device on the 
charging area (detect-
ing the portable device)

Charging

Flashing 
between 
green and 
orange

When any of the follow-
ing portable devices is 
using rapid charging
• Portable devices 

compliant with WPC 
Ver1.2.4 and compat-
ible with rapid 
charging

• iPhone’s with an iOS 

version that supports 
7.5 W charging 
(iPhone 8 and later 
models)

Suspected 

causes

Handling method

Vehicle to char-
ger communica-
tion failure.

If the engine is 
running, stop 
and then restart 
the engine. If the 
engine switch is 
in ACC, start the 
engine. 
(

P.192)

Suspected 

causes

Handling method

Foreign sub-
stance detection:
A metallic for-
eign substance 
is in the charge 
area, and so the 
abnormal heat-
ing prevention 
function of the 
charging coil 
operated

Remove the for-
eign substance 
from the charge 
area.

542

6-4. Using the other interior features

Repeatedly flashes 4 times 
continuously (Orange)

The wireless charger can be 

operated when

The engine switch is in ACC or ON.

Usable portable devices

Qi standard wireless charge stan-

dard can be used on compatible 

devices. However, not all Qi stan-

dard devices and compatibility are 

guaranteed.

Starting with mobile phones and 

smartphones, it is aimed for low 

power electrically supplied porta-

ble devices of no more than 5W.

However, charging exceeding 5 W 

is supported by the following por-

table devices.

• Charging at 7.5 W or less is sup-

ported by iPhone’s that support 

7.5 W charging.

• Charging at 10 W or less is sup-

ported by portable devices compli-

ant with WPC standard Ver1.2.4.

Using the smart key system

If the smart key system detects the 

key while a device is being charged, 

charging will be temporarily 

stopped.

When covers and accessories 

are attached to portable devices

Do not charge in situations where 

cover and accessories not able to 

handle Qi are attached to the porta-

ble device. Depending on the type 

of cover and accessory, it may not 

be possible to charge. When 

charging is not performed even with 

the portable device placed on the 

charge area, remove the cover and 

accessories.

While charging, noise enters 

the AM radio

Turn off the wireless charger and 

confirm that the noise has 

decreased. If the noise 

decreases, continuously pushing 

the power supply switch of the 

wireless charger for 2 seconds, 

the frequency of the charger can 

be changed and the noise can be 

reduced. Also, on that occasion, 

the operation indicator light will 

flash orange 2 times.

iPhone’s use a particular fre-

quency for rapid charging. 

Depending on the iOS version, 

rapid charging may not be per-

formed while switching frequen-

cies.

Portable device 
misaligned:
The charging coil 
in the portable 
device moved 
outside of the 
charge area, and 
so the abnormal 
heating preven-
tion function of 
the charging coil 
operated

Remove the por-
table device from 
the charging 
tray, check that 
the operation 
indicator light 
switches back to 
green, and then 
once again place 
the device near 
the center of the 
charging tray. If 
there is a case or 
cover attached 
to the portable 
device, remove 
it.

Suspected 

causes

Handling method

Safety shut-
down resulting 
when the tem-
perature within 
the wireless 
charger 
exceeded the set 
value

Stop charging, 
remove the por-
table device from 
the charging 
tray, wait for the 
temperature to 
drop, and then 
start charging 
again.

Suspected 

causes

Handling method

543

6-4. Using the other interior features

6

Interior

 featur

es

Important points of the wireless 

charger

If the electronic key cannot be 

detected within the vehicle inte-

rior, charging cannot be done. 

When the door is opened and 

closed, charging may be tempo-

rarily suspended.

When charging, the wireless 

charging device and portable 

device will get warmer, however 

this is not a malfunction.

When a portable device gets 

warm while charging, charging 

may stop due to the protection 

function on the portable device 

side. In this case, when the tem-

perature of the portable device 

drops significantly, charge again.

The fan may start operating to lower 

the temperature inside the wireless 

charger, however this is not a mal-

function.

Operation sounds

A buzzing noise may be heard when 

pressing the power supply switch to 

turn the power supply on, when 

turning the engine switch to ACC or 

ON while the wireless charger 

power supply is on, or when detect-

ing a portable device. However, this 

is not a malfunction.

WARNING

Caution while driving

When charging a portable device, 

for safety reasons, the driver 

should not operate the main part 

of the portable device while driv-

ing.

Caution while in motion

Do not charge lightweight devices 

such as wireless headphones 

while in motion. These devices 

are very light and may be ejected 

from the charging tray, which may 

lead to unforeseen accidents.

Caution regarding interfer-

ence with electronic devices

People with implantable cardiac 

pacemakers, cardiac resynchroni-

zation therapy-pacemakers or 

implantable cardioverters, as well 

as any other electrical medical 

device, should consult their physi-

cian about the usage of the wire-

less charger.

To prevent malfunctions or 

burns

Observe the following precau-

tions. Failure to do so may result 

in a equipment failure and dam-

age, catch fire, burns due to over-

heat or electric shock.

Do not insert any metallic 

objects between the charge 

area and the portable device 

while charging

Do not attach an aluminum 

sticker or other metallic object to 

the charge area

Do not attach an aluminum 

sticker or other metallic object to 

the side of the portable device 

(or to its case or cover) that 

touches the charge area

Do not use the charging tray as 

a small storage space

Do not subject to a strong force 

or impact

Do not disassemble, modify or 

remove

Do not charge devices other 

than specified portable devices

Keep away from magnetic items

Do not charge devices if the 

charge area is covered in dust

Do not cover with a cloth or sim-

ilar material

544

6-4. Using the other interior features

NOTICE

Situations in which the func-

tion may not operate normally

Devices may not be charged nor-

mally in the following situations.

The portable device is fully 

charged

The portable device is being 

charged with a cable connected

There is foreign matter between 

the charge area and portable 

device

Charging has caused the porta-

ble device to heat up

The temperature around the 

charging tray is 95°F (35°C) or 

higher, such as in extreme heat

The portable device is placed 

with its charging side facing up

The portable device is placed in 

an area misaligned from the 

charge area

The portable device is larger 

than the charging tray

A foldable and portable device 

is placed outside the charge 

area

The vehicle is in an area where 

strong electrical waves or noise 

are emitted, such as near a tele-

vision tower, power plant, gaso-

line station, broadcasting 

station, large display, airport, 

etc.

Any of the following objects that 

is 0.08 in (2 mm) or thicker is 

between the charging side of 

the portable device and the 

charge area

• A card that has metal on it, such 

as aluminum foil, etc.

• A pack of cigarettes that 

includes aluminum foil

• A wallet or bag that is made of 

metal

• Coins

• A heating pad

• CDs, DVDs or other media

• A metal accessory

• A case or cover made of metal

Electric wave type wireless 

remote controls are being used 

nearby

2 or more portable devices are 

placed on the charging tray at 

the same time

If charging is abnormal or the 

operation indicator light contin-

ues to flash for any other reason, 

the wireless charger may be mal-

functioning. Contact your Toyota 

dealer.

To prevent malfunctions and 

data corruptions

When charging, bringing a 

credit, or other magnetic card, 

or magnetic storage media 

close to the charge area may 

clear any stored data due to 

magnetic influence. Also, do not 

bring a wristwatch or other pre-

cision instrument close to the 

charge area since doing so may 

cause it to malfunction.

545

6-4. Using the other interior features

6

Interior

 featur

es

Fold down the armrest for use.

An assist grip installed on the 
ceiling can be used to support 
your body while sitting on the 
seat.

The coat hooks are provided 
with the rear assist grips.

NOTICE

Do not charge with a non-con-

tact IC card such as a transpor-

tation system IC card inserted 

between the charging side of a 

portable device and the charge 

area. The IC chip may become 

extremely hot and damage the 

portable device or IC card. Be 

especially careful not to charge 

a portable device inside a case 

or cover with a non-contact IC 

card attached.

Do not leave portable devices 

inside the vehicle. The inside of 

the vehicle can become hot in 

extreme heat, which could 

cause a malfunction.

If the smartphone OS has 

been updated

If the smartphone OS has been 

updated to a newer version, its 

charging specifications may have 

changed significantly. For details, 

check the information on the man-

ufacturer’s website.

To prevent battery discharge

Do not use the wireless charger 

for a long period of time when the 

engine is stopped.

Armrest

NOTICE

To prevent damage to the 

armrest

Do not apply too much load on the 

armrest.

Assist grips

WARNING

Assist grips

Do not use the assist grip when 

getting in or out of the vehicle or 

rising from your seat.

NOTICE

To prevent damage to the 

assist grip

Do not hang any heavy object or 

put a heavy load on the assist 

grip.

Coat hooks

546

6-4. Using the other interior features

*

: If equipped

HomeLink

®

 programming pro-

cedure

The programming procedures can 

also be found at the following URL.
Website: www.homelink.com/toyota

For support, contact customer sup-

port at the following.
Help Line: 1-800-355-3515

The HomeLink

®

 wireless control 

system in your vehicle has 3 
buttons which can be pro-
grammed to operate 3 different 
devices. Refer to the program-
ming methods on the following 
pages to determine the method 
which is appropriate for the 
device.

WARNING

Items that must not be 

hanged on the hook

Do not hang coat hangers or 

other hard or sharp objects on the 

hook. If the SRS curtain shield air-

bags deploy, these items may 

become projectiles, causing death 

or serious injury.

Garage door opener

*

The garage door opener can 
be programmed using the 
HomeLink

®

 to operate 

garage doors, gates, entry 
doors, door locks, home 
lighting systems, security 
systems, and other devices.

System components

547

6-4. Using the other interior features

6

Interior

 featur

es

Vehicles with auto anti-glare 
inside rear view mirror

HomeLink

®

 indicator light

Garage door operation indi-
cators

HomeLink

®

 icon

Illuminates while HomeLink

®

 is 

operating.

Buttons

Vehicles with Digital Rear-
view Mirror

HomeLink

®

 indicator light

Illuminates above each button 
selected.

HomeLink

®

 icon

Garage door operation indi-

cators

HomeLink

®

 logo

Appears while HomeLink

®

 is oper-

ating.
When the HomeLink

®

 button is 

pressed, the logo disappears even 
while the HomeLink

®

 is operating.

Setting icon

Press the menu button to change 
the setting.

Menu buttons

HomeLink

®

 buttons

Codes stored in the HomeLink

®


memory

The registered codes are not 

erased even if the battery cable is 

disconnected.

If learning failed when registering 
a different code to a HomeLink

®


button that already has a code 

registered to it, the already regis-

tered code will not be erased.

A

B

C

D

A

B

C

WARNING

When programming a garage 

door or other remote control 

device

The garage door or other device 

may operate, so ensure people 

and objects are out of danger to 

prevent potential harm.

D

E

F

G

548

6-4. Using the other interior features

Before programming 
HomeLink

®

During programming, it is pos-
sible that garage doors, 
gates, or other devices may 
operate. For this reason, 
make sure that people and 
objects are clear of the 
garage door or other devices 
to prevent injury or other 
potential harm.

It is recommended that a new 
battery be placed in the 
remote control transmitter for 
successful programming.

Garage door opener motors 
manufactured after 1995 may 
be equipped with rolling code 
protection. If this is the case, 

you may need a stepladder or 
other sturdy, safe device to 
reach the “Learn” or “Smart” 
button on the garage door 
opener motor.

Programming HomeLink

®

Steps 

2

 through 

4

 must be per-

formed within 60 seconds, oth-
erwise the HomeLink

®

 indicator 

light will stop flashing and pro-
gramming will not be success-
fully completed.

1

Vehicles with Digital Rear-
view Mirror: Press the 
HomeLink

®

 button or menu 

button

When the HomeLink

®

 button is 

pressed:

Homelink

®

 Training Tutorial will be 

displayed to assist you program-
ming the HomeLink

®

.

When Homelink

®

 Training Tutorial 

is displayed, follow the instructions 

displayed.
When the menu button is pressed:

Press the menu button 

 and 

select the “Set Up >”. Homelink

®


Training Tutorial will be displayed 

to assist you programming the 
HomeLink

®

.

When Homelink

®

 Training Tutorial 

is displayed, follow the instructions 

displayed.

2

Press and release the 
HomeLink

®

 button you want 

to program and check that 
the HomeLink

®

 indicator light 

flashes (orange).

WARNING

Conforming to federal safety 

standards

Do not use the HomeLink

®

 com-

patible transceiver with any 

garage door opener or device that 

lacks safety stop and reverse fea-

tures as required by federal safety 

standards.
This includes any garage door 

that cannot detect an interfering 

object. A door or device without 

these features increases the risk 

of death or serious injury.

When operating or program-
ming HomeLink

®

Never allow a child to operate or 
play with the HomeLink

®

 buttons.

Programming HomeLink

®


Content      ..     31      32      33      34     ..