Toyota RAV4 (2022 year). Manual in english - page 34


  Index      Toyota     Toyota RAV4 (2022 year). Manual in english


Search            copyright infringement  


Content      ..     32      33      34      35     ..


Toyota RAV4 (2022 year). Manual in english - page 34


549

6-4. Using the other interior features

6

Interior

 featur

es

3

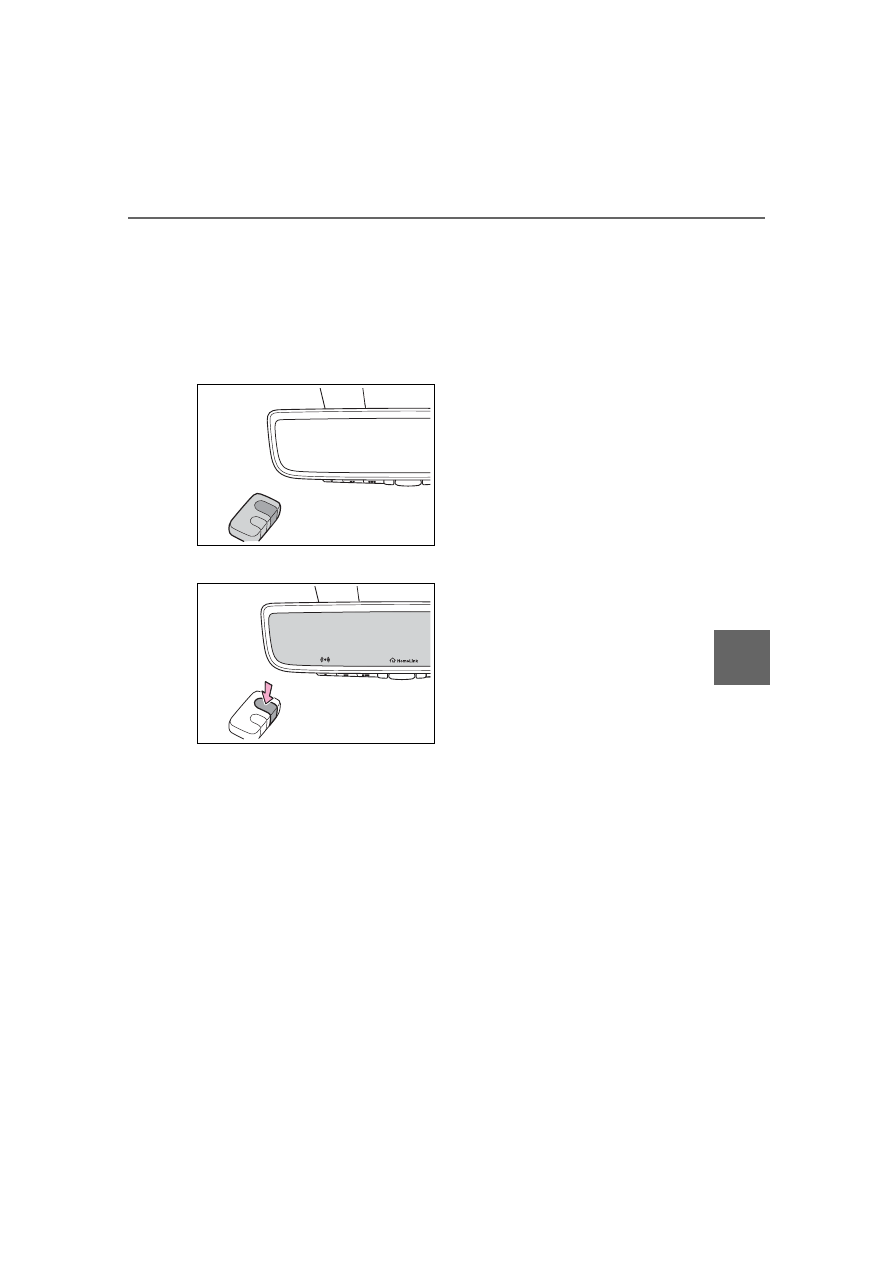
Point the remote control 
transmitter for the device at 
the rear view mirror, 1 to 3 in. 
(25 to 75 mm) from the 
HomeLink

®

 buttons.

Keep the HomeLink

®

 indicator light 

in view while programming.

4

Program a device.

Programming a device other 
than an entry gate (for U.S.A. 
owners)

Press and hold the remote con-
trol transmitter button until the 
HomeLink

®

 indicator light 

changes from slowly flashing 
orange to rapidly flashing green 
(rolling code) or continuously lit 
green (fixed code), then release 
the button.

Programming an entry gate 
(for U.S.A. owners)/Program-
ming a device in the Cana-
dian market

Press and release the remote 
control transmitter button at 2 
second intervals, repeatedly, 
until the HomeLink

®

 indicator 

light changes from slowly flash-
ing orange to rapidly flashing 
(green) (rolling code) or continu-
ously lit (green) (fixed code).

5

Test the HomeLink

®

 opera-

tion by pressing the newly 
programmed button and 
observing the HomeLink

®


indicator light:

HomeLink

®

 indicator light illu-

minates: Programming of a 
fixed code device has com-
pleted. The garage door or 
other device should operate 
when a HomeLink

®

 button is 

pressed and released.

HomeLink

®

 indicator light 

flashes rapidly: The garage 
door opener or other device is 
equipped with a rolling code. 
To complete programming, 
firmly press and hold the 
HomeLink

®

 button for 2 sec-

onds then release it.

If the garage door or other 
device does not operate, pro-
ceed to “Programming a roll-
ing code system”.

550

6-4. Using the other interior features

6

Repeat the steps above to 
program another device for 
any of the remaining 
HomeLink

®

 buttons.

Programming a rolling code 
system

Two or more people may be 
needed to complete rolling code 
programming.

1

Locate the “Learn” or “Smart” 
button on the garage door 
opener motor in the garage.

This button can usually be found 

where the hanging antenna wire is 

attached to the unit. The name and 

color of the button may vary by 

manufacturer. Refer to the owner’s 

manual supplied with the garage 

door opener motor for details.

2

Press and release the 
“Learn” or “Smart” button.

Perform 

3

 within 30 seconds after 

performing 

2

.

3

Press and hold the desired 
HomeLink

®

 button (inside the 

vehicle) for 2 seconds and 
release it. Repeat this 
sequence 
(press/hold/release) up to 3 
times to complete program-
ming.
If the garage door opener 
motor operates when the 
HomeLink

®

 button is 

pressed, the garage door 
opener motor recognizes the 
HomeLink

®

 signal.

Enabling 2-way communi-
cation with a garage door 
(only available for compati-
ble devices)

When enabled, 2-way communi-
cation allows you to check the 
status of the opening and clos-
ing of a garage door through 
indicators in your vehicle.
2-way communication is only 
available if the garage door 
opener motor used is a compati-
ble device. (To check device 
compatibility, refer to 
www.homelink.com.)

551

6-4. Using the other interior features

6

Interior

 featur

es

1

Within 5 seconds after pro-
gramming the garage door 
opener has been completed, 
if the garage door opener 
motor is trained to 
HomeLink

®

, both garage 

door operation indicators will 
flash rapidly (green) and the 
light on the garage door 
opener motor will blink twice, 
indicating that 2-way commu-
nication is enabled.

If the indicators do not flash, per-

form 

2

 and 

3

 within the first 10 

presses of the HomeLink

®

 button 

after programming has been com-

pleted.

2

Press a programmed 
HomeLink

®

 button to oper-

ate a garage door.

3

Within 1 minute of pressing 
the HomeLink

®

 button, after 

the garage door operation 
has stopped, press the 
“Learn” or “Smart” button on 
the garage door opener 
motor. Within 5 seconds of 
the establishment of 2-way 
communication with the 
garage door opener, both 
garage door operation indica-
tors in the vehicle will flash 
rapidly (green) and the light 
on the garage door opener 
motor will blink twice, indicat-
ing that 2-way communica-
tion is enabled.

Reprogramming a single 
HomeLink

®

 button

When the following procedure is 
performed, buttons which 
already have devices registered 
to them can be overwritten:

1

Press and hold the desired 
HomeLink

®

 button.

2

When the HomeLink

®

 indica-

tor starts flashing orange, 
release the HomeLink

®

 but-

ton and perform “Program-
ming HomeLink

®

” 

1

 (it takes 

20 seconds for the 
HomeLink

®

 indicator to start 

flashing).

Before programming

Install a new battery in the trans-

mitter.

The battery side of the transmitter 

must be pointed away from the 
HomeLink

®

 buttons.

Press the appropriate 
HomeLink

®

 button. The 

HomeLink

®

 indicator light 

should turn on.
The status of the opening and 
closing of a garage door is 
shown by the garage door oper-
ation indicators.

Operating HomeLink

®

552

6-4. Using the other interior features

Vehicles with auto anti-glare 
inside rear view mirror

Opening

Closing

Vehicles with Digital Rear-
view Mirror

Opening

Closing

This function is only available if the 
garage door opener motor used is a 
compatible device. (To check 
device compatibility, refer to 
www.homelink.com.)

The indicators can operate 
within approximately 820 ft. (250 
m) of the garage door. However, 
if there are obstructions 
between the garage door and 
the vehicle, such as houses and 
trees, feedback signals from the 
garage door may not be 
received.
To recall the previous door oper-
ation status, press and release 
either HomeLink

®

 buttons 


and 

 or 

 and 

 (vehicles 

with auto anti-glare inside rear 
view mirror), 

 and 


or 

 and 

 (vehicles 

with Digital Rear-view Mirror) 
simultaneously. The last 
recorded status will be dis-
played for 3 seconds.

Press and hold the 2 outside 
buttons for 10 seconds until the 
HomeLink

®

 indicator light 

changes from continuously lit 
(orange) to rapidly flashing 
(green).

Color

Status

Orange (flash-

ing)

Currently open-

ing/closing

A

B

A

B

Green

Opening/closing 

has completed

Red (flashing)

Feedback sig-

nals cannot be 

received

Erasing the entire 
HomeLink

®

 memory (all 

three codes)

Color

Status

553

6-4. Using the other interior features

6

Interior

 featur

es

If you sell your vehicle, be sure to 
erase the programs stored in the 
HomeLink

®

 memory.

555

7

7

Maintena

nce
 a

nd ca

re

Maintenance and care

7-1. Maintenance and care

Cleaning and protecting the 

vehicle exterior ..........

556

Cleaning and protecting the 

vehicle interior ...........

559

7-2. Maintenance

Maintenance requirements

..................................

562

General maintenance..

563

Emission inspection and 

maintenance (I/M) pro-
grams ........................

566

7-3. Do-it-yourself mainte-

nance

Do-it-yourself service pre-

cautions.....................

567

Hood ...........................

569

Positioning a floor jack

570

Engine compartment...

572

Tires ............................

579

Tire inflation pressure .

588

Wheels ........................

590

Air conditioning filter....

592

Wiper insert replacement

..................................

594

Wireless remote con-

trol/electronic key battery

..................................

597

Checking and replacing 

fuses..........................

600

Headlight aim ..............

603

Light bulbs...................

604

556

7-1. Maintenance and care

7-1.Maintenance and care

Working from top to bottom, 
liberally apply water to the 
vehicle body, wheel wells and 
underside of the vehicle to 
remove any dirt and dust.

Wash the vehicle body using 
a sponge or soft cloth, such 
as a chamois.

For hard-to-remove marks, 
use car wash soap and rinse 
thoroughly with water.

Wipe away any water.

Wax the vehicle when the 
waterproof coating deterio-
rates.

If water does not bead on a clean 
surface, apply wax when the vehi-
cle body is cool.

Automatic car washes

Before washing the vehicle:

• Fold the mirrors

• Turn off the power back door (if 

equipped)

Start washing from the front of the 
vehicle. Make sure to extend the 
mirrors before driving.

Brushes used in automatic car 

washes may scratch the vehicle 

surface, parts (wheel, etc.) and 

harm your vehicle’s paint.

Rear spoiler may not be washable 

in some automatic car washes. 

There may also be an increased 

risk of damage to vehicle.

High pressure car washes

As water may enter the cabin, do 

not bring the nozzle tip near the 

gaps around the doors or perimeter 

of the windows, or spray these 

areas continuously.

Note for a smart key system (if 

equipped)

If the door handle becomes wet 

while the electronic key is within the 

effective range, the door may lock 

and unlock repeatedly. In that case, 

follow the following correction pro-

cedures to wash the vehicle:

Place the key in a position 6 ft. (2 

m) or more separate from the 

vehicle while the vehicle is being 

washed. (Take care to ensure that 

the key is not stolen.)

Set the electronic key to battery-

saving mode to disable the smart 

key system. (

P.128)

Wheels and wheel ornaments (if 

equipped)

Remove any dirt immediately by 

using a neutral detergent.

Wash detergent off with water 

immediately after use.

To protect the paint from damage, 

make sure to observe the follow-

ing precautions.

• Do not use acidic, alkaline or 

abrasive detergent.

• Do not use hard brushes.

• Do not use detergent on the 

wheels when they are hot, such 

as after driving or parking in hot 

weather.

For vehicles with matte painted 

wheels: The wheels are not main-

tained in the same way as normal 

aluminum wheels. For details, 

Cleaning and protect-

ing the vehicle exte-

rior

Perform the following to 
protect the vehicle and 
maintain it in prime condi-
tion:

Cleaning instructions

557

7-1. Maintenance and care

7

Maintena

nce
 a

nd ca

re

contact your Toyota dealer.

• When washing the vehicle, use 

water to wash off dirt. If the vehi-

cle is particularly dirty, use a 

diluted neutral detergent and a 

sponge or a soft cloth and wash 

off the dirt by hand.

• Wash detergent off with water 

immediately after use. After using 

detergent, wash the detergent off 

with water and wipe the vehicle 

dry with a soft cloth.

For vehicles with matte painted 

wheels: Make sure to observe the 

following precautions to prevent 

damage to the matte paint.

• Do not polish or scrub with dry 

cloths, brushes, etc.

• Do not use detergents containing 

coatings or abrasives.

• If using an automatic car wash, 

make sure it does not include ded-

icated wheel brushes.

• Do not use high-pressure spray 

guns or steam cleaners.

• Do not use detergent on the 

wheels when they are hot, such 

as after driving or parking in hot 

weather.

Brake pads and calipers

Rust may form if the vehicle is 

parked with wet brake pads or disc 

rotors, causing them to stick. Before 

parking the vehicle after it is 

washed, drive slowly and apply the 

brakes several times to dry the 

parts.

Bumpers

Do not scrub with abrasive cleaners.

Plated portions

If dirt cannot be removed, clean the 

parts as follows:

Use a soft cloth dampened with 

an approximately 5% solution of 

neutral detergent and water to 

clean the dirt off.

Wipe the surface with a dry, soft 

cloth to remove any remaining 

moisture.

To remove oily deposits, use alco-

hol wet wipes or a similar product.

WARNING

When washing the vehicle

Do not apply water to the inside of 

the engine compartment. Doing 

so may cause the electrical com-

ponents, etc. to catch fire.

When cleaning the windshield 

(vehicles with rain-sensing 

windshield wipers)

Set the wiper switch to off.

If the wiper switch is in “AUTO”, 

the wipers may operate unexpect-

edly in the following situations, 

and may result in hands being 

caught or other serious injuries 

and cause damage to the wiper 

blades.

Off

AUTO

When the upper part of the 

windshield where the raindrop 

sensor is located is touched by 

hand

When a wet rag or similar is 

held close to the raindrop sen-

sor

If something bumps against the 

windshield

If you directly touch the raindrop 

sensor body or if something 

bumps into the raindrop sensor

A

B

558

7-1. Maintenance and care

WARNING

Precautions regarding the 

exhaust pipes

Exhaust gasses cause the 

exhaust pipes to become quite 

hot.
When washing the vehicle, be 

careful not to touch the pipes until 

they have cooled sufficiently, as 

touching hot exhaust pipes can 

cause burns.

Precaution regarding the rear 

bumper with Blind Spot Moni-

tor (if equipped)

If the paint of the rear bumper is 

chipped or scratched, the system 

may malfunction. If this occurs, 

consult your Toyota dealer.

NOTICE

To prevent paint deterioration 

and corrosion on the body 

and components (aluminum 

wheels, etc.)

Wash the vehicle immediately in 

the following cases:

• After driving near the sea coast
• After driving on salted roads
• If coal tar or tree sap is present 

on the paint surface

• If dead insects, insect droppings 

or bird droppings are present on 

the paint surface

• After driving in an area contami-

nated with soot, oily smoke, 

mine dust, iron powder or chem-

ical substances

• If the vehicle becomes heavily 

soiled with dust or mud

• If liquids such as benzene and 

gasoline are spilled on the paint 

surface

If the paint is chipped or 

scratched, have it repaired 

immediately.

To prevent the wheels from cor-

roding, remove any dirt and 

store in a place with low humid-

ity when storing the wheels.

Cleaning the exterior lights

Wash carefully. Do not use 

organic substances or scrub 

with a hard brush.

This may damage the surfaces 

of the lights.

Do not apply wax to the sur-

faces of the lights.

Wax may cause damage to the 

lenses.

When using an automatic car 

wash (vehicles with rain-

sensing windshield wipers)

Set the wiper switch to off posi-

tion.

If the wiper switch is in “AUTO”, 

the wipers may operate and the 

wiper blades may be damaged.

When using a high pressure 

car wash

When washing the vehicle, do 

not let water from the high-pres-

sure washer directly hit the 

camera or the area around the 

camera. Due to the shock from 

the high pressure water, it is 

possible that the device may not 

operate normally.

Do not spray water directly on 

the radar which is equipped 

behind the emblem. Otherwise 

it may cause the device to be 

damaged.

559

7-1. Maintenance and care

7

Maintena

nce
 a

nd ca

re

Remove dirt and dust using a 
vacuum cleaner. Wipe dirty 
surfaces with a cloth damp-
ened with lukewarm water.

If dirt cannot be removed, 
wipe it off with a soft cloth 
dampened with neutral deter-
gent diluted to approximately 
1%.
Wring out any excess water 
from the cloth and thoroughly 
wipe off remaining traces of 
detergent and water.

Shampooing the carpets

There are several commercial foam-

ing-type cleaners available. Use a 

sponge or brush to apply the foam. 

Rub in overlapping circles. Do not 

use water. Wipe dirty surfaces and 

let them dry. Excellent results are 

obtained by keeping the carpet as 

dry as possible.

Handling the seat belts

Clean with mild soap and lukewarm 

water using a cloth or sponge. Also 

check the belts periodically for 

excessive wear, fraying or cuts.

NOTICE

Do not bring the nozzle tip close 

to boots (rubber or resin manu-

factured cover), or connectors 

or the following parts.

The parts may be damaged if 

they come into contact with 

high-pressure water.

• Traction related parts
• Steering parts
• Suspension parts
• Brake parts

Keep the cleaning nozzle at 

least 11.9 in. (30 cm) away from 

the vehicle body. Otherwise 

resin section, such as moldings 

and bumpers, may be deformed 

and damaged. Also, do not con-

tinuously hold the nozzle in the 

same place.

Do not spray the lower part of 

the windshield continuously. If 

water enters the air conditioning 

system intake located near the 

lower part of the windshield, the 

air conditioning system may not 

operate correctly.

Do not wash the underside of 

the vehicle using a high pres-

sure car washer.

Cleaning and protect-

ing the vehicle interior

Perform cleaning in a man-
ner appropriate to each 
component and its material.

Protecting the vehicle 
interior

560

7-1. Maintenance and care

WARNING

Water in the vehicle

Do not splash or spill liquid in 

the vehicle.

Doing so may cause electrical 

components, etc., to malfunc-

tion or catch fire.

Do not get any of the SRS com-

ponents or wiring in the vehicle 

interior wet. 

(

P.36)

An electrical malfunction may 

cause the airbags to deploy or 

not function properly, resulting 

in death or serious injury.

Vehicles with wireless charger:

Do not let the wireless charger 

(

P.545) get wet. Failure to do 

so may cause the charger to 

become hot and cause burns or 

could cause electric shock 

resulting in death or serious 

injury.

Cleaning the interior (espe-

cially instrument panel)

Do not use a polish wax or polish 

cleaner. The instrument panel 

may reflect off the windshield, 

obstructing the driver’s view and 

leading to an accident, resulting in 

death or serious injury.

NOTICE

Cleaning detergents

Do not use the following types 

of detergent, as they may dis-

color the vehicle interior or 

cause streaks or damage to 

painted surfaces:

• Non-seat portions: Organic sub-

stances such as benzene or 

gasoline, alkaline or acidic solu-

tions, dye, and bleach

• Seats: Alkaline or acidic solu-

tions, such as thinner, benzene, 

and alcohol

Do not use a polish wax or pol-

ish cleaner. The instrument 

panel’s or other interior part’s 

painted surface may be dam-

aged.

Preventing damage to leather 

surfaces

Observe the following precautions 

to avoid damage to and deteriora-

tion of leather surfaces:

Remove any dust or dirt from 

leather surfaces immediately.

Do not expose the vehicle to 

direct sunlight for extended peri-

ods of time. Park the vehicle in 

the shade, especially during 

summer.

Do not place items made of 

vinyl, plastic, or containing wax 

on the upholstery, as they may 

stick to the leather surface if the 

vehicle interior heats up signifi-

cantly.

Water on the floor

Do not wash the vehicle floor with 

water.

Vehicle systems such as the 

audio system may be damaged if 

water comes into contact with 

electrical components such as the 

audio system above or under the 

floor of the vehicle. Water may 

also cause the body to rust.

When cleaning the inside of 

the windshield

Do not allow glass cleaner to con-

tact the lens. Also, do not touch 

the lens. (

P.222)

561

7-1. Maintenance and care

7

Maintena

nce
 a

nd ca

re

Remove dirt and dust using a 
vacuum cleaner.

Wipe off any excess dirt and 
dust with a soft cloth damp-
ened with diluted detergent.

Use a diluted water solution of 
approximately 5% neutral wool 
detergent.

Wring out any excess water 
from the cloth and thoroughly 
wipe off all remaining traces 
of detergent.

Wipe the surface with a dry, 
soft cloth to remove any 
remaining moisture. Allow the 
leather to dry in a shaded and 
ventilated area.

Caring for leather areas

Toyota recommends cleaning the 

interior of the vehicle at least twice a 

year to maintain the quality of the 

vehicle’s interior.

Remove dirt and dust using a 
vacuum cleaner.

Wipe it off with a soft cloth 
dampened with neutral deter-
gent diluted to approximately 
1%.

Wring out any excess water 
from the cloth and thoroughly 
wipe off remaining traces of 
detergent and water.

NOTICE

Cleaning the inside of the rear 

window

Do not use a glass cleaner to 

clean the rear window, as this 

may cause damage to the rear 

window defogger heater wires. 

Use a cloth dampened with 

lukewarm water to gently wipe 

the window clean. Wipe the win-

dow in strokes running parallel 

to the heater wires.

Be careful not to scratch or 

damage the heater wires.

Cleaning the leather areas

Cleaning the synthetic 
leather areas

562

7-2. Maintenance

7-2.Maintenance

Repair and replacement

It is recommended that genuine 

Toyota parts be used for repairs to 

ensure performance of each sys-

tem. If non-Toyota parts are used in 

replacement or if a repair shop other 

than a Toyota dealer performs 

repairs, confirm the warranty cover-

age.

Allow inspection and repairs to 

be performed by a Toyota 

dealer

Toyota technicians are well-

trained specialists and are kept up 

to date with the latest service 

information. They are well 

informed about the operations of 

all systems on your vehicle.

Keep a copy of the repair order. It 

proves that the maintenance that 

has been performed is under war-

ranty coverage. If any problem 

should arise while your vehicle is 

under warranty, your Toyota 

dealer will promptly take care of it.

General maintenance should be 
performed on a daily basis. This 
can be done by yourself or by a 
Toyota dealer.

Scheduled maintenance should 
be performed at specified inter-
vals according to the mainte-
nance schedule.

For details about maintenance 
items and schedules, refer to the 
“Scheduled Maintenance Guide” or 
“Owner’s Manual Supplement”.

Maintenance require-

ments

To ensure safe and econom-
ical driving, day-to-day care 
and regular maintenance 
are essential. It is the 
owner’s responsibility to 
perform regular checks. 
Toyota recommends the fol-
lowing maintenance:

WARNING

If your vehicle is not properly 

maintained

Improper maintenance could 

result in serious damage to the 

vehicle and possible death or seri-

ous injury.

Handling of the battery

Engine exhaust, some of its 

constituents, and a wide variety 

of automobile components con-

tain or emit chemicals known to 

the State of California to cause 

cancer and birth defects and 

other reproductive harm. Work 

in a well ventilated area.

Oils, fuels and fluids contained 

in vehicles as well as waste pro-

duced by component wear con-

tain or emit chemicals known to 

the State of California to cause 

cancer and birth defects or 

other reproductive harm. Avoid 

exposure and wash any 

affected area immediately.

Battery posts, terminals and 

related accessories contain lead 

and lead compounds which are 

known to cause brain damage. 

Wash your hands after han-

dling. (

P.577)

General maintenance

Scheduled maintenance

563

7-2. Maintenance

7

Maintena

nce
 a

nd ca

re

Resetting the message indicat-

ing maintenance is required

After the required maintenance is 

performed according to the mainte-

nance schedule, please reset the 

reminder light or message.

To reset the reminder light or mes-

sage, follow the procedure 

described below:

1

Press 

 or 

 of the meter 

control switches and select 


on the multi-information display.

2

Press 

 or 

 of the meter 

control switches and select 

“Vehicle Settings”. Then press 
and hold 

.

3

Press 

 or 

 of the meter 

control switches and select 

“Scheduled Maintenance”. Then 
press 

.

4

Select “Yes” and press 

.

You can perform some mainte-
nance procedures by yourself. 
Please be aware that do-it-your-
self maintenance may affect 
warranty coverage.

The use of Toyota Repair Manuals 
is recommended.
For details about warranty cover-
age, refer to the separate “Owner’s 
Warranty Information Booklet” or 
“Owner’s Manual Supplement”.

Do-it-yourself mainte-
nance

General maintenance

Listed below are the general 
maintenance items that 
should be performed at the 
intervals specified in the 
“Owner’s Warranty Informa-
tion Booklet” or “Owner’s 
Manual Supplement/Sched-
uled Maintenance Guide”. It 
is recommended that any 
problem you notice should 
be brought to the attention 
of your Toyota dealer or 
qualified service shop for 
advice.

WARNING

If the engine is running

Turn the engine off and ensure 

that there is adequate ventilation 

before performing maintenance 

checks.

Engine compartment

Items

Check points

Battery

Check the connec-
tions. (

P.577)

Brake fluid

Is the brake fluid at 
the correct level? 
(

P.575)

Engine coolant

Is the engine cool-
ant at the correct 
level? (

P.574)

Engine oil

Is the engine oil at 
the correct level? 
(

P.572)

564

7-2. Maintenance

Exhaust sys-
tem

There should not 
be any fumes or 
strange sounds.

Radiator/con-
denser

The radiator and 
condenser should 
be free from for-
eign objects. 
(

P.575)

Washer fluid

Is there sufficient 
washer fluid? 
(

P.577)

Vehicle interior

Items

Check points

Accelerator 
pedal

• The accelerator 

pedal should 
move smoothly 
(without uneven 
pedal effort or 
catching).

Automatic 
transmission 
“Park” mecha-
nism

• When parked on 

a slope and the 
shift position is in 
P, is the vehicle 
securely 
stopped?

Brake pedal

• Does the brake 

pedal move 
smoothly?

• Does the brake 

pedal have 
appropriate 
clearance from 
the floor?

• Does the brake 

pedal have the 
correct amount 
of free play?

Items

Check points

Brakes

• The vehicle 

should not pull to 
one side when 
the brakes are 
applied.

• The brakes 

should work 
effectively.

• The brake pedal 

should not feel 
spongy.

• The brake pedal 

should not get 
too close to the 
floor when the 
brakes are 
applied.

Head 
restraints

• Do the head 

restraints move 
smoothly and 
lock securely?

Indica-
tors/buzzers

• Do the indica-

tors and buzzers 
function prop-
erly?

Lights

• Do all the lights 

come on?

• Are the head-

lights aimed cor-
rectly?

Parking brake

• Does the park-

ing brake oper-
ate normally?

• When parked on 

a slope and the 
parking brake is 
on, is the vehicle 
securely 
stopped?

Items

Check points

565

7-2. Maintenance

7

Maintena

nce
 a

nd ca

re

Seat belts

• Do the seat belts 

operate 
smoothly?

• The seat belts 

should not be 
damaged.

Seats

• Do the seat con-

trols operate 
properly?

Steering wheel

• Does the steer-

ing wheel rotate 
smoothly?

• Does the steer-

ing wheel have 
the correct 
amount of free 
play?

• There should not 

be any strange 
sounds coming 
from the steer-
ing wheel.

Vehicle exterior

Items

Check points

Doors

• Do the doors 

operate 
smoothly?

Engine hood

• Does the engine 

hood lock system 
work properly?

Fluid leaks

• There should not 

be any signs of 
fluid leakage 
after the vehicle 
has been parked.

Items

Check points

Tires

• Is the tire infla-

tion pressure 
correct?

• The tires should 

not be damaged 
or excessively 
worn.

• Have the tires 

been rotated 
according to the 
maintenance 
schedule?

• The wheel nuts 

should not be 
loose.

Windshield 
wipers/rear 
window wiper

• The wiper blades 

should not show 
any signs of 
cracking, split-
ting, wear, con-
tamination or 
deformation.

• The wiper blades 

should clear the 
windshield with-
out streaking or 
skipping.

Items

Check points


Content      ..     32      33      34      35     ..