Toyota Hilux (2022 year). Manual in english - page 20
8-2. Steps to take in an emergency
573
Q Passenger detection sensor, seat belt reminder and warning buzzer
O If luggage is placed on the passenger seat, the front passenger detection
sensor or the rear passenger detection sensor (if equipped) may cause the
warning light to flash and the warning buzzer to sound even if a passenger
is not sitting in the seat.
O If a cushion is placed on the seat, the sensor may not detect a passenger,
and the warning light may not operate properly.
Q If the malfunction indicator lamp comes on while driving
For some models, malfunction indicator lamp will come on if the fuel tank
becomes completely empty. If the fuel tank is empty, refuel the vehicle imme-
diately. The malfunction indicator lamp will go off after several trips.
If the malfunction indicator lamp does not go off, contact any authorized
Toyota retailer or Toyota authorized repairer, or any reliable repairer as soon
as possible.
Q Warning buzzer
In some cases, the buzzer may not be heard due to being in a noisy location
or audio sound.
8
574
8-2. Steps to take in an emergency
WARNING
Q If a warning light comes on or a warning buzzer sounds when a warn-
ing message is shown on the multi-information display (vehicles with
multi-information display)
Check and follow the message shown on the multi-information display. Fail-
ure to do so may result in death or serious injury.
Q If both the ABS and the brake system warning lights remain on
Stop your vehicle in a safe place immediately and contact any authorized
Toyota retailer or Toyota authorized repairer, or any reliable repairer. The
vehicle will become extremely unstable during braking, and the ABS system
may fail, which could cause an accident resulting in death or serious injury.
NOTICE
Q If the malfunction indicator lamp comes on when the boost pressure in
the turbocharger is abnormally high (diesel engine)
Never drive at high speed or race the engine even after the lamp goes off.
Q If the fuel system warning light flashes (diesel engine)
Never drive the vehicle with the warning light flashing. Continued driving
with water accumulated in the fuel filter will damage the fuel injection pump.
8-2. Steps to take in an emergency
575
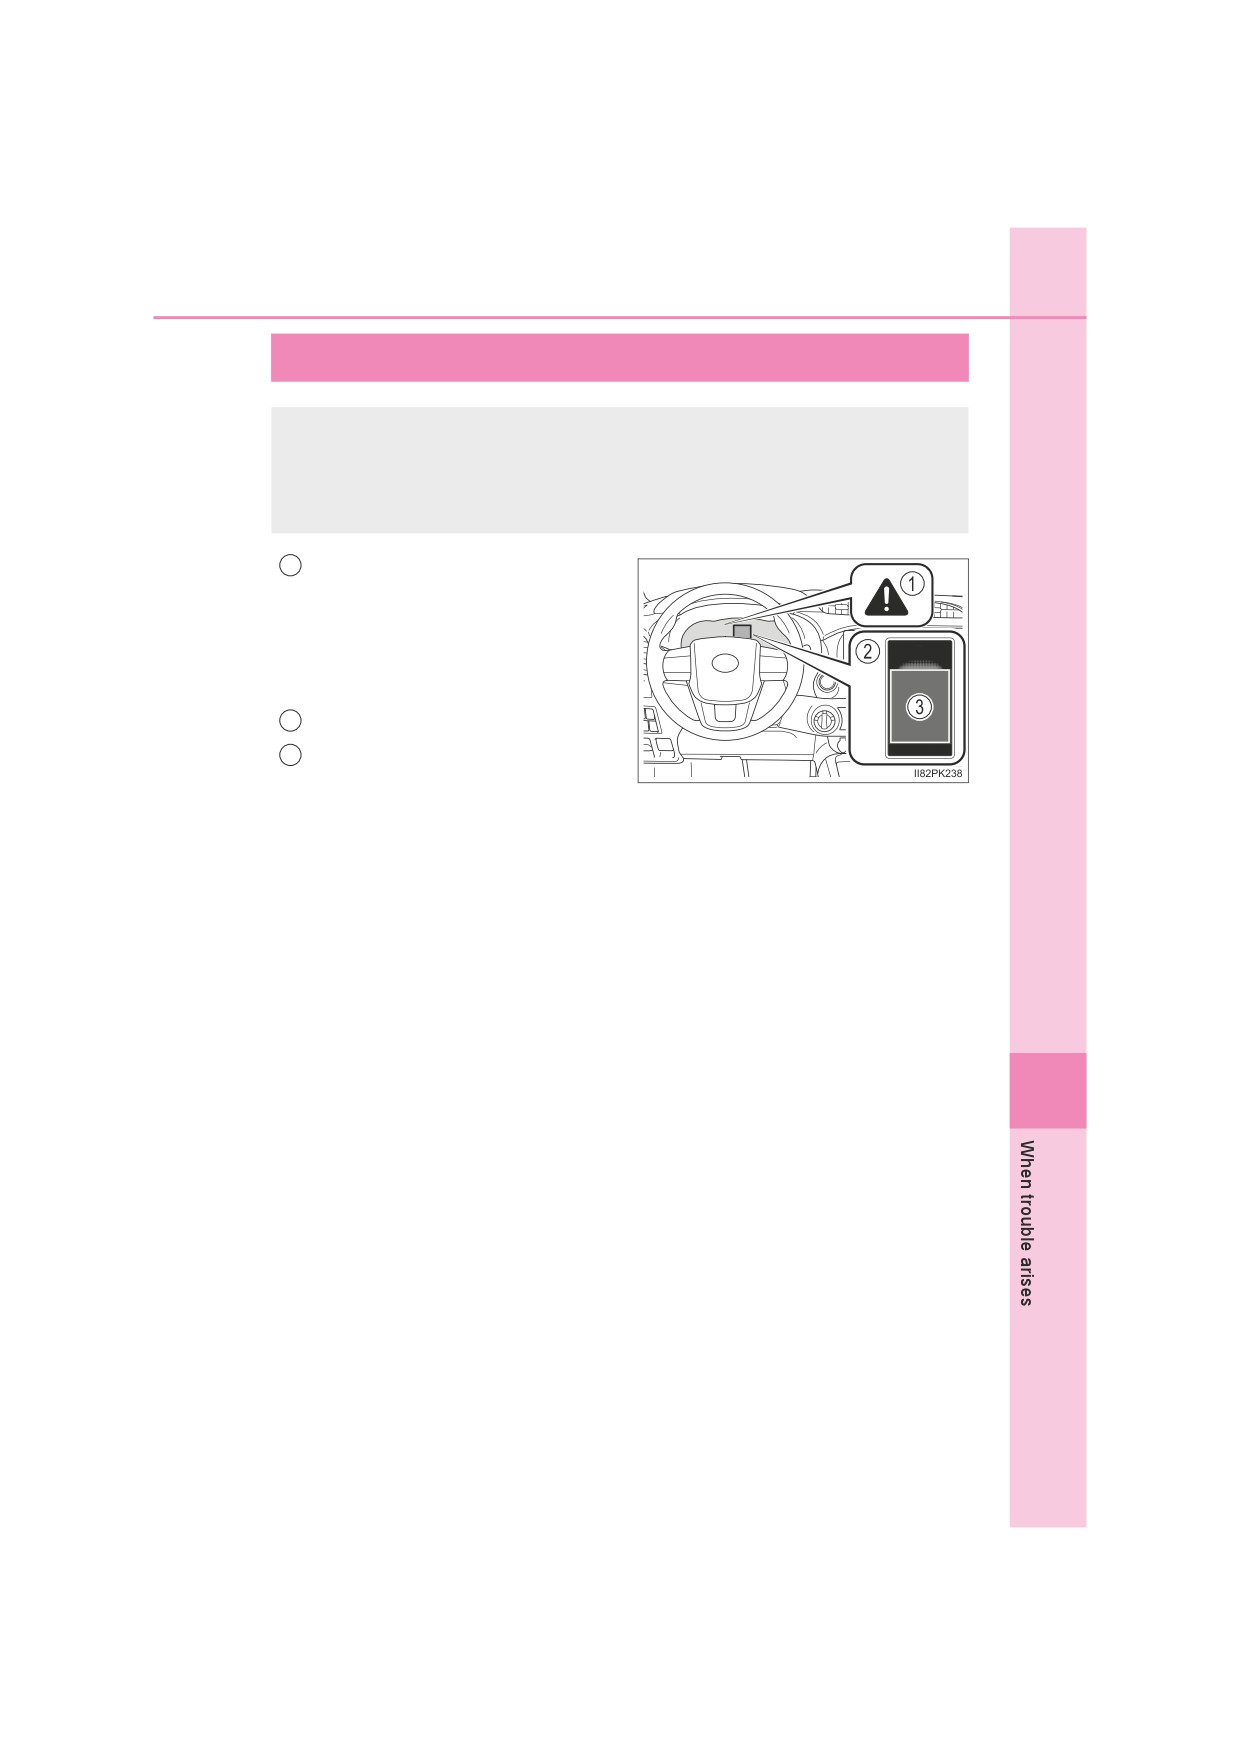
If a warning message is displayed
The multi-information display shows warnings of system mal-
functions, incorrectly performed operations, and messages that
indicate a need for maintenance. When a message is shown,
perform the correction procedure appropriate to the message.
Master warning light
1
The master warning light also
comes on or flashes in order to
indicate that a message is cur-
rently being displayed on the multi-
information display.
2
Multi-information display
3
Handling method
Follow the instructions of the mes-
sage on the multi-information dis-
play.
If any of the warning messages comes on again after the following
actions have been performed, contact any authorized Toyota retailer
or Toyota authorized repairer, or any reliable repairer.
8
: If equipped
576
8-2. Steps to take in an emergency
Messages and warnings
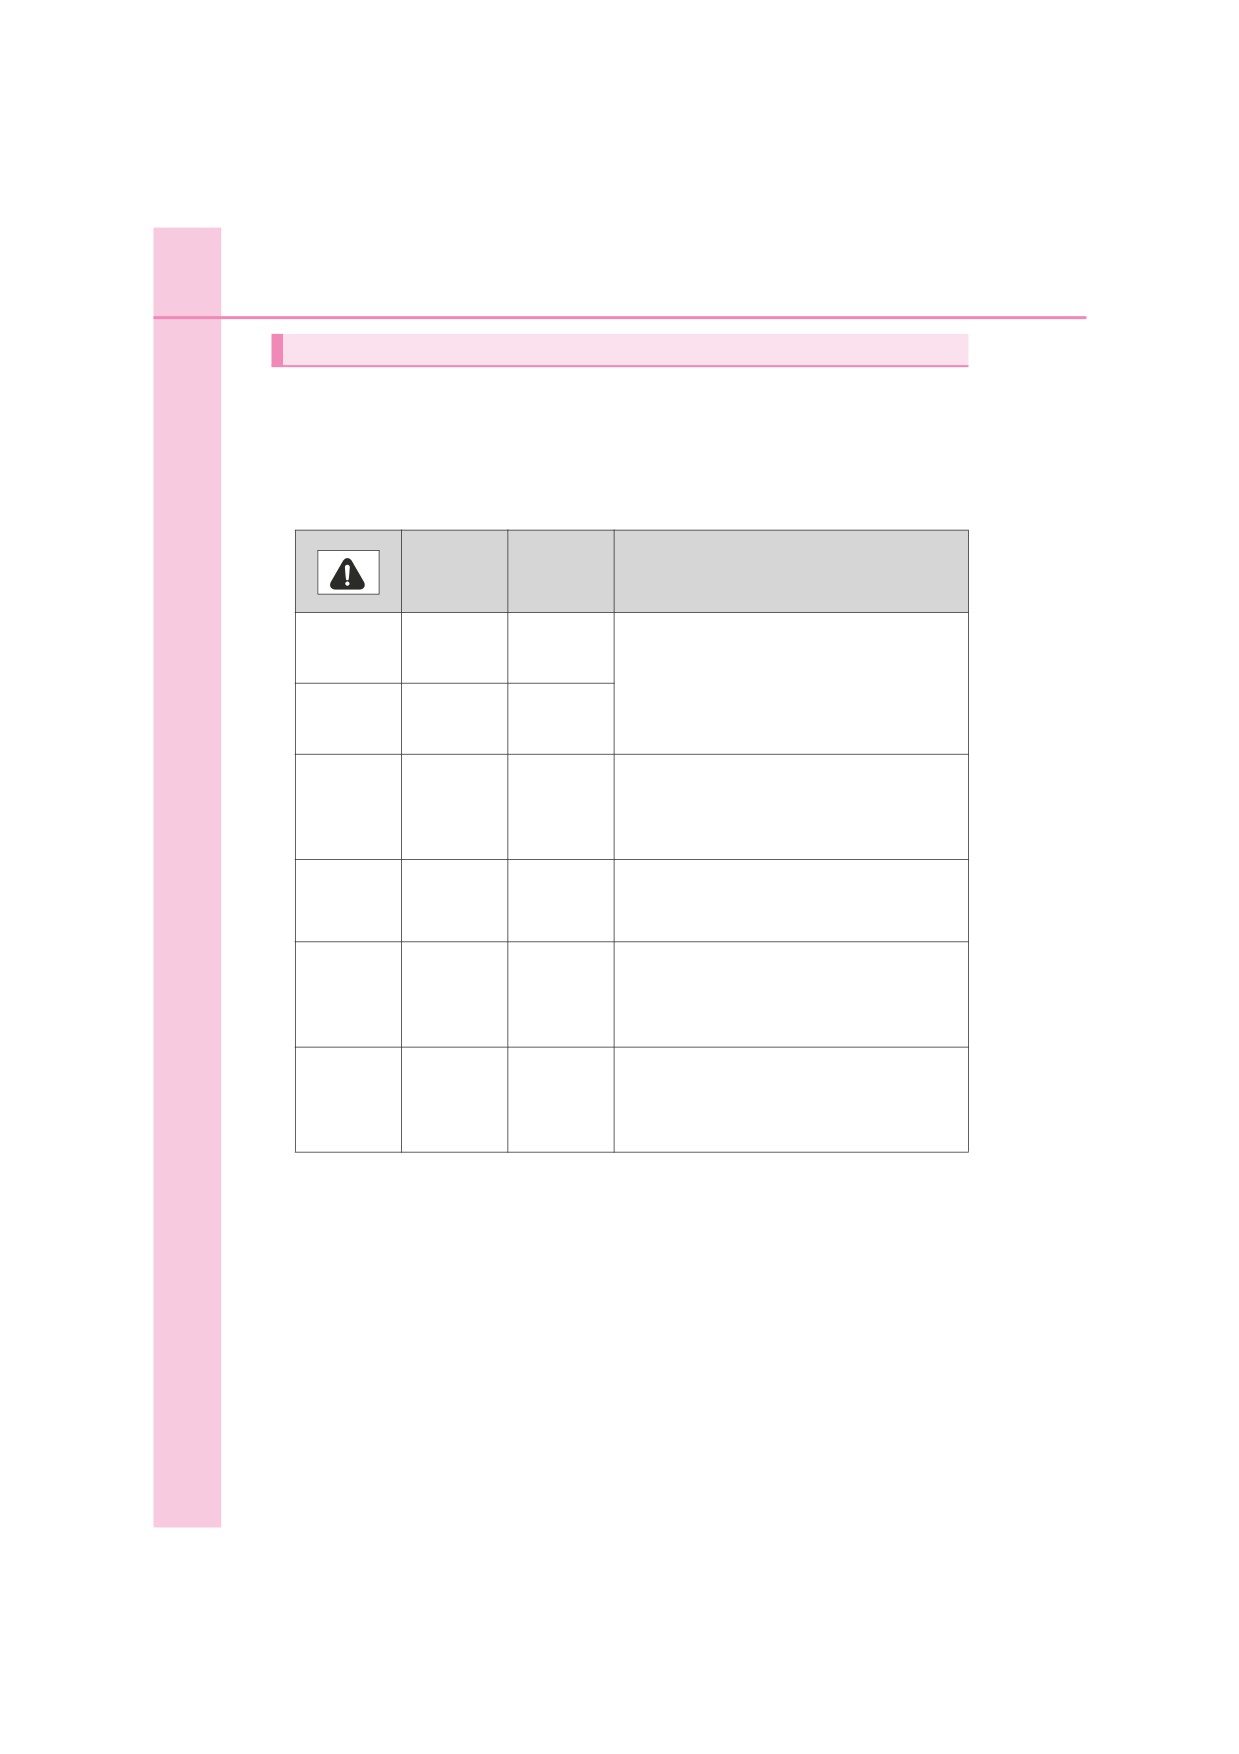
The warning lights and warning buzzers operate as follows depending
on the content of the message. If a message indicates the need for
inspection by a dealer, have the vehicle inspected by any authorized
Toyota retailer or Toyota authorized repairer, or any reliable repairer
immediately.
System
Warning
warning
Warning
buzzer*
light
Indicates an important situation, such
Comes on
Comes on
Sounds
as when a system related to driving is
malfunctioning or that danger may
result if the correction procedure is not
Comes on
Sounds
performed
Indicates an important situation, such
Comes on
as when the systems shown on the
Sounds
or flashes
multi-information display may be mal-
functioning
Indicates a situation, such as when
Flashes
Sounds
damage to the vehicle or danger may
result
Indicates a condition, such as mal-
Does not
function of electrical components, their
Comes on
sound
condition, or indicates the need for
maintenance
Indicates a situation, such as when an
Does not
operation has been performed incor-
Flashes
sound
rectly, or indicates how to perform an
operation correctly
The operation of the warning lights and warning buzzers may differ
from those stated. In this case, perform the correction procedure
according to the displayed message.
*: A buzzer sounds the first time a message is shown on the multi-informa-
tion display.
8-2. Steps to take in an emergency
577
Q Warning messages
The warning messages explained below may differ from the actual messages
according to operation conditions and vehicle specifications.
Q If a message about an operation is shown
OIf a message about an operation of the engine switch is shown
An instruction for operation of the engine switch is shown when the incor-
rect procedure for starting the engine is performed or the engine switch is
operated incorrectly. Follow the instructions shown on the multi-information
display to operate the engine switch again.
O If a message about a shift lever operation is shown
To prevent the shift lever from being operated incorrectly or the vehicle from
moving unexpectedly, a message that requires shifting the shift lever may
be shown on the multi-information display. In that case, follow the instruc-
tion of the message and shift the shift lever.
O If a message or image about an open/close state of a part or replenishment
of a consumable is shown
Confirm the part indicated by the multi-information display or a warning
light, and then perform the coping method such as closing the open door or
replenishing a consumable.
Q If
is shown
The engine oil pressure is too low. (This warning message may be displayed
if the vehicle is stopped on a slope. Move the vehicle to a level surface and
check to see if the message goes off.)
Immediately stop the vehicle in a safe place and contact any authorized
Toyota retailer or Toyota authorized repairer, or any reliable repairer. Continu-
ing to drive the vehicle may be dangerous.
Q If “Accelerator and Brake Pedals Pressed Simultaneously” is shown
The accelerator and brake pedal are being depressed simultaneously.
(P. 195)
Release the accelerator pedal and depress the brake pedal.
8
Q If “Windshield washer fluid low” is shown
The washer fluid level is low.
Add washer fluid. (P. 498)
578
8-2. Steps to take in an emergency
Q If “Oil maintenance required soon” is shown
The engine oil is scheduled to be changed.
Check the engine oil, and change if necessary. After changing the engine oil,
the oil change system should be reset. (P. 491)
For Russia, Armenia, Ukraine, Byelarus, Moldova, Bosnia Herzegovina, Mon-
tenegro, Serbia and Macedonia: You have forgotten to reset the oil change
system. Change the engine oil in accordance with the maintenance schedule.
Q If “Oil maintenance required” is shown
The engine oil is scheduled to be changed.
Check and change the engine oil, and oil filter by any authorized Toyota
retailer or Toyota authorized repairer, or any reliable repairer. After changing
the engine oil, the oil change system should be reset. (P. 491)
For Russia, Armenia, Ukraine, Byelarus, Moldova, Bosnia Herzegovina, Mon-
tenegro, Serbia and Macedonia: You have forgotten to reset the oil change
system. Change the engine oil in accordance with the maintenance schedule.
Q If “Differential oil temp high Shift to 2WD mode Cooling time required” or
“Differential oil temp high Cooling time required” is shown
The differential oil temperature is too high.
Turn the front-wheel drive control switch to H2, and reduce the vehicle speed
or stop the vehicle in a safe place. (P. 331)
Q If “Engine oil level low Add or replace” is shown
The engine oil level is low. (This warning message may be displayed if the
vehicle is stopped on a slope. Move the vehicle to a level surface and check
to see if the message goes off.)
Check the level of the engine oil and add or replace oil if necessary.
(P. 479)
Q If “Power turned off to save battery” is shown
Power was turned off due to the automatic power off function.
Next time when starting the engine, increase the engine speed slightly and
maintain that level for approximately 5 minutes to recharge the battery.
Q If “DPF full Manual regeneration required See owner’s manual” is shown
The deposit collected in the filter needs to be regenerated. (P. 371)
Q If “DPF regeneration in progress” is shown
Regeneration is being automatically carried out by the DPF system.
(P. 370)
8-2. Steps to take in an emergency
579
Q If a message that indicates the malfunction of front camera is shown
The following systems may be suspended until the problem shown in the
message is resolved. (P. 271, 566)
O PCS (Pre-Collision System)*
O LDA (Lane Departure Alert With Yaw Assist Function)*
ORSA (Road Sign Assist)*
O Dynamic radar cruise control*
*: If equipped
Q If a message that indicates the malfunction of radar sensor is shown
The following systems may be suspended until the problem shown in the
message is resolved. (P. 271, 566)
O PCS (Pre-Collision System)*
O LDA (Lane Departure Alert With Yaw Assist Function)*
O Dynamic radar cruise control*
*: If equipped
Q If “See owner’s manual” is shown
O If the following messages are shown, follow the instructions accordingly.
•
“Engine Coolant Temp High Stop in a Safe Place” (P. 610)
•
“Transmission fluid temp high” (P. 238)
•
“Water accumulation in fuel filter” (P. 499)
•
“AdBlue Level Low Fill up AdBlue in 2400 km” (P. 502)
•
“AdBlue level Low No start in 800 km Top up AdBlue” (P. 502)
•
“AdBlue empty Unable to Restart Engine Fill up AdBlue” (P. 502)
•
“DPF full” (P. 371)
•
“Front Camera Temporarily Unavailable” (P. 271)
OIf “Smart Entry & Start System malfunction” is shown, this may be a mal-
function.
Immediately have the vehicle inspected by any authorized Toyota retailer or
Toyota authorized repairer, or any reliable repairer.
8
O If “Low Braking Power Stop in a Safe Place” is shown, there may be a mal-
function. Immediately stop the vehicle in a safe place and contact any
authorized Toyota retailer or Toyota authorized repairer, or any reliable
repairer. Continuing to drive the vehicle may be dangerous.
O If the following messages are shown, there may be a malfunction. Immedi-
ately stop the vehicle in a safe place and contact any authorized Toyota
retailer or Toyota authorized repairer, or any reliable repairer.
•
“Charging System Malfunction Stop in a Safe Place”
•
“Oil Pressure Low Stop in a Safe Place”
580
8-2. Steps to take in an emergency
Q If “Radar Cruise Control Temporarily Unavailable See Owner’s Manual”
is shown
The dynamic radar cruise control system is suspended temporarily or until the
problem shown in the message is resolved. (causes and coping methods:
P. 271)
Q If “Radar Cruise Control Unavailable” is shown
The dynamic radar cruise control system cannot be used temporarily. Use the
system when it becomes available again.
Q If “Visit your dealer” is shown
The system or part shown on the multi-information display is malfunctioning.
Have the vehicle inspected by any authorized Toyota retailer or Toyota autho-
rized repairer, or any reliable repairer immediately.
Q Warning buzzer
In some cases, the buzzer may not be heard due to being in a noisy location
or audio sound.
WARNING
Q If a warning light comes on or a warning buzzer sounds when a warn-
ing message is shown
Check and follow the message shown on the multi-information display. Fail-
ure to do so may result in death or serious injury.
NOTICE
Q While the engine oil level warning is shown
Continued engine operation with low engine oil will damage the engine.
Q If “Water accumulation in fuel filter See owner’s manual” is shown
Never drive the vehicle if the warning message is displayed. Continued driv-
ing with water accumulated in the fuel filter will damage the fuel injection
pump.
8-2. Steps to take in an emergency
581
If you have a flat tire
Your vehicle is equipped with a spare tire. The flat tire can be
replaced with the spare tire.
For details about tires: P. 507
WARNING
Q If you have a flat tire
Do not continue driving with a flat tire.
Driving even a short distance with a flat tire can damage the tire and the
wheel beyond repair, which could result in an accident.
Before jacking up the vehicle
O Stop the vehicle in a safe place on a hard, flat surface.
O Set the parking brake.
O Shift the shift lever to P (automatic transmission) or R (manual
transmission).
O Stop the engine.
O Turn on the emergency flashers. (P. 554)
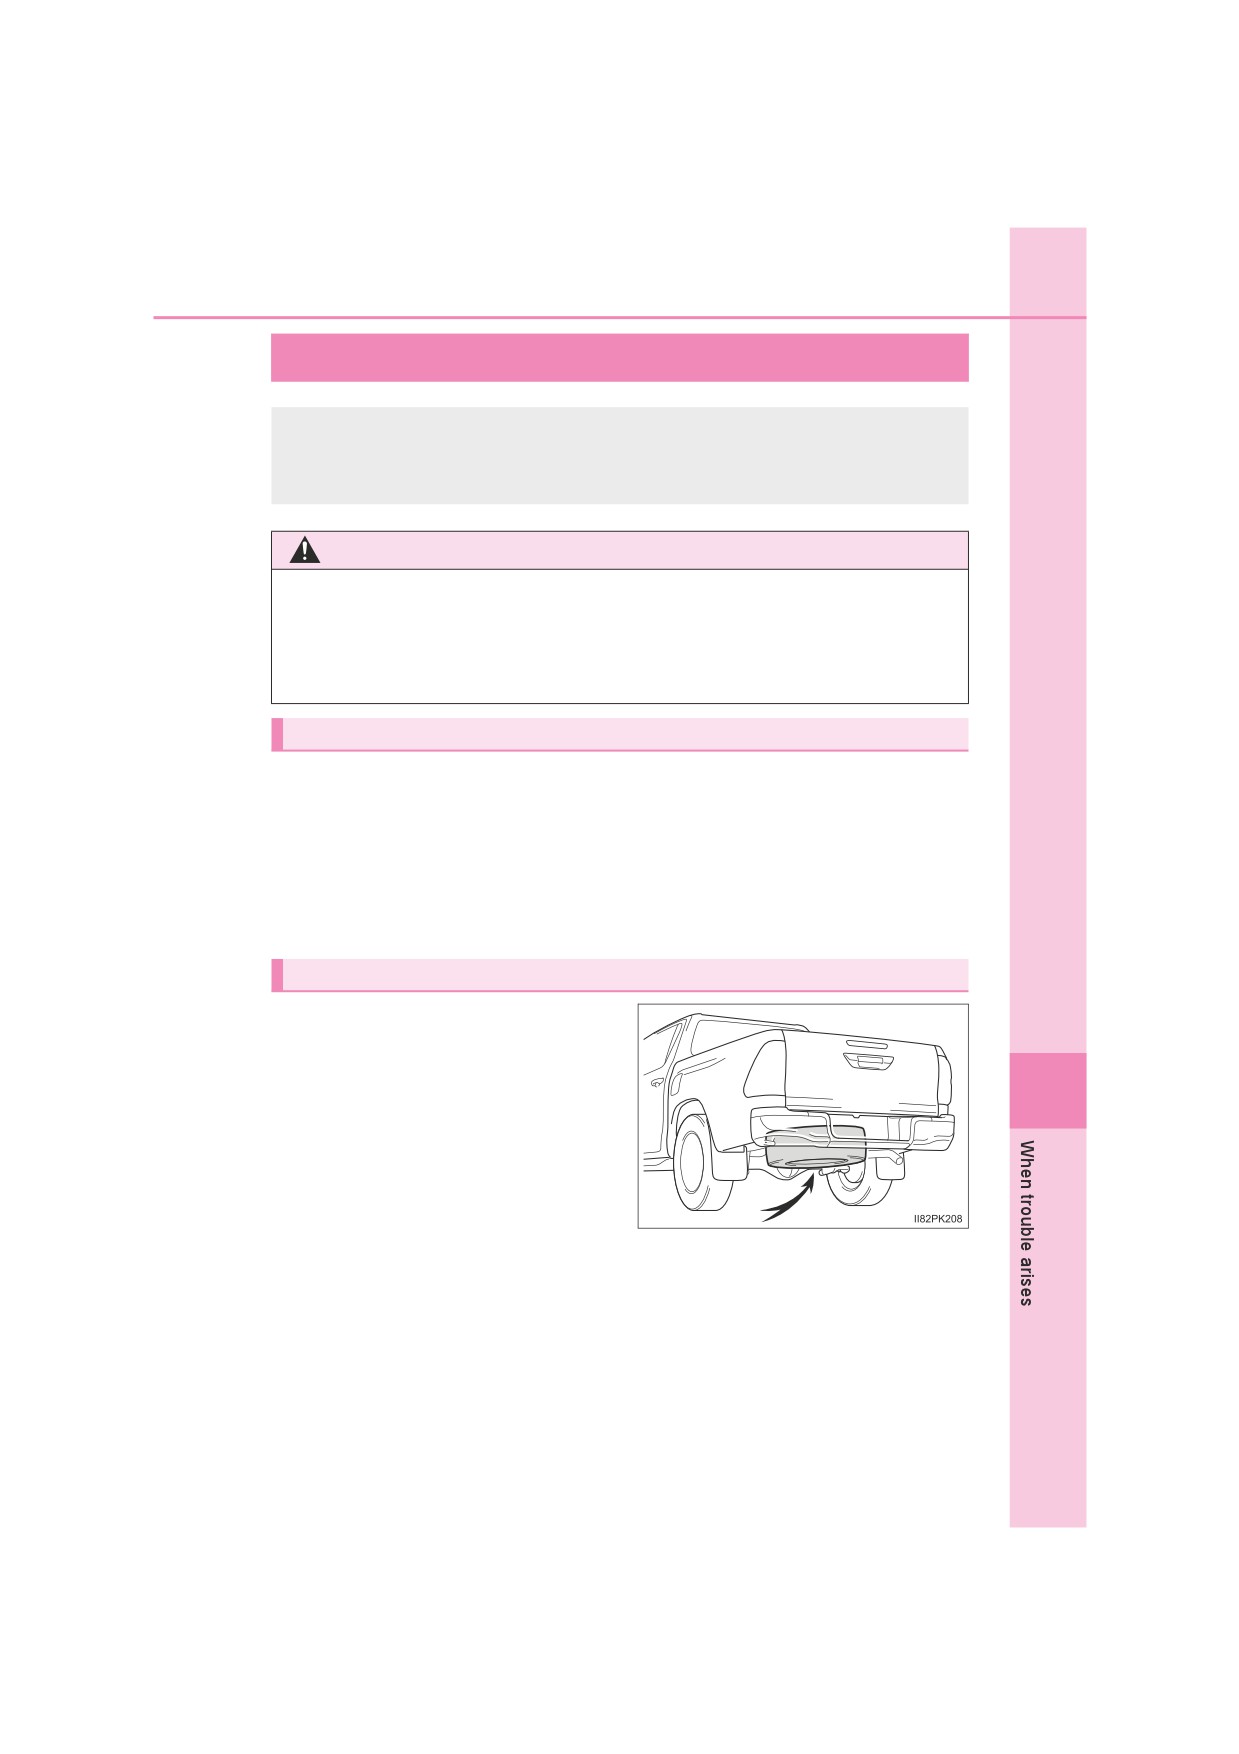
Location of the spare tire
8
582
8-2. Steps to take in an emergency
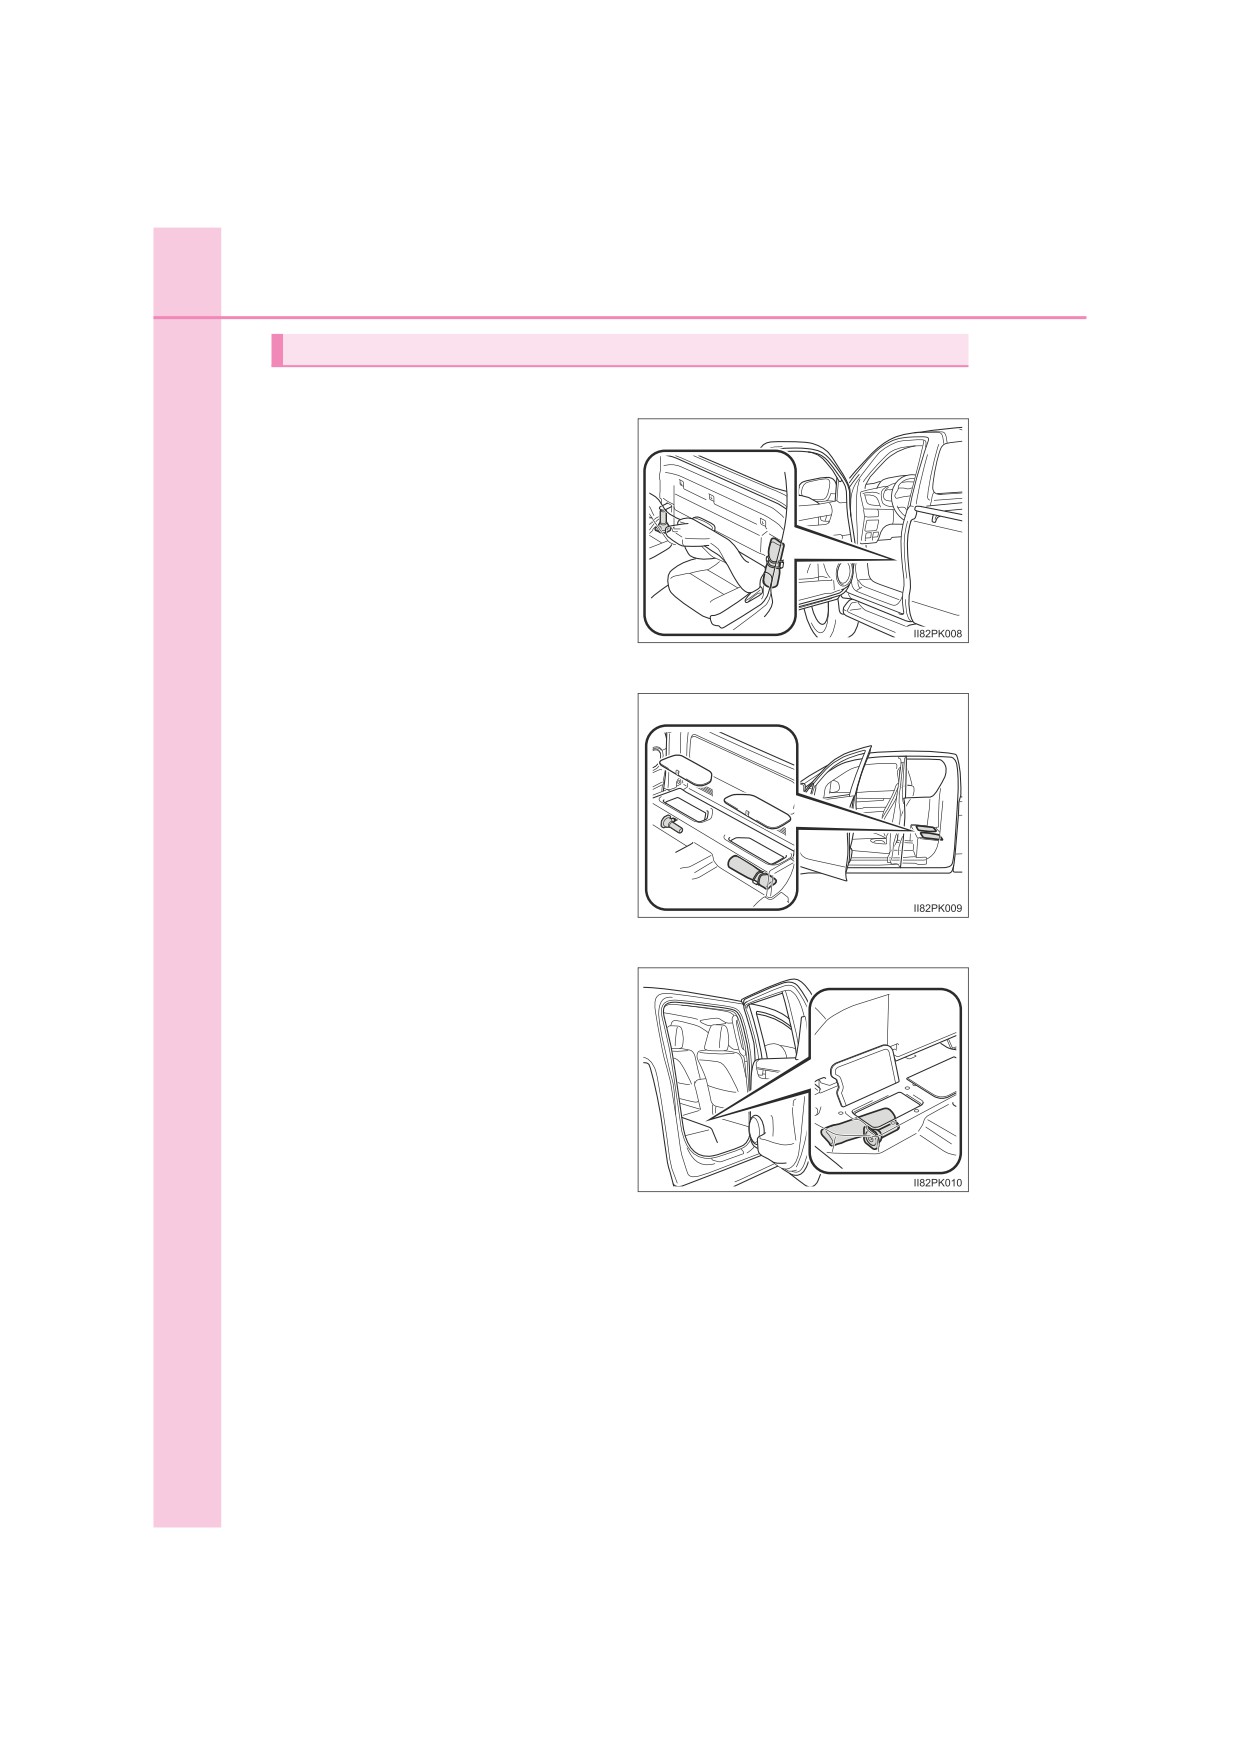
Location of the jack and tools
Single-cab models
The jack and tools are stored
behind the seat.
Smart-cab models
The jack and tools are stored
under the lid.
Double-cab models
The jack and tools are stored
under the bottom cushion.
8-2. Steps to take in an emergency
583
WARNING
Q Using the tire jack
Improper use of the tire jack may cause the vehicle to suddenly fall off the
jack, leading to death or serious injury.
ODo not use the tire jack for any purpose other than replacing tires or install-
ing and removing tire chains.
OOnly use the tire jack that comes with this vehicle for replacing a flat tire.
Do not use it on other vehicles, and do not use other tire jacks for replac-
ing tires on this vehicle.
O Make sure the tire jack can be moved properly.
OAlways check that the tire jack is securely set to the correct jack up point.
ODo not put any part of your body under the vehicle while it is supported by
the jack.
ODo not start or run the engine while your vehicle is supported by the jack.
ODo not raise the vehicle while someone is inside.
O When raising the vehicle, do not put an object on or under the jack.
ODo not raise the vehicle to a height greater than that required to replace
the tire.
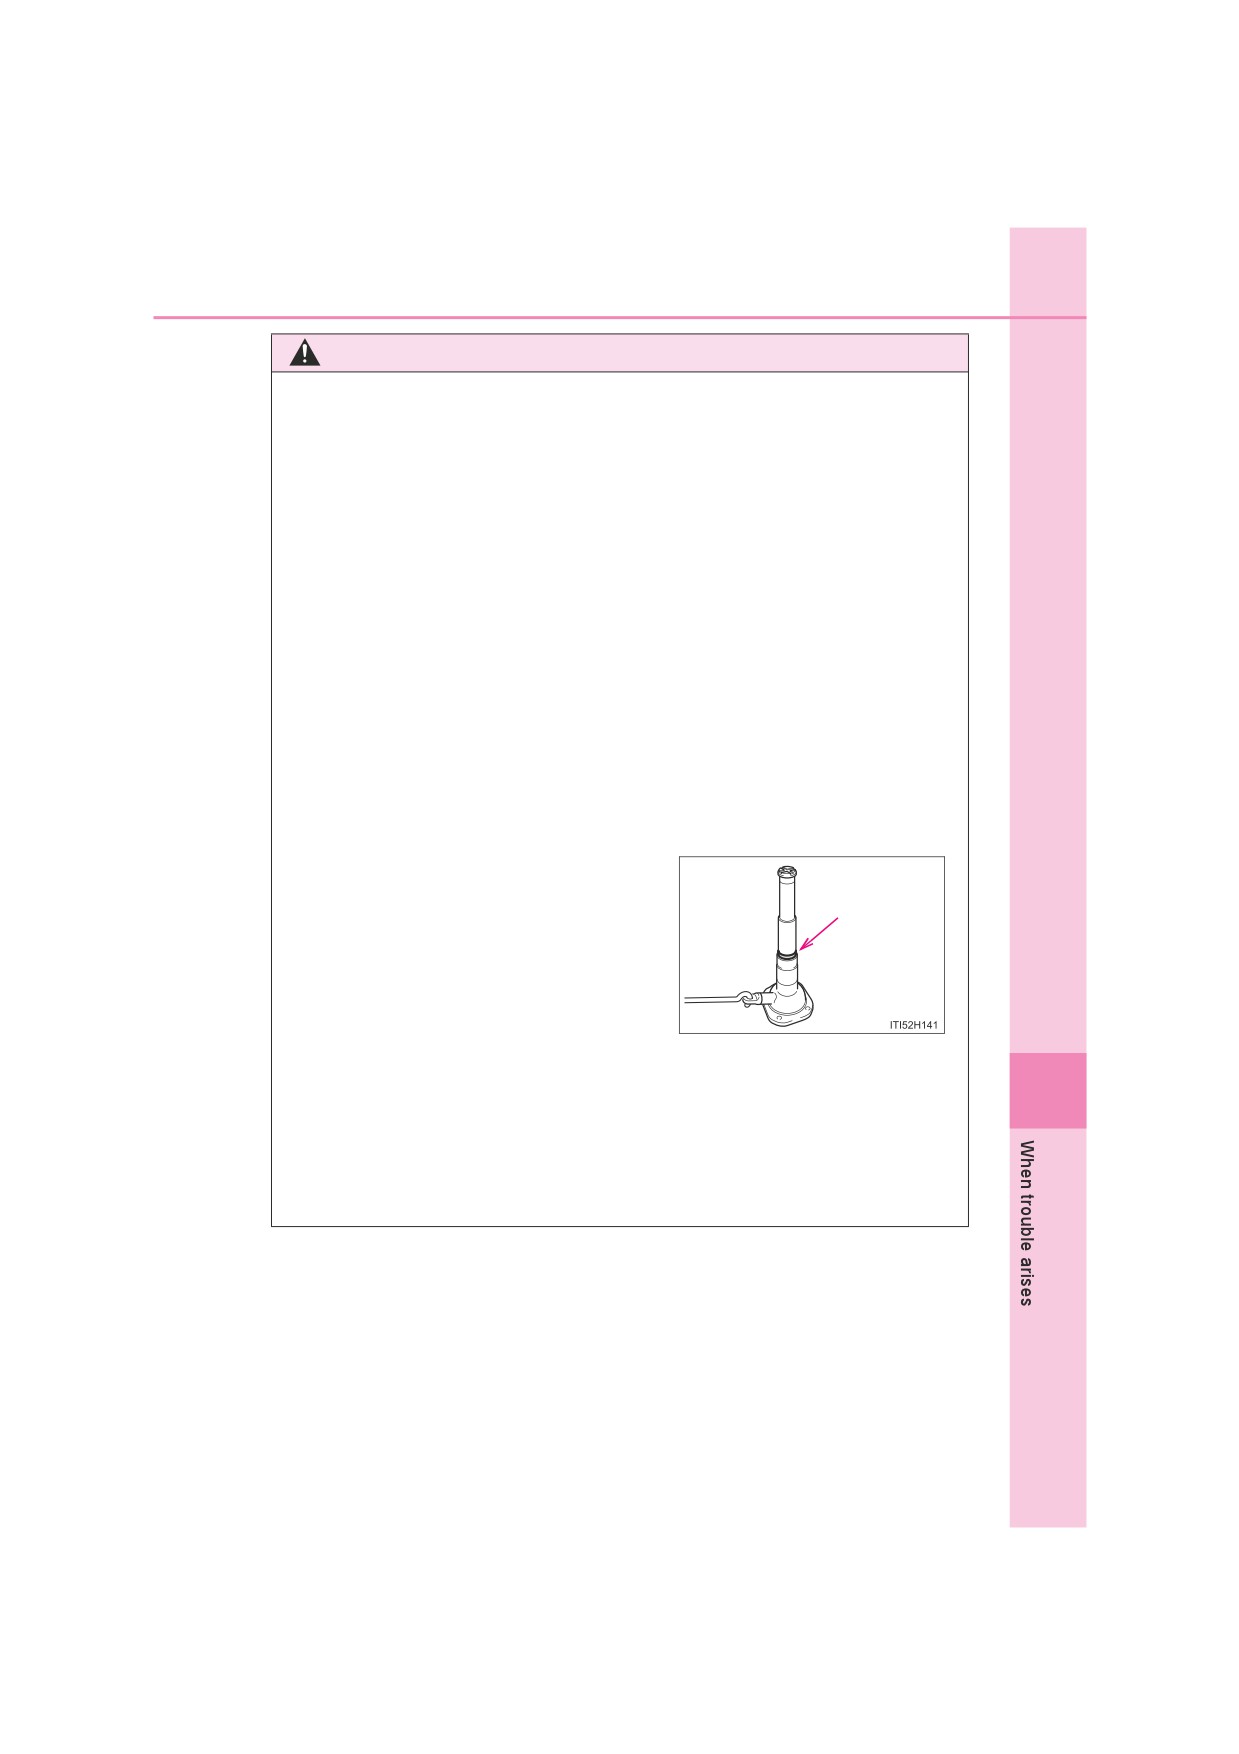
ODo not continue jacking up once the yel-
Yellow
low caution line has appeared.
caution line
OUse a jack stand if it is necessary to get under the vehicle.
8
Take particular care when lowering the vehicle to ensure that no one work-
ing on or near the vehicle may be injured.
Q Using the jack handle
Insert the square head securely until you hear a click to prevent the exten-
sion parts from coming apart unexpectedly.
584
8-2. Steps to take in an emergency
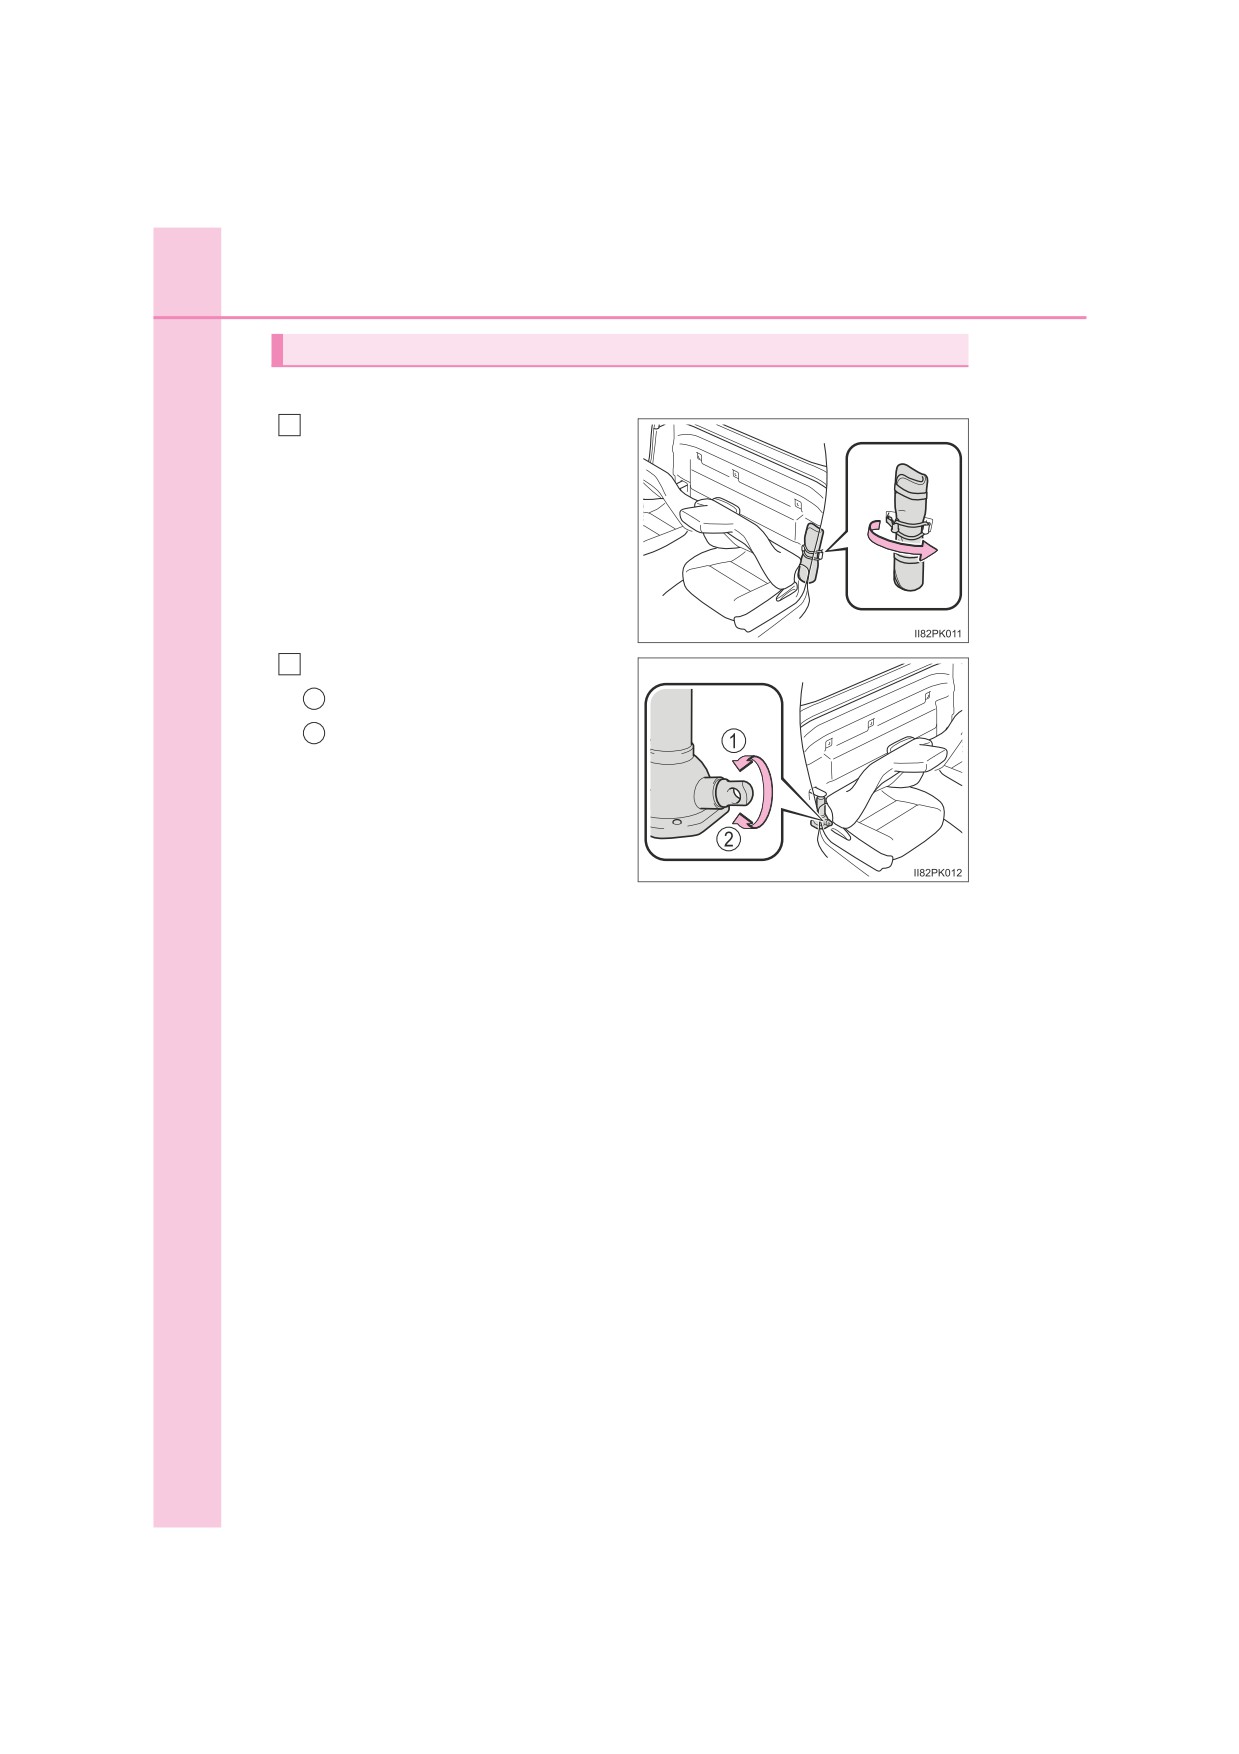
Taking out the jack and tool bag
Single-cab models
1
Unhook the strap and take out
the tool bag.
2
Take out the jack.
1
For loosening
2
For tightening
8-2. Steps to take in an emergency
585
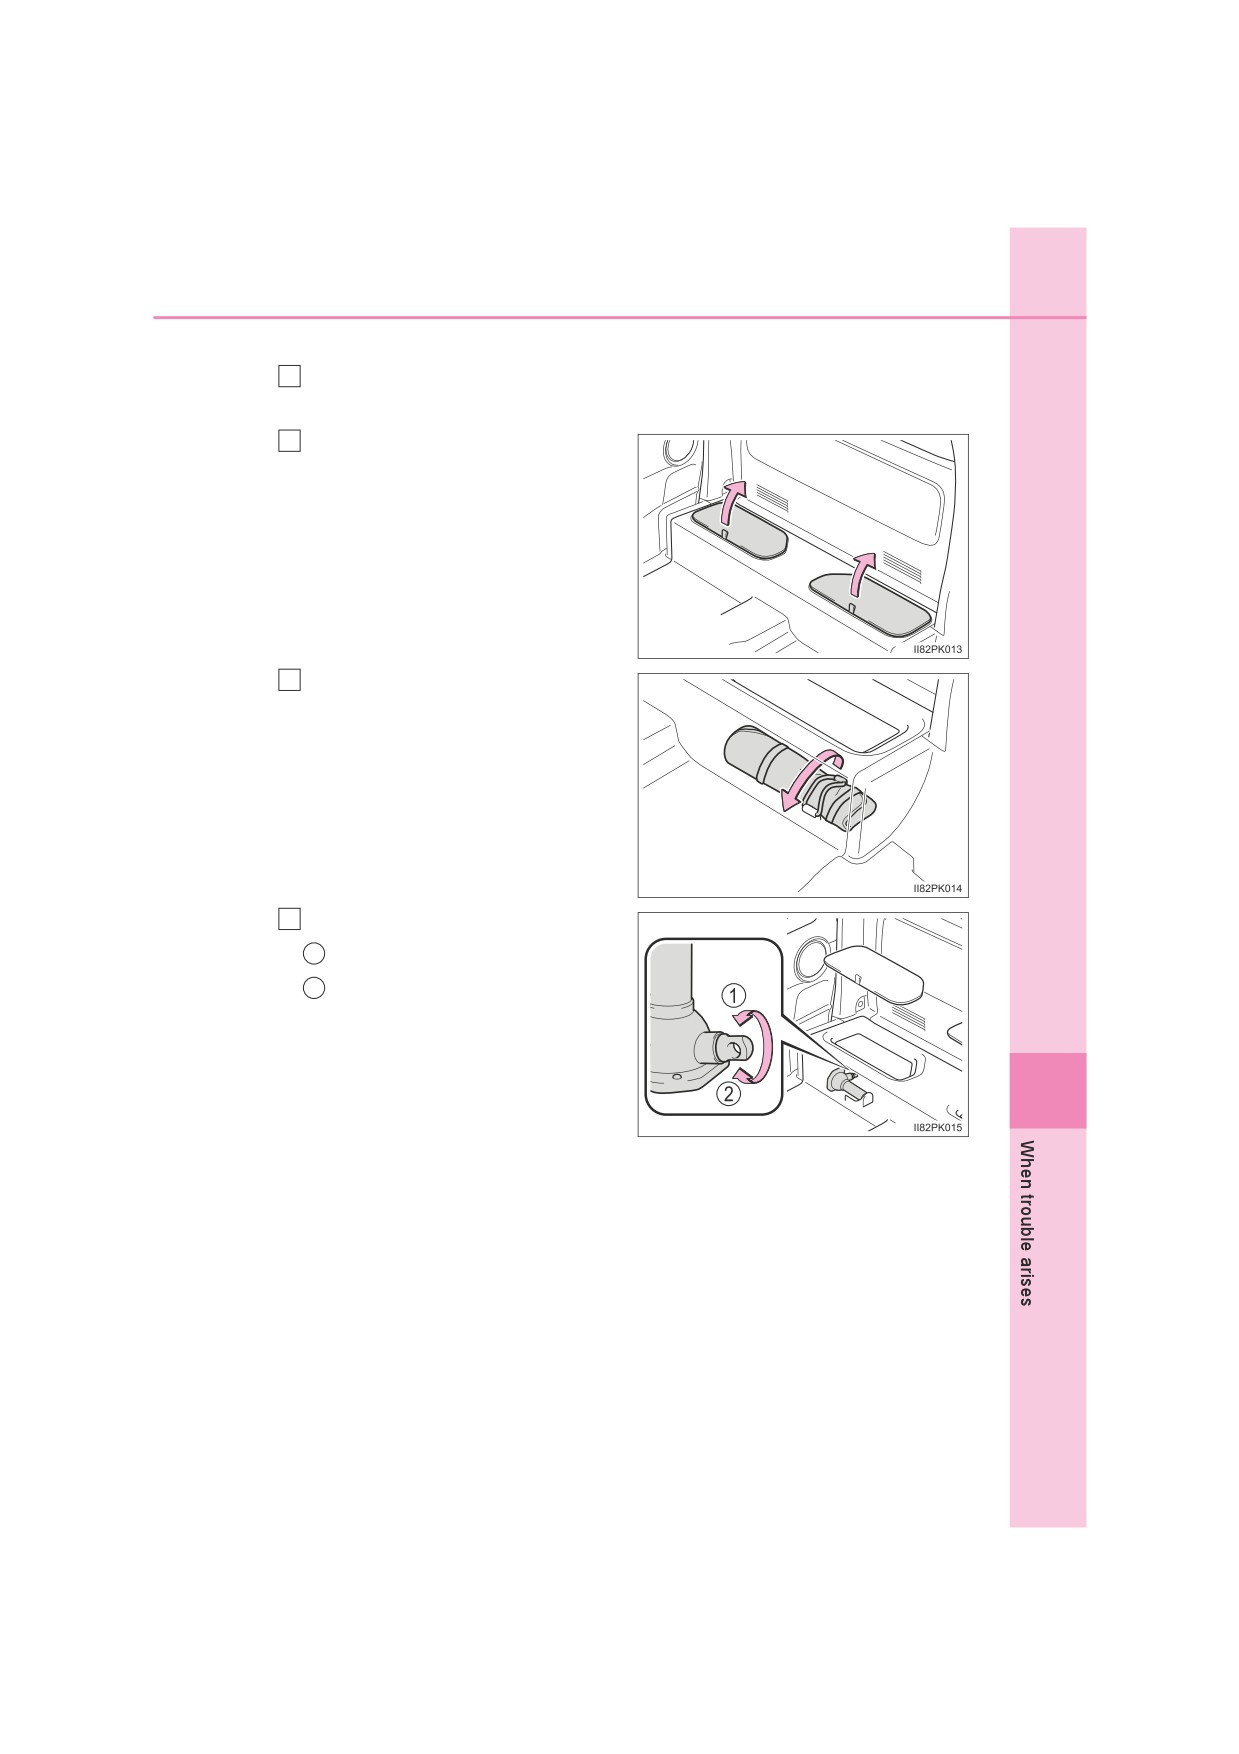
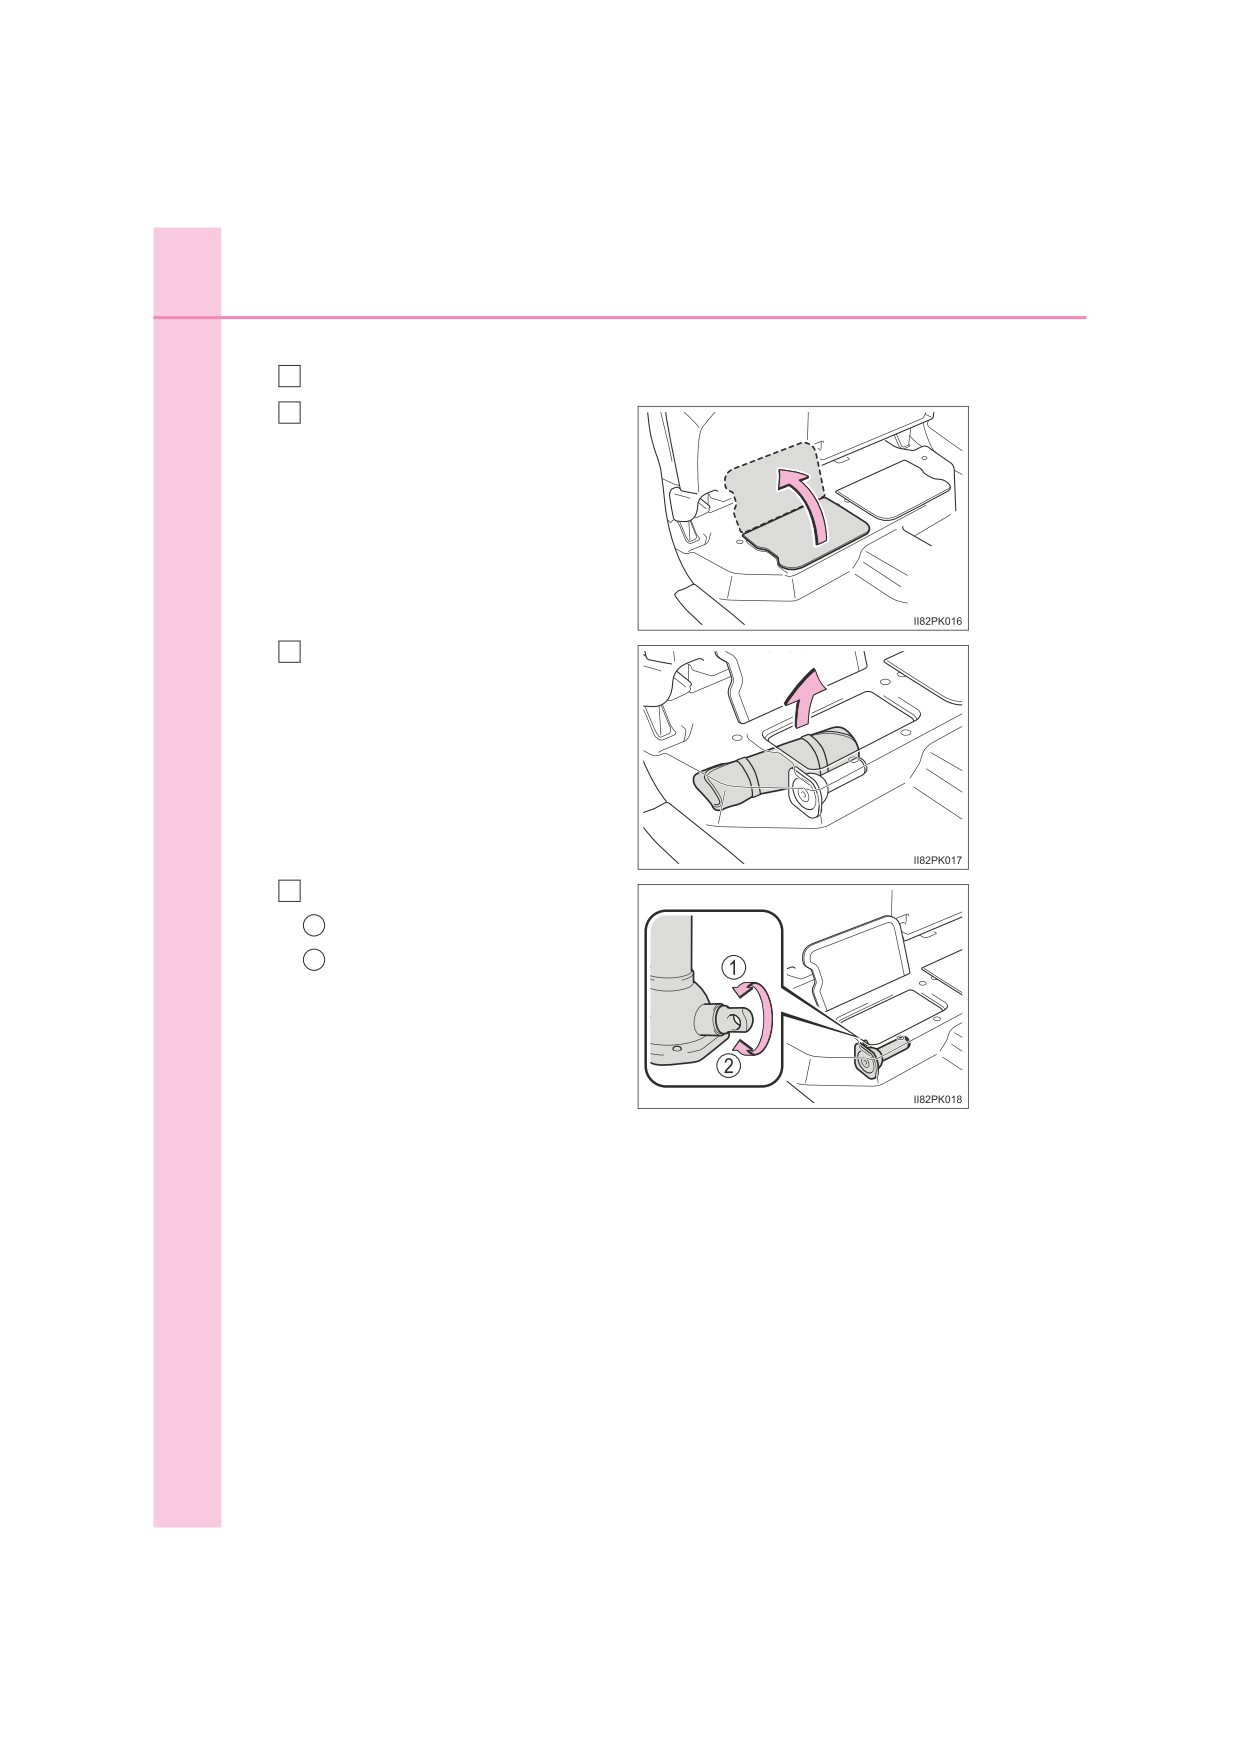
Smart-cab models
1
Vehicles with rear seat cushions:Remove the rear seat cushions.
(P. 172)
2
Pull the tag and open the lid.
3
Unhook the strap and take out
the tool bag.
4
Take out the jack.
1
For loosening
2
For tightening
8
586
8-2. Steps to take in an emergency
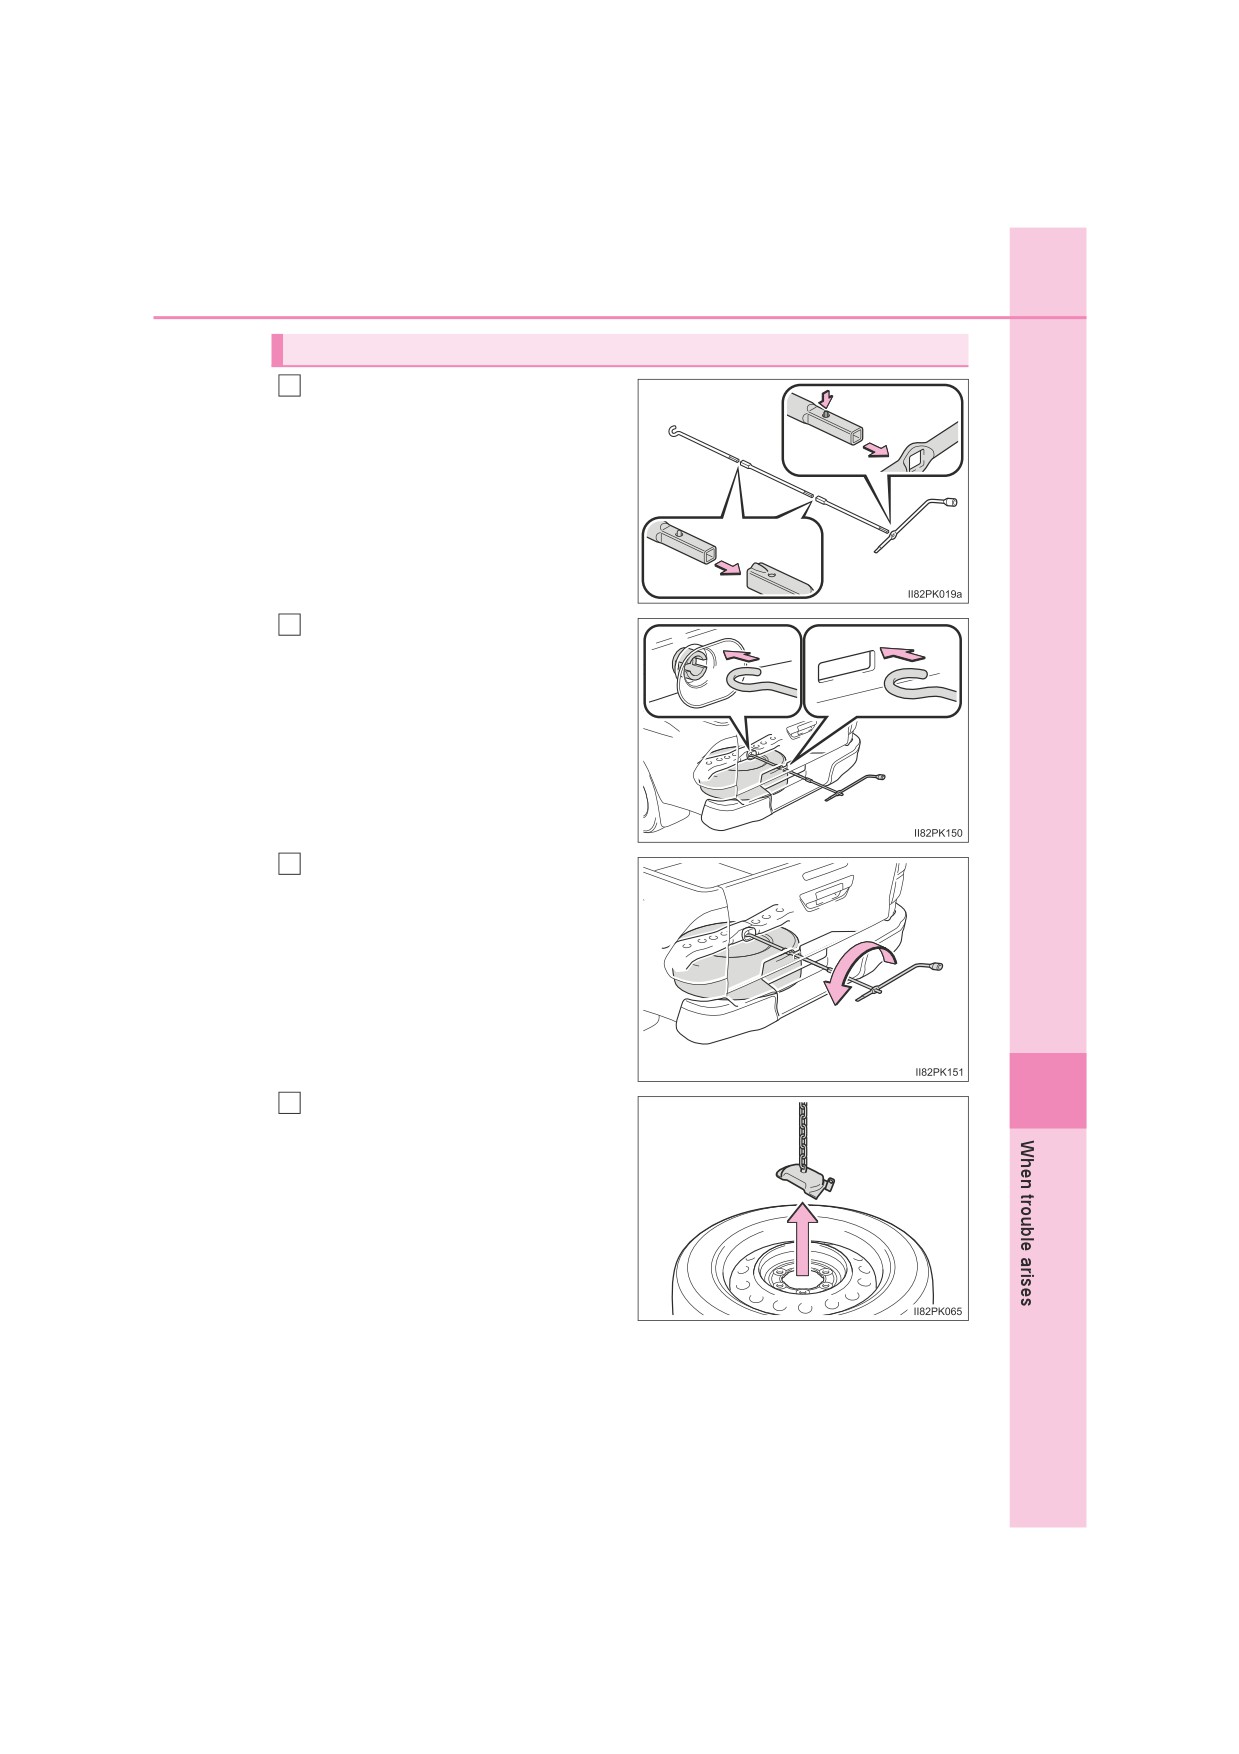
Double-cab models
1
Tumbling the bottom cushion (P. 172)
2
Open the lid.
Take out the tool bag.
3
4
Take out the jack.
1
For loosening
2
For tightening
8-2. Steps to take in an emergency
587
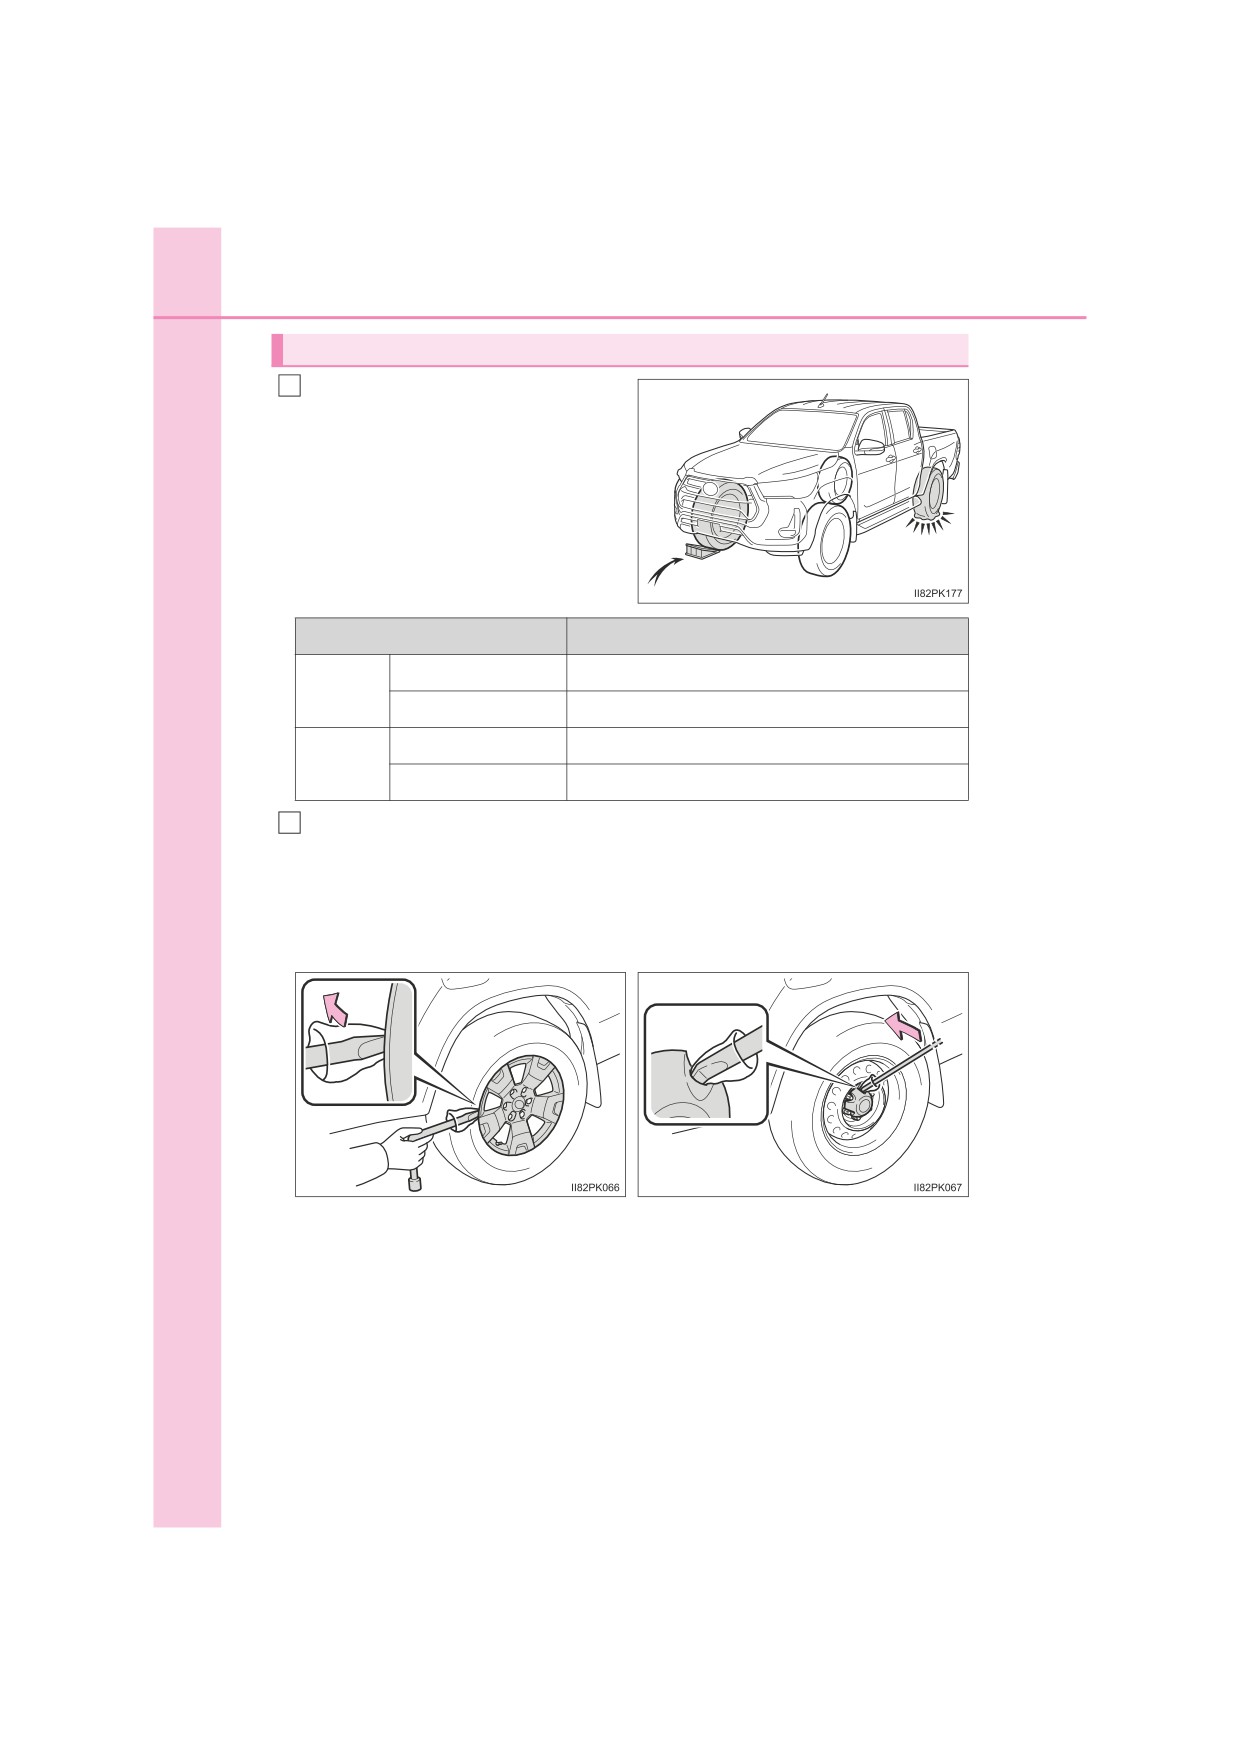
Taking out the spare tire
Assemble the jack handle end,
1
jack handle extensions and
wheel nut wrench.
To assemble the jack handle
extension and wheel nut wrench,
push in the projection on the jack
handle extension.
Insert the jack handle end into
2
the lowering screw.
3
Lower the spare tire completely
to the ground.
8
Remove the holding bracket
4
and pull out the spare tire.
588
8-2. Steps to take in an emergency
Replacing a flat tire
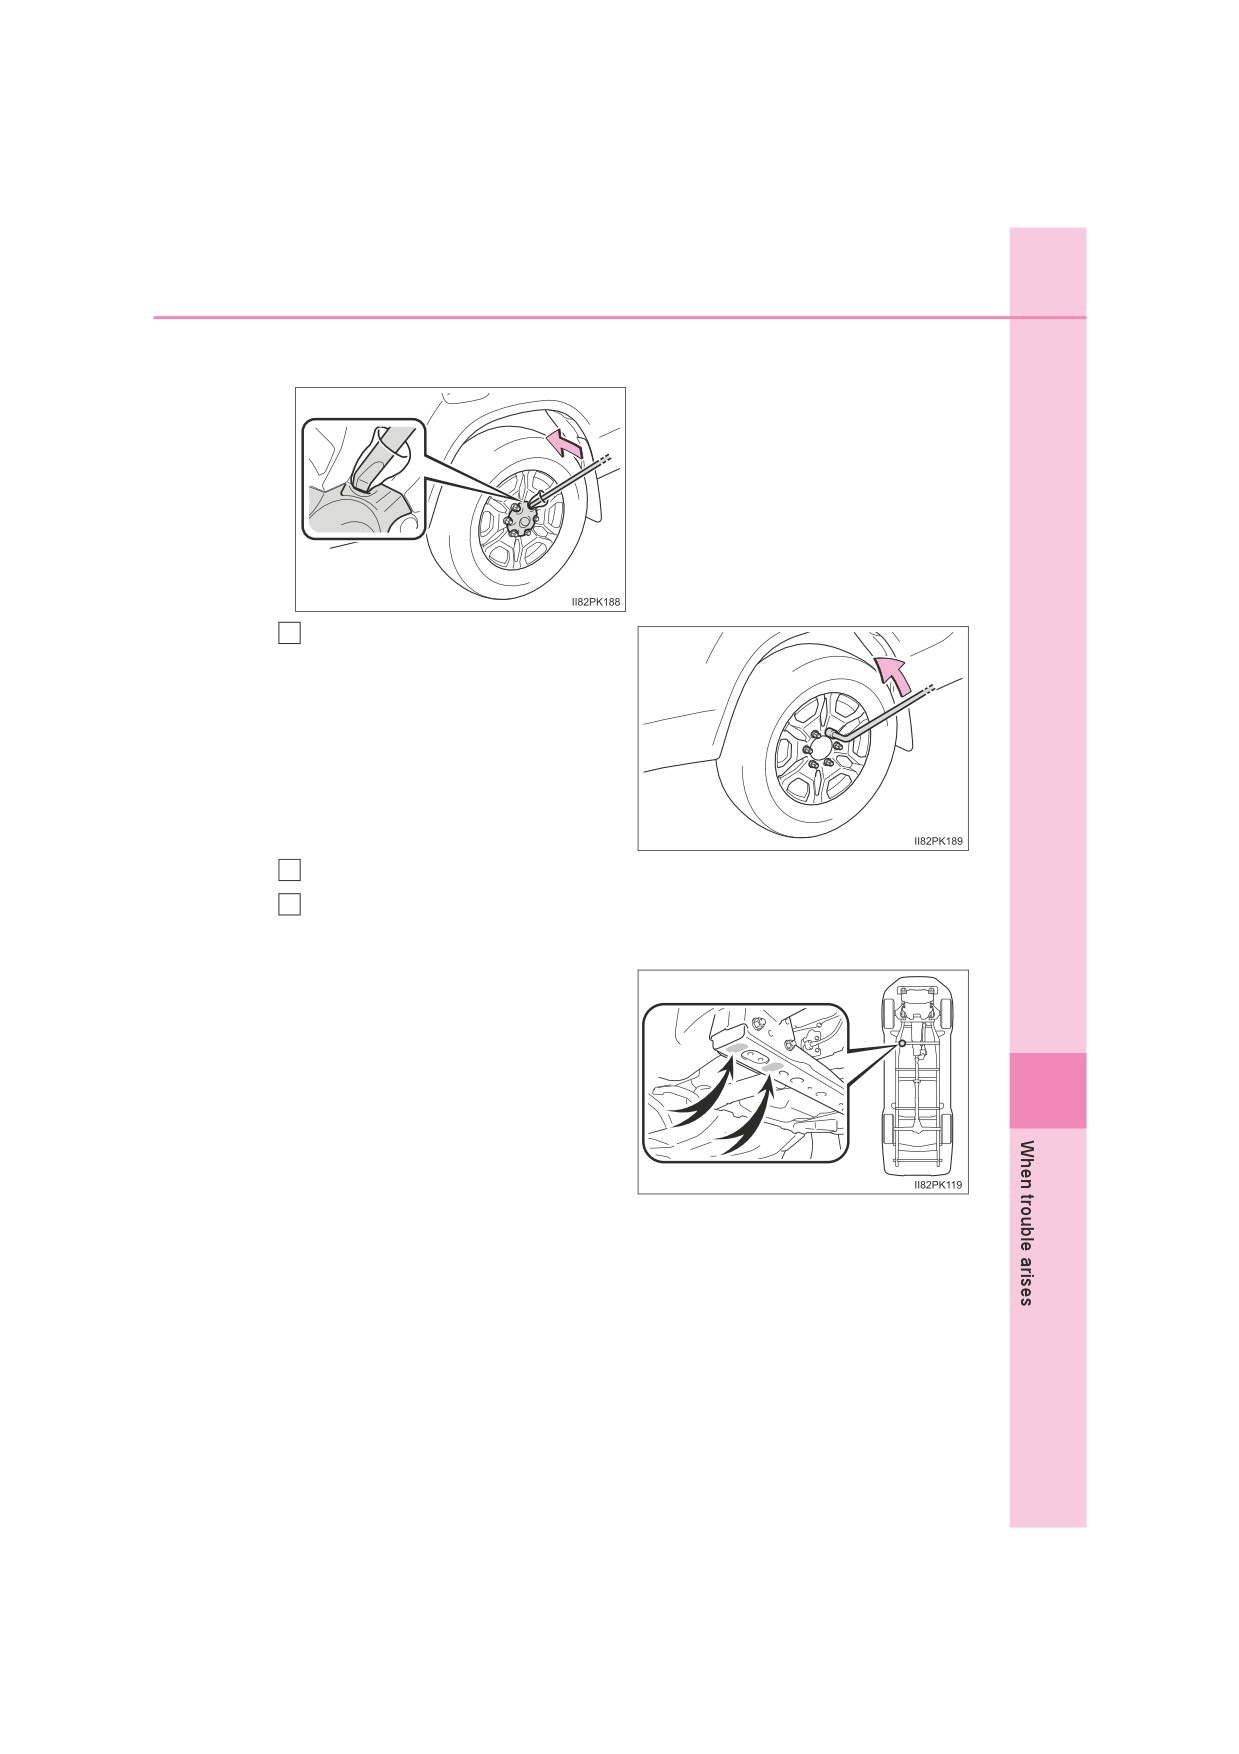
1
Chock the tires.
Flat tire
Wheel chock positions
Left-hand side
Behind the rear right-hand side tire
Front
Right-hand side
Behind the rear left-hand side tire
Left-hand side
In front of the front right-hand side tire
Rear
Right-hand side
In front of the front left-hand side tire
2
Remove the wheel ornament, using the beveled end of the wheel
nut wrench as shown.
To protect the wheel ornament, place a rag between the wheel nut wrench
and the wheel ornament.
Type A
Type B
8-2. Steps to take in an emergency
589
Type C
3
Slightly loosen the wheel
nuts
(one turn).
4
Assembling the jack handle. (P. 587)
5
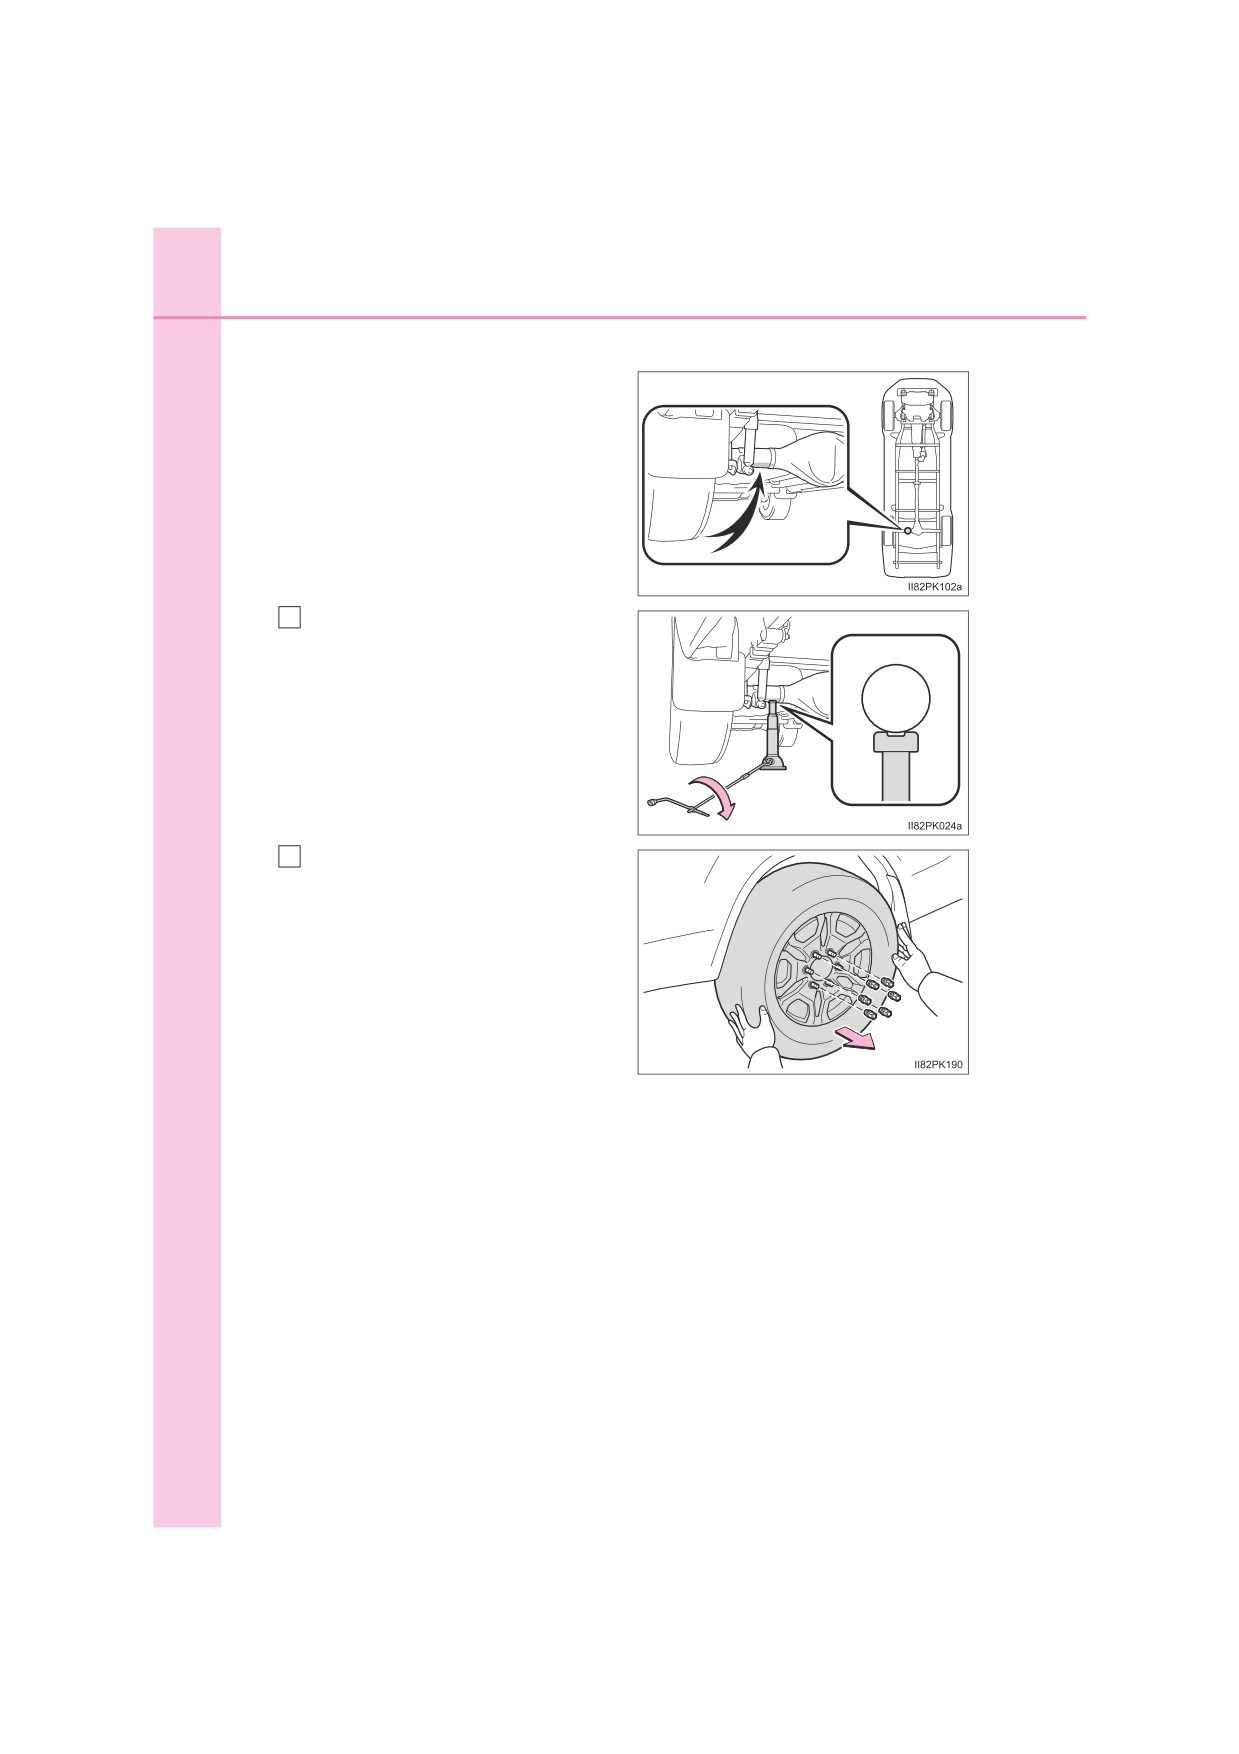
Position the jack at the jack points as shown.
Front
Under the cross member
8
590
8-2. Steps to take in an emergency
Rear
Under the rear axle housing
Raise the vehicle until the tire is
6
slightly raised off the ground.
When positioning the jack under
the rear axle housing, make sure
the groove on the top of the jack
fits with the rear axle housing.
7
Remove all the wheel nuts and
the tire.
When resting the tire on the
ground, place the tire so that the
wheel design faces up to avoid
scratching the wheel surface.
8-2. Steps to take in an emergency
591
WARNING
Q Replacing a flat tire
OObserve the following precautions.
Failure to do so may result in serious injury:
• Lower the spare tire completely to the ground before removing it from
under the vehicle.
• Do not try to remove the wheel ornament by hand. Take due care in
handling the ornament to avoid unexpected personal injury.
• Do not touch the disc wheels or the area around the brakes immediately
after the vehicle has been driven.
After the vehicle has been driven the disc wheels and the area around
the brakes will be extremely hot. Touching these areas with hands, feet
or other body parts while changing a tire, etc. may result in burns.
OFailure to follow these precautions could cause the wheel nuts to loosen
and the tire to fall off, resulting in death or serious injury.
• Have the wheel nuts tightened with a torque wrench to
105 N•m
(10.7 kgf•m, 77 ft•lbf) as soon as possible after changing wheels.
• Do not attach a heavily damaged wheel ornament, as it may fly off the
wheel while the vehicle is moving.
• When installing a tire, only use wheel nuts that have been specifically
designed for that wheel.
• If there are any cracks or deformations in the bolt screws, nut threads or
bolt holes of the wheel, have the vehicle inspected by any authorized
Toyota retailer or Toyota authorized repairer, or any reliable repairer.
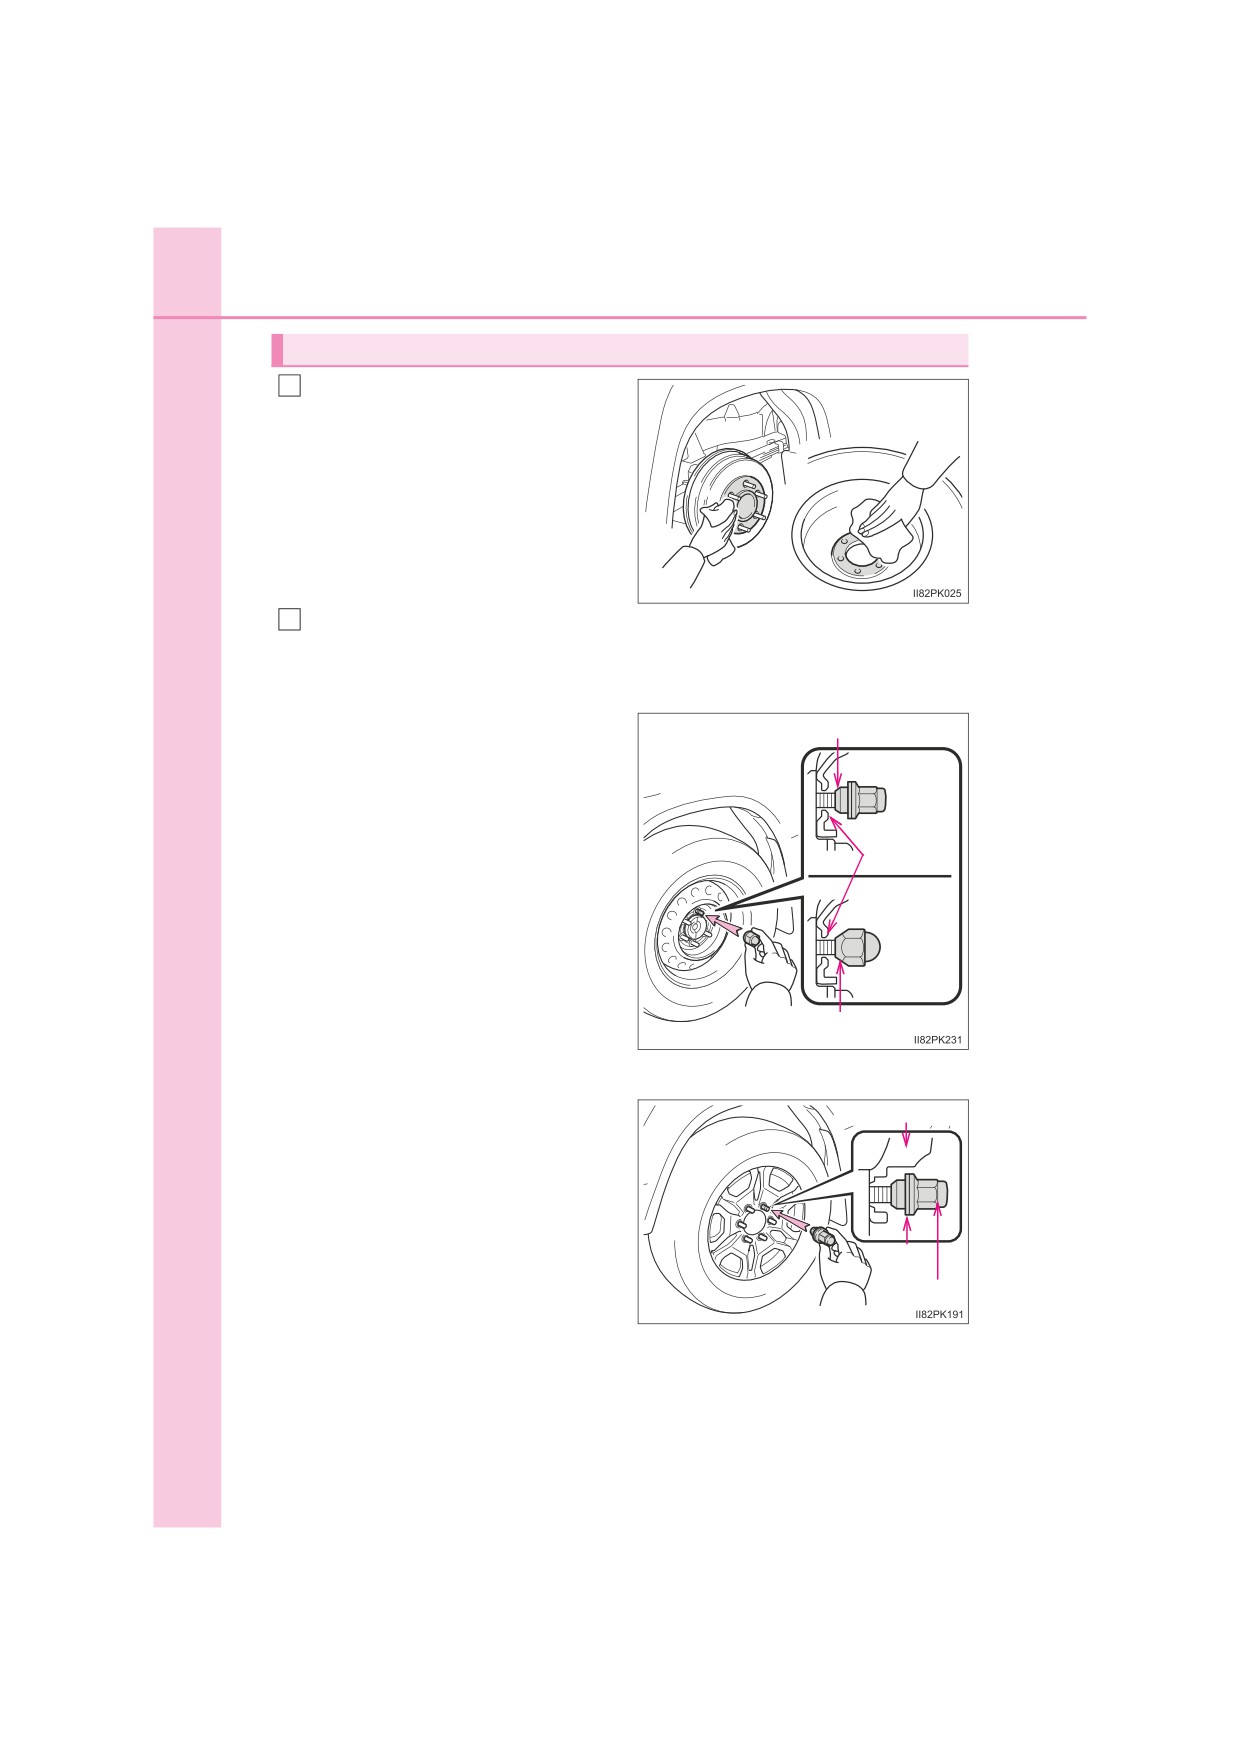
• When installing the wheel nuts, be sure to install them with the tapered
ends facing inward.
8
592
8-2. Steps to take in an emergency
Installing the spare tire
Remove any dirt or foreign mat-
1
ter from the wheel contact sur-
face.
If foreign matter is on the wheel
contact surface, the wheel nuts
may loosen while the vehicle is in
motion, causing the tire to come
off.
2
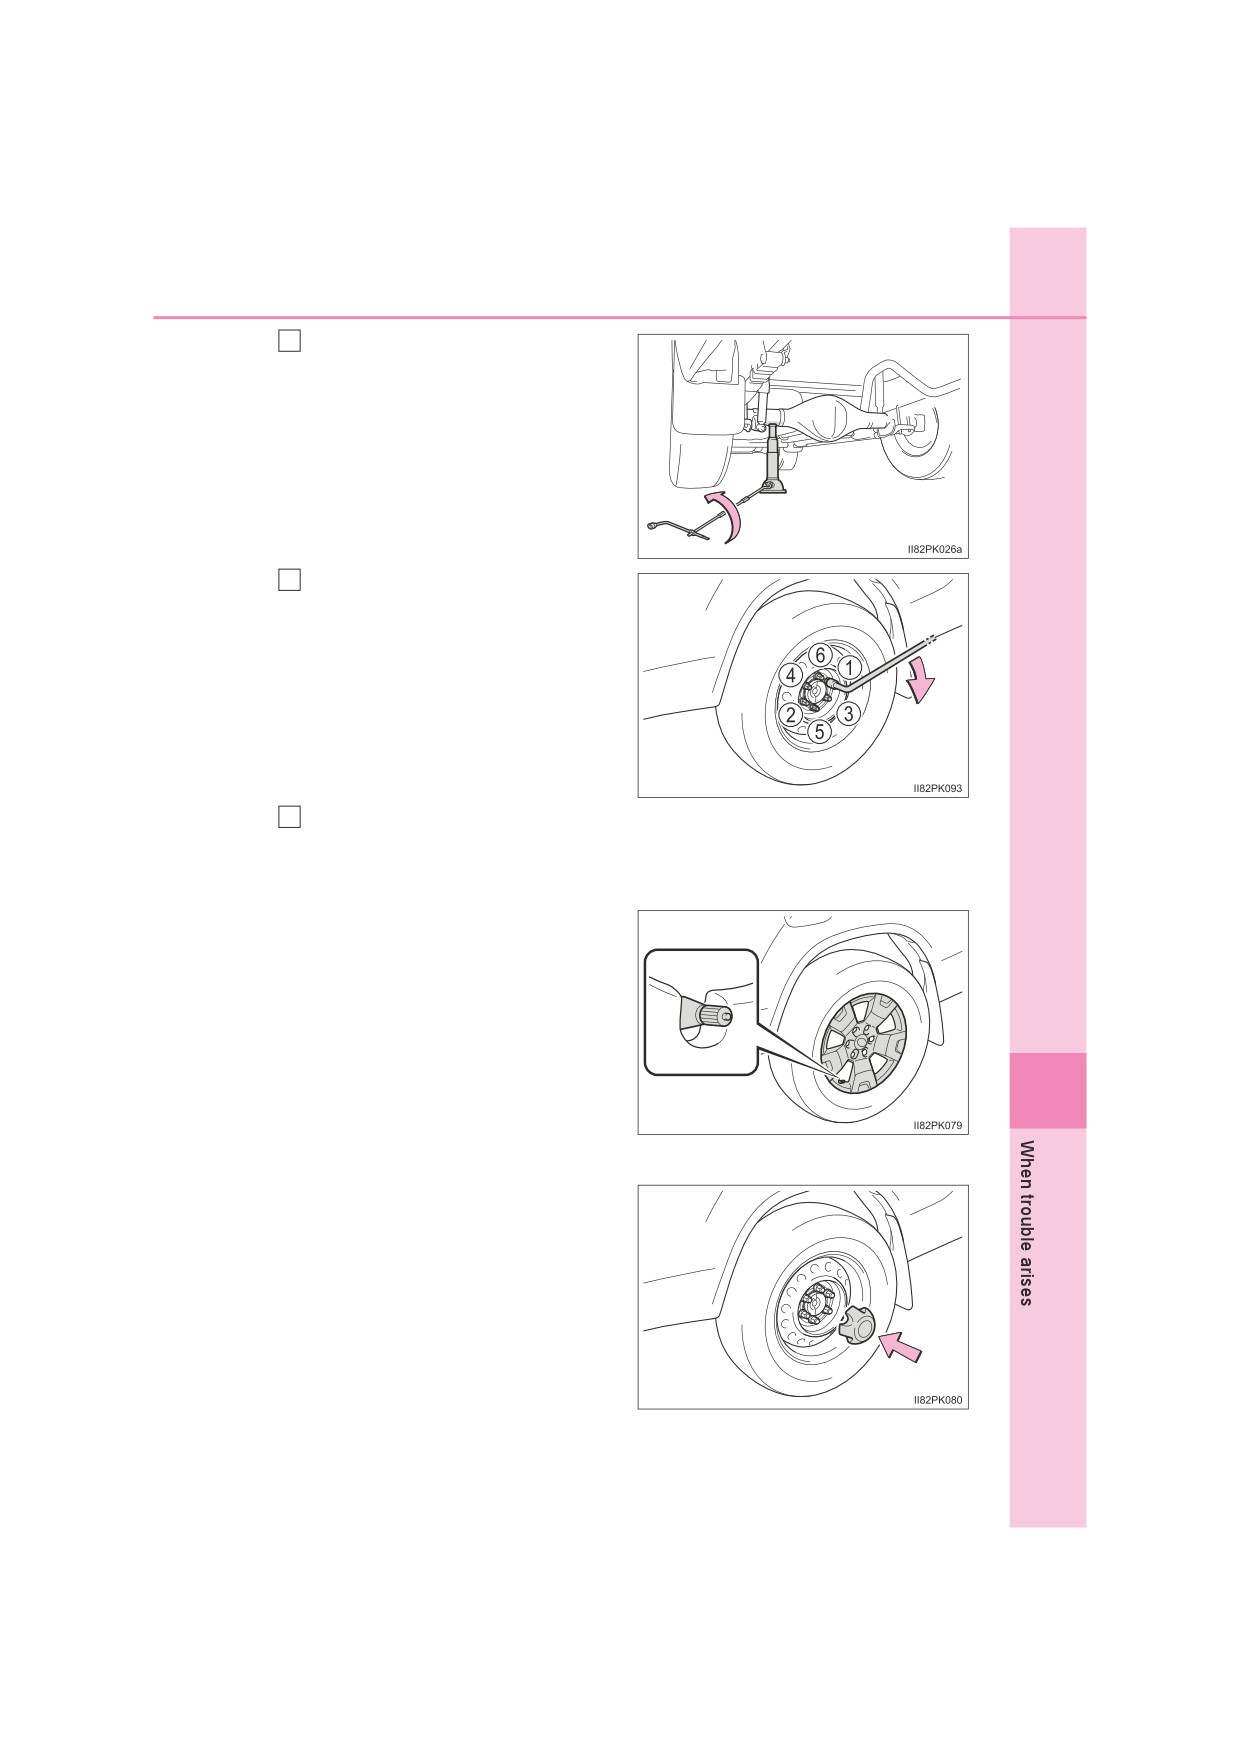
Install the tire and loosely tighten each wheel nut by hand by
approximately the same amount.
Steel wheels
Tighten the wheel nuts until the
Tapered portion
tapered portion comes into
loose contact with the disc
wheel seat.
Disc wheel
seat
Tapered portion
Aluminum wheels
Turn the wheel nuts until the
Disc wheel
washers come into contact with
the disc wheel.
Washer
Wheel nut
8-2. Steps to take in an emergency
593
3
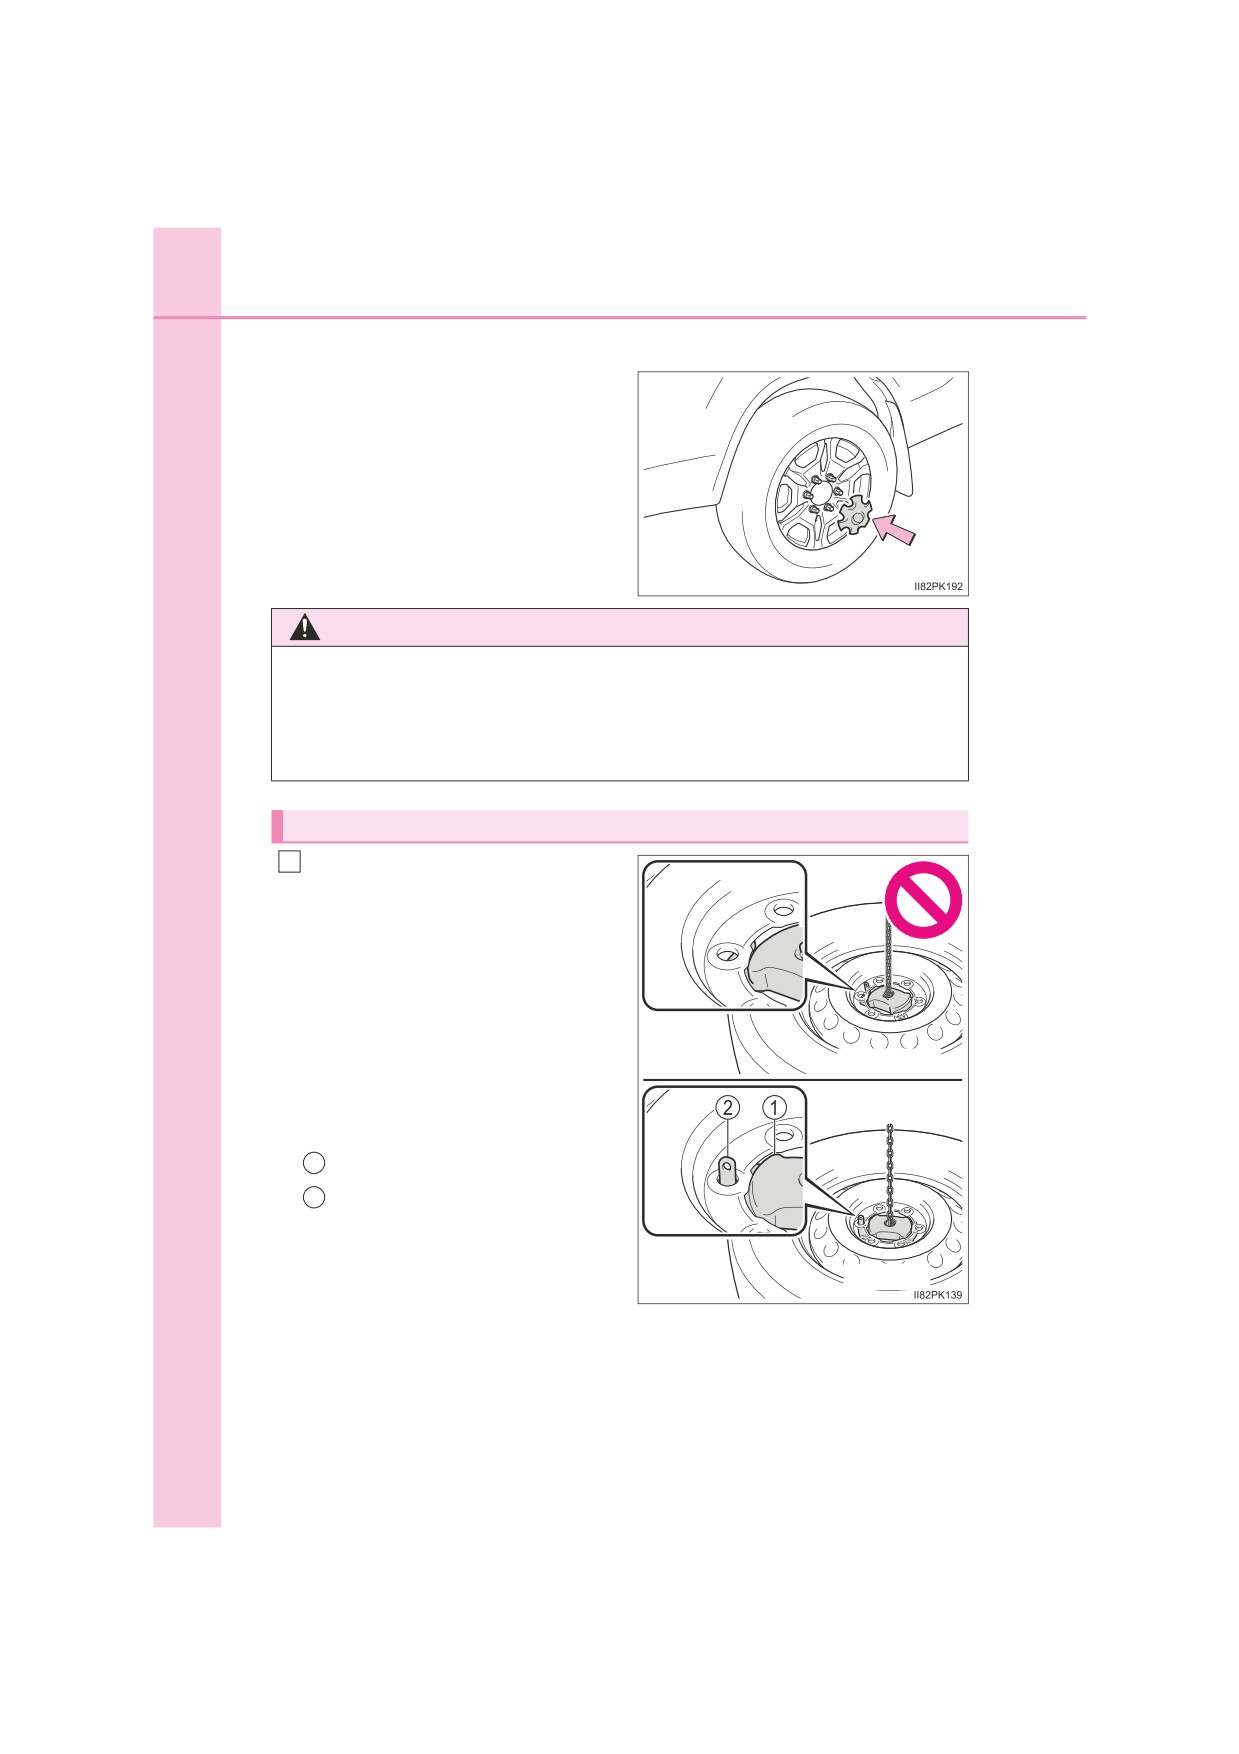
Lower the vehicle.
Firmly tighten each wheel nut
4
two or three times in the order
shown in the illustration.
Tightening torque:
105 N•m (10.7 kgf•m, 77 ft•lbf)
5
Vehicles with spare tire of the same wheel type as the installed
tires: Reinstall the wheel ornament.
Type A
Align the cutout of the wheel
ornament with the valve stem
as shown.
8
Type B
594
8-2. Steps to take in an emergency
Type C
WARNING
Q Stowing the flat tire
Failure to follow steps listed under stowing the tire may result in damage to
the spare tire carrier and loss of the tire, which could result in death or seri-
ous injury.
Stowing the flat tire, jack and all tools
Lay down the tire with the valve
1
stem facing up and install the
holding bracket, inserting the
claw into the wheel lug
nut hole.
Turn the jack handle extension
clockwise to take up slack in
the chain.
Then, check to ensure the claw is
incorrect
in the wheel lug nut hole and the
holding bracket is centered in the
wheel hub.
1
Holding bracket
2
Claw
correct
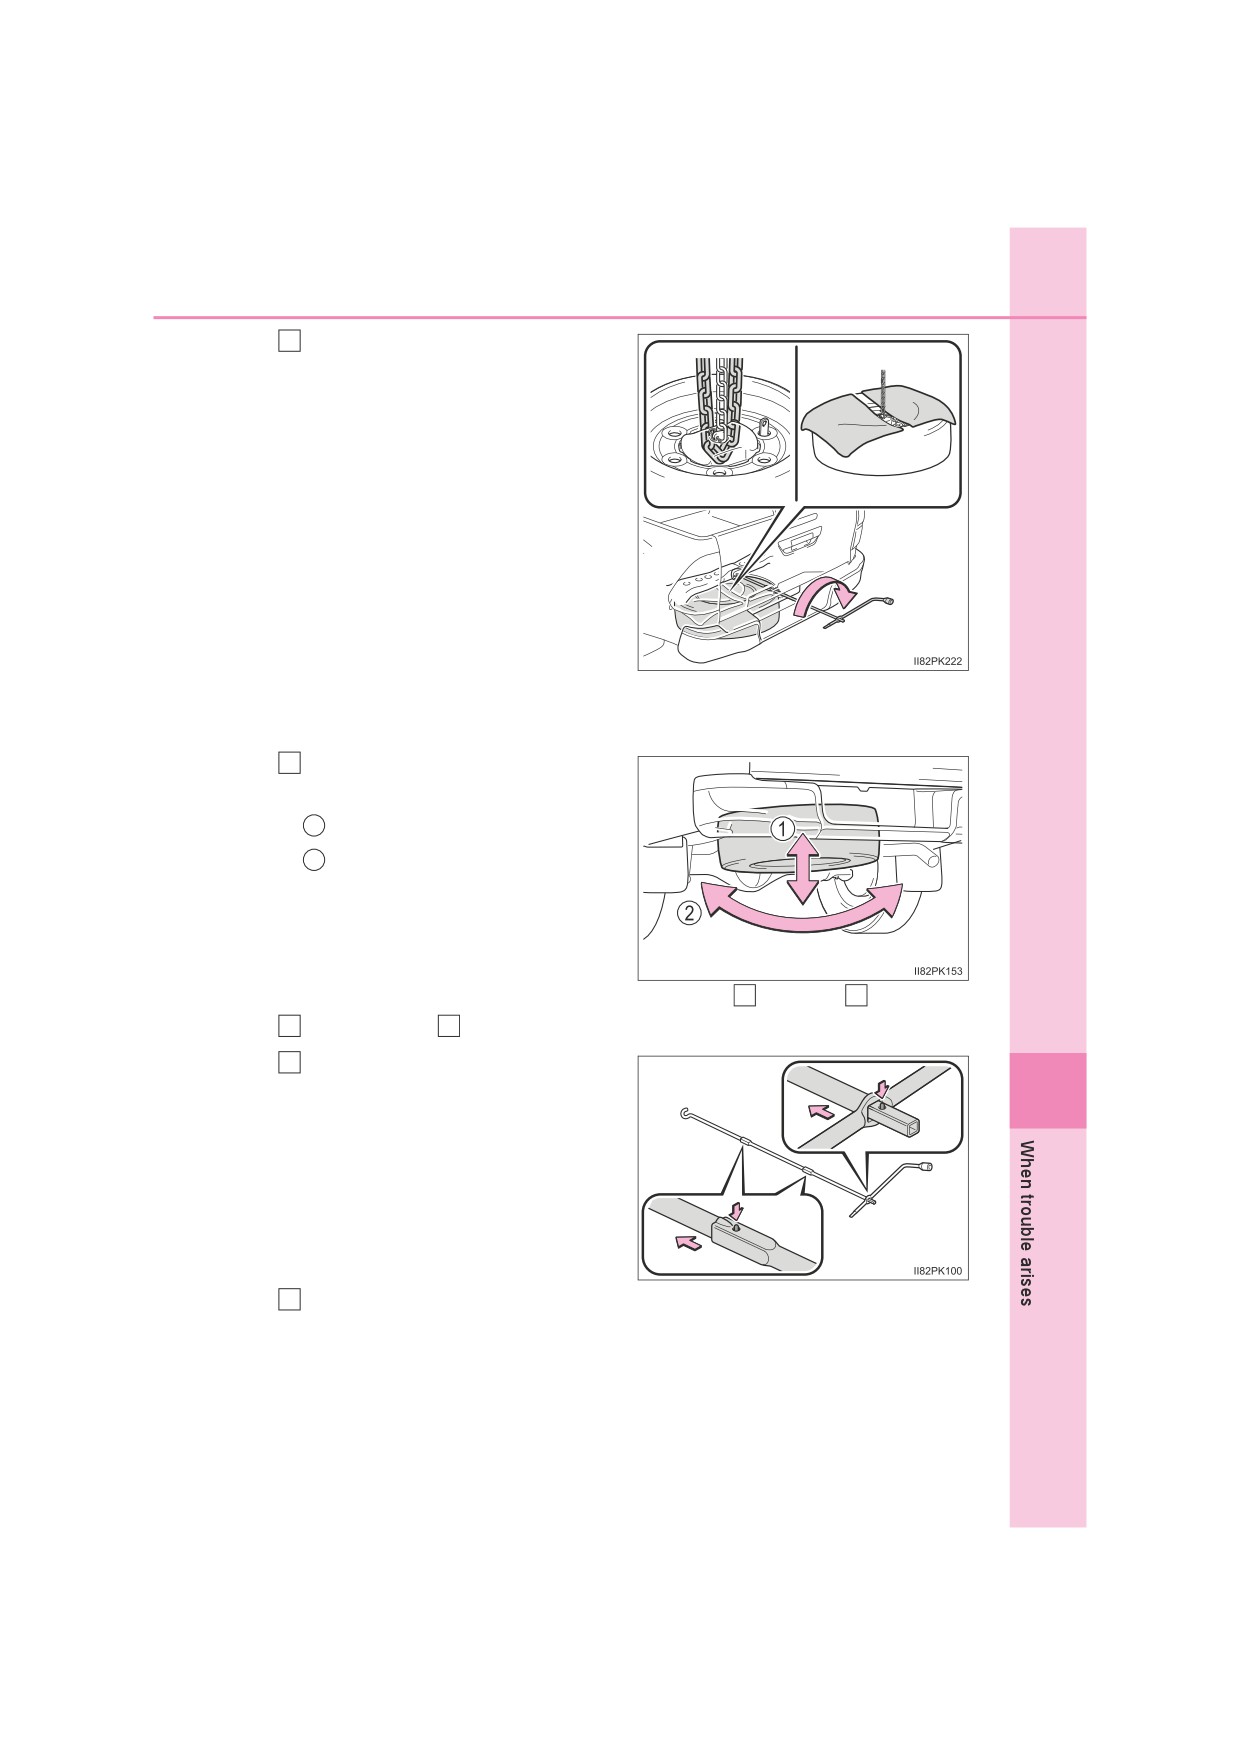
8-2. Steps to take in an emergency
595
2
Raise the tire.
To protect the wheel design faces,
place rags between the wheel
design faces and the frame.
While raising, secure the tire, tak-
ing care that the tire goes straight
up without catching on any sur-
rounding part, to prevent it from fly-
ing forward during a collision or
sudden braking.
After the tire goes half way up,
check that the suspended chain is
able to enter the tire hole, for
proper storage.
Tightening torque:
37.0 N•m (3.8 kgf•m, 27.3
ft•lbf)
3
Confirm that the tire is not
loose
after tightening:
1
Push and pull the tire
2
Try rotating
Visually check to ensure the tire is
not hung on surrounding parts.
If looseness or misassembly exists, repeat step
2
and step
3
4
Repeat step
3
, any time the tire is lowered or disturbed.
5
Push in the projection on the
8
jack handle and disassemble
the jack handle end, jack han-
dle extensions and wheel nut
wrench.
Stow the tools and jack securely.
6
8-2. Steps to take in an emergency
597
Q Flat tire
Repair or replace the flat tire as soon as possible.
When stowing the repaired or replaced tire to the carrier, remove the rags that
are protecting the wheel design faces.
WARNING
Q After using the tools and jack
Before driving, make sure all the tools and jack are securely in place in their
storage location to reduce the possibility of personal injury during a collision
or sudden braking.
NOTICE
Q When stowing the flat tire
Ensure that there is no object caught between the tire and the vehicle
underbody (except for rags that is used when stowing the flat tire).
Q When assembling the jack handle extension
Insert the square head securely until you hear a click. Otherwise the exten-
sion may come off and it may damage the paint or vehicle body.
8

598
8-2. Steps to take in an emergency
If the engine will not start
If the engine will not start even though correct starting proce-
dures are being followed (P. 220, 223), consider each of the
following points:
The engine will not start even though the starter motor operates
normally.
One of the following may be the cause of the problem:
O There may not be sufficient fuel in the vehicle’s tank.
Gasoline engine: Refuel the vehicle.
Diesel engine: P. 614
O The engine may be flooded. (gasoline engine)
Try to restart the engine again following correct starting procedures.
(P. 220, 223)
O There may be a malfunction in the engine immobilizer system.
(P. 115)
The starter motor turns over slowly, the interior lights and head-
lights are dim, or the horn does not sound or sounds at a low
volume.
One of the following may be the cause of the problem:
O The battery may be discharged. (P. 604)
O The battery terminal connections may be loose or corroded.
The starter motor does not turn over (vehicles with smart entry &
start system).
The engine starting system may be malfunctioning due to an electrical
problem such as an open circuit or a blown fuse. However, an interim
measure is available to start the engine. (P. 599)
8-2. Steps to take in an emergency
599
The starter motor does not turn over, the interior lights and head-
lights do not turn on, or the horn does not sound.
One of the following may be the cause of the problem:
O One or both of the battery terminals may be disconnected.
O The battery may be discharged. (P. 604)
O There may be a malfunction in the steering lock system. (vehicles
with smart entry & start system)
Contact any authorized Toyota retailer or Toyota authorized repairer, or any
reliable repairer if the problem cannot be repaired, or if repair procedures
are unknown.
Emergency start function (vehicles with smart entry & start sys-
tem)
When the engine does not start, the following steps can be used as an
interim measure to start the engine if the engine switch is functioning
normally.
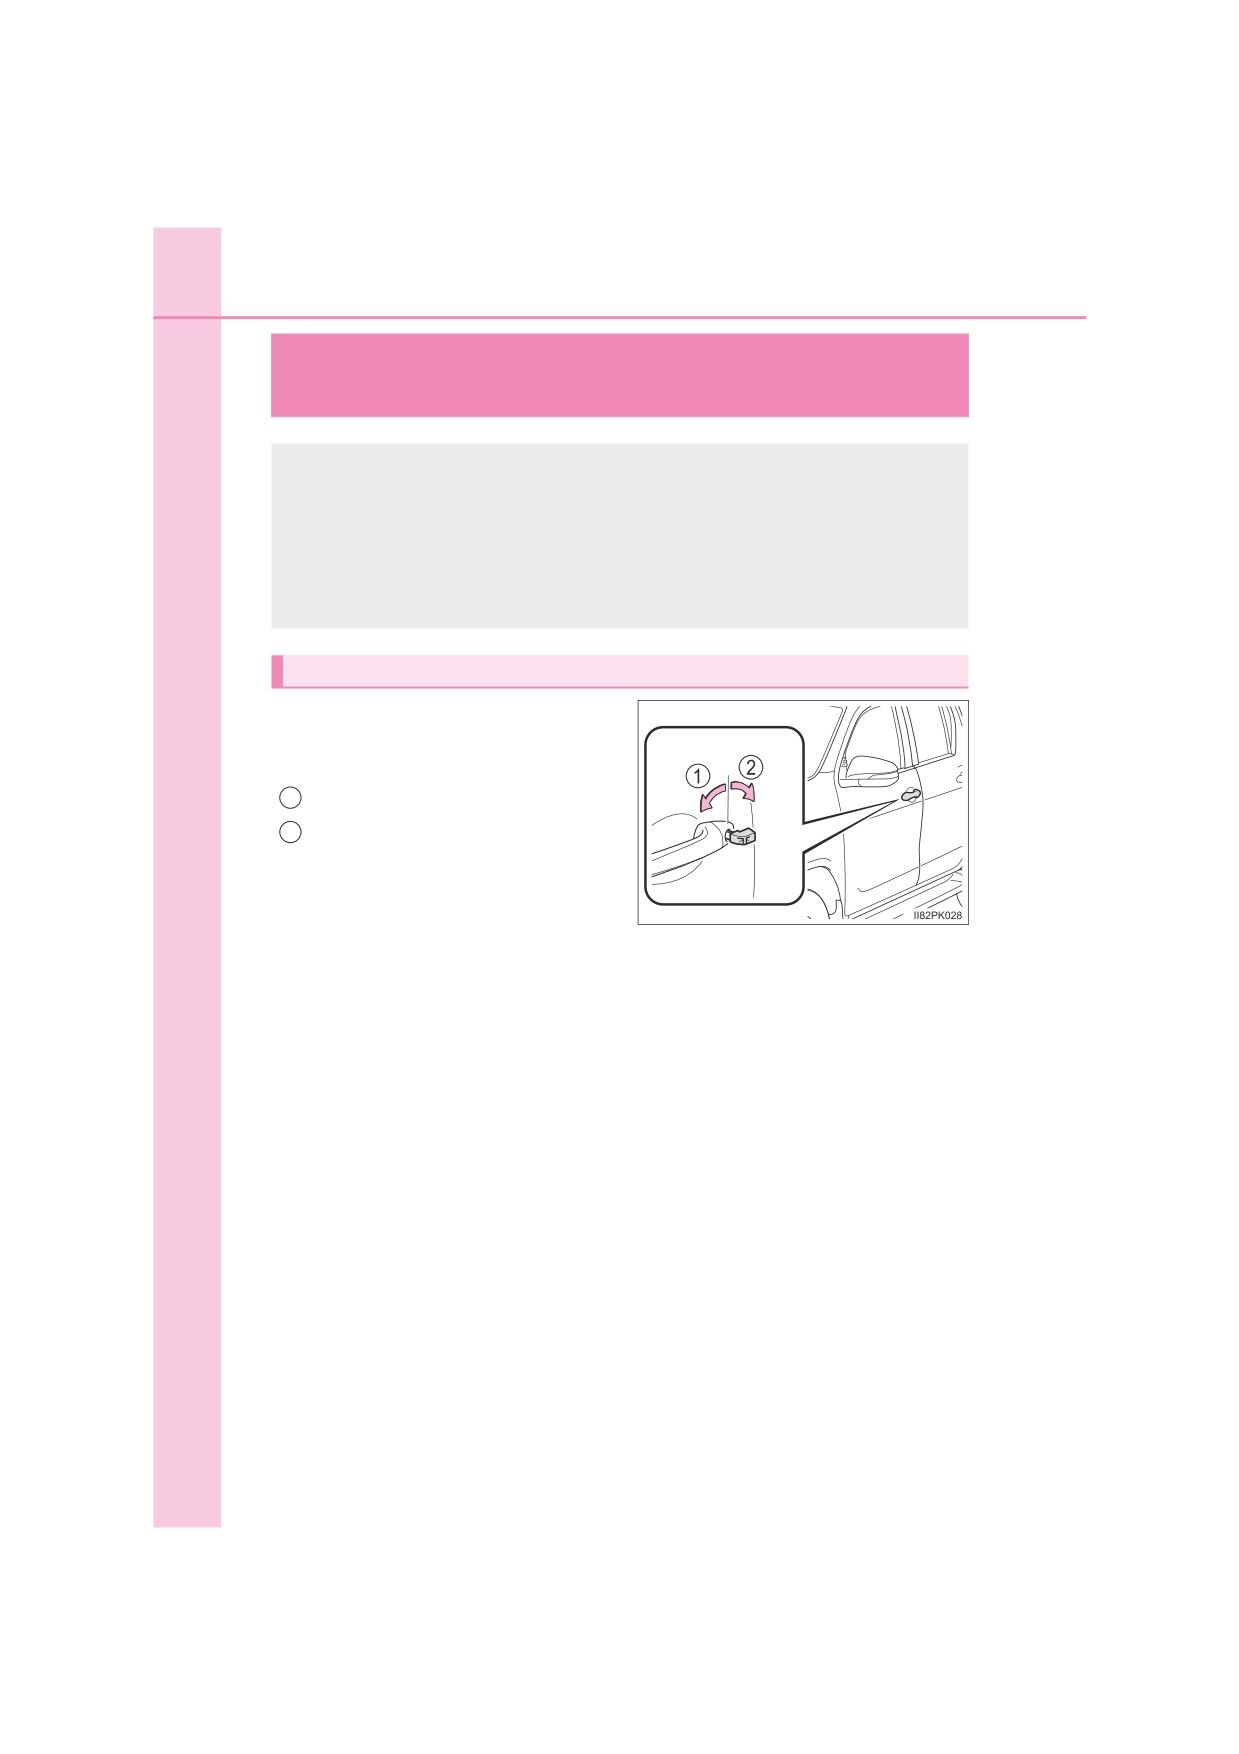
1
Set the parking brake.
2
Shift the shift lever to P (automatic transmission) or N (manual
transmission).
3
Turn the engine switch to ACCESSORY mode.
4
Press and hold the engine switch for about 15 seconds while
depressing the brake pedal and clutch pedal (manual transmission)
firmly.
Even if the engine can be started using the above steps, the system
may be malfunctioning. Have the vehicle inspected by your any
8
authorized Toyota retailer or Toyota authorized repairer, or any reliable
repairer.
600
8-2. Steps to take in an emergency
If the electronic key does not operate properly
(vehicles with smart entry & start system)
If communication between the electronic key and vehicle is
interrupted
(P. 166) or the electronic key cannot be used
because the battery is depleted, the smart entry & start system
and wireless remote control cannot be used. In such cases, the
doors can be opened and the engine can be started by following
the procedure below.
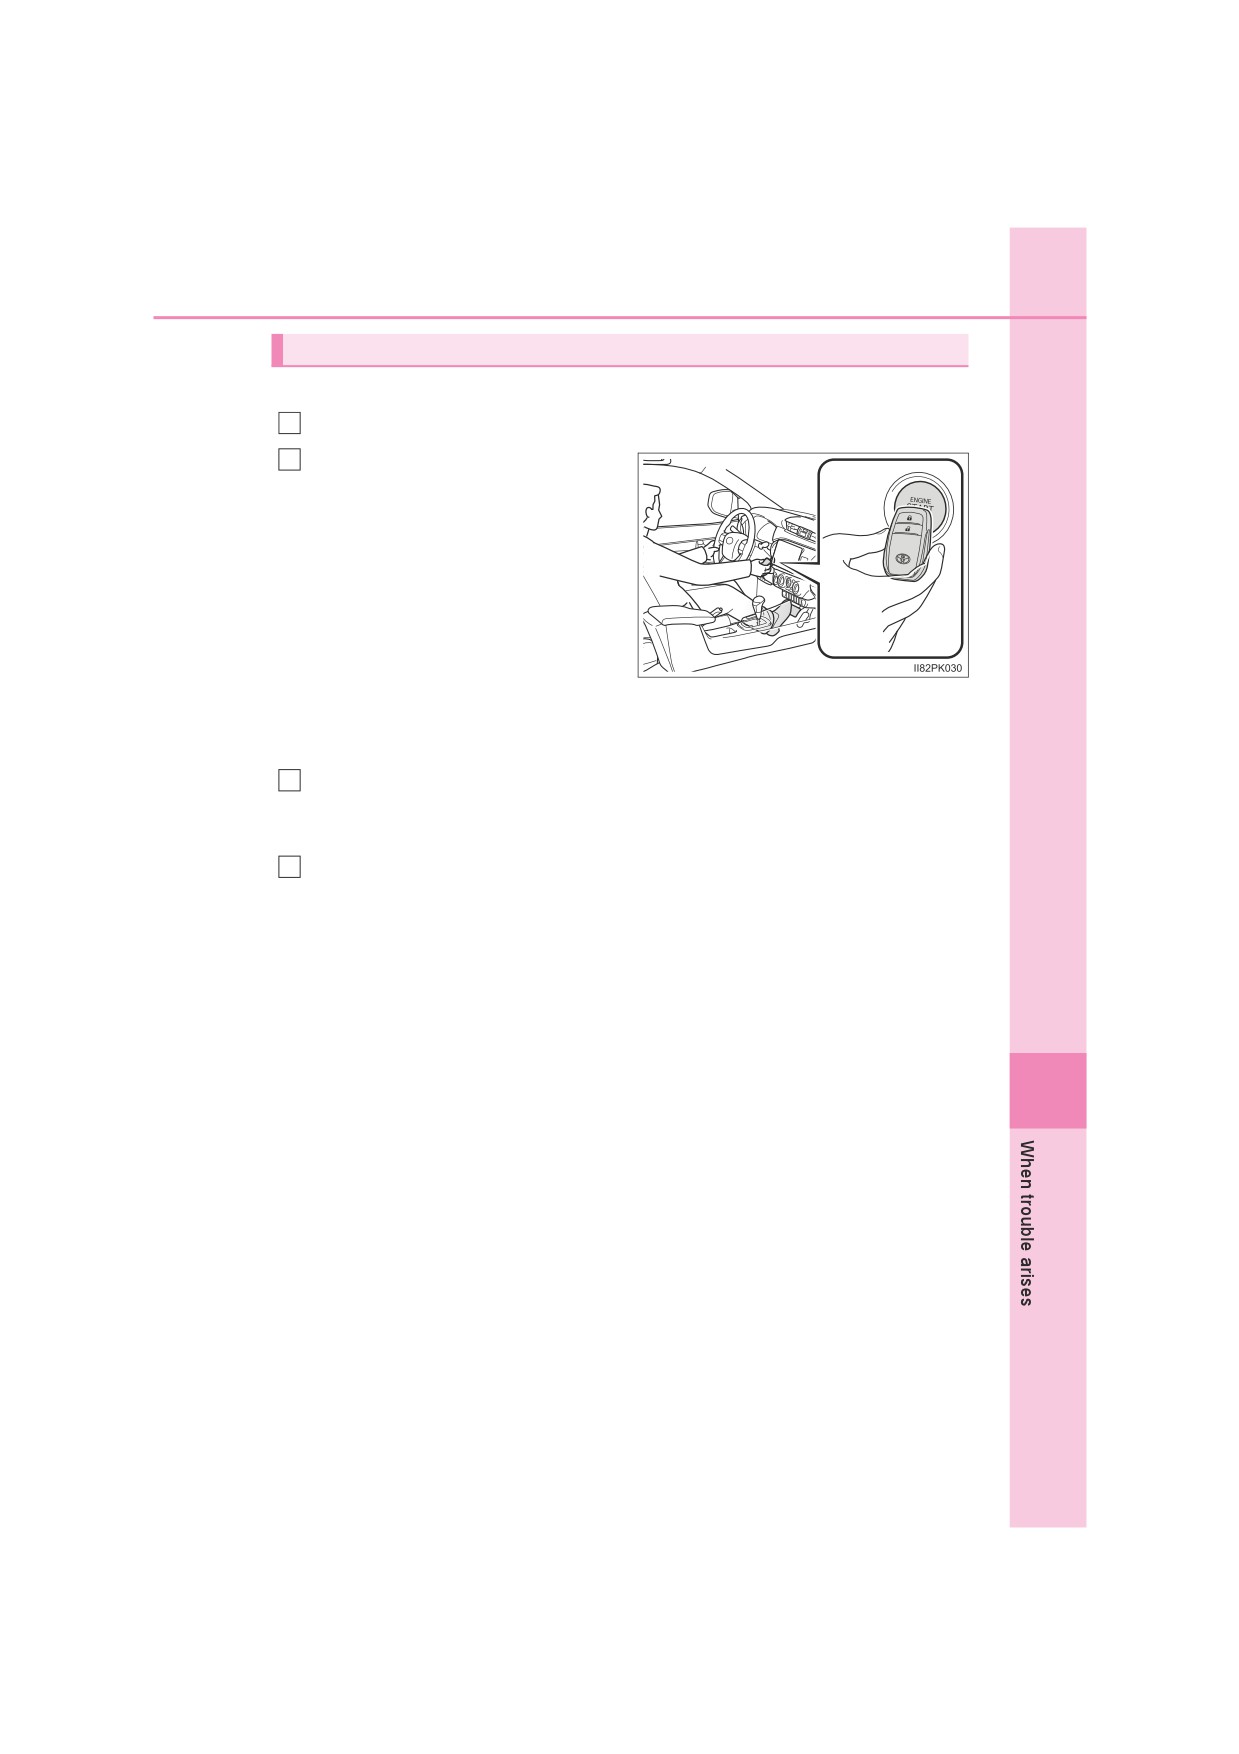
Locking and unlocking the doors
Use the mechanical key (P. 148,
150) in order to perform the follow-
ing operations:
1
Locks all doors
2
Unlocks all doors
8-2. Steps to take in an emergency
601
Starting the engine
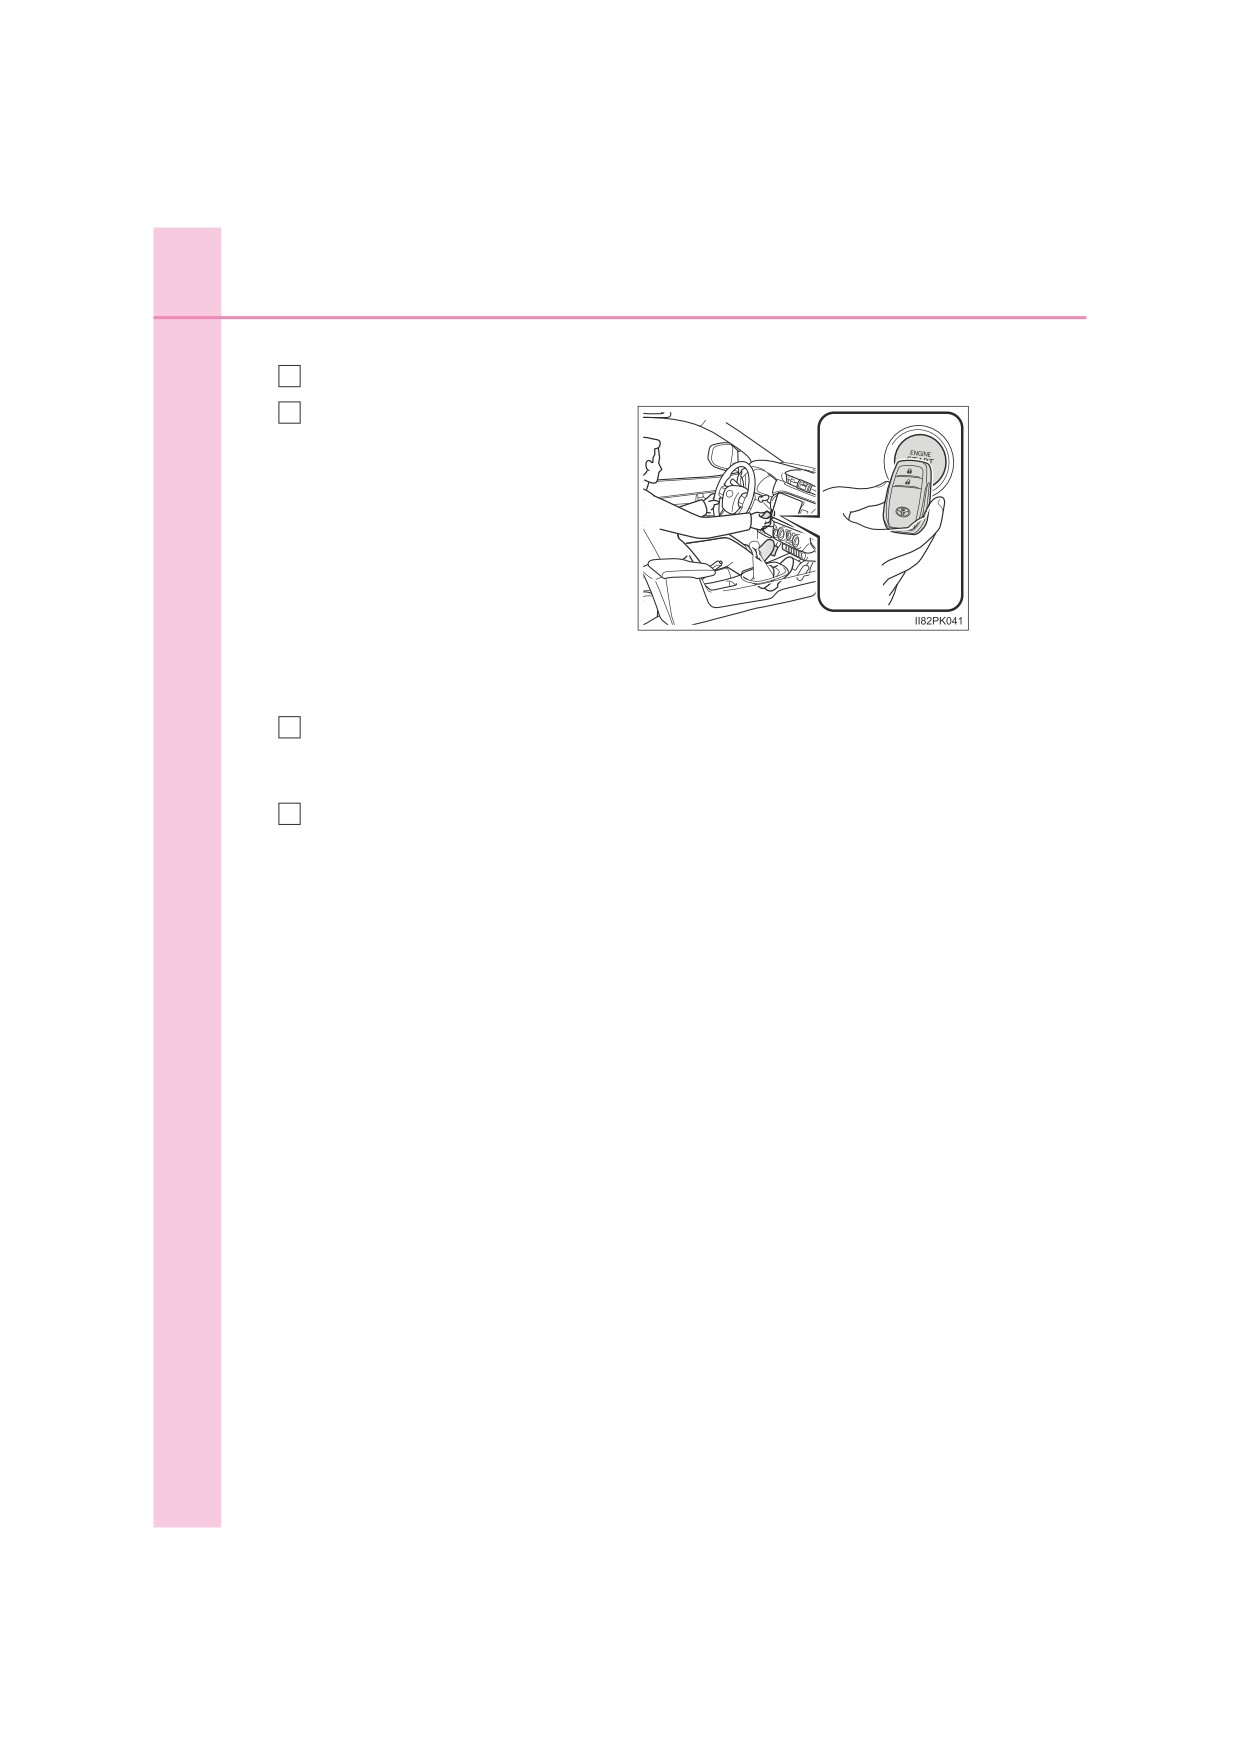
Automatic transmission
1
Ensure that the shift lever is in P and depress the brake pedal.
2
Touch the area behind the lock
button and unlock button on the
electronic key to the engine
switch.
When the electronic key is
detected, a buzzer sounds and the
engine switch will turn to IGNITION
ON mode.
When the smart entry & start sys-
tem is deactivated in customization
setting, the engine switch will turn
to ACCESSORY mode.
Firmly depress the brake pedal.
3
A message indicating how to start the engine will be displayed on the
multi-information display.
Press the engine switch.
4
In the event that the engine still cannot be started, contact any autho-
rized Toyota retailer or Toyota authorized repairer, or any reliable
repairer.
8
602
8-2. Steps to take in an emergency
Manual transmission
1
Ensure that the shift lever is in N and depress the clutch pedal.
2
Touch the area behind the lock
button and unlock button on the
electronic key to the engine
switch.
When the electronic key is
detected, a buzzer sounds and the
engine switch will turn to IGNITION
ON mode.
When the smart entry & start sys-
tem is deactivated in customization
setting, the engine switch will turn
to ACCESSORY mode.
Firmly depress the clutch pedal.
3
A message indicating how to start the engine will be displayed on the
multi-information display.
Press the engine switch.
4
In the event that the engine still cannot be started, contact any autho-
rized Toyota retailer or Toyota authorized repairer, or any reliable
repairer.
8-2. Steps to take in an emergency
603
QStopping the engine
Shift the shift lever to P (automatic transmission) or N (manual transmission)
and press the engine switch as you normally do when stopping the engine.
Q Replacing the key battery
As the above procedure is a temporary measure, it is recommended that the
electronic key battery be replaced immediately when the battery is depleted.
(P. 516)
Q Alarm (vehicles with alarm for models for model code destination W*,
and Kazakhstan)
Using the mechanical key to lock the doors will not set the alarm system.
If a door is unlocked using the mechanical key and is opened when the alarm
system is set, the alarm may be triggered.
*: See “Checking your vehicle’s model” if you are not sure of which model
your vehicle is. (P. 12)
Q Changing engine switch modes
Release the brake pedal (automatic transmission) or clutch pedal (manual
transmission) and press the engine switch in step
above.
3
The engine does not start and modes will be changed each time the switch is
pressed. (P. 226)
Q When the electronic key does not work properly
O Make sure that the smart entry & start system has not been deactivated in
the customization setting. If it is off, turn the function on.
(Customizable features: P. 646)
OCheck if battery-saving mode is set. If it is set, cancel the function.
(P. 164)
8