Toyota Corolla (2021 year). Manual in english - part 5
 

  Index      Toyota     Toyota Corolla (2021 year). Manual in english


Search            copyright infringement  


Content      ..     3      4      5      6     ..


Toyota Corolla (2021 year). Manual in english - part 5


269

4-5. Using the driving support systems

4

Dr

iv

ing

COROLLA_U

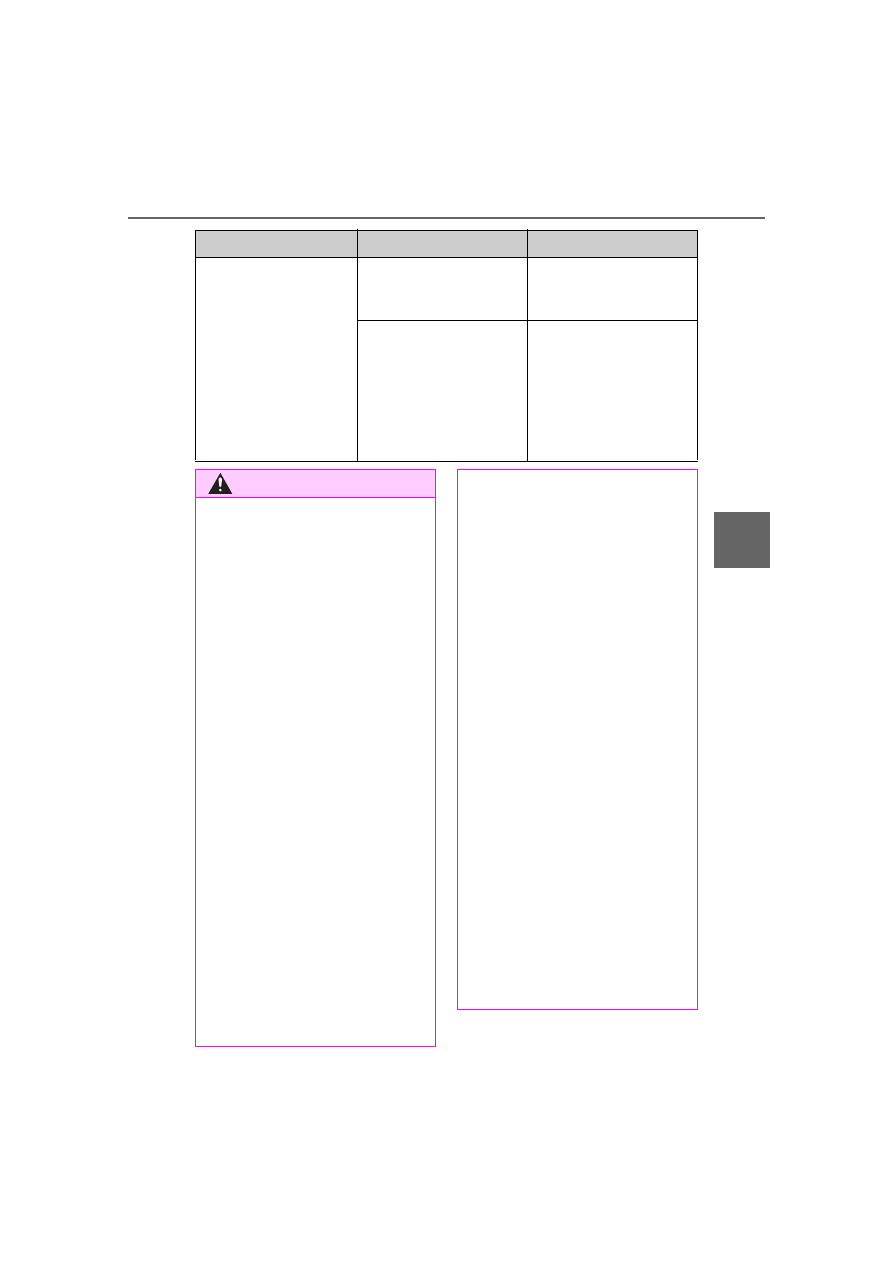
The fixed guide lines 
are very far out of 
alignment

The camera position is 
out of alignment.

Have the vehicle 
inspected by your Toy-
ota dealer.

The vehicle is tilted 
(there is a heavy load 
on the vehicle, tire 
pressure is low due to 
a tire puncture, etc.)

The vehicle is used on 
an incline.

If this happens due to 
these causes, it does 
not indicate a malfunc-
tion.
Back up while visually 
checking the vehicle’s 
surroundings.

Symptom

Likely cause

Solution

WARNING

When using the rear view 

monitor system

The rear view monitor system is a 

supplemental device intended to 

assist the driver when backing up. 

When backing up, be sure to visu-

ally check all around the vehicle 

both directly and using the mirrors 

before proceeding. Observe the 

following precautions to avoid an 

accident that could result in death 

or serious injuries.

Never depend on the rear view 

monitor system entirely when 

backing up. The image and the 

position of the guide lines dis-

played on the screen may differ 

from the actual state. Use cau-

tion, just as you would when 

backing up any vehicle.

Be sure to back up slowly, 

depressing the brake pedal to 

control vehicle speed.

The instructions given are only 

guide lines. When and how 

much to turn the steering wheel 

will vary according to traffic con-

ditions, road surface condi-

tions, vehicle condition, etc. 

when parking. It is necessary to 

be fully aware of this before 

using the rear view monitor sys-

tem.

When parking, be sure to check 

that the parking space will 

accommodate your vehicle 

before maneuvering into it.

Do not use the rear view moni-

tor system in the following 

cases:

• On icy or slick road surfaces, or 

in snow

• When using tire chains or emer-

gency tires

• When the trunk is not closed 

completely

• On roads that are not flat or 

straight, such as curves or 

slopes

In low temperatures, the screen 

may darken or the image may 

become faint. The image could 

distort when the vehicle is mov-

ing, or you may become unable 

to see the image on the screen. 

Be sure to visually check all 

around the vehicle both directly 

and using the mirrors before 

proceeding.

If the tire sizes are changed, the 

position of the fixed guide lines 

displayed on the screen may 

change.

-------------------------------------------------------------------------------------------------------------------------------------------------------------

270

4-5. Using the driving support systems

COROLLA_U

WARNING

The camera uses a special lens. 

The distances between objects 

and pedestrians that appear in 

the image displayed on the 

screen will differ from the actual 

distances. (

P.265)

NOTICE

How to use the camera

The rear view monitor system 

may not operate properly in the 

following cases.

• If the back of the vehicle is hit, 

the position and mounting angle 

of the camera may change.

• As the camera has a water 

proof construction, do not 

detach, disassemble or modify 

it. This may cause incorrect 

operation.

• When cleaning the camera lens, 

flush the camera with a large 

quantity of water and wipe it 

with a soft and wet cloth. 

Strongly rubbing the camera 

lens may cause the camera lens 

to be scratched and unable to 

transmit a clear image.

• Do not allow organic solvent, 

car wax, window cleaner or 

glass coating to adhere to the 

camera. If this happens, wipe it 

off as soon as possible.

• If the temperature changes rap-

idly, such as when hot water is 

poured on the vehicle in cold 

weather, the system may not 

operate normally.

• When washing the vehicle, do 

not apply intensive bursts of 

water to the camera or camera 

area. Doing so may result in the 

camera malfunctioning.

Do not expose the camera to 

strong impact as this could 

cause a malfunction. If this hap-

pens, have the vehicle 

inspected by your Toyota dealer 

as soon as possible.

-------------------------------------------------------------------------------------------------------------------------------------------------------------

271

4-5. Using the driving support systems

4

Dr

iv

ing

COROLLA_U

*

: If equipped

Each time the switch is pressed, the 
system changes between sport 
mode and normal mode.

1

Normal mode

Provides an optimal balance of fuel 
economy, quietness, and dynamic 
performance. Suitable for normal 
driving.

2

Sport mode

Controls the transmission and 
engine to provide quick, powerful 
acceleration. This mode also 
changes the steering feel, making it 
suitable for when agile driving 
response is desired, such as when 
driving on roads with many curves.
When the sport mode is selected, 
sport mode indicator comes on.

Automatic deactivation of sport 

mode

If the engine switch is turned off 

after driving in sport mode, the drive 

mode will be changed to normal 

mode.

Driving mode select 

switch

*

The driving modes can be 
selected to suit driving con-
dition.

Selecting a drive mode

-------------------------------------------------------------------------------------------------------------------------------------------------------------

272

4-5. Using the driving support systems

COROLLA_U

ABS (Anti-lock Brake Sys-
tem)

Helps to prevent wheel lock 
when the brakes are applied 
suddenly, or if the brakes are 
applied while driving on a slip-
pery road surface

Brake assist

Generates an increased level of 
braking force after the brake 
pedal is depressed when the 
system detects a panic stop sit-
uation

VSC (Vehicle Stability Con-
trol)

Helps the driver to control skid-
ding when swerving suddenly or 
turning on slippery road sur-
faces.

Enhanced VSC (Enhanced 
Vehicle Stability Control)

Provides cooperative control of 
the ABS, TRAC, VSC and EPS.
Helps to maintain directional 
stability when swerving on slip-
pery road surfaces by con-
trolling steering performance.

TRAC (Traction Control)

Helps to maintain drive power 
and prevent the drive wheels 
from spinning when starting the 
vehicle or accelerating on slip-
pery roads

Active Cornering Assist 
(ACA)

Helps to prevent the vehicle 
from drifting to the outer side by 
performing inner wheel brake 
control when attempting to 
accelerate while turning

Hill-start assist control

Helps to reduce the backward 
movement of the vehicle when 
starting on an uphill

EPS (Electric Power Steer-
ing)

Employs an electric motor to 
reduce the amount of effort 
needed to turn the steering 
wheel.

The Secondary Collision 
Brake

When the SRS airbag sensor 
detects a collision and the sys-
tem operates, the brakes and 
brake lights are automatically 

Driving assist systems

To keep driving safety and 
performance, the following 
systems operate automati-
cally in response to various 
driving situations. Be 
aware, however, that these 
systems are supplementary 
and should not be relied 
upon too heavily when oper-
ating the vehicle.

Summary of the driving 
assist systems

-------------------------------------------------------------------------------------------------------------------------------------------------------------

273

4-5. Using the driving support systems

4

Dr

iv

ing

COROLLA_U

controlled to reduce the vehicle 
speed and help reduce the pos-
sibility of further damage due to 
a secondary collision.

When the TRAC/VSC systems 

are operating

The slip indicator light will flash 

while the TRAC/VSC systems are 

operating.

Disabling the TRAC system

If the vehicle gets stuck in mud, dirt 

or snow, the TRAC system may 

reduce power from the engine to the 
wheels. Pressing 

 to turn the 

system off may make it easier for 

you to rock the vehicle in order to 

free it.
To turn the TRAC system off, quickly 
press and release 

.

The “Traction Control Turned OFF” 
will be shown on the multi-informa-
tion display.

Press 

 again to turn the system 

back on.

Turning off both TRAC and VSC 

systems

To turn the TRAC and VSC systems 
off, press and hold

 for more 

than 3 seconds while the vehicle is 

stopped.
The VSC OFF indicator light will 
come on and the “Traction Control 
Turned OFF” will be shown on the 
multi-information display.

*

Press

 again to turn the system 

back on.

*

: PCS will also be disabled (only 

Pre-Collision warning is avail-
able). The PCS warning light will 
come on and a message will be 
displayed on the multi-information 
display. (

P.210)

When the message is dis-

played on the multi-information 

display showing that TRAC has 
been disabled even if 

 has 

not been pressed

TRAC is temporary deactivated. If 

the information continues to show, 

contact your Toyota dealer.

Operating conditions of 

hill-start assist control

When the following four conditions 

are met, the hill-start assist control 

will operate:

Vehicles with continuously vari-

able transmission: The shift lever 

is in a position other than P or N 

(when starting off forward/back-

ward on an upward incline)

Vehicles with manual transmis-

sion: The shift lever is in a position 

other than R when starting off for-

ward on an upward incline, or the 

shift lever is in R when starting off 

backward on an upward incline.

The vehicle is stopped

The accelerator pedal is not 

-------------------------------------------------------------------------------------------------------------------------------------------------------------

274

4-5. Using the driving support systems

COROLLA_U

depressed

The parking brake is not engaged

Automatic system cancelation 

of hill-start assist control

The hill-start assist control will turn 

off in any of the following situations:

Vehicles with a continuously vari-

able transmission: The shift lever 

is shifted to P or N.

Vehicles with a manual transmis-

sion: The shift lever is shifted to R 

when starting off forward on an 

upward incline, or the shift lever is 

shifted to other than R when start-

ing off backward on an upward 

incline.

The accelerator pedal is 

depressed

The parking brake is engaged

2 seconds at maximum elapsed 

after the brake pedal is released

Sounds and vibrations caused 

by the ABS, brake assist, VSC, 

TRAC and hill-start assist con-

trol systems

A sound may be heard from the 

engine compartment when the 

brake pedal is depressed repeat-

edly, when the engine is started or 

just after the vehicle begins to 

move. This sound does not indi-

cate that a malfunction has 

occurred in any of these systems.

Any of the following conditions 

may occur when the above sys-

tems are operating.

None of these indicates that a 

malfunction has occurred.

• Vibrations may be felt through the 

vehicle body and steering.

• A motor sound may be heard also 

after the vehicle comes to a stop.

• The brake pedal may pulsate 

slightly after the ABS is activated.

• The brake pedal may move down 

slightly after the ABS is activated.

Active Cornering Assist opera-

tion sounds and vibrations

When the Active Cornering Assist is 

operated, operation sounds and 

vibrations may be generated from 

the brake system, but this is not a 

malfunction.

EPS operation sound

When the steering wheel is oper-

ated, a motor sound (whirring 

sound) may be heard. This does not 

indicate a malfunction.

Automatic reactivation of TRAC 

and VSC systems

After turning the TRAC and VSC 

systems off, the systems will be 

automatically re-enabled in the fol-

lowing situations:

When the engine switch is turned 

off

If only the TRAC system is turned 

off, the TRAC will turn on when 

vehicle speed increases

If both the TRAC and VSC sys-

tems are turned off, automatic 

re-enabling will not occur when 

vehicle speed increases.

Operating conditions of Active 

Cornering Assist

The system operates when the fol-

lowing occurs.

TRAC/VSC can operate

The driver is attempting to accel-

erate while turning

The system detects that the vehi-

cle is drifting to the outer side

The brake pedal is released

Reduced effectiveness of the 

EPS system

The effectiveness of the EPS sys-

tem is reduced to prevent the sys-

tem from overheating when there is 

frequent steering input over an 

extended period of time. The steer-

ing wheel may feel heavy as a 

result. Should this occur, refrain 

from excessive steering input or 

stop the vehicle and turn the engine 

-------------------------------------------------------------------------------------------------------------------------------------------------------------

275

4-5. Using the driving support systems

4

Dr

iv

ing

COROLLA_U

off. The EPS system should return 

to normal within 10 minutes.

Secondary Collision Brake 

operating conditions

The system operates when the SRS 

airbag sensor detects a collision 

while the vehicle is in motion.

However, the system does not oper-

ate in any of the following situations.

The vehicle speed is below 6 mph 

(10 km/h)

Components are damaged

Secondary Collision Brake 

automatic cancellation

The system is automatically can-

celed in any of the following situa-

tions.

The vehicle speed drops below 

approximately 6 mph (10 km/h)

A certain amount of time elapses 

during operation

The accelerator pedal is 

depressed a large amount

WARNING

The ABS does not operate 

effectively when

The limits of tire gripping perfor-

mance have been exceeded 

(such as excessively worn tires 

on a snow covered road).

The vehicle hydroplanes while 

driving at high speed on wet or 

slick roads.

Stopping distance when the 

ABS is operating may exceed 

that of normal conditions

The ABS is not designed to 

shorten the vehicle’s stopping dis-

tance. Always maintain a safe dis-

tance from the vehicle in front of 

you, especially in the following sit-

uations:

When driving on dirt, gravel or 

snow-covered roads

When driving with tire chains

When driving over bumps in the 

road

When driving over roads with 

potholes or uneven surfaces

TRAC/VSC may not operate 

effectively when

Directional control and power may 

not be achievable while driving on 

slippery road surfaces, even if the 

TRAC/VSC system is operating. 

Drive the vehicle carefully in con-

ditions where stability and power 

may be lost.

Active Cornering Assist does 

not operate effectively when

Do not overly rely on Active 

Cornering Assist. Active Corner-

ing Assist may not operate 

effectively when accelerating 

down slopes or driving on slip-

pery road surfaces.

When Active Cornering Assist 

frequently operates, Active Cor-

nering Assist may temporarily 

stop operating to ensure proper 

operation of the brakes, TRAC 

and VSC.

Hill-start assist control does 

not operate effectively when

Do not overly rely on hill-start 

assist control. Hill-start assist 

control may not operate effec-

tively on steep inclines and 

roads covered with ice.

Unlike the parking brake, 

hill-start assist control is not 

intended to hold the vehicle sta-

tionary for an extended period 

of time. Do not attempt to use 

hill-start assist control to hold 

the vehicle on an incline, as 

doing so may lead to an acci-

dent.

-------------------------------------------------------------------------------------------------------------------------------------------------------------

276

4-5. Using the driving support systems

COROLLA_U

WARNING

When the TRAC/VSC is acti-

vated

The slip indicator light flashes. 

Always drive carefully. Reckless 

driving may cause an accident. 

Exercise particular care when the 

indicator light flashes.

When the TRAC/VSC systems 

are turned off

Be especially careful and drive at 

a speed appropriate to the road 

conditions. As these are the sys-

tems to help ensure vehicle stabil-

ity and driving force, do not turn 

the TRAC/VSC systems off 

unless necessary.

Replacing tires

Make sure that all tires are of the 

specified size, brand, tread pat-

tern and total load capacity. In 

addition, make sure that the tires 

are inflated to the recommended 

tire inflation pressure level.
The ABS, TRAC and VSC sys-

tems will not function correctly if 

different tires are installed on the 

vehicle.

Contact your Toyota dealer for fur-

ther information when replacing 

tires or wheels.

Handling of tires and the sus-

pension

Using tires with any kind of prob-

lem or modifying the suspension 

will affect the driving assist sys-

tems, and may cause a system to 

malfunction.

Secondary Collision Brake

Do not rely solely upon the Sec-

ondary Collision Brake. This sys-

tem is designed to help reduce 

the possibility of further damage 

due to a secondary collision, how-

ever, that effect changes accord-

ing to various conditions. Overly 

relying on the system may result 

in death or serious injury.

-------------------------------------------------------------------------------------------------------------------------------------------------------------

277

4-6. Driving tips

4

Dr

iv

ing

COROLLA_U

4-6.Driving tips

Use fluids that are appropriate 
to the prevailing outside tem-
peratures.

• Engine oil
• Engine coolant
• Washer fluid

Have a service technician 
inspect the condition of the 
battery.

Have the vehicle fitted with 
four snow tires or purchase a 
set of tire chains for the front 
tires.

Ensure that all tires are the same 
size and brand, and that chains 
match the size of the tires.

Winter driving tips

Carry out the necessary 
preparations and inspec-
tions before driving the 
vehicle in winter. Always 
drive the vehicle in a man-
ner appropriate to the pre-
vailing weather conditions.

Pre-winter preparations

WARNING

Driving with snow tires

Observe the following precautions 

to reduce the risk of accidents.

Failure to do so may result in a 

loss of vehicle control and cause 

death or serious injury.

Use tires of the size specified.

Maintain the recommended 

level of air pressure.

Do not drive in excess of 75 

mph (120 km/h), regardless of 

the type of snow tires being 

used.

Use snow tires on all, not just 

some wheels.

Driving with tire chains

Observe the following precautions 

to reduce the risk of accidents.

Failure to do so may result in the 

vehicle being unable to be driven 

safely, and may cause death or 

serious injury.

Do not drive in excess of the 

speed limit specified for the tire 

chains being used, or 30 mph 

(50 km/h), whichever is lower.

Avoid driving on bumpy road 

surfaces or over potholes.

Avoid sudden acceleration, 

abrupt steering, sudden brak-

ing and shifting operations that 

cause sudden engine braking.

Slow down sufficiently before 

entering a curve to ensure that 

vehicle control is maintained.

Do not use LTA (Lane Tracing 

Assist) system. (if equipped)

Do not use LDA (Lane Depar-

ture Alert with steering control) 

system. (if equipped)

NOTICE

Repairing or replacing snow 

tires (vehicles with a tire pres-

sure warning system)

Request repairs or replacement of 

snow tires from Toyota dealers or 

legitimate tire retailers.

This is because the removal and 

attachment of snow tires affects 

the operation of the tire pressure 

warning valves and transmitters.

-------------------------------------------------------------------------------------------------------------------------------------------------------------

278

4-6. Driving tips

COROLLA_U

Perform the following according 
to the driving conditions:

Do not try to forcibly open a 
window or move a wiper that 
is frozen. Pour warm water 
over the frozen area to melt 
the ice. Wipe away the water 
immediately to prevent it from 
freezing.

To ensure proper operation of 
the climate control system 
fan, remove any snow that 
has accumulated on the air 
inlet vents in front of the wind-
shield.

Check for and remove any 
excess ice or snow that may 
have accumulated on the 
exterior lights, vehicle’s roof, 
chassis, around the tires or on 
the brakes.

Remove any snow or mud 
from the bottom of your shoes 
before getting in the vehicle.

Accelerate the vehicle slowly, 
keep a safe distance between 
you and the vehicle ahead, and 
drive at a reduced speed suit-
able to road conditions.

Park the vehicle and shift the 
shift lever to P (continuously 

variable transmission), or 1 or 
R (manual  transmission) 
without setting the parking 
brake. The parking brake may 
freeze up, preventing it from 
being released. If the vehicle 
is parked without setting the 
parking brake, make sure to 
block the wheels.
Failure to do so may be dan-
gerous because it may cause 
the vehicle to move unexpect-
edly, possibly leading to an 
accident.

Vehicles with a continuously 
variable transmission: If the 
vehicle is parked without set-
ting the parking brake, con-
firm that the shift lever cannot 
be moved out of P

*

.

*

: The shift lever will be locked if it is 

attempted to be shifted from P to 
any other position without 
depressing the brake pedal. If the 
shift lever can be shifted from P, 
there may be a problem with the 
shift lock system. Have the vehi-
cle inspected by your Toyota 
dealer immediately.

Use the correct tire chain size 
when mounting the tire chains.
Chain size is regulated for each 
tire size.

Before driving the vehicle

When driving the vehicle

When parking the vehicle

Selecting tire chains

-------------------------------------------------------------------------------------------------------------------------------------------------------------

279

4-6. Driving tips

4

Dr

iv

ing

COROLLA_U

Side chain (0.12 in. [3 mm] in 
diameter)
Side chain (0.39 in. [10 mm] 
in width)
Side chain (1.18 in. [30 mm] 
in length)
Cross chain (0.16 in. [4 mm] 
in diameter)
Cross chain (0.55 in. [14 mm] 
in width)
Cross chain (0.98 in. [25 mm] 
in length)

Regulations regarding the use 
of tire chains vary depending on 
location and type of road. 
Always check local regulations 
before installing chains.

Tire chain installation

Observe the following precautions 

when installing and removing 

chains:

Install and remove tire chains in a 

safe location.

Install tire chains on the front tires 

only. Do not install tire chains on 

the rear tires.

Install tire chains on the front tires 

as tightly as possible. Retighten 

chains after driving 1/4

1/2 mile 

(0.5

1.0 km).

Install tire chains following the 

instructions provided with the tire 

chains.

Regulations on the use of 
tire chains

NOTICE

Fitting tire chains (vehicles 

with a tire pressure warning 

system)

The tire pressure warning valves 

and transmitters may not function 

correctly when tire chains are fit-

ted.

-------------------------------------------------------------------------------------------------------------------------------------------------------------

280

4-6. Driving tips

COROLLA_U

-------------------------------------------------------------------------------------------------------------------------------------------------------------

281

5

5

Audio

COROLLA_U

Audio

.

5-1. Basic function

Buttons overview.........

283

Menu screen ...............

285

Status icon ..................

286

“Setup” screen ............

288

5-2. Basic information before 

operation

Initial screen................

289

Touch screen...............

290

Home screen...............

292

Entering letters and num-

bers/list screen operation

..................................

293

Screen adjustment ......

296

Linking multi-information 

display and the system

..................................

297

5-3. Connectivity settings

Registering/Connecting a 

Bluetooth

®

 device .....

298

Setting Bluetooth

®

 details

..................................

302

Wi-Fi

®

 Hotspot ............

310

Apple CarPlay/

Android Auto..............

314

5-4. Other settings

General settings..........

321

Voice settings..............

325

Vehicle settings ...........

326

5-5. Using the audio/visual 

system

Quick reference...........

328

Some basics................

329

5-6. Radio operation

AM radio/FM radio/Siri-

usXM

®

 Satellite 

Radio(SXM)...............

333

Internet radio ...............

338

5-7. Media operation

USB memory...............

339

iPod/iPhone (Apple Car-

Play) ..........................

341

Android Auto................

344

Bluetooth

®

 audio .........

345

5-8. Audio/visual remote con-

trols

Steering switches ........

349

5-9. Audio settings

Setup...........................

351

5-10.Tips for operating the 

audio/visual system

Operating information..

352

5-11.Voice command system 

operation

Voice command system

..................................

364

Command list ..............

367

5-12.Mobile Assistant opera-

tion

Mobile Assistant ..........

371

-------------------------------------------------------------------------------------------------------------------------------------------------------------

282

COROLLA_U

5-13.Phone operation 

(Hands-free system for 
cellular phones)

Quick reference...........

373

Some basics ...............

374

Placing a call using the 

Bluetooth

®

 hands-free sys-

tem ............................

378

Receiving a call using the 

Bluetooth

®

 hands-free sys-

tem ............................

381

Talking on the Bluetooth

®


hands-free system.....

382

Bluetooth

®

 phone message 

function......................

384

5-14.Phone settings

Setup...........................

388

5-15.What to do if... (Blue-

tooth

®

)

Troubleshooting ..........

398

5-16.Connected Services Over-

view

Functional overview ....

402

Type A: Function achieved 

by using a smart phone or 
DCM..........................

403

Type B: Function achieved 

by using DCM and the sys-
tem ............................

406

Type C: Function achieved 

by using DCM............

407

Type D: Function achieved 

by using DCM and a 
smartphone ...............

407

5-17.Connected Services 

Operation

Toyota apps.................

409

5-18.Toyota apps settings

Setup...........................

413

-------------------------------------------------------------------------------------------------------------------------------------------------------------

283

5-1. Basic function

5

Audio

COROLLA_U

5-1.Basic function

*

: If equipped

Audio Plus/Premium Audio

Owners of this system should refer to the “NAVIGATION AND MUL-
TIMEDIA SYSTEM OWNER’S MANUAL”.

By touching the screen with your finger, you can control the 
selected functions. (

P.290)

Press to seek up or down for a radio station or to access a 
desired track/file. (

P.333, 339, 341, 345)

Press to access the Bluetooth

®

 hands-free system. (

P.373)

When an Apple CarPlay connection is established, press to dis-
play the Phone app screen.

*1, 2

Press to display the Toyota apps screen.

*2, 3

 (

P.402)

Turn to change the radio station or skip to the next or previous 
track/file. (

P.333, 339, 341, 345)

Press to turn the audio/visual system on and off, and turn it to 
adjust the volume. Press and hold to restart the system. (

P.289

Buttons overview

*

Operations of each part

-------------------------------------------------------------------------------------------------------------------------------------------------------------

284

5-1. Basic function

COROLLA_U

329)
When an Apple CarPlay/Android Auto connection is established, 
press to display the Maps app screen.

*1, 2

Press to display the audio/visual system screen. (

P.328, 329)

Press to display the “Menu” screen. (

P.285)

Press to display the home screen. (

P.292)

*1

:For details about Apple CarPlay/Android Auto: 

P.314

*2

:This function is not made available in some countries or areas.

*3

:When an Apple CarPlay/Android Auto connection is established, this 

function will be unavailable.

The screen shots in this document 

and the actual screens of the sys-

tem differ depending on whether the 

functions and/or a contract existed.

WARNING

For safety, the driver should not 

operate the system while he/she 

is driving. Insufficient attention to 

the road and traffic may cause an 

accident.

-------------------------------------------------------------------------------------------------------------------------------------------------------------

285

5-1. Basic function

5

Audio

COROLLA_U

Press the “MENU” button to display the “Menu” screen.

Displays the clock. Select to display the clock settings screen. 
(

P.322)

Select to display the audio control screen. (

P.328)

Select to display the hands-free operation screen. (

P.373)

When an Apple CarPlay connection is established, select to dis-
play the Phone app screen.

*1

Select to display the application screen.

*1, 2

 (

P.402)

When an Apple CarPlay/Android Auto connection is established 
and this button displays “Apple CarPlay”/“Android Auto”, select to 
display the home screen of Apple CarPlay/Android Auto.

*1


(

P.314)

Vehicles without DCM: Select to display the fuel consumption 
screen. (

P.106)

Vehicles with DCM: Select to display the information screen.
Select “ECO” to display the fuel consumption screen. (

P.106)

The “Vehicle Alert History” shown on the information screen. 

*1

Select to display the “Setup” screen. (

P.288)

Select to adjust the contrast, brightness, etc. of the display. 
(

P.296)

*1

:This function is not made available in some countries or areas.

*2

:When an Apple CarPlay/Android Auto connection is established, this 

function will be unavailable.

Menu screen

Menu screen operation

-------------------------------------------------------------------------------------------------------------------------------------------------------------

286

5-1. Basic function

COROLLA_U

Indicate during data commu-
nication performed via Data 
Communication Module 
(DCM)

*1

The reception level of Data 
Communication Module 
(DCM) display

*1

 (

P.286)

The reception level of the 
connected phone display 
(

P.286)

Remaining battery charge 
display (

P.287)

Bluetooth

®

 phone connection 

condition display (

P.287)

Wi-Fi

®

 connection condition 

display

*1, 2

 (

P.310)

*1

:Vehicles with DCM

*2

:This function is not made avail-

able in some countries or areas.

The number of status icons that can 

be displayed differs depending on 

the displayed screen.

The level of reception does not 
always correspond with the level 
displayed on the cellular phone. 
The level of reception may not 
be displayed depending on the 
phone you have.
When the cellular phone is out 
of the service area or in a place 
inaccessible by radio waves, 

/

 is displayed.

“Rm” is displayed when receiv-
ing in a roaming area. While 
roaming, display “Rm” top-left 
on the icon.
The receiving area may not be 
displayed depending on the type 
of Bluetooth

®

 phone you have.

While connected with cellular 
phone

Status icon

Status icons are displayed 
at the top of the screen.

Status icon explanation

Reception level display

Reception Level

Indicators

Poor

Excellent

-------------------------------------------------------------------------------------------------------------------------------------------------------------

287

5-1. Basic function

5

Audio

COROLLA_U

While using Data Communi-
cation Module (DCM)

While using Wi-Fi

®

 Hotspot

When Wi-Fi

®

 Hotspot is off, no item 

is displayed.

The amount displayed does not 
always correspond with the 
amount displayed on the Blue-
tooth

®

 device.

The amount of battery charge 
left may not be displayed 
depending on the type of the 
Bluetooth

®

 device connected.

This system does not have a 
charging function.

An antenna for the Bluetooth

®


connection is built into the 
instrument panel.

The condition of the Bluetooth

®


connection may deteriorate and 
the system may not function 
when a Bluetooth

®

 phone is 

used in the following conditions 
and/or places:
The cellular phone is obstructed 
by certain objects (such as 
when it is behind the seat or in 
the glove box or console box).
The cellular phone is touching or 
is covered with metal materials.

Leave the Bluetooth

®

 phone in a 

place where the condition of the 
Bluetooth

®

 connection is good.

Reception Level

Indicators

Poor

Excellent

Reception Level

Indicators

No connection

Connected

Remaining battery charge 
display

Remaining 

charge

Indicators

Empty

Full

Bluetooth

®

 connection 

condition display

Indicators

Conditions

(Blue)

Indicates that the con-
dition of the Blue-
tooth

®

 connection is 

good.

(Gray)

While in this condition, 
sound quality during 
phone calls may dete-
riorate.

Indicates that the cel-
lular phone is not con-
nected via Bluetooth

®

.

-------------------------------------------------------------------------------------------------------------------------------------------------------------

288

5-1. Basic function

COROLLA_U

Press the “MENU” button, then 
select “Setup” to display the 
“Setup” screen. The items 
shown on the “Setup” screen 
can be set.

Select to change the selected 
language, operation sound 
settings, etc. (

P.321)

Select to set Bluetooth

®


device and Bluetooth

®

 sys-

tem settings. (

P.302)

Select to set audio settings. 
(

P.351)

Select to set the phone 
sound, contacts, message 
settings, etc. (

P.388)

Select to set the voice set-
tings. (

P.325)

Select to set vehicle informa-
tion. (

P.326)

Select to set Wi-Fi

®

 connec-

tion settings.

*1, 2

 (

P.311)

Select to set Toyota apps set-
tings.

*2

 (

P.413)

*1

:Vehicles with DCM

*2

:This function is not made avail-

able in some countries or areas.

“Setup” screen

“Setup” screen

-------------------------------------------------------------------------------------------------------------------------------------------------------------

289

5-2. Basic information before operation

5

Audio

COROLLA_U

5-2.Basic information before operation

After a few seconds, the caution 
screen will be displayed.
After about 5 seconds or select-
ing “Continue”, the caution 
screen automatically switches to 
the next screen.

When system response is 
extremely slow, the system can 
be restarted.
Press and hold the “POWER 
VOLUME” knob for 3 seconds or 
more.

Initial screen

When the engine switch is 
turned to ACC or ON, the 
initial screen will be dis-
played and the system will 
begin operating.

Caution screen

WARNING

When the vehicle is stopped with 

the engine running, always apply 

the parking brake for safety.

Restarting the system

-------------------------------------------------------------------------------------------------------------------------------------------------------------

290

5-2. Basic information before operation

COROLLA_U

Operations are performed by touching the touch screen directly with 
your finger.

*

: The above operations may not be performed on all screens.

Flick operations may not be performed smoothly at high altitudes.

This system is operated mainly 
by the buttons on the screen. 
(Referred to as screen buttons 
in this manual.)
When a screen button is 

touched, a beep sounds. (To set 
the beep sound: 

P.321)

If the system does not respond to 

touching a screen button, move 

your finger away from the screen 

and then touch it again.

Dimmed screen buttons cannot be 

Touch screen

Touch screen gestures

Operation method

Outline

Main use

Touch

Quickly touch and 
release once.

Selecting an item 
on the screen

Drag

*

Touch the screen 
with your finger, 
and move the 
screen to the 
desired position.

Scrolling the lists

Flick

*

Quickly move the 
screen by flicking 
with your finger.

Scrolling the main 
screen page

Touch screen operation

-------------------------------------------------------------------------------------------------------------------------------------------------------------

291

5-2. Basic information before operation

5

Audio

COROLLA_U

operated.

The displayed image may become 

darker and moving images may 

be slightly distorted when the 

screen is cold.

In extremely cold conditions, the 

screen may not be displayed and 

the data input by a user may be 

deleted. Also, the screen buttons 

may be harder than usual to 

depress.

When you look at the screen 

through polarized material such as 

polarized sunglasses, the screen 

may be dark and hard to see. If 

so, look at the screen from differ-

ent angles, adjust the screen set-

tings on the display settings 

screen or take off your sun-

glasses.

When 

 is displayed on the 

screen, select 

 to return to the 

previous screen.

The operable areas of the 
capacitive touch screen buttons 
use capacitive touch sensors 
and may not operate properly in 
the following situations:

If the screen is dirty or wet

If a source of strong electro-
magnetic waves is brought 
near the screen

If a glove is worn during oper-
ation

If the screen is touched by a 
fingernail

If a stylus is used to operate 
the buttons

If your palm touches the oper-
able area of another button 
during operation

If a button is touched quickly

If the operable part of a 
capacitive touch screen but-
ton is touched by or covered 
with a metal object, such as 
the following, it may not oper-
ate properly:

• Magnetic isolation cards
• Metallic foil, such as the inner 

packaging of a cigarette box

• Metallic wallets or bags
• Coins
• Discs, such as a CD or DVD

If the operable part of a 
capacitive touch screen but-
ton is wiped, it may operate 
unintentionally.

If the capacitive touch screen 
button is being touched when 
the engine switch is changed 
to ACC or ON, the button may 
not operate properly. In this 
case, remove anything touch-
ing the button, turn the engine 
switch off and then turn it to 

NOTICE

To prevent damaging the 

screen, lightly touch the screen 

buttons with your finger.

Do not use objects other than 

your finger to touch the screen.

Wipe off fingerprints using a 

glass cleaning cloth. Do not use 

chemical cleaners to clean the 

screen, as they may damage 

the touch screen.

Capacitive touch screen 
buttons

-------------------------------------------------------------------------------------------------------------------------------------------------------------

292

5-2. Basic information before operation

COROLLA_U

ACC or ON, or restart the sys-
tem by press and hold the 
“POWER VOLUME” knob for 
3 seconds or more.

Capacitive touch screen button sen-

sor sensitivity can be adjusted. 

(

P.321)

1

Press the “HOME” button.

2

Check that the home screen 
is displayed.

Selecting a screen will display it full 

screen.

The display information and area 

on the home screen can be cus-

tomized.

The home screen can be set to 

several types of split layouts

Home screen

On the home screen, multi-
ple screens, such as the 
audio/visual system screen, 
hands-free screen and clock 
screen, can be displayed 
simultaneously.

Home screen operation

-------------------------------------------------------------------------------------------------------------------------------------------------------------

293

5-2. Basic information before operation

5

Audio

COROLLA_U

The display information/area on 
the home screen and the home 
screen layout can be changed.

1

Press the “MENU” button.

2

Select “Setup”.

If the general settings screen is not 

displayed, select “General”.

3

Select “Customize Home 
Screen”.

4

Select the items to be set.

Select to change the display 
information and area on the 
home screen.
Select to change the home 
screen layout.

When searching by a name or 
entering data, letters and num-
bers can be entered via the 
screen.

Text field. Entered charac-
ter(s) will be displayed.
Select to erase one charac-
ter. 
Select and hold to continue 
erasing characters.
Select to move the cursor.
Select to choose predictive 
text candidate for entered 
text. (

P.294)

Select to display a list of pre-
dictive text candidates when 
there is more than one. 
(

P.294)

Select to enter desired char-
acters.
Select to enter characters in 
lower case or in upper case.

Customizing the home 
screen

Entering letters and 

numbers/list screen 

operation

Entering letters and num-
bers

-------------------------------------------------------------------------------------------------------------------------------------------------------------

294

5-2. Basic information before operation

COROLLA_U

Select to change character 
types. (

P.294)

Select to make a space on 
cursor.

Keyboard layout can be changed. 

(

P.321)

1

Select “Change Type”.

2

Select the desired character.

Depending on the screen being dis-

played, it may not be possible to 

change keyboard characters.

When text is input, the system 
predicts the text that may com-
plete the currently unconfirmed 
text and displays predictive 
replacement candidates that 
match the beginning of the text.

1

Input text.

2

Select the desired candidate.

To select a candidate that is not 
displayed, select 

, and 

then select the desired predic-
tive replacement candidate.

The list screen may be dis-
played after entering characters. 
When a list is displayed, use the 
appropriate screen button to 
scroll through the list.

Changing character type

Displaying predictive text 
candidates

List screen

Scrolling list screen

-------------------------------------------------------------------------------------------------------------------------------------------------------------

295

5-2. Basic information before operation

5

Audio

COROLLA_U

To scroll up/down the list, 
flick the list up/down.
Select to skip to the next or 
previous page. Select and 
hold 

 or 

 to scroll 

through the displayed list.
Indicates the position of the 
displayed entries in the entire 
list.
To scroll up/down pages, 
drag the bar.

If 

 appears to the right of an item 

name, the complete name is too 

long to display.

Select to 

 scroll to the end of 

the name.

Select 

 to move to the begin-

ning of the name.

Items are displayed in the list 
with the most similar results of 
the search at the top.

1

Select 

.

2

Input text.

3

Select “Search”.

4

The list is displayed.

Searching a list

-------------------------------------------------------------------------------------------------------------------------------------------------------------

296

5-2. Basic information before operation

COROLLA_U

1

Press the “MENU” button.

2

Select “Display”.

3

Select the desired items to 
be set.

Select to turn the screen off. 
To turn it on, press any but-

ton.
Select to turn day mode 
on/off. (

P.296)

Select to adjust the screen 
display. (

P.296)

Select to adjust the camera 
display.

When the screen is viewed through 

polarized sunglasses, a rainbow 

pattern may appear on the screen 

due to optical characteristics of the 

screen. If this is disturbing, please 

operate the screen without polarized 

sunglasses.

Depending on the position of the 
headlight switch, the screen 
changes to day or night mode. 
This feature is available when 
the headlight is switched on.
Select “Day Mode”.

If the screen is set to day mode with 

the headlight switch turned on, this 

condition is memorized even with 

the engine turned off.

The contrast and brightness of 
the screen can be adjusted 
according to the brightness of 
your surroundings.

1

Select “General” or “Cam-
era”.

2

Select the desired item.

“Display (General)” screen only: 

Screen adjustment

The contrast and brightness 
of the screen display and 
the image of the camera dis-
play can be adjusted. The 
screen can also be turned 
off, and/or changed to either 
day or night mode.

(For information regarding 
audio/visual screen adjust-
ment: 

P.331)

Displaying the screen 
adjustment screen

Changing between day 
and night mode

Adjusting the con-
trast/brightness

-------------------------------------------------------------------------------------------------------------------------------------------------------------

297

5-2. Basic information before operation

5

Audio

COROLLA_U

Select “<” or “>” to select the 

desired display.

“Contrast”

“+”: Select to strengthen the con-
trast of the screen.
“-”: Select to weaken the contrast of 
the screen.

“Brightness”

“+”: Select to brighten the screen.
“-”: Select to darken the screen.

Linking multi-informa-

tion display and the 

system

The following functions of 
the system are linked with 
the multi-information dis-
play in the instrument clus-
ter:

Audio

Phone

*

etc.

These functions can be 
operated using multi-infor-
mation display control 
switches on the steering 
wheel. (

P.101)

*

: When an Apple CarPlay con-

nection is established, this 
function will be unavailable.

-------------------------------------------------------------------------------------------------------------------------------------------------------------

298

5-3. Connectivity settings

COROLLA_U

5-3.Connectivity settings

This system is not guaranteed to 
operate with all Bluetooth

®


devices.

If your cellular phone does not 

support HFP, registering the Blue-
tooth

®

 phone or using OPP, 

PBAP, MAP or SPP profiles indi-

vidually will not be possible.

If the connected Bluetooth

®


device version is older than rec-

ommended or incompatible, the 
Bluetooth

®

 device function may 

not work properly.

Refer to 

https://www.toyota.com/

audio-multimedia in the United 

States, 

https://www.toyota.ca/connected 

in Canada, and 

http://www.toyotapr.com/

audio-multimedia in Puerto Rico, 
to find approved Bluetooth

®


phones for this system.

Certification

Bluetooth is a registered trademark 

of Bluetooth SIG, Inc.

Registering from the sys-
tem

1

Turn the Bluetooth

®

 connec-

tion setting of your cellular 
phone on.

This function is not available when 
Bluetooth

®

 connection setting of 

your cellular phone is set to off.

Registering/Connect-

ing a Bluetooth

®


device

To use the hands-free sys-
tem, it is necessary to regis-
ter a Bluetooth

®

 phone with 

the system.

Once the phone has been 
registered, it is possible to 
use the hands-free system.

This operation cannot be 
performed while driving.

When an Apple CarPlay 
connection is established, 
Bluetooth

®

 functions of the 

system will become unavail-
able and any connected 
Bluetooth

®

 devices will be 

disconnected.

*

When connecting to 
Android Auto, a Bluetooth

®


connection will be made 
automatically.

*

When an Android Auto con-
nection is established, 
some Bluetooth

®

 functions 

other than hands-free sys-
tem cannot be used.

*

*

: This function is not made avail-

able in some countries or 
areas.

Registering a Bluetooth

®


phone for the first time

-------------------------------------------------------------------------------------------------------------------------------------------------------------

299

5-3. Connectivity settings

5

Audio

COROLLA_U

2

Press the “MENU” button.

3

Select “Phone”.

Operations up to this point can also 

be performed by pressing the 

“PHONE” button on the instrument 

panel.

4

Select “Yes” to register a 
phone.

5

Select the desired Bluetooth

®


device.

If the desired Bluetooth

®

 phone is 

not on the list, select “If you cannot 

find...” and follow the guidance on 

the screen. (

P.300)

6

Register the Bluetooth

®


device using your Blue-
tooth

®

 device.

For details about operating 
the Bluetooth

®

 device, see 

the manual that comes with it.

A PIN code is not required for 
SSP (Secure Simple Pairing) 
compatible Bluetooth

®


devices. Depending on the 
type of Bluetooth

®

 device 

being connected, a message 
confirming registration may 
be displayed on the Blue-
tooth

®

 device’s screen. 

Respond and operate the 
Bluetooth

®

 device according 

to the confirmation message.

7

Check that the following 
screen is displayed, indicat-
ing pairing was successful (a 
Bluetooth

®

 link has been 

-------------------------------------------------------------------------------------------------------------------------------------------------------------

300

5-3. Connectivity settings

COROLLA_U

established but registration is 
not yet complete).

The system is connecting to 
the registered device.

At this stage, the Bluetooth

®


functions are not yet avail-
able.

8

Check that “Connected” is 
displayed and registration is 
complete.

If an error message is displayed, 

follow the guidance on the screen 

to try again.

If a cellular phone does not operate 

properly after being connected, turn 

the cellular phone off and on and 

then connect it again.

Registering from phone

1

Select “If you cannot find…”.

2

Select “Register from 
Phone”.

3

Check that the following 
screen is displayed, and reg-
ister the Bluetooth

®

 device 

using your Bluetooth

®


device.

For details about operating 
the Bluetooth

®

 device, see 

the manual that comes with it.

A PIN code is not required for 
SSP (Secure Simple Pairing) 
compatible Bluetooth

®


-------------------------------------------------------------------------------------------------------------------------------------------------------------

301

5-3. Connectivity settings

5

Audio

COROLLA_U

devices. Depending on the 
type of Bluetooth

®

 device 

being connected, a message 
confirming registration may 
be displayed on the Blue-
tooth

®

 device’s screen. 

Respond and operate the 
Bluetooth

®

 device according 

to the confirmation message.

4

Follow the steps in “Register-
ing a Bluetooth

®

 phone for 

the first time” from step 

7

(

P.298)

To use the Bluetooth

®

 audio, it is 

necessary to register an audio 
player with the system.
Once the player has been regis-
tered, it is possible to use the 
Bluetooth

®

 audio.

This operation cannot be per-
formed while driving.
For details about registering a 
Bluetooth

®

 device: 

P.298

1

Turn the Bluetooth

®

 connec-

tion setting of your audio 
player on.

This function is not available when 
the Bluetooth

®

 connection setting 

of your audio player is set to off.

2

Press the “AUDIO” button.

3

Select “Source” on the audio 
screen or press “AUDIO” but-
ton again.

4

Select “Bluetooth”.

5

Select “Yes” to register an 
audio player.

6

Follow the steps in “Register-
ing a Bluetooth

®

 phone for 

the first time” from step 

5

(

P.298)

This system supports the follow-
ing services.

Bluetooth

®

 Core Specifica-

tion

Ver. 2.0 (Recommended: Ver. 
4.1 +EDR)

Profiles

HFP (Hands Free Profile) Ver. 
1.0 (Recommended: Ver. 1.7)

This is a profile to allow hands-free 
phone calls using a cellular phone. 
It has outgoing and incoming call 
functions.

OPP (Object Push Profile) 
Ver. 1.1 (Recommended: Ver. 

Registering a Bluetooth

®


audio player for the first 
time

Profiles

-------------------------------------------------------------------------------------------------------------------------------------------------------------

302

5-3. Connectivity settings

COROLLA_U

1.2)

This is a profile to transfer contacts 
data.

PBAP (Phone Book Access 
Profile) Ver. 1.0 (Recom-
mended: Ver. 1.2)

This is a profile to transfer phone-
book data.

MAP (Message Access Pro-
file) Ver. 1.0 (Recommended: 
Ver. 1.2)

This is a profile to use phone mes-
sage functions.

SPP (Serial Port Profile) Rec-
ommended: Ver. 1.2

This is a profile to use the Toyota 
audio multimedia function.

A2DP (Advanced Audio Dis-
tribution Profile) Ver. 1.0 (Rec-
ommended: Ver. 1.3)

This is a profile to transmit stereo 
audio or high quality sound to the 
audio/visual system.

AVRCP (Audio/Video Remote 
Control Profile) Ver. 1.0 (Rec-
ommended: Ver. 1.6)

This is a profile to allow remote 
control the A/V equipment.

1

Press the “MENU” button.

2

Select “Setup”.

3

Select “Bluetooth”.

Setting Bluetooth

®


details

When an Apple CarPlay 
connection is established, 
this function will be unavail-
able.

*

When an Android Auto con-
nection is established, 
some functions will be 
unavailable.

*

*

: This function is not made avail-

able in some countries or 
areas.

Displaying the Blue-
tooth

®

 setup screen

-------------------------------------------------------------------------------------------------------------------------------------------------------------

303

5-3. Connectivity settings

5

Audio

COROLLA_U

4

Select the desired item to be 
set.

Connecting a Bluetooth

®


device and editing the Blue-
tooth

®

 device information 

(

P.303, 306)

Registering a Bluetooth

®


device (

P.305)

Deleting a Bluetooth

®

 device 

(

P.305)

Setting the Bluetooth

®

 sys-

tem (

P.307)

Up to 5 Bluetooth

®

 devices 

(Phones (HFP) and audio play-
ers (AVP)) can be registered.

If more than 1 Bluetooth

®

 device 

has been registered, select 
which device to connect to.

1

Display the Bluetooth

®

 set-

tings screen. (

P.302)

2

Select “Registered Device”.

3

Select the device to be con-
nected.

: Phone

: Audio player

: Phone/Toyota apps services

The profile icon for a currently 
connected device will be dis-
played in color.

Selecting a profile icon which 
is not currently connected will 
switch the connection to the 
function.

If the desired Bluetooth

®


device is not on the list, select 
“Add New Device” to register 
the device. (

P.305)

Bluetooth

®

 setup screen

Connecting a Bluetooth

®


device

-------------------------------------------------------------------------------------------------------------------------------------------------------------

304

5-3. Connectivity settings

COROLLA_U

4

Select the desired connec-
tion.

“Device Info”: Select to confirm and 
change the Bluetooth

®

 device infor-

mation. (

P.306)

When another Bluetooth

®


device is connected

To disconnect the Bluetooth

®


device, select “Yes”.

5

Check that a confirmation 
screen is displayed when the 
connection is complete.

If an error message is displayed, 

follow the guidance on the screen 

to try again.

It may take time if the device con-

nection is carried out during Blue-
tooth

®

 audio playback.

Depending on the type of Blue-
tooth

®

 device being connected, it 

may be necessary to perform 

additional steps on the device.

When disconnecting a Bluetooth

®


device, it is recommended to dis-

connect using the system.

Connecting a Bluetooth

®


device in a different way 
(from phone top screen)

P.375

Connecting a Bluetooth

®


device in a different way 
(from phone setup screen)

P.388

Connecting a Bluetooth

®


device in a different way 
(from Bluetooth

®

 audio 

screen)

P.347

Auto connection mode

To turn auto connection mode 
on, set “Bluetooth Power” to on. 
(

P.307) Leave the Bluetooth

®


device in a location where the 
connection can be established.

When the engine switch is in 
ACC or ON, the system 
searches for a nearby regis-
tered device.

The system will connect with 
the registered device that was 
last connected, if it is nearby. 
When automatic connection 
priority is set to on and there 
is more than one registered 
Bluetooth

®

 phone available, 

the system will automatically 
connect to the Bluetooth

®


phone with the highest prior-
ity. (

P.307)

Connecting manually

When the auto connection has 
failed or “Bluetooth Power” is 
turned off, it is necessary to con-
nect the Bluetooth

®

 device man-

ually.

-------------------------------------------------------------------------------------------------------------------------------------------------------------

305

5-3. Connectivity settings

5

Audio

COROLLA_U

1

Display the Bluetooth

®

 set-

tings screen. (

P.302)

2

Follow the steps in “Connect-
ing a Bluetooth

®

 device” from 

step 

2

. (

P.303)

Reconnecting the Blue-
tooth

®

 phone

If a Bluetooth

®

 phone is discon-

nected due to poor reception 
from the Bluetooth

®

 network 

when the engine switch is in 
ACC or ON, the system auto-
matically reconnects the Blue-
tooth

®

 phone.

Up to 5 Bluetooth

®

 devices can 

be registered.

Bluetooth

®

 compatible phones 

(HFP) and audio players (AVP) 
can be registered simultane-
ously.
This operation cannot be per-
formed while driving.

1

Display the Bluetooth

®

 set-

tings screen. (

P.302)

2

Select “Add New Device”.

When another Bluetooth

®


device is connected

To disconnect the Bluetooth

®


device, select “Yes”.

When 5 Bluetooth

®

 devices 

have already been registered

A registered device needs to be 
replaced. Select “Yes”, and select 
the device to be replaced.

3

Follow the steps in “Register-
ing a Bluetooth

®

 phone for 

the first time” from step 

5

(

P.298)

This operation cannot be per-
formed while driving.

1

Display the Bluetooth

®

 set-

tings screen. (

P.302)

2

Select “Remove Device”.

3

Select the desired device.

4

Select “Yes” when the confir-
mation screen appears.

5

Check that a confirmation 
screen is displayed when the 
operation is complete.

When deleting a Bluetooth

®

 phone, 

the contact data will be deleted at 

the same time.

Registering a Bluetooth

®


device

Deleting a Bluetooth

®


device

-------------------------------------------------------------------------------------------------------------------------------------------------------------

306

5-3. Connectivity settings

COROLLA_U

The Bluetooth

®

 device’s infor-

mation can be displayed on the 
screen. The displayed informa-
tion can be edited.
This operation cannot be per-
formed while driving.

1

Display the Bluetooth

®

 set-

tings screen. (

P.302)

2

Select “Registered Device”.

3

Select the desired device to 
be edited.

4

Select “Device Info”.

5

Confirm and change the 
Bluetooth

®

 device informa-

tion.

The name of the Bluetooth

®


device is displayed. It can be 
changed to a desired name. 
(

P.307)

Select to set the Bluetooth

®


audio player connection 
method. (

P.307)

Device address is unique to 
the device and cannot be 
changed.
Phone number is unique to 
the Bluetooth

®

 phone and 

cannot be changed.
Compatibility profile is unique 
to the Bluetooth

®

 device and 

cannot be changed.
Select to reset all setup 
items.

Editing the Bluetooth

®


device information

-------------------------------------------------------------------------------------------------------------------------------------------------------------

307

5-3. Connectivity settings

5

Audio

COROLLA_U

If 2 Bluetooth

®

 devices have been 

registered with the same device 

name, the devices can be distin-

guished referring to the device’s 

address.

Depending on the type of Blue-
tooth

®

 phone, some information 

may not be displayed.

1

Select “Device Name”.

2

Enter the name and select 
“OK”.

Even if the device name is changed, 

the name registered in your Blue-
tooth

®

 device does not change.

1

Select “Connect Audio Player 
From”.

2

Select the desired connec-
tion method.

“Vehicle”: Select to connect the 

audio player from the vehicle’s 

audio/visual system.
“Device”: Select to connect the 

vehicle’s audio/visual system from 

the audio player.
Depending on the audio player, the 

“Vehicle” or “Device” connection 

method may be best. As such, refer 

to the manual that comes with the 

audio player.

The Bluetooth

®

 settings can be 

confirmed and changed.

1

Display the Bluetooth

®

 set-

tings screen. (

P.302)

2

Select “Detailed Settings”.

3

Select the desired item to be 
set.

Select to set Bluetooth

®

 con-

nection on/off. (

P.307)

Select to change the auto-
matic connection priority of 
the registered Bluetooth

®


devices. (

P.308)

Select to edit the system 
information. (

P.308)

Select to reset all setup 
items.

1

Select “Bluetooth Power”.

When “Bluetooth Power” is on: 
The Bluetooth

®

 device is auto-

Changing a device name

Setting audio player con-
nection method

“Detailed Settings” 
screen

Changing “Bluetooth 
Power”

-------------------------------------------------------------------------------------------------------------------------------------------------------------

308

5-3. Connectivity settings

COROLLA_U

matically connected when the 
engine switch is in ACC or ON.
When “Bluetooth Power” is off: 
The Bluetooth

®

 device is dis-

connected, and the system will 
not connect to it next time.

While driving, the auto connection 

state can be changed from off to on, 

but cannot be changed from on to 

off.

The automatic connection prior-
ity of the registered Bluetooth

®


devices can be changed.

1

Select “Preferred Device Set-
tings”.

2

Select the desired item to be 
set.

Select to set automatic con-
nection priority on/off.
Select to change the auto-
matic connection priority of 
the registered Bluetooth

®


phones. (

P.308)

Select to change the auto-
matic connection priority of 
the registered Bluetooth

®


audio players. (

P.308)

Select to reset all setup 
items.

Changing Bluetooth

®


device automatic connec-
tion priority

1

Select “Preferred Phones” or 
“Preferred Audio Players”.

2

Select the desired Bluetooth

®


device and select “Move Up” 
or “Move Down” to change 
the preferred order.

A newly registered Bluetooth

®


device will automatically be given 

the highest automatic connection 

priority.

1

Select “System Information”.

Setting automatic connec-
tion priority

Editing the system infor-
mation

-------------------------------------------------------------------------------------------------------------------------------------------------------------

309

5-3. Connectivity settings

5

Audio

COROLLA_U

2

Select the desired item to be 
set.

Displays system name. Can 
be changed to a desired 
name. (

P.309)

PIN code used when the 
Bluetooth

®

 device was regis-

tered. Can be changed to a 
desired code. (

P.309)

Device address is unique to 
the device and cannot be 
changed.
Select to set the connection 
status display of the phone 
on/off.
Select to set the connection 
status display of the audio 
player on/off.
Compatibility profile of the 
system
Select to reset all setup 
items.

Editing the system name

1

Select “System Name”.

2

Enter a name and select 
“OK”.

Editing the PIN code

1

Select “System PIN Code”.

2

Enter a PIN code and select 
“OK”.

-------------------------------------------------------------------------------------------------------------------------------------------------------------

310

5-3. Connectivity settings

COROLLA_U

*

: If equipped

1

Enable the Wi-Fi

®

 Hotspot 

function. (

P.311)

2

Disable the “Hide Access 
Point” function. (

P.310)

3

Search for the vehicle access 
point using the device you 
wish to connect.

For details about operating the 

device, refer to the documentation 

which came with it.

4

Operate the device to con-
nect it to the vehicle access 
point.

To check the vehicle access point 

password, check “Password”. 

(

P.311)

Hints for connecting to the vehicle 
via Wi-Fi

®

 can be displayed. 

(

P.311)

1

Enable the Wi-Fi

®

 Hotspot 

function. (

P.311)

2

Enable the “Hide Access 
Point” function. (

P.310)

3

Enter the access point name 
(SSID) into the device you 
wish to connect and connect 
it.

To check the vehicle access 
point password, check “Pass-
word”. (

P.311)

The security settings on the 
device must be the same as 
that displayed for “Security”. 
(

P.311)

For details about operating 
the device, refer to the docu-
mentation which came with it.

Wi-Fi

®

 Hotspot

*

By connecting a device to 
the vehicle via Wi-Fi

®

, it can 

access the internet through 
the DCM.

To use this function, a 
Wi-Fi

®

 Hotspot service sub-

scription from Verizon Wire-
less is required. Contact 
your Toyota dealer for 
details.

This function is not made 
available in some countries 
or areas.

Connecting a device to 
the in-vehicle access 
point

Searching for and con-
necting a device to the 
vehicle access point

Connecting a device to the 
in-vehicle access point 
using the access point 
name (SSID)

-------------------------------------------------------------------------------------------------------------------------------------------------------------

311

5-3. Connectivity settings

5

Audio

COROLLA_U

1

Press the “MENU” button.

2

Select “Setup”.

3

Select “Wi-Fi

*

”.

*

: Wi-Fi

®

 is a registered trademark 

of Wi-Fi Alliance

®

.

4

Select the desired item to be 
set.

Select to enable/disable the 
Wi-Fi

®

 Hotspot function. 

(

P.311)

Select to check/change the 
access point password. 
(

P.312)

Select to display hints for 
connecting to the vehicle via 
Wi-Fi

®

.

Select to make the access 
point searchable/unsearch-
able.
Select to check/change the 
security protocol of the 
access point (for authentica-
tion and encryption). 
(

P.312)

Select to change the access 
point name (SSID). (

P.312)

Select to change the Wi-Fi

®


connection channel (within 
the 2.4GHz frequency band). 
(

P.312)

If any settings have been changed, 

it will be necessary to reset the 
Wi-Fi

®

 system to complete the 

changes. To reset the Wi-Fi

®

 sys-

tem, select “Yes” on the pop-up dis-

played after changing the settings.

When the Wi-Fi

®

 Hotspot func-

tion is enabled, the system 
checks for a valid Hotspot ser-
vice subscription.
If a hotspot service subscription 
has not been started, connect 
your device to the in-vehicle 
access point to start your sub-

Changing the Wi-Fi

®

 set-

tings

Enabling/disabling the 
Wi-Fi

®

 Hotspot function

-------------------------------------------------------------------------------------------------------------------------------------------------------------

312

5-3. Connectivity settings

COROLLA_U

scription. A trial subscription 
may be available.

1

Select “Password”.

2

Check that the following 
screen is displayed.

Displays the password
Select to display/hide the 
entered password.
Select to change the pass-
word.

1

Select “Change Password”.

2

Enter the desired password 
and select “OK”.

When setting/changing a pass-

word, observe the following guide-

lines to help prevent the password 

from being cracked by a third party:

Use an 8-character or longer 
password consisting of letters 
and numbers. (Non-ASCII 
characters will not be recog-
nized by the system.)

Change the password regu-
larly.

If you write the password 
down, do not leave it some-
where where it would be visi-
ble.

Do not use the same or a sim-
ilar password to that for other 
accounts.

Avoid using easy to identify 
words, such as your vehicle’s 
model name or license plate 
number, simple dictionary 
words, or words with simple 
obfuscation, such as c@t (for 
cat), as your password.

1

Select “Security”.

2

Select the desired security 
protocol.

1

Select “Access Point Name”.

2

Enter the desired access 
point name (SSID) and select 
“OK”.

1

Select “Channel”.

Checking/changing the 
password

Changing the password

Changing the security pro-
tocol

Changing the access point 
name (SSID)

Selecting a Wi-Fi

®

 connec-

tion channel

-------------------------------------------------------------------------------------------------------------------------------------------------------------

313

5-3. Connectivity settings

5

Audio

COROLLA_U

2

Check that the following 
screen is displayed.

Select to change the chan-
nel selection to auto-
matic/manual.
When “Manual” is selected, 
select to change the channel.

1

Set “Select Channel” to 
“Manual”.

2

Select “Channel Number”.

3

Enter the desired channel 
number and select “OK”.

Channels 1 through 11 can be 

selected.

Wi-Fi

®

 function operating hints

If a connected device is taken out 
of the Wi-Fi

®

 connection area, the 

connection will be severed.

If the vehicle is driven out of the 

cellular communication coverage 

area, connecting to the internet 
via the Wi-Fi

®

 Hotspot will not be 

possible.

If a Bluetooth

®

 device is used 

while a device is connected using 

the Wi-Fi

®

 Hotspot function, the 

communication speed may 

decrease.

If the vehicle is near a radio 

antenna, radio station or other 

source of strong radio waves and 

electrical noise, communication 

may be slow or impossible.

The condition of Wi-Fi

®

 connec-

tion appears on the right upper 
side of the screen. (

P.286)

Changing the channel

Wi-Fi

®

 function operating 

hints

WARNING

Use Wi-Fi

®

 devices only when 

safe and legal to do so.

Your audio unit is fitted with 
Wi-Fi

®

 antennas. People with 

implantable cardiac pacemak-

ers, cardiac resynchronization 

therapy-pacemakers or implant-

able cardioverter defibrillators 

should maintain a reasonable 

distance between themselves 
and the Wi-Fi

®

 antennas.

The radio waves may affect the 

operation of such devices.

Before using Wi-Fi

®

 devices, 

users of any electrical medical 

device other than implantable 

cardiac pacemakers, cardiac 

resynchronization ther-

apy-pacemakers or implantable 

cardioverter defibrillators should 

consult the manufacturer of the 

device for information about its 

operation under the influence of 

radio waves. 

Radio waves could have unex-

pected effects on the operation 

of such medical devices.

Conditions displayed with 
Wi-Fi

®

 icon

-------------------------------------------------------------------------------------------------------------------------------------------------------------

314

5-3. Connectivity settings

COROLLA_U

Communication standards
IEEE 802.11b
IEEE 802.11g
IEEE 802.11n (2.4GHz)

Security
WPA™
WPA2™

• WPA™ and WPA2™ are trade-

marks of Wi-Fi Alliance

®

.

*

: This function is not made avail-

able in some countries or areas.

1

Enable Siri on the device to 
be connected.

Specifications

Apple CarPlay/

Android Auto

*

Apple CarPlay allows some 
applications, such as Map, 
Phone, and Music, to be 
used on the system.

When an Apple CarPlay 
connection is established, 
Apple CarPlay compatible 
applications will be dis-
played on the system dis-
play.

Compatible devices

Apple iPhone (iOS Ver. 9.3 or 
later) that supports Apple Car-
Play. 

For details, refer to
https://www.apple.com/ios/car
play/.

*

Android™ devices with Android 
OS Ver. 5.0 or higher which sup-
port Android Auto and have the 
Android Auto application 
installed.
For details, refer to

https://www.android.com/auto/
.

*

*

: Some devices may not operate 

with this system.

Establishing an Apple 
CarPlay connection

-------------------------------------------------------------------------------------------------------------------------------------------------------------

315

5-3. Connectivity settings

5

Audio

COROLLA_U

2

Connect the device to the 
USB port. (

P.330)

3

Select “Always Enable” or 
“Enable Once”.

If “Do Not Enable” is selected, 
an Apple CarPlay connection 
will not be established. In this 
case, the device can be oper-
ated as a normal Apple 
device, such as an iPod.

Depending on the device con-
nected, it may take approxi-
mately 3 to 6 seconds before 
an Apple CarPlay connection 
is established.

4

Check that home screen of 
Apple CarPlay is displayed.

Select to display the home 
screen of Apple CarPlay.
Touch and hold to activate 
Siri.
Select to start the application.
User can use any iPhone 

application supported by 
Apple CarPlay.
Select to display the system 
screen.

1

Check that the Android Auto 
application is installed to the 
device to be connected.

2

Connect the device to the 
USB port. (

P.329)

3

Select “On” to enable the 
function.

“Off”: Select to not enable 
Android Auto. Android Auto 
will remain off until “Android 
Auto” of “Projection Settings” 
on the general settings screen 
is turned on.

Depending on the device con-
nected, it may take approxi-
mately 3 to 6 seconds before 
the system returns to previous 
screen.

The screen may change to 
“step 

6

” depending on the 

system.

Establishing an Android 
Auto connection

-------------------------------------------------------------------------------------------------------------------------------------------------------------

316

5-3. Connectivity settings

COROLLA_U

4

Press the “MENU” button.

5

Select “Android Auto”.

6

Check that home screen of 
Android Auto is displayed.

When an Apple CarPlay/Android 

Auto connection is established, 

the function of some system but-

tons will change.

When an Apple CarPlay/Android 

Auto connection is established, 

some system functions, such as 

the following, will be replaced by 

similar Apple CarPlay/Android 

Auto functions or will become 

unavailable:

• iPod (Audio Playback)

• Hands-free Phone

• USB audio/USB video
• Bluetooth

®

 audio

• Bluetooth

®

 phone (Apple CarPlay 

only)

• Toyota apps

When an Apple CarPlay/Android 

Auto connection is established, 

voice command system (Siri/Goo-

gle Assistant) and map application 

voice guidance volume can be 

changed by selecting “Voice Vol-

ume” on the voice settings screen. 

It cannot be changed by “POWER 

VOLUME” knob on Audio control 

panel. (

P.325)

Apple CarPlay/Android Auto is an 

application developed by Apple 

Inc/Google LLC. Its functions and 

services may be terminated or 

changed without notice depending 

on the connected device’s opera-

tion system, hardware and soft-

ware, or due to changes in Apple 

CarPlay/Android Auto specifica-

tions.

For a list of the apps supported by 

Apple CarPlay or Android Auto, 

refer to their respective website.

While using these functions, vehi-

cle and user information, such as 

location and vehicle speed, will be 

shared with the respective appli-

cation publisher and the cellular 

service provider.

By downloading and using each 

application, you agree to their 

terms of use.

Data for these functions is trans-

mitted using the internet and may 

incur charges.

For information about data trans-

mission fees, contact your cellular 

service provider.

Depending on the application, cer-

tain functions, such as music play-

back, may be restricted.

As the applications for each func-

tion are provided by a third-party, 

they may be subject to change or 

discontinuation without notice.

For details, refer to the website of 

the function.

If the USB cable is disconnected, 

operation of Apple Car-

Play/Android Auto will end.

At this time, sound output will stop 

and change to the system screen.

Use of the Apple CarPlay logo 

means that a vehicle user inter-

face meets Apple performance 

standards. Apple is not responsi-

ble for the operation of this vehicle 

-------------------------------------------------------------------------------------------------------------------------------------------------------------

317

5-3. Connectivity settings

5

Audio

COROLLA_U

or its compliance with safety and 

regulatory standards. Please note 

that the use of this product with 

iPhone or iPod may affect wire-

less performance.

Apple CarPlay is a trademark of 

Apple Inc.

Compatible models

Made for

• iPhone X

• iPhone 8

• iPhone 8 Plus

• iPhone 7

• iPhone 7 Plus

• iPhone SE

• iPhone 6s

• iPhone 6s Plus

• iPhone 6

• iPhone 6 Plus

• iPhone 5s

• iPhone 5c

• iPhone 5

Android and Android Auto are 

trademarks of Google LLC.

If you are experiencing difficulties with Apple CarPlay/Android Auto, 
check the following table.

WARNING

Do not connect iPhone or operate 

the controls while driving.

NOTICE

Do not leave your iPhone in the 

vehicle. In particular, high tem-

peratures inside the vehicle 

may damage the iPhone.

Do not push down on or apply 

unnecessary pressure to the 

iPhone while it is connected as 

this may damage the iPhone or 

its terminal.

Do not insert foreign objects into 

the port as this may damage the 

iPhone or its terminal.

Troubleshooting

-------------------------------------------------------------------------------------------------------------------------------------------------------------

318

5-3. Connectivity settings

COROLLA_U

Symptom

Solution

An Apple Car-
Play/Android Auto con-
nection cannot be 
established.

Check if the device supports Apple Car-
Play/Android Auto.
Check if Apple CarPlay/Android Auto is 
enabled on the connected device.
Check if that the Android Auto application is 
installed to the device to be connected.
For details, refer to 
Apple CarPlay: 
https://www.apple.com/ios/carplay/.
Android Auto: 
https://www.android.com/auto/.

Check if “Apple CarPlay”/“Android Auto” of 
“Projection Settings” on the general settings 
screen is set to on. (

P.321)

Check if the USB cable being used is securely 
connected to the device and USB port.
Check that the device is connected directly to 
the USB port of the system and not connected 
to a USB hub.
For Apple CarPlay: Check if the Lightning cable 
being used is certified by Apple. Check if Siri is 
enabled.

After checking all of the above, try to establish 
an Apple CarPlay/Android Auto connection. 
(

P.314, 315)

When an Apple Car-
Play/Android Auto con-
nection is established and 
a video is being played, 
the video is not displayed, 
but audio is output 
through the system.

As the system is not designed to play video 
through Apple CarPlay/Android Auto, this is not 
a malfunction.

Although an Apple Car-
Play/Android Auto con-
nection is established, 
audio is not output 
through the system.

The system may muted or the volume may be 
low. Increase the system volume.

-------------------------------------------------------------------------------------------------------------------------------------------------------------

319

5-3. Connectivity settings

5

Audio

COROLLA_U

The Apple Car-
Play/Android Auto screen 
has artifacts and/or audio 
from Apple Car-
Play/Android Auto has 
noise.

Check if the USB cable being used to connect 
the device to the system is damaged.
To check if the USB cable is damaged inter-
nally, connect the device to another system, 
such as a PC, and check if the device is recog-
nized by the connected system. (The device 
should begin charging when connected.)

After checking all of the above, try to establish 
an Apple CarPlay/Android Auto connection. 
(

P.314, 315)

The map display of the 
Apple CarPlay Maps app 
cannot be enlarged or 
contracted with pinch 
multi-touch gestures.

As the Apple CarPlay Maps app is not compati-
ble with pinch multi-touch gestures, this is not a 
malfunction.

During Apple CarPlay 
music application (Apple 
Music, Spotify, etc.) play-
back, if the iPhone is 
operated to start and play 
audio from an application 
that is not compatible with 
Apple CarPlay* and the 
onboard device volume is 
changed, the audio of the 
incompatible application 
stops and the system 
resumes playback of the 
original music application.

This operation is performed according to the 
specification of the onboard device, this is not a 
malfunction.

After interrupt audio (such 
as navigation route guid-
ance) is played from an 
application that is not 
compatible with Apple 
CarPlay while the onboard 
device is playing audio, 
the system does not 
resume playback of the 
original audio.

This operation is performed according to the 
specification of the onboard device, this is not a 
malfunction.
Manually change the audio source by yourself. 
Or, do not use applications that are not compat-
ible with Apple CarPlay.

*

 Due to some naviga-

tion applications are compatible from iOS 12, 
update to the latest iOS and application ver-
sions.

Symptom

Solution

-------------------------------------------------------------------------------------------------------------------------------------------------------------

320

5-3. Connectivity settings

COROLLA_U

*

: Applications not compatible with Apple CarPlay are applications installed 

on the iPhone that are not displayed on the Apple CarPlay screen appli-
cation list. (such as visual voicemail)

When using Apple Car-
Play, route guidance 
arrows and turn by turn 
navigation are not dis-
played on the multi-infor-
mation display and 
system display.
When using Android Auto, 
turn by turn navigation is 
not displayed on the 
multi-information display 
and system display.

This is not a malfunction as display of these 
items is not possible with this function.

When using Android Auto, 
hands-free call audio can-
not be heard from the 
vehicle’s speakers.

Disconnect the phone from the USB cable and 
check if hands-free call audio can be heard 
using the hands-free system.

Connect the phone to the system using Android 
Auto, turn up the volume on the system and 
check if hands-free call audio can be heard.
Check if other sounds can be heard from the 
vehicle’s speakers.

Symptom

Solution

-------------------------------------------------------------------------------------------------------------------------------------------------------------

321

5-4. Other settings

5

Audio

COROLLA_U

5-4.Other settings

1

Press the “MENU” button.

2

Select “Setup”.

If the general settings screen is not 

displayed, select “General”.

3

Select the desired items to 
be set.

“Clock”

Select to change the time zone and 
select “On” or “Off” for daylight sav-
ing time, automatic adjustment of 
the clock, etc. (

P.322)

“Language”

Select to change the language. The 
language setting of Apple Car-
Play/Android Auto can only be 
changed on the connected device.

“Customize Home Screen”

Select to change the display infor-
mation/area on the home screen 
and the home screen layout.  
(

P.292)

“Theme Setting”

Select to change the screen theme 
setting.

“Beep”

Select to turn the beep sound 
on/off.

“Units of Measurement”

Select to change the unit of mea-
sure for distance/fuel consumption.

“Keyboard Layout”

Select to change the keyboard lay-
out.

“Delete Keyboard History”

Select to delete the keyboard his-
tory.

“Memorize Keyboard History”

Select to set the memorize key-
board history on/off.

“Animation”

Select to turn the animations on/off.

“Projection Settings”

*1

Select to set automatic Apple Car-
Play/Android Auto connection 
establishment on/off. (

P.323)

“Driver Setting”

Select to change the driver set-

General settings

Settings are available for 
clock, operation sounds, 
etc.

Displaying the general 
settings screen

General settings screen

-------------------------------------------------------------------------------------------------------------------------------------------------------------

322

5-4. Other settings

COROLLA_U

tings. (

P.323)

“Delete Personal Data”

Select to delete personal data. 
(

P.324)

“Software Update”

Select to update software versions. 
For details, contact your Toyota 
dealer.

“Software Update Setting”

*2

Select to set software update set-
ting. (

P.324)

“Gracenote Database 
Update”

Select to update Gracenote

®

 data-

base versions. For details, contact 
your Toyota dealer.

“Software Information”

Select to display the software infor-
mation. Notices related to third 
party software used in this product 
are enlisted. (This includes instruc-
tions for obtaining such software, 
where applicable.)

“SW Sensitivity Level”

Select to change the capacitive 
touch screen button sensitivity to 1 
(low), 2 (medium), or 3 (high).

*1

:This function is not made avail-

able in some countries or areas.

*2

:If equipped

1

Display the general settings 
screen. (

P.321)

2

Select “Clock”.

3

Select the desired items to 
be set.

Select to change the time 
zone. (

P.322)

Select to set daylight saving 
time on/off.
Select to set automatic 
adjustment of the clock by 
GPS on/off.
When set to off, the clock can 
be manually adjusted. 
(

P.322)

Select to set the 24 hour time 
format on/off.
When set to off, the clock is 
displayed in 12 hour time for-
mat.

1

Select “Time Zone”.

2

Select the desired time zone.

When “Auto Adjust by GPS” is 
turned off, the clock can be 
manually adjusted.

1

Select “Auto Adjust by GPS” 
to set to off.

Clock settings

Setting the time zone

Manual clock setting

-------------------------------------------------------------------------------------------------------------------------------------------------------------

323

5-4. Other settings

5

Audio

COROLLA_U

2

Adjust the clock manually.

Select “+” to set the time for-
ward one hour and “-” to set 
the time back one hour.
Select “+” to set the time for-
ward one minute and “-” to 
set the time back one minute.
Select to round to the nearest 
hour.
e.g.
1:00 to 1:29 

 1:00

1:30 to 1:59 

 2:00

*

: This function is not made avail-

able in some countries or areas.

1

Display the general settings 
screen. (

P.321)

2

Select “Projection Settings”.

3

Select the desired items to 
be set.

Select to turn Apple CarPlay 

connection establishment 
on/off when a compatible 
iPhone is connected to the 
system via USB. (

P.314)

Depending on the system, 
this setting cannot be 
changed when a device is 
connected to the system via 
USB. Disconnect the device 
before attempting to change 
the setting.
Select to turn Android Auto 
connection establishment 
on/off when a compatible 
device is connected to the 
system via USB. (

P.315)

Depending on the system, 
this setting cannot be 
changed when a device is 
connected to the system via 
USB. Disconnect the device 
before attempting to change 
the setting.

The driver settings feature will 
allow the system to link some 
preferences (such as audio pre-
sets, screen theme, language, 
etc.) to a paired Bluetooth

®


phone.

1

Display the general settings 
screen. (

P.321)

2

Select “Driver Setting”.

Projection settings

*

Driver settings

-------------------------------------------------------------------------------------------------------------------------------------------------------------

324

5-4. Other settings

COROLLA_U

3

Select “Enable This Feature”.

1

Select “Manually Select 
Linked Settings”.

2

Select the desired phone.

After a few seconds, loaded screen 
automatically switches to the home 
screen.

Registered or changed per-
sonal settings will be deleted or 
returned to their default condi-
tions.

1

Display the general settings 
screen. (

P.321)

2

Select “Delete Personal 
Data”.

3

Select “Delete”.

4

Select “Yes” when the confir-
mation screen appears.

Examples of settings that can be 

returned to their default conditions:

Audio settings

Phone settings

etc.

*

: This function is not made avail-

able in some countries or areas.

When the automatic update 
check function is enabled, if a 
software update is available 
from the Toyota response cen-
ter, a message will be displayed.

1

Display the general settings 
screen. (

P.321)

2

Select “Software Update Set-
ting”.

3

Select “Automatic Update 
Check” to enable/disable the 
automatic update check func-
tion.

When software update information 

is displayed, contact your Toyota 

dealer.

Manually select linked set-
tings

Deleting personal data

Software update settings

*

-------------------------------------------------------------------------------------------------------------------------------------------------------------

325

5-4. Other settings

5

Audio

COROLLA_U

1

Press the “MENU” button.

2

Select “Setup”.

3

Select “Voice”.

4

Select the desired items to 
be set.

Select to adjust the volume of 
voice guidance.
Select to set the voice recog-
nition prompts.
Select to train voice recogni-
tion.

The voice command system 
adapts the user accent.
Select to start the voice rec-
ognition tutorial.
Select to set the voice 
prompt interrupt on/off.
Select to reset all setup 
items.

Voice settings

Voice volume, etc. can be 
set.

Displaying the voice set-
tings screen

Voice settings screen

-------------------------------------------------------------------------------------------------------------------------------------------------------------

326

5-4. Other settings

COROLLA_U

1

Press the “MENU” button.

2

Select “Setup”.

3

Select “Vehicle”.

4

Select the desired items to 
be set.

Select to set vehicle customi-
zation. (

P.581)

Select to set valet mode. 
(

P.326)

The security system can be set 
to on by entering a security code 
(4-digit number).
When set to on, the system will 
become inoperative once the 
electrical power source is dis-
connected until the security 
code is entered.

1

Display the vehicle settings 
screen. (

P.326)

2

Select “Valet Mode”.

3

Enter the 4-digit personal 
code and select “OK”.

4

Enter the same 4-digit per-
sonal code again and select 
“OK”.

The system will request that 
you input the security code 
again to confirm that you 
remember it correctly.

When valet mode activates, 
the system stops and a secu-
rity code (4-digit number) 
standby screen is displayed.

If the 4-digit personal code is forgot-

ten, please contact your Toyota 

dealer.

Enter the 4-digit personal code 
and select “OK”.

If an incorrect security code (4-digit 

number) is entered 6 times, the sys-

tem will not accept another security 

Vehicle settings

Settings are available for 
vehicle customization, etc.

Displaying the vehicle 
settings screen

Vehicle settings screen

Setting the valet mode

If the valet mode has been 
activated

-------------------------------------------------------------------------------------------------------------------------------------------------------------

327

5-4. Other settings

5

Audio

COROLLA_U

code (4-digit number) for 10 min-

utes.

-------------------------------------------------------------------------------------------------------------------------------------------------------------

328

5-5. Using the audio/visual system

COROLLA_U

5-5.Using the audio/visual system

The audio control screen can be reached by the following methods:

From the “AUDIO” button

Press the “AUDIO” button.

From the “MENU” button

Press the “MENU” button, then select “Audio”.

• Using the radio (

P.333)

• Playing a USB memory (

P.339)

• Playing an iPod/iPhone (Apple CarPlay

*

) (

P.341)

• Using the Android Auto

*

 (

P.344)

• Playing a Bluetooth

®

 device (

P.345)

• Using the steering wheel audio switches (

P.349)

• Audio system settings (

P.351)

*

: This function is not made available in some countries or areas.

Quick reference

Functional overview

-------------------------------------------------------------------------------------------------------------------------------------------------------------

329

5-5. Using the audio/visual system

5

Audio

COROLLA_U

“POWER VOLUME” knob: 
Press to turn the audio/visual 
system on and off. The system 
turns on in the last mode used. 
Turn this knob to adjust the vol-
ume.

1

Press the “AUDIO” button.

2

Select “Source” or press 
“AUDIO” button again.

3

Select the desired source.

Dimmed screen buttons cannot be 

operated.

When there are two pages, select 

 or 

 to change the page.

When an Apple CarPlay/Android 

Auto connection is established, 

some system functions, such as 

the following, will be replaced by 

similar Apple CarPlay/Android 

Auto function or will become 
unavailable

*

:

• iPod (Audio Playback)

• USB audio/USB video
• Bluetooth

®

 audio

• Toyota apps

*

: This function is not made avail-

able in some countries or areas.

1

Display the audio source 
selection screen. (

P.329)

2

Select “Reorder”.

Some basics

This section describes 
some of the basic features 
of the audio/visual system. 
Some information may not 
pertain to your system.

Your audio/visual system 
works when the engine 
switch is in ACC or ON.

NOTICE

To prevent the battery from being 

discharged, do not leave the 

audio/visual system on longer 

than necessary when the engine 

is not running.

Turning the system on 
and off

Selecting an audio source

Reordering the audio 
source

-------------------------------------------------------------------------------------------------------------------------------------------------------------

330

5-5. Using the audio/visual system

COROLLA_U

3

Select the desired audio 
source then 

 or 

 to reor-

der.

4

Select “OK”.

Connect a device.

Turn on the power of the device if it 
is not turned on.

If a USB hub is plugged-in, two 

devices can be connected at a 

time.

Even if a USB hub is used to con-

nect more than two USB devices, 

only the first two connected 

devices will be recognized.

If a USB hub that has more than 

two ports is connected to the USB 

port, devices connected to the 

USB hub may not charge or be 

inoperable, as the supply of cur-

rent may be insufficient.

1

Display the audio control 
screen. (

P.329)

2

Select “Sound”.

3

Select the desired item to be 
set.

Select to set the tre-
ble/mid/bass. (

P.330)

Select to set the fader/bal-
ance. (

P.331)

Select to set the automatic 
sound levelizer. (

P.331)

Treble/Mid/Bass

How good an audio program 
sounds is largely determined by 
the mix of the treble, mid and 
bass levels. In fact, different 
kinds of music and vocal pro-
grams usually sound better with 
different mixes of treble, mid 
and bass.

1

Select “Treble/Mid/Bass”.

2

Select the desired screen 
button.

Select “+” or “-” to adjust 
high-pitched tones.

USB port

Sound settings

-------------------------------------------------------------------------------------------------------------------------------------------------------------

331

5-5. Using the audio/visual system

5

Audio

COROLLA_U

Select “+” or “-” to adjust 
mid-pitched tones.
Select “+” or “-” to adjust 
low-pitched tones.

Fader/Balance

A good balance of the left and 
right stereo channels and of the 
front and rear sound levels is 
also important.
Keep in mind that when listening 
to a stereo recording or broad-
cast, changing the right/left bal-
ance will increase the volume of 
1 group of sounds while 
decreasing the volume of 
another.

1

Select “Fader/Balance”.

2

Select the desired screen 
button.

Select to adjust the sound 
balance between the front 
and rear speakers.
Select to adjust the sound 
balance between the left and 
right speakers.

Automatic sound levelizer 
(ASL)

The system adjusts to the opti-
mum volume and tone quality 

according to vehicle speed to 
compensate for increased road 
noise, wind noise, or other 
noises while driving.

1

Select “Automatic Sound 
Levelizer”.

2

Select “High”, “Mid”, “Low” or 
“Off”.

Screen format settings

The screen format can be 
selected for USB video.

1

Press the “MENU” button.

2

Select “Setup”.

3

Select “Audio”.

4

Select “Common”.

5

Select “Screen Format”.

6

Select the desired item to be 
adjusted.

Select to display a 4 : 3 
screen, with either side in 
black.
Select to enlarge the image 
horizontally and vertically to 
full screen.
Select to enlarge the image 
by the same ratio horizontally 

Audio screen adjustment

-------------------------------------------------------------------------------------------------------------------------------------------------------------

332

5-5. Using the audio/visual system

COROLLA_U

and vertically.

Contrast and brightness 
adjustment

The contrast and brightness of 
the screen can be adjusted.

1

Press the “MENU” button.

2

Select “Setup”.

3

Select “Audio”.

4

Select “Common”.

5

Select “Display”.

6

Select the desired item to be 
adjusted.

“Contrast”

“+”: Select to strengthen the con-
trast of the screen.
“-”: Select to weaken the contrast of 
the screen.

“Brightness”

“+”: Select to brighten the screen.
“-”: Select to darken the screen.

Depending on the audio source, 

some functions may not be avail-

able.

1

Press this switch to operate 
the voice command system.

The voice command system and its 

list of commands can be operated. 

(

P.364)

Voice command system

-------------------------------------------------------------------------------------------------------------------------------------------------------------


Content      ..     3      4      5      6     ..