Toyota FJ Cruiser (GSJ 10, 15 series). Instruction - part 456


  Index      Toyota     Toyota FJ Cruiser (model GSJ 10, 15 series) - service repair instruction 2007 year


Search            copyright infringement  


Content   ..  454  455  456  457   ..


Toyota FJ Cruiser (GSJ 10, 15 series). Instruction - part 456


SE–6

SEAT  –  FRONT SEAT ASSEMBLY

SE

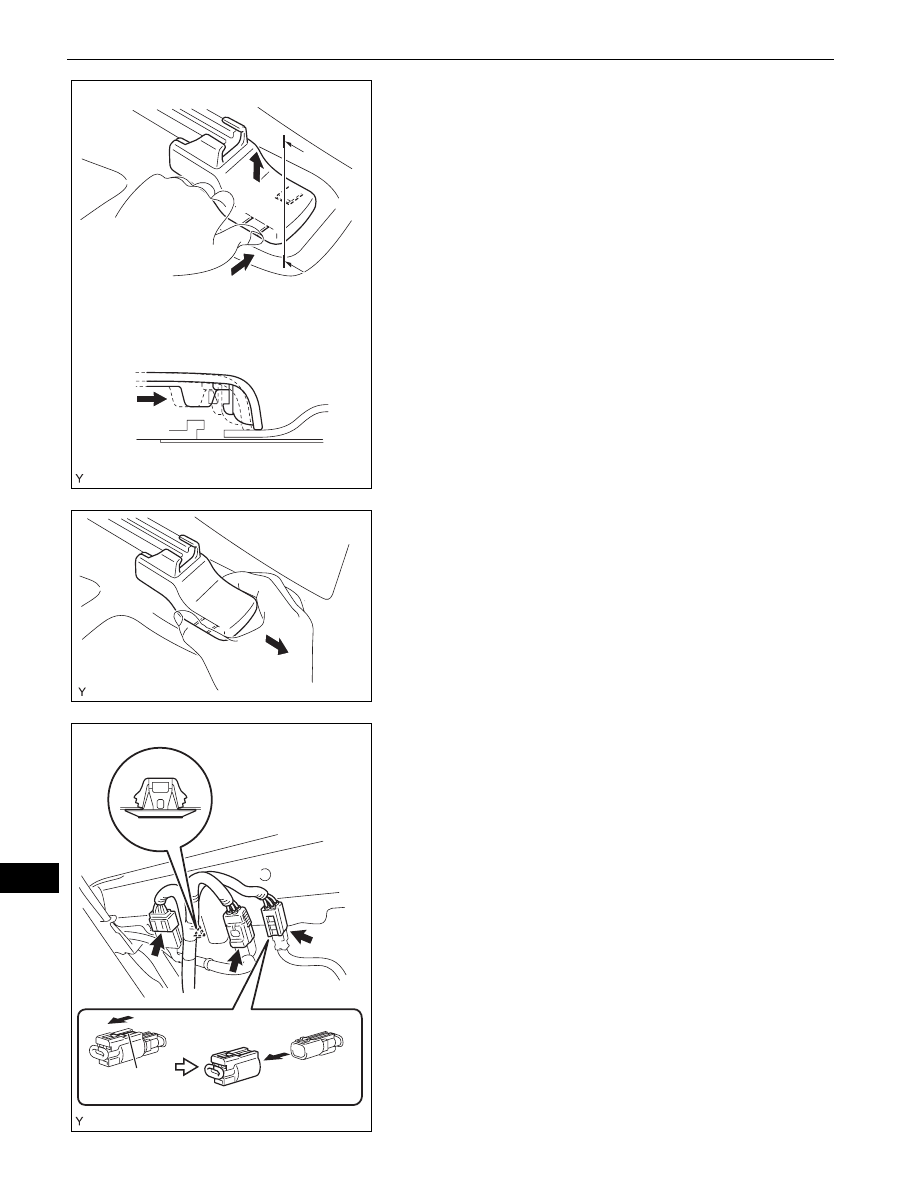
(c) Lift up on the area where the claw was removed. 

Then push in the direction of the claw on the 
opposite side to remove the outside claw.

(d) After the 2 claws have been removed, carefully pull 

the front seat track cover rearward and remove the 
front seat track cover.

3.

REMOVE FRONT SEAT ASSEMBLY
(a) for Driver Side:

(1) Using a clip remover, remove the clamp.
(2) Disconnect the 2 buckle switch connectors.
(3) w/ Front Seat Side Airbag:

1. Slide the slider and disconnect the airbag 

connector.

Push

A-A

A

A

1 Push

2 Up

B138596E01

Pull

B138597E01

Slider

B135117E01

SEAT  –  FRONT SEAT ASSEMBLY

SE–7

SE

(b) for Front Passenger Side:

(1) Using a clip remover, remove the clamp.
(2) Disconnect the connector.
(3) w/ Front Seat Side Airbag:

1. Slide the slider and disconnect the airbag 

connector.

(c) Move the front seat to the most forward position.
(d) Remove the 2 bolts from the rear side.
(e) Move the front seat to the most rearward position.
(f)

Remove the 2 bolts fromthe front side.

(g) Remove the front seat.

Slider

B135119E01

B130665

SE–8

SEAT  –  FRONT SEAT ASSEMBLY

SE

DISASSEMBLY

CAUTION:
Wear protective gloves. Sharp surfaces on the front seat 
adjuster could cause injuries to your hands.
HINT:
The procedure described below is for the driver side. Use the 
same procedure for both the driver and front passenger 
sides, unless otherwise specified.

1.

REMOVE VERTICAL SEAT ADJUSTER KNOB (for 
Driver Side)
(a) Using a screwdriver with its tip wrapped in 

protective tape, disengage the snap ring and 
remove the vertical seat adjuster knob.

2.

REMOVE VERTICAL SEAT ADJUSTER HANDLE 
COVER (for Driver Side)
(a) Using a screwdriver with its tip wrapped in 

protective tape, disengage the 3 claws and remove 
the vertical seat adjuster handle cover.

3.

REMOVE VERTICAL SEAT ADJUSTER HANDLE (for 
Driver Side)
(a) Remove the 2 screws and the vertical seat adjuster 

handle.

4.

REMOVE RECLINING ADJUSTER RELEASE 
HANDLE
(a) Using a screwdriver with its tip wrapped in 

protective tape, disengage the claw and remove the 
reclining adjuster release handle.

Protective Tape

B130668E01

Protective Tape

B130670E01

B130672

Protective Tape

B130673E01

SEAT  –  FRONT SEAT ASSEMBLY

SE–9

SE

5.

REMOVE FRONT SEAT CUSHION OUTER SHIELD
(a) Remove the screw.
(b) Using a screwdriver with its tip wrapped in 

protective tape, disengage the 2 claws and the clip 
and remove the front seat cushion outer shield.

6.

REMOVE FRONT SEAT INNER BELT ASSEMBLY 
(See page 

SB-31

)

7.

REMOVE FRONT SEAT CUSHION INNER SHIELD
(a) Remove the screw.
(b) Using a screwdriver with its tip wrapped in 

protective tape, disengage the claw and the clip and 
remove the front seat cushion inner shield.

8.

REMOVE FRONT SEAT CUSHION ASSEMBLY
(a) Using a clip remover, remove the 2 clips.

(b) Remove the 2 front seatback cover bands.

Protective Tape

B130675E01

Protective Tape

B130677E01

B130701

B130680


Content   ..  454  455  456  457   ..