Toyota Tundra. Manual - part 965
 

  Index      Toyota     Toyota Tundra (2007-2010 year) - Service and Repair Manual


Search            copyright infringement  


Content   ..  963  964  965  966   ..


Toyota Tundra. Manual - part 965


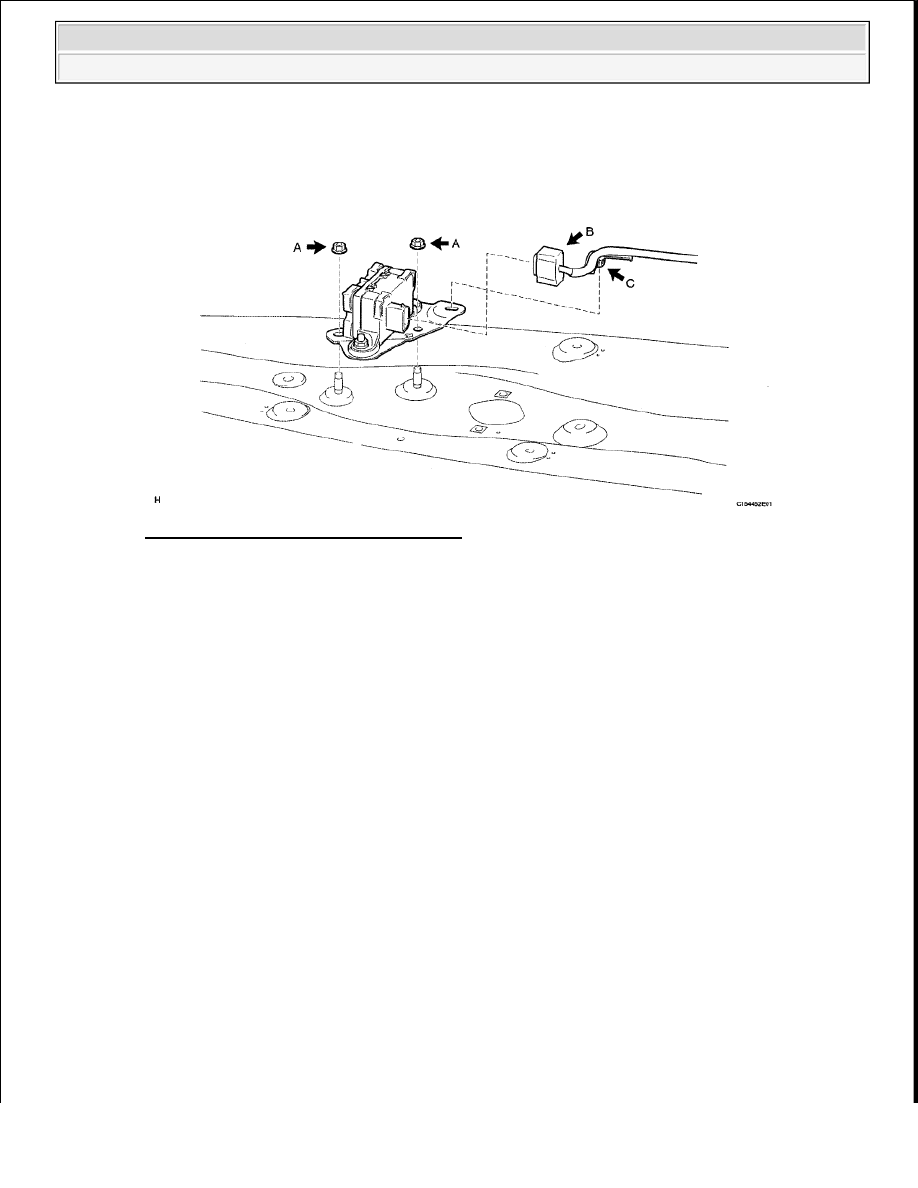
a. Remove the 2 nuts (labeled A) and sensor.  

b. Disconnect the sensor connector (labeled B), and then detach the clamp (labeled C) from the sensor 

bracket. 

Fig. 165: Locating Yaw Rate Sensor Nuts 
Courtesy of TOYOTA MOTOR SALES, U.S.A., INC. 

INSPECTION 

1. CHECK YAW RATE SENSOR 

a. Check the yaw rate sensor. If any of the following occurs, replace the sensor with a new one: 

The surface of the sensor is cracked, dented, or chipped.  

The connector is scratched, cracked, or damaged.  

The sensor has been dropped.  

INSTALLATION 

1. INSTALL YAW RATE SENSOR 

a. Connect the sensor connector (labeled A), and then attach the clamp (labeled B) to the hole of the 

sensor bracket.  

b. Install the yaw rate sensor with the 2 nuts (labeled C). 

Torque: 13 N*m (127 kgf*cm, 9 ft.*lbf)  

NOTE:

Make sure that the sensor is oriented correctly.  

If the sensor is dropped, replace it.  

Securely connect the connector.  

When installing the sensor, make sure to avoid impacts to the sensor. 


2009 Toyota Tundra 

2009 BRAKES Brake Control - Tundra


2. INSTALL CENTER FRONT SEAT (for Center Seat) (See INSTALLATION )  

3. INSTALL CONSOLE BOX ASSEMBLY (for Separate Seat Type) 

a. Install the console box (see INSTALLATION ).  

4. CONNECT CABLE TO NEGATIVE BATTERY TERMINAL 

5. PERFORM YAW RATE SENSOR ZERO POINT CALIBRATION 

a. Perform the yaw rate sensor zero point calibration (see CALIBRATION ).  

6. CHECK YAW RATE SENSOR SIGNAL 

a. Check the yaw rate sensor signal (see TEST MODE PROCEDURE ).  

STEERING ANGLE SENSOR 

COMPONENTS 

Fig. 166: Locating Yaw Rate Sensor With Nuts 
Courtesy of TOYOTA MOTOR SALES, U.S.A., INC. 

NOTE:

Some systems need to be initialized after the cable is reconnected (see 
INITIALIZATION ).


2009 Toyota Tundra 

2009 BRAKES Brake Control - Tundra


Fig. 167: Identifying Steering Angle Sensor Replacement Components With Torque Specifications - W/O 
Steering Pad Switch
 
Courtesy of TOYOTA MOTOR SALES, U.S.A., INC. 

Fig. 168: Identifying Steering Angle Sensor Replacement Components With Torque Specifications - W/ 
Steering Pad Switch (1 Of 2)
 
Courtesy of TOYOTA MOTOR SALES, U.S.A., INC. 


2009 Toyota Tundra 

2009 BRAKES Brake Control - Tundra


Fig. 169: Identifying Steering Angle Sensor Replacement Components With Torque Specifications - W/ 
Steering Pad Switch (2 Of 2)
 
Courtesy of TOYOTA MOTOR SALES, U.S.A., INC. 

REMOVAL 

1. DISCONNECT CABLE FROM NEGATIVE BATTERY TERMINAL 

CAUTION: Wait at least 90 seconds after disconnecting the cable from the 

negative (-) battery terminal to prevent airbag and seat belt 
pretensioner activation.

NOTE:

After the ignition switch is turned OFF, the navigation system 
requires approximately 90 seconds to record various types of 
memory and settings. As a result, after turning the ignition switch 
OFF, wait 90 seconds or more before disconnecting the cable from 
the negative (-) battery terminal.  

Some systems need to be initialized after the cable is reconnected 
(see INITIALIZATION ).  


2009 Toyota Tundra 

2009 BRAKES Brake Control - Tundra


Content   ..  963  964  965  966   ..