Toyota Tundra. Manual - part 1767


  Index      Toyota     Toyota Tundra (2007-2010 year) - Service and Repair Manual


Search            copyright infringement  


Content   ..  1765  1766  1767  1768   ..


Toyota Tundra. Manual - part 1767
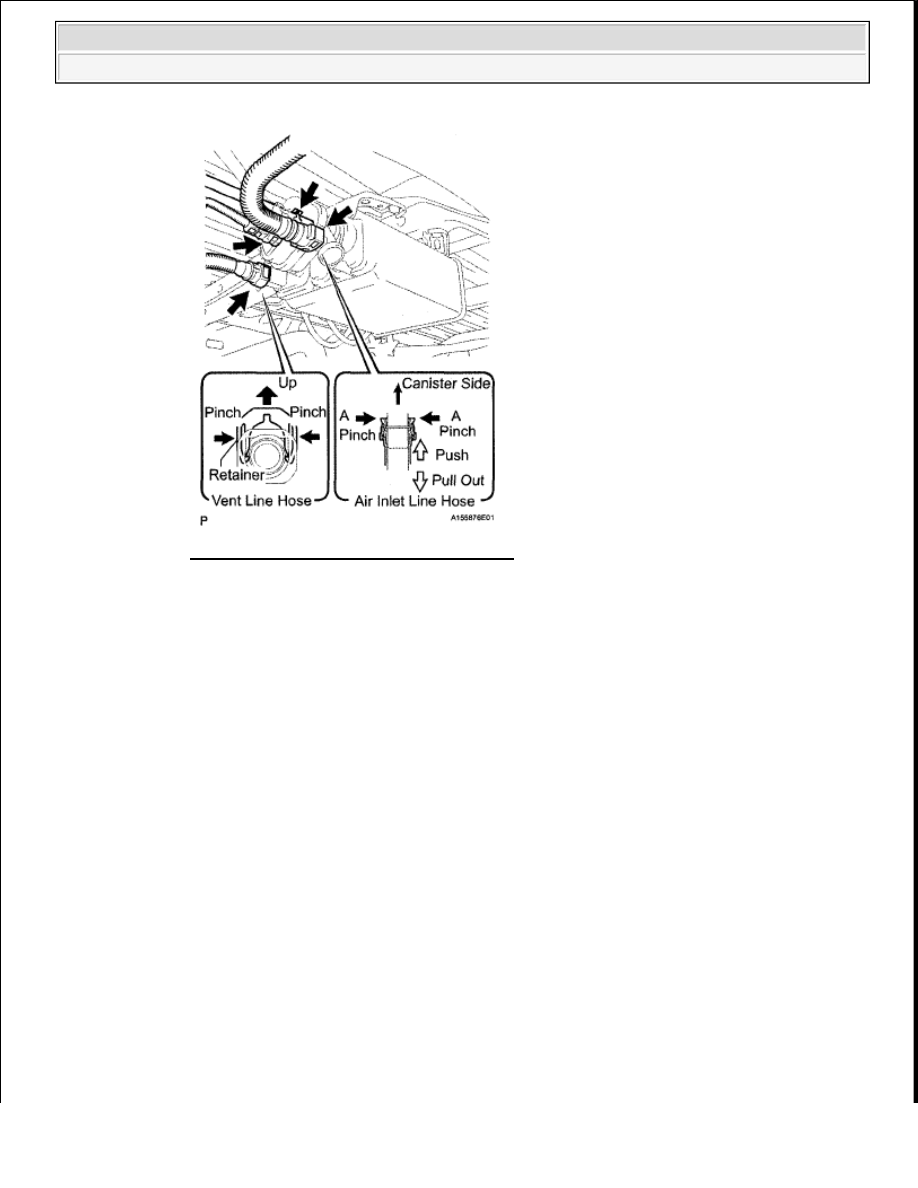


Fig. 87: Disconnecting Air Inlet Line Hose 
Courtesy of TOYOTA MOTOR SALES, U.S.A., INC. 

3

Pull out the hose  

e

Disconnect the vent line hose  

1

Pinch the retainer and then raise it  

f

Disconnect the wire harness clamp  

NOTE:

Do not use any tools in this procedure.  

Check for any dirt and foreign matter contamination in the 
canister and around the hose. Clean if necessary. Foreign 
matter may damage the O-rings or cause leaks in the seal 
between the canister and hose.  

NOTE:

Do not use any tools in this procedure.  

Check for any dirt and foreign matter contamination in the 
valve and around the connector. Clean if necessary. 
Foreign matter may damage the O-rings or cause leaks in 
the seal between the valve and connector.  


2009 Toyota Tundra 

2009 ENG NE Emission Control (3UR-FE) - Tundra


Fig. 88: Identifying Wire Harness Clamp 
Courtesy of TOYOTA MOTOR SALES, U.S.A., INC. 

g

Remove the 4 bolts and canister  

Fig. 89: Identifying Canister Bolts 
Courtesy of TOYOTA MOTOR SALES, U.S.A., INC. 

INSPECTION 

1

INSPECT CANISTER ASSEMBLY 

a

Visually check the canister for cracks or damage  If cracks or damage are found, replace the 
canister assembly  

Fig. 90: Checking Canister For Cracks And Damage 
Courtesy of TOYOTA MOTOR SALES, U.S.A., INC. 


2009 Toyota Tundra 

2009 ENG NE Emission Control (3UR-FE) - Tundra


b

Check for the canister operation  

1

With the purge port closed, blow 2 kPa (20 gf/cm

2

 , 0 3 psi) of air into the vent port, and 

check that air flows from the air inlet port  

If the result is not as specified, replace the canister assembly  

Fig. 91: Checking Canister Operation 
Courtesy of TOYOTA MOTOR SALES, U.S.A., INC. 

2

With the vent port closed, blow 1 kPa (10 gf/cm

2

 , 0 2 psi) of air inlet port, and check that air 

flows from the purge port  

If the result is not as specified, replace the canister assembly  

Fig. 92: Checking Air Flows From Purge Port 
Courtesy of TOYOTA MOTOR SALES, U.S.A., INC. 

c

Check for air leak  

1

Remove the air hose between ports A and B   

2

Connect the pressure gauge to the vent port of the canister  


2009 Toyota Tundra 

2009 ENG NE Emission Control (3UR-FE) - Tundra


Fig. 93: Connecting Pressure Gauge To Vent Port Of Canister 
Courtesy of TOYOTA MOTOR SALES, U.S.A., INC. 

3

With port B, purge port and the air inlet port closed and port A open, apply 20 kPa (0 2 
kgf/cm

2

 , 2 9 psi) of pressurized air into the vent port, then confirm that pressure is retained 

for 1 minute  

If the result is not as specified, replace the canister assembly  

d

Check the leak detection pump  

1

Remove the detection pump from the canister   

2

Check that air flows from port A to B and then to C  

If the result is not as specified, replace the canister assembly  

Fig. 94: Checking Air Flow From Port A To B & Then To C 
Courtesy of TOYOTA MOTOR SALES, U.S.A., INC. 


2009 Toyota Tundra 

2009 ENG NE Emission Control (3UR-FE) - Tundra


Content   ..  1765  1766  1767  1768   ..