Toyota Tundra. Manual - part 1118


  Index      Toyota     Toyota Tundra (2007-2010 year) - Service and Repair Manual


Search            copyright infringement  


Content   ..  1116  1117  1118  1119   ..


Toyota Tundra. Manual - part 1118


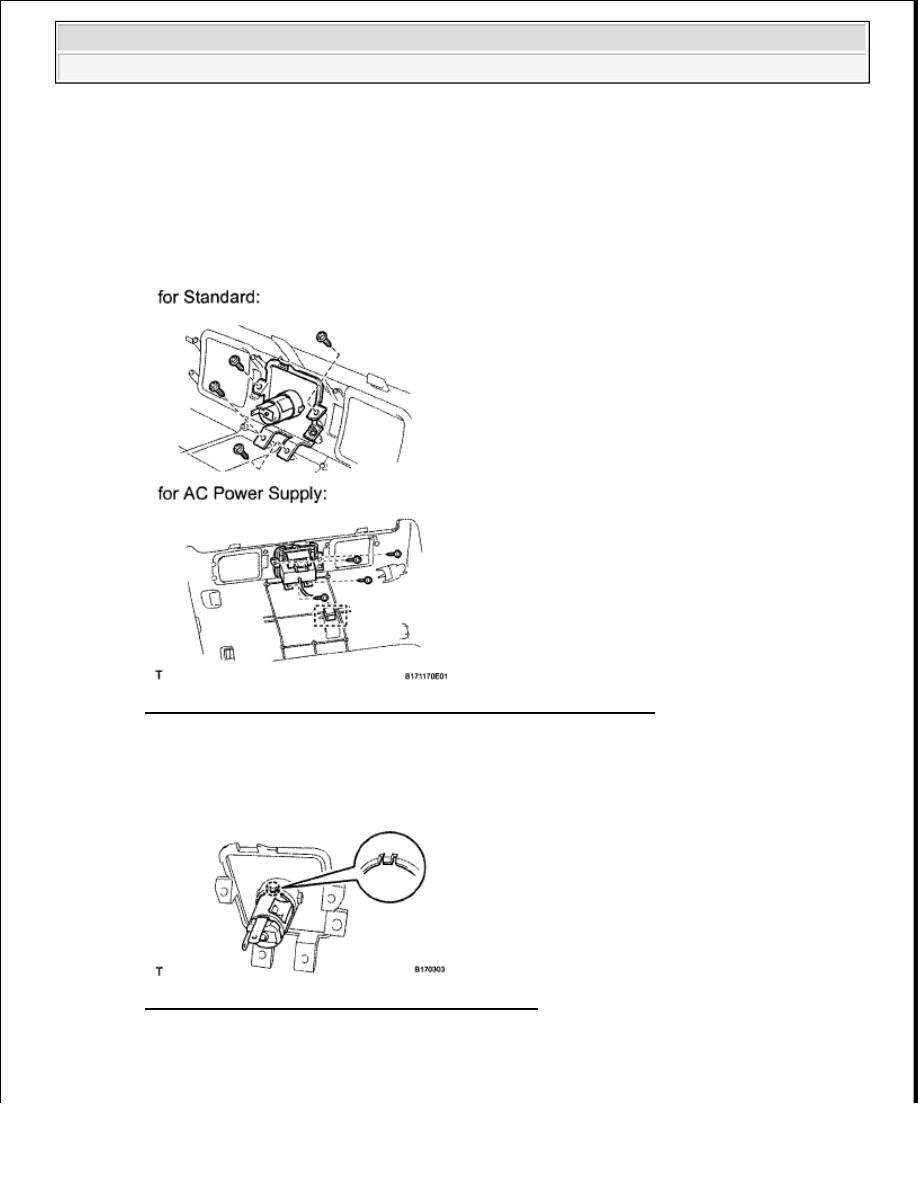
4. REMOVE NO. 2 SEATBACK LOCK CONTROL BEZEL 

a. for AC Power Supply: 

Disconnect the clamp. 

b. Remove the 4 screws and bezel. 

Fig. 28: Identifying No. 2 Seatback Lock Control Bezel And Screw 
Courtesy of TOYOTA MOTOR SALES, U.S.A., INC. 

5. REMOVE REAR POWER OUTLET SOCKET (for Standard) 

a. Detach the claw and remove the power outlet socket. 

Fig. 29: Identifying Power Outlet Socket And Claw 
Courtesy of TOYOTA MOTOR SALES, U.S.A., INC. 

6. REMOVE REAR POWER OUTLET SOCKET COVER (for Standard) 

a. Detach the 2 claws and remove the power outlet socket cover. 


2009 Toyota Tundra 

2009 ELECTRICAL Power Outlet - Tundra


Fig. 30: Identifying Power Outlet Socket Cover And Claws 
Courtesy of TOYOTA MOTOR SALES, U.S.A., INC. 

7. REMOVE REAR POWER POINT SOCKET (for AC Power Supply) 

a. Detach the 2 claws and remove the power outlet socket. 

Fig. 31: Identifying Power Outlet Socket And Claws 
Courtesy of TOYOTA MOTOR SALES, U.S.A., INC. 

INSTALLATION 

1. INSTALL REAR POWER POINT SOCKET (for AC Power Supply) 

a. Attach the 2 claws to install the power outlet socket. 

Fig. 32: Identifying Power Outlet Socket And Claws 
Courtesy of TOYOTA MOTOR SALES, U.S.A., INC. 

2. INSTALL REAR POWER OUTLET SOCKET COVER (for Standard) 

a. Attach the 2 claws to install the power outlet socket cover. 


2009 Toyota Tundra 

2009 ELECTRICAL Power Outlet - Tundra


Fig. 33: Identifying Power Outlet Socket Cover And Claws 
Courtesy of TOYOTA MOTOR SALES, U.S.A., INC. 

3. INSTALL REAR POWER OUTLET SOCKET (for Standard) 

a. Attach the claw to install the power outlet socket. 

Fig. 34: Identifying Power Outlet Socket And Claw 
Courtesy of TOYOTA MOTOR SALES, U.S.A., INC. 

4. INSTALL NO. 2 SEATBACK LOCK CONTROL BEZEL 

a. for AC Power Supply: 

Connect the clamp. 

b. Install the bezel with the 4 screws. 


2009 Toyota Tundra 

2009 ELECTRICAL Power Outlet - Tundra


Fig. 35: Identifying No. 2 Seatback Lock Control Bezel And Screws 
Courtesy of TOYOTA MOTOR SALES, U.S.A., INC. 

5. INSTALL NO. 2 CONSOLE BOX REGISTER ASSEMBLY (See INSTALLATION )  

6. INSTALL NO. 1 CONSOLE BOX REGISTER ASSEMBLY (See REASSEMBLY )  

7. INSTALL CENTER SEATBACK PANEL (See INSTALLATION )  

POWER OUTLET SOCKET (FOR COLUMN SHIFT TYPE) 

COMPONENTS 


2009 Toyota Tundra 

2009 ELECTRICAL Power Outlet - Tundra


Content   ..  1116  1117  1118  1119   ..