Subaru Legacy (2023 year). Manual in english - page 33
 

  Index      Manuals     Subaru Legacy (2023 year). Manual in english


Search            copyright infringement  


Content      ..     31      32      33      34     ..


Subaru Legacy (2023 year). Manual in english - page 33


(526,1)

11-7. Cooling System

WARNING

Never remove the radiator cap until
the engine has been shut off and has
cooled down completely. Since the
coolant is under pressure, you may
suffer serious burns from a spray of
boiling hot coolant when the cap is
removed.

CAUTION

.

Vehicles are filled at the factory

with SUBARU SUPER COOLANT
that does not require the first
change for 11 years/137,500
miles (11 years/220,000 km). This
coolant should not be mixed with
any other brand or type of cool-
ant during this period. Mixing
with a different coolant will re-
duce the life of the coolant. When
necessary to top off the coolant
for any reason, use only SUBARU
SUPER COOLANT.

If SUBARU SUPER COOLANT is
diluted with another brand or
type, the maintenance interval is

shortened to that of the mixing
coolant.

.

Do not splash the engine coolant

over painted parts. The alcohol
contained in the engine coolant
may damage the paint surface.

&

Cooling Fan, Hose and Con-
nections

Your vehicle employs an electric cooling
fan which is thermostatically controlled to
operate when the engine coolant reaches
a specific temperature.

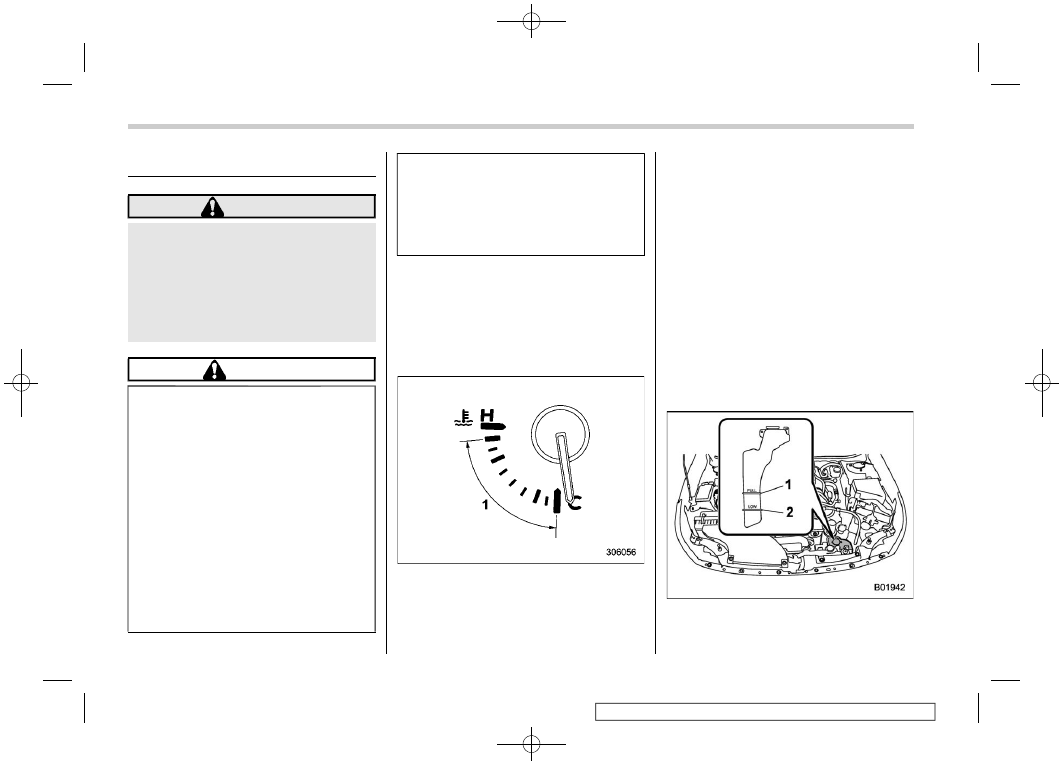
1)

Normal operating range

If the radiator cooling fan does not operate
even when the engine coolant tempera-
ture gauge exceeds the normal operating

range, the cooling fan circuit may be
defective. Refer to “Engine Coolant Tem-
perature Gauge”

P177.

Check the fuse and replace it if necessary.
If the fuse is not blown, have the cooling
system checked by your SUBARU dealer.

If the frequent addition of coolant is
necessary between vehicle service visits,
it is recommended that you have your
vehicle inspected by an authorized
SUBARU dealer to check for leaks, da-
mage, or looseness.

&

Engine Coolant

!

Checking the coolant level

1)

“FULL” level mark

2)

“LOW” level mark

Cooling System

524

(527,1)

Check the coolant level at each fuel stop.
1. Check the coolant level on the outside
of the reservoir while the engine is cool.
2. If the level is close to or lower than the
“LOW” level mark, add coolant up to the
“FULL” level mark. If the reserve tank is
empty, remove the radiator cap and refill
coolant up to just below the filler neck as
shown in the following illustration.

1)

Fill up to this level.

3. After refilling the reserve tank and the
radiator, reinstall the cap and check that
the rubber gaskets inside the radiator cap
are in the proper position.

CAUTION

.

Be careful not to spill engine

coolant when adding it. If coolant
touches the exhaust pipe, it may
cause a bad smell, smoke, and/or
a fire. If engine coolant gets on
the exhaust pipe, be sure to wipe
it off.

.

Do not splash the engine coolant

over painted parts. The alcohol
contained in the engine coolant
may damage the paint surface.

!

Changing the coolant

It may be difficult to change the coolant.
Have the coolant changed by your
SUBARU dealer if necessary.

The coolant should be changed according
to the maintenance schedule in the “War-
ranty and Maintenance Booklet”.

Cooling System

525

11

Maintenance

and

Service

(528,1)

11-8. Air Cleaner Element

WARNING

Do not operate the engine with the
air cleaner element removed. The air
cleaner element not only filters in-
take air but also stops flames if the
engine backfires. If the air cleaner
element is not installed when the
engine backfires, you could be
burned.

CAUTION

When replacing the air cleaner ele-
ment, use a genuine SUBARU air
cleaner element. If it is not used,
there is the possibility of causing a
negative effect to the engine.

The air cleaner element functions as a filter
screen. When the element is perforated or
removed, engine wear will be excessive
and engine life shortened.

The air cleaner element is a dry type. It is
unnecessary to clean or wash the element.

&

Replacing the Air Cleaner
Element

Replace the air cleaner element according
to the maintenance schedule in the “War-
ranty and Maintenance Booklet”. Under
extremely dusty conditions, replace it
more frequently. It is recommended that
you always use genuine SUBARU parts.

!

2.5 L models

1)

Clips

1. Unsnap the two clips holding the air
cleaner case (rear).

2. Open the air cleaner case and pull the
cover rearward while lifting it up.

3. Remove the air cleaner element.

CAUTION

If the inside of the air cleaner case is
extremely soiled (for example, by
sand), contact a SUBARU dealer and
have the air cleaner case cleaned.

4. If you find large foreign objects such as
leaves inside the air cleaner case, remove
the foreign objects.

Air Cleaner Element

526

(529,1)

5. Install a new air cleaner element in the
way the longitudinal side and the trans-
verse side face as shown in the illustration.

6. To install the air cleaner case (rear),
insert the three projections on the air
cleaner case (rear) into the slits on the air

cleaner case (front).
7. Install in the reverse order of removal.

!

2.4 L models

1)

Clips

1. Unsnap the two clips holding the air
cleaner case (rear).

2. Open the air cleaner case and pull the
cover rearward while lifting it up.

3. Remove the air cleaner element.

CAUTION

If the inside of the air cleaner case is
extremely soiled (for example, by
sand), contact a SUBARU dealer and
have the air cleaner case cleaned.

4. If you find large foreign objects such as
leaves inside the air cleaner case, remove
the foreign objects.

– CONTINUED –

Air Cleaner Element

527

11

Maintenance

and

Service

(530,1)

5. Install a new air cleaner element in the
way the longitudinal side and the trans-
verse side face as shown in the illustration.

6. To install the air cleaner case (rear),
insert the three projections on the air
cleaner case (rear) into the slits on the air

cleaner case (front).
7. Install the removed parts in the reverse
order of removal.

11-9. Spark Plugs

It may be difficult to replace the spark
plugs. It is recommended that you have the
spark plugs replaced by your SUBARU
dealer.

The spark plugs should be replaced
according to the maintenance schedule
in the “Warranty and Maintenance Book-
let”.

&

Recommended Spark Plugs

Refer to “Electrical System”

P565.

Spark Plugs

528

(531,1)

11-10. Drive Belts

It is unnecessary to check the deflection of
the drive belt periodically because your
engine is equipped with an automatic belt
tension adjuster. However, replacement of
the belt should be done according to the
maintenance schedule in the “Warranty
and Maintenance Booklet”. Consult your
SUBARU dealer for replacement.
If the belt is loose, cracked or worn,
contact your SUBARU dealer.

11-11. Continuously Variable
Transmission Fluid

There is no fluid level gauge. It is un-
necessary to check the continuously vari-
able transmission fluid level. However, if
necessary, consult your SUBARU dealer
for inspection.

11-12. Front Differential Gear
Oil and Rear Differential Gear
Oil

It is not necessary to check the gear oil
level. Check that there are no cracks,
damage or leakage. However, the oil
inspection should be performed according
to the maintenance schedule in the “War-
ranty and Maintenance Booklet”. Consult
your SUBARU dealer for details.

&

Recommended Grade and
Viscosity

Each oil manufacturer has its own base
oils and additives. Never use different
brands together. For details, refer to “Front
Differential and Rear Differential Gear Oil”

P564.

CAUTION

Using a differential gear oil other
than the specified oil may cause a
decline in vehicle performance.

Drive Belts

529

11

Maintenance

and

Service

(532,1)

11-13. Brake Fluid

&

Checking the Fluid Level

WARNING

.

Never let brake fluid contact your

eyes because brake fluid can be
harmful to your eyes. If brake
fluid gets in your eyes, immedi-
ately flush them thoroughly with
clean water. For safety, when
performing this work, wearing
eye protection is advisable.

.

Brake fluid absorbs moisture

from the air. Any absorbed moist-
ure can cause a dangerous loss
of braking performance.

.

If the vehicle requires frequent

refilling, there may be a leak. If
you suspect a problem, have the
vehicle checked at your SUBARU
dealer.

CAUTION

.

When adding brake fluid, be care-

ful not to allow any dirt into the
reservoir.

.

Never splash the brake fluid over

painted surfaces or rubber parts.

Alcohol contained in the brake
fluid may damage them.

.

Be careful not to spill brake fluid

when adding it. If brake fluid
touches the exhaust pipe, it may
cause a bad smell, smoke, and/or
a fire. If brake fluid gets on the
exhaust pipe, be sure to wipe it
off.

Visually check the brake fluid level of the
reservoir monthly on the even surface.

1)

“MAX” level line

2)

“MIN” level line

Be sure to check the brake fluid level from
the outside of the reservoir. If the fluid level
is below “MIN”, top up brake fluid to “MAX”.
Use only brake fluid from a sealed contain-
er.

&

Recommended Brake Fluid

Refer to “Fluids”

P564.

CAUTION

Never use different brands of brake
fluid together. Also, avoid mixing
DOT 3 and DOT 4 brake fluids even if
they are the same brand.

Brake Fluid

530

(533,1)

11-14. Brake Pedal

Check the brake pedal free play and
reserve distance according to the main-
tenance schedule in the “Warranty and
Maintenance Booklet”.

11-15. Replacement of Brake
Pad

CAUTION

.

If you continue to drive despite

the scraping noise from the audi-
ble brake pad wear indicator, it
will result in the need for costly
brake rotor repair or replace-
ment.

.

It is recommended that you dis-

connect the vehicle battery be-
fore replacing the brake pad.
However, it is dangerous to dis-
connect the vehicle battery. We
recommend that you have your
SUBARU dealer replace the brake
pad.

The disc brakes have audible wear in-
dicators on the brake pads. If the brake
pads wear close to their service limit, the
wear indicator makes a very audible
scraping noise when the brake pedal is
applied.

If you hear this scraping noise each time
you apply the brake pedal, have the brake
pads serviced by your SUBARU dealer as
soon as possible.

Brake Pedal

531

11

Maintenance

and

Service

(534,1)

11-16. Tires and Wheels

&

Types of Tires

You should be familiar with type of tires
present on your vehicle.

!

All season tires

The factory-installed tires on your new
vehicle are all season tires.
All season tires are designed to provide an
adequate measure of traction, handling
and braking performance in year-round
driving including snowy and icy road
conditions. However all season tires do
not offer as much traction performance as
winter (snow) tires in heavy or loose snow
or on icy roads.
All season tires are identified by “ALL
SEASON” and/or “M+S” (Mud & Snow) on
the tire sidewall.

!

Summer tires

Summer tires are high-speed capability
tires best suited for highway driving under
dry conditions.
Summer tires are inadequate for driving on
slippery roads such as on snow-covered or
icy roads.
If you drive your vehicle on snow-covered
or icy roads, we strongly recommend the
use of winter (snow) tires.
When installing winter tires, be sure to

replace all four tires.

!

Winter (snow) tires

Winter tires are best suited for driving on
snow-covered and icy roads. However
winter tires do not perform as well as
summer tires and all season tires on roads
other than snow-covered and icy roads.

&

Tire Pressure Monitoring
System (TPMS) (U.S.-Spec.
Models)

The tire pressure monitoring system pro-
vides the driver with a warning message by
sending a signal from a sensor that is
installed in each wheel when tire pressure
is severely low. The tire pressure monitor-
ing system will activate only when the
vehicle is driven. Also, this system may not
react immediately to a sudden drop in tire
pressure (for example, a blow-out caused
by running over a sharp object).

If you adjust the tire pressures in a warm
garage and will then drive the vehicle in
cold outside air, the resulting drop in tire
pressures may cause the low tire pressure
warning light to illuminate. To avoid this
problem when adjusting the tire pressures
in a warm garage, inflate the tires to
pressures higher than those shown on
the tire inflation pressure label. Specifi-
cally, inflate them by an extra 1 psi (6.9

kPa, 0.07 kgf/cm

2

) for every difference of

10

8

F (5.6

8

C) between the temperature in

the garage and the temperature outside.
By way of example, the following table
shows the required tire pressures that
correspond to various outside tempera-
tures when the temperature in the garage
is 60

8

F (15.6

8

C).

Example:

Tire size: 225/55R17 97V, 225/50R18 95V
Standard tire pressures:
Front: 33 psi (230 kPa, 2.3 kgf/cm

2

)

Rear: 32 psi (220 kPa, 2.2 kgf/cm

2

)

Garage temperature: 60

8

F (15.6

8

C)

Outside

temperature

Adjusted pressure

[psi (kPa, kgf/cm

2

)]

Front

Rear

30

8

F (−1

8

C)

36 (250, 2.5)

35 (240, 2.4)

10

8

F (−12

8

C)

38 (265, 2.65) 37 (255, 2.55)

−10

8

F (−23

8

C)

41 (280, 2.8)

39 (270, 2.7)

Example:

Tire size: 225/65R17 102H, 225/60R18
100H, 225/65R17 102T
Standard tire pressures:
Front: 35 psi (240 kPa, 2.4 kgf/cm

2

)

Rear: 33 psi (230 kPa, 2.3 kgf/cm

2

)

Garage temperature: 60

8

F (15.6

8

C)

Tires and Wheels

532

(535,1)

Outside

temperature

Adjusted pressure

[psi (kPa, kgf/cm

2

)]

Front

Rear

30

8

F (−1

8

C)

38 (260, 2.65)

36 (250, 2.5)

10

8

F (−12

8

C)

40 (275, 2.8)

38 (265, 2.65)

−10

8

F (−23

8

C) 42 (290, 2.95)

41 (280, 2.8)

If the low tire pressure warning light
illuminates when you drive the vehicle in
cold outside air after adjusting the tire
pressures in a warm garage, re-adjust the
tire pressures using the method described
above. Then, increase the vehicle speed
to at least 20 mph (32 km/h) and check to
see that the low tire pressure warning light
goes off a few minutes later. If the low tire
pressure warning light does not go off, the
tire pressure monitoring system may not
be functioning normally. In this event, go to
a SUBARU dealer to have the system
inspected as soon as possible.

While the vehicle is driven, friction be-
tween tires and the road surface causes
the tires to warm up. After illumination of
the low tire pressure warning light, any
increase in the tire pressures caused by an
increase in the outside air temperature or
by an increase in the temperature in the
tires can cause the low tire pressure
warning light to go off.

It may not be possible to install TPMS
valves on certain wheels that are on the
market. Therefore, if you change the
wheels (for example, a switch to snow
tires), use wheels that have the same part
number as the standard-equipment
wheels. Without four operational TPMS
valve/sensors on the wheels, the TPMS
will not fully function and the warning light
in the instrument panel will illuminate
steadily after blinking for approximately
one minute.

WARNING

If the low tire pressure warning light
does not illuminate briefly after the
ignition switch is turned ON or the
light illuminates steadily after blink-
ing for approximately one minute,
you should have your Tire Pressure
Monitoring System checked at a
SUBARU dealer as soon as possi-
ble.

If this light illuminates while driving,
never brake suddenly. Instead, per-
form the following procedure. Other-
wise an accident involving serious
vehicle damage and serious perso-
nal injury could occur.

1) Keep driving straight ahead while

gradually reducing speed.

2) Slowly pull off the road to a safe

place.

If this light still illuminates while
driving after adjusting the tire pres-
sure, a tire may have significant
damage and a fast leak that causes
the tire to lose air rapidly. If you have
a flat tire, replace it with a spare tire
as soon as possible.

When a spare tire is mounted or a
wheel rim is replaced without the
original pressure sensor/transmitter
being transferred, the low tire pres-
sure warning light will illuminate
steadily after blinking for approxi-
mately one minute. This indicates
the TPMS is unable to monitor all
four road wheels. Contact your
SUBARU dealer as soon as possible
for tire and sensor replacement and/
or system resetting. If the light
illuminates steadily after blinking
for approximately one minute,
promptly contact a SUBARU dealer
to have the system inspected.

!

TPMS valve self-registration

When the wheels are replaced (such as
when installing snow tires) or when a new
TPMS valve is mounted on a new installed
wheel, you will need to perform TPMS

– CONTINUED –

Tires and Wheels

533

11

Maintenance

and

Service

(536,1)

valve self-registration. Refer to the follow-
ing procedure to perform TPMS valve self-
registration.
1. Install the wheels with TPMS valves on
the vehicle.
2. Adjust the tire pressure to the specified
value. For information about the specified
value of the tire pressure, refer to “Tires”

P566.

3. Drive at speeds above 25 mph (40
km/h) for at least 4 miles (6 km) or until the
low tire pressure warning light turns off.

NOTE

.

When installing TPMS valves, use

only genuine SUBARU parts.

.

Registration of TPMS valves can

also be done at a SUBARU dealer.
Consult your SUBARU dealer.

&

Tire Inspection

Check on a daily basis that the tires
are free from serious damage,
nails, and stones. At the same time,
check the tires for abnormal wear.
Contact your SUBARU dealer im-
mediately if you find any problem.

NOTE

.

When the wheels and tires

strike curbs or are subjected to
harsh treatment as when the
vehicle is driven on a rough
surface, they can suffer damage
that cannot be seen with the
naked eye. This type of damage
does not become evident until
time has passed. Try not to drive
over curbs, potholes or on other
rough surfaces. If doing so is
unavoidable, keep the vehicle’s
speed down to a walking pace or
less, and approach the curbs as
squarely as possible. Also, make
sure the tires are not pressed
against the curb when you park
the vehicle.

.

If you feel unusual vibration

while driving or find it difficult to
steer the vehicle in a straight line,
one of the tires and/or wheels
may be damaged. Drive slowly to
the nearest authorized SUBARU
dealer and have the vehicle in-
spected.

&

Tire Pressures and Wear

Maintaining the correct tire pres-
sures helps to maximize the tires’
service lives and is essential for
good running performance. Check
and, if necessary, adjust the pres-
sure of each tire and the spare (if
equipped) at least once a month
and before any long journey.

Tire inflation pressure label

Check the tire pressures when the
tires are cold. Use a pressure
gauge to adjust the tire pressures
to the values shown on the tire
inflation pressure label. The tire
inflation pressure label is located

Tires and Wheels

534

(537,1)

on the door pillar on the driver’s
side.

Driving even a short distance
warms up the tires and increases
the tire pressures. Also, the tire
pressures are affected by the out-
side temperature. It is best to check
tire pressure outdoors before driv-
ing the vehicle.

When a tire becomes warm, the air
inside it expands, causing the tire
pressure to increase. Be careful not
to mistakenly release air from a
warm tire to reduce its pressure.

NOTE

.

The air pressure in a tire

increases by approximately 4.3
psi (30 kPa, 0.3 kgf/cm

2

) when the

tire becomes warm.

.

The tires are considered cold

when the vehicle has been
parked for at least 3 hours or
has been driven less than 1 mile
(1.6 km).

WARNING

Do not let air out of warm tires
to adjust pressure. Doing so
will result in low tire pressure.

Incorrect tire pressures detract from
controllability and ride comfort, and
they cause the tires to wear abnor-
mally.

.

Correctly inflated tires (tread

worn evenly)

Roadholding is good, and steering
is responsive. Rolling resistance is
low, so fuel consumption is also
lower.

.

Under inflated tires (tread worn at

shoulders)

Rolling resistance is high, so fuel
consumption is also higher.

– CONTINUED –

Tires and Wheels

535

11

Maintenance

and

Service

(538,1)

.

Over inflated tires (tread worn in

center)

Ride comfort is poor. Also, the tire
magnifies the effects of road sur-
face bumps and dips, possibly
resulting in vehicle damage.

WARNING

Driving at high speeds with
excessively low tire pressures
can cause the tires to deform
severely and to rapidly be-
come hot. A sharp increase in
temperature could cause tread
separation, and destruction of
the tires. The resulting loss of

vehicle control could lead to
an accident.

&

Wheel Balance

Each wheel was correctly balanced
when your vehicle was new, but the
wheels will become unbalanced as
the tires become worn during use.
Wheel imbalance causes the steer-
ing wheel to vibrate slightly at
certain vehicle speeds and detracts
from the vehicle’s straight-line sta-
bility. It can also cause steering and
suspension system problems and
abnormal tire wear. If you suspect
that the wheels are not correctly
balanced, have them checked and
adjusted by your SUBARU dealer.
Also have them adjusted after tire
repairs and after tire rotation.

CAUTION

Loss of correct wheel align-
ment causes the tires to wear
on one side and reduces the
vehicle’s running stability.

Contact your SUBARU dealer
if you notice abnormal tire
wear.

NOTE

The suspension system is de-
signed to hold each wheel at a
certain alignment (relative to the
other wheels and to the road) for
optimum straight-line stability
and cornering performance.

&

Wear Indicators

1) New tread
2) Worn tread

Tires and Wheels

536

(539,1)

3) Tread wear indicator

Each tire incorporates a tread wear
indicator, which becomes visible
when the depth of the tread grooves
decreases to 0.063 in (1.6 mm). A
tire must be replaced when the
tread wear indicator appears as a
solid band across the tread.

WARNING

When a tire’s tread wear indi-
cator becomes visible, the tire
is worn beyond the acceptable
limit and must be replaced
immediately. With a tire in this
condition, driving at high
speeds in wet weather can
cause the vehicle to hydro-
plane. The resulting loss of
vehicle control can lead to an
accident

.

NOTE

For safety, inspect the tire tread
regularly and replace the tires
before their tread wear indicators

become visible.

&

Rotational Direction of Tires

Example of rotational direction
marked on the sidewall

1) Front

If the tires have specific rotational
direction, refer to the arrow marked
on the side wall.
The arrow should be pointing for-
ward direction when the wheels are
fitted.

&

Tire Rotation

Vehicles equipped with 4 non-
unidirectional tires

1) Front

– CONTINUED –

Tires and Wheels

537

11

Maintenance

and

Service

(540,1)

Vehicles equipped with unidi-
rectional tires

1) Front

Models with a spare tire of the
same wheel type as the in-
stalled tires

1) Front

NOTE

In prior to carrying out a tire
rotation, check the side wall of
the tires and confirm the follow-
ing.

.

All 5 tires are the same in

brand and tread pattern.

.

The rotational directions and

sizes match.

Tire wear varies from wheel to
wheel. Move the tires to the posi-

tions shown in the illustration each
time they are rotated. For the tire
rotation schedule, refer to the “War-
ranty and Maintenance Booklet”.
Replace any damaged or unevenly
worn tire at the time of rotation. After
tire rotation, adjust the tire pres-
sures and make sure the wheel nuts
are correctly tightened.

After driving approximately 600
miles (1,000 km), check the wheel
nuts again and retighten any nut
that has become loose.

&

Tire Replacement

The wheels and tires are important and
integral parts of your vehicle’s design; they
cannot be changed arbitrarily. The tires
fitted as standard equipment are optimally
matched to the characteristics of the
vehicle and were selected to give the best
possible combination of running perfor-
mance, ride comfort, and service life. It is
essential for every tire to have a size and
construction matching those shown on the
tire inflation pressure label and to have a
speed symbol and load index matching
those shown on the tire inflation pressure
label.

Tires and Wheels

538

(541,1)

Using tires of a non-specified size detracts
from controllability, ride comfort, braking
performance, speedometer accuracy and
odometer accuracy. It also creates incor-
rect body-to-tire clearances and inappro-
priately changes the vehicle’s ground
clearance.

All four tires must be the same in terms of
manufacturer, brand (tread pattern), con-
struction, and size. You are advised to
replace the tires with new ones that are
identical to those fitted as standard equip-
ment.

For safe vehicle operation, SUBARU
recommends replacing all four tires at the
same time.

WARNING

.

When replacing or installing

tire(s), all four tires must be the
same for the following items.

(a) Size

(b) Speed symbol

(c) Load index

(d) Circumference

(e) Construction

(f) Manufacturer

(g) Brand (tread pattern)

(h) Degrees of wear

For items (a) to (c), you must
obey the specification that is
printed on the tire inflation pres-
sure label. The tire inflation pres-
sure label is located on the dri-
ver’s door pillar.

If all four tires are not the same in
items (a) to (h), serious mechan-
ical damage could be caused to
the drivetrain of the car, and
affect the followings.

– Ride

– Handling

– Braking

– Speedometer/Odometer cali-

bration

– Clearance between the body

and the tires

It also may be dangerous and
lead to loss of vehicle control,
and it can lead to an accident.

.

Use only radial tires. Do not use

radial tires together with belted
bias tires and/or bias-ply tires.
Doing so can dangerously re-
duce controllability, resulting in
an accident.

&

Wheel Replacement

When replacing wheels due, for example,
to damage, make sure the replacement
wheels match the specifications of the
wheels that are fitted as standard equip-
ment. Replacement wheels are available
from SUBARU dealers.

WARNING

Use only those wheels that are
specified for your vehicle. Wheels
not meeting specifications could
interfere with brake caliper opera-
tion and may cause the tires to rub
against the wheel well housing dur-
ing turns. The resulting loss of
vehicle control could lead to an
accident.

Tires and Wheels

539

11

Maintenance

and

Service


Content      ..     31      32      33      34     ..