Subaru Legacy (2023 year). Manual in english - page 21
 

  Index      Manuals     Subaru Legacy (2023 year). Manual in english


Search            copyright infringement  


Content      ..     19      20      21      22     ..


Subaru Legacy (2023 year). Manual in english - page 21


(328,1)

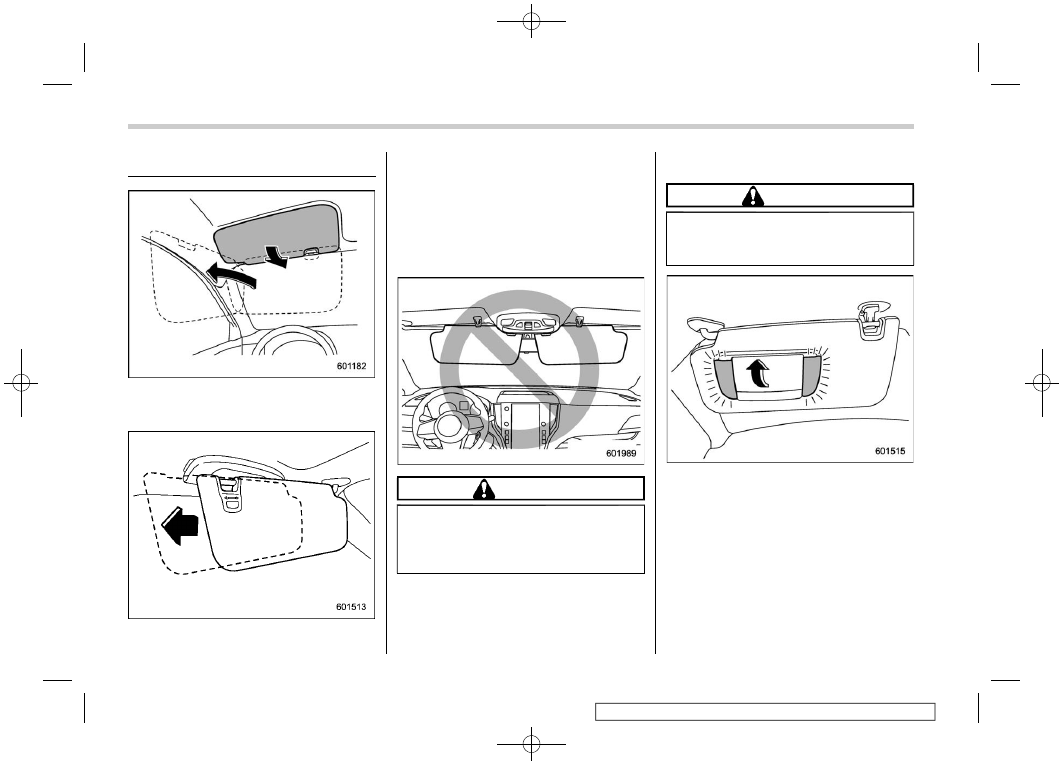
6-2. Sun Visors

To block out glare, swing down the visors.
To use the sun visor at a side window,
swing it down and move it sideways.

With the sun visor positioned over the side
window, you can slide the sun visor toward
the rear to prevent glare through the gap
between the sun visor and center pillar. To
slide the sun visor, pull it toward the rear of
the vehicle. When you have finished
sliding it, push it toward the front of the
vehicle.

CAUTION

Do not slide the sun visor over the
windshield. The slided sun visor
would obstruct your view of the
rearview mirror.

&

Vanity Mirror with Light

CAUTION

Keep the vanity mirror cover closed
while the car is being driven to avoid
being blinded by glare.

To use the vanity mirror, swing down the
sun visor and open the vanity mirror cover.
The lights beside the vanity mirror illumi-
nate when the mirror cover is opened.

NOTE

Use of the vanity mirror light for a long
period of time while the engine is not
running can cause battery discharge.

Sun Visors

326

(329,1)

6-3. Storage Compartment

CAUTION

.

Always keep the storage com-

partment closed while driving to
reduce the risk of injury in the
event of sudden stops or an
accident.

.

Do not store the following items

in the storage compartment.
Otherwise, it may cause a fire or
accident.

– Spray cans, containers with

flammable or corrosive li-
quids or any other dangerous
items.

– Plastic or other heat-vulner-

able or flammable articles
such as a lighter.

&

Glove Box

1)

Lock

2)

Unlock

To open the glove box, pull the handle. To
close it, push the lid firmly upward.
To lock the glove box, insert the key and
turn it clockwise. To unlock the glove box,
insert the key and turn it counterclockwise.

For models with “keyless access with
push-button start system”, use the emer-
gency key to lock or unlock the glove box.

NOTE

The emergency key is directional. If the
key cannot be inserted, change the
direction that the grooved side is facing
and insert it again.

&

Center Console

The center console box provides a storage
space.

1)

Upper lid opening lever

2)

Upper and lower lid opening lever (dotted
surface)

The center console box has a two-layer
structure consisting of an upper compart-
ment and lower compartment.

– CONTINUED –

Storage Compartment

327

6

Interior

Equipment

(330,1)

&

Overhead Console

To open the console, push on the lid lightly
and it will automatically open.

WARNING

Do not use the overhead console
while driving. Doing so may distract
you from the road conditions ahead
and cause an accident that may
result in serious injury or death.

CAUTION

.

Before operating this vehicle, en-

sure that the overhead console is
closed.

.

When your vehicle is parked in

the sun or on a warm day, the
inside of the overhead console
heats up. Avoid storing plastic or
other heat vulnerable or flam-
mable articles such as a lighter
in the overhead console.

.

Do not pull the lid when opening

the overhead console.

There is the risk that the over-
head console may be damaged.

6-4. Cup Holder

CAUTION

Take care to avoid spills. Beverages,
if hot, might burn you and/or your
passengers. Spilled beverages may
also damage upholstery, carpets or
audio equipment.

&

Front Passenger’s Cup
Holder

CAUTION

.

Do not pick up a cup from the cup

holder or put a cup in the holder
while you are driving, as this may
distract you and lead to an acci-
dent.

.

Take care not to spill a beverage

on the select lever or any
switch(es) in the adjacent area. If
the beverage is spilled, it may
cause a malfunction of the select
lever and/or switch(es).

Cup Holder

328

(331,1)

1)

Spacer

The dual cup holder is built into the center
console.
Place a spacer in it before putting in a
small cup or can.

&

Rear Passenger’s Cup Holder

A dual cup holder is built into the armrest.

CAUTION

When a cup containing a beverage is
in the cup holder, do not fold down
or recline any seat. Otherwise, the
beverage could spill while driving
and, if the beverage is hot, it could
burn you and/or your passengers.

6-5. Bottle Holders

CAUTION

.

Do not pick up a bottle from the

bottle holder or put a bottle in the
holder while you are driving, as
this may distract you and lead to
an accident.

.

When placing a beverage in a

bottle holder, make sure it is
capped. Otherwise, the beverage
could spill when opening/closing
the door or while driving and, if
the beverage is hot, it could burn
you and/or your passengers.

The bottle holder equipped on each door

– CONTINUED –

Bottle Holders

329

6

Interior

Equipment

(332,1)

trim can be used to hold beverage bottles
and other items.

6-6. Accessory Power Out-
lets

Power outlet in the glove box

Power outlet in the center console (if
equipped)

Power outlet in the cargo area (Outback/
Subaru Outback Wilderness)

Accessory power outlets are provided in
the glove box, center console and cargo
area. Electrical power (12 V DC) from the
battery is available at any of the outlets
when the ignition switch is in either the
“ACC” or “ON” position.
You can use an in-vehicle electrical appli-
ance by connecting it to an outlet.
The maximum power rating of an appli-
ance that can be connected is

120 W

. Do

not use an appliance which exceeds the
indicated wattage for each outlet.
When using appliances connected to two
or more outlets simultaneously, the total
power consumed by them must not ex-
ceed 120 W.

Accessory Power Outlets

330

(333,1)

CAUTION

.

Do not attempt to use a cigarette

lighter in the accessory power
outlet.

.

Do not place any foreign objects,

especially metal ones such as
coins or aluminum foil, into the
accessory power outlet. That
could cause a short circuit. Al-
ways put the cap on the acces-
sory power outlet when it is not in
use.

.

Use only electrical appliances

which are designed for 12 V DC.

The maximum power rating of an
appliance that can be connected
is 120 W. Do not use an appliance
which exceeds the indicated wat-
tage for each outlet.

When using appliances con-
nected to two or more outlets
simultaneously, the total power
consumed by them must not
exceed 120 W. Overloading the
accessory power outlet can
cause a short circuit. Do not use
double adapters or more than
one electrical appliance.

.

If the plug on your electric appli-

ance is either too loose or too

tight for the accessory power
outlet, this can result in a poor
contact or cause the plug to get
stuck. Only use plugs that fit
properly.

.

Use of an electric appliance in the

accessory power outlet for a long
period of time while the engine is
not running can cause battery
discharge.

.

Before driving your vehicle, make

sure that the plug and the cord on
your electrical appliance will not
interfere with your shifting gears
and operating the accelerator
and brake pedals. If they do, do
not use the electrical appliance
while driving.

Power outlet in the glove box

Power outlet in the center console (if
equipped)

NOTE

The power outlets in the center console
and the glove box can be used even

– CONTINUED –

Accessory Power Outlets

331

6

Interior

Equipment

(334,1)

when the lid is closed, because there
are gaps that allow the cords to come
out. Pass the cord of the electrical
appliance through this gap.

6-7. USB Power Supply

CAUTION

.

The specification of a USB term-

inal that can be used is Type-A
and Type-C. If a different specifi-
cation of terminal is connected,
power supply or charging may
not be possible, or the device
may malfunction.

.

There is a risk that a connected

device may malfunction or data
may be damaged. The connec-
tion of a device shall be per-
formed at your responsibility.

.

To avoid an electric shock or a

malfunction, observe the follow-
ing precautions.

– Do not connect a USB hub.

– Do not insert any metal or

other foreign object into the
USB terminal.

– Do not spill water or other

liquid on the USB terminal.

.

Be careful not to pull the con-

nected cable. Doing so could
break the USB terminal and the
connected device.

.

If a device is connected for a long

time when the engine is not
running, doing so may cause the
risk of a discharged battery. Even
when the engine is running, we
recommend that you do not con-
nect a device for an unnecessa-
rily long time.

.

Do not connect a malfunctioning

device. Doing so may cause the
risk of smoke and fire.

NOTE

.

The rated voltage of each USB

terminal is DC 5 V. For details about
the maximum rated power, refer to
“How to Use the USB Power Supply”

P333. Before connecting a device, be

sure to read the instruction manual of
the device and check whether or not
this specification of the output is
supported by the device. If a device
that requires power exceeding the
maximum rating is connected, power
supply or charging may not be possi-
ble. Even if charging could be com-
pleted, the time required for charging
may be longer than when the genuine
charger for that device is used.

.

Depending on the device, charging

may be possible only when a special

USB Power Supply

332

(335,1)

cable is used. In this case, be sure to
connect the device using the special
cable.

.

When a device that communicates

with a PC is connected, power supply
or charging may not be possible.

.

When connect a device for charging,

disconnect the device promptly after
charging is completed.

&

How to Use the USB Power
Supply

Type-A and Type-C

Type-A
Front seat USB power supply (an audio
device can be connected and used)

2-terminal type USB power supply
– USB Type-A: DC 5 V/2.4 A*
– USB Type-C: DC 5 V/3.0 A*

*: The available electrical power of the two USB

terminals is a maximum of 5.4 A.

1-terminal type USB power supply
– USB Type-A: DC 5 V/2.4 A

Console USB power supply (charge only)
(if equipped)

– USB Type-A: DC 5 V/2.4 A*
– USB Type-C: DC 5 V/3.0 A*

*: The available electrical power of the two USB

terminals is a maximum of 5.4 A.

Use the USB terminal to use or charge an
electronic device.
When the ignition switch is in the “ACC” or
“ON” position, the power can be supplied
to the electronic device.

USB Power Supply

333

6

Interior

Equipment

(336,1)

6-8. Ashtray (Dealer Option)

CAUTION

.

Do not use ashtrays as waste

receptacles or leave a lighted
cigarette in an ashtray. This could
cause a fire.

.

Always extinguish matches and

cigarettes before putting them
into the ashtray, and then close
the ashtray securely. If you keep
the ashtray open, the fire of the
cigarette may spread to another
cigarette butt and start a fire.

.

Do not put flammable material in

the ashtray.

.

Do not leave a lot of cigarette

butts in the ashtray.

NOTE

Particles of ash and tobacco will accu-
mulate around the hinges of the ash-
tray’s inner lid. Clean them off using a
toothbrush or a similar narrow-ended
implement.

The portable ashtray can be installed in
each cup holder or bottle holder. For the
locations of the cup holders, refer to “Cup
Holder”

P328. For the locations of the

bottle holders, refer to “Bottle Holders”

P329.

When using the ashtray, open the lid of the
ashtray. Fully close the lid after using the
ashtray to help reduce residual smoke.

6-9. Assist Grip

1)

Assist grip

The assist grip is to be held to support the
body of the passengers when they are in
the seat and the vehicle is moving.

WARNING

Do not hold the assist grip when
getting up from the seat. Holding
and pulling the assist grip in the
wrong way could break the grip and
possibly cause injury.

Ashtray (Dealer Option)

334

(337,1)

CAUTION

Do not attach heavy objects to the
assist grip. Doing so could break it
and damage the object.

6-10. Coat Hook

WARNING

Obey the following instructions.

.

Do not hang coat hangers or

other hard or pointed objects on
the coat hooks. Hang clothing
directly on the coat hooks with-
out using hangers.

.

Before hanging clothing on the

coat hooks, make sure there are
no pointed objects in the pock-
ets.

If these instructions are ignored, the
following may occur in sudden
stops or in a collision.

.

Serious injuries by the items

thrown through the cabin

.

Incorrect SRS curtain airbag de-

ployment

CAUTION

Never hang anything on the coat
hook that might obstruct the driver’s
view or that could cause injury in
sudden stops or in a collision. And
do not hang items on the coat hook
that weigh 11 lbs (5 kg) or more.

The coat hook is attached to each rear
passenger’s assist grip.

Coat Hook

335

6

Interior

Equipment

(338,1)

6-11. Shopping Bag Hook

&

Legacy

CAUTION

Do not hang items on the shopping
bag hook that weigh 11 lbs (5 kg) or
more.

A shopping bag hook is attached to each
inner side wall of the trunk near the trunk
lid opening.

&

Outback/Subaru Outback
Wilderness

CAUTION

Do not hang items on the shopping
bag hook that weigh 6 lbs (3 kg) or
more.

A shopping bag hook is attached to each
side of the cargo area.
To use the hook, push the upper portion
and the shopping bag hook will appear.
Store the hook after using it.

6-12. Floor Mat

CAUTION

If the floor mat slips forward and
interferes with the movement of the
pedals during driving, it could cause
an accident. Observe the following
precautions to prevent the floor mat
from slipping forward.

.

Be sure to use a genuine
SUBARU floor mat designed with
grommets in the correct loca-
tions.

.

Make sure that the driver’s floor

mat is placed back in its proper
location and is correctly secured
on its retaining pins.

Shopping Bag Hook

336

(339,1)

.

Do not use more than one floor

mat.

Retaining pins are located on the driver’s
side floor.
The floor mat should be properly secured
using the built-in grommets, by placing the
grommets over the pins and pushing them
downward.

6-13. Lifting Cargo Cover
(Outback/Subaru Outback
Wilderness – If Equipped)

The Lifting Cargo Cover is provided to
cover the cargo area and to protect its
contents from direct sunlight.
The cover also has the practicability of its
easy lift-up function, eliminating the need
to rewind the cover all the way when
accessing the cargo.
This cover can be detached to make room
for additional cargo.

1)

Cargo area cover

2)

Cover housing

3)

Front cover

4)

Front cover rod

&

To Install the Cover Housing

1. Insert the left side cover housing end
into the retainer, then insert the right cover
housing end into the right retainer.
Make sure both ends are clicked into the
retainers.

NOTE

If the label on the cover housing is
placed on the top, the cover housing
will be installed in reverse and it will not
be affixed to the vehicle body.

– CONTINUED –

Lifting Cargo Cover (Outback/Subaru Outback Wilderness – If Equipped)

337

6

Interior

Equipment

(340,1)

2. Align the right side of the front cover
rod end with a triangle mark on the cargo
area trim.

NOTE

When the rear seatbacks are reclined,
align the front cover rod to the rear
triangle mark.

3. Push the front cover rod on the right
side against the cargo area trim to shorten
the front cover rod.
4. Once the right side is aligned, align the
left side to a triangle mark on the cargo
area trim to fix the front cover in place.

CAUTION

When reclining the rear seatback,
move the front cover backward so

that the cover is not damaged

&

Using the Cover

WARNING

Do not place anything on the ex-
tended cover. Putting excessive
weight on the extended cover can
break it and the object on the cover
could tumble forward in the event of
a sudden stop or collision. This
could cause serious injury.

CAUTION

Be careful not to scratch the rear
gate stays while extending and re-
winding the cover. Scratches on the
stays could cause leakage of gas
from the stays, which may result in
their inability to hold the rear gate
open.

!

To extend the cover

A)

Stopper

1)

Tilt up

2)

Pull out

1. Hold the cover by the handle in the
center, tilt it up and pull it out to free the
stoppers.

Lifting Cargo Cover (Outback/Subaru Outback Wilderness – If Equipped)

338

(341,1)

2. Pull out the cover by the handle in the
center to extend it. Then insert the
stoppers into the catches as shown.

!

To rewind the cover

1. Hold the cover by the handle in the

center and pull it toward you, then slightly
lower it to free the stoppers in the catches.

A)

Stopper

1)

Rewind

2)

Tilt up

2. Slowly rewind the cover completely.
Then tilt the cover up by the handle to hook
the stoppers.

CAUTION

Do not leave the cover dangling.
Make sure the stoppers are hooked
on to the cover housing. Otherwise
the cover may be torn and damaged.

!

To lift the cover

CAUTION

Do not drive with the cover lifted up.
Doing so could obstruct the rear-
ward view.

– CONTINUED –

Lifting Cargo Cover (Outback/Subaru Outback Wilderness – If Equipped)

339

6

Interior

Equipment

(342,1)

1. Push down the handle in the center to
lift the cover up.
The stoppers will slide up the grooves and
stop at the top.

2. To lower the lifted cover, hold the cover
by the handle and pull it back into to the

catches.

&

To Remove the Cover Hous-
ing

1. Slowly rewind the cover completely.
Then tilt the cover up by the handle to hook
the stoppers.
2. Push the front cover rod on the right
side against the cargo area trim to shorten
the front cover rod.

3. Remove the front cover and place it on
the cover housing.

4. Hold down the button on the right-hand
cargo area trim and lift up the right-hand
cover housing end.
5. Gently slide the left-hand cover end out
to the right then remove the cover housing.

Lifting Cargo Cover (Outback/Subaru Outback Wilderness – If Equipped)

340

(343,1)

&

To Stow the Cover

The cover can be stowed in the under-floor
storage.

1. To open the cargo floor lid, pull the
handle up.

2. Use the hook provided on the back to
hang the cargo floor lid open.
The hook can be hanged onto the opening
of the rear gate.

3. Remove the left and right corners of
the cargo floor lid.

4. Stow the cover housing in the cargo
area under-floor storage.

NOTE

To make enough room for the cover
when stowing, first insert the right-
hand side into the ditch on the cargo
area trim.

– CONTINUED –

Lifting Cargo Cover (Outback/Subaru Outback Wilderness – If Equipped)

341

6

Interior

Equipment


Content      ..     19      20      21      22     ..