Subaru Legacy (2023 year). Manual in english - page 22
 

  Index      Manuals     Subaru Legacy (2023 year). Manual in english


Search            copyright infringement  


Content      ..     20      21      22      23     ..


Subaru Legacy (2023 year). Manual in english - page 22


(344,1)

&

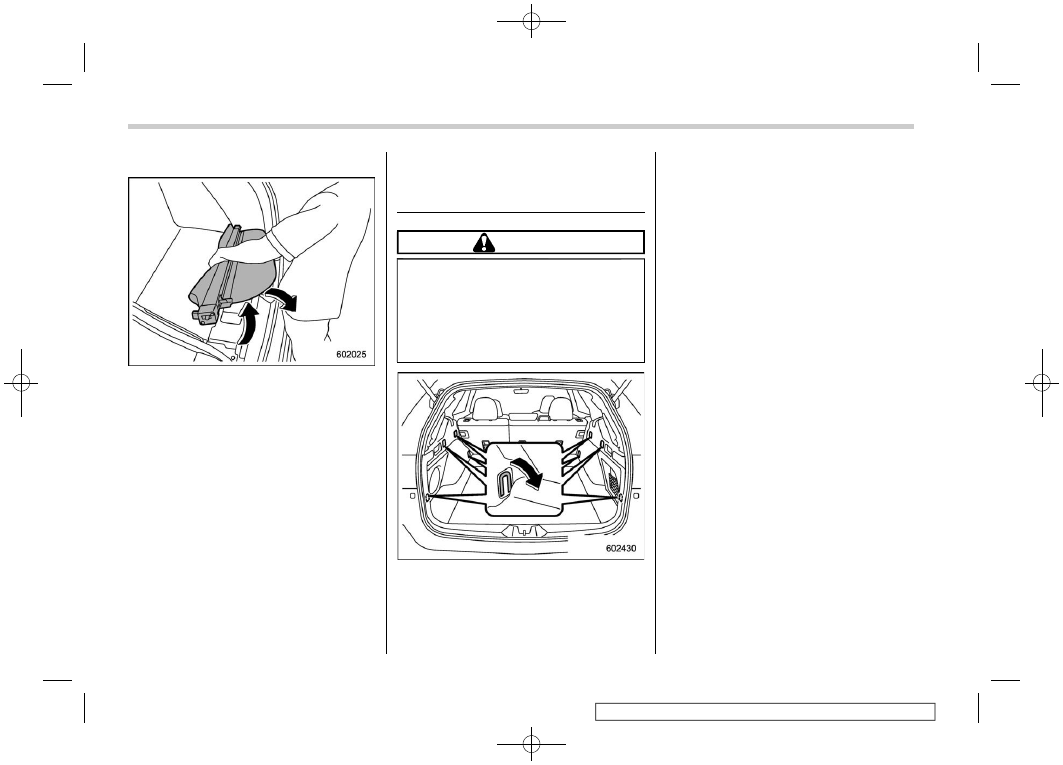
To Take Out the Stowed Cover

1. Raise the cover.
2. Take out the cover housing by lifting it
toward you.

6-14. Convenient Tie-Down
Hooks (Outback/Subaru
Outback Wilderness)

CAUTION

The convenient tie-down hooks are
designed only for securing light
cargo. Never try to secure cargo that
exceeds the capacity of the hooks.
The maximum load capacity is 110
lbs (50 kg) per hook.

The cargo area is equipped with several
tie-down hooks so that cargo can be
secured with a luggage net or ropes.

When using the tie-down hooks, turn them
down out of the storing recesses. When
not in use, put the hooks up into the storing
recesses.

Convenient Tie-Down Hooks (Outback/Subaru Outback Wilderness)

342

(345,1)

6-15. Adjustable Storage Net
(Outback/Subaru Outback
Wilderness)

There is an adjustable storage net in the
cargo area. Push the net downward to
expand the cargo area.

6-16. Under-Floor Storage
Compartment

The subfloor storage compartment is
located under the floor of the trunk or
cargo area and can be used to store small
items. To open the lid, pull the tab or
handle up.

NOTE

When storing a flat tire, put the subfloor
storage in the trunk or cargo area.

CAUTION

.

Always keep the lid of the sub-

floor storage compartment
closed while driving to reduce
the risk of injury in the event of
sudden stop or an accident.

.

Do not store spray cans, contain-

ers with flammable or corrosive
liquids or any other dangerous
items in the subfloor storage
compartment.

Legacy

Outback/Subaru Outback Wilderness

For Outback/Subaru Outback Wilderness,
hang the hook provided on the underside
of the lid on the rear edge of the roof to
keep the lid open.

– CONTINUED –

Adjustable Storage Net (Outback/Subaru Outback Wilderness)

343

6

Interior

Equipment

(346,1)

NOTE

The lid cannot be hooked while the
Lifting Cargo Cover is being used.
Rewind the cover completely to open
the lid.

Under-Floor Storage Compartment

344

(347,1)

7-1. Fuel .................................................................. 348

Fuel Requirements.............................................. 348
Fuel Filler Lid and Cap........................................ 350

7-2. State Emission Testing (U.S. Only) ............... 354
7-3. Preparing to Drive .......................................... 355
7-4. Starting and Stopping the Engine (Models

without Push-Button Ignition Switch) ......... 356

General Precautions When Starting/Stopping

Engine.............................................................. 356

Starting Engine................................................... 356
Stopping the Engine ........................................... 357
Steering Lock ..................................................... 357

7-5. Starting and Stopping Engine (Models with

Push-Button Start System) .......................... 358

Safety Precautions.............................................. 358
Operating Range for Push-Button Start System... 358
Starting Engine................................................... 358
Stopping Engine ................................................. 360
When Access Key Fob Does Not Operate

Properly ........................................................... 360

Steering Lock ..................................................... 361

7-6. Remote Engine Start System

(Dealer Option) .............................................. 361

Remote Engine Starter Transceiver (Fob) ............ 362
Alternate Operation Method for Models with

“Keyless Access with Push-Button Start
System” ........................................................... 365

Entering the Vehicle While It Is Running via

Remote Start (Models without “Keyless Access
with Push-Button Start System”)....................... 365

Entering the Vehicle While It Is Running via

Remote Start (Models with “Keyless Access
with Push-Button Start System”) ...................... 366

Entering the Vehicle Following Remote Engine

Start Shutdown ................................................ 366

Pre-heating or Pre-cooling the Interior of

the Vehicle ....................................................... 366

Remote Transmitter Program (Remote Engine

Starter Transceiver).......................................... 366

System Maintenance .......................................... 367
Certification for Remote Engine Starter .............. 368

7-7. Continuously Variable Transmission .............369

Continuously Variable Transmission Features..... 369
Select Lever ....................................................... 370
Shift Lock Function............................................ 371
Selection of Manual Mode .................................. 373
Driving Tips ....................................................... 374

7-8. SI-DRIVE (If Equipped) ....................................374

Intelligent (I) Mode ............................................. 374
Sport Sharp (S#) Mode ....................................... 375
SI-DRIVE Switches ............................................. 375

7-9. Power Steering ................................................376
7-10. Braking ...........................................................377

Braking Tips ...................................................... 377
Brake System..................................................... 377
Disc Brake Pad Wear Warning Indicators............ 378

7-11. ABS (Anti-Lock Brake System) ....................378

ABS Self-Check.................................................. 379
ABS Warning Light............................................. 379

Starting and Operating

7

Starting

and

Operating

(348,1)

7-12. Electronic Brake Force Distribution (EBD)

System ........................................................... 379

EBD System Malfunctions................................... 379

7-13. Vehicle Dynamics Control System .............. 380

Vehicle Dynamics Control System Monitor .......... 381
To Turn On/Off the Vehicle Dynamics Control

System ............................................................. 381

7-14. X-MODE (Outback/Subaru Outback

Wilderness).................................................... 382

To Activate/Deactivate X-MODE........................... 383
Hill Descent Control Function ............................. 385

7-15. Tire Pressure Monitoring System (TPMS)

(U.S.-Spec. Models) ...................................... 386

TPMS Screen ...................................................... 388

7-16. Parking Your Vehicle .................................... 388

Electronic Parking Brake .................................... 388
Parking Tips ....................................................... 394

7-17. Auto Start Stop System ............................... 394

System Operation ............................................... 394
Displaying the Auto Start Stop System Status..... 398
System Warning ................................................. 398

7-18. Front View Monitor (If Equipped) ................ 399

How to Access the Front View Monitor................ 399
How to Cancel the Front View Monitor ................ 400
Range of Image on Screen.................................. 400
Guiding Line....................................................... 401
Handling of Camera ............................................ 401

7-19. Rear View Camera ........................................ 402

How to Use the Rear View Camera ...................... 403

Viewing Range on the Screen............................. 404
Help Lines ......................................................... 405

7-20. BSD/RCTA (If Equipped) ...............................407

System Features ................................................ 407
System Operation .............................................. 409
BSD/RCTA Approach Indicator Light/Warning

Buzzer ............................................................. 410

BSD/RCTA OFF Indicator.................................... 412
BSD/RCTA Warning Indicator.............................. 413
To Turn On/Off the BSD/RCTA ............................ 413
Certification for the BSD/RCTA ........................... 413
Handling of Rear Corner Radars ......................... 415

7-21. Reverse Automatic Braking (RAB) System

(If Equipped) ..................................................416

Reverse Automatic Braking (RAB) System

Overview.......................................................... 417

Operating Conditions ......................................... 419
Sonar Audible Alarm Function............................ 422
Automatic Braking Function Operation ............... 423
Canceling the Reverse Automatic Braking

(RAB) System Operation .................................. 425

Reverse Automatic Braking (RAB) System

ON/OFF Setting ................................................ 425

RAB Warning Indicator ....................................... 426
Handling of the Sonar Sensors........................... 426

7-22. Driver Monitoring System (If Equipped) ......427

User Recognition Function ................................. 431
Inattentive/Drowsy Driving Warning .................... 433
Driver Monitoring System Indicator/Warning ....... 434
Using the Driver Monitoring System ................... 435

Starting and Operating

(349,1)

Registering and Deleting a User.......................... 437
Registering and Deleting Driver Position

Personalization ................................................. 437

Driver Monitoring System ON/OFF Settings ........ 437
How to Get the Source Code Using the Open

Source ............................................................. 438

Starting and Operating

7

Starting

and

Operating

(350,1)

7-1. Fuel

CAUTION

.

Use of a fuel which is low in

quality or use of an inappropriate
fuel additive may cause damage
to the engine and/or fuel system.

.

Some gas stations, particularly

those in high altitude areas, offer
fuels posted as regular octane
gasoline with an octane rating
below 87 AKI (90 RON). Use of
those fuels are not recom-
mended.

&

Fuel Requirements

The engine is designed to operate using

unleaded gasoline

with an octane rating

of

87 AKI (90 RON) or higher

.

NOTE

When using the 2.4 L turbo engine
model to tow a trailer, SUBARU recom-
mends using unleaded gasoline with an
octane rating of 91 AKI (95 RON) or
higher to reduce the risk of engine
overheat.

!

Fuel octane rating

Using a gasoline with a lower octane rating
can cause persistent and heavy knocking,
which can damage the engine. Do not be
concerned if your vehicle sometimes
knocks lightly when you drive up a hill or
when you accelerate. See your dealer or a
qualified service technician if you use a
fuel with the specified octane rating and
your vehicle knocks heavily or persistently.

!

RON

This octane rating is the Research Octane
Number.

!

AKI

This octane rating is the average of the
Research Octane and Motor Octane num-
bers and is commonly referred to as the
Anti Knock Index (AKI).

!

Unleaded gasoline

The neck of the fuel filler pipe is designed
to accept only an unleaded gasoline filler
nozzle. Under no circumstances should
leaded gasoline be used because it will
damage the emission control system and
may impair driveability and fuel economy.

!

Reformulated gasoline

SUBARU supports the use of reformulated
gasoline when available. Reformulated
gasoline has been blended to burn more

cleanly and reduce vehicle emissions.

!

MMT

Some gasoline contains an octane-enhan-
cing additive called MMT (Methylcyclo-
pentadienyl Manganese Tricarbonyl). If
you use such fuels, your emission control
system performance may deteriorate and
the CHECK ENGINE warning light/mal-
function indicator light may turn on. If this
happens, return to your authorized
SUBARU Dealer for service. If it is
determined that the condition is caused
by the type of fuel used, repairs may not be
covered by your warranty.

!

Gasoline for cleaner air (2.4 L mod-
els)

Your use of gasoline with detergent ad-
ditives will help prevent deposits from
forming in your engine and fuel system.
This helps keep your engine in tune and
your emission control system working
properly, and is a way of doing your part
for cleaner air. If you continuously use a
high quality fuel with the proper detergent
and other additives, you should never
need to add any fuel system cleaning
agents to your fuel tank.

Many gasolines are now blended with
materials called oxygenates. Use of these
fuels can also help keep the air cleaner.
Oxygenated blend fuels, such as ethanol

Fuel

348

(351,1)

(ethyl or grain alcohol) may be used in your
vehicle, but should contain no more than
15% ethanol for the proper operation of
your SUBARU.

Do not use any gasoline that contains
more than 15% ethanol, including from any
pump labeled E30, E50 or E85 (which are
only some examples of fuel containing
more than 15% ethanol).

In addition, some gasoline suppliers are
now producing reformulated gasolines,
which are designed to reduce vehicle
emissions. SUBARU approves the use of
reformulated gasoline.

If you are not sure what the fuel contains,
you should ask your service station op-
erators if their gasolines contain deter-
gents and oxygenates and if they have
been reformulated to reduce vehicle emis-
sions.

As additional guidance, only use fuels
suited for your vehicle as explained in the
following description.

.

Fuel should be unleaded and have an

octane rating no lower than that specified
in this manual.

.

Methanol (methyl or wood alcohol) is

sometimes mixed with unleaded gasoline.
Methanol can be used in your vehicle

ONLY

if it does not exceed 5% of the fuel

mixture

AND

if it is accompanied by

sufficient quantities of the proper cosol-
vents and corrosion inhibitors required to
prevent damage to the fuel system. Do not
use fuel containing methanol

EXCEPT

under these conditions.

.

If undesirable driveability problems are

experienced and you suspect they may be
fuel related, try a different brand of gaso-
line before seeking service at your
SUBARU dealer.

.

Fuel system damage or driveability

problems which result from the use of
improper fuel are not covered under the
SUBARU Limited Warranty.

!

Gasoline for cleaner air (2.5 L mod-
els)

Your use of gasoline with detergent ad-
ditives will help prevent deposits from
forming in your engine and fuel system.
This helps keep your engine in tune and
your emission control system working
properly, and is a way of doing your part
for cleaner air. If you continuously use a
high quality fuel with the proper detergent
and other additives, you should never
need to add any fuel system cleaning
agents to your fuel tank.

Many gasolines are now blended with
materials called oxygenates. Use of these
fuels can also help keep the air cleaner.

Oxygenated blend fuels, such as ethanol
(ethyl or grain alcohol) may be used in your
vehicle, but should contain no more than
10% ethanol for the proper operation of
your SUBARU.

Do not use any gasoline that contains
more than 10% ethanol, including from any
pump labeled E15, E30, E50 or E85 (which
are only some examples of fuel containing
more than 10% ethanol).

In addition, some gasoline suppliers are
now producing reformulated gasolines,
which are designed to reduce vehicle
emissions. SUBARU approves the use of
reformulated gasoline.

If you are not sure what the fuel contains,
you should ask your service station op-
erators if their gasolines contain deter-
gents and oxygenates and if they have
been reformulated to reduce vehicle emis-
sions.

As additional guidance, only use fuels
suited for your vehicle as explained in the
following.

.

Fuel should be unleaded and have an

octane rating no lower than that specified
in this manual.

.

Methanol (methyl or wood alcohol) is

sometimes mixed with unleaded gasoline.
Methanol can be used in your vehicle

– CONTINUED –

Fuel

349

7

Starting

and

Operating

(352,1)

ONLY

if it does not exceed 5% of the fuel

mixture

AND

if it is accompanied by

sufficient quantities of the proper cosol-
vents and corrosion inhibitors required to
prevent damage to the fuel system. Do not
use fuel containing methanol

EXCEPT

under these conditions.

.

If undesirable driveability problems are

experienced and you suspect they may be
fuel related, try a different brand of gaso-
line before seeking service at your
SUBARU dealer.

.

Fuel system damage or driveability

problems which result from the use of
improper fuel are not covered under the
SUBARU Limited Warranty.

&

Fuel Filler Lid and Cap

!

Locations of the fuel filler lid

!

Refueling

Only one person should be involved in
refueling. Do not allow others to approach
the area of the vehicle near the fuel filler
pipe while refueling is in progress.
Be sure to observe any other precautions
that are posted at the service station.

1. Stop the vehicle, turn the ignition
switch to the “LOCK”/ “OFF” position and
turn off all the other electrical components.
2. To unlock the fuel filler lid, perform one
of the operations below.

– Press the “ ” button on the key fob.
– Press the unlock side of the power
door locking switch.

3. Push the rear side of the fuel filler lid.
4. The fuel filler lid opens automatically.
Open it further by hand.

WARNING

Before opening the fuel filler cap,
first touch the vehicle body or a
metal portion of the fuel pump or
similar object to discharge any sta-
tic electricity that may be present on
your body. If your body is carrying
an electrostatic charge, there is a
possibility that an electric spark
could ignite the fuel, which could
burn you. To avoid acquiring a new
static electric charge, do not get
back into the vehicle while refueling
is in progress.

Fuel

350

(353,1)

1)

Open

2)

Close

5. Remove the fuel filler cap by turning it
slowly counterclockwise.

WARNING

.

Gasoline vapor is highly flam-

mable. Before refueling, always
turn the ignition switch to the
“LOCK”/“OFF” position first and
then close all vehicle doors and
windows. Make sure that there
are no lighted cigarettes, open
flames or electrical sparks in the
adjacent area. Only handle fuel
outdoors. Quickly wipe up any
spilled fuel.

.

When opening the cap, grasp it

firmly and turn it slowly to the left.
Do not remove the cap quickly.
Fuel may be under pressure and
spray out of the fuel filler neck,
especially in hot weather. If you
hear a hissing sound while you
are removing the cap, wait for the
sound to stop and then slowly
open the cap to prevent fuel from
spraying out and creating a fire
hazard.

6. Set the fuel filler cap on the cap holder
inside the fuel filler lid.

WARNING

.

When refueling, insert the fuel

nozzle securely into the fuel filler

pipe. If the nozzle is lifted or not
fully inserted, its automatic stop-
ping mechanism may not func-
tion, causing fuel to overflow the
tank and creating a fire hazard.

.

Stop refueling when the auto-

matic stop mechanism on the
fuel nozzle activates. If you con-
tinue to add fuel, temperature
changes or other conditions
may cause fuel to overflow from
the tank and create a fire hazard.

7. Stop filling the tank after the fuel filler
pump automatically stops. Do not add any
more fuel.
8. Put the cap back on and turn it clock-
wise until you hear a clicking noise. Be
certain not to catch the tether under the
cap while tightening.

CAUTION

Make sure that the cap is tightened
until it clicks to prevent fuel spillage
in the event of an accident.

9. Close the fuel filler lid completely.

CAUTION

Do not let fuel spill on the exterior

– CONTINUED –

Fuel

351

7

Starting

and

Operating

(354,1)

surfaces of the vehicle. Because fuel
may damage the paint, be sure to
wipe off any spilled fuel quickly.
Paint damage caused by spilled fuel
is not covered under the SUBARU
Limited Warranty.

NOTE

.

You will see the “

” sign in the fuel

gauge. This indicates that the fuel filler
lid is located on the right side of the
vehicle.

.

If the fuel filler cap is not tightened

until it clicks or if the tether is caught
under the cap, the CHECK ENGINE
warning light/malfunction indicator
light may illuminate. Refer to “CHECK
ENGINE Warning Light/Malfunction In-
dicator Light”

P184.

.

To lock the fuel filler lid, perform one

of the operations below. However if
these operations are performed when
the fuel filler lid is open, the fuel filler lid
will not lock when it is subsequently
closed.

– Press the “ ” button on the key
fob.
– Press the lock side of the power
door locking switch.

.

When the doors are locked or un-

locked using the automatic door lock

system, the fuel filler lid will be locked
or unlocked at the same time.

CAUTION

.

Never add any cleaning agents to

the fuel tank. The addition of a
cleaning agent may cause da-
mage to the fuel system.

.

After refueling, turn the cap to the

right until it clicks to ensure that
it is fully tightened. If the cap is
not securely tightened, fuel may
leak out while the vehicle is being
driven or fuel spillage could oc-
cur in the event of an accident,
creating a fire hazard.

.

Do not let fuel spill on the exterior

surfaces of the vehicle. Because
fuel may damage the paint, be
sure to wipe off any spilled fuel
quickly. Paint damage caused by
spilled fuel is not covered under
the SUBARU Limited Warranty.

.

Always use a genuine SUBARU

fuel filler cap. If you use the
wrong cap, it may not fit or have
proper venting and your fuel tank
and emission control system
may be damaged. It could also
lead to fuel spillage and a fire.

.

Immediately put fuel in the tank

whenever the low fuel warning
light illuminates. Engine misfires
as a result of an empty tank could
cause damage to the engine.
Continuing to operate your vehi-
cle at an extremely low fuel level
may result in a reduction of
engine performance.

!

If the fuel filler lid cannot be opened
(Legacy)

If the fuel filler lid cannot be opened due to
a malfunction or a dead battery, it can be
opened from the trunk.

1. Remove the access cover at the right-
side of the trunk trim.

Fuel

352

(355,1)

1)

Clip

2. Remove the yellow clip from the trim.

3. Pull the yellow clip to unlock the fuel
filler lid.

!

If the fuel filler lid cannot be opened
(Outback/Subaru Outback
Wilderness)

If the fuel filler lid cannot be opened due to
a malfunction or a dead battery, it can be
opened from the cargo area.

1. Remove the access cover at the right-
side of the cargo area trim using a flat-
head screwdriver.

1)

Clip

2. Remove the yellow clip from the trim.

3. Pull the yellow clip to unlock the fuel
filler lid.

Fuel

353

7

Starting

and

Operating

(356,1)

7-2. State Emission Testing
(U.S. Only)

WARNING

Only use a four-wheel dynamometer
when testing an All-Wheel Drive
(AWD) model.

Testing of an AWD model must
NEVER be performed on a single
two-wheel dynamometer. Attempt-
ing to do so will result in uncon-
trolled vehicle movement and may
cause an accident or injuries to
persons nearby.

CAUTION

.

At state inspection time, remem-

ber to tell your inspection or
service station in advance not to
place your SUBARU AWD vehicle
on a two-wheel dynamometer.
Otherwise, serious transmission
damage will result.

.

Resultant vehicle damage due to

improper testing is not covered
under the SUBARU Limited War-
ranty and is the responsibility of
the state inspection program or

its contractors or licensees.

California and a number of federal states
have Inspection/Maintenance programs to
inspect your vehicle’s emission control
system. If your vehicle does not pass this
test, some states may deny renewal of
your vehicle’s registration.

Your vehicle is equipped with a computer
that monitors the performance of the
engine’s emission control system. Certi-
fied emission inspectors will inspect the
On-Board Diagnostic (OBDII) system as
part of the state emission inspection
process. The OBDII system is designed
to detect engine and transmission pro-
blems that might cause the vehicle emis-
sions to exceed allowable limits. OBDII
inspections apply to all 1996 model year
and newer passenger cars and trucks.
Over 30 states plus the District of Colum-
bia have implemented emission inspection
of the OBDII system.

.

The inspection of the OBDII system

consists of a visual operational check of
the “

CHECK ENGINE

” warning light/mal-

function indicator light (MIL) and an ex-
amination of the OBDII system with an
electronic scan tool.

.

A vehicle passes the OBDII system

inspection if proper operation of the

CHECK ENGINE

” warning light/malfunc-

tion indicator light (MIL) is observed, there
are no stored diagnostic trouble codes,
and the OBDII readiness monitors are all
complete.

.

A vehicle fails the OBDII inspection if

the “

CHECK ENGINE

” warning light/mal-

function indicator light (MIL) is not properly
operating (light is illuminated or is not
working due to a burned out bulb) or there
is one or more diagnostic trouble codes
stored in the vehicle’s computer.

.

A state emission inspection may reject

(not pass or fail) a vehicle if the number of
OBDII system readiness monitors “

NOT

READY

” is greater than one. If the

vehicle’s battery has been recently re-
placed or disconnected, the OBDII system
inspection may indicate that the vehicle is
not ready for the emission test. Under this
condition, the vehicle driver should be
instructed to drive his/her vehicle for a
few days to reset the readiness monitors
and return for an emission re-inspection.

.

Owners of rejected or failing vehicles

should contact their SUBARU Dealer for
service.

Some states still use dynamometers in
their emission inspection program. A
dynamometer is a treadmill or roller-like
testing device that allows your vehicle’s
wheels to turn while the vehicle remains in

State Emission Testing (U.S. Only)

354

(357,1)

one place. Prior to your vehicle being put
on a dynamometer, tell your emission
inspector not to place your SUBARU
AWD vehicle on a two-wheel dynam-
ometer.

Otherwise, serious transmis-

sion damage will result.

The U.S. Environmental Protection
Agency (EPA) and states using two-wheel
dynamometers in their emission testing
program have EXEMPTED SUBARU
AWD vehicles from the portion of the
testing program that involves a two-wheel
dynamometer. There are some states that
use four-wheel dynamometers in their
testing program. When properly used, this
equipment should not damage a SUBARU
AWD vehicle.

Under no circumstances should the rear
wheels be jacked off the ground, nor
should the driveshaft be disconnected in
an attempt to bypass AWD for state
emission testing. An AWD vehicle must
be tested using an AWD dynamometer
with all 4 wheels driven and loaded.

7-3. Preparing to Drive

You should perform the following checks
and adjustments every day before you
start driving.
1. Check that all windows, mirrors, and
lights are clean and unobstructed.
2. Check the appearance and condition
of the tires. Also check tires for proper
inflation.
3. Look under the vehicle for any sign of
leaks.
4. Check that no small animals enter the
engine compartment.
5. Check that the hood, trunk (Legacy)
and rear gate (Outback/Subaru Outback
Wilderness) are fully closed.
6. Check the adjustment of the seat.
7. Check the adjustment of the inside and
outside mirrors.
8. Fasten your seatbelt. Check that your
passengers have fastened their seatbelts.
9. Check the operation of the warning
and indicator lights when the ignition
switch is turned to the “ON” position.
10. Check the gauges, indicator and warn-
ing lights after starting the engine.

CAUTION

Trapping small animals in the cool-
ing fan and belts of the engine may
result in a malfunction. Check that
no small animal enters the engine
compartment and under the vehicle
before starting the engine.

NOTE

.

Engine oil, engine coolant, brake

fluid, washer fluid and other fluid levels
should be checked daily, weekly or at
fuel stops.

.

When towing a trailer, refer to “Trai-

ler Hitch (Outback/Subaru Outback
Wilderness – If Equipped)”

P463.

Preparing to Drive

355

7

Starting

and

Operating

(358,1)

7-4. Starting and Stopping
the Engine (Models without
Push-Button Ignition Switch)

&

General Precautions When
Starting/Stopping Engine

WARNING

.

Never start the engine from out-

side the vehicle (except when
using the remote engine start
system). It may result in an acci-
dent.

.

Do not leave the engine running

in locations with poor ventilation,
such as a garage and indoors.
The exhaust gas may enter the
vehicle or indoors, and it may
result in carbon monoxide poi-
soning.

.

Do not start the engine near dry

foliage, paper, or other flammable
substances. The exhaust pipe
and exhaust emissions can cre-
ate a fire hazard at high tempera-
tures.

CAUTION

.

If the engine is stopped during

driving, the catalyst may over-
heat and burn.

.

When starting the engine, be sure

to sit in the driver’s seat (except
when using the remote engine
start system).

NOTE

.

Avoid racing and rapid acceleration

immediately after the engine has
started.

.

After the engine starts, the engine

speed will be kept high.

.

On rare occasions, it may be difficult

to start the engine depending on the
fuel used and the driving condition
(repeated short trips when the engine
is not warmed up sufficiently). In such a
case, it is recommended to switch to a
different brand of fuel.

.

On rare occasions, transient knock-

ing may be heard from the engine when
the accelerator is operated rapidly such
as a rapid start-up and a rapid accel-
eration. This is not a malfunction.

.

The engine starts more easily when

the headlights, air conditioner and rear
window defogger are turned off.

&

Starting Engine

CAUTION

Do not operate the starter motor
continuously for more than 10 sec-
onds. If the engine fails to start after
operating the starter for 5 to 10
seconds, wait for 10 seconds or
more before trying again.

NOTE

.

It may be difficult to start the engine

when the battery has been discon-
nected and reconnected (for mainte-
nance or other purposes). This diffi-
culty is caused by the electronically
controlled throttle’s self-diagnosis
function. To overcome it, keep the
ignition switch in the “ON” position
for approximately 10 seconds before
starting the engine.

.

Do not shift the select lever while the

starter is cranking.

Starting and Stopping the Engine (Models without Push-Button Ignition Switch)

356

(359,1)

CAUTION

If you restart the engine while the
vehicle is moving, shift the select
lever into the “N” position. Do not
attempt to place the select lever of a
moving vehicle into the “P” position.

1. Apply the parking brake.
2. Turn off unnecessary lights and acces-
sories.
3. Shift the select lever to the “P” or “N”
position (preferably “P” position). The
starter will only operate when the select
lever is at the “P” or “N” position.
4. Turn the ignition switch to the “ON”
position and check the operation of the
warning and indicator lights. Refer to
“Warning and Indicator Lights”

P179.

5. Turn the ignition switch to the “START”
position

without

depressing the accelera-

tor pedal. Release the key immediately
after the engine has started.
If the engine does not start, perform the
following procedure.

(1) Turn the ignition switch to the
“LOCK” position and wait for at least
10 seconds. After checking that the
parking brake is applied, turn the
ignition switch to the “START” position
while depressing the accelerator pedal

slightly (approximately a quarter of the
full stroke). Release the accelerator
pedal as soon as the engine starts.
(2) If this fails to start the engine, turn
the ignition switch back to the “LOCK”
position and wait for at least 10
seconds. Then fully depress the accel-
erator pedal and turn the ignition
switch to the “START” position. If the
engine starts, quickly release the ac-
celerator pedal.
(3) If this fails to start the engine, turn
the ignition switch again to the “LOCK”
position. After waiting for 10 seconds
or longer, turn the ignition switch to the
“START” position without depressing
the accelerator pedal.
(4) If the engine still does not start,
contact your nearest SUBARU dealer
for assistance.

6. Confirm that all warning and indicator
lights have turned off after the engine has
started. The fuel injection system auto-
matically lowers the idle speed as the
engine warms up.

While the engine is warming up, make sure
that the select lever is at the “P” or “N”
position and that the parking brake is
applied.

&

Stopping the Engine

The ignition switch should be turned off
only when the vehicle is stopped and the
engine is idling.

WARNING

Do not stop the engine when the
vehicle is moving. This will cause
loss of power to the power steering
and the brake booster, making steer-
ing and braking more difficult. It
could also result in accidental acti-
vation of the “LOCK” position on the
ignition switch, causing the steering
wheel to lock.

1. Stop the vehicle completely.
2. Move the select lever to the “P”
position.
3. Turn the ignition switch to the “LOCK/
OFF” position.

The engine will stop, and the power will be
switched off.

&

Steering Lock

After stopping the engine and the key is
removed from ignition switch, the steering
wheel will be locked due to the steering
lock function.

– CONTINUED –

Starting and Stopping the Engine (Models without Push-Button Ignition Switch)

357

7

Starting

and

Operating


Content      ..     20      21      22      23     ..