Subaru Forester (2023 year). Manual in english - page 17
 

  Index      Manuals     Subaru Forester (2023 year). Manual in english


Search            copyright infringement  


Content      ..     15      16      17      18     ..


Subaru Forester (2023 year). Manual in english - page 17


(271,1)

&

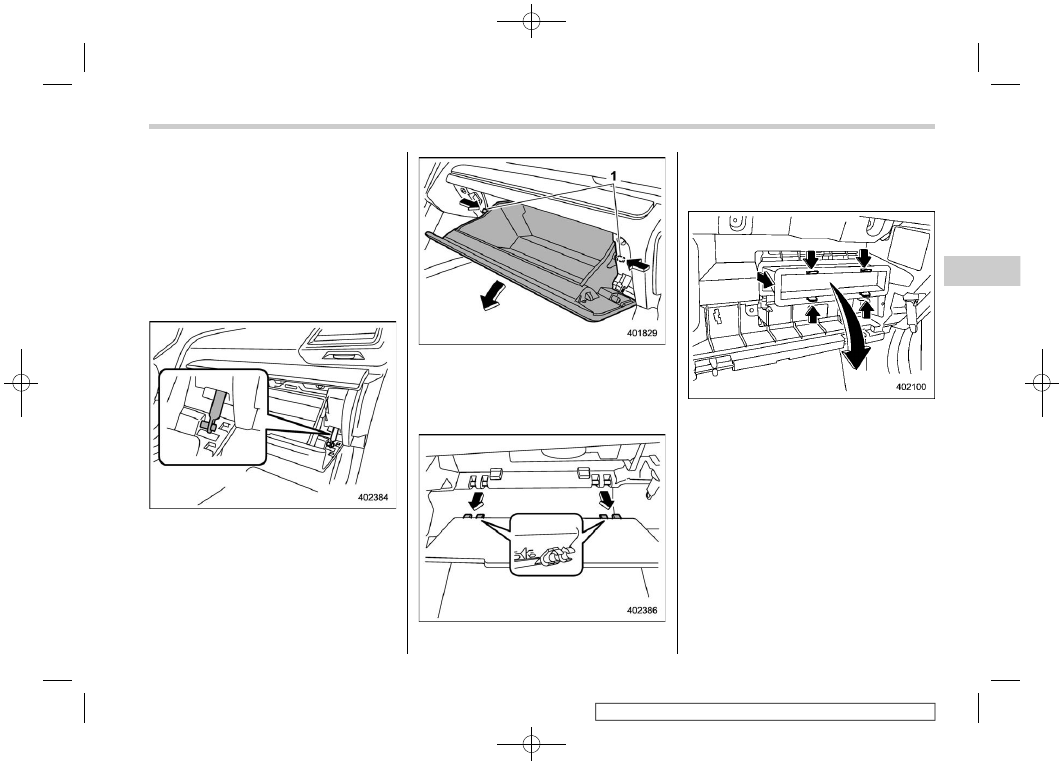
Replacing the cabin air filter

1. Remove the glove box.

NOTE

We recommend that you take measures
to protect the center console with
masking tape first, so that you avoid
scratching the center console with the
glove box.

(1) Open the glove box.

(2) Remove the damper shaft from the

glove box.

1

Stoppers

(3) Push in the stoppers located on

both sides of the glove box and
then pull down the glove box as far
as it will go.

(4) Pull out the glove box horizontally

and remove the hinge portion.
When doing this, be careful not to
damage the hinge.

2. Remove the cabin air filter according to

the following procedure in order to
prevent dust on the cabin air filter from
falling to the inside of its housing.
(1) Push in the four stoppers to unlock,

and then slowly pull out the cabin
air filter 0.4 in (1 cm) from the
housing.

(2) Completely pull out the cabin air

filter by gently tilting the front side
of the cabin air filter downward.

– CONTINUED –

Air filtration system

269

4

Climate

control

(272,1)

3. Replace the cabin air filter element

with a new one.

CAUTION

The arrow mark on the filter must
point UP.

4. Reinstall the glove box, and connect

the damper shaft.

5. Close the glove box.

Air filtration system

270

(273,1)

5-1. Antenna ........................................................... 272

Roof antenna ...................................................... 272

5-2. Audio set..........................................................272

Audio

5

Audio

(274,1)

5-1. Antenna

&

Roof antenna

The roof antenna is installed on the roof.

5-2. Audio set

If your vehicle is equipped with a genuine
SUBARU navigation system or audio
system, refer to the separate navigation/
audio Owner’s Manual for details.

Antenna

272

(275,1)

6-1. Interior lights................................................... 274

Map lights .......................................................... 274
Dome light.......................................................... 274
Cargo area light.................................................. 275
Rear gate light (if equipped)................................ 275
OFF delay timer .................................................. 276

6-2. Sun visors ....................................................... 276

Sun visor extension plate ................................... 276
Vanity mirror....................................................... 277
Vanity mirror with light (if equipped) ................... 277

6-3. Overhead console........................................... 278
6-4. Storage compartment..................................... 278

Glove box........................................................... 278
Center console ................................................... 279
Cup holders........................................................ 279
Bottle holders..................................................... 279

6-5. Accessory power outlets ............................... 280

Use with the cigarette lighter (dealer option) ....... 282

6-6. USB power supply .......................................... 282

How to use the USB power supply ...................... 283

6-7. Ashtray (dealer option) .................................. 284
6-8. Floor mat ......................................................... 284

6-9. Assist grip........................................................285
6-10. Shopping bag hook.......................................286
6-11. Convenience hook.........................................286
6-12. Cargo area cover (if equipped) ....................287

Using the cover.................................................. 287
To install the front part of the cover ................... 287
To remove the front cover .................................. 288
To remove the cover housing ............................. 288
Stowage of the cargo area cover ........................ 288
To install the cover housing ............................... 289

6-13. Cargo tie-down hooks...................................289
6-14. Cargo upper hooks .......................................290
6-15. Under-floor storage compartment

(if equipped) ..................................................290

6-16. Front View Monitor (if equipped) .................291

How to access the Front View Monitor................ 292
How to cancel the Front View Monitor ................ 292
How to adjust the display contrast and

brightness ....................................................... 292

Range of image on screen.................................. 293
Guiding line ....................................................... 294
Handling of camera ............................................ 294

6-17. Rear View Camera .........................................295

Interior equipment

6

Interior

equipment

(276,1)

6-1. Interior lights

CAUTION

When leaving your vehicle, make
sure the lights are turned off to
avoid battery discharge.

&

Map lights

1

Door interlock switch

To turn on the map light, push the lens.
To turn it off, push the lens again.

!

Automatic illumination

When the door interlock switch is in the
“DOOR” position, the map lights illuminate
automatically in the following cases.

.

Any of the doors other than the rear
gate is opened.

.

The doors are unlocked using the
keyless access function (if equipped).
Refer to “Locking and unlocking by
holding the access key fob”

P115.

.

The doors are unlocked using the
remote keyless entry system. Refer to
“Remote keyless entry system”

P128.

.

The ignition switch is turned from the
“ACC” position to the “LOCK”/“OFF”
position.

&

Dome light

1

OFF

2

DOOR

3

ON

The dome light switch has the following
three positions.

ON:

The light remains on continuously.

OFF:

The light remains off.

DOOR:

The dome light illuminates auto-

matically in the following cases.

.

Any of the doors or the rear gate is
opened.

.

The doors or the rear gate are unlocked
using the keyless access function (if
equipped). Refer to “Locking and un-
locking by holding the access key fob”

P115.

Interior lights

274

(277,1)

.

The doors or the rear gate are unlocked
using the remote keyless entry system.
Refer to “Remote keyless entry system”

P128.

.

The ignition switch is turned from the
“ACC” position to the “LOCK”/“OFF”
position.

&

Cargo area light

Cargo area light (models without rear gate
light)

1

ON

2

OFF

3

DOOR

Cargo area light (models with rear gate
light)

1

OFF

2

DOOR

3

ON

ON:

The light remains on continuously.

OFF:

The light remains off.

DOOR:

The cargo area light will illuminate

automatically in the following case.

.

The rear gate is opened.

&

Rear gate light (if equipped)

Rear gate light

1

OFF

2

DOOR

OFF:

The light remains off.

DOOR:

The rear gate light will illuminate

automatically in the following case.

.

The rear gate is opened.

– CONTINUED –

Interior lights

275

6

Interior

equipment

(278,1)

&

OFF delay timer

The following lights have an automatic
illumination function.

.

Dome light

.

Map light

.

Cargo area light

.

Rear gate light (if equipped)

When the interior light switch is set to the
“DOOR” position, the light will automati-
cally turn on and turn off depending on the
locking and unlocking of the doors, the
opening and closing of the doors including
the rear gate, as well as the position of the
ignition switch.

NOTE

The setting for the period of time in
which the lights remain on (OFF delay
timer) can be changed by a SUBARU
dealer. Contact your SUBARU dealer
for details. The setting can also be
changed by operating the combination
meter display (color LCD). For details,
refer to “Vehicle Setting”

P196.

6-2. Sun visors

To block out glare, swing down the visors.
To use the sun visor at a side window,
swing it down and move it sideways.

&

Sun visor extension plate

With the sun visor positioned over the side
window, you can use the sun visor exten-
sion plate to prevent glare through the gap
between the sun visor and center pillar. To
use the extension plate, pull it toward the
rear of the vehicle. When you have
finished using it, stow it by pushing it
toward the front of the vehicle.

Sun visors

276

(279,1)

CAUTION

Do not pull out the extension plate
with the sun visor positioned over
the windshield. The extension plate
would obstruct your view of the
rearview mirror.

&

Vanity mirror

CAUTION

Keep the vanity mirror cover closed
while the car is being driven to avoid
being temporarily blinded by the
glare of bright light.

To use the vanity mirror, swing down the
sun visor and open the vanity mirror cover.

&

Vanity mirror with light (if
equipped)

CAUTION

Keep the vanity mirror cover closed
while the car is being driven to avoid
being distracted by the light.

To use the vanity mirror, swing down the
sun visor and open the vanity mirror cover.
The light beside the vanity mirror illumi-
nates when the mirror cover is opened.

NOTE

Use of the vanity mirror light for a long
period of time while the engine is not
running can cause battery discharge.

Sun visors

277

6

Interior

equipment

(280,1)

6-3. Overhead console

To open the console, push on the lid lightly
and it will automatically open.

CAUTION

.

Before driving, ensure that the

overhead console is closed.

.

When your vehicle is parked in

the sun or on a warm day, the
inside of the overhead console
heats up. Avoid storing plastic or
other heatvulnerable or flam-
mable articles such as a lighter
in the overhead console.

6-4. Storage compartment

CAUTION

.

Always keep the storage com-

partment closed while driving to
reduce the risk of injury in the
event of a sudden stop or an
accident.

.

Do not store spray cans, contain-

ers with flammable or corrosive
liquids or any other dangerous
items in the storage compart-
ment.

&

Glove box

1

Rotate the key clockwise to lock.

2

Rotate the key counterclockwise to un-
lock.

To open the glove box, pull the handle.
To close it, push the lid firmly upward.

NOTE

.

The emergency key is directional. If
the key cannot be inserted, change
the direction that the grooved side is
facing and insert it again.

.

For models with the “keyless access
with push-button start system”, use
the emergency key to lock or unlock
the glove box.

Overhead console

278

(281,1)

&

Center console

The center console box provides a storage
space.

The top of the console can be used as an
armrest.

&

Cup holders

CAUTION

.

Do not pick up a cup from the cup

holder or put a cup in the holder
while you are driving, as this may
distract you and lead to an acci-
dent.

.

Take care to avoid spills. Bev-

erages, if hot, might scald you
and/or your passengers. Spilled
beverages may also damage up-
holstery or carpets.

.

When a cup in the rear passen-

ger’s cup holder contains a bev-
erage, do not fold down the rear
seatback. Otherwise, the bever-
age could spill and, if the bev-
erage is hot, it could scald you
and/or your passengers.

Front passenger’s cup holder

A dual cup holder is built into the center
console.

Rear seat’s cup holder (if equipped)

A dual cup holder is built into the armrest.

&

Bottle holders

CAUTION

.

Do not pick up a bottle from the

bottle holder or put a bottle in the
holder while you are driving, as
this may distract you and lead to
an accident.

.

When placing a beverage in a

bottle holder, make sure it is
capped. Otherwise, the beverage
could spill when opening/closing
the door or while driving and, if
the beverage is hot, it could scald
you and/or your passengers.

– CONTINUED –

Storage compartment

279

6

Interior

equipment

(282,1)

The bottle holder equipped on each door
trim can be used to hold beverage bottles
and other items.

6-5. Accessory power outlets

CAUTION

.

Do not place any foreign objects,

especially metal ones, such as
coins or aluminum foil, into the
accessory power outlet. That
could cause a short circuit. Al-
ways put the cap on the acces-
sory power outlet when it is not in
use.

.

If the plug on your electric appli-

ance is either too loose or too
tight for the accessory power
outlet, this can result in a poor
contact or cause the plug to get
stuck. Only use plugs that fit
properly.

.

Use of an electric appliance in the

accessory power outlet for a long
period of time while the engine is
not running can cause battery
discharge.

.

Before driving your vehicle, make

sure that the plug and the cord on
your electrical appliance will not
interfere with shifting gears and
operating the accelerator and
brake pedals. If they do, do not
use the electrical appliance while

driving.

Electrical power (12 V DC) is available at
any of the accessory power outlets when
the ignition switch is in either the “ACC” or
“ON” position. Accessory power outlets
are located in the following places.

Power outlet below the climate control
panel

Accessory power outlets

280

(283,1)

Power outlet in the center console

Power outlet in the cargo area

You can use an in-vehicle electrical appli-
ance by connecting it to an outlet.
The maximum power rating of an appli-
ance that can be connected is

120 W

.

CAUTION

.

Do not attempt to use a cigarette

lighter in the accessory power
outlets.

.

Use only electrical appliances

which are designed for 12 V DC.

The maximum power rating of an
appliance that can be connected
is 120 W. Do not use an appliance
which exceeds the indicated wat-
tage for each outlet.

.

When using appliances con-

nected to two outlets simulta-
neously, the total power con-
sumed by them must not exceed
120 W. Overloading the acces-
sory power outlet can cause a
short circuit. Do not use double
adapters or more than one elec-
trical appliance.

NOTE

When the lid of the center console is
closed, an opening remains between
the center console and the lid to allow
the power outlet in the center console
to be used. Pass the cord of the
electrical appliance through this open-
ing.

– CONTINUED –

Accessory power outlets

281

6

Interior

equipment

(284,1)

&

Use with the cigarette lighter
(dealer option)

To use the accessory power outlet as a
cigarette lighter socket, purchase the
cigarette lighter plug, which is an optional
accessory. A cigarette lighter plug is
available from your SUBARU dealer.
The cigarette lighter operates only when
the ignition switch is in the “ON” or “ACC”
position.
To use the cigarette lighter, push in the
knob and wait a few moments. It will
automatically spring up when ready for
use.

WARNING

To avoid being burned, never grasp
the lighter by the end with the
heating element. Doing so could
result in injury and could also da-
mage the heating element.

CAUTION

.

Do not hold the lighter pushed in,

because it will overheat.

.

The electrical power socket is

originally designed to use a gen-
uine SUBARU cigarette lighter
plug. Do not use a non-genuine

cigarette lighter plug in the sock-
et. Doing so may cause a short-
circuit and overheating, resulting
in a fire.

.

If the socket is ever used for a

plug-in accessory such as a cell
phone, that may damage the
portion of the socket’s internal
mechanism that causes a cigar-
ette lighter plug to “pop out” after
its lighter element is heated.
Therefore, do not place a cigar-
ette lighter plug in a socket that
has been used, even once, to
power a plug-in accessory. Doing
so may cause the plug to stick
and overheat, creating a potential
fire hazard.

6-6. USB power supply

CAUTION

.

The specification of a USB term-

inal that can be used is the A-
type. If a different specification of
terminal is connected, power
supply or charging may not be
possible, or the device may mal-
function.

.

There is a risk that a connected

device may malfunction or data
may be damaged. The connec-
tion of a device shall be per-
formed at your responsibility.

.

To avoid an electric shock or a

malfunction, observe the follow-
ing precautions.

– Do not connect a USB hub.

– Do not insert any metal or

other foreign objects into the
USB terminal.

– Do not spill water or other

liquid on the USB terminal.

.

Be careful not to pull the con-

nected cable. Doing so could
break the USB terminal and the
connected device.

USB power supply

282

(285,1)

.

If a device is connected for a long

time when the engine is not
running, the battery may be dis-
charged. Even when the engine is
running, we recommend that you
do not connect a device for an
unnecessarily long time.

.

Do not connect a malfunctioning

device. Doing so may cause
smoke and fire.

NOTE

.

The rated voltage of each USB
terminal is DC 5 V/2.1 A (total 4.2
A). Before connecting a device, be
sure to read the instruction manual
of the device and check whether or
not this specification of the output is
supported by the device. If a device
that requires power exceeding the
maximum rating is connected,
power supply or charging may not
be possible. Even if charging could
be completed, the time required for
charging may be longer than when
the genuine charger for that device
is used.

.

Depending on the device, charging
may be possible only when a special
cable is used. In this case, be sure to
connect the device using the special

cable.

.

When a device that communicates
with a PC is connected, power
supply or charging may not be
possible.

.

When connect a device for charging,
disconnect the device promptly after
charging is completed.

&

How to use the USB power
supply

Front seat USB power supply (An audio
device can be connected and used)

Console USB power supply (power supply
function only) (if equipped)

Use the USB terminal to use or charge an
electronic device.
When using the terminal, open the USB
power supply cover. After use, close the
USB power supply cover.
When the ignition switch is in the “ACC” or
“ON” position, the power can be supplied
to the electronic device. Up to DC 5 V/2.1 A
can be supplied from each terminal (total
of 4.2 A).

USB power supply

283

6

Interior

equipment

(286,1)

6-7. Ashtray (dealer option)

CAUTION

.

Do not use ashtrays as waste

receptacles or leave a lighted
cigarette in an ashtray. This could
cause a fire.

.

Always extinguish matches and

cigarettes before putting them
into the ashtray, and then close
the ashtray securely. If you keep
the ashtray open, the fire of the
cigarette may spread to another
cigarette butt and start a fire.

.

Do not put flammable material in

the ashtray.

.

Do not leave a lot of cigarette

butts in the ashtray.

NOTE

Particles of ash and tobacco will accu-
mulate around the hinges of the ash-
tray’s inner lid. Clean them off using a
toothbrush or a similar narrow-ended
implement.

The portable ashtray can be installed in
each cup holder or bottle holder. For the
locations of the cup holders, refer to “Cup
holders”

P279. For the locations of the

bottle holders, refer to “Bottle holders”

P279.

When using the ashtray, open the lid of the
ashtray. Fully close the lid after using the
ashtray to help reduce residual smoke.

6-8. Floor mat

CAUTION

If the floor mat slips forward and
interferes with the movement of the
pedals during driving, it could cause
an accident. Observe the following
precautions to prevent the floor mat
from slipping forward.

.

Be sure to use a genuine
SUBARU floor mat or an equiva-
lent designed with grommets in
the correct locations.

.

Make sure that the driver’s floor

mat is placed in its proper loca-
tion and is correctly secured on
its retaining pins.

Ashtray (dealer option)

284


Content      ..     15      16      17      18     ..