Subaru Forester (2023 year). Manual in english - page 14
 

  Index      Manuals     Subaru Forester (2023 year). Manual in english


Search            copyright infringement  


Content      ..     12      13      14      15     ..


Subaru Forester (2023 year). Manual in english - page 14


(223,1)

without applying the setting changes.

NOTE

Traffic information setting is only dis-
played for the audio unit with SiriusXM
satellite radio.

!

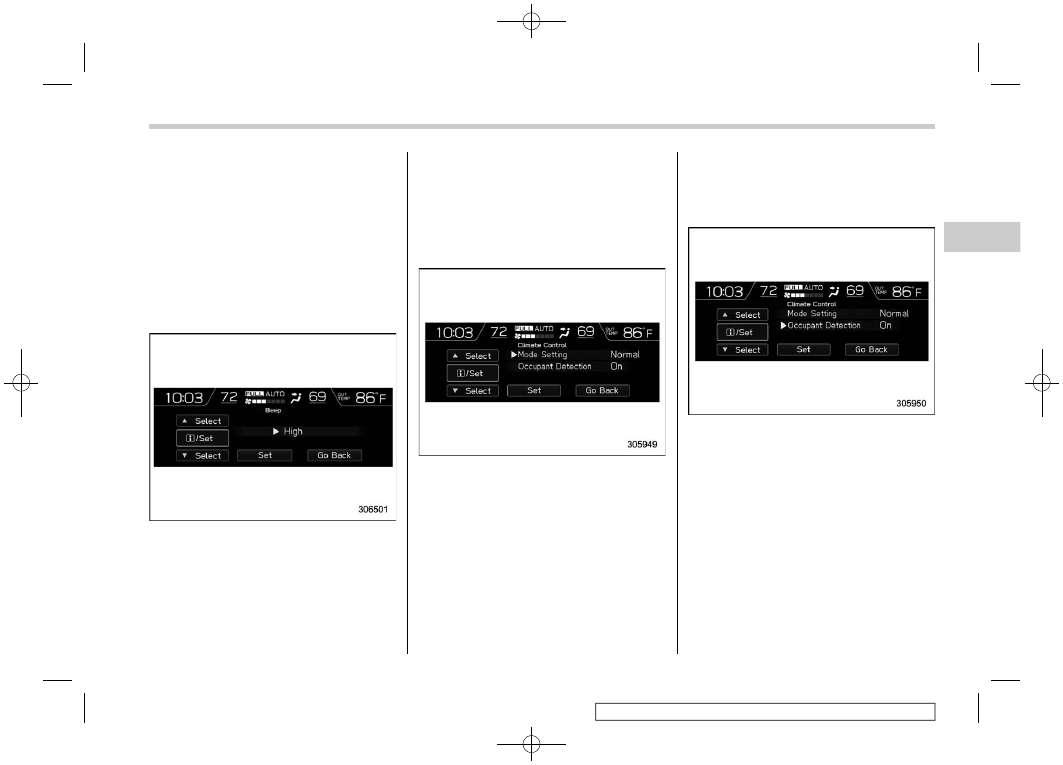
Beep setting

1. Select “Beep” from the 2nd menu in the

setting screen. Refer to “Setting
screen”

P211.

2. Set the beep volume by using the

control switches.

3. Select “Set” to exit settings. Select “Go

Back” to return to the previous screen
without applying the setting changes.

!

Climate Control settings

You can set the climate control settings.

!

Mode Setting

1. Select “Mode Setting” from the 2nd

menu in the setting screen. Refer to
“Setting screen”

P211.

2. Select “Normal”, “Mild”, “Power” or

“ECO” by using the control switches.
For details about Mode Setting, refer to
“Automatic climate control customiza-
tion (for type B and C)”

P262.

3. Select “Set” to exit settings. Select “Go

Back” to return to the previous screen
without applying the setting changes.

!

Occupant detection settings

1. Select “Occupant Detection” from the

2nd menu in the setting screen. Refer
to “Setting screen”

P211.

2. Select “On” or “Off” to turn the occu-

pant detection on or off by using the
control switches.

3. Select “Set” to exit settings. Select “Go

Back” to return to the previous screen
without applying the setting changes.

– CONTINUED –

Multi-function display (color LCD)

221

3

Instruments

and

controls

(224,1)

!

Camera settings (if equipped)

You can set the front camera display
settings.

!

Brightness setting

1. Select “Brightness” from the 2nd menu

in the setting screen. Refer to “Setting
screen”

P211.

2. Select the brightness level by using the

control switches.

3. Press the “

/SET” button to confirm

the setting.

!

Contrast setting

1. Select “Contrast” from the 2nd menu in

the setting screen. Refer to “Setting
screen”

P211.

2. Select the contrast level by using the

control switches.

3. Press the “

/SET” button to confirm

the setting.

!

Camera shift link setting

1. Select “Camera Shift Link” from the

2nd menu in the setting screen. Refer
to “Setting screen”

P211.

2. Select “On” or “Off” by using the control

switches.

3. Select “Set” to exit settings. Select “Go

Back” to return to the previous screen
without applying the setting changes.

Multi-function display (color LCD)

222

(225,1)

!

Maintenance settings

You can set maintenance reminders.

!

Engine oil setting

1. Select “Engine Oil” from the 2nd menu

in the setting screen. Refer to “Setting
screen”

P211.

2. Set the date and distance of the

reminder by using the control switches.

3. Select “Set” to exit settings. Select

“Update” to change the notification
distance to the default value. Select
“Go Back” to return to the previous
screen without applying the setting
changes.

NOTE

.

The reminder will be displayed by
either date or distance in accor-
dance with the setting.

.

Even when either “Day” or “Dis-
tance” are displayed as “_ _” a
pop-up screen will appear.

.

The reminder will be displayed until
either of the following conditions is
satisfied.

– The period of time passed after

the registered notification date is
15 days or more.

– The total distance driven after the

registered notification distance
is approximately 311 miles (500
km) or more.

!

Oil filter setting

The setting procedure is the same as
“Engine oil setting”

P223, but select the

“Oil Filter” item in step 1.

!

Tires setting

The setting procedure is the same as
“Engine oil setting”

P223, but select the

“Tires” item in step 1.

!

Maintenance schedule setting

The setting procedure is the same as
“Engine oil setting”

P223, but select the

“Maintenance Schedule” item in step 1.

!

On/Off setting

1. Select “On/Off” from the 2nd menu on

the setting screen. Refer to “Setting
screen”

P211.

2. Select “On” or “Off” to turn the opening

screen on or off by using the control
switches.

3. Select “Set” to exit settings. Select “Go

Back” to return to the previous screen
without applying the setting changes.

– CONTINUED –

Multi-function display (color LCD)

223

3

Instruments

and

controls

(226,1)

!

Clear setting

1. Select “Clear All Settings” from the 2nd

menu on the setting screen. Refer to
“Setting screen”

P211.

2. Select “Yes” or “No” by using the

control switches.

!

Initialize

You can initialize the items that have been
set to your preference.
1. Select “Initialize” from the 2nd menu on

the setting screen. Refer to “Setting
screen”

P211.

2. Select “Yes” or “No” by using the

control switches.

NOTE

You cannot initialize the items if the
Driver Monitoring System is not oper-
ated.

&

How to get the source code
using the open source

Free/Open Source Software Information

This product contains Free/Open Source
Software (FOSS).
The license information and/or the source
code of such FOSS can be found at the
following URL.

http://www.globaldenso.com/en/open-
source/ivi/subaru/

Multi-function display (color LCD)

224

(227,1)

3-10. Clock

For models with a SUBARU genuine
navigation and/or audio system, the clock
can be adjusted using either auto mode or
manual mode.

.

Auto mode: Automatic clock adjust-
ment

.

Manual mode: Manual clock adjust-
ment

CAUTION

The clock in the multi-function dis-
play (color LCD) cannot be adjusted,
if the SUBARU genuine navigation
and/or audio system is removed.

&

Setting the clock manually

!

Type A multi-function display (black
and white)

1. Turn the ignition switch to “ON”.

2. Press the

button.

3. Select “Settings”.
4. Select “Vehicle”.
5. Select “Time/Date” and then select

“Manual”.

6. Press the “+” button or the “−” button

beside the clock.

!

Setting 12-hour or 24-hour dis-
play

The clock can be set to 12-hour or 24-hour
display. Perform the following procedure to
switch the display format.
1. Turn the ignition switch in the “LOCK”/

“OFF” position.

2. Press and hold the “−” button located

near the clock display for approxi-
mately 5 seconds. The clock display
will then start to flash.

3. While the clock display is flashing,

press and hold the “+” button for
approximately 2 seconds. The clock
format will then change.

– CONTINUED –

Clock

225

3

Instruments

and

controls

(228,1)

4. The clock display will continue to flash

for approximately 3 seconds to indicate
that the clock display has been chan-
ged.

!

Type B multi-function display (color
LCD)

1. Turn the ignition switch to “ON”.

2. Press the

button.

3. Select “Settings”.
4. Select “Vehicle”.
5. Select “Time/Date” and then select

“Manual”.

6. Set the each items plus and minus.
7. Select

to complete the clock

setting.
Select “Back” to return to the previous
screen without saving settings.

NOTE

.

Adjust the time, then select 12h
display or 24h display from the
format.

.

The Birthday/Anniversary and main-
tenance reminder system function
are based on the time and date on
the multi-function display (color
LCD).

&

Setting the clock automati-
cally

1. Turn the ignition switch to “ON”.

2. Press the

button.

3. Select “Settings”.
4. Select “Vehicle”.
5. Select “Time/Date” and then select

Clock

226

(229,1)

“Auto”.

6. Press the

button again to complete

the setting.

!

Models with navigation system

The clock will be set automatically where a
GPS signal is available.

!

Models without navigation system

The clock will be set and adjusted auto-
matically when a smartphone is connected
via Bluetooth

®

for transferring phonebook

data.
1. Register the smartphone to the audio

system. For details, refer to “Bluetooth
SETTINGS” in the supplemental Own-
er’s Manual for the audio/navigation
system.

2. Transfer phonebook data to the sys-

tem. For details, refer to “Bluetooth
SETTINGS” in the supplemental Own-
er’s Manual for the audio/navigation
system. The clock will be adjusted
automatically.

NOTE

Depending on the model of smart-
phone, the settings of the connected
smartphone may need to be changed.
(ex: For iOS or other models, notifica-
tion settings may need to be activated.)
For details, check the instructions on

connecting smartphones.

&

Regulatory information

The Bluetooth

®

word mark and logos are

registered trademarks owned by Bluetooth
SIG, Inc.

3-11. Light control switch

&

Precautions and tips

CAUTION

.

Use of any lights for a long period

of time while the engine is not
running can cause the battery to
discharge.

.

Before leaving the vehicle, make

sure that the lights are turned off.
If the vehicle is left unattended
for a long time with the lights
illuminated, the battery may be
discharged.

NOTE

.

Even if the key is removed from the
ignition switch, the lights can be
illuminated by operating the light
control switch from the “ ” (off)
position to the “

” or “

” position

(models without “keyless access
with push-button system”).

.

Even if the push-button ignition
switch is turned off, the lights can
be illuminated by operating the light
control switch from the “ ” (off)
position to the “

” or “

” position

(models with “keyless access with

– CONTINUED –

Light control switch

227

3

Instruments

and

controls

(230,1)

push-button start system”).

.

If the driver’s door is opened while
the lights are illuminated and the key
is removed from the ignition switch,
the chirp sound will inform the driver
that the lights are illuminated.

&

Headlights

Except for Canada models

For Canada models

To turn on the headlights, turn the knob on
the end of the turn signal lever.

” position:

Instrument panel illumination, headlights,
parking lights, front side marker lights, rear
side marker lights, tail lights and license
plate lights are on.

” position:

Instrument panel illumination, parking
lights, front side marker lights, rear side
marker lights, tail lights and license plate
lights are on.

” position:

.

Auto on/off headlights

When the ignition switch is in the “ON”
position, the instrument panel illumination,
headlights, parking lights, front side mar-

ker lights, rear side marker lights, tail lights
and license plate lights are automatically
on or off depending on the level of the
ambient light.

NOTE

.

The sensitivity of the auto on/off
headlights can be changed by a
SUBARU dealer. Consult your
SUBARU dealer for details. Also,
the setting can be changed using
the display. For details, refer to
“Vehicle Setting”

P196.

.

If the light control switch is in the
“AUTO” position and the headlights
do not turn on when it becomes dark
outside, turn the light switch to the

” position. If this happens, have

your vehicle inspected by your
SUBARU dealer as soon as possible.

“ ” position (except for Canada mod-
els):

The headlights are all off.
Only when the following conditions are
fulfilled, instrument panel illumination,
headlights, parking lights, front side mar-
ker lights, rear side marker lights, tail lights
and license plate lights are automatically
on or off depending on the level of the
ambient light.

.

The engine is running.

.

The parking brake is fully released.

Light control switch

228

(231,1)

.

The select lever is in a position other
than the “P” position.

“OFF” position (for Canada models):

The headlights are all off *

1

*

2

.

*1: When the light switch is switched to the

“OFF” position while the vehicle is stopped,
the lights turn off. Then the light switch will
automatically return to the “AUTO” position.

*2: The headlights will automatically change to

the AUTO mode when the following condi-
tions are met:

.

The engine is running.

.

The parking brake is fully released.

.

The select lever is in a position other than the
“P” position.

.

Auto-on/off wiper-linked headlights

While the light control switch is in the
“AUTO” position, the headlights will auto-
matically turn on when the windshield
wipers operate several times. The head-
lights will automatically turn off when the
wipers stop.

NOTE

The ON/OFF setting of this function can
be changed by a SUBARU dealer.
Consult your SUBARU dealer for de-
tails.

!

Welcome lighting function

The welcome lighting function turns on the
low beam headlight for smooth approach-
ing to or exiting from the vehicle at night or
in a dark place.

The function is activated while all of the
following conditions are met.

.

The light control switch is in the “AUTO”
position.

.

It is dark enough to turn on the auto on/
off headlights.

NOTE

If the engine is turned off after turning
off the light switch, the welcome light-
ing function may not operate (Canada
models).

When approaching:

While the welcome lighting function is
activated, the low beam headlights, instru-
ment panel illumination, parking lights,
front side marker lights, rear side marker
lights, tail lights and license plate lights will
automatically illuminate when unlocking
the doors and the rear gate by using the
remote keyless entry system.

The lights will remain illuminated for 30
seconds

*1

and then turn off. However, if

any of the following operations is done, the
lights will turn off.

.

The doors are locked.

.

The light control switch is turned to a
position other than “AUTO”.

.

The ignition switch is turned to the “ON”
position.

When exiting:

While the welcome lighting function is
activated, the low beam headlights, instru-
ment panel illumination, parking lights,
front side marker lights, rear side marker
lights, tail lights and license plate lights will
remain illuminated even when either of the
following operation is done.

.

The push-button ignition switch is
turned to the “OFF” status (models with
“keyless access with push-button start
system”).

.

The key is pulled out from the ignition
switch (models without “keyless access
with push-button start system”).

The lights will turn off under any of the
following conditions.

.

3 minutes have passed since the lights
were illuminated by the welcome light-
ing function.

.

30 seconds have passed since the door
is opened and closed.*

1

.

The light control switch is turned to a
position other than “AUTO”.

– CONTINUED –

Light control switch

229

3

Instruments

and

controls

(232,1)

.

The locking procedure is performed
twice. When performing the unlocking
procedure after performing the locking
procedure, perform the locking proce-
dure twice again.

*1: The setting for the period of time in which the

low beam headlights remain on by the
welcome lighting function can be changed
by a SUBARU dealer. Contact your
SUBARU dealer for details.

!

Sensor for the auto on/off head-
lights

The sensor is as shown in the illustration.

CAUTION

If any object is placed on or near the
sensor, the sensor may not detect
the level of the ambient light cor-

rectly and the auto on/off headlights
may not operate properly.

&

High/low beam change (dim-
mer)

1

High beam

2

Low beam

When the headlights are on high beam, the
high beam indicator light “

” on the

combination meter is also on.

&

Headlight flasher

CAUTION

Do not hold the lever in the flashing
position for more than just a few
seconds.

To flash the headlights, pull the lever
toward you and then release it. The high
beam will stay on for as long as you hold
the lever.

When the headlights are on high beam, the
high beam indicator light “

” on the

combination meter also illuminates.

Light control switch

230

(233,1)

&

High beam assist function

NOTE

.

The high beam assist function uti-
lizes the stereo camera installed at
the position of the upper side of the
windshield.

.

For details on how to handle the
stereo camera, refer to the Owner’s
Manual supplement for the EyeSight
system.

The high beam assist function automati-
cally changes the headlight from high
beam to low beam (or vice versa).

When all of the following conditions are
met, the headlight will change to high
beam.

.

When the vehicle speed increases to or
above 20 mph (32 km/h).

.

There is no preceding or oncoming
vehicle.

.

The forward area of the vehicle is dark.

.

The road does not have a sharp curve.

When any of the following conditions are
met, the headlight will change to low beam.

.

When the vehicle speed decreases to
or below 10 mph (16 km/h).

.

When the forward area of the vehicle is
bright.

.

When there is a preceding or oncoming
vehicle.

.

When the EyeSight system is malfunc-
tioning or is temporarily stopped.

NOTE

.

Do not overestimate the capacity of
the high beam assist function. The
driver always has the responsibility
to understand the surrounding si-
tuation, to drive safely, and to
change the headlight mode manu-
ally if necessary.

.

The factory setting (default setting)
for this function is set as “opera-
tional”. This setting can be changed
to OFF (non-operation) at SUBARU
dealers. For more details, contact a
SUBARU dealer.

!

How to use the high beam assist
function

The high beam assist function will be
activated when all the following conditions
are met.

.

The light control switch is in the “AUTO”
position and the low beam headlights
are on automatically.

.

The turn signal lever is pushed forward.

High beam assist indicator light

When the high beam assist function is
activated, the high beam assist indicator
light on the combination meter will illumi-
nate.

NOTE

If the high beam assist function is
malfunctioning or is temporarily
stopped, the headlight will be fixed at
low beam.

!

How to temporarily lower the sensi-
tivity of the high beam assist func-
tion

The sensitivity of the high beam assist
function can be lowered by performing the
following operations.

– CONTINUED –

Light control switch

231

3

Instruments

and

controls

(234,1)

1. Before turning the ignition switch to the

“ON” position, set the light control
switch to the “AUTO” position and push
the signal lever forward (high beam
position).

2. Turn the ignition switch to the “ON”

position and within approximately 15
seconds, press the “

/ ” (following

distance setting) switch more than 10
times consecutively.

When the sensitivity of the high beam
assist function is lowered, the high beam
assist indicator light “

” on the combina-

tion meter will flash.

NOTE

.

The sensitivity of the high beam
assist function cannot be lowered
in the following conditions.

– Cruise control or Adaptive Cruise

Control indicator is illuminated.

– The EyeSight warning indicator

(yellow) is illuminated.

.

The sensitivity of the high beam
assist function returns to normal
level the next time the ignition
switch is turned to the “LOCK”/
“OFF” position and the engine is
restarted.

!

How to change the headlight mode
manually

Change to the low beam:

When you return the turn signal lever to the
center position, the high beam assist
function will turn off and the high beam
assist indicator light will turn off.

Change to the high beam:

When you turn the light control switch to
the “

” position, the headlight mode will

be changed to the high beam.
At this time, the high beam assist function
will turn off, the high beam assist indicator
light will turn off and the high beam
indicator light will turn on.

NOTE

.

After manually changing the head-
light mode to the high beam, if you
turn on the high beam assist func-
tion, return the light control switch
to the “AUTO” position.

.

When manually changing the head-
light mode to the high beam, if you
turn the light control switch to the

” position, the instrument panel

illumination, parking lights, front
side marker lights, rear side marker
lights, tail lights and license plate
lights will be on.

!

Tips for the high beam assist sys-
tem

.

The high beam assist function recog-
nizes the conditions surrounding the
vehicle based on the brightness of
illumination ahead of your vehicle, etc.
Therefore, the headlight mode may
switch in some situations that do not
match to the driver’s sense.

.

A bicycle or cargo cycle may not be
detected.

.

Under the following situations, the
brightness of ambient illumination may
not be detected correctly and the high
beam assist function may not work
properly. As a result, the glare of the
high beam may disturb the oncoming
vehicle or vehicle ahead. Also, the low
beam mode may continue although
there are no oncoming vehicles and
vehicles ahead. In the such cases,
change the headlight mode manually.

– In bad weather (fog, snow, sand

storm, heavy rain, etc.).

– When the windshield glass is dirty or

fogged.

– When the windshield is cracked or

damaged.

– When the stereo camera is de-

formed or the stereo camera lenses
are dirty.

Light control switch

232

(235,1)

– If there are lights similar to the

headlights or the tail lights in the
surrounding area.

– When an oncoming vehicle or ve-

hicle ahead is driven without its
headlights and tail lights on.

– If the headlights of an oncoming

vehicle or the tail lights of a vehicle
ahead are dirty or discolored, or if
the light beams are not aimed
correctly.

– When a rapid change of brightness

continues while driving.

– When driving on a road with many

ups and downs or uneven surfaces.

– When driving on a road with many

curves.

– When there are some objects that

reflect light strongly, such as a road
sign or a mirror in vehicle ahead.

– When the rear part of the vehicle

ahead, such as a container, reflects
light strongly.

– When the headlights of your vehicle

are damaged or dirty.

– When your vehicle is tilted, such as

in case the vehicle has a flat tire or is
being towed.

– Immediately after the engine has

started.

.

In the following conditions, the head-
light mode will not be automatically

changed from the high beam to the low
beam.

– When your vehicle passes an on-

coming vehicle suddenly in a blind
curve.

– When another vehicle passes in

front of your vehicle.

– When an oncoming vehicle or ve-

hicle ahead comes in and out of
view because of continuous curves,
median strips, roadside trees, etc.

.

If the stereo camera detects the light of
the front fog lights of an oncoming
vehicle, the headlight mode may
change from the high beam to the low
beam automatically.

.

The headlight mode may change from
the high beam to the low beam, or the
low beam mode may continue, when
affected by a street light, traffic signal,
illumination of an advertisement board,
or a reflective object such as a road
sign and signboard.

.

The timing of the change of headlight
mode may differ due to the following
factors.

– Color or brightness of the headlights

of an oncoming vehicle or the tail
lights of a vehicle ahead.

– The headlights of the oncoming

vehicle or the tail lights of the vehicle
ahead are covered with mud, snow,

etc.

– Movement and direction of an on-

coming vehicle or a vehicle ahead.

– When the headlights of an oncom-

ing vehicle or the tail lights of a
vehicle ahead illuminate on only one
side.

– When the oncoming vehicle or

vehicle ahead is a motorcycle.

– Conditions of a road (slope, curve,

road surface, etc.).

– Number of passengers and weight

of loaded cargo.

– Limitation of the detection ability of

the stereo camera.

– If the EyeSight traffic lane customi-

zation is not set to the actual flow of
traffic.

&

Daytime running light system

WARNING

When the daytime running lights are
illuminated, the tail lights do not
illuminate. When it becomes dark
outside, turn the light switch to the

” position to illuminate the head-

lights and tail lights. This will im-
prove visibility and allow other dri-
vers to see your vehicle more easily.

– CONTINUED –

Light control switch

233

3

Instruments

and

controls

(236,1)

The daytime running lights will automati-
cally illuminate when the following condi-
tions are fulfilled.

.

The engine is running.

.

The parking brake is fully released.

.

The light control switch is in “AUTO” (if
equipped), “

” or “ ” (except for

Canada models).

.

The light control switch is in “AUTO”,

” or “OFF” (for Canada models).

.

The select lever is in a position other
than the “P” position.

NOTE

When the light switch is in the “

position, the instrument panel illumina-
tion, front side marker lights, tail lights
and license plate lights are also illumi-
nated.

3-12. Steering Responsive
Headlight (SRH)

1

The target area of illumination when SRH
is activated.

2

The target area of illumination when SRH
is not activated.

SRH is a function that automatically moves
the headlight beam to the left or right in
accordance with the steering angle and
vehicle speed. This function helps to
improve the visibility at night by illuminat-
ing the road ahead at corners and inter-
sections.

You can turn the SRH function on or off by
pressing the SRH OFF switch.

1

SRH OFF indicator light

The SRH OFF indicator light on the
combination meter turns off when SRH is
turned on.

Steering Responsive Headlight (SRH)

234

(237,1)

The SRH OFF indicator light on the
combination meter illuminates when SRH
is turned off.
If SRH is malfunctioning, the SRH OFF
indicator light on the combination meter
flashes when the ignition switch is in the
“ON” position. It indicates that SRH has
been deactivated. Contact a SUBARU
dealer for an inspection.

NOTE

.

If you turn the ignition switch to the
“OFF” position with SRH turned off
and then start the engine again, SRH
will automatically turn on.

.

When you turn the ignition switch to
the “ON” position, the SRH OFF
indicator light will illuminate and
turn off after several seconds.

.

SRH only activates when the vehicle
is traveling forward at the speed of
approximately 5 mph (8 km/h) or
more.

3-13. Headlight beam leveler

The LED headlights produce more light
than conventional halogen headlights.
When the vehicle is carrying a heavy load
and the headlight beams are angled
upwards, the driver of an oncoming vehicle
may experience glare.
To prevent this, the automatic headlight
beam leveler adjusts the headlights to the
optimum height automatically depending
on the load the vehicle is carrying.

CAUTION

In certain circumstances, the head-
lights may become misaligned, and
the headlight beam leveler will not
reset them to the proper angle. This
may occur after transporting your
vehicle on a flat-bed truck, or if the
vehicle is parked and restarted on
different angles. In such cases, have
the headlight alignment checked by
a SUBARU dealer.

3-14. Fog light switch (if
equipped)

Except for Canada models

1

Headlight switch

2

Fog light switch

– CONTINUED –

Headlight beam leveler

235

3

Instruments

and

controls

(238,1)

For Canada models

1

Headlight switch

2

Fog light switch

The front fog lights will turn on when the
fog light switch is placed in the “

” position

while the headlights are in the following
condition.

.

The headlight switch is in the “

position with the low beam mode
selected.

.

For models with the auto on/off head-
lights, while the headlight switch is in
the “AUTO” position and the low beam
headlights turn on automatically.

To turn off the front fog lights, perform the
following.

.

Turn the switch to “ ” (except for
Canada models).

.

Turn the switch to “OFF” (for Canada
models).

The indicator light on the combination
meter will illuminate when the front fog
lights are illuminated.

3-15. Turn signal lever

1

Right turn

2

Lane change right signal

3

Lane change left signal

4

Left turn

If the lever does not return after cornering,
return the lever to the neutral position by
hand.

To signal a lane change, push the turn
signal lever up or down slightly and hold it
during the lane change. The lever will
return automatically to the neutral position
when you release it.

Turn signal lever

236


Content      ..     12      13      14      15     ..