Subaru Forester (2023 year). Manual in english - page 12
 

  Index      Manuals     Subaru Forester (2023 year). Manual in english


Search            copyright infringement  


Content      ..     10      11      12      13     ..


Subaru Forester (2023 year). Manual in english - page 12


(191,1)

&

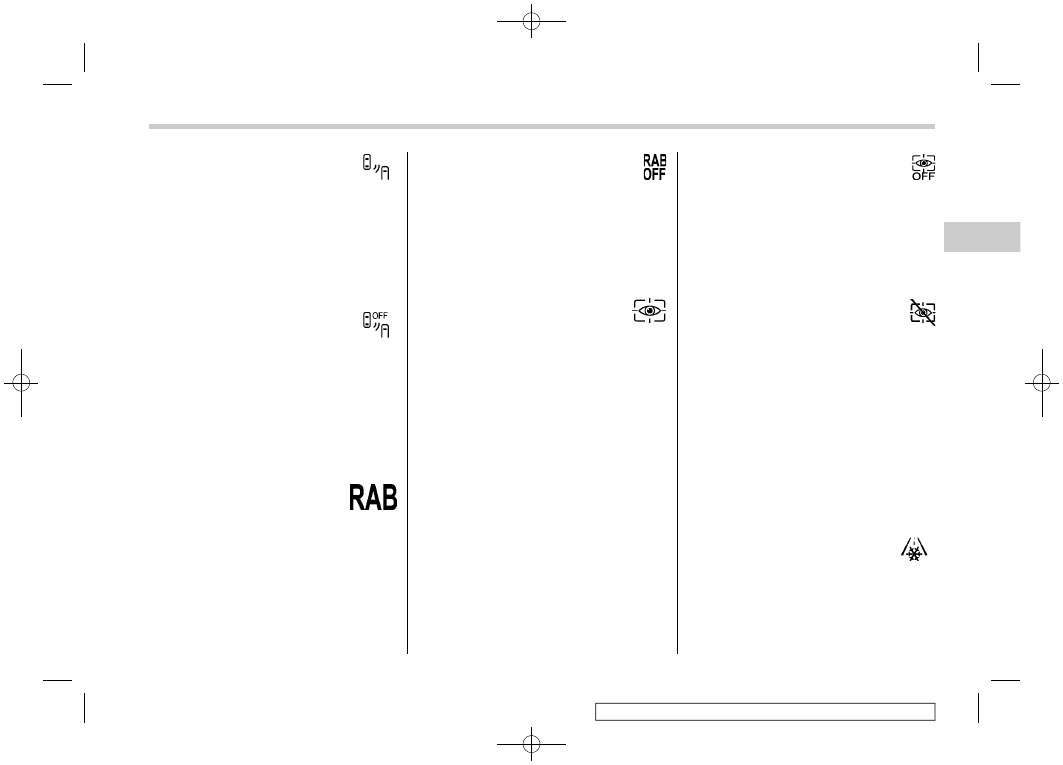
BSD/RCTA warning
light (if equipped)

This warning indicator appears when the
BSD/RCTA is malfunctioning. In this case
the BSD/RCTA warning light will be shown
on the combination meter display (color
LCD). When this indicator appears, have
your vehicle inspected by your SUBARU
dealer as soon as possible.

&

BSD/RCTA OFF indica-
tor light (if equipped)

The indicator appears when the BSD/
RCTA OFF switch is pressed to deactivate
the BSD/RCTA or when the BSD/RCTA is
suspended temporarily. In this case the
BSD/RCTA OFF indicator light will be
shown on the combination meter display
(color LCD). For details, refer to “BSD/
RCTA”

P354.

&

RAB warning indicator
(if equipped)

This indicator illuminates if the Reverse
Automatic Braking (RAB) system malfunc-
tions. Refer to “Reverse Automatic Brak-
ing (RAB) system”

P363.

&

RAB OFF indicator (if
equipped)

This indicator illuminates when the Re-
verse Automatic Braking (RAB) system is
turned OFF, or when the Reverse Auto-
matic Braking (RAB) system is suspended
temporarily. Refer to “Reverse Automatic
Braking (RAB) system”

P363.

&

Driver Monitoring Sys-
tem operation indicator
light (green)/Driver
Monitoring System
warning light (yellow) (if
equipped)

!

Driver Monitoring System operation
indicator light (green)

This indicator illuminates when the Driver
Monitoring System is activated. Refer to
“Driver Monitoring System operation in-
dicator light (green)”

P382.

!

Driver Monitoring System warning
light (yellow)

This warning illuminates if the Driver
Monitoring System malfunctions. Have
your vehicle inspected at a SUBARU
dealer as soon as possible.

&

Driver Monitoring Sys-
tem OFF indicator light
(if equipped)

This indicator illuminates when the Driver
Monitoring System OFF switch is pressed
to deactivate the Driver Monitoring Sys-
tem. Refer to “Driver Monitoring System
OFF indicator light”

P382.

&

Driver Monitoring Sys-
tem temporary stop in-
dicator light (if
equipped)

This indicator illuminates when the Driver
Monitoring System is temporarily stopped.
Refer to “Driver Monitoring System tem-
porary stop indicator light”

P382.

NOTE

The Driver Monitoring System stops
temporarily when the temperature of
the Driver Monitoring System unit is
high.

&

Icy road surface warn-
ing light (if equipped)

When the outside temperature is 37

8

F

(3

8

C) or less, the icy road surface warning

will illuminate to inform the driver that the
road surface may be frozen.

– CONTINUED –

Warning and indicator

189

3

Instruments

and

controls

(192,1)

NOTE

.

The outside temperature indicator
shows the temperature in the area
around the sensor. However, the
temperature may not be indicated
correctly or the update may be
delayed in the following conditions.

– While parking or driving at low

speeds

– When the outside temperature

changes suddenly (example:
when going in and out of an
underground parking area or
when passing through a tunnel)

– When starting the engine after

being parked for a certain period
of time

.

The icy road surface warning screen
should be treated only as a guide. Be
sure to check the condition of the
road surface before driving.

.

Once the icy road surface warning
screen appears, it will not disappear
unless the outside temperature has
increased to 41

8

F (5

8

C) or higher.

3-7. Combination meter dis-
play (color LCD) (if equipped)

WARNING

Always pay adequate attention to
safe driving when operating the
combination meter display (color
LCD) while the vehicle is in motion.
When operation of the combination
meter display (color LCD) interferes
with your ability to concentrate on
driving, stop the vehicle before
performing operations on the
screen. Also, do not concentrate on
the display while driving. Doing so
may cause you to look away from the
road and could result in an accident.

Various information will be shown on the
combination meter display (color LCD).
Also, a warning message will appear on
the display if a malfunction is detected. In
addition, several settings for the displayed
content can be performed.

Combination meter display (color LCD)

1

ECO gauge (Refer to “ECO gauge”

P164.)

2

Warning screen (Refer to “Warning
screen”

P192.)/Basic screen (Refer to

“Basic screens”

P193.)

3

EyeSight screen

Combination meter display (color LCD)

190

(193,1)

4

Telltale screen (Refer to “Telltale screen”

P192.)

5

Select lever/gear position indicator (Re-
fer to “Select lever/gear position indica-
tor”

P186.)

6

X-MODE indicator (if equipped) (Refer to
“X-MODE indicator light”

P188.)

SI-DRIVE indicator (Refer to “SI-DRIVE
indicator light”

P186.)

7

O d o m e t e r ( R e f e r t o “ O d o m e t e r ”

P163.)/Double trip meter (Refer to

“Double trip meter”

P163.)

8

Fuel gauge (Refer to “Fuel gauge”

P164.)

A:

Deactivating the EyeSight system

B:

Activating the EyeSight system

&

Basic operation

Control switch

1

(Up)

2

/SET (Enter)

3

(Down)

By operating “

” or “

” of the control

switch, the screens and selection items
can be switched. When the “

/SET”

switch is pulled toward you, the item can
be selected and set.

If there are some useful messages, such
as vehicle information, warning informa-
tion, etc., they will interrupt the current
screen, and appear on the display accom-
panied by a beep. If such a screen is
displayed, take proper action according to
the message shown on the screen.

The warning screen will return to the
original screen after a few seconds. While
the “

” information reminder is shown on

the display, it may be possible to display
the warning screen again. To recall the
message marked with “

” on the display,

pull the “

/SET” switch on the steering

wheel toward you.

NOTE

When the multi-function display (color
LCD) is set to the setting screen, the
combination meter display (color LCD)
cannot be controlled pressing on the

”, “

” and “

/SET” on the control

switch.

&

Welcome screen (opening
animation) and Good-bye
(ending animation) screen

When the driver’s door is opened and
closed after unlocking the door, the wel-
come screen (opening animation) will
appear on the combination meter display
(color LCD) for approximately 20 seconds.
When the ignition switch is turned to the
“LOCK”/“OFF” position, the combination
meter display (color LCD) gradually turns
off by showing Good-bye screen (ending
animation).

– CONTINUED –

Combination meter display (color LCD)

191

3

Instruments

and

controls

(194,1)

NOTE

.

The welcome screen and the good-
bye screen may differ in the actual
words and appearance.

.

The basic screen will be shown
when the ignition switch is turned
to the “ON” position while the wel-
come screen is displayed.

.

Once the welcome screen appears, it
takes a certain period of time to
display it again.

.

If the ignition switch is operated
after unlocking the driver’s door,
the welcome screen will not appear
even when the driver’s door is
opened and closed.

.

The welcome screen will disappear
when you lock the driver’s door by
using the remote keyless entry sys-
tem (all models) or the keyless
access function (if equipped) while
the welcome screen is displayed.

.

The welcome screen including the
multi-function display (color LCD)
and the audio/navigation unit can be
set to on or off.

.

The welcome screen can be set to on
or off. For details, refer to “Welcome
Screen”

P196.

.

The Good-bye screen can be set to
on or off. For details, refer to “Good-
bye Screen”

P196.

&

Warning screen

Example of warning

If there is a warning message or a
maintenance notification, it will appear on
this screen. Take the appropriate actions
based on the messages indicated.

&

Telltale screen

1

Telltale screen

When the corresponding situation occurs,
the following telltales will be displayed on
the telltale screen.

NOTE

When there is warning information to
display, it will be displayed in five
warning indicators, starting on the left
in ascending order of severity. If there
are six or more warning informations
displayed, pull the “

/SET” switch and

check the item.

Combination meter display (color LCD)

192

(195,1)

Mark

Name

Page

Door open warning light

178

Engine hood open
warning light

178

LED headlight warning
light

187

High beam assist indi-
cator light

186

Steering Responsive
Headlight warning light

187

Rear differential oil
temperature warning
light (if equipped)

173

Engine low oil level
warning light

172

RAB warning indicator
(if equipped)

189

RAB OFF indicator (if
equipped)

189

BSD/RCTA warning
light (if equipped)

189

BSD/RCTA OFF indi-
cator light (if equipped)

189

Mark

Name

Page

Auto Start Stop warning
light/Auto Start Stop
OFF indicator light (yel-
low)

187

Automatic headlight
beam leveler warning
light

187

Windshield washer fluid
warning light

173

Auto Start Stop indica-
tor light (green)

188

Auto Start Stop No Ac-
tivity Detected indicator
light

188

Hill descent control in-
dicator light (if
equipped)

188

Driver Monitoring Sys-
tem operation indicator
light (green) (if
equipped)

189

Driver Monitoring Sys-
tem warning light (yel-
low) (if equipped)

189

Driver Monitoring Sys-
tem OFF indicator light
(if equipped)

189

Driver Monitoring Sys-
tem temporary stop in-
dicator light (if
equipped)

189

Mark

Name

Page

Icy road surface warn-
ing light

189

&

Basic screens

By operating the “

” or “

” switch on the

steering wheel, you can change the screen
that is always displayed.

Average fuel consumption screen:

: Average fuel consumption
: Driving range on remaining fuel

This screen displays the average rate of
fuel consumption since the trip meter was
last reset.

– CONTINUED –

Combination meter display (color LCD)

193

3

Instruments

and

controls

(196,1)

NOTE

The driving range on the remaining fuel
is only a guide. The indicated value may
differ from the actual driving range on
the remaining fuel, so you must im-
mediately fill the tank when the low fuel
warning light illuminates.

Current fuel consumption screen:

: Current fuel consumption
: Driving range on remaining fuel

NOTE

The driving range on the remaining fuel
is only a guide. The indicated value may
differ from the actual driving range on
the remaining fuel, so you must im-
mediately fill the tank when the low fuel
warning light illuminates.

Driving information screen:

: Journey time
: Journey distance

This screen displays the journey time (the
time that has elapsed since the ignition
switch was turned to the “ON” position)
and journey distance (the distance that
has been driven since the ignition switch
was turned to the “ON” position).

Digital speed screen:

1

Speed limit indicator (if equipped)

2

Vehicle speed

This screen displays the current vehicle
speed.

Combination meter display (color LCD)

194

(197,1)

Auto Start Stop screen:

: The total amount of time that the engine

was stopped by means of the Auto Start
Stop system

: The total amount of fuel saved due to the

engine being stopped by the Auto Start
Stop system

The indicated values are calculated from
the most recent reset of the currently
displayed trip meter to the current time.
The indication ranges are as follows.

.

Total amount of time: from 00

00

@

to

9999h59

59

@

.

Total amount of fuel saved: from 0 ml to
9999.999 L

NOTE

.

When the trip meter is reset, the
corresponding accumulated time
and the amount of fuel saving are

also reset.

.

The time spent with the engine
stopped by means of the Auto Start
Stop system is also added to the
journey time.

TPMS screen (U.S.-spec. models):

This screen displays each tire pressure.
When a tire is deflated, the deflated tire
and the tire pressure will be displayed on
the screen in yellow.

NOTE

.

The tire pressure values are dis-
played several minutes after driving.

.

The tire pressure units can be set.
For details about setting the units,
refer to “Tire Pressure Units (U.S.-
spec. models)”

P196.

.

Once the tire pressure monitoring
system detects the low tire pressure,
the tire pressure values will display
in yellow until the system detects the
normal tire pressure.

.

Immediately adjust the tire pressure
when the warning light illuminates.
When the tire pressure monitoring
system detects the adjusted tire
pressure, the warning light will turn
off and the tire pressure values will
turn to white.

.

For information about the specified
value of the air pressure, refer to
“Tires”

P498.

Menu screen entering screen:

While this screen is selected, pull and hold
the “

/SET” switch to enter the menu

screen.

– CONTINUED –

Combination meter display (color LCD)

195

3

Instruments

and

controls

(198,1)

&

Menu screens

Pull and hold the “

/SET” switch to enter

the menu screens when all of the following
conditions are satisfied.

.

The menu screen entering screen is
selected.

.

The “

” information reminder is off.

NOTE

.

While driving, the setting items
available on the combination meter
display (color LCD) are limited.

.

For function settings and adjust-
ments on the combination meter
display, refer to “Function settings”

P24.

By operating the “

” or “

” switch on the

steering wheel, you can select the menu.
Pull the “

/SET” switch to enter the

selected menu.

NOTE

If you enter the “Go Back” menu, the
system will return to the previous
screen.

!

Screen Settings

After entering the “Screen Settings” menu,
select one of the following menus.

!

Welcome Screen

The welcome screen can be activated or
deactivated.

!

Good-bye Screen

The good-bye screen can be activated or
deactivated.

!

Gauge Initial Movement

The movement of the meter needles and
gauge needles that occurs when the
ignition switch is turned to the “ON”
position can be activated or deactivated.

!

Units

Changes the units displayed in the combi-
nation meter display (color LCD), the multi-
function display (black and white) and the
multi-function display (color LCD).

!

Tire Pressure Units (U.S.-spec.
models)

Changes the units displayed in the Tire
Pressure Monitoring system.

!

Languages

Changes the language displayed in the
combination meter display (color LCD)
and the multi-function display (color LCD).

!

Warning Volume

Sets the EyeSight warning volume, the
BSD/RCTA warning volume and the RAB
warning volume.

!

Rear Seat Reminder

The rear seat reminder can be activated or
deactivated.

!

EyeSight

NOTE

For details about how to use the
EyeSight system, refer to the Owner’s
Manual supplement for the EyeSight
system.

!

RAB (if equipped)

!

Sonar Audible Alarm

When the Reverse Automatic Braking
(RAB) system is in operation, the warning
sound to notify that an obstacle is detected
in the rear can be activated or deactivated.

NOTE

For models with Reverse Automatic
Braking (RAB) system, refer to “Re-
verse Automatic Braking (RAB) sys-
tem”

P363.

!

Vehicle Setting

After entering the “Vehicle Setting” menu,
select one of the following menus.

Combination meter display (color LCD)

196

(199,1)

!

Keyless Entry System

Sets the settings used when the keyless
access function was operated.

.

Audible Signal (if equipped)

Sets the electronic chirp that sounds when
the door is locked or unlocked.

.

Hazard Warning Flasher

Sets the operation of the hazard warning
flasher that blinks when the door is locked
or unlocked.

.

Driver Door Unlock (if equipped)

Select only the driver’s door to unlock or all
doors to unlock simultaneously when the
driver’s door is unlocked.

.

Rear Gate/Trunk Unlock (if equipped)

Select only the rear gate to unlock or all
doors to unlock simultaneously when
accessing from the cargo area.

!

Defogger

Sets and customizes the operation of the
defogger.

!

Interior Light

Sets and customizes the interior light off
delay timer.

!

Auto Door Lock and Unlock

Setting conditions for “Auto Door Lock and
Unlock”

.

Auto Door Lock:

Set the condition of the following items to
lock the door automatically.

– Vehicle Speed: When the vehicle

speed reaches more than 12 mph
(20 km/h).

– Shift Into or Out of PARK: When the

select lever is shifted into a position
other than the “P” position.

– Off: When the function is set to OFF.

.

Auto Door Unlock:

Set the conditions of the following items to
unlock the door automatically.

– Shift Into or Out of PARK: When the

select lever is shifted into the “P”
position.

– Ignition OFF: When the ignition

switch is turned to OFF.

– Driver Door Open: When the dri-

ver’s door is open.

– Off: When the function is set to OFF.

!

Auto Light Sensor

Sets and customizes the sensitivity of the
auto light sensor.

!

Welcome Lighting

Sets the leaving time and approaching
time.

.

Approaching time set

Sets the illumination time of the headlights

that illuminate when you approach the
vehicle.

.

Leaving time set

Sets the time until the headlights turn off
when you have moved away from the
vehicle.

!

One-touch lane changer

Sets the one-touch lane changer on/off.

!

Door mirror setting (if equipped)

The reverse tilt-down feature can be
activated or deactivated.

!

Default Settings

Select “Yes” to use the menu screen to
restore customized settings (except the
“Vehicle Setting” of “Keyless Entry Sys-
tem”, “Defogger”, “Interior Light”, “Auto
Door Lock and Unlock”, “Auto Light Sen-
sor”, “Welcome Lighting” and “One-touch
lane changer”) to the factory default set-
tings. Select “No” to return to the previous
screen without restoring to the factory
default settings.

Combination meter display (color LCD)

197

3

Instruments

and

controls

(200,1)

3-8. Multi-function display
(black and white)

NOTE

For models with multi-function display
(color LCD), refer to “Multi-function
display (color LCD)”

P202.

1

Outside temperature indicator

2

X-MODE indicator (if equipped)

3

Driving information display

4

Clock

With the ignition switch in the “ACC”
position, the clock appears on the display.

With the ignition switch in the “ON” posi-
tion, the outside temperature indicator,
driving information display and clock all
appear on the display.

NOTE

The indicated values vary in accor-
dance with changes in the vehicle’s
running conditions. Also, the indicated
values may differ slightly from the
actual values and should thus be
treated only as a guide.

&

Driving information display

NOTE

You can set the units for both the multi-
function display (black and white) and
the combination meter at the same
time. For details about setting the
language and units, refer to “Menu
screens”

P196.

!

How to change the information dis-
play

1

INFO button

Pressing the INFO button on the steering
wheel switches changes the display to the
following sequence.

Multi-function display (black and white)

198

(201,1)

!

Driving range on remaining fuel

1

When setting the displayed unit as MPH

2

When setting the displayed unit as km/h

The driving range indicates the distance
that can be driven taking into account the
amount of fuel remaining in the tank and

the average rate of fuel consumption.

1

When setting the displayed unit as MPH

2

When setting the displayed unit as km/h

If the driving range is shown as “

”, there

is only a tiny amount of fuel left in the tank.

NOTE

The driving range on the remaining fuel
is only a guide. The indicated value may
differ from the actual driving range on
the remaining fuel, so you must im-
mediately fill the tank when the low fuel
warning light illuminates.

!

Average fuel consumption

1

Displays the driving range per gallon of
fuel

2

Displays the driving range per liter of fuel

3

Displays the fuel consumption per 100
km

This display shows the average rate of fuel
consumption since the trip meter was last
reset.

– CONTINUED –

Multi-function display (black and white)

199

3

Instruments

and

controls

(202,1)

1

TRIP RESET switch

Press the TRIP RESET switch to switch
between the displays for the average fuel
consumption that corresponds to the A trip
meter mileage and the average fuel con-
sumption that corresponds to the B trip
meter mileage.
When the trip meter displays is reset, the
corresponding average fuel consumption
value is also reset.

NOTE

When the trip meter display is reset, the
average fuel consumption correspond-
ing to that trip meter display is not
shown until the vehicle has subse-
quently covered a distance of 1 mile
(or 1 km).

!

Current fuel consumption

1

Displays the driving range per gallon of
fuel

2

Displays the driving range per liter of fuel

3

Displays the fuel consumption per 100
km

This indication shows the rate of fuel
consumption at the present moment.

!

Average vehicle speed

1

When units in miles is selected

2

When units in km is selected

This display shows the average vehicle
speed since the trip meter was last reset.
Pressing the TRIP RESET switch toggles
the display between the average vehicle
speed corresponding to the A trip meter
display and the average vehicle speed
corresponding to the B trip meter display.
When either of the trip meter displays is
reset, the corresponding average vehicle
speed value is also reset.

NOTE

When either trip meter display is reset,
the average vehicle speed correspond-
ing to that trip meter display is not
shown until the vehicle has subse-

Multi-function display (black and white)

200

(203,1)

quently covered a distance of 1 mile (or
1 km).

!

Turn off display of driving informa-
tion display

Select the blank space in the menu to exit
the driving information display selection.

NOTE

.

The average fuel consumption and
average vehicle speed are calcu-
lated even while the driving informa-
tion display is not displayed.

.

Even if you turn off the driving
information display, the display will
automatically turn on when the bat-
tery voltage is disconnected and
then reconnected for battery repla-
cement or fuse replacement.

&

Outside temperature indica-
tor

1

U.S.-spec. models

2

Except U.S.-spec. models

NOTE

.

The outside temperature indicator
shows the temperature around the
sensor. However, the temperature
may not be indicated correctly or
the update may be delayed in the
following conditions.

– While parking or driving at low

speeds

– When the outside temperature

changes suddenly (example:
when going in and out of an
underground parking area or

when passing through a tunnel)

– When starting the engine after

being parked for a certain period
of time

.

The temperature unit cannot be
changed.

!

Road surface freeze warning indi-
cation

1

U.S.-spec. models

2

Except U.S.-spec. models

When the outside temperature drops to a
certain temperature or lower, the tempera-
ture indication flashes for 5 seconds to
show that the road surface may be frozen.
If the display is already indicating that the
outside temperature is low when the
ignition switch is turned to the “ON”
position, the indication does not flash.

– CONTINUED –

Multi-function display (black and white)

201

3

Instruments

and

controls

(204,1)

NOTE

The outside temperature indication
may differ from the actual outside
temperature. The road surface freeze
warning indication should be treated
only as a guide. Be sure to check the
condition of the road surface before
driving.

&

X-MODE indicator (if
equipped)

This indicator will be shown while X-MODE
is activated. It will turn off when X-MODE is
deactivated.

&

Clock

For details about clock setting, refer to
“Clock”

P225.

3-9. Multi-function display
(color LCD)

NOTE

For models with multi-function display
(black and white), refer to “Multi-func-
tion display (black and white)”

P198.

WARNING

Always pay adequate attention to
safe driving when operating the
multi-function display (color LCD)
while the vehicle is in motion. When
operation of the multi-function dis-
play (color LCD) is disturbing your
awareness and ability to concen-
trate on driving, stop the vehicle in
a safe place before performing op-
erations on the screen. Also, do not
concentrate on the display while
driving. Doing so may cause you to
look away from the road and could
result in an accident.

&

Features

The multi-function display (color LCD) has
the following functions.

Description

Page

Displays useful messages, such
as notification, etc.

204

Displays basic screens (e.g. fuel
consumption screen, etc.)

204

Sets and adjusts maintenance
notification

223

Also, the multi-function display (color LCD)
can also be used to set and initialize the
multi-function display (color LCD) itself.

NOTE

.

When the vehicle is in motion,
certain functions and selections
may not be available.

.

You can set the language and units
for both the multi-function display
(color LCD) and the combination
meter at the same time. For details
about setting the language and
units, refer to “Menu screens”

P196.

.

The images displayed in this Own-
er’s Manual are sample images. The
actual image may vary depending on
the market and vehicle specifica-
tions.

Multi-function display (color LCD)

202

(205,1)

&

Welcome screen

When the driver’s door is opened and
closed, the welcome screen will appear for
a short time.

NOTE

.

The welcome screen will disappear
when the ignition switch is turned to
the “ON” position while the welcome
screen is displayed.

.

The welcome screen can be set to on
or off. For details, refer to “Screen
Settings”

P196.

.

For a certain period of time after the
welcome screen has once appeared,
it may not appear again even when
the driver’s door is opened and
closed again. This does not indicate
a malfunction.

&

Self-check screen

NOTE

When the setting is “On”, the self-
check screen appears. For details
about this setting, refer to “On/Off
setting”

P223.

When the ignition switch is turned to the
“ON” position, the vehicle self-check will
be performed. The screens corresponding
to the following items will appear one after
another for several seconds each.

1

Engine oil: Checks the interval of engine
oil replacement.

2

Oil filter: Checks the interval of oil filter
replacement.

3

Tires: Checks the interval of tire rotation.

4

Inspection and maintenance: Checks the
interval of inspection and maintenance.

When the checks are performed, the color
of the icon corresponding to the checked
item will change.
If there is a notification, the message will
be displayed. Take the appropriate actions
based on the message indicated.
After the self-check is completed, today’s
date, the stored birthday or the stored
anniversary is displayed.

NOTE

.

After performing the maintenance,
change the setting of the corre-
sponding maintenance item. For de-
tails, refer to “Maintenance settings”

P223.

.

The maintenance notification screen
will be displayed under either of the
following conditions.

– The period of time remaining until

the registered notification date is
15 days or less.

– The total driving distance remain-

ing until the registered notifica-
tion distance is approximately
311 miles (500 km) or less.

.

The maintenance notification screen
will be displayed until either of the
following conditions is satisfied.

– The period of time passed after

the registered notification date is
15 days or more.

– CONTINUED –

Multi-function display (color LCD)

203

3

Instruments

and

controls

(206,1)

– The total distance driven after the

registered notification distance
is approximately 311 miles (500
km) or more.

&

Interruption screen

Example

Useful messages, such as reminder in-
formation, weather information (if
equipped) and traffic information (if
equipped) may interrupt the current screen
and appear on the display accompanied
by a beep. Take proper action according to
the message.

The interruption screen will return to the
original screen after a few seconds. Also,
you can press the INFO button to skip the
interruption screen.

&

Basic operation

Control switch

1

INFO button

2
3

/SET

4

Press the INFO button on the steering
wheel to switch the item displayed on the
basic screen. You can operate the items
on the setting screen by using the “

”,

” and “

/SET” switches.

&

Basic screens

1

Clock

2

Climate control*

3

Outside temperature

4

Information screen

Multi-function display (color LCD)

204


Content      ..     10      11      12      13     ..