Subaru BRZ (2023 year). Manual in english - page 11
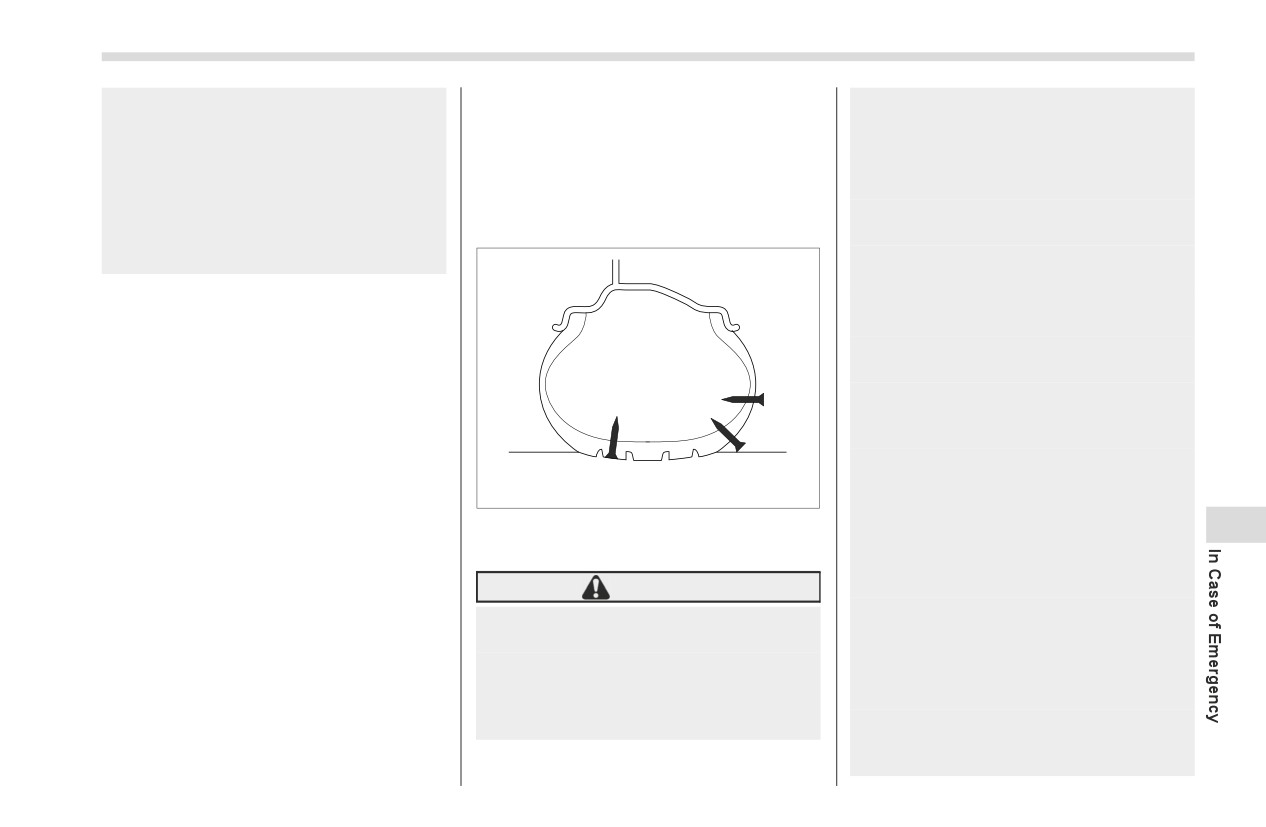
Flat Tires
307
For tire replacement, refer to "Tire
Compliance with these instructions
-
The tire damage is not located
Replacement" ) P365.
is vital to ensuring vehicle safety.
within the visible tread of the
Noncompliance with these instruc-
tire.
▼ Safety precautions when sealing a
tions means risking tire damage,
-
The tire damage is on the
flat tire
which can affect vehicle handling
sidewall of the tire.
and lead to loss of vehicle control.
Observe the following rules when sealing
-
When the tire has been taken
This may result in serious injury or
a flat tire.
off of the wheel.
death.
-
The wheel or the tire valve of
the flat tire is damaged.
If the tire is punctured, you can seal the
-
Two or more tires have been
flat tire temporarily by using the flat tire
punctured.
repair kit. You can seal a flat tire caused,
-
The expiration date of the
for example, by nails or similar objects
sealant has passed.
with less than 0.2 in (4 mm). However,
2
-
The tire is punctured by
depending on the type and extent of tire
pointed items such as nails of
damage, some tires can only be partially
0.2 in (4 mm) or larger.
sealed or not sealed at all, and this condi-
2
When inflating the flat tire, if the
tion may cause a loss of tire pressure. A
1
tire inflation pressure does not
loss of tire pressure can affect vehicle
900483
reach the green zone of the pres-
handling, leading to the loss of vehicle
1)
Sealing is possible
sure gauge within 10 minutes, do
9
control.
2)
Sealing is not possible
not continue to seal the tire. We
After sealing the flat tire temporarily,
recommend that you contact your
change the tires with new ones as soon as
WARNING
SUBARU dealer.
possible. We recommend that you have
Drive with caution and avoid
the sealed tire changed by your nearest
Do not use the flat tire repair kit in
making sudden steering or
SUBARU dealer. You may reuse the
the following cases.
driving maneuvers.
wheel if the attached sealant is wiped off,
-
The tire has already been
but the valve of the wheel must be
Do not exceed a maximum speed
damaged as a result of being
replaced with a new one. If you reuse the
of 50 mph (80 km/h).
driven in the under inflated
wheel without replacing the valve, air may
condition.
Do not exceed a maximum
leak from the valve.
driving distance of 125 miles (200
km).
- CONTINUED -
308
Flat Tires
Do not use tire chains on a sealed
The tires can be repaired when
When raining, take measures to
tire.
the ambient temperature is −22 °F
prevent the air compressor from
Do not tow a trailer.
(−30 °C) or higher.
being exposed directly to the
rain. Exposing to rain may cause
If used for a purpose other than
a malfunction.
sealing a flat tire, the flat tire
repair kit may cause a severe
CAUTION
Do not use air compressors other
accident or injury due to the fact
than the one in the repair kit.
Remember that the flat tire repair
that compressed air can act as an
Using an air compressor other
kit only provides temporary
explosive or propellant.
than the one in the repair kit may
mobility. Regulations concerning
damage the tires.
Safely park your vehicle on the
tire repair after usage of flat tire
roadside so that you do not
Do not disassemble or modify the
repair kit may differ from country
obstruct the flow of traffic and so
to country. We recommend that
air compressor to enable the use
that you are able to seal the flat
you consult your SUBARU dealer
of a power supply or a battery
other than DC 12 V.
tire without being in danger.
or tire dealer for advice.
If a temporary puncture repair is
Apply the parking brake, even if
Store the flat tire repair kit safely
the vehicle is parked on a level
performed with the repair kit, the
and secure it under the floor of
road, to make sure that the
Tire Pressure Monitoring System
the trunk. Storing it anywhere in
vehicle will not move.
(TPMS)
(if equipped) may not
the passenger compartment is
operate normally.
Stop the engine before sealing
not advisable because it could
the flat tire.
strike an occupant in the event of
Turn on the hazard warning
a sudden stop or collision and
flasher while sealing the flat tire.
cause injury.
Do not attempt to remove foreign
Use the flat tire repair kit with
original vehicle tires only.
objects like nails or screws that
have penetrated the tire. Leave
Do not keep the air compressor
them as they are.
operating for more than
10
minutes, otherwise there is a risk
Never leave the flat tire repair kit
of overheating.
unattended while in use.
The temperature of the air
Only one tire can be repaired with
compressor may become high.
one bottle of sealant.
Be careful not to burn yourself.
309
Flat Tires
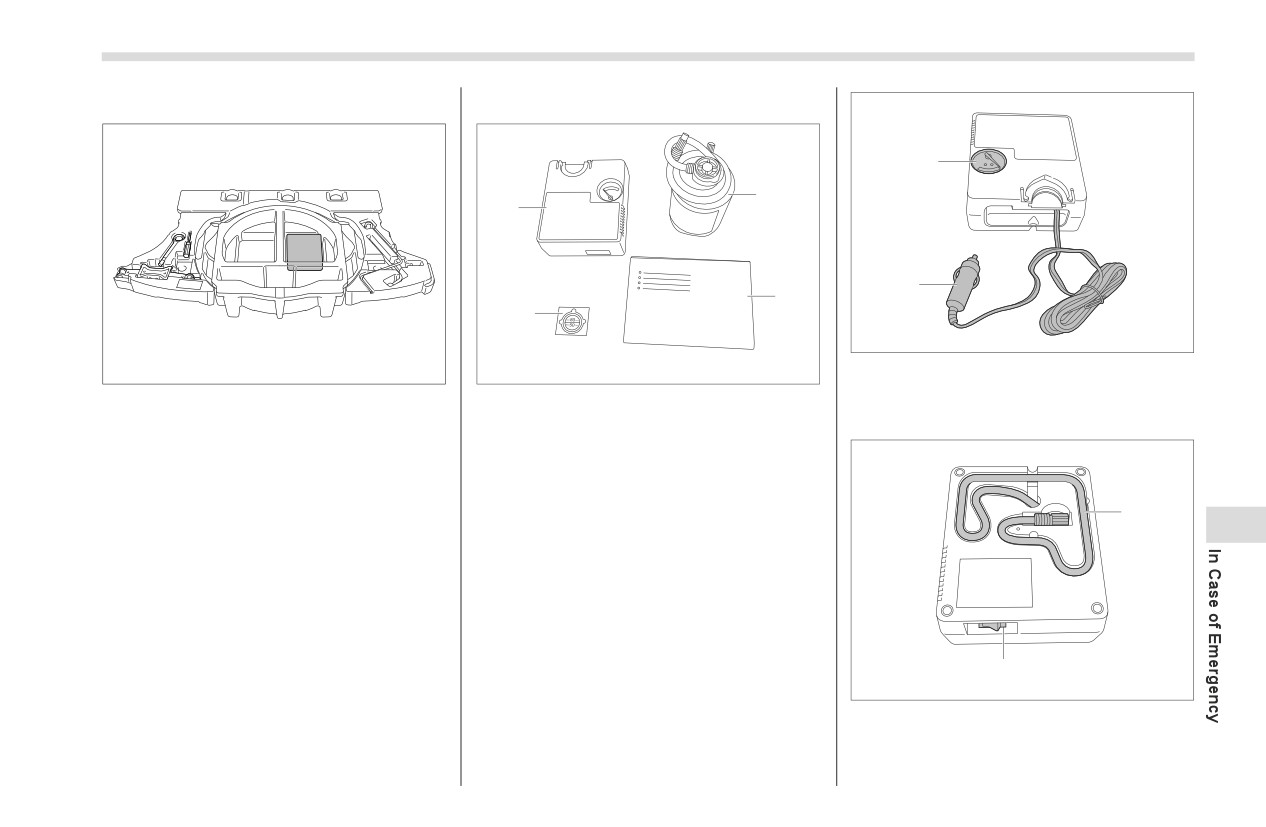
▼ Location of the flat tire repair kit
▼ Contents of the flat tire repair kit
1
1
3
2
2
4
900881
901220
900880
Air compressor (front side)
1) Air gauge
Flat tire repair kit
1) Sealant bottle
2) Power plug
2) Quick reference guide
The flat tire repair kit is stored in the
3) Air compressor
portion shown in the illustration.
4) Speed limit label
The above repair kits are packed in a
plastic bag. Return them to the plastic bag
1
9
after use.
2
900882
Air compressor (rear side)
1) Hose
2) Compressor switch
- CONTINUED -
310
Flat Tires
or 3 miles (5 km) so that the sealant can
If a person who is allergic to
seal the damaged area.
natural rubber comes in contact
1
the sealant, allergy symptoms
Stop the vehicle again, check and, if
may occur.
necessary, adjust the pressure of the
damaged tire.
After that, you can continue to drive
carefully no faster than 50 mph (80 km/h)
and within the maximum distance of 125
miles (200 km).
2
Inform all other users of the vehicle that
the tire has been temporarily sealed with
900858
the flat tire repair kit and make them aware
of the special driving conditions to be
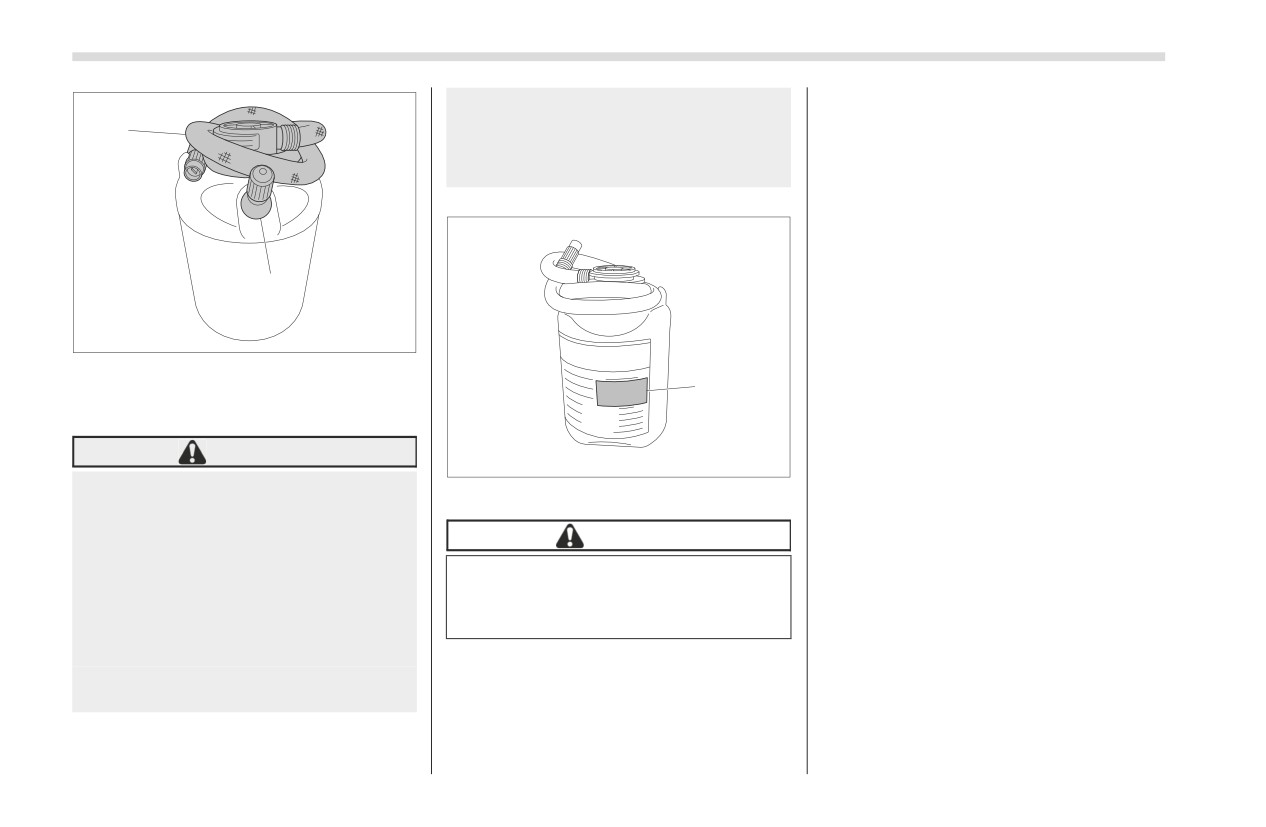
Sealant bottle
observed.
1) Hose
1
2) Valve
WARNING
900883
Do not drink the sealant. If the
1) Expiration date
sealant is accidentally swal-
lowed, seek medical attention
CAUTION
immediately.
If the sealant splashes onto your
Replace the sealant bottle with a
skin or eyes, wash it away imme-
new one before the expiration date
diately with plenty of water. If
passes.
necessary, seek medical atten-
tion immediately.
▼ How to seal the flat tire
Keep the flat tire repair kit out of
To seal the flat tire, perform the following
the reach of children.
steps.
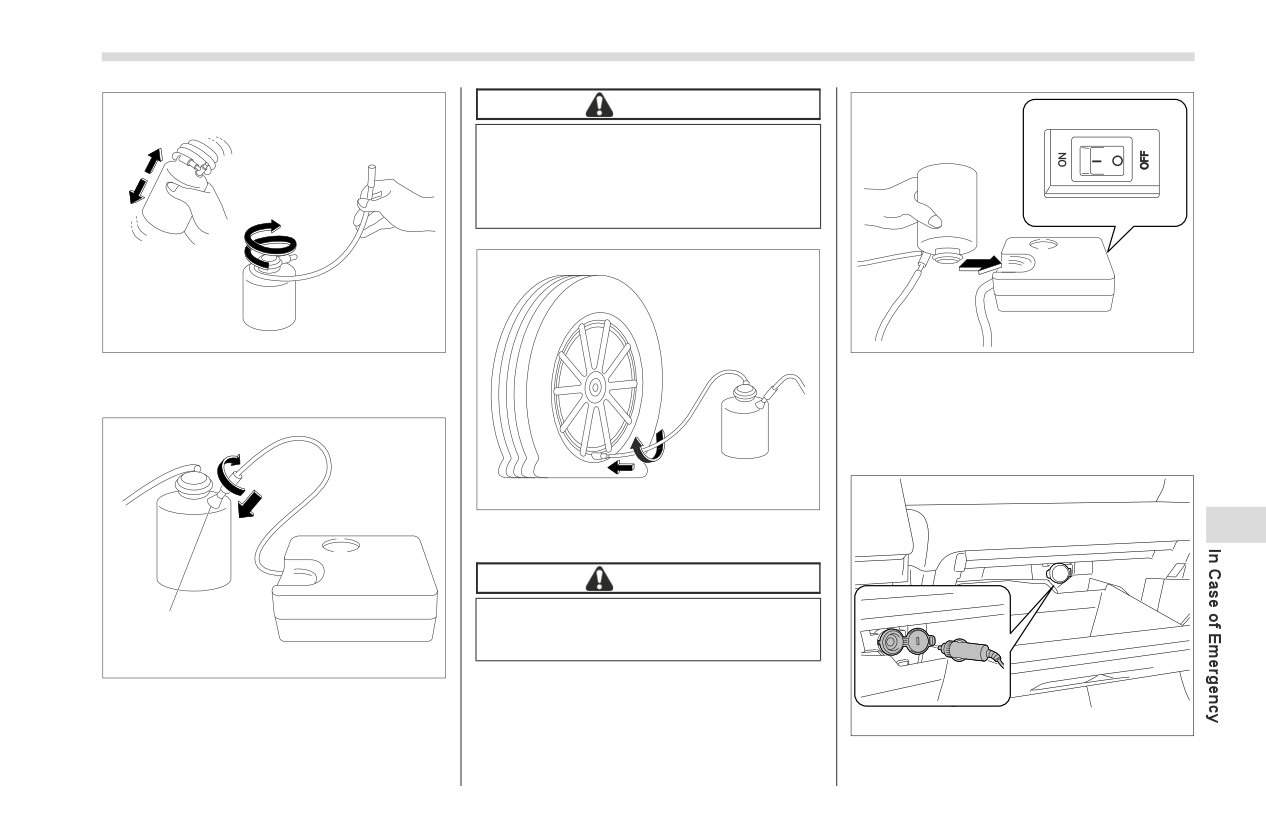
First, pump in the sealant and air. Drive
the vehicle for approximately 10 minutes
Flat Tires
311
CAUTION
Make sure that the air
compressor switch is OFF.
The sealant may leak if the fitting
is not tight enough.
900898
900886
3. Turn the bottle upside down and tilt the
1. Shake the sealant bottle well. Loosen
bottle cap into the bottle holder of the air
the hose.
compressor.
Make sure that the air compressor switch
is OFF.
900885
Connect the hose from the bottle to the tire
9
valve stem tightly.
CAUTION
The sealant may leak if the fitting is
1
not tight enough.
900884
1) Valve
901218
2. Connect the air compressor hose to
the valve on the bottle.
4. Connect the power plug of the air
compressor into the accessory power
- CONTINUED -
312
Flat Tires
outlet. Apply the parking brake and turn on
CAUTION
the ignition switch to the “ACC” position.
Do not run the air compressor for
more than 10 minutes as it can
get hot. Be careful not to get
burned.
If tire pressure doesn’t reach the
green zone for 10 minutes, this kit
will be unable to seal the tire.
Please contact your SUBARU
dealer for help.
901219
NOTE
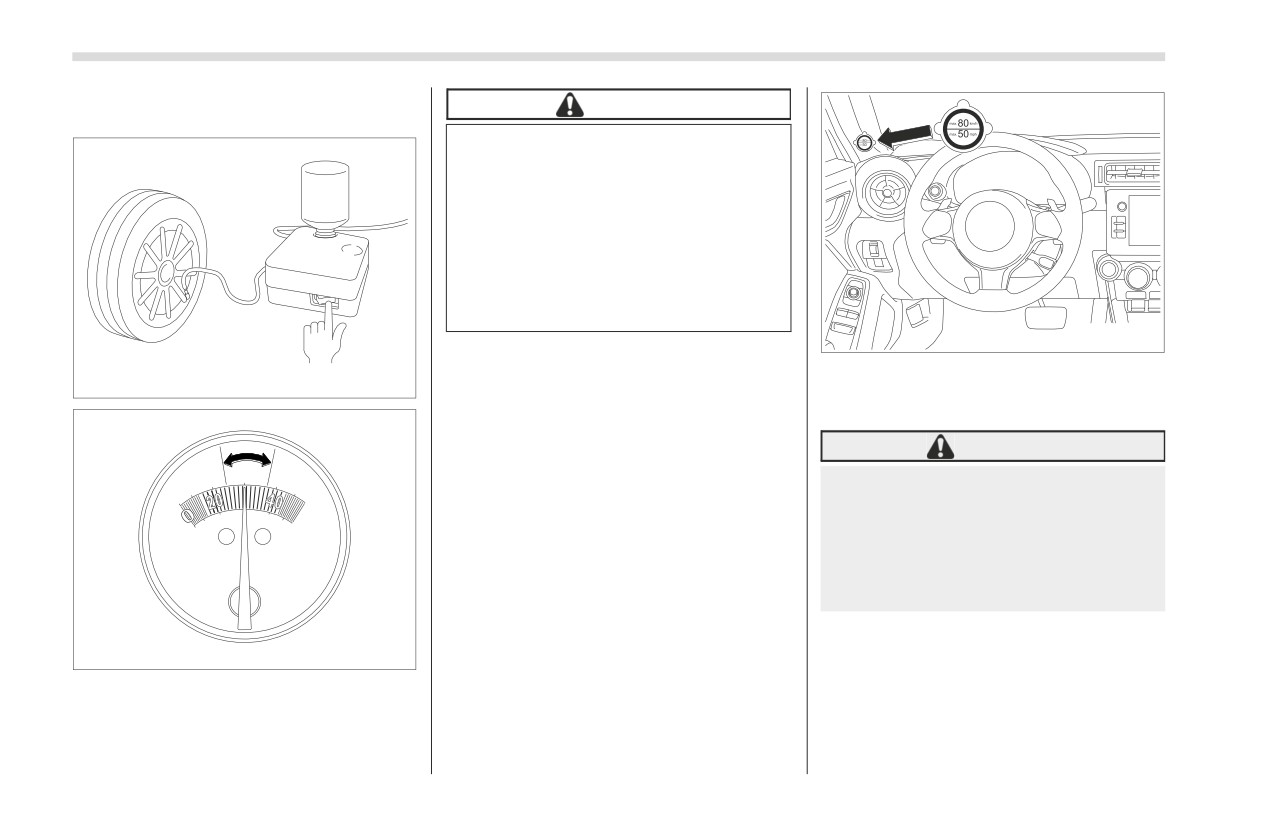
5. While filling the tire with air, attach the
900888
After the compressor starts to
speed limit label on the position shown in
operate, the air pressure will tempo-
the illustration.
rarily rise to 45 psi (300 kPa, 3.0 kgf/
cm2) or higher. After about 30 seconds
WARNING
when all of the sealant is inside the tire,
the air pressure will lower, repre-
Do not attach the speed limit label
30
senting the air pressure in the tire.
in a position where the label hides
psi
In extremely low temperatures −22°F
the warning lamp or on the steering
to −4°F (−30°C to −20°C), the viscosity
wheel. It may interfere with the nor-
of the sealant increases and the
mal operation of the airbag and lead
sealant will flow more slowly. In such
to a critical failure.
temperatures, bring the sealant into
the vehicle to warm it up before use.
901088
When mending the tire, if the air
pressure gauge is hard to read, turn
Turn
the
air
compressor
switch
on and
the compressor switch off once to get
adjust the air pressure to the appropriate
level (green zone of the air gauge).
an accurate reading.
Flat Tires
313
30
psi
901088
900891
901076
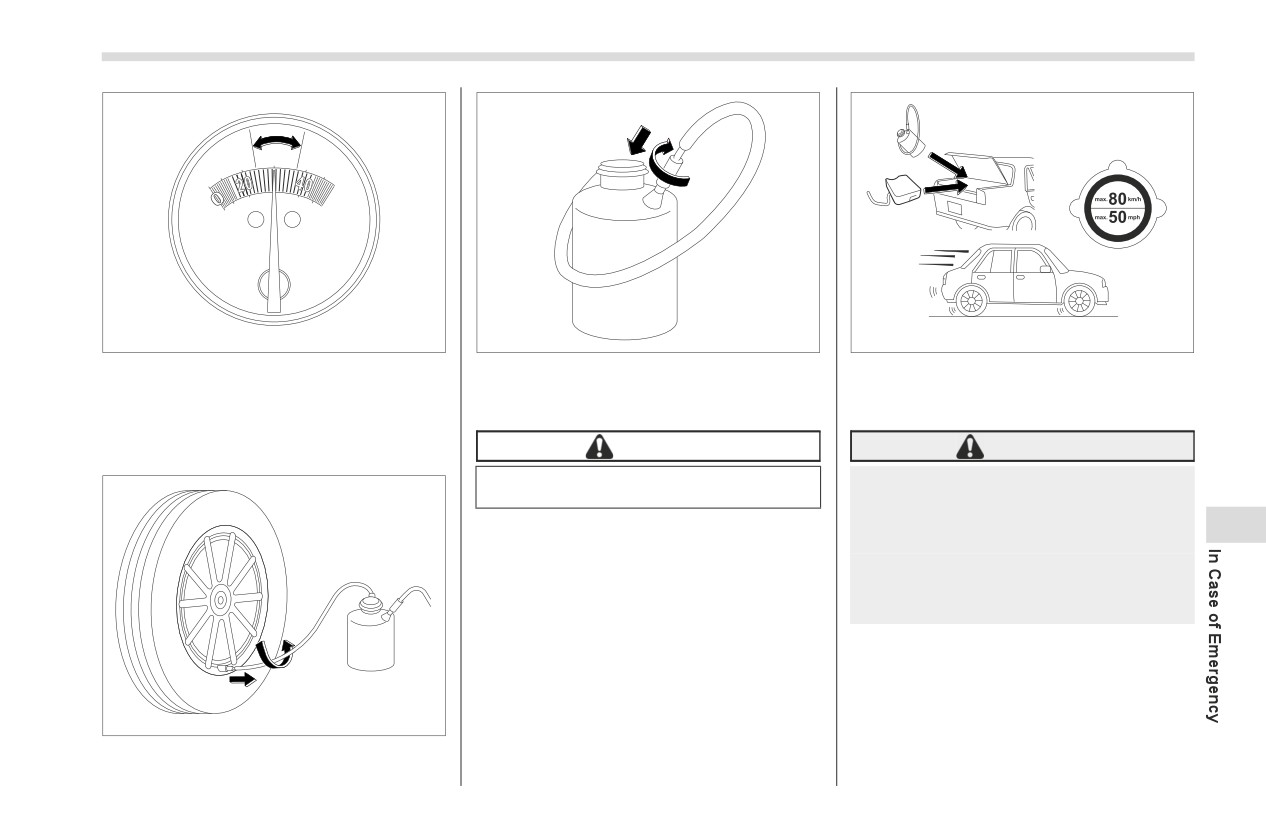
6. Turn the air compressor power switch
Connect the hose of the bottle to the valve
7. Stow the kit back in the vehicle and
off when the air pressure reaches the
of the bottle in a circular fashion to avoid
drive your vehicle immediately for
10
green zone of the air gauge.
leakage of the remaining sealant.
minutes or 3 miles (5 km).
Remove the power plug from the acces-
sory power socket.
CAUTION
WARNING
The sealant may stain clothing.
Drive carefully. Do not exceed 50
mph (80 km/h). Driving faster than
that can result in the vehicle
9
shaking.
Do not use tire chains on a sealed
tire.
Do not tow a trailer.
900890
Remove the hose after filling the tire with
air and fasten the valve cap.
- CONTINUED -
314
Flat Tires
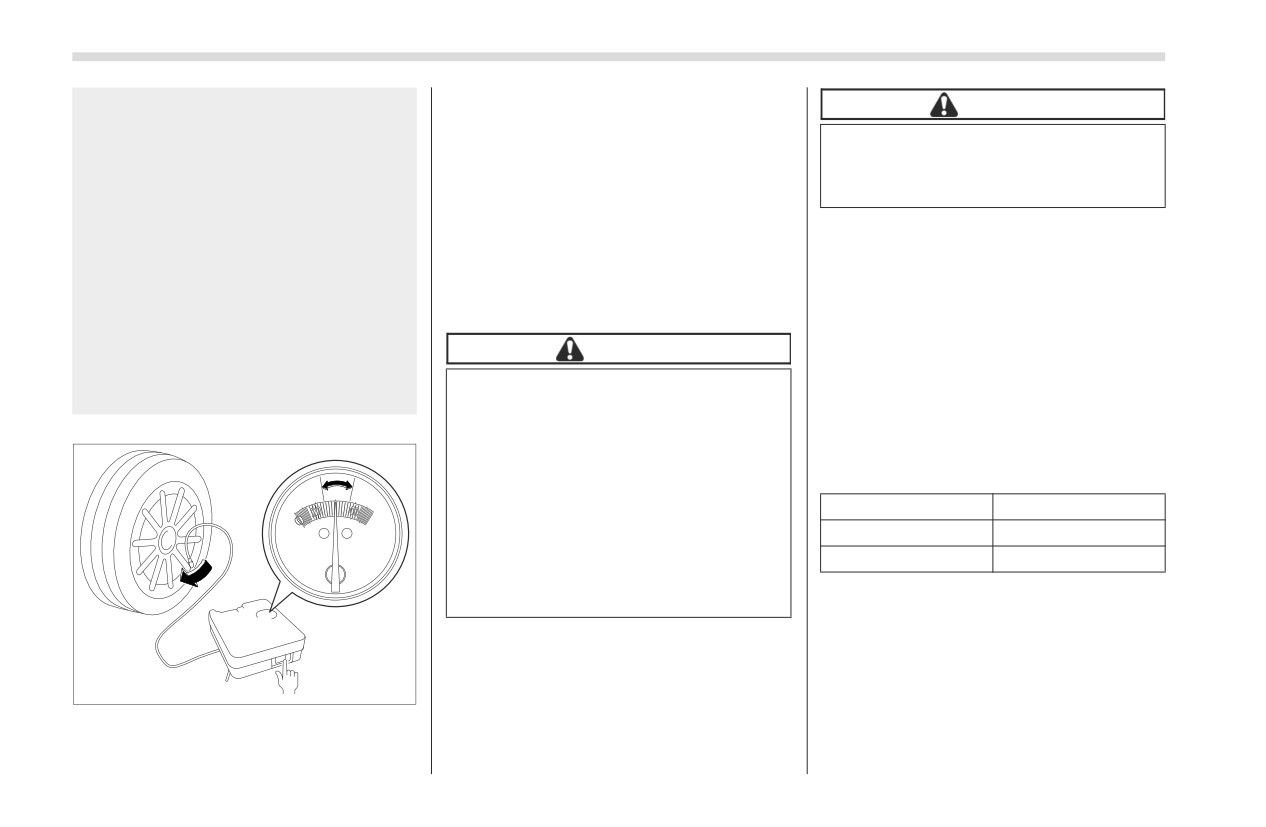
vehicle in a safe place to recheck the air
If heavy vibrations, unsteady
CAUTION
pressure (see step 4).
steering behavior or noises occur
while driving, reduce your speed
If necessary, fill the tire with air to the
The sealant bottle and speed limit
and drive with caution to a loca-
appropriate air pressure again and drive
label need to be replaced after
tion where it is safe for you to
carefully to the nearest SUBARU dealer
using the flat tire repair kit.
stop the vehicle. Recheck the tire
for tire, valve stem and sealant bottle
and its pressure. If the tire pres-
replacement.
NOTE
sure is in the red zone of the air
New sealant and replacement parts
gauge or if there are any cracks,
NOTE
can be purchased from your autho-
bumps or similar tire damage
Connect the air compressor only to
rized repair shop or SUBARU dealer,
visible, temporary repairs cannot
the tire valve.
and they should also be installed into
be performed with the repair kit.
the kit by a specialist. Empty sealant
We recommend that you consult
CAUTION
bottles and replacement parts must be
with your SUBARU dealer or road
If the air pressure is in red zone of
returned to your SUBARU dealer or
service provider.
the air gauge, the kit did not
disposed of in compliance with local
successfully seal the puncture. In
waste disposal regulations.
this case, please stop driving and
contact your SUBARU dealer for
▼ Technical data of air compressor
help.
30
Do not drive your vehicle with the
Line voltage
DC 12 V
psi
sealed tire for more than
125
Operating voltage
DC 10 - 15 V
miles (200 km). Failure to replace
Amperage
Max. 10 A
the valve stem may result in air
leakage at the valve stem.
Before the tire is removed from the rim,
inform your SUBARU dealer or other tire
901089
dealer that the tire contains sealant.
8. After driving for 10 minutes or 3 miles
(5 km), whichever comes first, stop the
Flat Tires
315
■ Tire Pressure Monitoring
When a spare tire is mounted or a
WARNING
System (TPMS) (If Equipped)
wheel rim is replaced without the
If the low tire pressure warning
original pressure sensor/trans-
light illuminates while driving,
mitter being transferred, the low
never brake suddenly. Instead,
tire pressure warning light will
perform the following procedure.
illuminate steadily after blinking
Otherwise an accident involving
for approximately one minute.
serious vehicle damage and
This indicates the TPMS is unable
serious personal injury could
to monitor all four road wheels.
occur.
Contact your SUBARU dealer as
(1) Keep driving straight ahead
soon as possible for tire and
while gradually reducing
sensor replacement and/or
speed.
system resetting.
When a tire is repaired with liquid
(2) Slowly pull off the road to a
702780
sealant, the tire pressure warning
safe place.
valve and transmitter may not
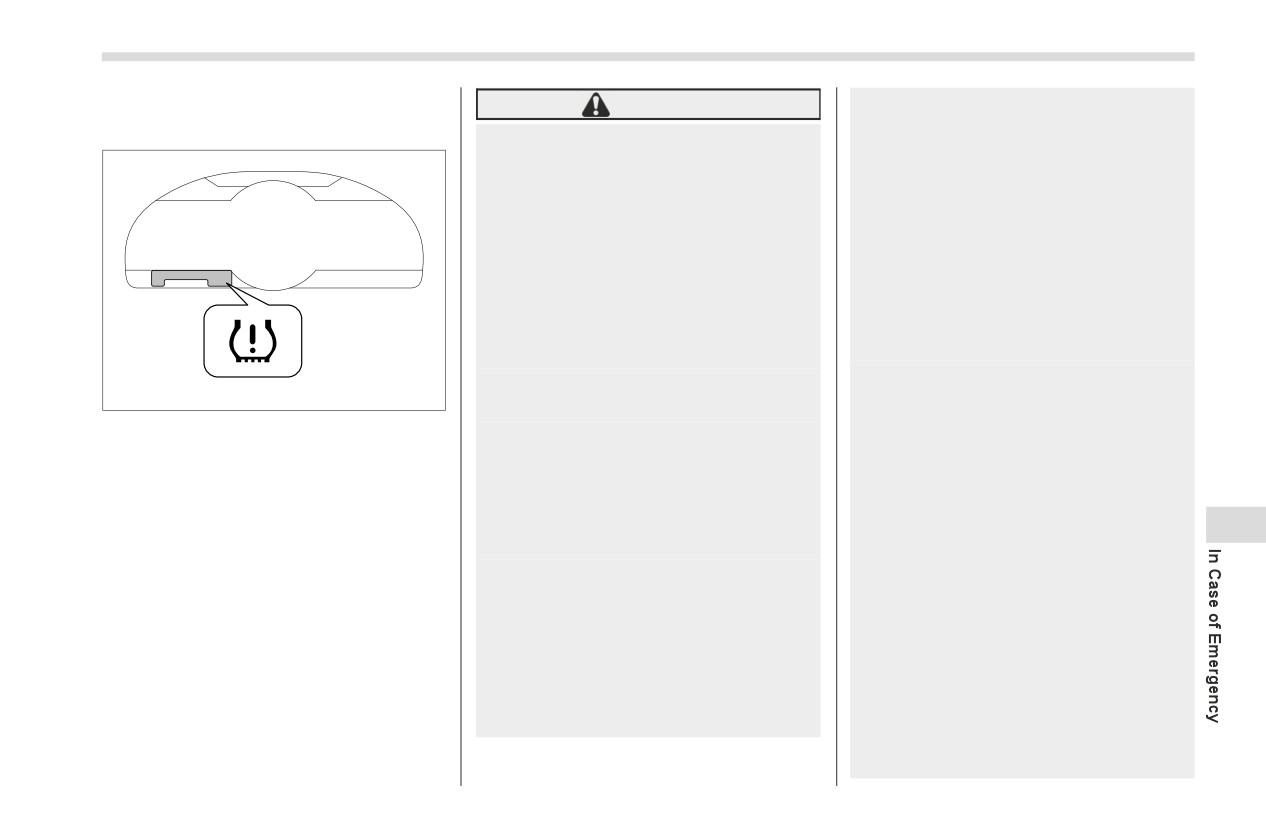
Low tire pressure warning light
(3) Check the pressure for all
operate properly. If a liquid
The tire pressure monitoring system
four tires and adjust the pres-
sealant is used, contact your
provides the driver with the warning
sure to the COLD tire pres-
nearest SUBARU dealer or other
message indicated by sending a signal
sure shown on the vehicle
qualified service shop as soon as
from a sensor that is installed in each
placard on the center pillar on
possible. Make sure to replace
wheel when tire pressure is severely low.
9
the driver’s side.
the tire pressure warning valve
The tire pressure monitoring system will
and transmitter when replacing
activate only when the vehicle is driven.
If this light still illuminates while
the tire. You may reuse the wheel
Also, this system may not react immedi-
driving after adjusting the tire
if there is no damage to it and if
ately to a sudden drop in tire pressure (for
pressure, a tire may have signifi-
the sealant residue is properly
example, a blow-out caused by running
cant damage and a fast leak that
cleaned off.
over a sharp object).
causes the tire to lose air rapidly.
If the light illuminates steadily
If you have a flat tire, replace it
after blinking for approximately
with a spare tire as soon as pos-
one minute, promptly contact a
sible.
SUBARU dealer to have the sys-
tem inspected.
- CONTINUED -
316
Jump Starting
■ TPMS Screen (If Equipped)
9-4. Jump Starting
Whenever working on or around a
battery, always wear suitable eye
■ Battery Precautions
protectors, and remove metal
objects such as rings, bands or
WARNING
other metal jewelry.
Be sure the jumper cables and
Battery fluid is SULFURIC ACID.
clamps on them do not have
Do not let it come in contact with
loose or missing insulation.
the eyes, skin, clothing or the
vehicle.
Do not jump start unless cables in
suitable condition are available.
If battery fluid gets on you, thor-
A running engine can be
oughly flush the exposed area
dangerous. Keep your fingers,
with water immediately. Get med-
702781
ical help if the fluid has entered
hands, clothing, hair and tools
away from the cooling fan, belts
your eyes.
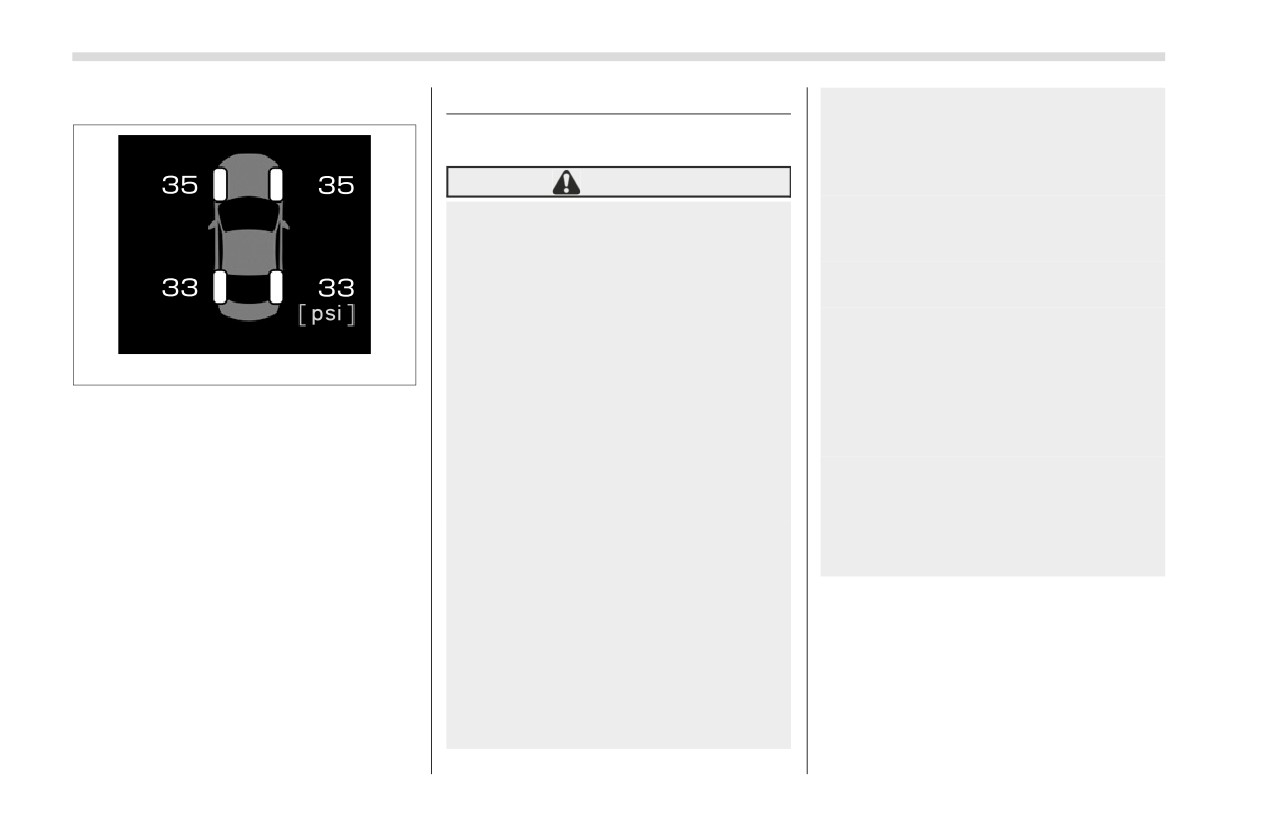
This screen displays each tire pressure.
and any other moving engine
Refer to "Combination Meter Display
If battery fluid is accidentally
parts. Removing rings, watches
(Color TFT)" ) P151.
swallowed, immediately drink a
and ties is advisable.
large amount of milk or water,
Jump starting is dangerous if it is
and obtain immediate medical
done incorrectly. If you are
help.
unsure about the proper proce-
dure for jump starting, consult a
Keep everyone including chil-
competent mechanic.
dren away from the battery.
The gas generated by a battery
explodes if a flame or spark is
When your vehicle does not start due to a
brought near it. Do not smoke or
run down (discharged) battery, the vehicle
light a match while jump starting.
may be jump started by connecting your
Never attempt jump starting if the
battery to another battery
(called the
booster battery) with jumper cables.
discharged battery is frozen. It
could cause the battery to burst
or explode.
Jump Starting
317
■ How to Jump Start
1. Make sure the booster battery is 12
volts and the negative terminal is
grounded.
2. If the booster battery is in another
vehicle, do not let the two vehicles touch.
3. Turn off all unnecessary lights and
accessories.
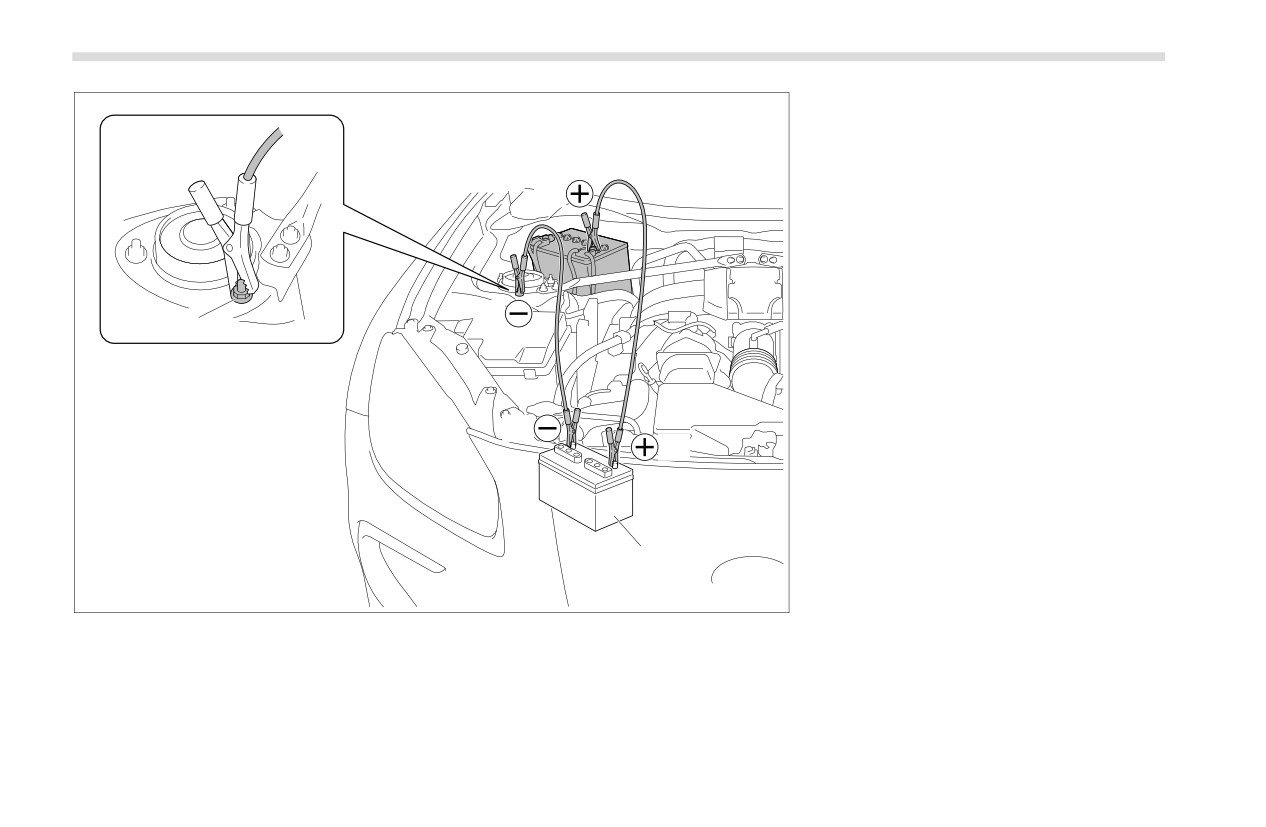
4. Connect the jumper cables exactly in
the sequence illustrated.
9
- CONTINUED -
318
Jump Starting
A) Booster battery
B) Strut mounting nut
1) Connect one jumper cable to the posi-
tive
(+) terminal on the discharged
battery.
(1)
2) Connect the other end of the jumper
cable to the positive (+) terminal of the
booster battery.
3) Connect one end of the other cable to
the negative (í) terminal of the booster
battery.
(4)
4) Connect the other end of the cable to
B
the strut mounting nut.
Make sure that the cables are not near
any moving parts and that the cable
clamps are not in contact with any other
(3)
metal.
(2)
5. Start the engine of the vehicle with the
booster battery and run it at moderate
speed. Then start the engine of the
vehicle that has the discharged battery.
6. When finished, carefully disconnect
A
the cables in exactly the reverse order.
901200
Engine Overheating
319
9-5. Engine Overheating
■ If No Steam Is Coming from
radiator cap, then turn the cap
counterclockwise slowly without pressing
the Engine Compartment
down until it stops. Release the pressure
WARNING
1. Keep the engine running at idling
from the radiator. After the pressure has
Never remove the radiator cap until
speed.
been fully released, remove the cap by
pressing down and turning it.
the engine has been shut off and
2. Open the hood to ventilate the engine
has fully cooled down. When the
compartment. Refer to "Engine Hood"
engine is hot, the coolant is under
) P343.
pressure. Removing the cap while
Confirm that the cooling fan is turning. If
the engine is still hot could release
the fan is not turning, immediately turn off
a spray of boiling hot coolant,
the engine and contact your authorized
which could burn you very seri-
dealer for repair.
ously.
3. After the engine coolant temperature
has dropped, turn off the engine.
If the temperature gauge stays in the over-
CAUTION
heated zone, turn off the engine.
If the engine overheats, the engine
4. After the engine has fully cooled down,
speed or the vehicle speed may be
check the coolant level in the reserve
reduced. Stop the vehicle in a safe
tank.
place immediately.
If the coolant level is below the “LOW”
mark, add coolant up to the “FULL” mark.
9
■ If Steam Is Coming from the
NOTE
Engine Compartment
For details about how to check the
Turn off the engine and get everyone
coolant level or how to add coolant,
away from the vehicle until it cools down.
refer to "Engine Coolant" ) P349.
5. If there is no coolant in the reserve
tank, add coolant to the reserve tank.
Then remove the radiator cap and fill the
radiator with coolant.
If you remove the radiator cap from a hot
radiator, first wrap a thick cloth around the
- CONTINUED -
320
Towing
9-6. Towing
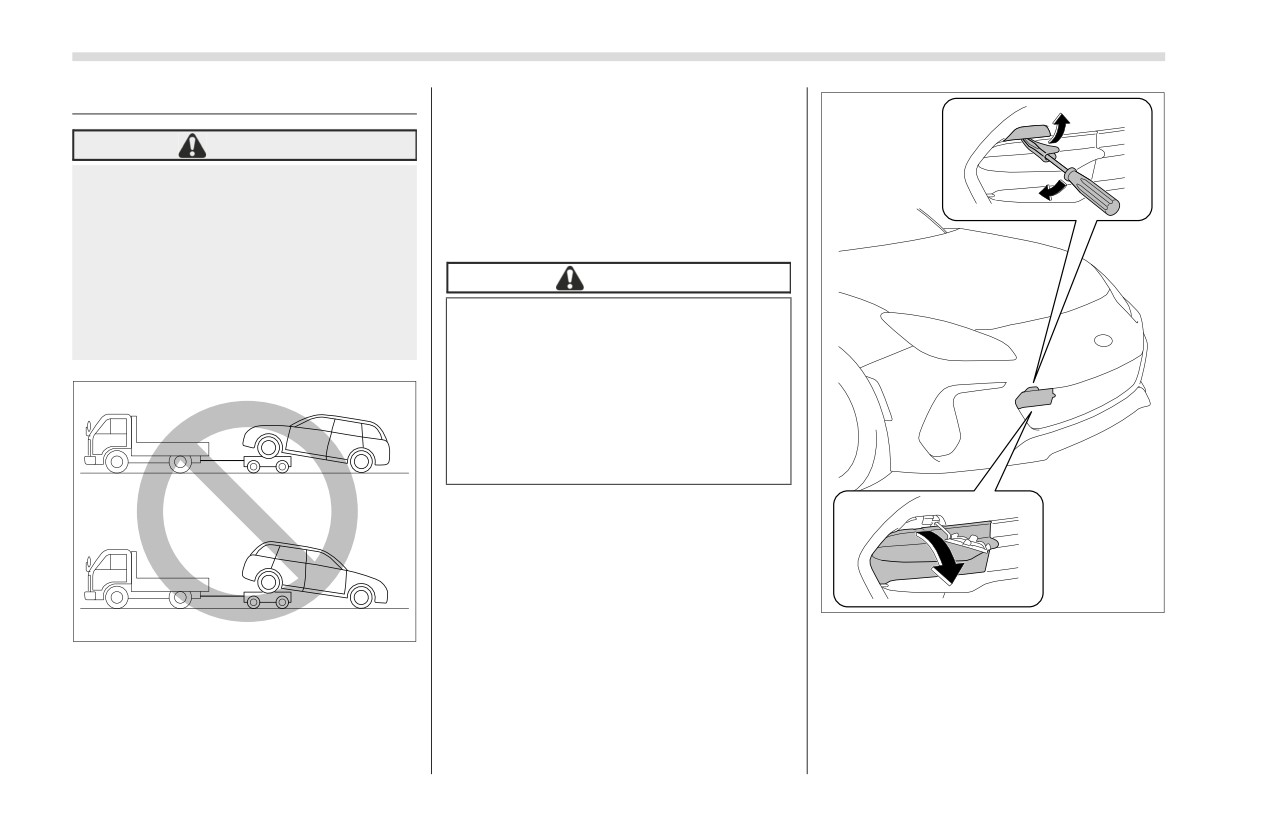
■ Towing Hook and Tie-Down
1
Hooks/Holes
WARNING
The towing hooks should be used only in
an emergency.
Never tow vehicles with the front
SUBARU recommends towing be done
wheels raised off the ground while
by your SUBARU dealer or a commer-
the rear wheels are on the ground,
or with the rear wheels raised off
cial towing service.
the ground while the front wheels
are on the ground.
CAUTION
This will cause the vehicle to dam-
Use only the specified towing
age or cause an accident.
hook and tie-down hooks/holes.
Never use suspension parts or
other parts of the body for towing
or tie-down purposes.
Never use the tie-down hole
closest to the muffler under the
vehicle for towing purposes.
Front towing hook:
2
1. Take out the screwdriver, towing hook
and wheel nut wrench from the under-floor
storage compartment.
901202
901277
1) Upper cover
2) Lower cover
If towing is necessary, SUBARU recom-
mends it be done by your SUBARU dealer
2. Insert a screwdriver, with its tip covered
or a commercial towing service.
with tape or a cloth to prevent damage
to the bumper, into the cutout of the
cover and pry up to separate the upper
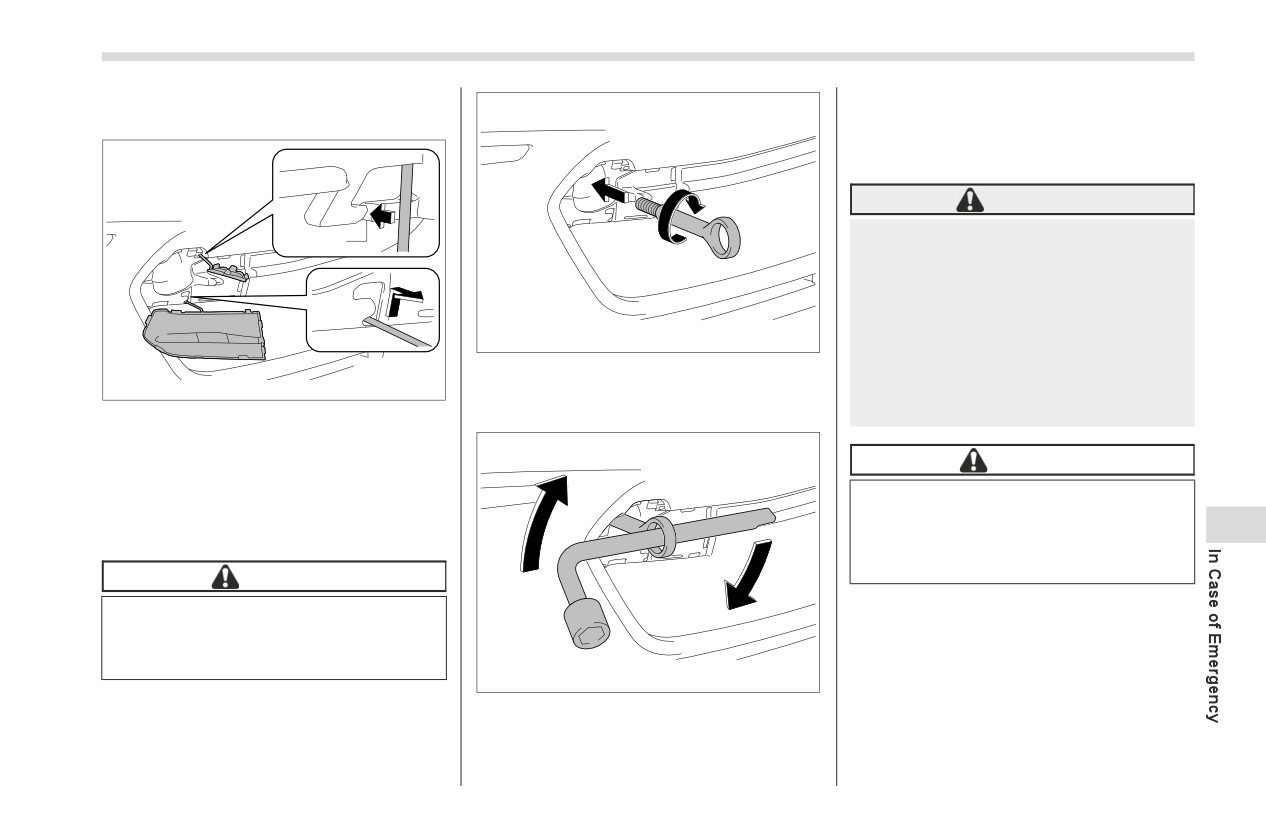
Towing
321
cover. Then, pull the lower cover to
After towing, remove the towing hook from
separate it.
the vehicle and stow it in the under-floor
storage compartment.
Fit the towing hook cover on the bumper.
WARNING
Do not use the towing hook
1
except when towing your vehicle.
Be sure to remove the towing
hook after towing. Leaving the
towing hook mounted on the
901203
vehicle could interfere with
proper operation of the SRS
4.
Screw the towing hook into the
901297
airbag system in a frontal colli-
threaded hole until the threads can no
sion.
1) Slit
longer be seen.
3. Remove the covers from the bumper.
CAUTION
When removing the upper side cover,
align the hook portion of the cover with the
To prevent deformation to the
slit and push it through the slit to remove
bumper and the towing hook, do not
9
the cover.
apply excessive load to the towing
hook.
CAUTION
Rear towing hook:
Do not apply excessive force when
removing the covers. Otherwise,
1. Take out the screwdriver, towing hook,
they may be deformed or damaged.
wheel nut wrench from the under-floor
901204
storage compartment.
5.
Tighten the towing hook securely using
the wheel nut wrench.
- CONTINUED -
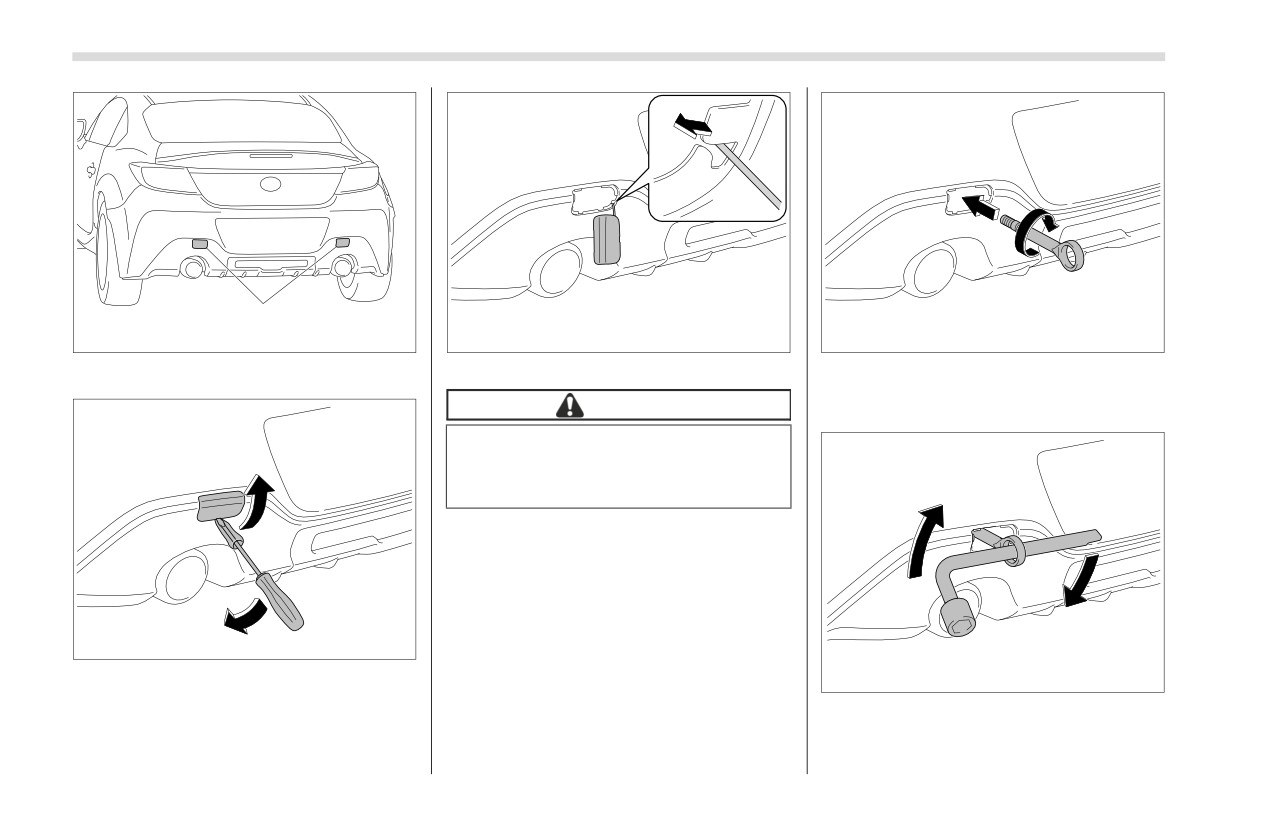
322
Towing
1
901310
901298
901206
1) Towing hook covers
3. Remove the covers from the bumper.
4. Screw the towing hook into the
threaded hole until its thread can no
CAUTION
longer be seen.
Do not apply excessive force when
removing the covers. Otherwise,
they may be deformed or damaged.
901205
2. Pry off the cover on the rear bumper
901207
using a screwdriver, and you will find a
5.Tighten the towing hook securely using
threaded hole for attaching the towing
the wheel nut wrench.
hook.
Towing
323
After towing, remove the towing hook from
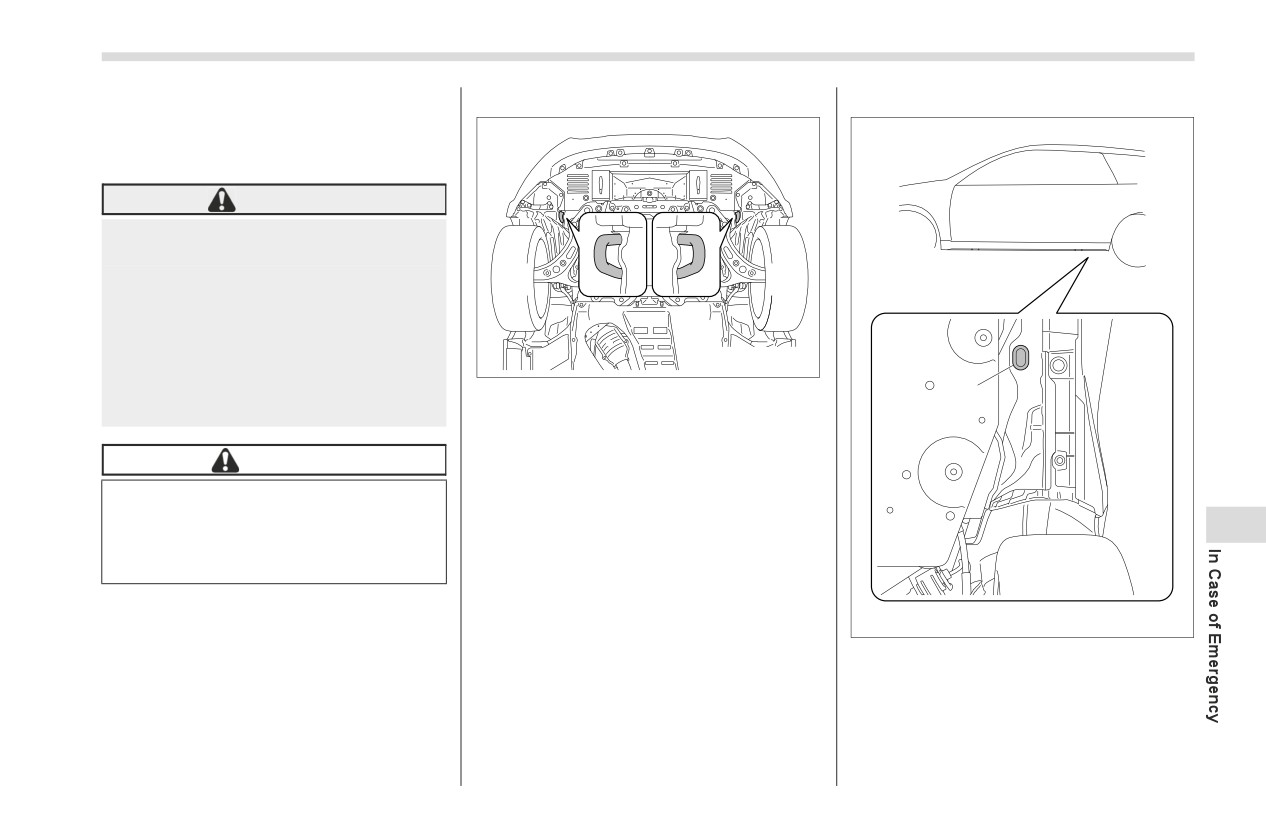
Front tie-down hooks:
Rear tie-down holes:
the vehicle and stow it in the under-floor
storage compartment.
Fit the towing hook cover on the bumper.
WARNING
Do not use the towing hook
except when towing your vehicle.
Be sure to remove the towing
hook after towing. Leaving the
towing hook mounted on the
vehicle could interfere with
proper operation of the fuel pump
901208
shut off function when the vehicle
The front tie-down hooks are located
1
is struck from behind.
between each of the front tires and the
front bumper.
Front Tie-down Hooks are for tying down
CAUTION
the vehicle. They are not for towing.
To prevent deformation to the
bumper and the towing hook, do not
9
apply excessive load to the towing
hook.
901209
1) Rear tie-down hole
The rear tie-down holes are located near
each of the jack-up reinforcements.
There is a plug in each rear tie-down hole.
To use the rear tie-down holes, remove
the plugs. After using the rear tie-down
- CONTINUED -
324
Towing
holes, return the plugs to their original
This is the best way to transport your
■ Towing with All Wheels on
places.
vehicle. Use the following procedures to
the Ground
ensure safe transportation.
WARNING
1. Shift the select lever into the “P” posi-
Use the rear tie-down holes only for
tion for AT models. Shift the shift lever into
downward anchoring. If they are
the 1st position for MT models.
used to anchor the vehicle in any
2. Apply the parking brake firmly.
other direction, cables may slip out
3. Secure the vehicle onto the carrier
of the holes, possibly causing
a
properly with safety chains. Each safety
dangerous situation.
chain should be equally tightened and
care must be taken not to pull the chains
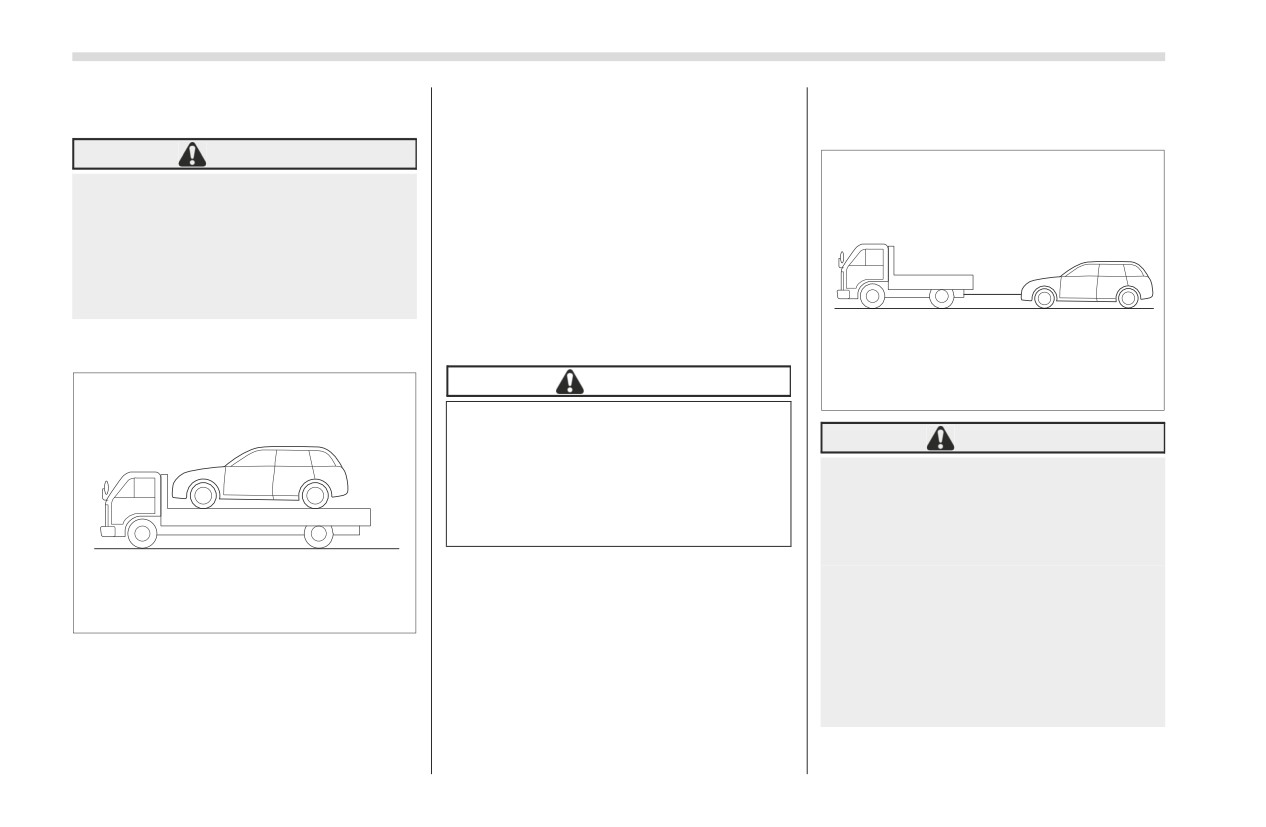
■ Using a Flat-Bed Truck
so tightly that the suspension bottoms out.
CAUTION
900489
Transport by flat-bed truck may
cause the headlights to become
WARNING
misaligned. In such a case, have the
Never turn the ignition switch to
headlight alignment checked by a
the
“OFF” position while the
SUBARU dealer after transporting
vehicle is being towed because
the vehicle by flat-bed truck.
the steering wheel and the direc-
tion of the wheels will be locked.
Remember that the brake booster
and power steering do not func-
900488
tion when the engine is not
running. Because the engine is
turned off, it will take greater
effort to operate the brake pedal
and steering wheel.

Access Key Fob - If Access Key Fob Does Not Operate Properly
325
Use a specific towing rope for
9-7. Access Key Fob - If
CAUTION
towing. If wire ropes and metal
Access Key Fob Does Not
If transmission failure occurs,
chains are needed to be used for
transport your vehicle on a flat-
Operate Properly
towing, wrap the contact portion
bed truck.
of the bumper with cloth to
Sometime damaged vehicles
protect it from damage.
CAUTION
cannot be towed because of their
Keep metallic objects, magnetic
damaged condition. In that case,
1. Release the parking brake and put the
sources and signal transmitters
use a flat-bed truck for transpor-
transmission in neutral.
away from the area between the
tation.
access key fob and the push-button
2. The ignition switch should be in the
The traveling speed must be
ignition switch. They may interfere
limited to less than 20 mph (32
“ON” position while the vehicle is being
with the communication between
km/h) and the traveling distance
towed.
the access key fob and the push-
to less than 19 miles (30 km). For
3. Take up slack in the towline slowly to
button ignition switch.
greater speeds and distances,
prevent damage to the vehicle.
transport your vehicle on a flat-
The following functions may be inoperable
bed truck.
because of strong radio signals in the
Use a flat-bed truck if there are
surrounding area or a low battery condi-
long distance downgrades or
tion of the access key fob.
steep slopes. However, do not
Locking/unlocking doors including
apply the brake pedal for a long
9
trunk
time because the engine braking
will not work while towing. Doing
Switching power status
so could overheat the brake.
Starting engine
Drive carefully and do not make
In such cases, perform the following
an impact on the towing rope by
procedure. When the battery of the
suddenly starting.
access key fob is discharged, replace it
with a new one. Refer to "Replacing
Battery of Access Key Fob" ) P376.
- CONTINUED -
326
Access Key Fob - If Access Key Fob Does Not Operate Properly
■ Locking and Unlocking
■ Switching Power Status
When the keyless access with
push-button start system is deacti-
1. Apply the parking brake.
vated: “ACC”
2. Shift the shift lever into neutral (MT
Under other conditions: “ON”
1
5. When the keyless access with push-
models) or the select lever into the “P”
position (AT models).
button start system is deactivated, press
the push-button ignition switch with the
3. Depress the clutch pedal (MT models)
clutch pedal (MT models) or brake pedal
or brake pedal (AT models).
(AT models) released. The status of the
push-button ignition switch then changes
to “ON”.
2
NOTE
202500
If the power does not switch even
though the above procedure was fol-
1)
Release button
lowed precisely, contact your SUBARU
2)
Emergency key
dealer.
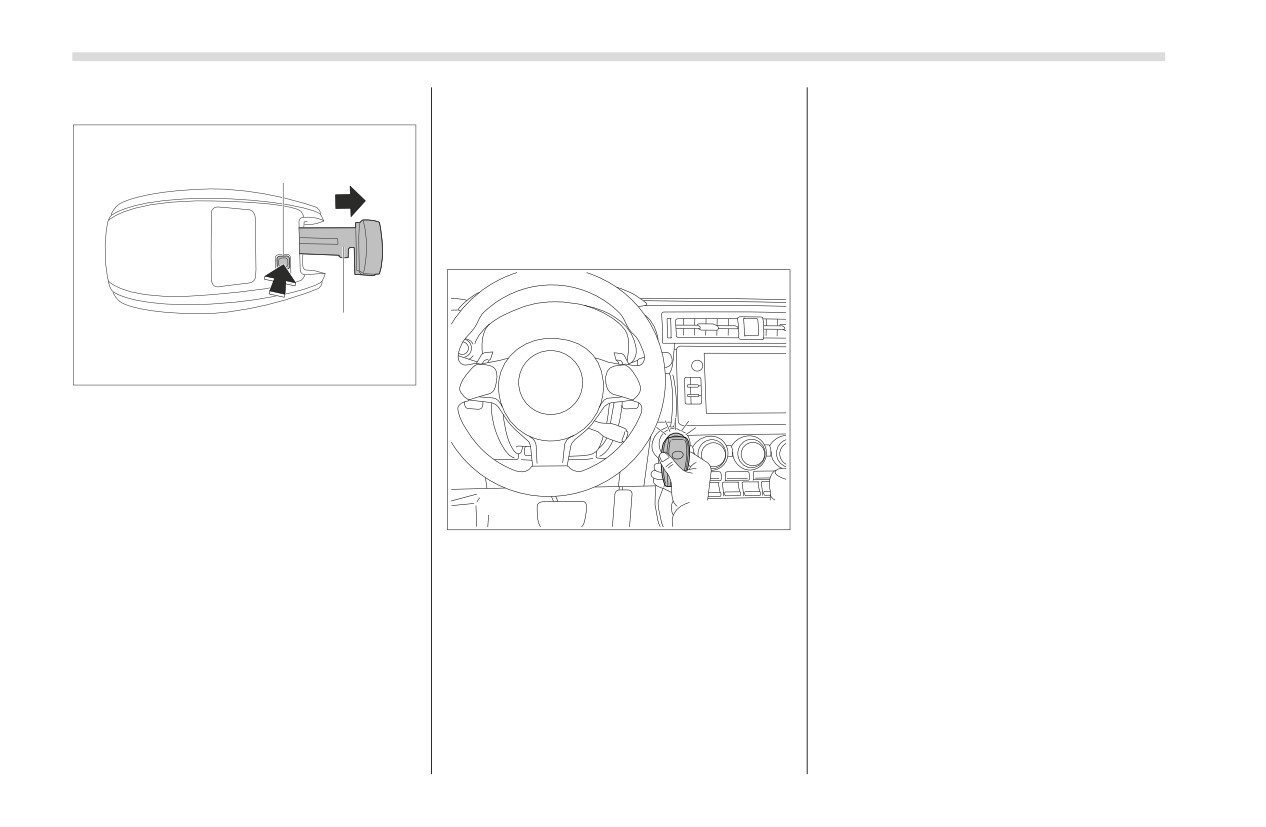
While pressing the release button of the
access key fob, take out the emergency
■ Starting Engine
key.
901210
1. Apply the parking brake.
Lock or unlock the driver’s door with the
2. Shift the shift lever into neutral (MT
emergency key in the procedure
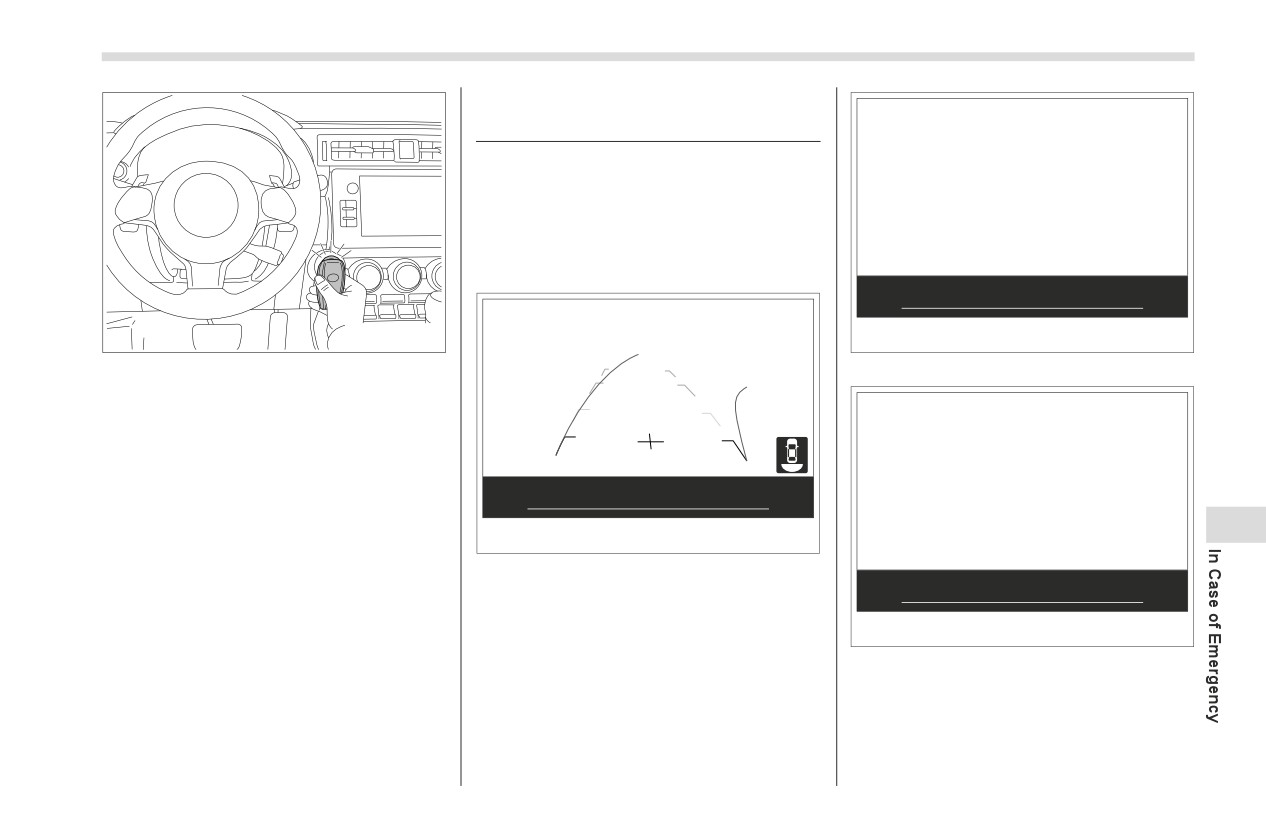
4. Hold the access key fob with the
models) or the select lever into the “P”
described in "Locking and Unlocking from
buttons facing you, and touch the push-
position (AT models).
the Outside" ) P111.
button ignition switch with it.
3. Depress the brake pedal (all models).
When the communication between the
NOTE
4. Depress the clutch pedal
(MT
access key fob and the vehicle is
After locking or unlocking, be sure to
completed, a chime (ding) will sound. At
models).
attach the emergency key back to the
the same time, the status of the push-
access key fob.
button ignition switch changes to either of
the following.
Malfunctions of the Center Information Display
327
9-8. Malfunctions of the
Center Information Display
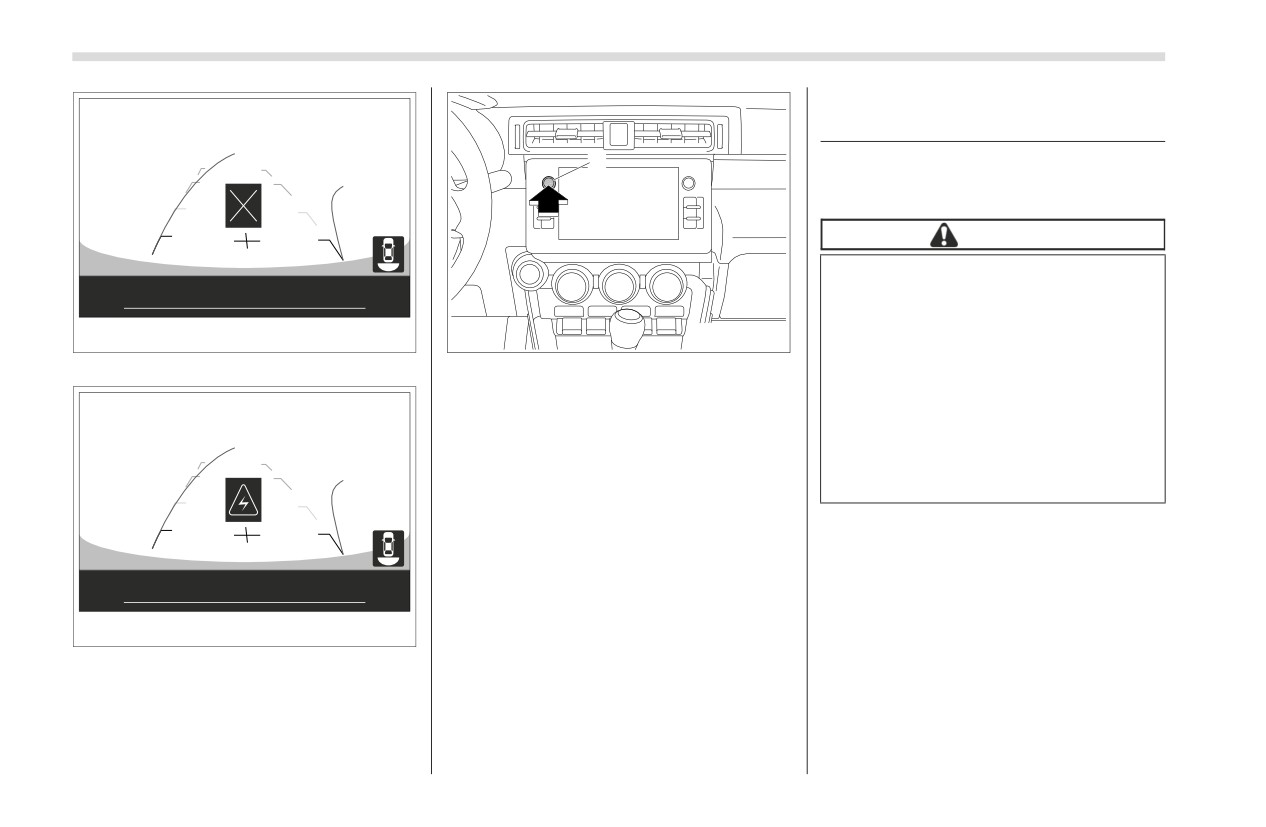
If the following screens are displayed,
temporary errors or malfunctions may
occur in the center information display.
If they are only temporary errors, the
following procedure may help to eliminate
them.
901210
901091
5. Hold the access key fob with the
Freezing the screen
buttons facing you, and touch the push-
button ignition switch with it.
When the communication between the
access key fob and the vehicle is
completed, a chime (ding) will sound. At
the same time, the push-button ignition
switch turns to the “ACC” or “ON” position.
9
6. After the push-button ignition switch
901090
turns to the “ACC” or “ON” position, while
Shutting down the screen
depressing the brake pedal (all models)
and the clutch pedal (MT models), press
the push-button ignition switch.
901092
NOTE
Blacking out the screen
If the engine does not start even
though the above procedure was fol-
lowed precisely, contact your SUBARU
dealer.
- CONTINUED -
328
If Your Vehicle Is Involved in an Accident
9-9. If Your Vehicle Is
Involved in an Accident
1
■ To Restart the Engine When
Involved in an Accident
CAUTION
If your vehicle is involved in an
accident, be sure to inspect the
ground under the vehicle before
901093
901213
restarting the engine. If you find
that fuel has leaked on the ground,
Error A
1) Volume button
do not try to restart the engine. The
fuel system has been damaged and
3. If the center information display
cannot be recovered even though the
is in need of repair. Immediately
engine has been restarted, press and hold
contact the nearest automotive ser-
the volume button for more than
10
vice facility. We recommend that
seconds. The center information display
you consult your SUBARU dealer.
will start up again.
4. If the center information display is not
Your vehicle has a fuel pump shut off
recovered by restarting it, contact your
system. When the vehicle sustains an
SUBARU dealer.
impact in an accident, etc., the fuel pump
shut off system stops supplying the fuel in
order to minimize fuel leakage.
901094
However, depending on the impact condi-
Error B
tions at the time of collision, the fuel pump
shut-off system may not operate.
1. Park the vehicle in a safe place.
2. Turn the ignition switch once to the
“OFF” position, then start the engine.
If Your Vehicle Is Involved in an Accident
329
Perform the following procedures to
restart the engine after the system is acti-
vated.
1. Turn the push-button ignition switch to
the “ACC” or “OFF” position.
2. Restart the engine.
9
Appearance Care
10-1. Exterior Care
332
To Help Prevent Corrosion
334
Washing
332
10-3. Cleaning the Interior
335
Waxing and Polishing
333
Seat Fabric Material
335
Cleaning Alloy Wheels
333
Leather Seat Materials
335
Alloy Wheels (Vehicles with Matte Painted
Synthetic Leather Upholstery
336
Wheels)
334
Instrument Panel, Console Panel, Switches,
10-2. Corrosion Protection
334
Combination Meter, and Other Plastic Surface
336
Most Common Causes of Corrosion
334
Center Information Display
336
10
332
Exterior Care
10-1. Exterior Care
Do not use any organic solvents
with plenty of lukewarm water. Wipe the
remaining water off with a chamois or soft
when washing the surface of the
cloth. Wear rubber gloves and use a hand
■ Washing
bulb assembly cover. However, if
brush when washing down underbody,
a detergent with organic solvents
inner fenders and suspension to effec-
CAUTION
is used to wash the cover surface,
tively remove mud and dirt off.
completely rinse off the detergent
When washing the vehicle, the
with water. Otherwise, the cover
brakes may get wet. As a result,
▼ Washing the underbody
surface may be damaged.
the brake stopping distance will
Chemicals, salts and gravel used for
be longer. To dry the brakes,
deicing road surfaces are extremely corro-
drive the vehicle at a safe speed
NOTE
sive, accelerating the corrosion of under-
while lightly pressing the brake
When having your vehicle washed in
body components, such as the exhaust
pedal to heat up the brakes.
an automatic car wash, make sure
system, fuel and brake lines, brake
Do not wash the engine compart-
beforehand that the car wash is of
cables, floor pan and fenders, and
ment and areas adjacent to it. If
suitable type.
suspension.
water enters the engine air intake
The best way to preserve your vehicle’s
Thoroughly flush the underbody and
or electrical parts, it will cause
beauty is frequent washing. Wash the
inside of the fenders with lukewarm or
engine trouble or a malfunction of
vehicle at least once a month to avoid
cold water at frequent intervals to reduce
the power steering.
contamination by road grime.
the harmful effects of such agents.
When washing inner fenders,
Wash dirt off with a wet sponge and plenty
Mud and sand adhering to the underbody
underbody,
bumpers
and
of lukewarm or cold water. Do not wash
components may accelerate their corro-
protruding objects such as
the vehicle with hot water and in direct
sion.
exhaust pipes and exhaust
sunlight.
After driving off-road or on muddy or
finishers, be careful to prevent
Salt, chemicals, insects, tar, soot, tree
sandy roads, wash the mud and sand off
injuries from contacting sharp
sap, and bird droppings should be washed
the underbody.
ends.
off by using a light detergent, as required.
Carefully flush the suspension and axle
If you use a light detergent, make certain
parts, as they are particularly prone to
that it is a neutral detergent. Do not use
mud and sand buildup. Do not use a
strong soap or chemical detergents. All
sharp-edged tool to remove caked mud.
cleaning agents should be promptly
flushed from the surface and not allowed
to dry there. Rinse the vehicle thoroughly
Exterior Care
333
Be sure to polish and wax the chrome trim,
CAUTION
CAUTION
as well as the painted surfaces. Loss of
Be careful not to damage brake
wax on a painted surface leads to loss of
Do not use any agents with organic
hoses, sensor harnesses, and
the original luster and also quickens the
solvents on the surface of the bulb
other parts when washing
deterioration of the surface. It is recom-
assembly cover. However, if a pol-
suspension components.
mended that a coat of wax be applied at
ish or wax with organic solvents is
least once a month, or whenever the
Be careful not to flush the engine
applied to the cover surface, com-
surface no longer repels water.
bottom for a long time. It may
pletely wipe off the polish or wax.
cause damage of some electrical
If the appearance of the paint has dimin-
Otherwise, the cover surface may
parts.
ished to the point where the luster or tone
be damaged.
cannot be restored, lightly polish the
surface with a fine-grained compound.
▼ Using a warm water washer
NOTE
Never polish just the affected area, but
Keep a good distance of 12 in (30 cm)
include the surrounding area as well.
Be careful not to block the windshield
washer nozzles with wax when waxing
or more between the washer nozzle and
Always polish in only one direction. A No.
the vehicle.
2000 grain compound is recommended.
the vehicle.
Do not wash the same area continu-
Never use a coarse-grained compound.
ously.
Coarser grained compounds have a
■ Cleaning Alloy Wheels
smaller grain-size number and could
Promptly wipe the alloy wheels clean of
If a stain will not come out easily, wash
damage the paint. After polishing with a
any kind of grime or agent. If dirt is left on
by hand. Some warm water washers are
compound, coat with wax to restore the
too long, it may be difficult to clean off.
of the high temperature, high pressure
original luster. Frequent polishing with a
type, and they can damage or deform the
Do not use soap containing grit to clean
compound or an incorrect polishing tech-
resin parts such as moldings, or cause
the wheels. Be sure to use a neutral
nique will result in removing the paint layer
10
water to leak into the vehicle.
cleaning agent, and later rinse thoroughly
and exposing the undercoat. When in
with water. Do not clean the wheels with a
doubt, it is always best to contact your
■ Waxing and Polishing
stiff brush or expose them to a high-speed
SUBARU dealer or an auto paint
washing device.
Always wash and dry the vehicle before
specialist.
waxing and polishing.
Clean the vehicle (including the alloy
wheels) with water as soon as possible
Use a good quality polish and wax and
when it has been splashed with sea water,
apply them according to the manufac-
exposed to sea breezes, or driven on
turer’s instructions. Wax or polish when
roads treated with salt or other agents.
the painted surface is cool.
- CONTINUED -
334
Corrosion Protection
Do not use detergent on the wheels
10-2. Corrosion Protection
though other parts of the vehicle may be
when they are hot, such as after driving or
dry.
parking in hot weather.
Your SUBARU has been designed and
High temperatures will cause corrosion
built to resist corrosion. Special materials
to parts of the vehicle which cannot dry
■ Alloy Wheels (Vehicles with
and protective finishes have been used on
quickly due to lack of proper ventilation.
most parts of the vehicle to help maintain
Matte Painted Wheels)
fine appearance, strength, and reliable
■ To Help Prevent Corrosion
As matte painted wheels require different
operation.
cleaning methods than conventional alloy
Wash the vehicle regularly to prevent
wheels, be sure to observe the following.
corrosion of the body and suspension
■ Most Common Causes of
For details, consult your SUBARU dealer.
components. Also, wash the vehicle
Corrosion
promptly after driving on any of the
Remove dirt using water. If the wheels
are excessively dirty, use a sponge or soft
The most common causes of corrosion
following surfaces.
cloth dampened with a diluted neutral
are:
Roads that have been salted to prevent
detergent to remove the dirt.
The accumulation of moisture retaining
them from freezing in winter
To prevent the matte paint from being
dirt and debris in body panel sections,
Mud, sand, or gravel
damaged, make sure to observe the
cavities, and other areas.
Coastal roads
following precautions:
Damage to paint and other protective
After the winter has ended, it is recom-
- Do not scrub or polish the wheels
coatings caused by gravel and stone
mended that the underbody be given a
using a brush or dry cloth.
chips or minor accidents.
very thorough washing.
- Do not use any wheel coatings or
Corrosion is accelerated on the vehicle
Before the beginning of winter, check the
abrasive detergents.
when:
condition of underbody components, such
It is exposed to road salt or dust control
as the exhaust system, fuel and brake
chemicals, or used in coastal areas where
lines, brake cables, suspension, steering
there is more salt in the air, or in areas
system, floor pan, and fenders. If any of
where there is considerable industrial
them are found to be rusted, they should
pollution.
be given an appropriate rust prevention
It is driven in areas of high humidity,
treatment or should be replaced. Contact
especially when temperatures range just
your SUBARU dealer to perform this kind
above freezing.
of maintenance and treatment if you need
Dampness in certain parts of the
assistance.
vehicle remains for a long time, even
Repair chips and scratches in the paint as
soon as you find them.
Cleaning the Interior
335
Check the interior of the vehicle for water
10-3. Cleaning the Interior
NOTE
and dirt accumulation under the floor mats
As the color of the meter visor may
because that could cause corrosion.
Use a soft, damp cloth to clean the climate
transfer, do not place anything on top
Occasionally check under the mats to
control panel, audio equipment, instru-
of it.
make sure the area is dry.
ment panel, center console, combination
Keep your garage dry. Do not park your
meter panel, and switches. (Do not use
■ Leather Seat Materials
vehicle in a damp, poorly ventilated
organic solvents.)
The leather used by SUBARU is a high
garage. In such a garage, corrosion can
quality natural product which will retain its
be caused by dampness. If you wash the
■ Seat Fabric Material
distinctive appearance and feel for many
vehicle in the garage or put the vehicle
Remove loose dirt, dust or debris with a
years with proper care.
into the garage when wet or covered with
vacuum cleaner. If the dirt is caked on the
snow, that can cause dampness.
Allowing dust or road dirt to build up on the
fabric or hard to remove with a vacuum
surface can cause leather to become
If your vehicle is operated in cold weather
cleaner, use a soft brush then vacuum it.
brittle and wear prematurely. To maintain
and/or in areas where road salts and other
Wipe the fabric surface with a tightly
its resiliency, leather should be cleaned
corrosive materials are used, the door
wrung cloth and dry the seat fabric thor-
monthly or whenever it becomes soiled.
hinges and locks, trunk lid lock, and hood
oughly. If the fabric is still dirty, wipe using
Before cleaning leather upholstery,
latch should be inspected and lubricated
a solution of mild soap and lukewarm
vacuum it to remove dust. Use a soft and
periodically.
water then dry thoroughly.
lint-free cloth dampened with lukewarm
If the stain does not come out, try a
water and mild soap, taking care not to
commercially available fabric cleaner. Use
soak the leather or allow water to pene-
the cleaner on a hidden place and make
trate the stitched seams. Use a gentle
sure it does not affect the fabric adversely.
circular motion while cleaning the leather -
Use the cleaner according to its instruc-
do not rub or apply extreme pressure.
10
tions.
Wipe the leather again with another clean,
slightly damp cloth to remove soap
CAUTION
residue and dry with a soft cloth.
When cleaning the seat, do not use
Minor surface blemishes or difficult dirt
benzine, paint thinner, or any simi-
spots may be treated with a commercial
lar materials. Doing so could dam-
leather spray. Never use alcohol, cleaning
age the surface and cause the color
solvents, leather oils, varnishes or
to deteriorate.
polishes on your leather as it will dry out
the leather finish.
- CONTINUED -
336
Cleaning the Interior
If your SUBARU is to be parked for a long
■ Instrument Panel, Console
CAUTION
time in bright sunlight, it is recommended
Panel, Switches, Combina-
that the seats and headrests be covered,
Do not spray neutral detergent
or the windows shaded, to prevent fading
tion Meter, and Other Plastic
directly onto the monitor. Doing
or shrinkage.
Surface
so could damage the monitor’s
You will discover that each leather seat
Use a soft, damp cloth to clean the instru-
components.
section will develop soft folds or wrinkles,
ment panel, center console, combination
Do not wipe the monitor with a
which is characteristic of genuine leather.
meter panel, and switches.
hard cloth. Doing so could
scratch the monitor.
■ Synthetic Leather Upholstery
CAUTION
Do not use cleaning fluid that
The synthetic leather material used on the
Do not use organic solvents such
contains thinner, fuel, or any
SUBARU may be cleaned using mild soap
other volatile substance. Such
as paint thinners or gasoline, or
or detergent and water, after first vacu-
cleaning fluid could erase the
strong cleaning agents that
uming or brushing away loose dirt. Allow
contain those solvents. Doing so
lettering on the switches at the
the soap to soak in for a few minutes and
could damage the surface and
bottom of the monitor.
wipe off with a clean, damp cloth.
cause the color to deteriorate.
Commercial foam-type cleaners suitable
Do not use chemical solvents that
for synthetic leather materials may be
contain silicone on the vehicle
used when necessary.
audio system, electrical compo-
nents of the air-conditioner or
CAUTION
any switches. If silicone adheres
to these parts, it may cause
Strong cleaning agents such as sol-
damage to electrical compo-
vents, paint thinners, window
nents.
cleaner or gasoline must never be
used on leather or synthetic interior
materials. Doing so could damage
■ Center Information Display
the surface and cause the color to
To clean the center information display,
deteriorate.
wipe it with a silicone cloth or with a soft
cloth. If the monitor is extremely dirty,
clean it with a soft cloth moistened with
neutral detergent then carefully wipe off
any remaining detergent.
Maintenance and Service
11-1. Maintenance Schedule
339
11-14. Brake Fluid
353
11-2. Maintenance Precautions
339
Checking the Fluid Level
353
Before Checking or Servicing in the Engine
Recommended Brake Fluid
354
Compartment
340
11-15. Clutch Fluid (MT models)
354
When Checking or Servicing in the Engine
Checking the Fluid Level
354
Compartment
340
Recommended Clutch Fluid
355
When Checking or Servicing in the Engine
11-16. Brake Booster
355
Compartment While the Engine Is Running
341
11-17. Brake Pedal
356
11-3. Maintenance Tips
341
11-18. Clutch Pedal (MT models)
356
Removing and Reinstalling Clips
341
11-19. Replacement of Brake Pad and Lining
356
11-4. Engine Hood
343
Breaking-in of New Brake Pads and Linings
357
11-5. Engine Compartment Overview
345
11-20. Parking Brake Stroke
357
11-6. Engine Oil
346
11-21. Tires and Wheels
358
Engine Oil Consumption
346
Types of Tires
358
Checking the Oil Level
346
Tire Pressure Monitoring System (TPMS)
Changing the Oil and Oil Filter
347
(If Equipped)
358
Recommended Grade and Viscosity
347
Tire Inspection
360
Synthetic Oil
348
Tire Pressures and Wear
361
11-7. Cooling System
348
Wheel Balance
363
Cooling Fan, Hose and Connections
348
Wear Indicators
363
Engine Coolant
349
Rotational Direction of Tires
364
11-8. Air Cleaner Element
350
Tire Rotation
364
Replacing the Air Cleaner Element
350
Tire Replacement
365
11-9. Spark Plugs
352
Wheel Replacement
365
Recommended Spark Plugs
352
11-22. Alloy Wheels
366
11
11-10. Drive Belt
352
11-23. Windshield Washer Fluid
366
11-11. Automatic Transmission Fluid
352
11-24. Replacement of Wiper Blades
367
Recommended Grade and Viscosity
352
Windshield Wiper Blade Assembly
368
11-12. Differential Gear Oil
353
Windshield Wiper Blade Rubber
369
Recommended Grade and Viscosity
353
11-25. Battery
370
11-13. Manual Transmission Oil
353
11-26. Fuses
371
Recommended Grade and Viscosity
353
11-27. Installation of Accessories
373