Subaru Ascent (2023 year). Manual in english - page 2
32
Seats
WARNING
WARNING
WARNING
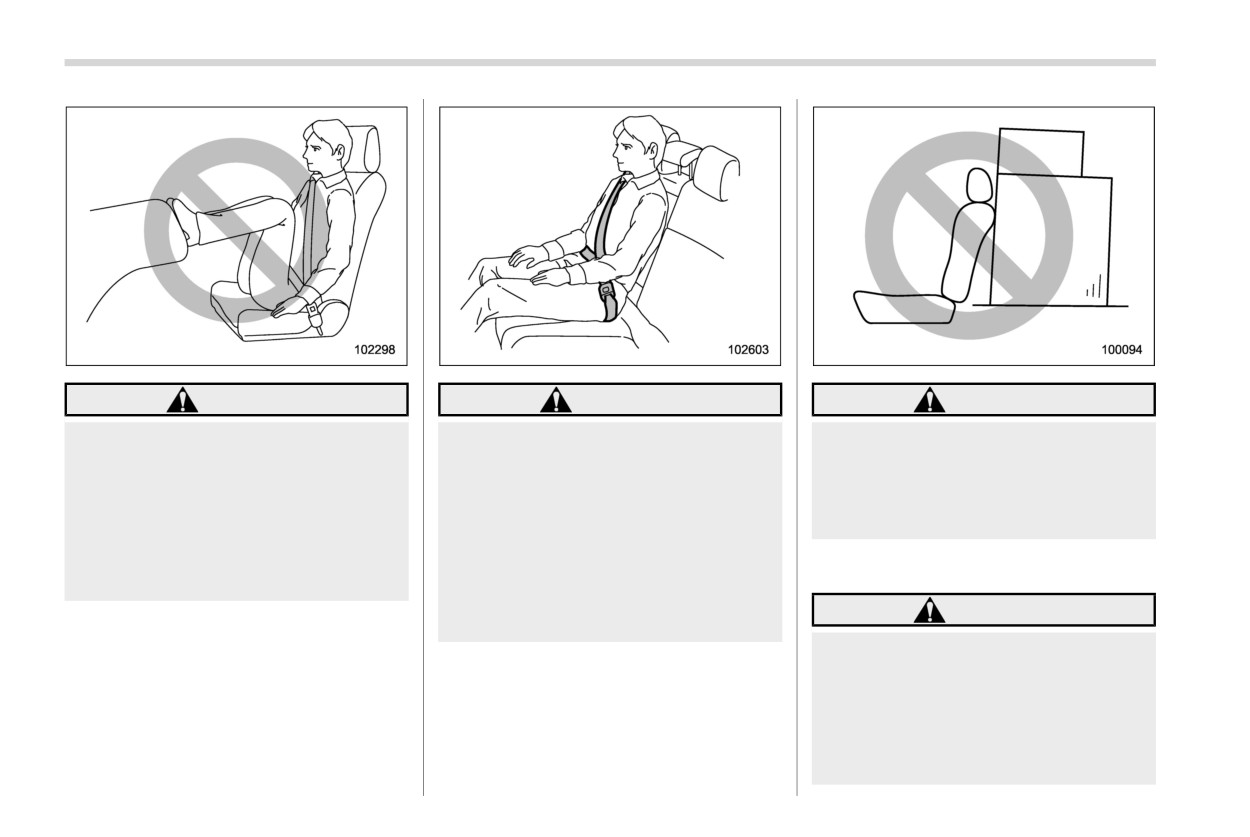
Do not press your feet or legs into
Seatbelts provide maximum re-
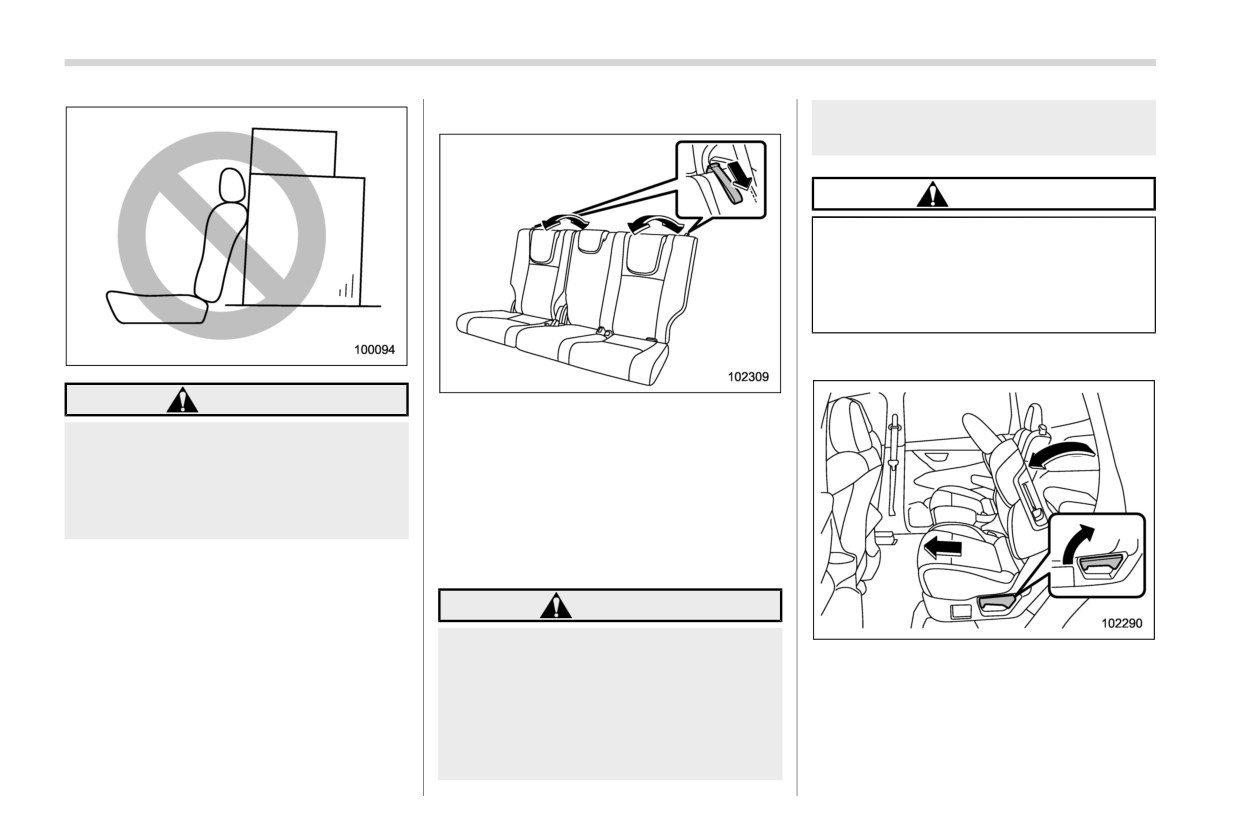
Never stack luggage or other cargo
the instrument panel. Doing so may
straint when the occupant sits back
higher than the top of the seatback
prevent the occupant detection
and upright in the seat. Do not place
as it could tumble forward and injure
function of the SRS airbag system
cushions or any other materials
passengers in the event of a sudden
and front passenger’s SRS frontal
between occupants and seatbacks
stop or accident.
airbag from functioning correctly.
or seat cushions. By doing so, the
This may result in serious injury or
risk of sliding under the lap belt and
! Safety tips for head restraint
death in the event of an accident.
of the lap belt sliding up over the
abdomen will increase, and both can
WARNING
result in serious injury or death.
. Never drive the vehicle with the
head restraints removed because
they are designed to reduce the
risk of serious neck injury in the
event that the vehicle is struck
from the rear. Also, never install
the head restraints the opposite
Seats
33
way round. Doing so will prevent
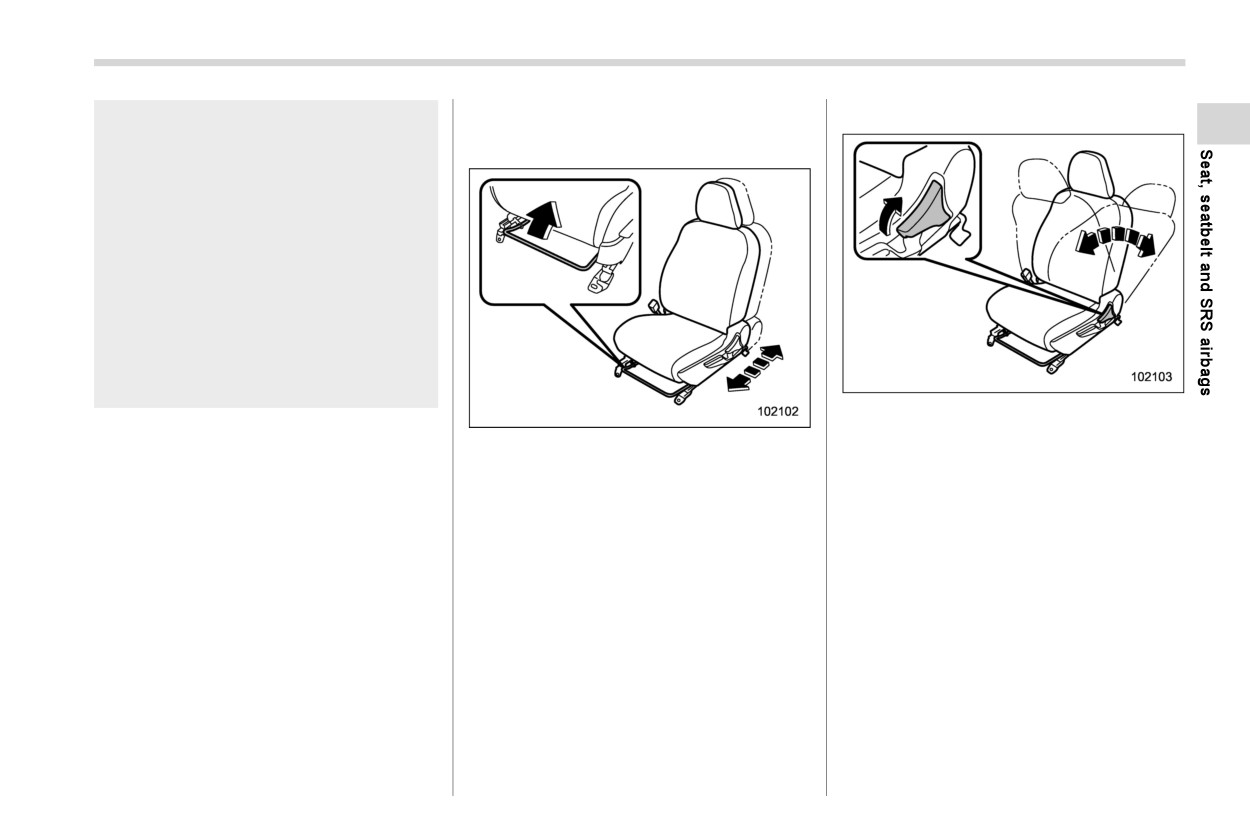
& Manual seat (if equipped)
! Reclining the seatback
the head restraints from function-
! Forward and backward adjustment
ing as intended. Therefore, when
you remove the head restraints,
you must reinstall all head re-
straints correctly to protect vehi-
cle occupants.
All occupants, including the dri-
ver, should not operate a vehicle
or sit in a vehicle’s seat until the
head restraints are placed in their
proper positions in order to mini-
mize the risk of neck injury in the
event of a crash.
Pull the reclining lever up and adjust the
seatback to the desired position. Then
Pull the lever upward and slide the seat to
release the lever and make sure the
the desired position. Then release the
seatback is securely locked into place.
lever and try to move the seat back and
The seatback placed in a reclined position
forth to make sure that it is securely locked
can spring back upward with force when
into place.
the lever is pulled. While operating the
lever to return the seatback, hold the
seatback lightly so that it may be raised
back gradually.
- CONTINUED -
34
Seats
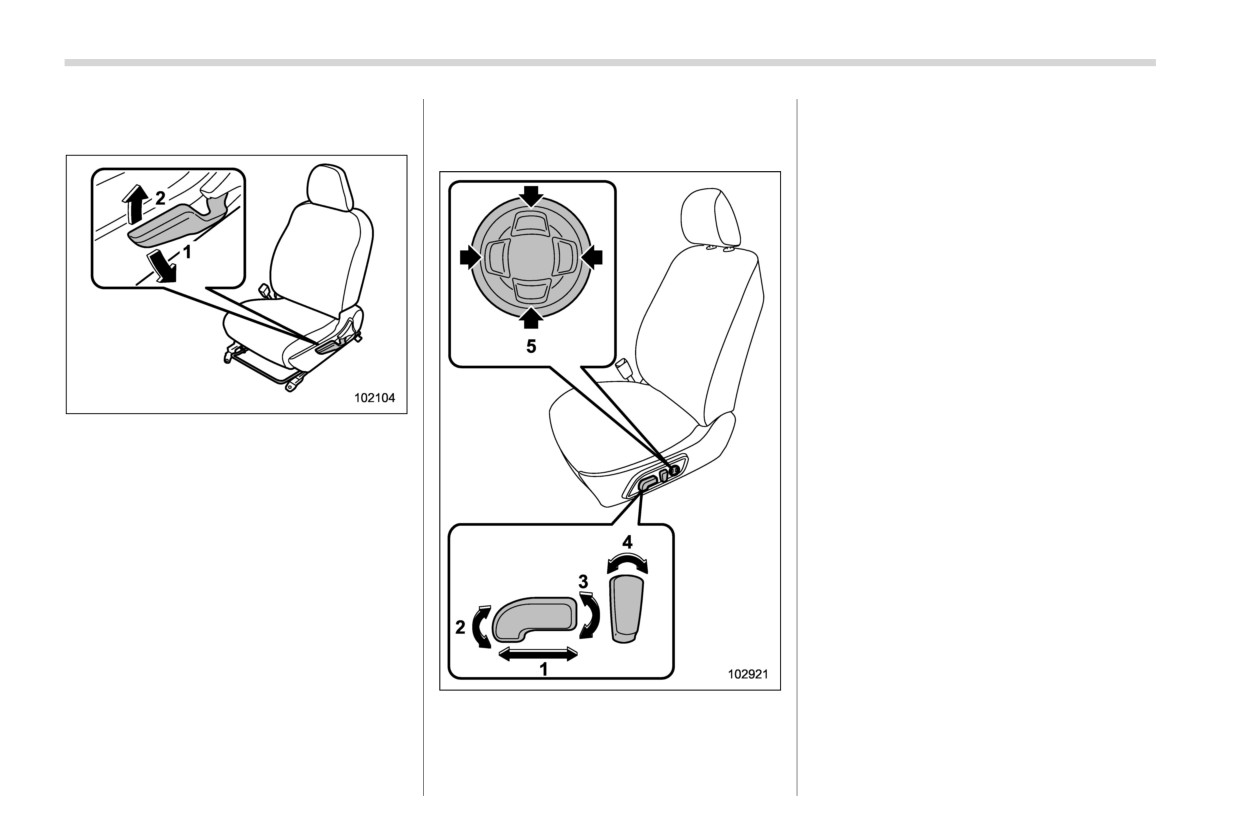
! Seat height adjustment (driver’s
& Power seat (if equipped)
backward. During forward/backward ad-
justment of the seat, you cannot adjust
seat)
! Driver’s seat
the seat cushion angle or seat cushion
height.
2
Seat cushion angle control switch
To adjust the seat cushion angle, pull up
or push down the front end of the control
switch.
3
Seat height control switch
To adjust the seat height, pull up or push
down the rear end of the control switch.
4
Seatback angle (reclining) control
switch
To adjust the angle of the seatback, move
the control switch.
5
Lumbar support control switch (if
equipped)
1
When the lever is pushed down, the seat
To increase lower back support, push the
is lowered.
front side of the switch.
2
When the lever is pulled up, the
seat
To decrease lower back support, push
rises.
the rear side of the switch.
To adjust the lumbar support height, push
The height of the seat can be adjusted by
the upper or lower side of the switch.
moving the seat adjustment lever up and
down.
1
Seat position forward/backward con-
trol switch
To adjust the seat forward or backward,
move the control switch forward or
Seats
35
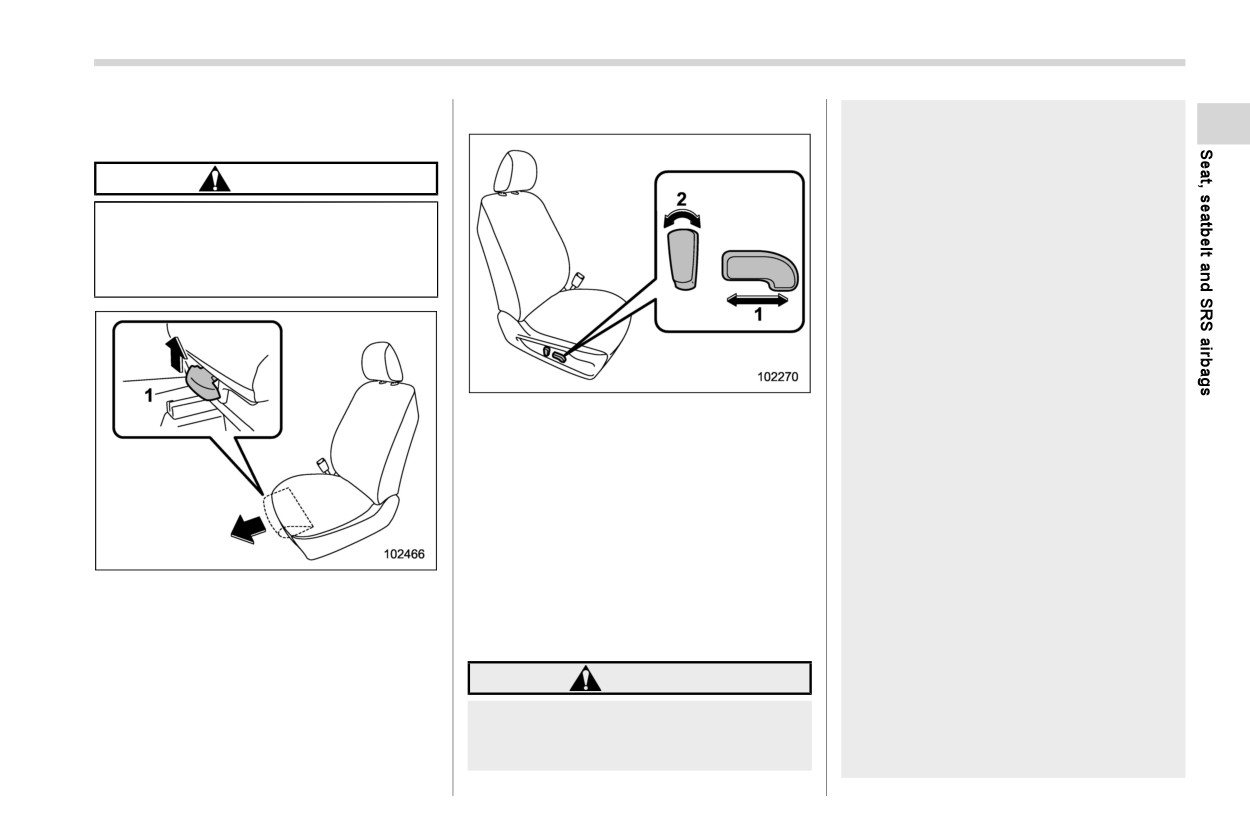
! Thigh extension (driver’s seat - if
! Front passenger’s seat
driving.
equipped)
- Adjusting the seat
- Selecting a registered seat
CAUTION
position
When the thigh extension is pulled
Before adjusting the seat or se-
out to its fullest, do not put weight on
lecting a registered seat position,
the top of it. Doing so could break
make sure that cargo or the
the part.
hands and feet of rear seat pas-
sengers are clear of the adjusting
mechanism.
The memory adjustment of the
seat position is finished. Be sure
to confirm that the select lever is
1
Seat position forward/backward con-
in the “P” position, and the park-
trol switch
ing brake is applied, when adjust-
To adjust the seat forward or backward,
ing the seat position. Do not drive
move the control switch forward or
until the utilizing of the seat
backward.
position is complete.
2
Seatback angle (reclining) control
switch
When any unusual conditions or
To adjust the angle of the seatback, move
malfunctions occur during the
the control switch.
memory adjustment of the seat
position, stop the memory ad-
The seat front length can be adjusted.
! Power driver’s seat with synchro-
justment of the seat position by
Pull up the lever “1” to adjust the length
nized outside mirrors memory
performing any of the following
and release the lever to lock it.
function (if equipped)
procedures.
- Operate any of the power seat
WARNING
switches.
To avoid loss of vehicle control or
- Press the “SET” button.
personal injury, never perform
- Press button “1” or “2”.
the following operations while
- Operate the outside mirror
- CONTINUED -
36
Seats
control switch.
. The select lever is in the “P” position.
! Registration of the reverse tilt-
down mirror angle with button
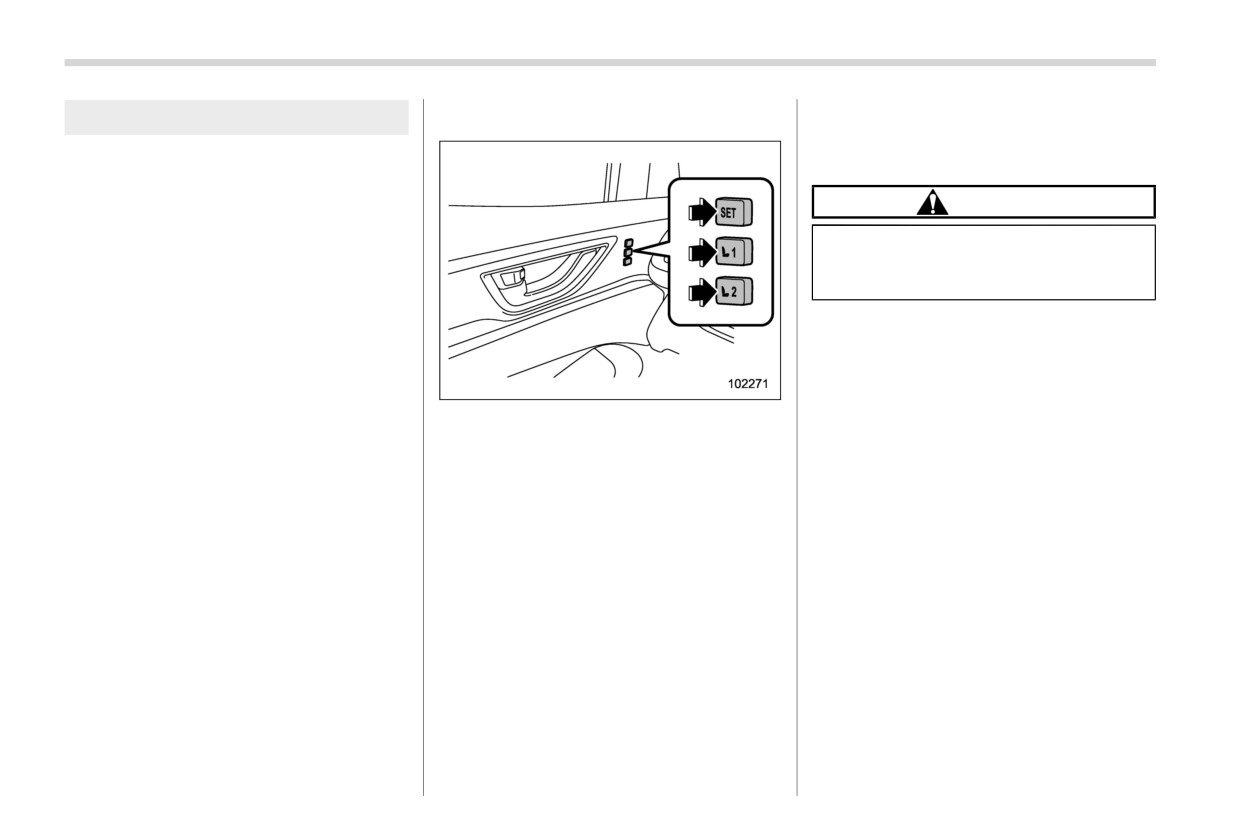
Register the seat position with button “1” or
“1” or “2”
“2” or each of the key fobs.
CAUTION
The following memory positions can be
registered.
Depress the brake pedal when re-
. Forward/backward position of the seat
gistering the reverse tilt-down mir-
. Angle of the seatback
ror angle.
. Angle of the seat cushion
. Height of the seat
1.
Move the select lever to the
“R”
. Angle of the outside mirrors
position, then the outside mirror angle
on the passenger’s side will move to
. Angle of the outside mirror angle on the
the reverse tilt-down position.
passenger’s side when the reverse tilt-
down operates.
2.
Adjust the outside mirror angle on the
2.
Register the adjusted positions
by
passenger’s side. For details about the
either of the following procedures.
NOTE
settings, refer to “Remote control mir-
. Press the “SET” button, then press
The seat position can also be retrieved
ror switch” FP270.
either “1” or “2” until a chirp sounds
with the Driver Monitoring System user
3.
Move the select lever to the
“P”
within 5 seconds.
information. To do so, perform user
position, then the outside mirror angle
. While pressing and holding the
registration in the Driver Monitoring
will return to its original position.
“SET” button, press either “1” or “2”
System settings. Refer to “Driver Mon-
4.
Register the adjusted positions by
until a chirp sounds within 5 sec-
itoring System” FP222.
either of the following procedures.
onds.
. Press the “SET” button, then press
! Registration of memory position
A chirp will sound once, and the seat
either “1” or “2” until a chirp sounds
with button “1” or “2”
position and outside mirror angle on the
within 5 seconds.
1. Adjust the seat and outside mirror
passenger’s side will be registered.
. While pressing and holding the
positions under the following condi-
“SET” button, press either “1” or “2”
tions.
NOTE
until a chirp sounds within 5 sec-
. The parking brake is applied.
If a new position is registered for the
onds.
. The ignition switch is in the “ON”
same button, the previously registered
position.
memory position is deleted.
Seats
37
A chirp will sound once, and the seat
! Registration of the reverse tilt-
position and outside mirror angle on the
down mirror angle with the key
passenger’s side will be registered.
fob
NOTE
CAUTION
The outside mirror angle will return
Depress the brake pedal when re-
to its original position approxi-
gistering the reverse tilt-down mir-
mately 9 seconds after the select
ror angle.
lever is moved to any position other
than “R” position.
The factory setting (default setting)
1.
Move the select lever to the
“R”
position, then the outside mirror angle
for this function is set as the front
will move to the reverse tilt-down
passenger’s side mirror. The setting
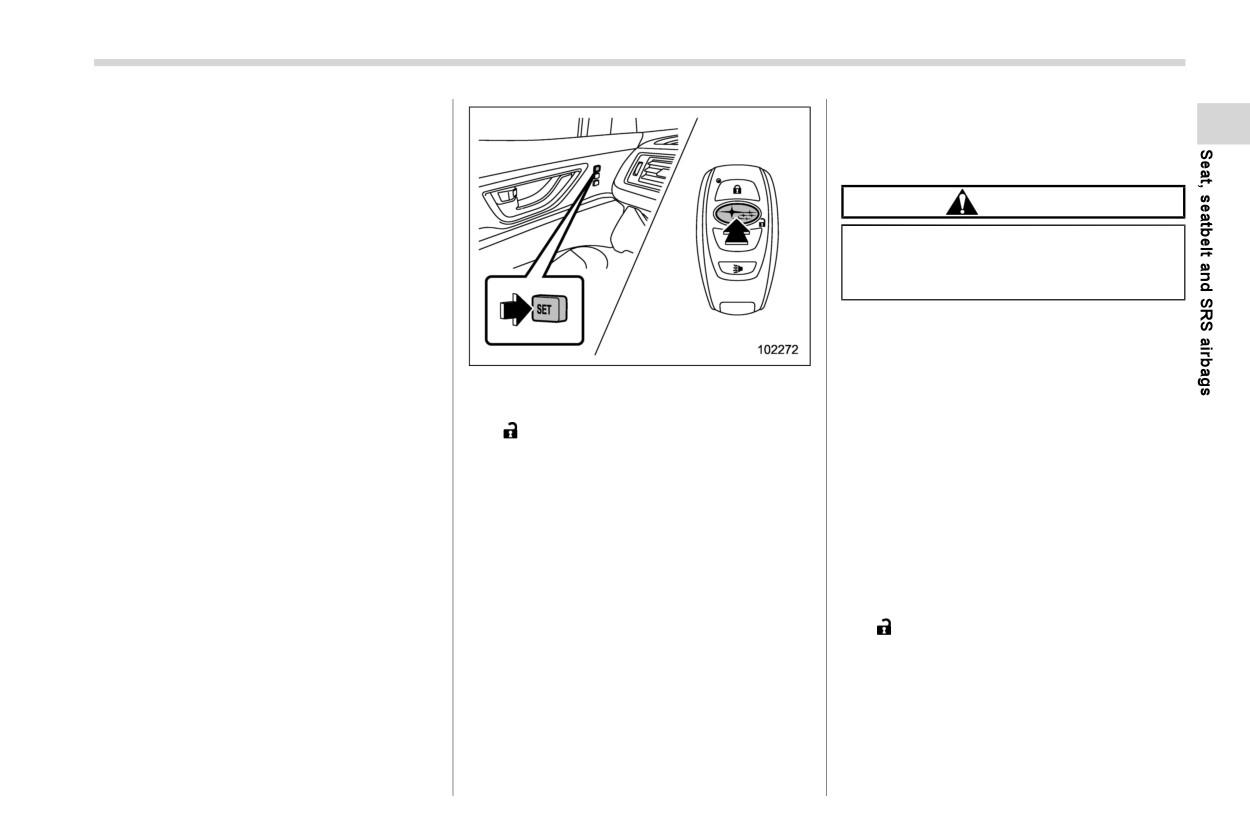
2. Hold the access key fob and press and
position.
of the driver’s side mirror operation
hold the “SET” button. Then press the
2.
Adjust the outside mirror angle. For
can be changed by a SUBARU deal-
“
” button of the access key fob.
details about the settings, refer to
er. Contact your SUBARU dealer for
details.
“Remote control mirror switch” FP270.
A chirp will sound once, and the memory
3.
Move the select lever to the
“P”
position is registered.
! Registration of memory position
position, then the outside mirror angle
with an access key fob (if
NOTE
will return to its original position.
equipped)
When registering the seat position,
4.
Turn the ignition switch to the “OFF”/
1.
Adjust the memory position under the
carry the access key that you want to
“LOCK” position.
following conditions.
register with you. If you are carrying 2
5.
Hold the access key fob and press and
. The parking brake is applied.
or more access keys, registration may
hold the “SET” button, then press the
. The ignition switch is in the “LOCK”/
not be possible.
“
” button of the access key fob.
“OFF” position.
A chirp will sound once, and the reverse
. The select lever is in the “P” position.
tilt-down mirror angle will be registered.
- CONTINUED -
38
Seats
NOTE
involving serious injury or death.
When the button “1” or “2” is
pressed within 45 seconds after the
The outside mirror angle will return
driver’s door is opened, the regis-
to its original position approxi-
tered memory position can be re-
mately 9 seconds after the select
trieved even if the ignition switch is
lever is moved to any position other
in the “LOCK” or “OFF” position.
than “R” position.
If buttons “1” and “2” are pressed at
The factory setting (default setting)
the same time, execution of seat
for this function is set as the front
position retrieval may not be possi-
passenger’s side mirror. The setting
ble.
of the driver’s side mirror operation
When the retrieved position is the
can be changed by a SUBARU deal-
same as the current seat position, a
er. Contact your SUBARU dealer for
chirp will sound twice.
details.
The system stores the adjusted
! Utilizing of the seat position
mirror angle for approximately 45
registered with access key fob
seconds after the ignition switch is
1.
Turn the
ignition
switch
to
the
“ON”
turned to the “OFF” position. Regis-
position.
1.
Hold the registered access key fob.
ter the mirror angle while the mem-
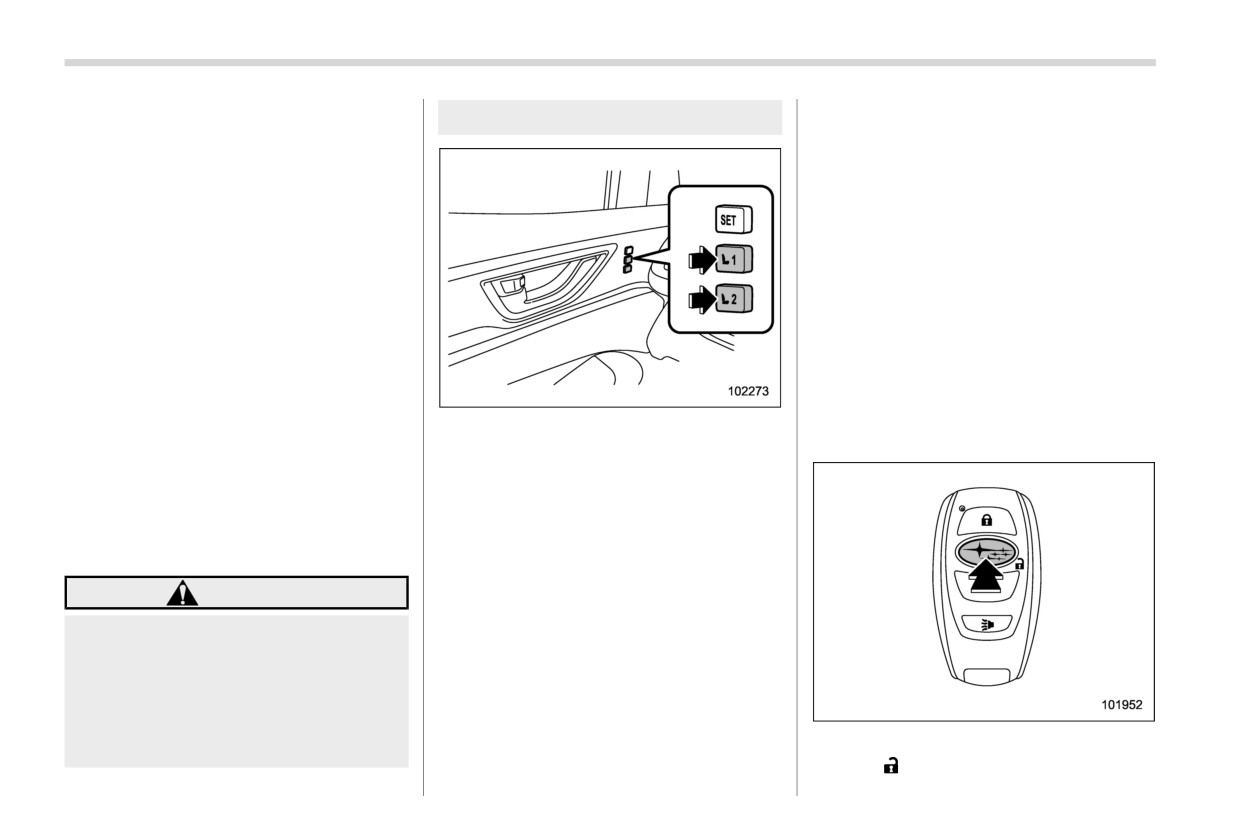
2.
Put the select lever is in the “P” position
ory function is available.
and apply the parking brake. Then
press button “1” or “2”.
! Utilizing of memory position
registered with button “1” or “2”
A chirp will sound and the seat and angle
of the outside mirrors moves to the
registered position.
WARNING
When the select lever is moved to the “R”
Be sure to press the correct button
position, the outside mirror will move to the
to retrieve your registered memory
registered reverse tilt-down position.
position. If the seat position is not
optimum for you, it may adversely
NOTE
affect your driving and may reduce
. If the vehicle battery is removed, the
the effectiveness of the seatbelt.
registered memory position data will
2.
Unlock the driver’s door by pressing
That could result in an accident
not be deleted.
the “
” button or gripping the door
Seats
39
handle.
. If a new position is registered for the
& Second-row seats
3. Open the driver’s door.
same access key fob, the previously
registered seat position is deleted.
A chirp sounds and the seat moves to the
. If you are carrying 2 or more access
registered position.
keys, seat position retrieval may not
When the select lever is moved to the “R”
be possible.
position, the outside mirror will move to the
registered reverse tilt-down position.
! Clearing the registered seat posi-
tion with access key fob
NOTE
1. Close the driver’s door.
If the registered seat position cannot
2. While holding the access key fob and
be retrieved after performing the
pressing the “SET” button, press the
previous procedures, try the follow-
“
” button on the access key fob.
ing procedures.
(1) Press the “SET” button on the
A chirp will sound, and the registered seat
driver’s door.
position will be cleared.
WARNING
(2) Press the
“ ” button on the
NOTE
access key fob or touch the
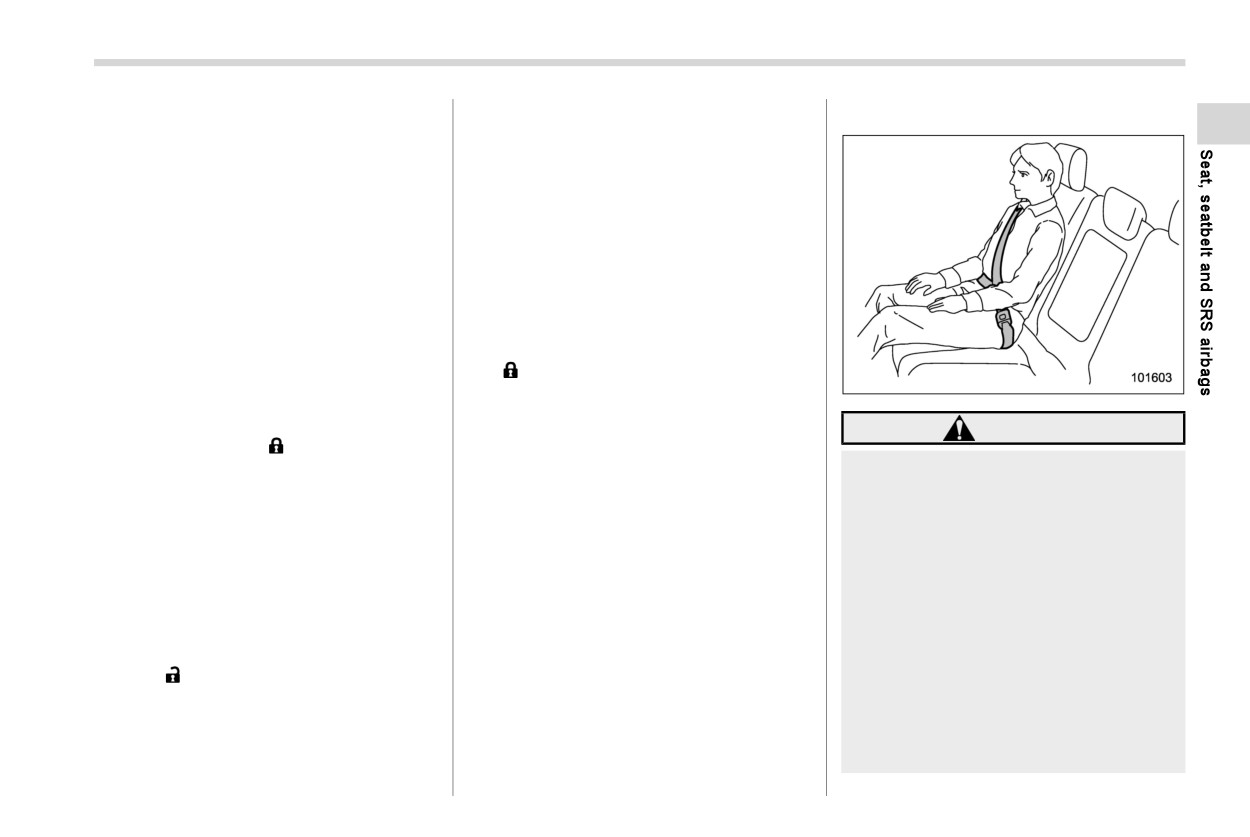
Seatbelts
provide maximum re-
door lock sensor to lock the
After deleting the seat position, wait for
straint when the occupant sits
doors.
a few moments before registering a
back and upright in the seat. Do
(3) Perform the prior procedures
new seat position.
not place cushions or any other
again.
materials between occupants
If the keyless access function is
and seatbacks or seat cushions.
disabled, the seat position cannot
By doing so, the risk of sliding
be retrieved by gripping the driver’s
under the lap belt and of the lap
door handle. However, the seat posi-
belt sliding up over the abdomen
tion can still be retrieved by pressing
will increase, and both can result
the “
” button on the access key
in serious injury or death.
fob. For information about how to
Never adjust the seat while driv-
enable/disable the keyless access
ing. Doing so is dangerous as the
function, refer to “Disabling keyless
seat could move rapidly and you
access function” FP127.
could be injured.
- CONTINUED -
40
Seats
Before adjusting the seat, make
WARNING
sure the hands and feet of the
third-row seat passengers are
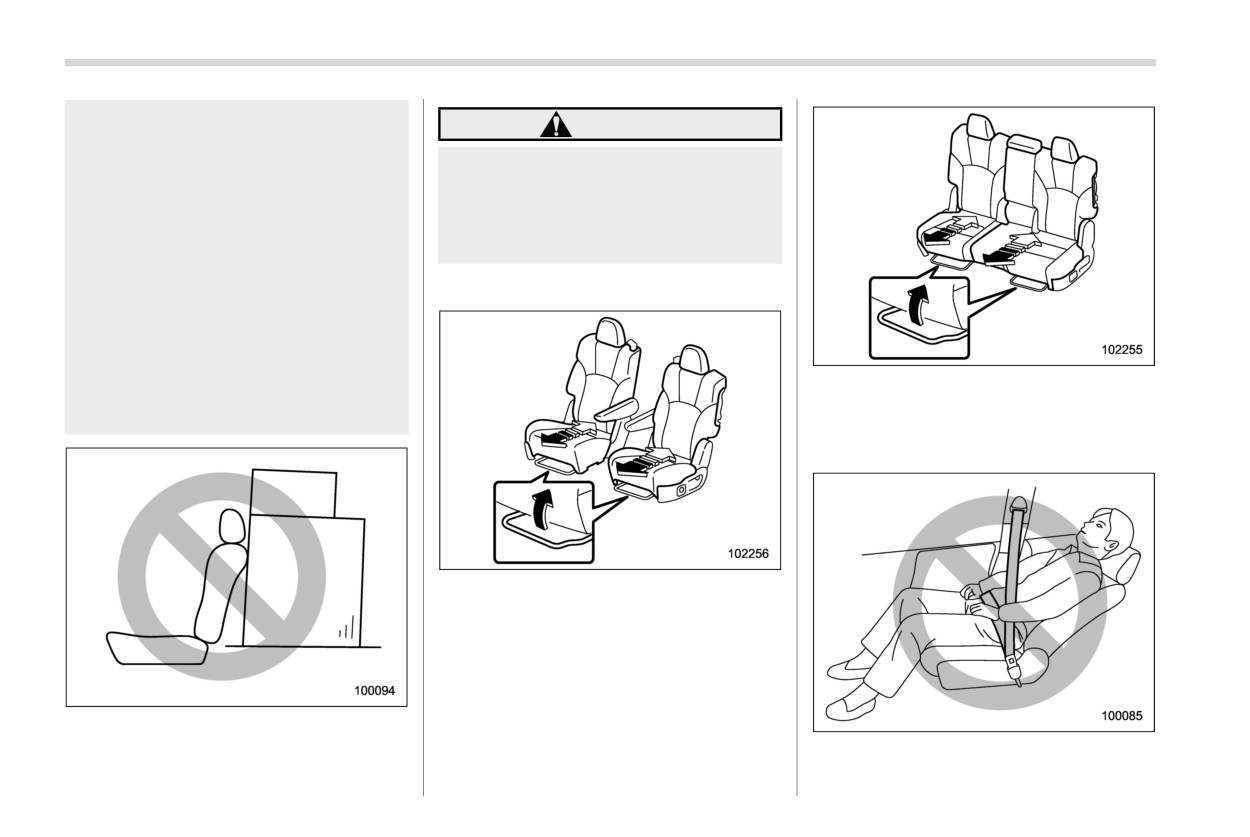
Never stack luggage or other cargo
clear of the adjusting mechan-
higher than the top of the seatback
ism.
as it could tumble forward and injure
After adjusting the seat, move it
passengers in the event of a sudden
back and forth to make sure it is
stop or accident.
securely locked. If the seat is not
securely locked, it may move or
! Forward and backward adjustment
the seatbelt may not operate
properly.
Do not put objects under the
second-row seats. They may in-
Bench seat
terfere with the seat locking and
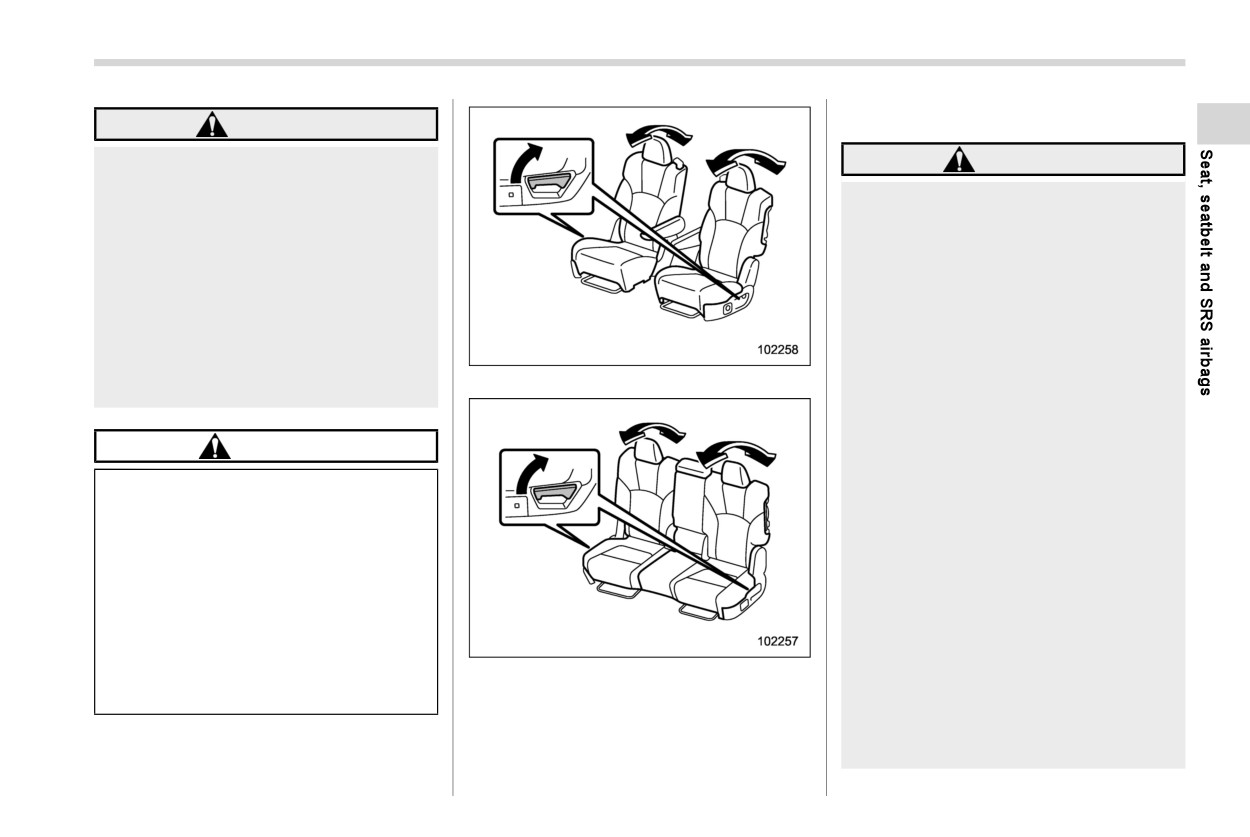
Pull the lever upward and slide the seat to
cause an accident.
the desired position.
! Reclining the seatback
Captain seat
41
Seats
! Folding down the seatback
WARNING
To prevent the passenger from slid-
WARNING
ing under the seatbelt in the event of
Never allow passengers to ride
a collision, always put the seatback
on the folded seatback or in the
in the upright position while the
cargo area. Doing so may result
vehicle is in motion. Also, do not
in serious injury or death.
place objects such as cushions
between the passenger and the seat-
Secure skis and other long items
back. If you do so, the risk of sliding
properly to prevent them from
under the lap belt and of the lap belt
being thrown around inside the
sliding up over the abdomen will
vehicle and causing serious in-
increase, and both can result in
jury during a sudden stop, steer-
Captain seat
serious internal injury or death.
ing maneuver or acceleration.
If passengers are sitting on the
third-row seat, never drive while
CAUTION
folding the second-row seat. It
can be a serious interference at
Never allow the third-row seat
the time of braking and impact.
passengers to adjust the seat-
back of the second row. Doing so
If passengers are sitting on the
is dangerous as the seatback will
third-row seat, never drive while
tilt rapidly and could injure the
the center seatback of the sec-
passengers.
ond-row seat is folded. Doing so
may result in serious injury in the
If the cargo area cover is
event of hard braking or an
equipped, be careful not to pinch
impact.
your hand between the headrest
and the cargo area cover when
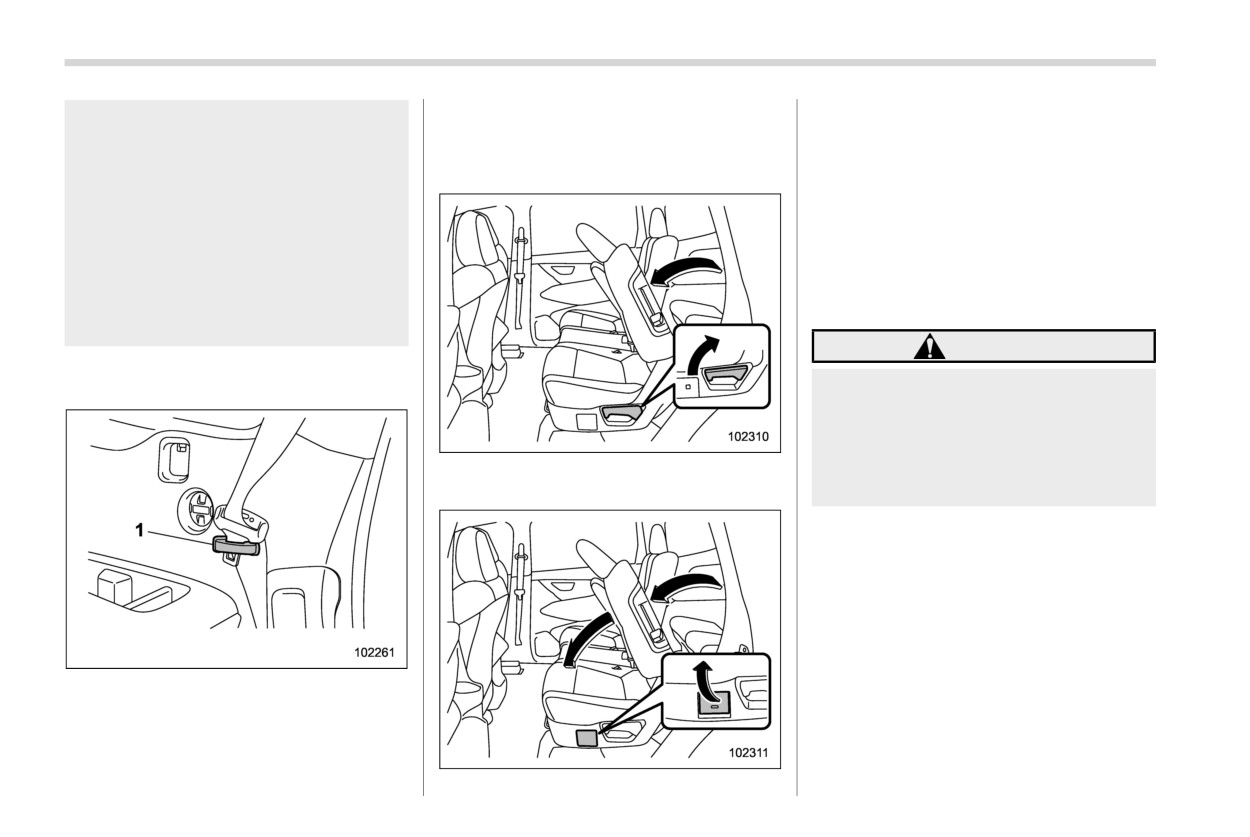
Bench seat
When you return the seatback to
you recline the seatback.
Pull the lever up and adjust the seatback to
its original position, shake it
slightly to confirm that it is se-
the desired position.
curely in place. If it is not securely
Then release the lever and make sure the
fixed in place, it may suddenly
seatback is securely locked into place.
- CONTINUED -
42
Seats
fold down in the event of sudden
the holder.
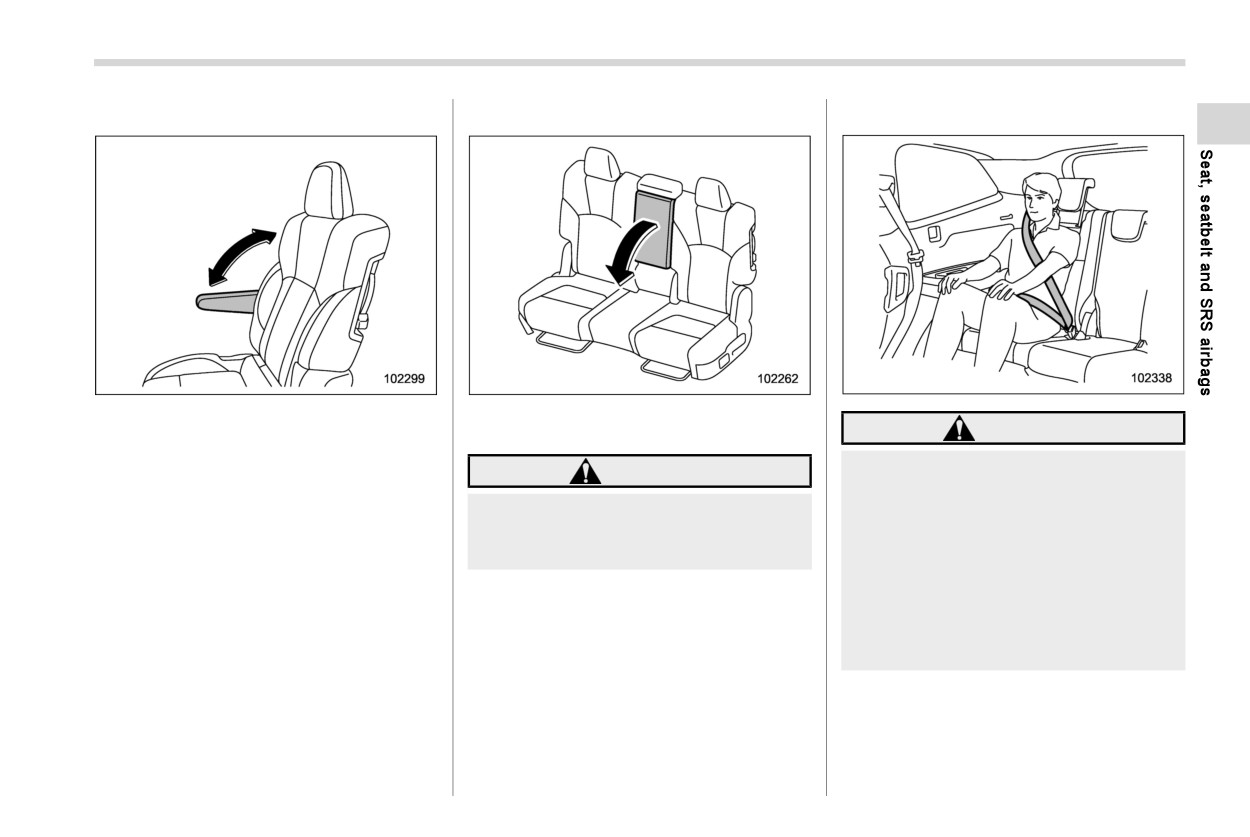
6. Pull the lever to unlock the seatback.
braking, or objects may move out
4.
Lower the headrest to the storage
The seatback will be folded down.
from the cargo area. Both could
position.
Refer to
“Head restraints”
7. Slide the folded second seats back-
cause serious injury or death.
FP47.
ward until they lock.
After returning the seatback to its
8. To return the seatback to its original
original position, be sure to place
position, raise the seatback until it
all of the seatbelts and the tab
locks into place. Make sure it is
attached to the seat cushion
securely locked.
above the seat cushion. Also,
make certain that the shoulder
! Armrest
belts are fully visible.
WARNING
1.
Store the armrest.
Do not hook the seatbelt onto the
2.
Store the seatbelt buckle.
armrest when the seatbelt is fas-
tened. The seatbelt may be unable to
fulfill its intended function in the
event of an accident, possibly re-
5.
Pull the
lever
and
tilt
the
seatback
sulting in serious injury.
forward.
1
Holder
3. Store the window-side seatbelt in the
holder to prevent it from being da-
maged. When using it, pull it out from
Seats
43
! Captain seat
! Bench seat
& Third-row seats
Lower the armrest to use it.
To lower the armrest, pull on the armrest’s
To lower the armrest position:
top edge.
WARNING
First lift it all the way to the top position,
Seatbelts provide maximum re-
WARNING
then lower it to the bottom position.
straint when the occupant sits back
To raise the armrest position:
To avoid serious injury, passengers
and upright in the seat. Do not place
Lift the armrest from the bottom position to
must never sit on the center armrest
cushions or any other materials
the desired height.
while the vehicle is in motion.
between occupants and seatbacks
or seat cushions. By doing so, the
risk of sliding under the lap belt and
of the lap belt sliding up over the
abdomen will increase, and both can
result in serious injury or death.
- CONTINUED -
44
Seats
! Third-row seats
so may result in serious injury or
death.
CAUTION
When getting into or out of the third-
row seat, make sure the second-row
seat is in the completely slid-for-
ward position and be sure to watch
your step.
! To access the third-row seat
WARNING
Pull the strap up and adjust the seatback to
the desired position. Then release the
Never stack luggage or other cargo
strap and make sure the seatback is
higher than the top of the seatback,
as it could tumble forward and injure
securely locked into place.
passengers in the event of a sudden
! Access to the third-row seats
stop or accident.
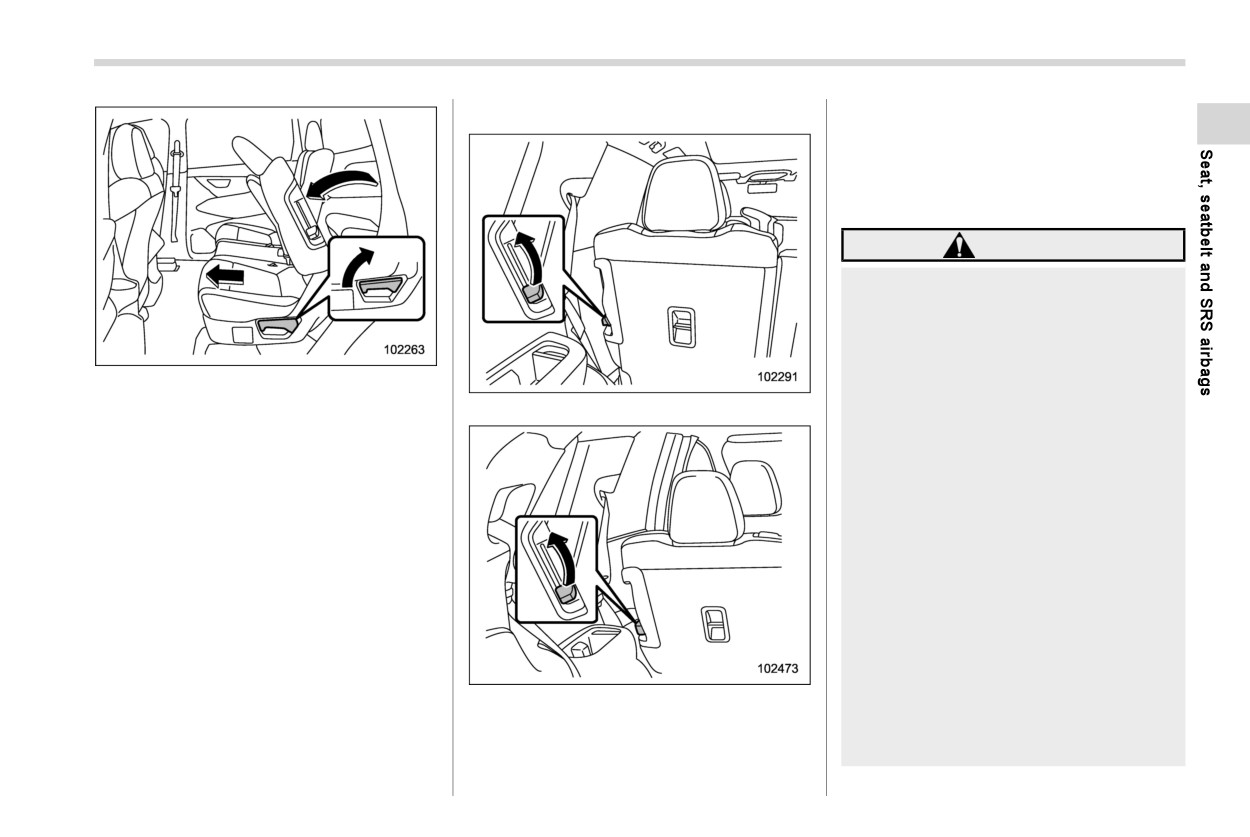
There are levers on both window sides of
the second-row seat. Each lever is used to
facilitate access to the third-row seat.
WARNING
In its slid-forward position with the
Captain seat
seatback tipped forward, the sec-
ond-row seat is not locked and is
free to move. Do not drive the
vehicle with the seat in this state or
allow anyone to sit on the seat
unless it is completely locked. Doing
Seats
45
! To get out from the third-row seat
Before driving the vehicle, adjust the fore/
aft position of the second-row seat, raise
the seatback, and make sure the seatback
is securely locked in position.
! Folding down the seatback
WARNING
Never allow passengers to ride
on the folded seatback or in the
cargo area. Doing so may result
in serious injury or death.
Secure skis and other long items
Bench seat
properly to prevent them from
Fold the seatback forward and slide the
Captain seat
being thrown around inside the
seat toward the front.
vehicle and causing serious in-
Before driving the vehicle, adjust the fore/
jury during a sudden stop, steer-
aft position of the second-row seat, raise
ing maneuver or acceleration.
the seatback, and make sure the seatback
When you return the seatback to
is securely locked in position.
its original position, shake it
slightly to confirm that it is se-
curely in place. If it is not securely
fixed in place, it may suddenly
fold down in the event of sudden
braking, or objects may move out
from the cargo area. Both could
cause serious injury or death.
After returning the seatback to its
Bench seat
original position, be sure to place
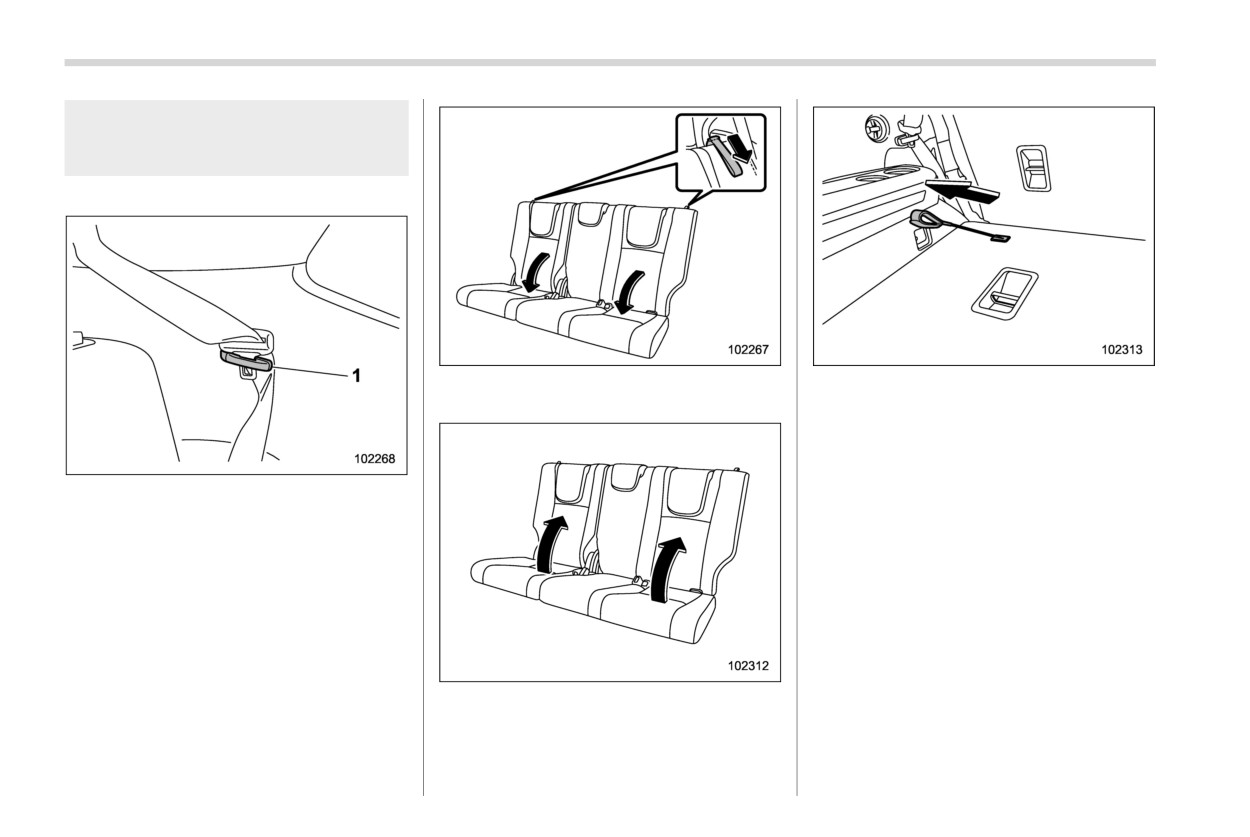
Raise the lever from the third-row seat.
all of the seatbelts and the tab
The seatback of the second-row seat will
attached to the seat cushion
tip forward and the seat will slide forward.
- CONTINUED -
46
Seats
above the seat cushion. Also,
make certain that the shoulder
belts are fully visible.
1. Store the seatbelt buckle.
From outside
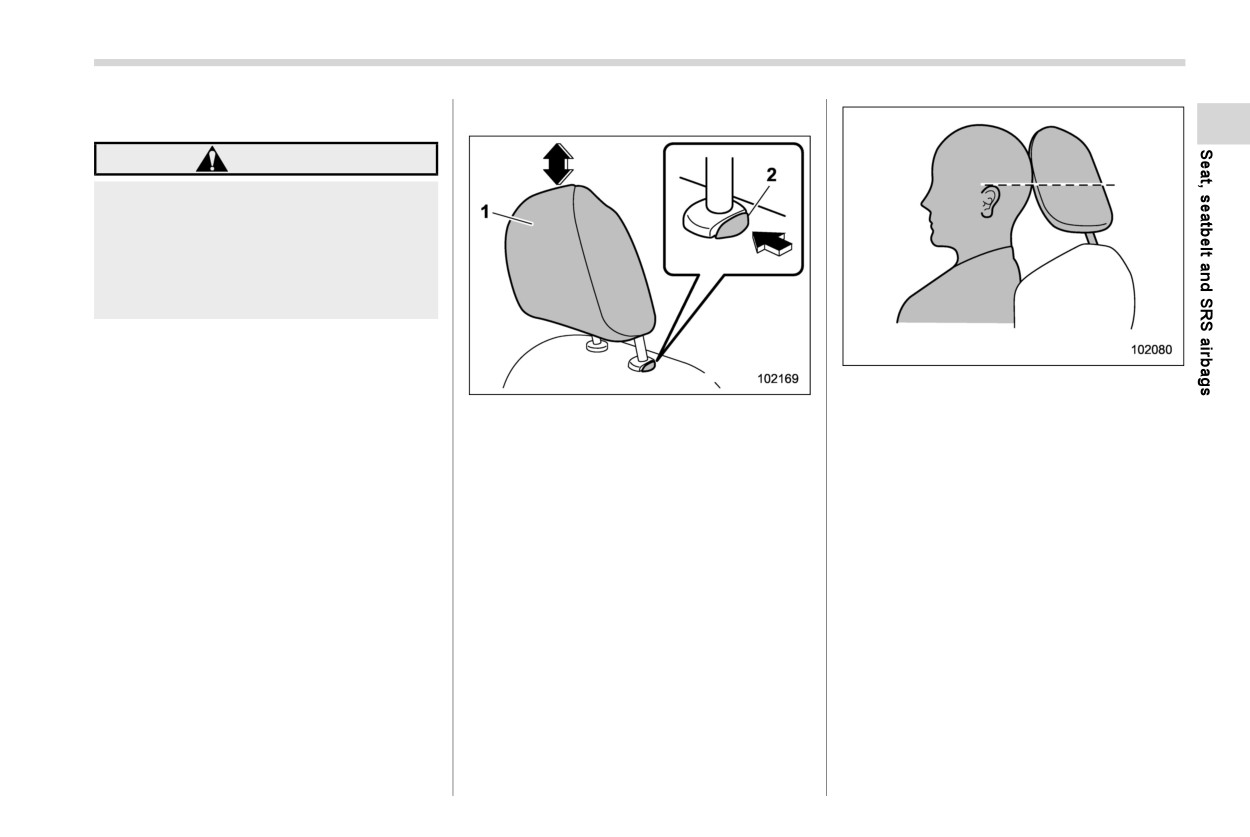
4. While pulling the straps, fold down the
seatbacks.
5. When returning the seatbacks to their
original positions, either press up on
the seatbacks from inside the vehicle,
or from outside the vehicle pull up on
1
Holder
the strap located on the back of the
seatback. Lift the seat up securely until
2. Store the window-side seatbelt in the
it locks in place.
holder to prevent it from being da-
maged. When using it, pull it out from
the holder.
3. Lower the headrest to the storage
position. Refer to
“Head restraints”
FP47.
From inside
Seats
47
& Head restraints
! Height adjustment
WARNING
Do not change the head restraint to
the head restraint from a different
seat. The head restraints were each
designed specifically for the front
seat, second-row seat, and third-row
seat.
NOTE
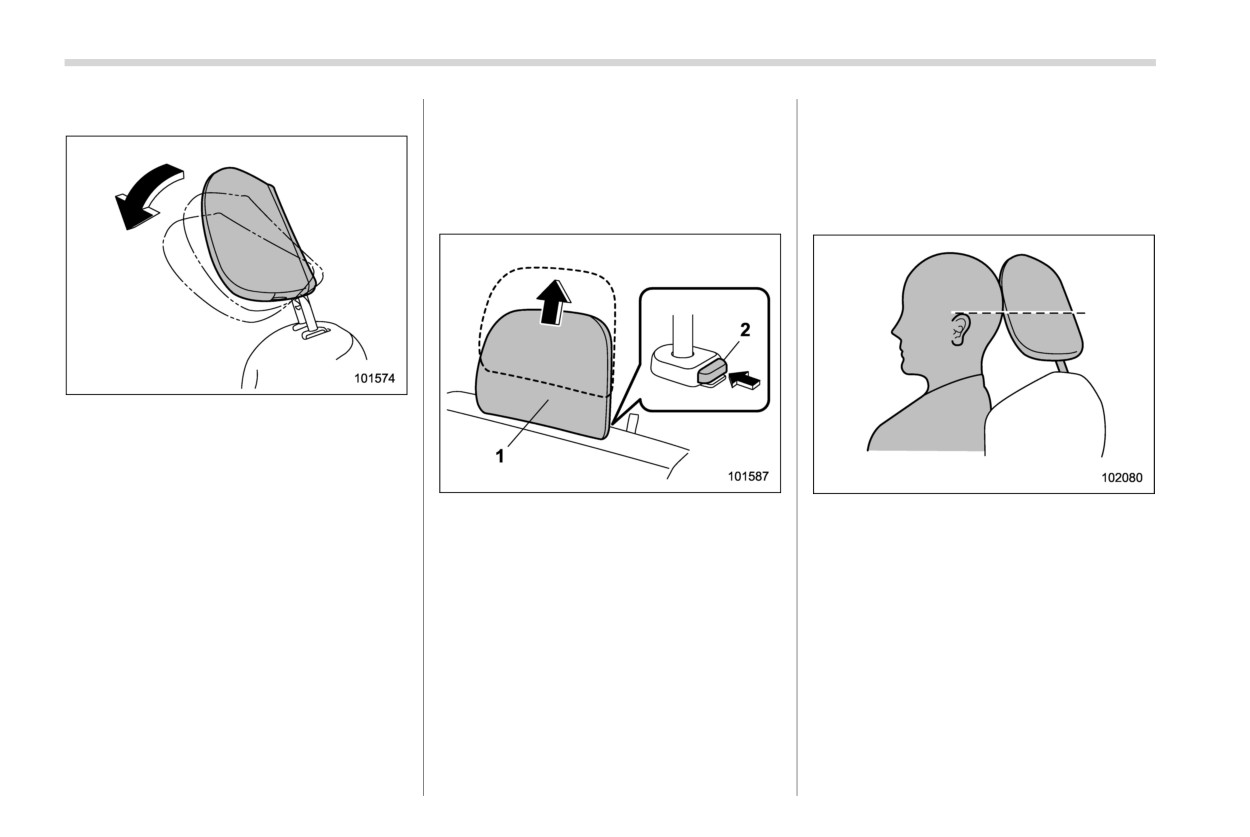
It is possible to adjust the angle of the
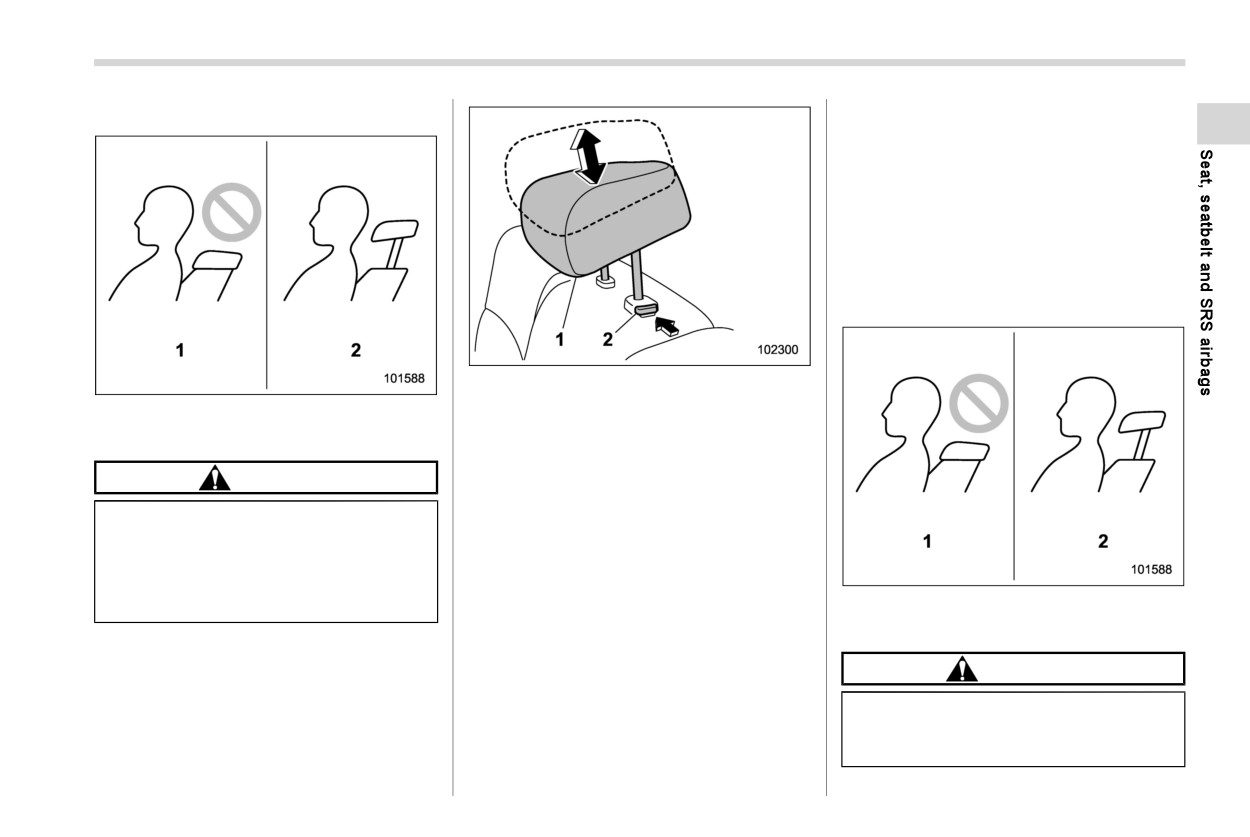
Each head restraint should be adjusted so
front seat head restraints only. When
that the center of the head restraint is
1
Head restraint
installing the front seat head restraints,
closest to the top of the occupant’s ears.
2
Release button
make sure that the angle of the head
restraints can be adjusted.
To raise:
NOTE
Pull the head restraint up.
When the head restraint cannot be
! Front seats
To lower:
pulled out or installed due to insuffi-
Both the driver’s seat and the front
cient clearance between the head re-
Push the head restraint down while press-
passenger’s seat are equipped with head
straint and the roof, tilt the seat and
ing the release button on the top of the
restraints. Both head restraints are adjus-
then perform the installation and re-
seatback.
table in the following ways.
moval tasks.
To remove:
While pressing the release button, pull out
the head restraint.
To install:
Install the head restraint into the holes that
are located on the top of the seatback until
the head restraint locks. Press and hold
the release button to lower the head
restraint.
- CONTINUED -
48
Seats
! Angle adjustment
! Second-row seats
To install:
Install the head restraint into the holes that
Head restraints are installed in all second-
are located on the top of the seatback until
row seats, and can be adjusted as follow-
the head restraint locks. Press and hold
ing.
the release button to lower the head
! Window side seating position
restraint.
The angle of the head restraint can be
adjusted in several steps. While maintain-
ing a suitable driving posture, adjust the
head restraint to a position where the back
of your head is as close to the head
1
Head restraint
Each head restraint should be adjusted so
restraint as possible.
2
Release button
that the center of the head restraint is
To tilt:
closest to the top of the occupant’s ears.
To raise:
Tilt the head restraint by hand to the
Pull the head restraint up.
After installing the head restraint, make
preferred position. A click will be audible
To lower:
sure it is securely locked.
when the head restraint is locked.
Push the head restraint down while press-
To return:
ing the release button on the top of the
Tilt the head restraint once as far forward
seatback.
as it can go. The head restraint will
To remove:
automatically return to the fully upright
position. Then, adjust the head restraint
While pressing the release button, pull out
again to the preferred angle.
the head restraint.
Seats
49
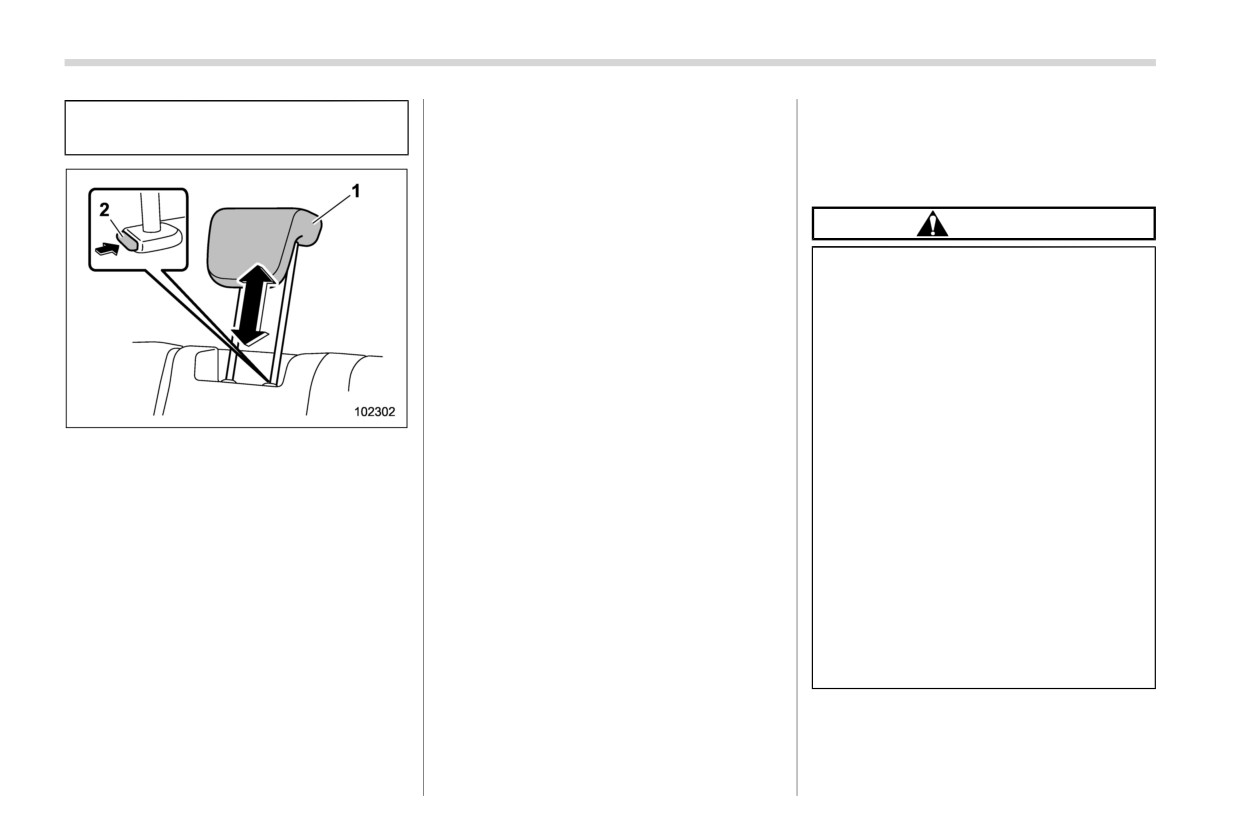
! Applicable only for eight seaters
When the second-row center seating
position is occupied, raise the head re-
straint to the extended position. When the
second-row center seating position is not
occupied, lower the head restraint to
improve rearward visibility.
! Third-row seats
Head restraints are installed in all third-row
seats, and can be adjusted as described
below.
1
Head restraint
2
Release button
1
When not used (retracted position)
2
When used (extended position)
To raise:
Pull the head restraint up.
CAUTION
To lower:
Push the head restraint down while press-
The head restraint is not intended to
ing the release button on the top of the
be used in the retracted position.
seatback.
Before sitting on the seat, raise the
To remove:
head restraint to the extended posi-
While pressing the release button, pull out
tion.
1
When not used (retracted position)
the head restraint.
2
When used (extended position)
To install:
Install the head restraint into the holes that
CAUTION
are located on the top of the seatback until
the head restraint locks. Press and hold
The head restraint is not intended to
the release button to lower the head
be used in the retracted position.
restraint.
Before sitting on the seat, raise the
- CONTINUED -
50
Seat heater
head restraint to the extended posi-
the release button to lower the head
1-2. Seat heater (if equipped)
tion.
restraint.
When the third-row seating position is
The seat heater operates when the ignition
occupied, raise the head restraint to the
switch is in the “ON” position.
extended position.
When the third-row
seating position is
not occupied, lower
CAUTION
the head
restraint
to
improve
rearward
Do not put hard or heavy objects
visibility.
or ones with protrusions on the
seat, and do not stab the seat
with sharp objects, such as pins
or needles.
People with delicate skin may
suffer slight burns even at low
temperatures if they use the seat
heater for a long period of time.
1
Head restraint
When using the heater, always be
2
Release button
sure to warn the persons con-
To raise:
cerned.
Pull the head restraint up.
Do not put anything on the seat
To lower:
which insulates against heat,
Push the head restraint down while press-
such as a blanket, cushion, or
ing the release button on the upper of the
similar items. This may cause the
seatback.
seat heater to overheat.
To remove:
When the seat is warmed enough
While pressing the release button, pull out
or before you leave the vehicle,
the head restraint.
be sure to turn off the seat heater.
To install:
Install the head restraint into the holes that
NOTE
are located on the top of the seatback until
. Use of the seat heater for a long
the head restraint locks. Press and hold
period of time while the engine is not
Seat heater
51
running can cause battery dis-
even if the vehicle has restarted. The
charge.
second-row seat switch will reset.
. When using for a long period of time,
we recommend setting the air venti-
lation to the MID or LOW position.
Use the HIGH position for only quick
heating at the start of the function
usage.
& Front seat heater
Adjust the front seat heater function on the
center information display. Refer to “Front
seat heater and ventilation” FP291.
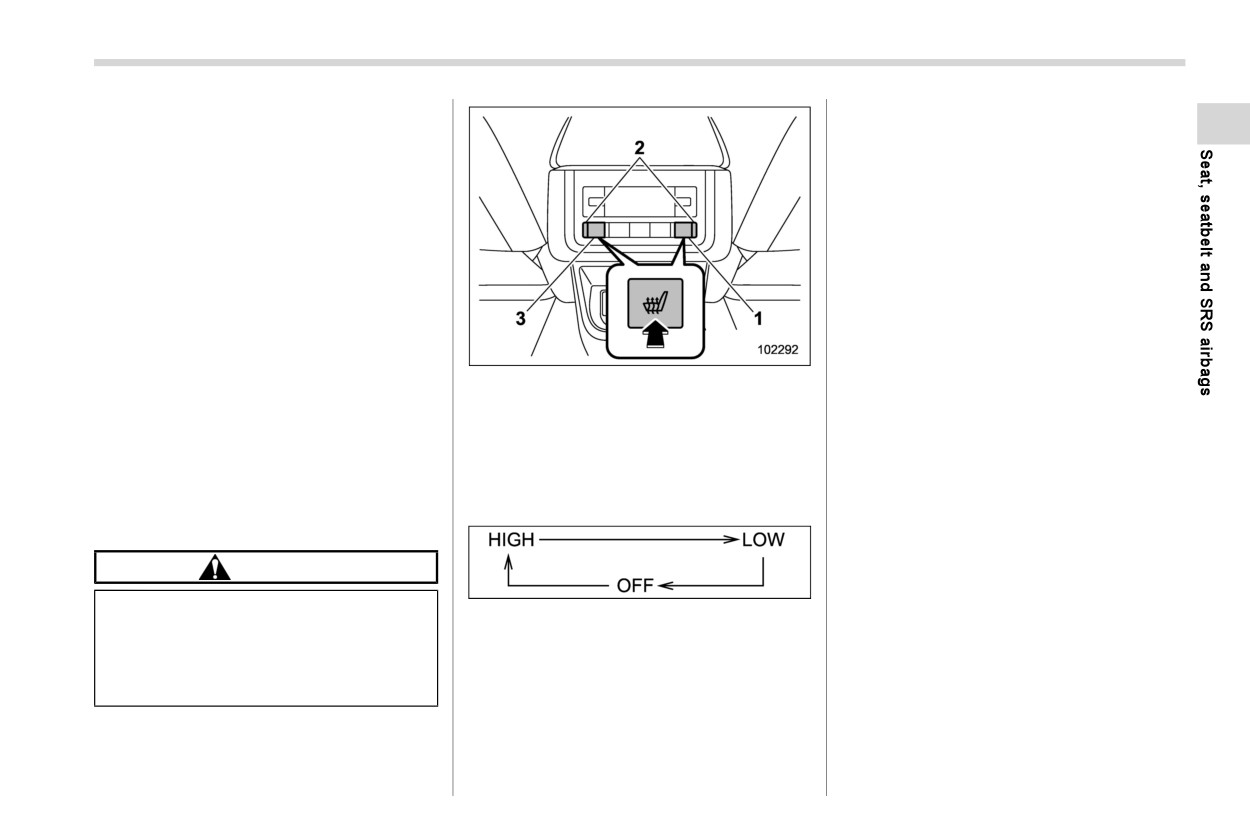
Second-row seat heater switch
1
Right side
NOTE
2
Indicator lights
The front seat heater function cannot
3
Left side
be used simultaneously with the seat
ventilation (if equipped).
Press the second-row seat heater switch.
Each time you press the switch, the mode
will change as follows.
& Second-row seat heater
CAUTION
Do not open and close the center
2 indicator lights are illuminated in HIGH
console lid while operating the sec-
mode, and 1 indicator light is illuminated in
ond-row seat heater switch. There is
LOW mode. All indicator lights turn off
the risk of fingers being caught in
when the heater is switched OFF.
the lid.
NOTE
Only the front seat heater switches
retain the previous switch position
52
Seat ventilation
. When using for a long period of time,
1-3. Seat ventilation (if
1-4. Seatbelts
we recommend setting the seat
equipped)
ventilation to the MID or LOW posi-
& Seatbelt safety tips
tion. Use the HIGH position for only
The seat ventilation are equipped in the
quick cooling at the start of the
WARNING
front seats.
function usage.
The seat ventilation operate when the
Adjust the seat ventilation function on the
All persons in the vehicle must
ignition switch is in the “ON” position.
center information display. Refer to “Front
fasten their seatbelts BEFORE
the vehicle starts to move. Other-
seat ventilation” FP292.
CAUTION
wise, the possibility of serious
injury becomes greater in the
Do not put hard or heavy objects
event of a sudden stop or acci-
or ones with protrusions on the
dent.
seat, and do not stab the seat
All belts should fit snugly in order
with sharp objects, such as pins
to provide full restraint. Loose
or needles.
fitting belts are not as effective in
When cleaning the seat, do not
preventing or reducing injury.
use organic solvents, such as
Each seatbelt is designed to sup-
thinner, benzene, or alcohol.
port only one person. Never use a
If water or liquid is spilled on the
single belt for two or more per-
seat, wipe it off with a dry cloth
sons - even children. Otherwise,
immediately.
in an accident, serious injury or
death could result.
Replace all seatbelt assemblies
NOTE
including retractors and attach-
. Use of the seat ventilation for a long
ing hardware worn by occupants
period of time while the engine is not
of a vehicle that has been in a
running can cause battery dis-
serious accident. The entire as-
charge.
sembly should be replaced even
. The seat ventilation function cannot
if damage is not obvious.
be used simultaneously with the
front seat heater.
Never use a belt that is twisted or
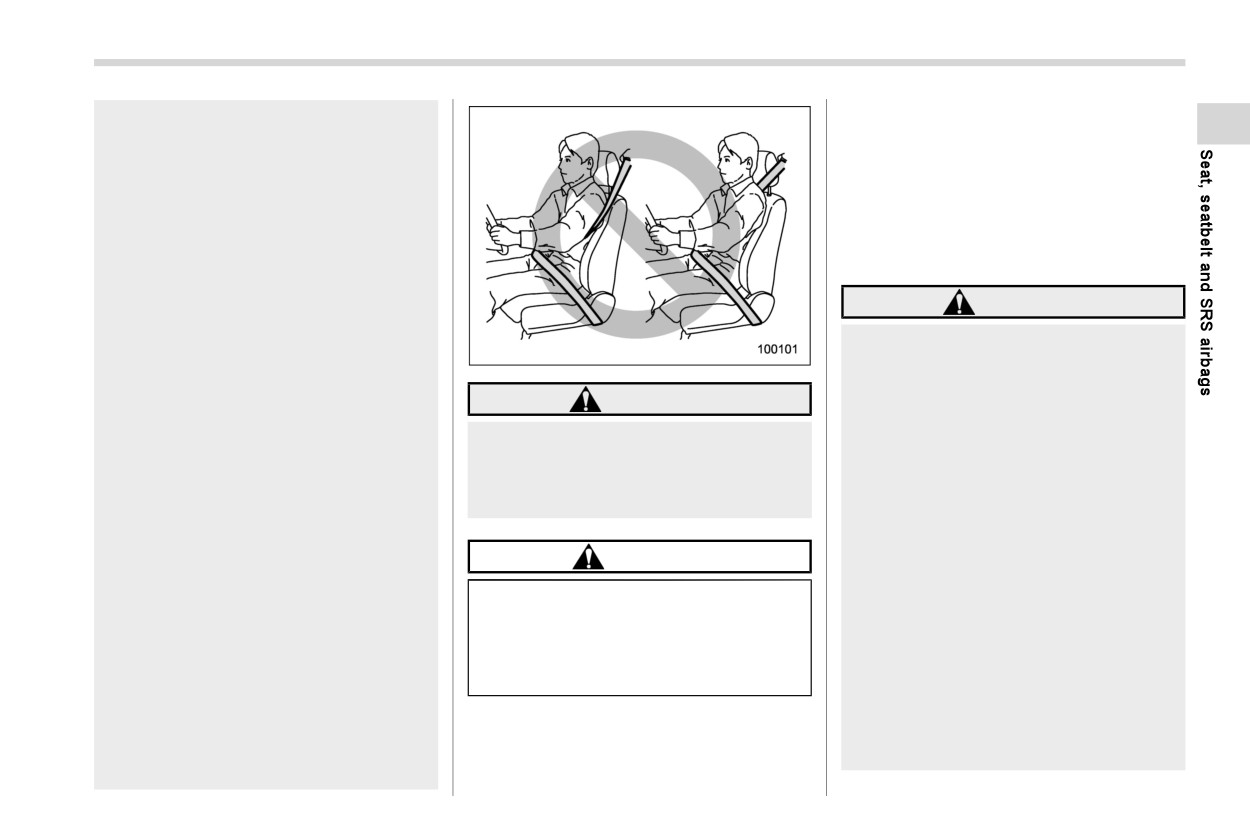
Seatbelts
53
reversed. In an accident, this can
passenger when any of the SRS frontal,
increase the risk or severity of
side and curtain airbags deploy.
injury.
! Infants or small children
Keep the lap belt as low as
Use a child restraint system that is suitable
possible on your hips. In a colli-
for your vehicle. Refer to “Child restraint
sion, this spreads the force of the
systems” FP65.
lap belt over stronger hip bones
instead of across the weaker
! Children
abdomen.
WARNING
Seatbelts provide maximum re-
straint when the occupant sits
Seat children in the rear seat prop-
well back and upright in the seat.
erly restrained at all times. The SRS
To reduce the risk of sliding
airbag deploys with considerable
under the seatbelt in a collision,
WARNING
speed and force and can injure or
the front seatbacks should be
even kill children, especially if they
always used in the upright posi-
Never place the shoulder belt under
are not restrained or improperly
tion while the vehicle is running.
the arm or behind the back. If an
restrained. Because children are
If the front seatbacks are not
accident occurs, this can increase
lighter and weaker than adults, their
used in the upright position in a
the risk or severity of injury.
risk of being injured from deploy-
collision, the risk of sliding under
ment is greater. For that reason, we
the lap belt and of the lap belt
strongly recommend that ALL chil-
sliding up over the abdomen will
CAUTION
dren (including those in child re-
increase, and both can result in
straint systems and those that have
Metallic parts of the seatbelt can
serious internal injury or death.
outgrown child restraint devices) sit
become very hot in a vehicle that has
Do not put cushions or any other
in the REAR seat properly restrained
been closed up in sunny weather;
materials between occupants
at all times in a child restraint device
they could burn an occupant. Do not
and seatbacks or seat cushions.
or in a seatbelt, whichever is appro-
touch such hot parts until they cool.
If you do so, the risk of sliding
priate for the child’s height and
under the lap belt and of the lap
weight.
Your vehicle is equipped with a crash
belt sliding up over the abdomen
sensing and diagnostic module, which will
Secure ALL types of child restraint
will increase, and both can result
record the use of the seatbelt by the front
devices (including forward facing
in serious internal injury or death.
- CONTINUED -
54
Seatbelts
child restraint systems) in the REAR
the belt buckle to help provide a good
& Emergency Locking Retrac-
seats at all times.
shoulder belt fit. Care must be taken to
tor (ELR)
securely place the lap belt as low as
NEVER INSTALL A CHILD RE-
The driver’s seatbelt has an Emergency
possible on the hips and not on the child’s
STRAINT SYSTEM IN THE FRONT
Locking Retractor (ELR).
waist. If the shoulder portion of the belt
PASSENGER’S SEAT. DOING SO
The emergency locking retractor allows
cannot be properly positioned, a child
RISKS SERIOUS INJURY OR DEATH
normal body movement but the retractor
restraint system should be used. Never
TO THE CHILD BY PLACING THE
locks automatically during a sudden stop,
place the shoulder belt under the child’s
CHILD’S HEAD TOO CLOSE TO THE
impact or if you pull the belt very quickly
arm or behind the child’s back.
SRS AIRBAG.
out of the retractor.
! Expectant mothers
According to accident statistics,
children are safer when properly
& Automatic Locking Retractor/
restrained in the rear seating posi-
Emergency Locking Retrac-
tions than in the front seating posi-
tor (ALR/ELR)
tions. For instructions and precau-
Each passenger’s seatbelt has an Auto-
tions concerning the child restraint
matic Locking Retractor/Emergency Lock-
system, refer to
“Child restraint
ing Retractor (ALR/ELR). The Automatic
systems” FP65.
Locking Retractor/Emergency Locking
This vehicle is equipped with a crash
Retractor normally functions as an Emer-
sensing and diagnostic module,
gency Locking Retractor (ELR). The ALR/
which will record whether the seat-
ELR has an additional locking mode
belt is in use by the front passenger
“Automatic Locking Retractor
(ALR)
when an SRS frontal, side or curtain
mode” intended to secure a child restraint
airbag deploys.
system. When the seatbelt is once drawn
Expectant mothers also need to use the
out completely and is then retracted even
If a child is too big for a child restraint
seatbelts. They should consult their doctor
slightly, the retractor locks the seatbelt in
system, the child should sit in the rear seat
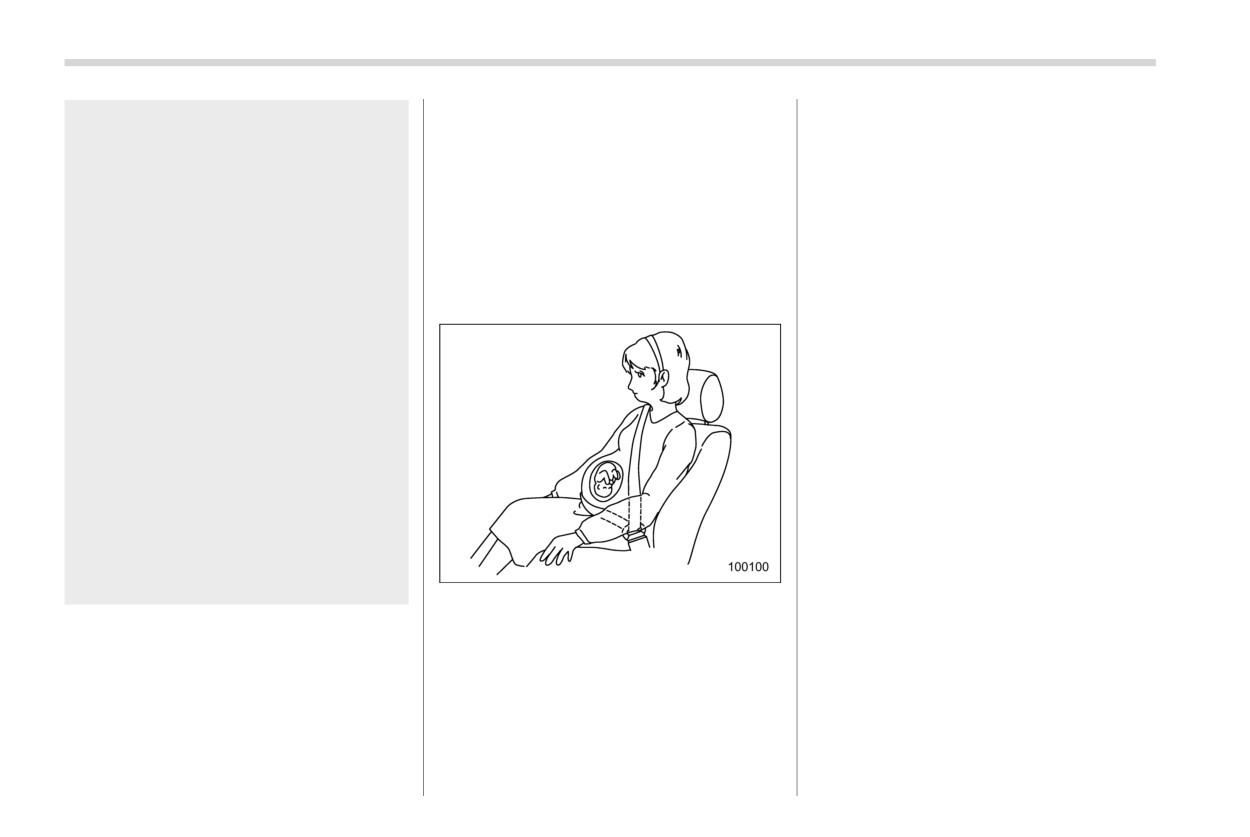
for specific recommendations. The lap belt
that position and the seatbelt cannot be
and be restrained using the seatbelts.
should be worn securely and as low as
extended. As the belt is rewinding, clicks
Never allow a child to stand up or kneel
possible over the hips, not over the waist.
will be heard which indicate the retractor
on the seat.
functions as an ALR. When the seatbelt is
If the shoulder portion of the belt crosses
retracted fully, the ALR mode is released.
the face or neck, move the child closer to
When securing a child restraint system on
Seatbelts
55
the rear seats by the use of the seatbelt,
far from the steering wheel as practical
the seatbelt must be changed over to the
while still maintaining full vehicle con-
Automatic Locking Retractor (ALR) mode.
trol.
Front passenger’s seat: Adjust the
When the child restraint system is re-
seatback to the upright position. Move
moved, make sure that the seatbelt re-
the seat as far back as possible.
tracts fully and the retractor returned to the
Emergency Locking Retractor
(ELR)
2.
Sit well back in the seat.
mode.
3.
Pick up the tongue plate and pull the
For instructions on how to convert the
belt out slowly. Do not let it get twisted.
retractor to the ALR mode and restore it to
. If the belt stops before reaching the
the ELR mode, refer to “Installing child
buckle, return the belt slightly and
restraint systems with ALR/ELR seatbelt”
pull it out more slowly.
FP70.
. If the belt still cannot be unlocked, let
5.
To tighten the lap part, pull up on the
the belt retract slightly after giving it a
shoulder belt.
& Seatbelt warning light
strong pull, then pull it out
slowly
6.
Place the lap belt as low as possible on
and chime
again.
the hips, not on the waist.
Refer to “Seatbelt warning light and chime”
FP173.
& Passengers seatbelt remin-
der
Refer to “Rear passenger’s seats” FP174.
& Fastening the seatbelt
! Front seatbelts
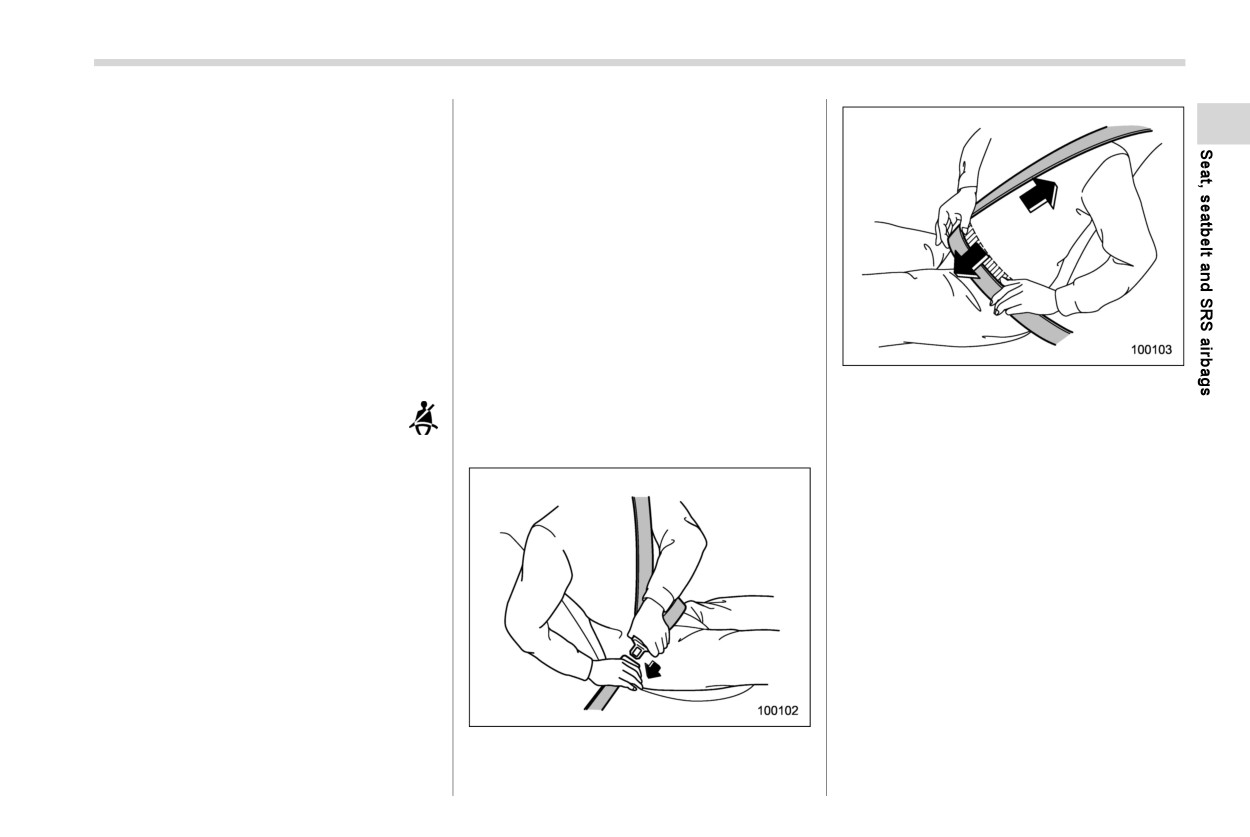
1. Adjust the seat position according to
the following procedure.
Driver’s seat: Adjust the seatback to
the upright position. Move the seat as
4.
Insert the tongue plate into the buckle
until you hear a click.
- CONTINUED -
56
Seatbelts
! Adjusting the front seat shoulder
Before closing the door, make sure that the
WARNING
belt anchor height
belts are retracted properly to avoid
When wearing the seatbelts, make
catching the belt webbing in the door.
sure the shoulder portion of the
! Second-row and third-row seatbelts
webbing does not pass over your
(except third-row center seatbelt)
neck. If it does, adjust the seatbelt
1.
Sit well back in the seat.
anchor to a lower position. Placing
the shoulder belt over the neck may
2.
Pick up the tongue plate and pull the
belt out slowly. Do not let it get twisted.
result in neck injury during sudden
braking or in a collision.
. If the belt stops before reaching the
buckle, return the belt slightly and
pull it out more slowly.
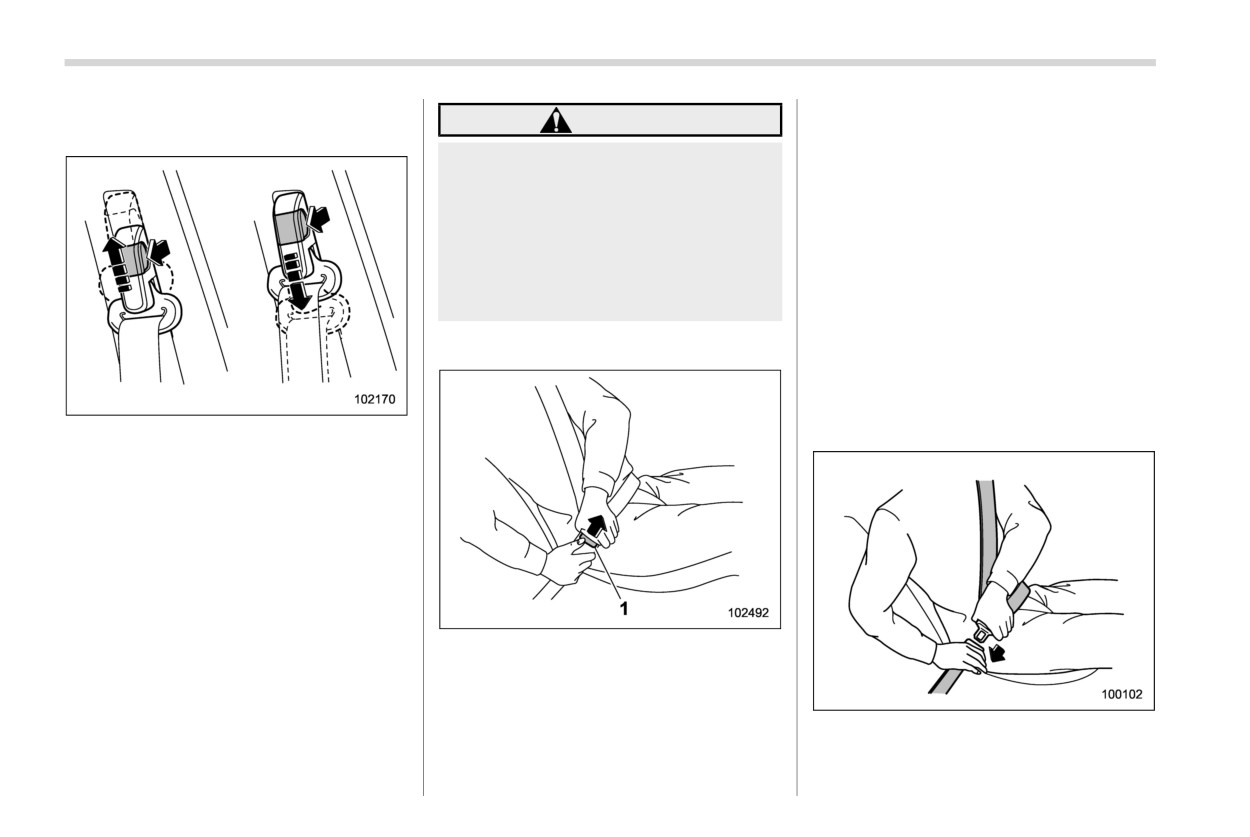
! Unfastening the seatbelt
. If the belt still cannot be unlocked, let
the belt retract slightly after giving it a
strong pull, then pull it out
slowly
again.
The shoulder belt anchor height should be
adjusted to the position best suited for the
driver/front passenger. Always adjust the
anchor height so that the shoulder belt
passes over the middle of the shoulder
without touching the neck.
To raise:
Pull the release knob and slide the anchor
up.
To lower:
1
Button
Pull the release knob and slide the anchor
down.
1.
Push the button on the buckle.
2.
Retract the seatbelt slowly to prevent it
Pull down on the anchor to make sure that
from getting tangled or twisted.
it is locked in place.
3.
Insert the tongue plate into the buckle
until you hear a click.
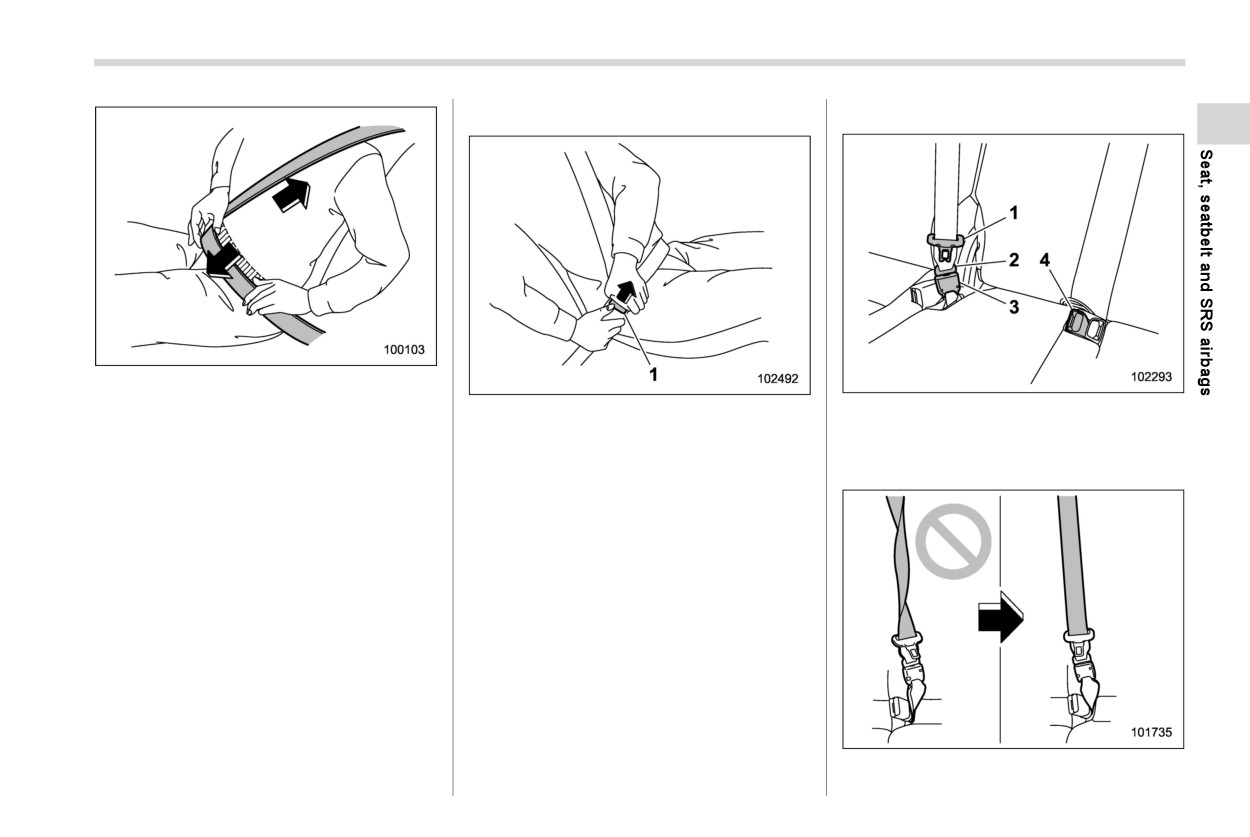
Seatbelts
57
! Unfastening the seatbelt
! Third-row center seatbelt
4. To tighten the lap part, pull up on the
shoulder belt.
1
Button
1
Center seatbelt tongue plate
5. Place the lap belt as low as possible on
2
Anchor tongue plate
1. Push the button on the buckle.
3
Anchor buckle
the hips, not on the waist.
2. Retract the seatbelt slowly to avoid the
4
Center seatbelt buckle
seatbelt being tangled or twisted.
Before closing the door, make sure that the
belts are retracted properly to avoid
catching the belt webbing in the door.
- CONTINUED -
58
Seatbelts
tongue plate not fastened to the
WARNING
anchor buckle on the right-hand
side), it cannot properly restrain
Fastening the seatbelt with the web-
bing twisted can increase the risk or
the wearer in position in an
severity of injury in an accident.
accident, possibly resulting in
serious injury or death.
When fastening the belt after it is
pulled out from the retractor, espe-
The head restraint is not intended
cially when inserting the anchor
to be used at the lowest position.
tongue plate into the mating buckle
Before sitting on the seat, raise
(on right-hand side), always check
the head restraint to the extended
that the webbing is not twisted.
position. Otherwise, in an acci-
dent, serious injury or death
could result.
2.
Pull out the seatbelt
slowly
from the
overhead retractor.
WARNING
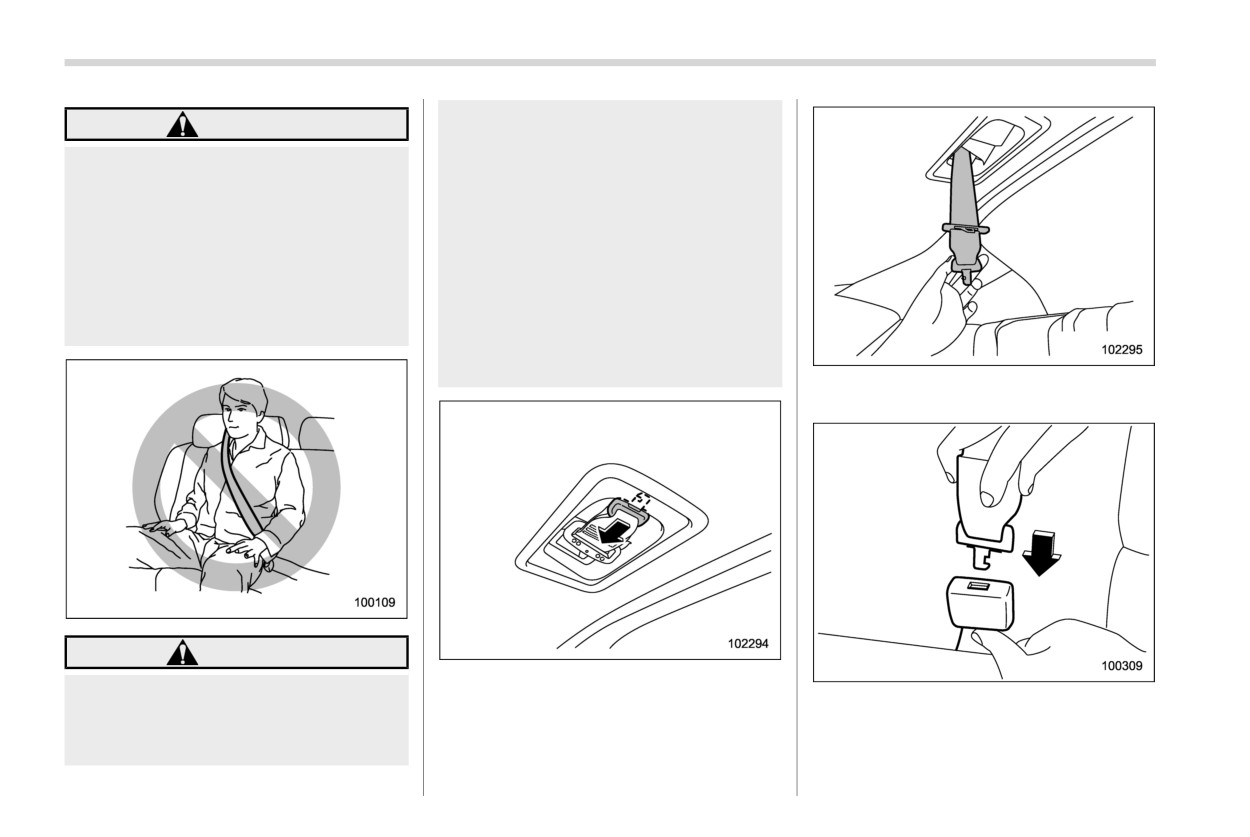
The center seatbelt is stowed in the recess
. Be sure to fasten both tongue
of the ceiling.
3. After confirming that the webbing is not
plates to the respective buckles.
1. Pull the anchor tongue plate out from
twisted, insert the anchor tongue plate
If the seatbelt is used only as a
the front side of the slot by pulling it
attached at the webbing end into the
shoulder belt (with the anchor
rearward.
buckle on the right-hand side until a
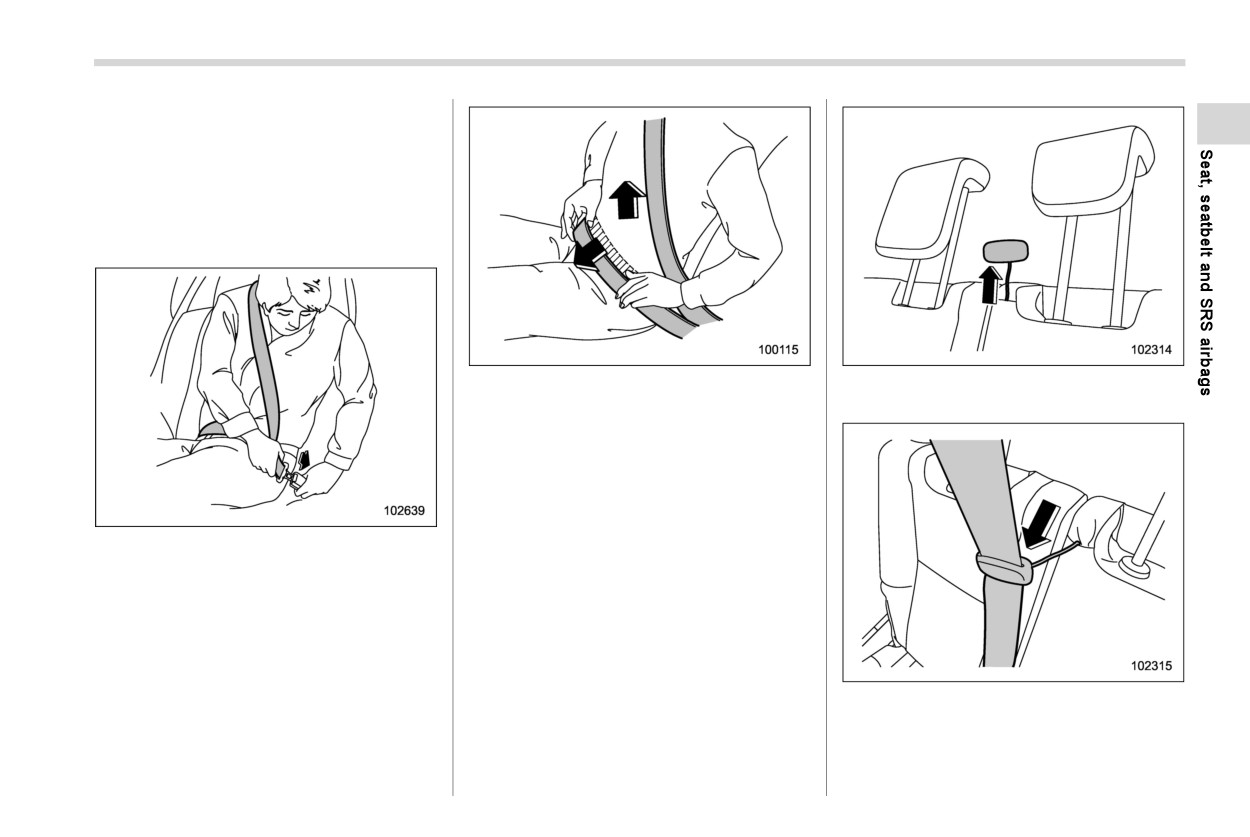
Seatbelts
59
click sounds.
. If the belt stops before reaching the
buckle, return the belt slightly and
pull it out more slowly.
. If the belt still cannot be unlocked,
give it a strong pull and let it retract
slightly, then pull it out slowly again.
5. To tighten the lap part, pull up on the
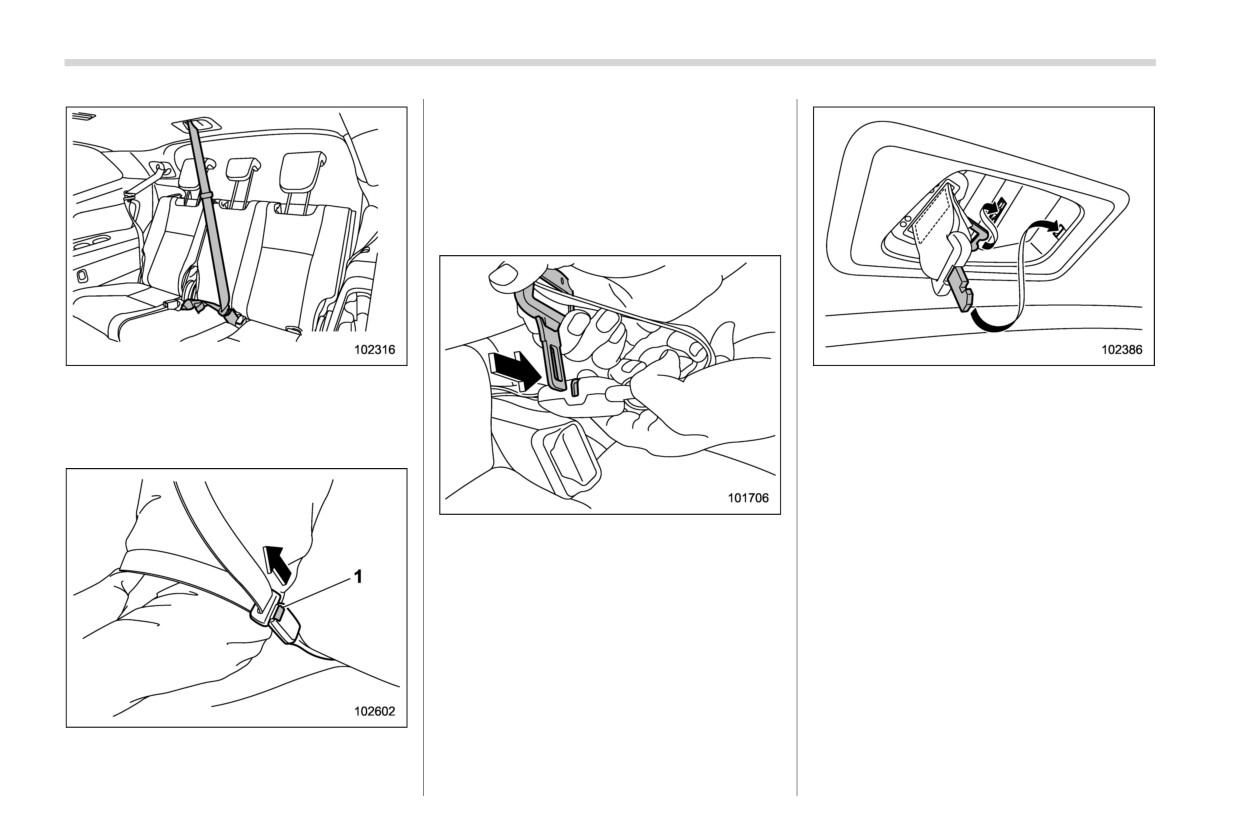
1. Pull the comfort guide from the
shoulder belt.
shoulder pocket.
6. Place the lap belt as low as possible on
the hips, not on the waist.
! Seatbelt comfort guide
In order to adjust the position of the
shoulder belt, use the seatbelt comfort
4. Insert the center seatbelt tongue plate
guide.
into the center seatbelt buckle marked
“CENTER” on the left-hand side until it
clicks.
2. Slide the seatbelt through the slot of
the guide. The elastic cord must be
placed behind the seatbelt.
- CONTINUED -
60
Seatbelts
1. Push the release button of the center
seatbelt buckle (on the left-hand side)
to unfasten the seatbelt.
NOTE
When the seatback is folded down, it is
necessary to disconnect the connector.
3. Insert the tongue plate into the buckle
3. With the belt held by hand, allow the
and position the seatbelt comfortably.
retractor to roll up the belt slowly. You
should hold the webbing end and guide
! Unfastening the seatbelt
it back into the retractor while it is
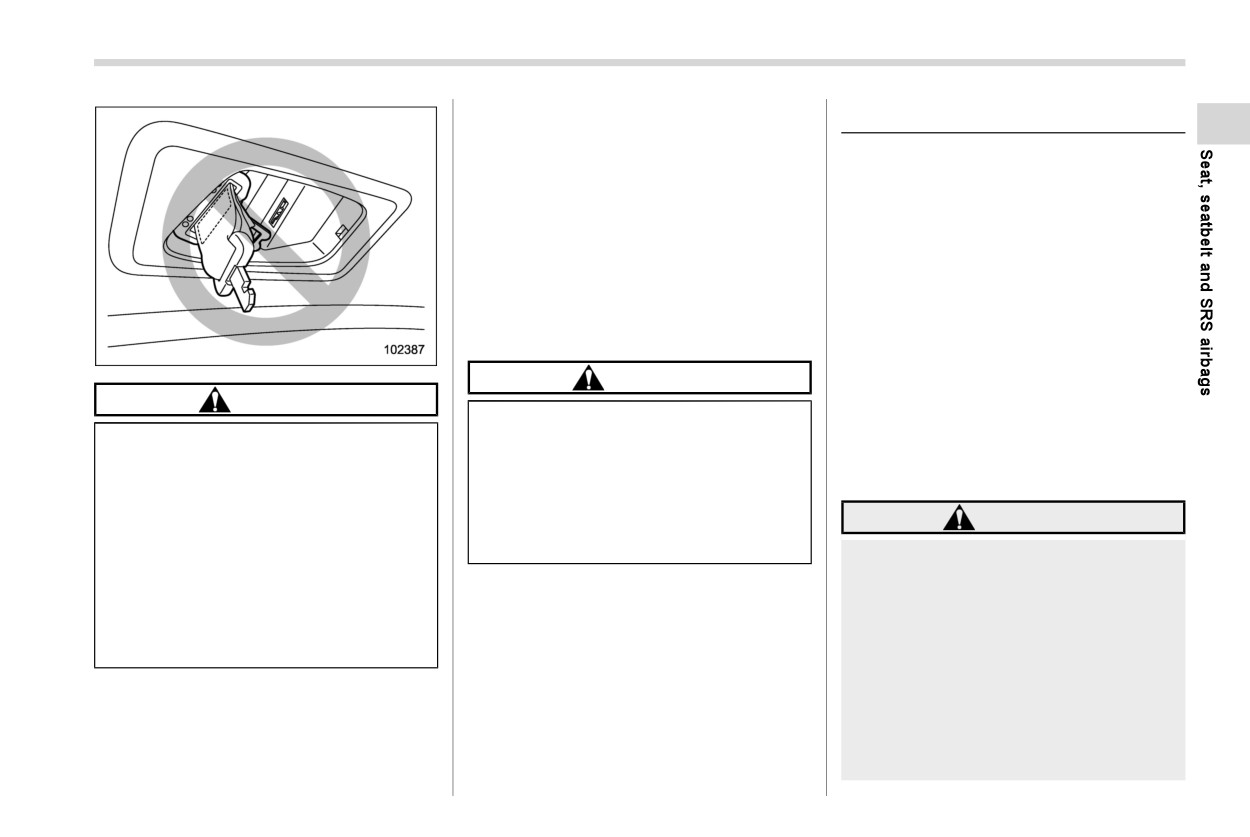
rolling up. Neatly store the tongue plate
in the recess on the ceiling and then
insert the tongue plate and anchor
tongue plate into the slot as shown in
2. Insert a tongue plate or another hard
the illustration.
pointed object into the slot in the
anchor buckle on the right-hand side
and push it in. The anchor tongue plate
will then disconnect from the buckle.
1
Button
Seatbelt pretensioners
61
& Seatbelt maintenance
1-5. Seatbelt pretensioners
To clean the seatbelts, use a mild soap and
lukewarm water. Never bleach or dye the
The following seatbelts have a seatbelt
belts because this could seriously affect
pretensioner.
their strength.
. Driver’s seatbelt
. Front passenger’s seatbelt
Inspect the seatbelts and attachments
including the webbing and all hardware
. Second-row seatbelts (window-sides)
periodically for cracks, cuts, gashes, tears,
The pretensioners are also activated by
damage, loose bolts or worn areas. Re-
the following sensors.
place the seatbelts even if only minor
damage is found.
. Front impact sensors
. Side impact sensors
CAUTION
. Rollover sensor
CAUTION
Keep the belts free of polishes,
The seatbelt pretensioners are designed
Do not allow the retractor to roll
oils, chemicals and particularly
to activate in an accident involving a
up the seatbelt too quickly. Other-
battery acid.
moderate to severe frontal or side colli-
wise, the metal tongue plates
sion, or a rollover accident.
Never attempt to make modifica-
may hit against the trim, resulting
tions or changes that will prevent
in damaged trim.
the seatbelt from operating prop-
WARNING
Have the seatbelt fully rolled up
erly.
. To obtain maximum protection,
so that the tongue plates are
the occupants should sit in an
neatly stored. A hanging tongue
upright position with their seat-
plate can swing and hit against
belts properly fastened. Refer to
the trim during driving, causing
“Seatbelts” FP52.
damage to the trim.
. Do not modify, remove or strike
the seatbelt retractor assemblies
equipped with seatbelt preten-
sioners or surrounding area. This
could result in accidental activa-
tion of the seatbelt pretensioners
- CONTINUED -