Subaru Solterra (2023 year). Manual in english - page 6
 

  Index      Manuals     Subaru Solterra (2023 year). Manual in english


Search            copyright infringement  


Content      ..     4      5      6      7     ..


Subaru Solterra (2023 year). Manual in english - page 6


96

2-2. Charging

AC charging (

P.103)

This is a charging method used 
when charging from an AC out-
let with the AC charging cable or 
charging that uses AC charger.

By setting charging schedule, it is 
also possible to charge at the 
desired date and time. (

P.116)

DC charging (

P.111)

This is a charging method that 
uses a DC charger that com-
plies with SAE J 1772. The trac-
tion battery can be charged in a 
shorter time than AC charging.
SAE is an abbreviation for an 
industrial standard issued by the 
Society of Automotive Engi-
neers.

This vehicle is equipped with 
several functions that are linked 
with charging.

My Room Mode (

P.127)

When the charging cable is con-
nected to the vehicle, electrical 
components such as the air con-
ditioning system and audio sys-

WARNING

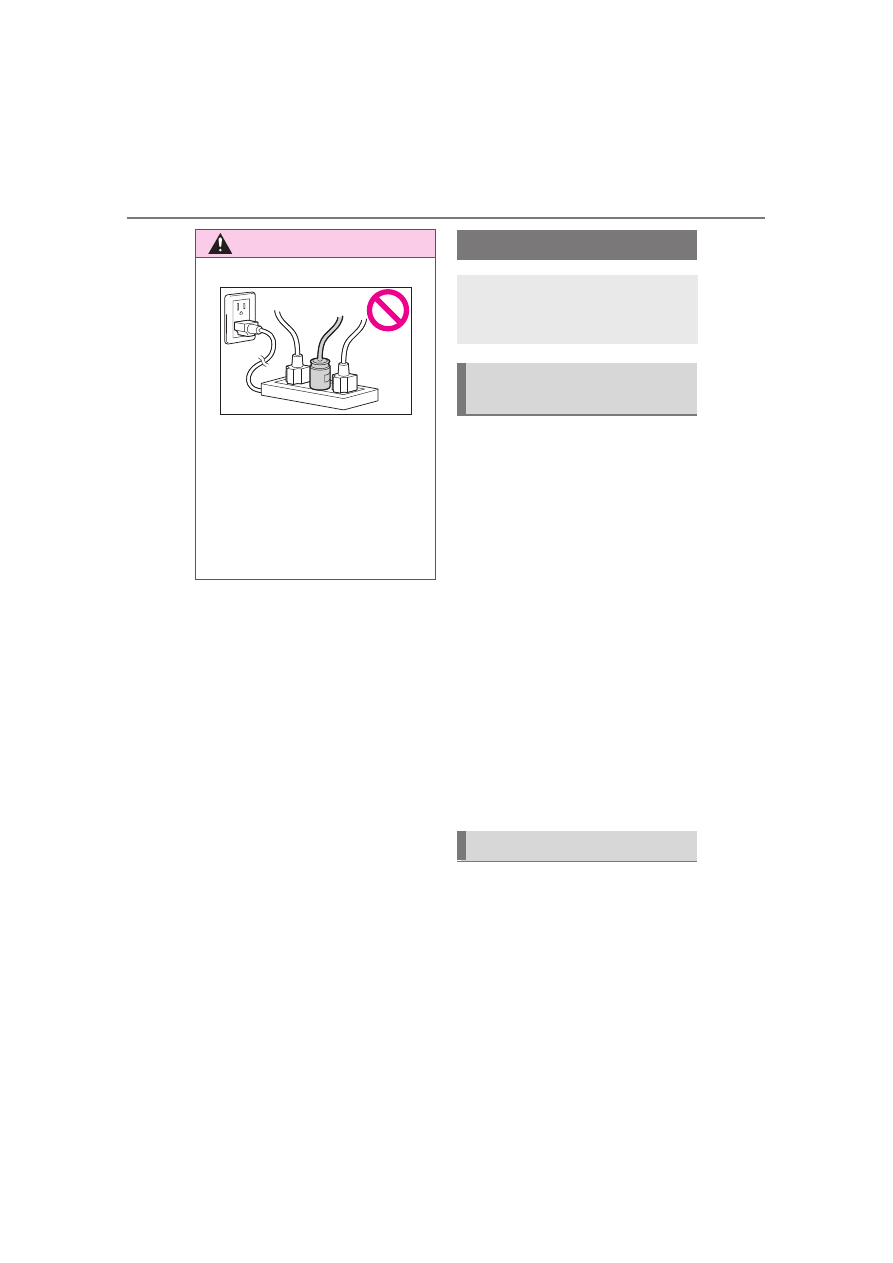
Do not connect to a power strip.

Use of a block heater for 

charging is prohibited.

Make sure to connect the 

charging connector and AC 

charging inlet directly. Do not 

connect a converting adaptor or 

extension cord between the 

charging connector and AC 

charging inlet.

Charging methods

The following methods can 
be used to charge the trac-
tion battery.

Types of charging meth-
ods

Charging-linked functions

97

2-2. Charging

2

E

le

ctr

ic 

V

ehi
cl

sys
te

m

tem can be used by the power 
supply from an external power 
source

*

.

*

: Depending on the situation, elec-

tricity of the traction battery may 
be consumed.

Traction battery heater

When the outside temperature 
is low and the charging cable is 
connected to the vehicle, this 
function automatically warms 
the traction battery until it 
reaches or exceeds a certain 
temperature.

The operation of this function 
is stopped automatically when 
the charging cable is discon-
nected or if the charging cable 
is left connected to the vehicle 
for approximately 3 days.

When the charging schedule 
is used (

P.116), this func-

tion will operate according to 
the schedule settings.

Traction battery warming 
control

This control operates after the 
charging cable remains con-
nected to the vehicle for approx-
imately 3 days and the traction 
battery heater automatically 
stops. It automatically insulates 
the traction battery in extremely 
low temperatures.

This control stops 31 days 
after the charging cable is 
connected, even if it is still 
connected to the vehicle.

When this control operates, 
charging schedule settings 
are ignored and charging 
starts immediately.

Traction battery cooler

When the traction battery is hot 
and the AC charging cable is 
connected to the vehicle, this 
function cools the traction bat-
tery to protect it.
The function may operate when 
continuously driving at high 
speeds such as driving on high-
ways or freeways, or during DC 
charging.

Using My Room Mode during 

DC charging

P.128

Traction battery heater

Traction battery heater may oper-

ate when charging is not being 

performed.

When Traction battery heater is 

operating, the charging indicator 

will illuminate.

When Traction battery heater is 

operating during charging, the 

charging may take longer than 

normal.

The remaining charge of the trac-

tion battery declines when the 

traction battery heater operates, it 

might be necessary to recharge 

the traction battery again in order 

to supplement the remaining 

charge.

Traction battery cooler

For AC charging: Traction battery 

cooler settings can be changed on 

the multi-information display. 

(

P.98)

The AC charging indicator will illu-

98

2-2. Charging

minate when the traction battery 

cooler is on standby or operating.

When the charge level of the trac-

tion battery is low, the traction bat-

tery cooler may not operate, even 

if the temperature of the traction 

battery is high.

When the following conditions are 

met while the traction battery 

cooler is operating, the cooling 

operation will stop.

• The hood is opened

• The power switch is turned to 

ACC or ON.

• The shift position is changed to 

any position other than P

• The Remote Air Conditioning Sys-

tem is operated (

P.413)

• The remaining charge of the trac-

tion battery drops below a certain 

amount

The traction battery cooler oper-

ates using power supplied by the 

traction battery and an external 

power source.

• While the traction battery cooler is 

operating, the charge of the trac-

tion battery will increase and 

decrease within a certain range, 

and will not increase as during AC 

charging.

• When the traction battery cooler 

operates, charger will recognize it 

as the battery being charged. If 

this function operates while a 

charger which charges a charging 

fee is connected to the vehicle, 

AC charging fees will apply.

Changing of the traction battery 

cooler setting

Setting can be changed 

 on the 

multi-information display.
Use the meter control switches 

(

P.154) and select “Vehicle Set-

tings”, “Charging Settings”, “Battery 

Cooler”, and change the setting.
When selecting to off, the traction 

battery output may be restricted 

depending on the driving situation.

To enable the use of battery 
electric vehicle, we recommend 
systematically charging the 
vehicle.

Before leaving home

In order to use the battery elec-
tric vehicle, charge the traction 
battery at home before leaving.

On the way to the destina-
tion or at the destination

When the remaining charge of 
the traction battery gets low, 
recharge the battery at the near-
est charging station.

Charging tips

This section explains meth-
ods for using the charging 
function for this vehicle and 
checking information 
related to charging.

Systematically charging

99

2-2. Charging

2

E

le

ctr

ic 

V

ehi
cl

sys
te

m

Information related to charging 
is displayed and can be checked 
on the multi-information display.

While charging

When any door is opened during 
charging with the power switch 
off, the current charging condi-
tion and approximate time 
remaining until charging is com-
plete are displayed for a certain 
period of time.
The actual charging time may 
differ depending on conditions 
such as the remaining capacity 
of the traction battery, outside 
temperature, and specifications 
of the AC/DC charger.
The time until charging com-
pleted may not be displayed if 
the charging current to the trac-
tion battery becomes smaller 
and the charging time becomes 
longer.

After charging is complete

When any door is opened with 
the power switch off after 
charging is complete, a mes-
sage detailing the results of the 
charging is displayed for a while.
Also, a message is displayed if 
an operation that stops charging 
is performed or a situation 
where charging cannot be per-
formed occurs.
When a message is displayed, 
follow the instructions displayed 
on the screen. (

P.138)

Checking information 
related to charging

100

2-2. Charging

Safety functions

The EV system will not start while 

the charging cable is attached to 

the vehicle, even if the power 

switch is operated.

If the charging cable is connected 

while the “READY” indicator is illu-

minated, the EV system will stop 

automatically and driving will not 

be possible.

Things to know before 

charging

Make sure to read the fol-
lowing precautions before 
charging the traction bat-
tery.

WARNING

Caution when charging

People with implantable cardiac 

pacemakers or cardiac resynchro-

nization therapy-pacemakers 

should not carry out the charging 

procedure. Ask someone else to 

do it.

Do not approach the charger 

and charging cable while 

charging. 

Charging procedure may affect 

the operation of such devices.

Do not remain in the vehicle 

during charging. 

Charging procedure may affect 

the operation of such devices.

Do not enter the vehicle even to 

take something out of the lug-

gage compartment. 

Charging procedure may affect 

the operation of such devices.

When the charging cable is 

connected to the vehicle

Do not change the shift position 

from P.
In the unlikely event that the 

charging cable has been dam-

aged, the shift position may 

change from P to another position 

and the vehicle could move, pos-

sibly leading to an accident.

Charging precautions

This vehicle has been designed to 

allow charging from an external 

power source using an AC 

charging cable for exclusive use 

with standard household AC out-

lets.
However, the vehicle differs 

greatly from standard household 

electrical goods in the following 

ways, and incorrect usage could 

cause fire or electric shock, possi-

bly leading to death or serious 

injury.

When 240V charging, a large 

amount of current will flow for a 

long time.

Charging can be conducted out-

doors.

NOTICE

Charging precautions

To charge properly, follow the pro-

cedure after reading the explana-

tion below. Charging is intended 

to be carried out by licensed driv-

ers only who properly understand 

the charging procedure.

Do not allow people who is not 

used to charging, such as chil-

dren, to perform charging with-

out supervision.

Also, keep the AC charging 

cable out of reach of infants.

101

2-2. Charging

2

E

le

ctr

ic 

V

ehi
cl

sys
te

m

Before charging, always check 
the following items.

The parking brake is applied. 
(

P.243)

The power switch is turned to 
OFF. (

P.231)

Lights such as the headlights, 
emergency flashers and inte-
rior lights, etc. are turned off.

If these light switches are turned 
on, then these features will con-
sume electricity, and charging time 
will increase.

Before charging, make sure that 
each part of the AC charging 
cable is in good condition. 
(

P.90)

During charging

The charging starting time may 

differ depending on the state of 

the vehicle, but this does not indi-

cate a malfunction.

During charging, sounds may be 

heard from near the traction bat-

tery in accordance with the opera-

tion of the air conditioning system 

or “Battery Cooler” (

P.97).

During and after charging, the 

motor compartment and its sur-

rounding area in which the 

onboard traction battery charger is 

installed may get warm.

The surface of the CCID 

(Charging Circuit Interrupting 

Device) may become hot, but this 

does not indicate a malfunction.

Depending on radio wave condi-

tions, interference may be heard 

on the radio.

When charging using a public 

charging facility

When charging using a public 

charging facility, check the setting 

of the charging schedule function.

• When the charging schedule is 

registered, temporarily turn off the 

function or turn “Charge Now” on. 

(

P.117)

• When the charging schedule is set 

to on, charging will not start even 

if the AC charging cable is con-

nected. Also, charging fee may 

occur due to connection of the AC 

charging cable.

Capacity reduction of the trac-

tion battery

The capacity of the traction battery 

will decline gradually when the trac-

tion battery is in use. The rate at 

which it declines will differ in accor-

dance with environmental conditions 

and the way in which the vehicle is 

used. Observing the following can 

help suppress the decline in the 

traction battery capacity.

Avoid parking the vehicle in high 

temperature areas, under direct 

sunlight when the traction battery 

is fully charged.

Avoid accelerating and decelerat-

ing frequently and suddenly.

Avoid frequent driving at high 

speed.

Use the charging schedule func-

tion as much as possible in order 

to fully charged the traction bat-

tery before starting off. (

P.116)

NOTICE

When charging with a charger, 

follow the procedures for using 

each charger.

Confirm the following 
before charging

Inspecting the AC 
charging cable

102

2-2. Charging

Avoid frequent DC charging

Also, if the capacity of the traction 
battery capacity reduces, the dis-
tance that can be driven decreases. 
However, vehicle performance does 
not significantly become worse.

When the remaining charge of 

the traction battery is low after 

charging

In the following situations, the 

remaining charge of the traction bat-

tery after charging completes may 

be less than normal in order to pro-

tect the traction battery (the driving 

range after the battery is fully 
charged may be shorter).

*

Charging is performed when the 

outside temperature is low or high

Charging is performed immedi-

ately after high-load driving or in 

extreme heat

In any other situation, if the remain-
ing charge of the traction battery is 
significantly lower than normal after 
charging completes, have the vehi-
cle inspected by your SUBARU 
dealer.

*

: When this occurs, even if the 

remaining charge display of the 
traction battery shows that it is 
fully charged, the remaining 
charge rapidly decreases faster 
than normal.

When the charging amount sent 

to the traction battery 

decreases

When the amount of power supplied 

by the charger is low or operation of 

the battery heater, etc., reduces the 

charging power sent to the traction 

battery, the charging amount sent to 

the traction battery may decrease.

Certification

This device complies with Part 15 of 

the FCC Rules. Operation is subject 

to the following two conditions: 

(1) this device may not cause harm-

ful interference, and (2) this device 

must accept any interference 

received, including interference that 

may cause undesired operation.

Charging time may increase

In the following situations, charging 

time may become longer than nor-

mal:

In very hot or very cold tempera-

tures.

When the traction battery 

becomes hot, such as immedi-

ately after high-load driving.

The vehicle is consuming a lot of 

electricity, for example, when the 

headlights are on, etc.

When using “My Room Mode”. 

(

P.127)

There is a power outage during 

charging.

There is an interruption in the 

electrical supply.

There is a drop in the voltage of 

external power source.

The charge in the 12-volt battery 

is low, for example due to the 

vehicle being left unused for a 

long period of time.

When the upper limit of charging 

current is changed in the charging 

current setting of the vehicle 

(

P.106)

When the battery heater operates. 

(

P.97)

When the “Battery Cooler” is oper-

ated before charging. (

P.97)

When the plug generates heat 

due to a loose outlet connection, 

etc.

When adjusting the power supply 

with the charger.

When frequently and repeatedly 

using DC charging.

When selecting “DC charging 

power” setting other than “MAX”.

When the temperature of 

103

2-2. Charging

2

E

le

ctr

ic 

V

ehi
cl

sys
te

m

charging-related parts is high.

Charging electricity

This vehicle can be charged up to 

approximately 7 kW.
However, depending on the used 

charger or AC charging cable, 

charging electricity may be limited.

How to use AC 

charging

This section explains the 
procedure for charging the 
traction battery with an AC 
charging cable.
When using an AC charger, 
make sure to check the 
operation instructions of 
the AC charger.
When the charging sched-
ule is registered, make sure 
“Charge Now” is turned on 
before charging. (

P.122, 

126)

NOTICE

When using the AC charging 

cable and related parts

To prevent damage to the AC 

charging cable and related parts, 

observe the following precautions.

When interrupting or canceling 

charging, remove the charging 

connector before removing the 

plug.

When removing the AC 

charging cable, check that the 

charging connector is unlocked.

Do not forcefully pull the 

charging connector cap and AC 

charging inlet cap.

Do not apply a vibration to the 

charging connector while 

charging. Charging may be 

stopped.

Do not insert anything but the 

charging connector into the AC 

charging inlet.

104

2-2. Charging

P.100

1

Prepare the AC charging 
cable. (

P.85)

2

Insert the AC charging cable 
into the outlet of the external 
power source.

Make sure to hold the body of the 

plug and insert it firmly into the out-

let.
If there is a switch that can switch 

the power supply to the outlet, turn 

it on.
Check that the power indicator on 

the CCID (Charging Circuit Inter-

rupting Device) is illuminated.
(If it is not illuminated, refer to 

P.131)
In order to reduce the load on the 

outlet and plug, when inserting the 

plug, use a string, etc., to hang the 

CCID (Charging Circuit Interrupting 

Device) on a hook or equivalent.

3

Open the charging port lid. 
(

P.83)

The charging inlet light 

 will illu-

minate.

4

Open the AC charging inlet 
cap.

NOTICE

When inserting the plug into or 

removing the plug from the out-

let, make sure to hold the body 

of the plug.

Do not damage the AC charging 

inlet cap with a sharp object.

Do not forcefully pull the AC 

charging cable that is caught or 

entangled. If the cable is entan-

gled, disentangle it before 

using.

AC charging inlet

Do not disassemble, repair or 

modify the AC charging inlet. 

When the AC charging inlet needs 

to be repaired, consult your SUB-

ARU dealer.

Charging precautions

When charging

105

2-2. Charging

2

E

le

ctr

ic 

V

ehi
cl

sys
te

m

5

Remove the charging con-
nector cap and secure it to 
the cable.

6

Insert the charging connector 
into the AC charging inlet.

Align the guide position on the bot-

tom of the charging connector, and 

push the charging connector 

straight into the AC charging inlet 

as far as possible. Once a click 

sound is heard, check that the 

charging connector is securely 

locked.
When the charging connector is 

inserted straight as far as possible, 

it will automatically lock. (

P.91)

7

Confirm that the charging 
indicator of the charging port 
is illuminated.

Charging will not start if the 

charging indicator does not illumi-

nate when the charging connector 

is inserted. (

P.131)

If the charging indicator is flashing, 

the charging schedule is registered. 

(

P.105)

If the error warning indicator on the 

CCID (Charging Circuit Interrupting 

Device) flashes during charging, 

check P.88 and follow the correc-

tion procedure.
The charging indicator will turn off 

when charging is completed.
The charging indicator will also turn 

off when charging is interrupted. In 

this case, refer to P.131

When connecting the AC 

charging connector

If the door is opened or the power 

switch is turned to ON with the AC 

charging connector connected, the 

charging cable indicator turns on to 

notify that the AC charging connec-

tor is connected.

If the charging indicator of the 

charging port flashes after con-

necting the AC charging cable

The charging schedule (

P.116) is 

registered and charging cannot be 

performed. To cancel charging using 

106

2-2. Charging

the charging schedule and start 

charging, perform any of the follow-

ing procedures.

Turn “Charge Now” on (

P.122, 

126)

While the charging indicator is 

flashing, remove and reconnect 

the charging connector immedi-

ately

When the charging connector 

cannot be inserted into the AC 

charging inlet

P.91

Safety function

If the latch release button is 

pressed, charging will not begin 

even if the AC charging cable is 

connected.
Also, charging will be stopped if the 

latch release button is pressed and 

held for several seconds during 

charging. When restarting charging, 

reinsert the charging connector after 

pulling it out, and check that the 

charging indicator of the charging 

port illuminates.

Charging time may increase

P.102

When your circuit breaker trips 

during charging

The upper limit of the charging cur-

rent can be changed on the multi-

information display or multimedia.

Setting operations on multi-infor-

mation display

1

Press 

 or 

 of the meter 

control switches to select 

.

2

Press 

 or 

 of the meter 

control switches to select “Vehi-
cle Settings”, and then press and 
hold 

.

3

Press 

 or 

 of the meter 

control switches to select 

“Charging Settings”, and then 
press 

.

The “Charging Settings” screen will 

be displayed.

4

Press 

 or 

 of the meter 

control switches to select 
“Charging Current”, and then 
press 

.

The “Charging Current” screen will 

be displayed.

5

Press 

 or 

 of the meter 

control switches to select “16A” 
or “8A” and then press 

.

Setting operations on multimedia

1

Select 

.

2

Select “Vehicle customize”.

3

Select “Charging”.

4

Select “Charging current”.

5

Select “16A” or “8A”.

The maximum charging current is 

limited to less than or equal to the 
selected current.

*

If the breaker still trips while 

charging, even after changing the 

upper limit of the charging current, 

check if the connected power 

source meets the specified charging 

conditions. (

P.94)

*

: Restricting the charging current 

will lengthen the charging time.

Changing the “Charging Limit” 

settings

The upper limit of the charge capac-

ity can be changed on the multi-

information display or multimedia.
The selected upper limit value is 

common to AC charging and DC 

charging.

Setting operations on multi-infor-

mation display

107

2-2. Charging

2

E

le

ctr

ic 

V

ehi
cl

sys
te

m

1

Press 

 or 

 of the meter 

control switches to select 

.

2

Press 

 or 

 of the meter 

control switches to select “Vehi-
cle Settings”, and then press and 
hold 

.

3

Press 

 or 

 of the meter 

control switches to select 
“Charging Settings”, and then 
press 

.

The “Charging Settings” screen will 

be displayed.

4

Press 

 or 

 of the meter 

control switches to select 
“Charging Limit”, and then press 

.

The “Charging Limit” screen will be 

displayed.

5

Select “Full”, “90%”, “80%”, 
“70%”, “60%” or “50%” and then 
press 

.

Setting operations on multimedia

1

Select 

.

2

Select “Vehicle customize”.

3

Select “Charging”.

4

Select “Charging limit”.

5

Select “Full”, “90%”, “80%”, 

“70%”, “60%” or “50%”.

If the setting is changed during DC 

charging, charging may stop due to 

the operation of the DC charger 

timer and the traction battery cannot 

be fully charged.

Protection function of AC 

charging inlet overheating

By installing a temperature sensor 

to the AC charging inlet, prevents 

parts from melting when the tem-

perature rises due to foreign matter 

entering the charging connector.

When a certain temperature 

increase is detected, charging is 

stopped immediately.
After this, when the power switch is 

off, a message will be displayed on 

the multi-information display 

(

P.138)

WARNING

When charging

Observe the following precau-

tions.
Failure to do so may cause an 

unexpected accident, resulting in 

death or serious injury.

Connect to a power source suit-

able for charging. (

P.94)

Check that the AC charging 

cable, plug and outlet are free of 

foreign matter.

Before charging, check that the 

AC charging inlet is not 

deformed, damaged or cor-

roded, and check that the inlet 

is free of foreign matter such as 

dirt, snow and ice.

If there is dirt or dust in these 

areas, remove completely 

before inserting the charging 

connector.

Do not get the terminals of the 

AC charging inlet wet.

Only use outlets where the plug 

can be securely inserted.

Do not bundle or wind the AC 

charging cable while charging, 

as doing so may result in over-

heating.

Do not touch the terminals of 

the charging connector and AC 

charging inlet with a sharp metal 

objects (needles, etc.,) or 

hands, or short them with for-

eign objects.

108

2-2. Charging

WARNING

When charging outdoors, make 

sure to connect to a weather-

proof outlet for outdoor use.

Ensure the weatherproof outlet 

cover closes completely. If the 

weatherproof outlet cover can-

not be closed, install a weather-

proof outlet cover that will close.

In order to stop charging at the 

charging station, follow the 

instructions of the charger.

If any heat, smoke, odors, noise 

or other abnormalities are 

noticed during charging, stop 

charging immediately.

Do not insert the plug if the out-

let is submerged in water or 

snow.

When charging while it is raining 

or snowing, do not connect or 

disconnect the plug if your 

hands are wet. Also, do not get 

the plug or outlet wet.

Do not charge the vehicle 

during a lightning storm.

Prevent the AC charging cable 

from being caught in the door or 

back door.

Do not let the wheels on the AC 

charging cable, plug, charging 

connector and CCID (Charging 

Circuit Interrupting Device).

Firmly insert the plug into the 

outlet.

Do not use an extension cord 

and converting adaptor.

Close the hood before using the 

charging system.

The cooling fan may start oper-

ating suddenly. Touching or get-

ting close to rotating parts such 

as the fan may cause your 

hands or clothes (especially a 

necktie or scarf) to become 

caught and result in a serious 

injury.

After connecting the charging 

cable, confirm that it is not 

wound around anything.

If the power indicator on the 

CCID (Charging Circuit Inter-

rupting Device) does not illumi-

nate after plugging the AC 

charging cable into the outlet, 

unplug it immediately.

If the error warning indicator 

on the CCID (Charging Circuit 

Interrupting Device) illumi-

nates or flashes during 

charging

There may be an electrical leak-

age in the power source path, or 

there may be a malfunction in the 

AC charging cable or CCID 

(Charging Circuit Interrupting 

Device).
Refer to P.88 and follow the cor-

rection procedure. If the error 

warning indicator does not turn off 

even after performing the correc-

tion procedure, immediately stop 

charging, remove the AC 

charging cable and contact your 

SUBARU dealer. Continuing to 

charge the vehicle in that condi-

tion may lead to unforeseen acci-

dents or serious injury.

109

2-2. Charging

2

E

le

ctr

ic 

V

ehi
cl

sys
te

m

1

Unlock the doors to unlock 
the charging connector. 
(

P.91)

The charging connector will be 

unlocked and the AC charging inlet 

light will illuminate when the doors 

are unlocked.

2

Pull the charging connector 
towards you while pressing 
the latch release button.

If the latch release button is 

pressed during charging (while the 

charging indicator is illuminated), 

charging will be interrupted.

3

Attach the charging connec-
tor cap.

WARNING

Onboard traction battery 

charger

The onboard traction battery char-

ger is located in the motor com-

partment. Make sure to observe 

the following precautions regard-

ing the onboard traction battery 

charger. Failure to observe these 

precautions may result in death or 

serious injury such as burns and 

electric shocks.

The onboard traction battery 

charger is hot during charging. 

Do not touch the onboard trac-

tion battery charger, as doing so 

may result in burns.

Do not disassemble, repair or 

modify the onboard traction bat-

tery charger. When the onboard 

traction battery charger needs 

to be repaired, consult your 

SUBARU dealer.

NOTICE

When charging

Do not insert the plug into the AC 

charging inlet.

The AC charging inlet may be 

damaged.

Using private power genera-

tor

Do not use private power genera-

tors as a power source for 

charging.

Doing so may make charging 

unstable, the voltage may be 

insufficient, and the charging 

operation may stop.

Charging station

Due to the environment in which 

the power equipment is located, 

charging may be unstable due to 

noise, the voltage may be insuffi-

cient, and the charging operation 

may stop.

After charging

110

2-2. Charging

4

Close the AC charging inlet 
cap and close the charging 
port lid.

5

Remove the plug from the 
outlet when the charging 
equipment will not be used 
for a prolonged period of 
time.

Hold the body of the plug when 

removing.
Make sure to put the cable away 

immediately after disconnecting. 

(

P.110)

When leaving the plug inserted, 

inspect the plug and connector 

once a month to check if dirt or dust 

has accumulated.

When the outside temperature 

is low or high

The level shown on the SOC (State 

of Charge) gauge (

P.150) may 

drop slightly when the power switch 

is turned to ON, even if charging 

has been completed and the trac-

tion battery is fully charged. How-

ever, this does not indicate a 

malfunction.

When removing the charging 

connector

Press the latch release button, 

check that the lever raises up, and 

then pull the charging connector 

towards you.
If the lever does not raise up even 

after the latch release button is 

pressed, the charging connector is 

locked. If this occurs, unlock the 

doors using the smart key system or 

wireless remote control to unlock 

the charging connector. (

P.165)

If the charging connector can-

not be unlocked

P.93

WARNING

After charging

Remove the plug if it will not be 

used for a long time.
Dirt and dust may accumulate 

plug or outlet, which could cause 

a malfunction or fire, possibly 

leading to death or serious injury.

NOTICE

After charging

Store the AC charging cable out 

of reach from infants and chil-

dren.

111

2-2. Charging

2

E

le

ctr

ic 

V

ehi
cl

sys
te

m

P.100

1

Open the charging port lid. 
(

P.83)

The charging inlet light will illumi-

NOTICE

After removing the plug from the 

outlet, keep it in a safe place 

free from moisture and dust. 

The AC charging cable or plug 

may be damaged if the cable is 

stepped on or ridden over by 

the vehicle.

After disconnecting the charging 

connector from the AC charging 

inlet, make sure to close the AC 

charging inlet cap and close the 

charging port lid.

If the AC charging inlet cap is 

left open, water or foreign 

objects may enter the AC 

charging inlet, which could lead 

to vehicle damage.

How to use DC 

charging

This section explains the 
DC charging procedure for 
the traction battery.
When using a DC charger, 
make sure to check the 
operation instructions of 
the DC charger.

WARNING

When using a DC charger

Observe the following precau-

tions.

Failure to do so may cause an 

unexpected accident, resulting in 

death or serious injury.

Use a SAE J 1772 compliant 

DC charger.

Do not use the charging cable 

longer than 30 meters.

Confirm the following 
before charging

When charging


Content      ..     4      5      6      7     ..