Subaru Impreza (2019 year). Instruction - part 3


  Index      Subaru     Subaru Impreza - instruction 2019 year in english


Search            


Content   ..  1  2  3  4   ..


Subaru Impreza (2019 year). Instruction - part 3


(37,1)

北米Model "A1350BE-A" EDITED: 2018/ 4/ 20

&

Front seats

!

Manual seat (if equipped)

!

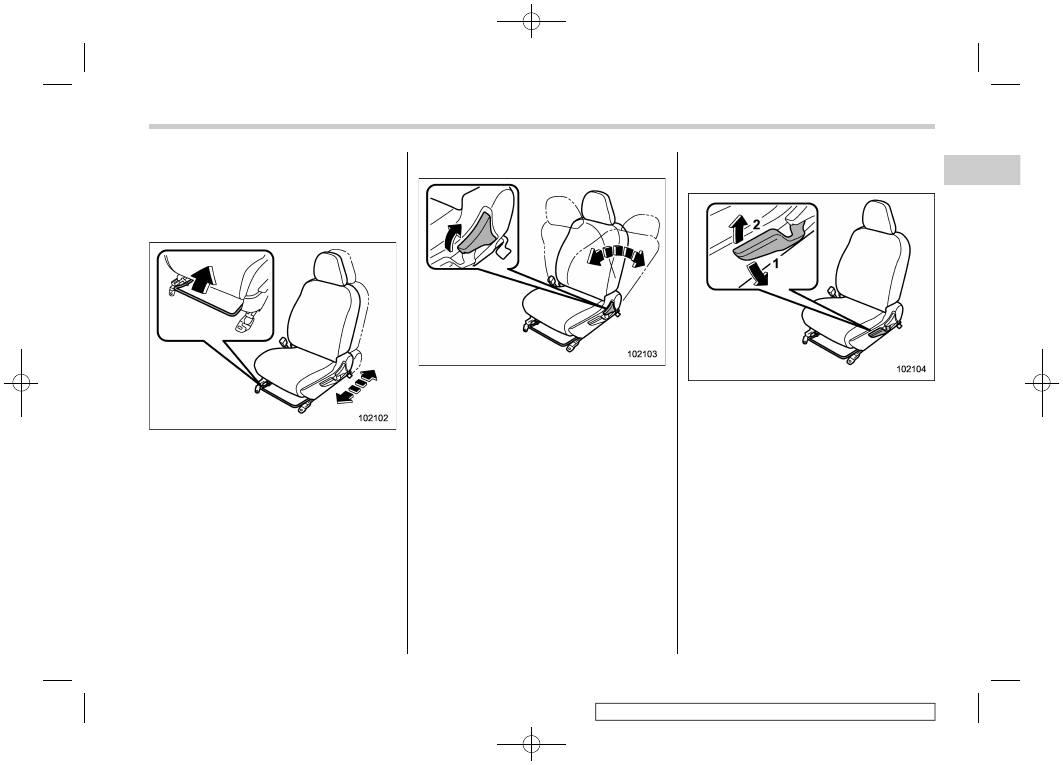
Forward and backward adjust-
ment

Pull the lever upward and slide the seat to
the desired position. Then release the
lever and try to move the seat back and
forth to make sure that it is securely locked
into place.

!

Reclining the seatback

Pull the reclining lever up and adjust the
seatback to the desired position. Then
release the lever and make sure the
seatback is securely locked into place.
The seatback placed in a reclined position
can spring back upward with force when
the lever is pulled. While operating the
lever to return the seatback, hold the
seatback lightly so that it may be raised
back gradually.

!

Seat height adjustment (driver’s
seat)

1)

When the lever is pushed down, the seat
is lowered.

2)

When the lever is pulled up, the seat
rises.

The height of the seat can be adjusted by
moving the seat adjustment lever up and
down.

– CONTINUED –

Seat, seatbelt and SRS airbags/Seats

1-5

1

(38,1)

北米Model "A1350BE-A" EDITED: 2018/ 4/ 20

!

Power seat (driver’s seat – if
equipped)

1)

Seat position forward/backward con-
trol switch
To adjust the seat forward or backward,
move the control switch forward or
backward. During forward/backward ad-
justment of the seat, you cannot adjust
the seat cushion height.

2)

Seat height control switch
To adjust the seat height, pull up or push
down the rear end of the control switch.

3)

Seatback angle (reclining) control
switch
To adjust the angle of the seatback, move
the control switch.

&

Rear seats

!

Armrest (if equipped)

To use the armrest, pull on the top edge of
the armrest.

WARNING

To avoid serious injury, passengers
must never be allowed to sit on the
center armrest.

!

Folding down the rear seatback

WARNING

.

When you fold down the seat-

back, check that there are no
passengers or objects on the rear
seat. Not doing so creates a risk
of injury or property damage if
the seatback suddenly folds
down.

.

Never allow passengers to ride

on the folded rear seatback or in
the cargo area or trunk. Doing so
may result in serious injury or
death.

.

Secure all objects and especially

long items properly to prevent
them from being thrown around
inside the vehicle and causing
serious injury during a sudden
stop, a sudden steering maneu-
ver or a rapid acceleration.

Seat, seatbelt and SRS airbags/Seats

1-6

(39,1)

北米Model "A1350BE-A" EDITED: 2018/ 4/ 20

Unlock the seatback by pulling the lock
release knob and then fold the seatback
down.

!

Return the rear seatback

WARNING

When returning the seatback to its
original position, observe the fol-
lowing precaution.

Failure to observe the precaution
may damage the seatbelt, impairing
its effectiveness, and possibly re-
sult in a serious injury.

.

When returning the seatback to

its original position, pull the
seatbelt out towards the vehicle
exterior so that it will not be
caught between the seatback
and the trim.

Lock release knob
1)

Unlocked

2)

Locked

A)

Unlocking marker in red

To return the seatback to its original
position, raise the seatback until it locks
into place and make sure that the unlock-
ing marker on the lock release knob is no
longer visible.

WARNING

When you return the seatback to its
original position, check that the
unlocking marker on the lock re-
lease knob is not visible. Also, move
the seatback back and forth to
confirm that it is securely fixed in
place. If the seatback is not securely
fixed in place, the seatback may

– CONTINUED –

Seat, seatbelt and SRS airbags/Seats

1-7

1

(40,1)

北米Model "A1350BE-A" EDITED: 2018/ 4/ 20

suddenly fold down in the event of
sudden braking, or objects may
move out from the cargo area or
trunk, which could cause serious
injury or death.

&

Head restraint

WARNING

The front seat head restraints are
designed to be installed into the
front seats only. The rear seat head
restraints are designed to be in-
stalled into the rear seats only. Do
not attempt to install the front seat
head restraints into the rear seats, or
the rear seat head restraints into the
front seats.

NOTE

It is possible to adjust the angle of the
front seat head restraints only. When
installing the front seat head restraints,
make sure that the angle of the head
restraints can be adjusted.

!

Front seats

Both the driver’s seat and the front
passenger’s seat are equipped with head
restraints. Both head restraints are adjus-
table in the following ways.

!

Height adjustment

1)

Head restraint

2)

Release button

To raise:
Pull the head restraint up.
To lower:
Push the head restraint down while press-
ing the release button on the top of the
seatback.
To remove:
While pressing the release button, pull out
the head restraint.

To install:
Install the head restraint into the holes that
are located on the top of the seatback until
the head restraint locks. Press and hold
the release button to lower the head
restraint.

Each head restraint should be adjusted so
that the center of the head restraint is
closest to the top of the occupant’s ears.

NOTE

When the head restraint cannot be
pulled out or installed due to insuffi-
cient clearance between the head re-
straint and the roof, tilt the seat and
then perform the installation and re-
moval tasks.

Seat, seatbelt and SRS airbags/Seats

1-8

(41,1)

北米Model "A1350BE-A" EDITED: 2018/ 4/ 20

!

Angle adjustment

The angle of the head restraint can be
adjusted in several steps. While maintain-
ing a suitable driving posture, adjust the
head restraint to a position where the back
of your head is as close to the head
restraint as possible.

To tilt:
Tilt the head restraint by hand to the
preferred position. A click will be audible
when the head restraint is locked.
To return:
Tilt the head restraint once as far forward
as it can go. The head restraint will
automatically return to the fully upright
position. Then, adjust the head restraint
again to the preferred angle.

!

Rear seats

Both the rear window side seats and the
rear center seat are equipped with head
restraints.

!

Rear windows side seating posi-
tion

1)

Head restraint

2)

Release button

To remove:
While pressing the release button, pull out
the head restraint.
To install:
Install the head restraint into the holes that
are located on the top of the seatback until
the head restraint locks. Press and hold
the release button to lower the head
restraint.

After installing the head restraint, make
sure it is securely locked.

!

Rear center seating position

CAUTION

The head restraint is not intended to
be used at the retracted position.
Before sitting on the seat, raise the
head restraint to the extended posi-
tion.

1)

Incorrect (retracted position)

2)

Correct (extended position)

– CONTINUED –

Seat, seatbelt and SRS airbags/Seats

1-9

1

(42,1)

北米Model "A1350BE-A" EDITED: 2018/ 4/ 20

1)

Head restraint

2)

Release button

To raise:
Pull the head restraint up.
To lower:
Push the head restraint down while press-
ing the release button on the top of the
seatback.
To remove:
While pressing the release button, pull out
the head restraint.
To install:
Install the head restraint into the holes that
are located on the top of the seatback until
the head restraint locks. Press and hold
the release button to lower the head
restraint.

When the rear-center seating position is
occupied, raise the head restraint to the
extended position. When the rear center
seating position is not occupied, lower the
head restraint to improve rearward visibi-
lity.

Seat heater (if equipped)

The seat heater is equipped in the front
seats.

The seat heater operates when the ignition
switch is either in the “ACC” or “ON”
position.

&

Safety precautions

CAUTION

.

People with delicate skin may

suffer slight burns even at low
temperatures if they use the seat
heater for a long period of time.
When using the heater, always be
sure to warn the persons con-
cerned.

.

Do not put anything on the seat

which insulates against heat,
such as a blanket, cushion, or
similar items. This may cause the
seat heater to overheat.

.

When the seat is warmed enough

or before you leave the vehicle,
be sure to turn off the seat heater.

Seat, seatbelt and SRS airbags/Seat heater

1-10

(43,1)

北米Model "A1350BE-A" EDITED: 2018/ 4/ 20

NOTE

Use of the seat heater for a long period
of time while the engine is not running
can cause battery discharge.

&

Operation

1)

HI – Rapid heating

2)

LO – Normal heating

3)

Off

A)

Left-hand side

B)

Right-hand side

To turn on the seat heater, push the “LO” or
“HI” position on the switch, as desired,
depending on the temperature.
Selecting the “HI” position will cause the
seat to heat up quicker.

To turn off the seat heater, lightly press the
opposite side of the current position.

The indicator located on the switch illumi-
nates when the seat heater is in operation.

Seat, seatbelt and SRS airbags/Seat heater

1-11

1

(44,1)

北米Model "A1350BE-A" EDITED: 2018/ 4/ 20

Seatbelts

&

Seatbelt safety tips

WARNING

.

All persons in the vehicle should

fasten their seatbelts BEFORE
the vehicle starts to move. Other-
wise, the possibility of serious
injury becomes greater in the
event of a sudden stop or acci-
dent.

.

All belts should fit snugly in order

to provide full restraint. Loose
fitting belts are not as effective in
preventing or reducing injury.

.

Each seatbelt is designed to sup-

port only one person. Never use a
single belt for two or more per-
sons – even children. Otherwise,
in an accident, serious injury or
death could result.

.

Replace all seatbelt assemblies

including retractors and attach-
ing hardware worn by occupants
of a vehicle that has been in a
serious accident. The entire as-
sembly should be replaced even
if damage is not obvious.

.

Never use a belt that is twisted or

reversed. In an accident, this can
increase the risk or severity of
injury.

.

Keep the lap belt as low as

possible on your hips. In a colli-
sion, this spreads the force of the
lap belt over stronger hip bones
instead of across the weaker
abdomen.

.

Seatbelts provide maximum re-

straint when the occupant sits
well back and upright in the seat.
To reduce the risk of sliding
under the seatbelt in a collision,
the front seatbacks should be
always used in the upright posi-
tion while the vehicle is running.
If the front seatbacks are not
used in the upright position in a
collision, the risk of sliding under
the lap belt and of the lap belt
sliding up over the abdomen will
increase, and both can result in
serious internal injury or death.

.

Do not put cushions or any other

materials between occupants
and seatbacks or seat cushions.
If you do so, the risk of sliding
under the lap belt and of the lap
belt sliding up over the abdomen
will increase, and both can result
in serious internal injury or death.

WARNING

Never place the shoulder belt under
the arm or behind the back. If an
accident occurs, this can increase
the risk or severity of injury.

CAUTION

Metallic parts of the seatbelt can
become very hot in a vehicle that has
been closed up in sunny weather;
they could burn an occupant. Do not
touch such hot parts until they cool.

Your vehicle is equipped with a crash
sensing and diagnostic module, which will
record the use of the seatbelt by the front

Seat, seatbelt and SRS airbags/Seatbelts

1-12

(45,1)

北米Model "A1350BE-A" EDITED: 2018/ 4/ 20

passenger when any of the SRS frontal,
side and curtain airbags deploy.

!

Infants or small children

Use a child restraint system that is suitable
for your vehicle. Refer to “Child restraint
systems” F1-26.

!

Children

WARNING

Place children in the rear seat prop-
erly restrained at all times. The SRS
airbag deploys with considerable
speed and force and can injure or
even kill children, especially if they
are not restrained or improperly
restrained. Because children are
lighter and weaker than adults, their
risk of being injured from deploy-
ment is greater. For that reason, we
strongly recommend that ALL chil-
dren (including those in child seats
and those that have outgrown child
restraint devices) sit in the REAR
seat properly restrained at all times
in a child restraint device or in a
seatbelt, whichever is appropriate
for the child’s height and weight.

Secure ALL types of child restraint
devices (including forward facing
child seats) in the REAR seats at all

times.

NEVER INSTALL A CHILD SEAT IN
THE FRONT SEAT. DOING SO RISKS
SERIOUS INJURY OR DEATH TO
THE CHILD BY PLACING THE
CHILD’S HEAD TOO CLOSE TO
THE SRS AIRBAG.

According to accident statistics,
children are safer when properly
restrained in the rear seating posi-
tions than in the front seating posi-
tions. For instructions and precau-
tions concerning the child restraint
system, refer to “Child restraint
systems” 
F1-26.

If a child is too big for a child restraint
system, the child should sit in the rear seat
and be restrained using the seatbelts.
According to accident statistics, children
are safer when properly restrained in the
rear seating positions than in the front
seating positions. Never allow a child to
stand up or kneel on the seat.

If the shoulder portion of the belt crosses
the face or neck, move the child closer to
the belt buckle to help provide a good
shoulder belt fit. Take care to securely
place the lap belt as low as possible on the
hips and not on the child’s waist. If the
shoulder portion of the belt cannot be

properly positioned, use a child restraint
system. Never place the shoulder belt
under the child’s arm or behind the child’s
back.

!

Expectant mothers

Expectant mothers also need to use the
seatbelts. They should consult their doctor
for specific recommendations. The lap belt
should be worn securely and as low as
possible over the hips, not over the waist.

– CONTINUED –

Seat, seatbelt and SRS airbags/Seatbelts

1-13

1

(46,1)

北米Model "A1350BE-A" EDITED: 2018/ 4/ 20

&

Emergency Locking Retrac-
tor (ELR)

The driver’s seatbelt has an Emergency
Locking Retractor (ELR).
The emergency locking retractor allows
normal body movement but the retractor
locks automatically during a sudden stop,
impact or if you pull the belt very quickly
out of the retractor.

&

Automatic Locking Retractor/
Emergency Locking Retrac-
tor (ALR/ELR)

Each passenger’s seatbelt has an Auto-
matic Locking Retractor/Emergency Lock-
ing Retractor (ALR/ELR). The Automatic
Locking Retractor/Emergency Locking
Retractor normally functions as an Emer-
gency Locking Retractor (ELR). The ALR/
ELR has an additional locking mode
“Automatic Locking Retractor (ALR)
mode” intended to secure a child restraint
system. When the seatbelt is once drawn
out completely and is then retracted even
slightly, the retractor locks the seatbelt in
that position and the seatbelt cannot be
extended. As the belt is rewinding, clicks
will be heard which indicate the retractor
functions as an ALR. When the seatbelt is
retracted fully, the ALR mode is released.

When securing a child restraint system on
the rear seats by the use of the seatbelt,
change the seatbelt to the Automatic
Locking Retractor (ALR) mode.

After removing the child restraint system,
make sure that the seatbelt retracts fully
and the retractor returned to the Emer-
gency Locking Retractor (ELR) mode.
For instructions on how to convert the
retractor to the ALR mode and restore it to
the ELR mode, refer to “Installing child
restraint systems with ALR/ELR seatbelt”
F1-30.

&

Seatbelt warning light
and chime

Refer to “Seatbelt warning light and chime”
F3-14.

&

Fastening the seatbelt

!

Front seatbelts

1. Adjust the seat position according to
the following procedure.
Driver’s seat: Adjust the seatback to the
upright position. Move the seat as far from
the steering wheel as practical while still
maintaining full vehicle control.
Front passenger’s seat: Adjust the seat-
back to the upright position. Move the seat
as far back as possible.

2. Sit well back in the seat.
3. Pick up the tongue plate and pull the
belt out slowly. Do not let it get twisted.

.

If the belt stops before reaching the

buckle, return the belt slightly and pull it
out more slowly.
.

If the belt still cannot be unlocked, let

the belt retract slightly after giving it a
strong pull, then pull it out slowly again.

4. Insert the tongue plate into the buckle
until you hear a click.

Seat, seatbelt and SRS airbags/Seatbelts

1-14

(47,1)

北米Model "A1350BE-A" EDITED: 2018/ 4/ 20

5. To make the lap part tight, pull up on
the shoulder belt.
6. Place the lap belt as low as possible on
your hips, not on your waist.

!

Adjusting the front seat shoulder
belt anchor height

The shoulder belt anchor height should be
adjusted to the position best suited for the
driver/front passenger. Always adjust the
anchor height so that the shoulder belt
passes over the middle of the shoulder
without touching the neck.

To raise:
Pull the release knob and slide the anchor
up.
To lower:
Pull the release knob and slide the anchor
down.

Pull down on the anchor to make sure that
it is locked in place.

WARNING

When wearing the seatbelts, make
sure the shoulder portion of the
webbing does not pass over your
neck. If it does, adjust the seatbelt
anchor to a lower position. Placing
the shoulder belt over the neck may
result in neck injury during sudden
braking or in a collision.

!

Unfastening the seatbelt

1. Push the button on the buckle.
2. Have the seatbelt retracted slowly to
avoid the seatbelt being tangled or twisted.

Before closing the door, make sure that the
belts are retracted properly to avoid
catching the belt webbing in the door.

– CONTINUED –

Seat, seatbelt and SRS airbags/Seatbelts

1-15

1

(48,1)

北米Model "A1350BE-A" EDITED: 2018/ 4/ 20

!

Rear seatbelts (except rear center
seatbelt on 5-door models)

1. Sit well back in the seat.
2. Pick up the tongue plate and pull the
belt out slowly. Do not let it get twisted.

.

If the belt stops before reaching the

buckle, return the belt slightly and pull it
out more slowly.
.

If the belt still cannot be unlocked, let

the belt retract slightly after giving it a
strong pull, then pull it out slowly again.

3. Insert the tongue plate into the buckle
until you hear a click.

4. To make the lap part tight, pull up on
the shoulder belt.
5. Place the lap belt as low as possible on
your hips, not on your waist.

!

Unfastening the seatbelt

1. Push the button on the buckle.
2. Have the seatbelt retracted slowly to
avoid the seatbelt being tangled or twisted.

Before closing the door, make sure that the
belts are retracted properly to avoid
catching the belt webbing in the door.

Seat, seatbelt and SRS airbags/Seatbelts

1-16

(49,1)

北米Model "A1350BE-A" EDITED: 2018/ 4/ 20

!

Rear center seatbelt on 5-door
models

1)

Center seatbelt tongue plate

2)

Connector (tongue)

3)

Connector (buckle)

4)

Center seatbelt buckle

WARNING

Fastening the seatbelt with the web-
bing twisted can increase the risk or
severity of injury in an accident.
When fastening the belt after it is
pulled out from the retractor, espe-
cially when inserting the connec-
tor’s tongue plate into the mating
buckle (on right-hand side), always
check that the webbing is not
twisted.

WARNING

.

Be sure to fasten both tongue

plates to the respective buckles.
If the seatbelt is used only as a
shoulder belt (with the connec-
tor’s tongue plate not fastened to
the connector’s buckle on the
right-hand side), it cannot prop-
erly restrain the wearer in posi-
tion in an accident, possibly
resulting in serious injury or
death.

.

The head restraint is not intended

to be used at the lowest position.
Before sitting on the seat, raise
the head restraint to the extended
position. Otherwise, in an acci-
dent, serious injury or death
could result.

– CONTINUED –

Seat, seatbelt and SRS airbags/Seatbelts

1-17

1

(50,1)

北米Model "A1350BE-A" EDITED: 2018/ 4/ 20

1. Raise the head restraint to the ex-
tended position. Do not remove the head
restraint.

2. Remove the tongue plate from the belt
holder on the right side of the cargo area
and pull out the seatbelt slowly.

3. After drawing out the seatbelt, pass it
through the belt guide as follows: First
insert one edge of the belt into the open
gap in the belt guide; then slide the rest of
the belt in, so that the whole belt fits inside.

4. After confirming that the webbing is not
twisted, insert the connector (tongue)
attached at the webbing end into the
buckle on the right-hand side until a click
is heard.

.

If the belt stops before reaching the

buckle, return the belt slightly and pull it
out more slowly.
.

If the belt still cannot be unlocked, let

the belt retract slightly after giving it a
strong pull, then pull it out slowly again.

Seat, seatbelt and SRS airbags/Seatbelts

1-18

(51,1)

北米Model "A1350BE-A" EDITED: 2018/ 4/ 20

5. Insert the center seatbelt tongue plate
into the center seatbelt buckle until it
clicks.

6. To make the lap part tight, pull up on
the shoulder belt.
7. Place the lap belt as low as possible on
your hips, not on your waist.

!

Unfastening the seatbelt

1. Push the release button of the center
seatbelt buckle (on the left-hand side) to
unfasten the seatbelt.

NOTE

When the seatback is folded down for
greater cargo area, it is necessary to
disconnect the connector.

– CONTINUED –

Seat, seatbelt and SRS airbags/Seatbelts

1-19

1

(52,1)

北米Model "A1350BE-A" EDITED: 2018/ 4/ 20

2. Insert a tongue plate or other hard
pointed object into the slot in the connector
(buckle) on the right-hand side and push it
in. The connector (tongue) plate will then
disconnect from the buckle.

3. Allow the retractor to roll up the belt.
You should hold the webbing end and
guide it back into the retractor while it is
rolling up. Insert the connector (tongue)
into the belt holder.

CAUTION

Observe the following precautions.
Otherwise, the tongue plate could
hit against the trim, causing damage
to the trim.

.

Do not allow the retractor to roll

up the seatbelt too quickly.

.

Have the seatbelt fully rolled up

so that the tongue plates are
neatly stored.

Seat, seatbelt and SRS airbags/Seatbelts

1-20


Content   ..  1  2  3  4   ..