Subaru Legacy III (2000-2003 year). Manual - part 938


  Index      Subaru     Subaru Legacy III - service repair manual 2000-2003 year


Search            


Content   ..  936  937  938  939   ..


Subaru Legacy III (2000-2003 year). Manual - part 938


GW-12

GLASS/WINDOWS/MIRRORS

FRONT DOOR GLASS

6. Front Door Glass

A: REMOVAL

1) Remove door trim.  <Ref. to EI-30, REMOVAL,
Front Door Trim.>
2) Remove sealing cover.  <Ref. to EB-13, RE-
MOVAL, Front Sealing Cover.>
3) Remove inner remote.  <Ref. to SL-19, REMOV-
AL, Front Inner Remote.>
4) Remove outer weatherstrip.
5) Remove inner stabilizer.

6) Remove outer mirror. <Ref. to GW-33, REMOV-
AL, Outer Mirror Assembly.>
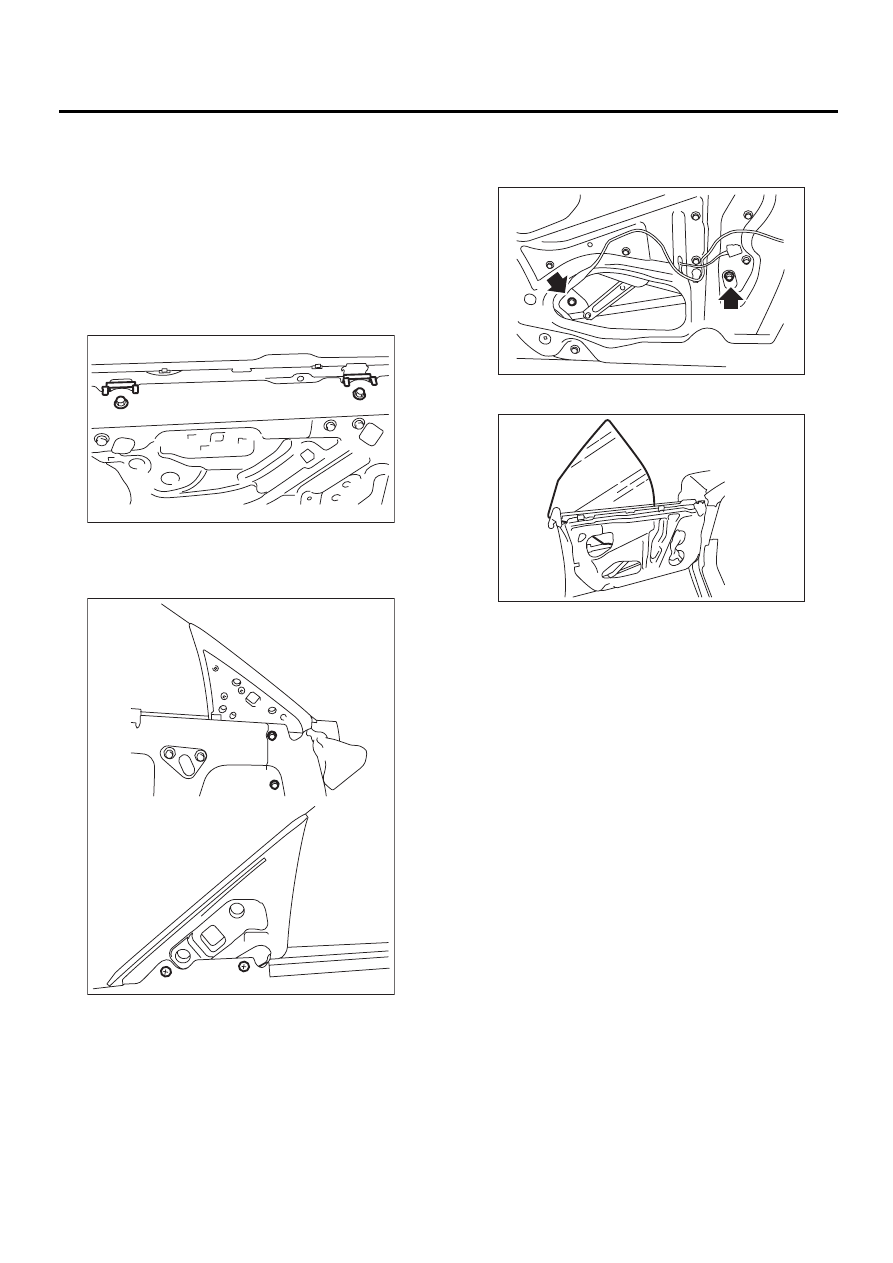
7) Remove gusset.

8) Operate the power window switch to move glass
to the position shown in the figure, and then re-
move the two nuts from service holes.

9) Take out door glass upward.

NOTE:
Do not turn regulator in the closing direction after
removal of the glass. Otherwise gear may be disen-
gaged.

B: INSTALLATION

1) Install in the reverse order of removal.

NOTE:
Make sure that glass stay is placed securely in
sash. 
2) Adjust front door glass. <Ref. to GW-13, AD-
JUSTMENT, Front Door Glass.>

GW-00085

GW-00086

GW-00087

GW-00088

GW-13

GLASS/WINDOWS/MIRRORS

FRONT DOOR GLASS

C: ADJUSTMENT

NOTE:
Before adjustment, ensure that all adjusting bolts of
stabilizer, upper stopper, and sash are loose and
door glass is raised so that it is in contact with
weatherstrip. 
1) Temporarily tighten one adjusting bolt on one
side of rear sash at the midpoint of slotted hole in
the inner panel.
2) Temporarily tighten regulator B-channel in a po-
sition slightly lower than midpoint of slotted hole.
3) Lower door glass 10 to 15 mm (0.39 to 0.59 in)
from fully closed position. While applying outward
pressure of 45

±

5 N (4.59

±

0.51 kgf, 10.1

±

1.1 lb) (F)

to upper edge of glass above midpoint of two outer
stabilizers, press inner stabilizer at 10

±

5 N

(1.02

±

0.51 kgf, 2.2

±

1.1 lb) until it just touches the

glass, then secure it.

4) For adjustment of clearance between front and
rear glasses, loosen nuts (A) and (B), and move
glass sash back and forth until clearance becomes
the value shown.

5) For adjustment of upper and lower ends of cen-
ter pillar, loosen adjusting nut (A) of B-channel (B).

(1) Full close

(2) Stabilizer

(3) 10 – 15 mm (0.39 – 0.59 in)

GW-00144

F

A

A  =  A

A

( 1 )

( 2 )

( 2 )

( 3 )

(1) 38 mm (1.50 in)

GW-00090

( A )

( B )

GW-00145

A-A

A A

( 1 )

GW-00092

( A )

( B )

GW-14

GLASS/WINDOWS/MIRRORS

FRONT DOOR GLASS

6) Adjust so that upper and lower ends of center pil-
lar are the same size.

7) For glass stroke adjustment, close door, raise
glass until positional relationship between glass
and weatherstrip becomes as shown. And secure
the glass so that upper stopper lightly touches the
glass holder.

8) After stabilizer adjustment, carry out glass crimp
adjustment. First, visually ensure positional rela-
tionship between retainer & molding and glass of
the roof side, and then begin with rear sash adjust-
ment. Adjust two adjusting bolts alternately step by
step to obtain dimensions shown below (cross-sec-
tion A).

NOTE:
If two nuts are loosened at the same time, sash
moves back and forth. Therefore, when one nut is
adjusted, secure the other. 
9) Make the same adjustment of two adjusting bolts
of rear sash.

NOTE:
Do not tilt sash bracket to inner panel during adjust-
ment. Otherwise smooth regulator operation can-
not be achieved. 

(1) Glass tilts too far rearward

(2) Narrow

(3) Wide

(4) Lower B channel

(5) Glass tilts too far forward

(6) Raise B channel

(1) 2.5±0.5 mm (0.098±0.020 in)

(2) 6 mm (0.24 in)

GW-00093

( 1 )

( 2 )

( 2 )

( 3 )

( 3 )

( 4 )

( 5 )

( 6 )

GW-00146

A-A

A

A

( 1 )

6
(0.24)

(1) 2.5±0.5 mm (0.098±0.020 in)

(2) 6 mm (0.24 in)

(1) Sash bracket

(2) Rear sash

(3) Adjust a line parallel

(4) Sash

(5) Inner panel

GW-00146

A-A

A

A

( 1 )

6
(0.24)

GW-00096

( 1 )

( 2 )

( 3 )

( 5 )

( 4 )

GW-15

GLASS/WINDOWS/MIRRORS

FRONT DOOR GLASS

10) Make adjustment of front sash in the same
manner as that of rear sash.

CAUTION:
Although front and rear sashes must, as a rule, 
be adjusted in the same manner, in some door 
installation, the adjustment in a different man-
ner may be required. However, adjustment of 
one sash to the maximum amount and the other 
to the minimum amount is not permitted. Such 
adjustment may result in application of exces-
sive load to regulator. 
11) After adjustments, tighten nuts.
12) After adjustment of glass, if there is a gap be-
tween outer lip of gusset and glass surface, adjust
the gap with adjusting bolt (A) in lower fitting part of
gusset to prevent generation of wind noise.
13) During adjustments, loosen other three clamp-
ing bolts.

14) After adjustment, tighten bolts and nuts.

GW-00097

( A )


Content   ..  936  937  938  939   ..