Subaru Legacy III (2000-2003 year). Manual - part 544


  Index      Subaru     Subaru Legacy III - service repair manual 2000-2003 year


Search            


Content   ..  542  543  544  545   ..


Subaru Legacy III (2000-2003 year). Manual - part 544


AT-70

AUTOMATIC TRANSMISSION

TRANSFER DUTY SOLENOID AND VALVE BODY

18.Transfer Duty Solenoid and 

Valve Body

A: REMOVAL

1) Set the vehicle on a lift.
2) Disconnect the ground cable from battery.
3) Remove the air cleaner case. (2.0 L non-TURBO
and 2.5 L models)
<Ref. to IN(H4SO)-6, REMOVAL, Air Cleaner
Case.>
4) Remove air intake chamber. (3.0 L model) 
<Ref. to IN(H6DO)-6, REMOVAL, Air Intake Cham-
ber.>
5) Remove intercooler. (TURBO model)
<Ref. to IN(H4DOSTC)-13, REMOVAL, Intercool-
er.>
6) Remove the pitching stopper.

7) Remove the front exhaust pipe with center ex-
haust pipe. (Non-TURBO model)
2.0 L and 2.5 L with OBD models
<Ref. to EX(H4SO)-5, REMOVAL, Front Exhaust
Pipe.>
2.0 L and 2.5 L without OBD models
<Ref. to EX(H4SOw/oOBD)-9, REMOVAL, Front
Exhaust Pipe.>
3.0 L model
<Ref. to EX(H6DO)-5, REMOVAL, Front Exhaust
Pipe.>
8) Remove center exhaust pipe. (TURBO model)
<Ref. to EX(H4DOSTC)-7, REMOVAL, Center Ex-
haust Pipe.>
9) Remove the rear exhaust pipe and muffler.
2.0 L non-TURBO and 2.5 L with OBD models
<Ref. to EX(H4SO)-9, REMOVAL, Rear Exhaust
Pipe.> and 
<Ref. to EX(H4SO)-10, REMOVAL,
Muffler.>
2.0 L and 2.5 L without OBD models

<Ref.  to  EX(H4SOw/oOBD)-13, 

REMOVAL, Rear

Exhaust Pipe.> and 

<Ref. to EX(H4SOw/oOBD)-14,

REMOVAL, Muffler.>
3.0 L model
<Ref. to EX(H6DO)-8, REMOVAL, Rear Exhaust
Pipe.> and <
Ref. to EX(H6DO)-9, REMOVAL, Muf-
fler.>

TURBO model

<Ref.  to  EX(H4DOSTC)-12, 

REMOVAL, Rear Ex-

haust Pipe.> and 

<Ref. to EX(H4DOSTC)-13, 

RE-

MOVAL, Muffler.>
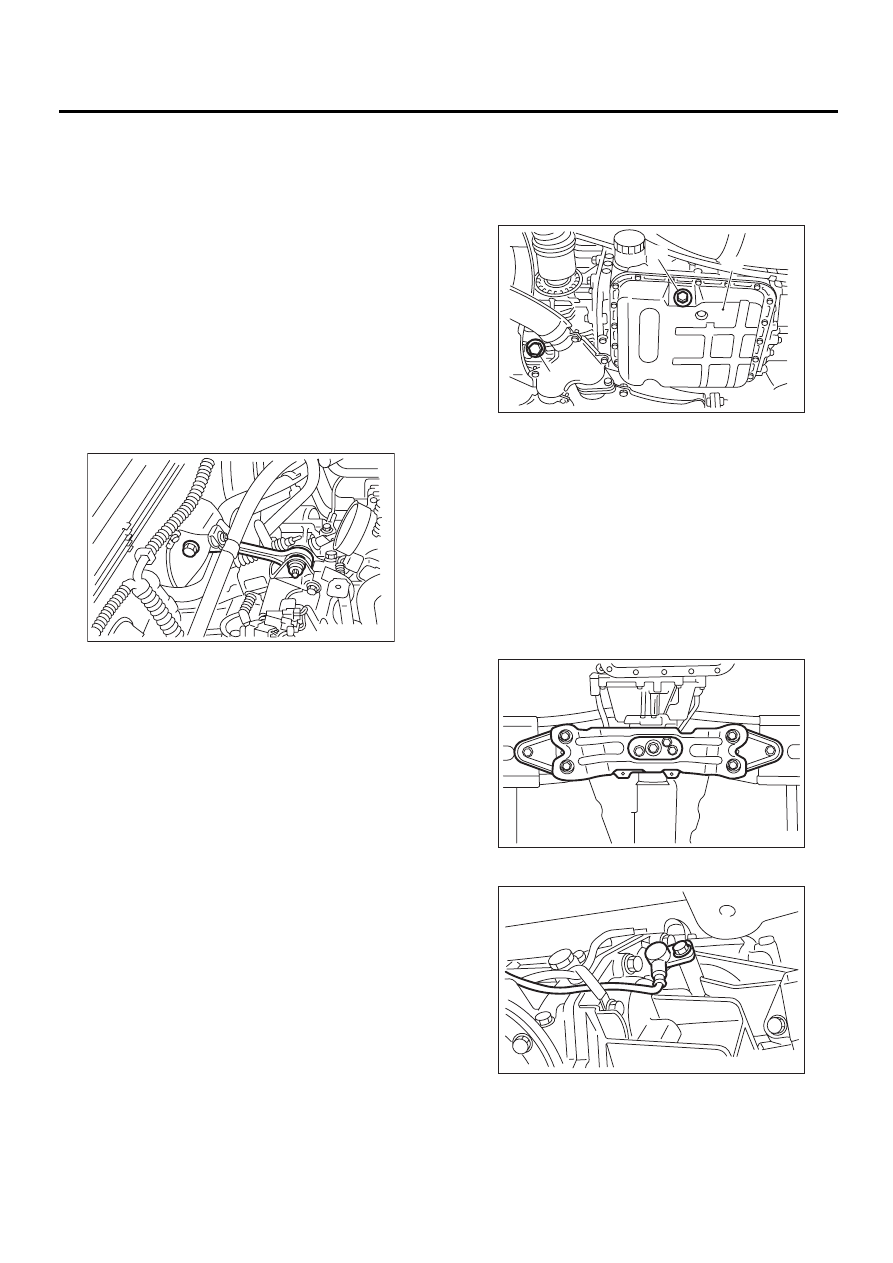
10) Raise the vehicle and drain the ATF.

11) Remove the heat shield cover. (If equipped)
12) Remove the propeller shaft. <Ref. to DS-14,
REMOVAL, Propeller Shaft.>
13) Remove the transmission rear crossmember.

(1) Support the transmission using a transmis-
sion jack and raise slightly.
(2) Remove the bolts and nuts as shown in the
figure.

14) Remove the rear vehicle speed sensor.

AT-00679

(A) Oil pan

(B) Drain plug

(C) Deferential oil drain plug

AT-00016 

( A )

( B )

( C )

AT-00687

AT-00082

AT-71

AUTOMATIC TRANSMISSION

TRANSFER DUTY SOLENOID AND VALVE BODY

15) Remove the select cable nut.

16) Move the gear select cable so that extension
bolts can be removed.
17) Remove the bolts.
18) Remove the extension case.

NOTE:
Use a container to catch oil flowing from extension.

19) Disconnect the transfer duty solenoid connec-
tor.
20) Remove the transfer duty solenoid and transfer
valve body.

B: INSTALLATION

1) Install the transfer duty solenoid and transfer
valve body.

(1) Install the transfer duty solenoid and trans-
fer valve body.

Tightening torque:

T: 8 N·m (0.8 kgf-m, 5.8 ft-lb)

(2) Connect the transfer duty solenoid connec-
tor.

2) Install a new gasket and the extension case to
transmission case.

(1) Tighten eleven bolts.

Tightening torque:

25 N·m (2.5 kgf-m, 18.1 ft-lb)

(2) Adjust the select cable. <Ref. to CS-14, AD-
JUSTMENT, Select Cable.>

3) Install the rear vehicle speed sensor.

Tightening torque:

T: 7 N·m (0.7 kgf-m, 5.1 ft-lb)

(A) Transfer valve body

(B) Transfer duty solenoid connector

(C) Transfer duty solenoid

AT-00083

AT-00084

AT-00085

( A )

( B )

( C )

(A) Transfer valve body

(B) Transfer duty solenoid connector

(C) Transfer duty solenoid

AT-00086

( A )

( B )

( C )

T

T

AT-00087

T

AT-72

AUTOMATIC TRANSMISSION

TRANSFER DUTY SOLENOID AND VALVE BODY

4) Install the transmission rear crossmember.

(1) Tighten the bolts.

Tightening torque:

T1: 35 N·m (3.6 kgf-m, 26 ft-lb)
T2: 70 N·m (7.1 kgf-m, 51 ft-lb)

(2) Remove the transmission jack.

5) Install the propeller shaft. <Ref. to DS-15, IN-
STALLATION, Propeller Shaft.>
6) Install the front, center rear exhaust pipe and
muffler. (Non-TURBO model)
2.0 L and 2.5 L with OBD models
<Ref. to EX(H4SO)-6, INSTALLATION, Front Ex-
haust Pipe.>,
  <Ref. to EX(H4SO)-9, INSTALLA-
TION, Rear Exhaust Pipe.> and 
<Ref. to
EX(H4SO)-10, INSTALLATION, Muffler.>
2.0 L and 2.5 L without OBD models
<Ref. to EX(H4SOw/oOBD)-10, INSTALLATION,
Front Exhaust Pipe.>,
 <Ref. to EX(H4SOw/oOBD)-
13, INSTALLATION, Rear Exhaust Pipe.> and
<Ref. to EX(H4SOw/oOBD)-14, INSTALLATION,
Muffler.>
3.0 L model
<Ref. to EX(H6DO)-6, INSTALLATION, Front Ex-
haust Pipe.>,
  <Ref. to EX(H6DO)-8, INSTALLA-
TION, Rear Exhaust Pipe.> and 
<Ref. to
EX(H6DO)-9, INSTALLATION, Muffler.>
7) Install center and rear exhaust pipes, and muf-
fler. (TURBO model)
<Ref. to EX(H4DOSTC)-8, INSTALLATION, Cen-
ter Exhaust Pipe.>,
 <Ref. to EX(H4DOSTC)-12, IN-
STALLATION, Rear Exhaust Pipe.>
 and <Ref. to
EX(H4DOSTC)-13, INSTALLATION, Muffler.>
8) Connect the transmission harness connector.

9) Install the pitching stopper.

Tightening torque:

T1: 50 N·m (5.1 kgf-m, 37 ft-lb)
T2: 58 N·m (5.9 kgf-m, 43 ft-lb)

10) Install the air cleaner case. (2.0 L non-TURBO
and 2.5 L models)
<Ref. to IN(H4SO)-6, INSTALLATION, Air Cleaner
Case.>
11) Install air intake chamber. (3.0 L model) 
<Ref. to IN(H6DO)-6, INSTALLATION, Air Intake
Chamber.>
12) Install intercooler. (TURBO model)
<Ref. to IN(H4DOSTC)-14, INSTALLATION, Inter-
cooler.>
13) Fill ATF up to the middle of the “COLD” side on
level gauge by using the gauge hole. <Ref. to AT-
30, Automatic Transmission Fluid.>
14) Check the ATF level. <Ref. to AT-30, Automat-
ic Transmission Fluid.>

T1

T2

T2

AT-00688

AT-00089

AT-00691

T1

T2

AT-73

AUTOMATIC TRANSMISSION

ATF FILTER

19.ATF Filter

A: REMOVAL

1. EXCEPT 3.0 L MODEL

NOTE:
The ATF filter is maintenance free.
1) Lift-up the vehicle.
2) Using ST, remove ATF filter.
ST

498545400

OIL FILTER WRENCH

2. 3.0 L MODEL

• ATF Filter

NOTE:
The ATF filter is maintenance free.
1) Lift-up the vehicle.
2) Remove front left mud guard.
<Ref. to EI-22, REMOVAL, Mud Guard.>
3) Using ST, remove ATF filter.
ST

498545400

OIL FILTER WRENCH

• ATF Filter Assembly

1) Remove battery.
2) Lift-up the vehicle.
3) Remove front left mud guard.
<Ref. to EI-22, REMOVAL, Mud Guard.>
4) Lower the vehicle.
5) Release clamp of IN, OUT of oil filter hose, and
remove hose from pipe.

NOTE:
• Plug the pipe.

• Put a mark etc., to distinguish IN, OUT on pipe
and hose.

6) Remove oil filter bracket installation nut.

7) Remove ATF filter assembly.
8) Remove ATF filter with attachment to bracket.
9) Get new ATF filter and apply a thin coat of ATF
to the oil seal.

3. TURBO MODEL

NOTE:
The ATF filter is maintenance free.
1) Set the vehicle on lift.
2) Remove the battery.
3) Remove oil filter bracket mounting bolts.

(A) ATF filter

AT-00091

( A )

ST

AT-00700

AT-00701

AT-00702

AT-00906


Content   ..  542  543  544  545   ..