Subaru Impreza 3 / Impreza WRX / Impreza WRX STI. Manual - part 727
 

  Index      Subaru     Subaru Impreza 3 / Impreza WRX / Impreza WRX STI - service repair manual 2008-2014 year


Search            


Content   ..  725  726  727  728   ..


Subaru Impreza 3 / Impreza WRX / Impreza WRX STI. Manual - part 727


SR-5

Glass Lid

SUNROOF/T-TOP/CONVERTIBLE TOP (SUNROOF)

3. Glass Lid

A: REMOVAL

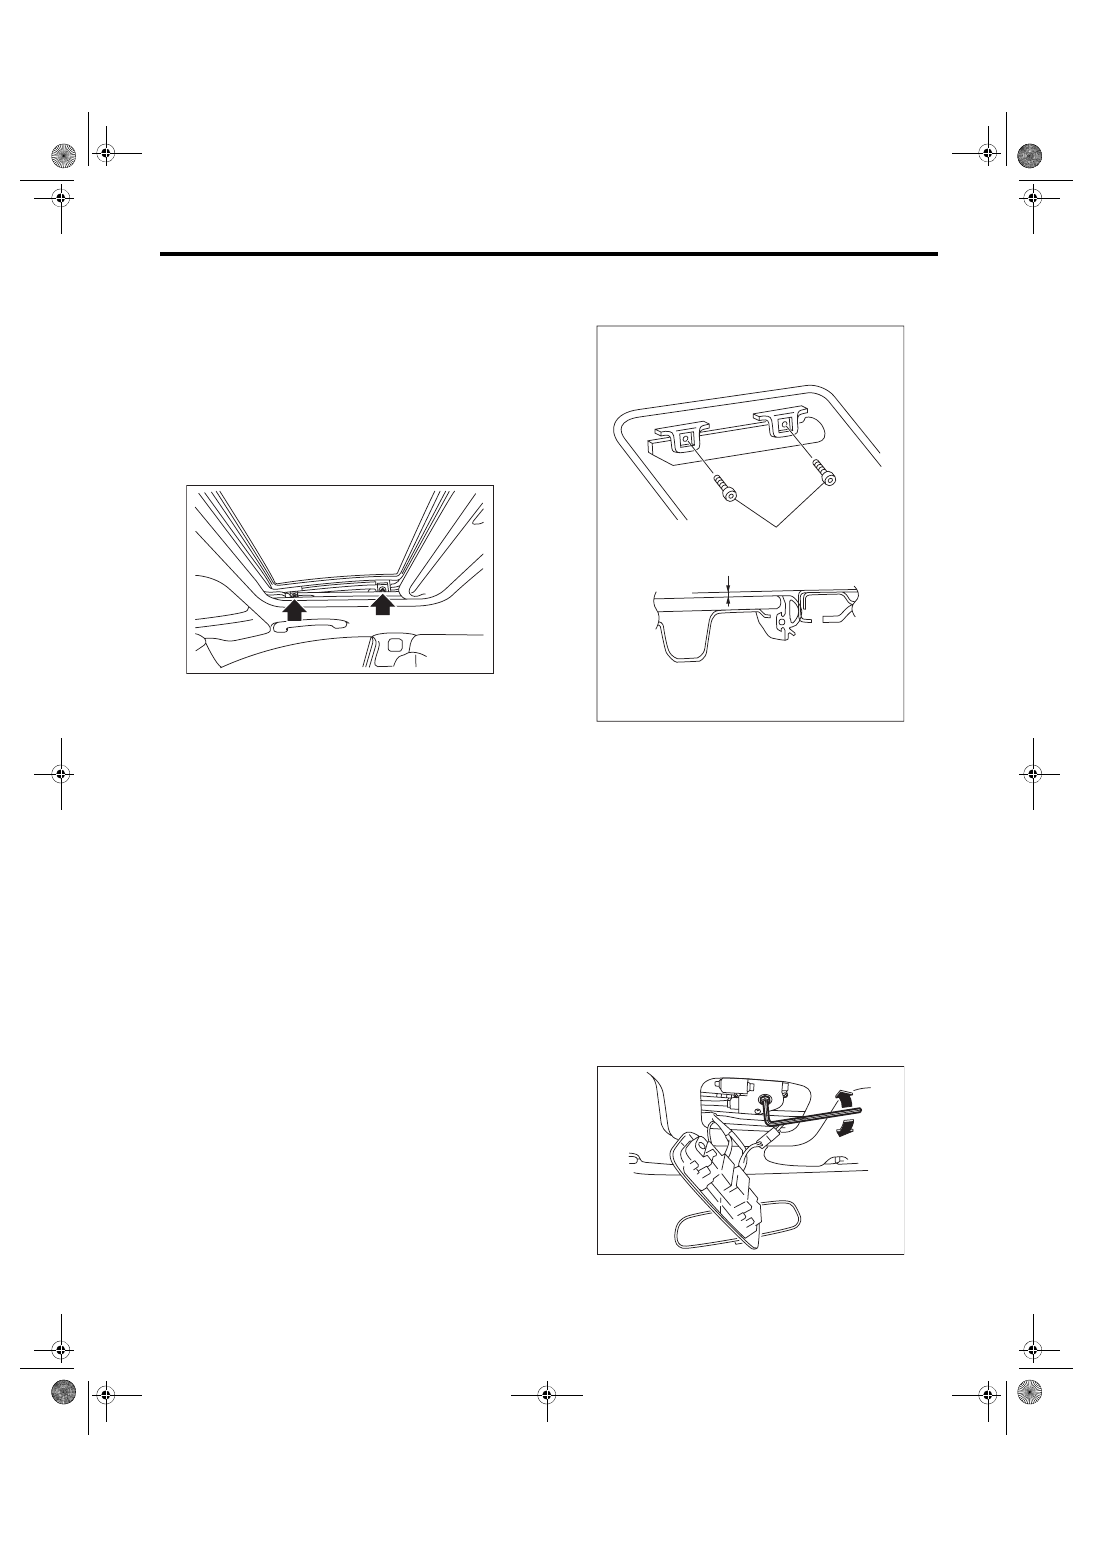
1) Open the sunshade.

2) Remove the TORX

®

 bolt, and then remove the

glass lid carefully.
CAUTION:

• The  thread  locker  is  applied  to  the  TORX

®

bolts,  so  use  the  new  parts  once  they  are  re-

moved.

• Be careful not to damage the glass lid.

B: INSTALLATION

Install each part in the reverse order of removal.
Tightening torque:

Refer to “COMPONENT” of “General Descrip-

tion”. <Ref. to SR-2, COMPONENT, General 

Description.>

C: ADJUSTMENT

1) Open the sunshade.

2) Loosen the glass lid mounting TORX

®

 bolts (A),

and then adjust the height by moving the lid side.

Difference in height between glass lid and roof 

panel L:

0.75

±

1.0 mm (0.03

±

0.04 in)

D: FORCED DRIVE

CAUTION:

After a forced operation, make sure to perform

an initialize operation. <Ref. to SR-4, INSPEC-

TION, Sunroof Control System.>
NOTE:

If the glass lid does not operate or is not supplied

with power, move the glass lid using the hexagon

wrench.

1) Remove the spot map light. <Ref. to LI-33, RE-

MOVAL, Spot Map Light.>

2) Insert  the  hexagon  wrench  securely  until  it

touches the motor shaft end.

3) Turn the hexagon wrench, and move the glass

lid.

• Turning right, the glass lid open.

• Turning left, the glass lid close.

SR-00185

SR-00152

L

(A)

SR-00153

SR-6

Sunroof Assembly

SUNROOF/T-TOP/CONVERTIBLE TOP (SUNROOF)

4. Sunroof Assembly

A: REMOVAL

CAUTION:

When removing the clip, use great care not to

damage the roof trim.

1) Disconnect the ground cable from battery.

2) Remove the roof trim. <Ref. to EI-66, REMOV-

AL, Roof Trim.>

3) Disconnect  the  harness  connector  of  sunroof

motor.

4) Remove the glass lid. <Ref. to SR-5, REMOV-

AL, Glass Lid.>

5) Remove the four drain tubes from frame assem-

bly.

6) Remove the assist rail bracket (front) (A) and as-

sist rail bracket (rear) (B).

7) Remove the curtain airbag module. (model with

curtain airbag module) <Ref. to AB-19, REMOVAL,

Curtain Airbag Module.>

8) Remove  the  bolts  and  nuts  and  remove  the

frame assembly.

B: INSTALLATION

CAUTION:

Be careful not to snag the harness.

Install each part in the reverse order of removal.
Tightening torque:

Refer to “COMPONENT” of “General Descrip-

tion”. <Ref. to SR-2, COMPONENT, General 

Description.>

NOTE:

• Be sure to connect the harness connector.

• When installing the drain tube, insert it securely

into drain pipe.
Length A:

15 mm (0.59 in) or more

C: DISASSEMBLY

1) Remove the sunroof motor. <Ref. to SR-7, RE-

MOVAL, Sunroof Motor.>

2) Remove the sunshade. <Ref. to SR-9, REMOV-

AL, Sunshade.>

D: ASSEMBLY

Assemble each part in the reverse order of disas-

sembly.

(A)

(B)

SR-00154

SR-00155

A

SR-00005

SR-7

Sunroof Motor

SUNROOF/T-TOP/CONVERTIBLE TOP (SUNROOF)

5. Sunroof Motor

A: REMOVAL

CAUTION:

Never rotate the motor assembly after remov-

ing it.

1) Completely close the glass lid.

2) Disconnect the ground cable from battery.

3) Remove the spot map light. <Ref. to LI-33, RE-

MOVAL, Spot Map Light.>

4) Remove the motor assembly.
CAUTION:

When  removing  the  motor  assembly,  secure

the cable wires to prevent moves.

(1) Disconnect  the  sunroof  motor  connector

(A).

(2) Remove the screws (B) to remove motor as-

sembly.

B: INSTALLATION

CAUTION:

When installing the motor assembly, be careful

not to move the sunroof cable.

1) Install each part in the reverse order of removal.

2) Perform the initialize operation of motor. <Ref. to

SR-4,  INITIALIZE  OPERATION,  INSPECTION,

Sunroof Control System.>

3) Check the operation of sunroof with following ta-

ble below.

C: INSPECTION

CAUTION:

Do  not  place  objects  in  the  way  to  check  the

auto-reverse mechanism.

1) Open the glass lid.

2) Forcefully push the glass lid in the opening direc-

tion while auto-closing, to check whether the win-

dow auto-reverse mechanism functions.

3) Check whether the window auto-reverse mech-

anism operates and the glass lid moves back to ful-

ly open position.

Operation

Switch position

(1) Glass lid closes completely.

Close

(2) Glass lid tilt up to the top position.

Tilt up

(3) Glass lid closes completely.

Tilt down

(4) Glass lid opens completely.

Open

(5) Glass lid closes completely.

Close

(A)

(B)

SR-00156

SR-8

Sunroof Switch

SUNROOF/T-TOP/CONVERTIBLE TOP (SUNROOF)

6. Sunroof Switch

A: REMOVAL

1) Disconnect the ground cable from battery.

2) Remove the lens (A) and screws (B) of the spot

map light.

3) Disconnect the harness connectors and remove

the spot map light.

4) Remove  the  screws  and  remove  the  sunroof

switch bracket from the spot map light.

5) Remove the sunroof switch from the bracket.

B: INSTALLATION

Install each part in the reverse order of removal.

C: INSPECTION

1) Remove the spot map light. <Ref. to LI-33, RE-

MOVAL, Spot Map Light.>

2) Check  the  resistance  between  sunroof  switch

terminals.

3) Replace the sunroof switch if the inspection re-

sult is not within the standard value.
NOTE:

If the glass lid does not operate or is not supplied

with power, move the glass lid using the hexagon

wrench.  <Ref.  to  SR-5,  FORCED  DRIVE,  Glass

Lid.>

SR-00222

(A)

SR-00223

(B)

SR-00160

SR-00161

Switch position Terminal No.

Standard

Connector 

No.

Open

1 and 3

Less than 1 Ω

R128

Close

3 and 4

Less than 1 Ω

Tilt up

1 and 3

less than 1 Ω

R187

Tilt down

3 and 4

Less than 1 Ω

2 1

4

5

3

SR-00133


Content   ..  725  726  727  728   ..