Subaru Impreza 3 / Impreza WRX / Impreza WRX STI. Manual - part 287
 

  Index      Subaru     Subaru Impreza 3 / Impreza WRX / Impreza WRX STI - service repair manual 2008-2014 year


Search            


Content   ..  285  286  287  288   ..


Subaru Impreza 3 / Impreza WRX / Impreza WRX STI. Manual - part 287


EN(H4DOTC)(diag)-372

Diagnostic Procedure with Diagnostic Trouble Code (DTC)

ENGINE (DIAGNOSTICS)

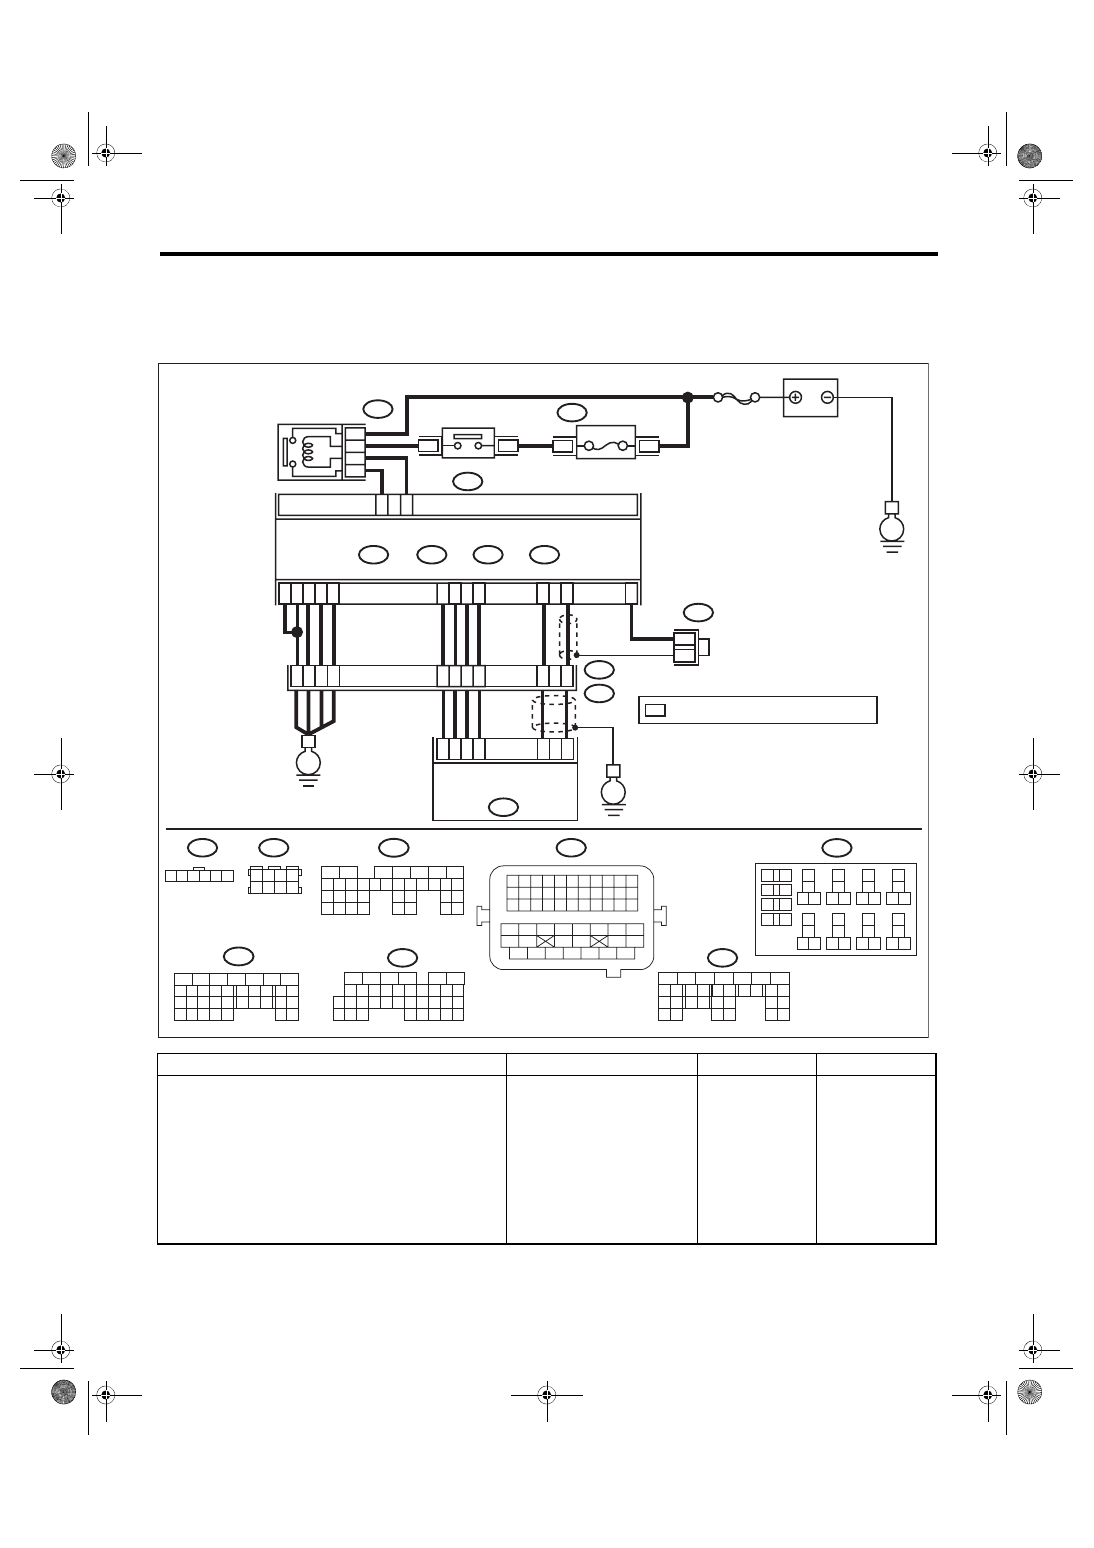
WIRING DIAGRAM:

• Engine electrical system, without SI-DRIVE <Ref. to WI-32, WITHOUT SI-DRIVE, WIRING DIAGRAM,

Engine Electrical System.>

• Engine electrical system, with SI-DRIVE <Ref. to WI-48, WITH SI-DRIVE, WIRING DIAGRAM, Engine

Electrical System.>

Step

Check

Yes

No

1

CHECK ELECTRONIC THROTTLE CON-
TROL RELAY.
1) Turn the ignition switch to OFF.
2) Remove the electronic throttle control relay.
3) Connect the battery to terminals No. 31 and 
No. 32 of electronic throttle control relay.
4) Measure the resistance between electronic 
throttle control relay terminals.

Terminals

No. 29 — No. 30:

Is the resistance less than 1 Ω? Go to step 

2.

Replace the elec-
tronic throttle con-
trol relay. <Ref. to 
FU(STI)-64, Elec-
tronic Throttle 
Control Relay.> 
<Ref. to FU(w/o 
STI)-62, Elec-
tronic Throttle 
Control Relay.>

ECM

EN-08727

5

6

7

8

2

1

9

4

3

10

24

22 23

25

11 12 13 14 15

26 27

28

16 17

18 19 20 21

33 34

29

32

30 31

B136

C:

B134

A:

36

35

34

40

B17

B7

D3

A29

6

E2

B21

A1

8

C4

A2

8

6

4

25

*

*

B122

24

3

8

39

2

8

A2

A1

A19

A6

A3

D1

A4

3

E57

2

1

5

B134

B220

B220

31

29

32

A:

B137

B136

D:

C:

B135

B:

*

30

21

22

15A

B220

3

4

B135

B:

35

34

33

32

31

30

29

21

20

19

18

17

16

28

27

26

15

14

13

12

11

25

23

22

24

10

3

4

9

1

2

8

7

6

5

B220

18

19

6

7

4

3
5

2

1

12

11

10

9

8

40

36 39

38

37

34

33

35

32

28 31

30

29

23

22

21

20

26

25

24

27

17

16

15

14

13

B122

8

7

6

5

4

3

2

1

B21

33

32

31

30

29

28

27

26

47

46

45

44

43

42

54

53

52

51

50

49

48

41

40

39

38

37

36

35

34

25

24

23

22

21

20

19

18

17

16

15

14

13

12

11

10

9

8

7

6

5

4

3

2

1

D: B137

26

25

24

23

22

18

28

27

17

16

15

14

13

31

30

29

21

20

19

12

11

10

4

3

6

5

9

8

7

2

1

E57

6

5

4

3

2

1

35

34

33

32

7

26

25

24

23

22

18

28

27

17

16

15

14

13

31

30

29

21

20

19

12

11

10

4

3

6

5

9

8

2

1

E

E

E

SBF-7

FUSE 

(RELAY BLOCK)

MAIN RELAY

ELECTRONIC THROTTLE

 CONTROL RELAY

BATTERY

: TERMINAL No. OPTIONAL ARRANGEMENT

ELECTRONIC THROTTLE 

CONTROL

EN(H4DOTC)(diag)-373

Diagnostic Procedure with Diagnostic Trouble Code (DTC)

ENGINE (DIAGNOSTICS)

2

CHECK POWER SUPPLY OF ELECTRONIC 
THROTTLE CONTROL RELAY.
Measure the voltage between electronic throttle 
control relay connector and chassis ground.

Connector & terminal

(B220) No. 29 (+) — Chassis ground (–):

Is the voltage 10 V or more?

Go to step 

3.

Repair the open or 
ground short circuit 
of power supply 
circuit.

3

CHECK HARNESS BETWEEN ECM AND 
ELECTRONIC THROTTLE CONTROL RE-
LAY CONNECTOR.
1) Disconnect the connector from ECM.
2) Turn the ignition switch to ON.
3) Measure the voltage between electronic 
throttle control relay connector and chassis 
ground.

Connector & terminal

(B220) No. 32 (+) — Chassis ground (–):

Is the voltage 10 V or more?

Repair the short 
circuit to power in 
the harness 
between ECM con-
nector and elec-
tronic throttle 
control relay con-
nector.

Go to step 

4.

4

CHECK HARNESS BETWEEN ECM AND 
ELECTRONIC THROTTLE CONTROL RE-
LAY CONNECTOR.
1) Turn the ignition switch to OFF.
2) Measure the resistance between electronic 
throttle control relay connector and chassis 
ground.

Connector & terminal

(B220) No. 32 — Chassis ground:
(B220) No. 30 — Chassis ground:

Is the resistance 1 MΩ or 
more?

Go to step 

5.

Repair the short 
circuit to ground in 
harness between 
ECM connector 
and electronic 
throttle control 
relay connector.

5

CHECK HARNESS BETWEEN ECM AND 
ELECTRONIC THROTTLE CONTROL RE-
LAY CONNECTOR.
Measure the resistance between ECM connec-
tor and electronic throttle control relay connec-
tor.

Connector & terminal

(B135) No. 17 — (B220) No. 32:
(B135) No. 7 — (B220) No. 30:

Is the resistance less than 1 Ω? Go to step 

6.

Repair the open 
circuit in harness 
between ECM con-
nector and elec-
tronic throttle 
control relay con-
nector.

6

CHECK HARNESS BETWEEN ECM AND 
ELECTRONIC THROTTLE CONTROL CON-
NECTOR.
1) Turn the ignition switch to OFF.
2) Disconnect the connectors from electronic 
throttle control.
3) Measure the resistance between ECM con-
nector and chassis ground.

Connector & terminal

(B134) No. 19 — Chassis ground:
(B134) No. 18 — Chassis ground:
(B134) No. 18 — (B136) No. 4:
(B134) No. 28 — Chassis ground:

Is the resistance 1 MΩ or 
more?

Go to step 

7.

Repair the ground 
short circuit of har-
ness between 
ECM connector 
and electronic 
throttle control 
connector.

Step

Check

Yes

No

EN(H4DOTC)(diag)-374

Diagnostic Procedure with Diagnostic Trouble Code (DTC)

ENGINE (DIAGNOSTICS)

7

CHECK SHORT CIRCUIT INSIDE THE ECM.
1) Connect the connector to ECM.
2) Measure the resistance between electronic 
throttle control connector and engine ground.

Connector & terminal

(E57) No. 6 — Engine ground:
(E57) No. 4 — Engine ground:

Is the resistance 1 MΩ or 
more?

Go to step 

8.

Repair the ground 
short circuit of har-
ness between 
ECM connector 
and electronic 
throttle control 
connector. 
Replace the ECM if 
defective. <Ref. to 
FU(STI)-59, 
Engine Control 
Module (ECM).> 
<Ref. to FU(w/o 
STI)-57, Engine 
Control Module 
(ECM).>

8

CHECK HARNESS BETWEEN ECM AND 
ELECTRONIC THROTTLE CONTROL CON-
NECTOR.
1) Disconnect the connector from ECM.
2) Measure the resistance of harness between 
ECM connector and electronic throttle control 
connector.

Connector & terminal

(B134) No. 18 — (E57) No. 6:
(B134) No. 28 — (E57) No. 4:
(B134) No. 29 — (E57) No. 3:

Is the resistance less than 1 Ω? Go to step 

9.

Repair the harness 
and connector.
NOTE:

In this case, repair
the following item:
• Open  circuit  in
harness  between
ECM 

connector

and 

electronic

throttle 

control

connector
• Poor  contact  of
coupling connector

9

CHECK HARNESS BETWEEN ECM AND 
ELECTRONIC THROTTLE CONTROL CON-
NECTOR.
1) Connect the connector to ECM.
2) Measure the resistance between electronic 
throttle control connector and engine ground.

Connector & terminal

(E57) No. 3 — Engine ground:

Is the resistance less than 5 Ω? Go to step 

10.

Repair the harness 
and connector.
NOTE:

In this case, repair
the following item:
• Open  circuit  of
harness  between
ECM 

connector

and engine ground
• Poor  contact  of
ECM connector
• Poor  contact  of
coupling connector

10

CHECK HARNESS BETWEEN ECM AND 
ELECTRONIC THROTTLE CONTROL CON-
NECTOR.
1) Turn the ignition switch to ON.
2) Measure the voltage between electronic 
throttle control connector and engine ground.

Connector & terminal

(E57) No. 6 (+) — Engine ground (–):
(E57) No. 4 (+) — Engine ground (–):

Is the voltage 5 V or more?

Repair the short 
circuit to power in 
the harness 
between ECM con-
nector and elec-
tronic throttle 
control connector.

Go to step 

11.

Step

Check

Yes

No

EN(H4DOTC)(diag)-375

Diagnostic Procedure with Diagnostic Trouble Code (DTC)

ENGINE (DIAGNOSTICS)

11

CHECK HARNESS BETWEEN ECM AND 
ELECTRONIC THROTTLE CONTROL CON-
NECTOR.
1) Turn the ignition switch to OFF.
2) Disconnect the connector from ECM.
3) Measure the resistance between ECM con-
nectors.

Connector & terminal

(B134) No. 19 — (B134) No. 18:
(B134) No. 19 — (B134) No. 28:

Is the resistance 1 MΩ or 
more?

Go to step 

12.

Repair the short 
circuit to power in 
the harness 
between ECM con-
nector and elec-
tronic throttle 
control connector.

12

CHECK SENSOR OUTPUT.
1) Connect all connectors.
2) Start the engine and warm up completely.
3) Stop the engine, and then turn the ignition 
switch to ON (engine OFF).
4) Read the value of «Main-Throttle Sensor» 
using Subaru Select Monitor.
NOTE:

For  detailed  operation  procedures,  refer  to
“READ CURRENT DATA FOR ENGINE”. <Ref.
to EN(H4DOTC)(diag)-40, Subaru Select Moni-
tor.>

Is the value of «Main-Throttle 
Sensor» 0.81 — 0.87 V?

Go to step 

13.

Repair the poor 
contact of elec-
tronic throttle con-
trol connector. 
Replace the elec-
tronic throttle con-
trol if defective. 
<Ref. to FU(STI)-
15, Throttle Body.> 
<Ref. to FU(w/o 
STI)-15, Throttle 
Body.>

13

CHECK SENSOR OUTPUT.
Read the value of «Sub-Throttle Sensor» using 
Subaru Select Monitor.
NOTE:

For  detailed  operation  procedures,  refer  to
“READ CURRENT DATA FOR ENGINE”. <Ref.
to EN(H4DOTC)(diag)-40, Subaru Select Moni-
tor.>

Is the value of «Sub-Throttle 
Sensor» 1.64 — 1.70 V?

Go to step 

14.

Repair the poor 
contact of elec-
tronic throttle con-
trol connector. 
Replace the elec-
tronic throttle con-
trol if defective. 
<Ref. to FU(STI)-
15, Throttle Body.> 
<Ref. to FU(w/o 
STI)-15, Throttle 
Body.>

14

CHECK HARNESS BETWEEN ECM AND 
ELECTRONIC THROTTLE CONTROL MO-
TOR.
1) Turn the ignition switch to OFF.
2) Disconnect the connectors from ECM and 
electronic throttle control.
3) Measure the resistance between ECM con-
nector and electronic throttle control connector.

Connector & terminal

(B134) No. 2 — (E57) No. 2:
(B134) No. 1 — (E57) No. 1:

Is the resistance less than 1 Ω? Go to step 

15.

Repair the harness 
and connector.
NOTE:

In this case, repair
the following item:
• Open  circuit  in
harness  between
ECM 

connector

and 

electronic

throttle 

control

connector
• Poor  contact  of
coupling connector

15

CHECK HARNESS BETWEEN ECM AND 
ELECTRONIC THROTTLE CONTROL MO-
TOR.
1) Connect the connector to ECM.
2) Turn the ignition switch to ON.
3) Measure the voltage between electronic 
throttle control connector and engine ground.

Connector & terminal

(E57) No. 2 (+) — Engine ground (–):
(E57) No. 1 (+) — Engine ground (–):

Is the voltage 5 V or more?

Repair the short 
circuit to power in 
the harness 
between ECM con-
nector and elec-
tronic throttle 
control connector.

Go to step 

16.

Step

Check

Yes

No


Content   ..  285  286  287  288   ..