Subaru Impreza 3 / Impreza WRX / Impreza WRX STI. Manual - part 97


  Index      Subaru     Subaru Impreza 3 / Impreza WRX / Impreza WRX STI - service repair manual 2008-2014 year


Search            


Content   ..  95  96  97  98   ..


Subaru Impreza 3 / Impreza WRX / Impreza WRX STI. Manual - part 97


CO(STI)-20

Radiator

COOLING

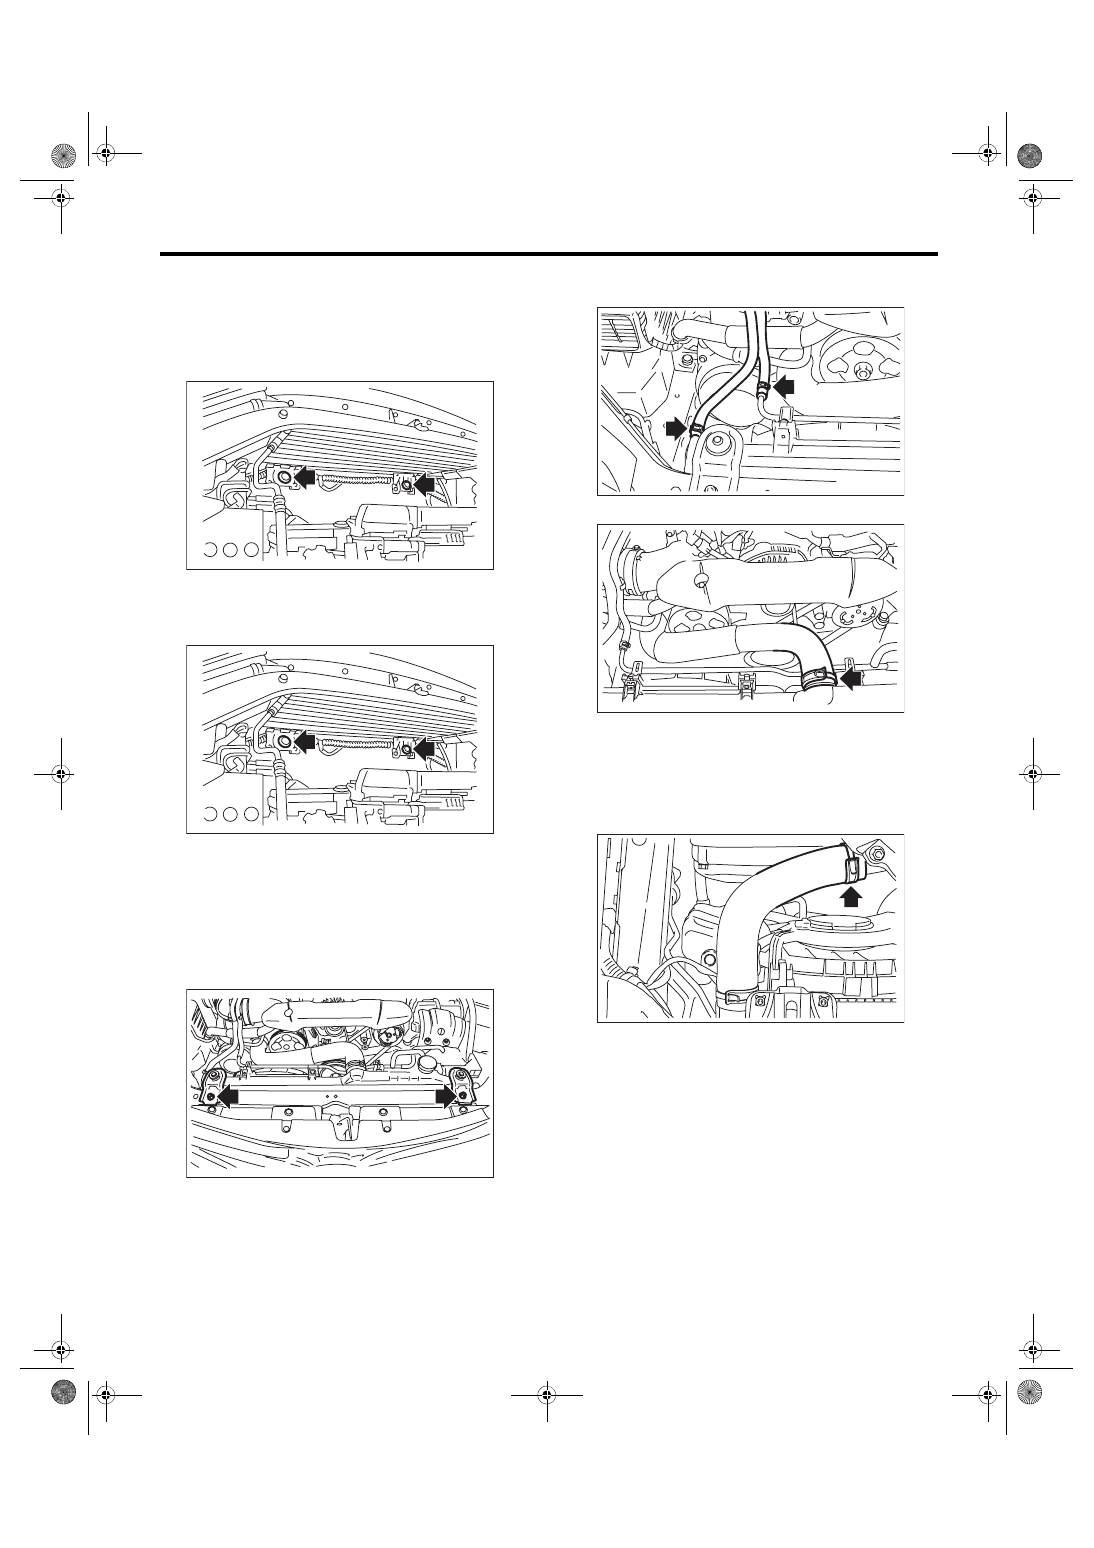
13) Move the radiator to the left while lifting it up-

ward.

14) Lift  the  radiator  up  and  remove  the  radiator

from vehicle.

15) Remove the radiator lower cushion from the ra-

diator lower bracket.

B: INSTALLATION

1) Attach the radiator lower cushion to the radiator

lower bracket.

2) Install the radiator to vehicle.
NOTE:

Make pins on the lower side of radiator be fitted into

the radiator lower cushions.

3) Install the radiator upper brackets.
Tightening torque:

12 N·m (1.2 kgf-m, 8.9 ft-lb)

4) Connect the two engine coolant hoses to the ra-

diator and over flow pipe.

5) Connect the radiator inlet hose.

6) Install  the  reservoir  tank.  <Ref.  to  CO(STI)-27,

INSTALLATION, Reservoir Tank.>

7) Install the air intake duct. <Ref. to IN(STI)-10, IN-

STALLATION, Air Intake Duct.>

8) Lift up the vehicle.

9) Connect the radiator outlet hose.

CO-02729

CO-02729

CO-02407

CO-02713

CO-02712

CO-02771

CO(STI)-21

Radiator

COOLING

10) Connect the connector (A) to the main fan mo-

tor and the connector (B) to the sub fan motor.

11) Install the under cover. <Ref. to EI-28, INSTAL-

LATION, Front Under Cover.>

12) Lower the vehicle.

13) Connect the battery ground terminal.

14) Fill engine coolant. <Ref. to CO(STI)-13, FILL-

ING  OF  ENGINE  COOLANT,  REPLACEMENT,

Engine Coolant.>

C: INSPECTION

1) Check that the radiator does not have deforma-

tion, cracks or damage.

2) Check that the hose has no cracks, damage or

loose part.

3) Remove the coolant filler tank cap, fill the cool-

ant filler tank with engine coolant, then install the

radiator cap tester to the filler neck of coolant filler

tank.

4) Apply a pressure of 122 kPa (1.2 kg/cm

2

, 18 psi)

to the radiator and check the following points:

• Leakage from the radiator or its vicinity

• Leakage from the hose or its connections
CAUTION:

• Inspection must be carried out at the side of

coolant filler tank, not at the side of radiator.

• Engine should be turned off.

• Wipe engine coolant from check points in ad-

vance.

• Be careful not to deform the filler neck of the

coolant filler tank when installing and removing

the radiator cap tester.

• Be  careful  of  engine  coolant  from  spurting

out when removing the radiator cap tester.

(A)

CO-02727

(B)

CO-02728

IN-00203

CO-02408

CO(STI)-22

Radiator Cap

COOLING

7. Radiator Cap

A: INSPECTION

1) Check that the radiator cap does not have defor-

mation, cracks or damage.

2) Attach the radiator cap tester to radiator cap.

3) Increase  pressure  until  the  radiator  cap  tester

gauge  needle  stops.  Radiator  cap  is  functioning

properly if it holds the service limit pressure for 5 —

6  seconds.  Replace  the  radiator  cap  if  its  valve

opens at less than the service limit.
Coolant filler tank side:

Standard

93 — 123 kPa (0.95 — 1.25 kg/cm

2

, 14 — 18 

psi)

Limit

83 kPa (0.85 kg/cm

2

, 12 psi)

Radiator side:

Standard

122 — 152 kPa (1.24 — 1.55 kg/cm

2

, 18 — 

22 psi)

Limit

112 kPa (1.14 kg/cm

2

, 16 psi)

CAUTION:

• Be  sure  to  remove  foreign  matter  and  rust

from the cap in advance. Otherwise, results of

pressure test will be incorrect.

• Do not confuse the cap of coolant filler tank

and cap of radiator.

CO-00044

CO(STI)-23

Radiator Main Fan and Fan Motor

COOLING

8. Radiator Main Fan and Fan 

Motor

A: REMOVAL

1) Disconnect the ground cable from battery.

2) Lift up the vehicle.

3) Remove  the  under  cover.  <Ref.  to  EI-28,  RE-

MOVAL, Front Under Cover.>

4) Disconnect the connector from the main fan mo-

tor.

5) Lower the vehicle.

6) Remove the air intake duct. <Ref. to IN(STI)-10,

REMOVAL, Air Intake Duct.>

7) Remove the reservoir tank. <Ref. to CO(STI)-27,

REMOVAL, Reservoir Tank.>

8) Remove  the  bolts  which  secure  the  radiator

main fan motor assembly and the over flow pipe.

9) Remove the radiator main fan motor assembly

from the upper side of the vehicle.

B: INSTALLATION

Install in the reverse order of removal.
CAUTION:

Check  if  the  radiator  hose  and  the  over  flow

hose are properly connected.
Tightening torque:

7.5 N·m (0.8 kgf-m, 5.5 ft-lb)

C: DISASSEMBLY

1) Remove the clip which holds the main fan motor

connector onto the radiator main fan shroud.

2) Disconnect the radiator main fan from the main

fan motor.

3) Disconnect the main fan motor from the radiator

main fan shroud.

IN-00203

CO-02776

CO-02412

CO-02372

CO-02373


Content   ..  95  96  97  98   ..