Subaru Impreza 3 / Impreza WRX / Impreza WRX STI. Manual - part 15


  Index      Subaru     Subaru Impreza 3 / Impreza WRX / Impreza WRX STI - service repair manual 2008-2014 year


Search            


Content   ..  13  14  15  16   ..


Subaru Impreza 3 / Impreza WRX / Impreza WRX STI. Manual - part 15


PI-14

Pre-delivery Inspection

PRE-DELIVERY INSPECTION

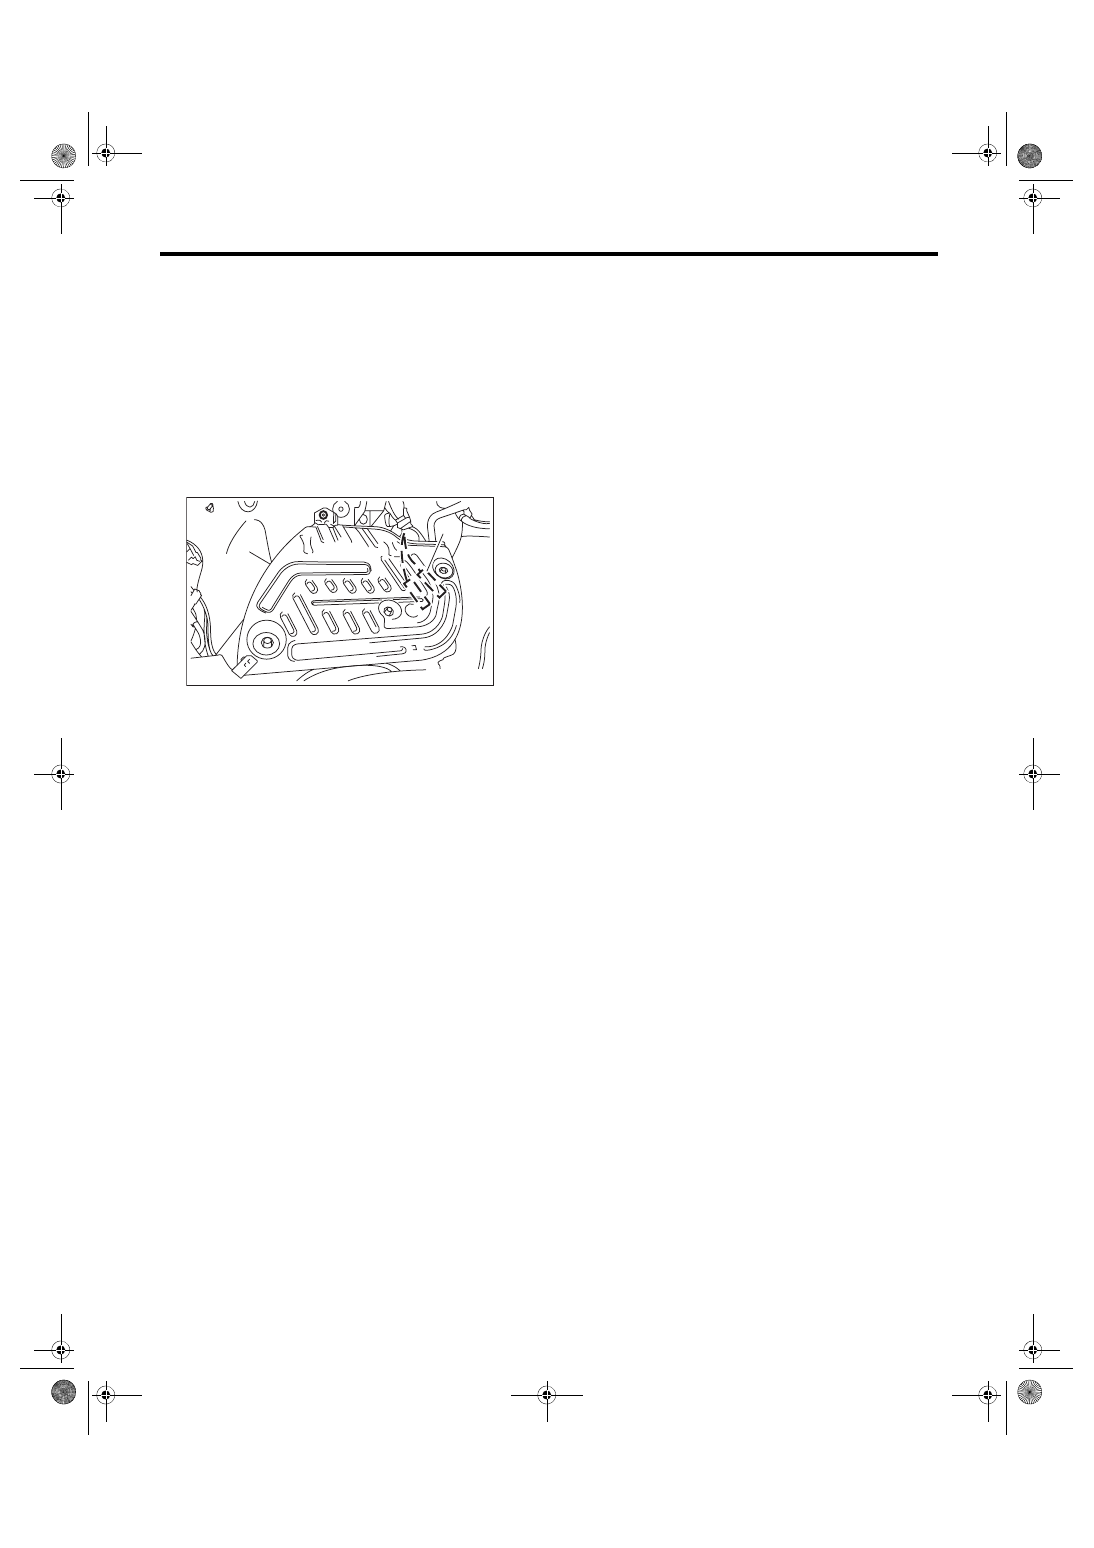
26.DELIVERY (TEST) MODE CONNECTOR

1) Turn the ignition switch to ON and check that the

malfunction indicator light starts blinking.

2) If the light blinks, return the ignition key to LOCK.

3) Disconnect  the  delivery  (test)  mode  connector

under the passenger’s seat.

4) Then, turn the ignition key to ON again.

5) If  the  malfunction  indicator  light  blinks  even

though  the  delivery  (test)  mode  connector  is  dis-

connected, carry out an engine diagnosis.

6) Put the disconnected delivery (test) mode con-

nector behind the ECM protector.

27.IMMOBILIZER SYSTEM

1) Check  that  the  engine  starts  with  all  keys  that

are equipped on vehicle.

2) 60 seconds after turning ignition switch from ON

to ACC or OFF, or immediately after removing the

key, check that the security indicator light is blink-

ing.
NOTE:

If malfunctions occur, refer to “IMMOBILIZER (DI-

AGNOSIS)”. <Ref. to IM(diag)-2, Basic Diagnostic

Procedure.>

28.STARTING CONDITION

Start the engine and check that the engine starts

smoothly. If the battery voltage is low, recharge or

replace the battery. If any noises are observed, im-

mediately stop the engine and check and repair the

abnormal components.

29.EXHAUST SYSTEM

Listen to the exhaust noise to see if no noises are

observed.

Check that no leaks are found.

30.INDICATOR AND WARNING LIGHTS

Check that all indicator lights and warning lights are

operating correctly.

31.HEATER & VENTILATION

Operate the heater & ventilation system to check

for normal airflow outlet control, air inlet control, air-

flow capacity and heating performance.

32.AIR CONDITIONER

Operate  the  air  conditioner.  Check  that  the  A/C

compressor operates normally and enough cooling

is provided.
NOTE:

To prevent the insufficient lubrication of the air con-

ditioner, operate the air conditioner for five minutes

at idling.

33.CLOCK

Check the clock for normal operations and enough

accuracy.

34.AUDIO

1) Check if the AM/FM radio broadcasting can be

heard.

2) Check that all the radio functions work properly

and the noise level is normal.

3) Check the CD and AUX for normal operation.

4) Check that the AUX is installed into the console

without looseness.

35.NAVIGATION SYSTEM

1) Check all display functions for normal operation.

(Refer to the operation manual.)

2) Check that the navigation system operates nor-

mally.

3) Check the radio, CD player and AUX for normal

operation.

4) Check that the AUX is installed into the console

without looseness.

36.FRONT ACCESSORY POWER SUPPLY 

SOCKET

Check the operation of the front accessory power

supply socket.

37.LIGHTING SYSTEM

1) Check  the  headlight  operations.  When  pulling

out  the  key,  check  if  the  headlight  illuminates  by

turning the headlight switch from OFF to ON.

2) Check the stop light operation.

3) Check other lights for normal operations.

4) Check that the manual leveler operates normal-

ly.

(A) Delivery (test) mode connector
(B) ECM protector

PI-00441

(A)

(B)

PI-15

Pre-delivery Inspection

PRE-DELIVERY INSPECTION

38.WINDOW WASHER

Check  that  the  window  washer  system  injects

washer fluid to the specified area of the windshield

shown in the figure.
Front spray position:

A: 250 mm (9.8 in)

B: 315 mm (12.4 in)

Rear spray position:

A: 140 mm (5.5 in)

B: 70°

39.WIPER

Check the front and rear wipers for normal opera-

tions.

40.POWER WINDOW

Operate the power window switches one by one to

check that each of the power windows goes up and

down without noises.

41.SUNROOF

Check that the sunroof operates normally.

42.REAR DEFOGGER SYSTEM

Check that the rear defogger system operates nor-

mally.

43.PARKING BRAKE

Check  the  parking  brake  for  normal  operations.

When pulling the parking brake lever with a force of

200 N (20 kgf, 45 lb), check that the lever stroke of

parking brake lever is 7 to 8 notches.

44.DIAGNOSTIC TROUBLE CODE (DTC) 

CHECK

Read  the  diagnostic  trouble  code  and  check  that

the diagnostic trouble code is not detected.

If any diagnostic trouble code is detected, clear all.

1) Read Diagnostic Trouble Code
NOTE:

For detailed operation procedures, refer to “PC ap-

plication help for Subaru Select Monitor”.

2) Clear Memory Mode
NOTE:

For detailed operation procedures, refer to “PC ap-

plication help for Subaru Select Monitor”.

45.BRAKE TEST

Check the foot brake for normal operations.

46.SHIFT CONTROL

1) Check for smooth operation to each position.

2) Check that the lever cannot be moved to the re-

verse position unless the slider is pulled up. (6MT

model)

3) Check  that  the  lever  can  be  moved  to  the  re-

verse  position  when  the  slider is  pulled  up.  (6MT

model)

47.CRUISE CONTROL

Operate the cruise control system. Check that the

system is activated and deactivated correctly.

48.POWER STEERING FLUID LEVEL

Check that the power steering fluid level is normal.

If insufficient, check for leaks. Then add the neces-

sary amount of the specified power steering fluid.

CAUTION:

If the power steering fluid is spilt over exhaust

pipe,  wipe  it  off  with  cloth  to  avoid  emitting

smoke or causing a fire.

49.FLUID LEAKAGE

Check entire areas of the vehicle for any trace of

coolant/oil (such as engine and gear oil)/fluid (such

as brake) leaks.

WW-00493

A

B

B

A

WW-00494

A

B

(A) Reservoir tank

PI-00461

(A)

HOT  MAX

COLD  MAX

HOT  MIN

COLD  MIN

PI-16

Pre-delivery Inspection

PRE-DELIVERY INSPECTION

50.WATER LEAKAGE

Spray  the  vehicle  with  water  using  a  hose  and

check that no water enters the passenger compart-

ment.

• Before  performing  the  water  leakage  test,  re-

move anything that may obstruct the operation or

which must be kept dry.

• Close all the windows and doors securely. Close

the front hood, trunk lid and rear gate before start-

ing the test.

• Connect a hose to a tap, and spray water on the

vehicle. The rate of water spray must be approx. 20

to 25 L (5.3 — 6.6 US gal, 4.4 — 5.5 Imp gal) per

minute.

When spraying water on areas adjacent to the floor

and  wheel  house,  increase  the  pressure.  When

spraying  water  on  areas  other  than  the  floor  and

wheel house, decrease the pressure. But the force

of  water  must  be  made  strong  occasionally  by

pressing the end of the hose.
NOTE:

Be  sure  to  keep  the  hose  at  least  10  cm  (3.9  in)

away from vehicle.

Check the following areas.

• Front  window and body framework mating por-

tion

• Door mating portions

• Glass mating portions

• Rear quarter window mating portions

• Rear  window  and  body  framework  mating  por-

tion

• Around roof drips

If any dampness in the compartments is discovered

after the water has been applied, carefully check all

the areas that may have possibly contributed to the

leak.

51.APPEARANCE 2

1) If  protective  coating  (lap  guard)  is  applied,  re-

move it.
NOTE:

• When removing the lap guard, using steam will

make it easier to remove.

• Vehicle left for a extended periods or at low tem-

peratures, spray the vehicle with water heated 50

— 60°C (122 — 140°F) to raise the surface temper-

ature before peeling off the wrap guard. Do not use

the water heated to over 60°C (140°F).

• If the adhesive remains exist on the coated sur-

face, soak a flannel rag, etc. with a small amount of

coating  wax  or  solvent  such  as  oil  benzene  and

IPA,  put  the  soaked  cloth  on  the  remains  lightly,

and then wipe them off with a flannel rag etc.

• Keep solvent from touching the resin or rubber

parts. Do not use coating wax or solvents while the

component surface temperature is hot due to hot

weather etc.

• If the coated surface is swollen out due to seams

or moisture, expose the vehicle to the sunlight for a

few hours or heat the seam and swollen portions

using a dryer etc.

• Dispose  of  the  peeled  wrap  guard  as  burnable

industrial garbage.

2) Check the whole vehicle body for flaking paint,

damage by transportation, corrosion, dirt, cracks or

blisters.
NOTE:

• It is better to determine an inspection pattern in

order to avoid missing an area, since the total in-

spection area is wide.

• Do  not  repair  the  body  paint  unless  absolutely

necessary. Also, if the vehicle is in need of repair to

remove scratches or corroded paint, the repair area

must  be  limited  to  the  minimum.  Re-painting  and

spray painting must be avoided as much as possi-

ble.

3) Check each window glass for scratches careful-

ly.  Slight  damage  may  be  removed  by  polishing

with cerium oxide. (Fill a cup half with cerium oxide,

and add warm water to it. Then agitate the content

until it turns to wax. Apply this wax to a soft cloth,

and polish the glass with it.)

4) Check each portion of the vehicle body and un-

derside components for the formation of rust. If rust

is discovered, remove it with sandpaper of #80 to

#180 and treat the surface with rust preventive. Af-

ter  this  treatment  is  completed,  flush  the  portion

thoroughly,  and  prepare  the  surface  for  repair

painting.

5) Check each portion of body and all of the exteri-

or parts for deformation or distortion. Also, check

each light lens for cracks.

6) Peel the identification seal attached to the rear

combination light and front fog light.

PERIODIC MAINTENANCE SERVICES

PM

Page

1.

General Description  ...................................................................................2

2.

Schedule  ....................................................................................................3

3.

Engine Oil ...................................................................................................5

4.

Engine Oil Filter ..........................................................................................7

5.

Spark Plug ..................................................................................................8

6.

V-belt ........................................................................................................10

7.

Timing Belt  ...............................................................................................12

8.

Fuel Line  ..................................................................................................14

9.

Fuel Filter  .................................................................................................15

10.

Air Cleaner Element  .................................................................................16

11.

Cooling System  ........................................................................................17

12.

Engine Coolant .........................................................................................19

13.

Clutch System  ..........................................................................................21

14.

Transmission Gear Oil  .............................................................................22

15.

Front & Rear Differential Gear Oil  ............................................................23

16.

Brake Line  ................................................................................................24

17.

Brake Fluid  ...............................................................................................26

18.

Disc Brake Pad and Disc  .........................................................................27

19.

Parking Brake ...........................................................................................28

20.

Suspension  ..............................................................................................29

21.

Wheel Bearing ..........................................................................................31

22.

Axle Boots & Joints  ..................................................................................32

23.

Tire Rotation .............................................................................................33

24.

Steering System (Power Steering) ...........................................................34

25.

A/C Filter  ..................................................................................................37

gi14usena07.fm  1 ページ  2013年9月10日 火曜日 午後3時59分


Content   ..  13  14  15  16   ..