Scania 16 litre engine. Work Description - part 18


  Главная      Scania     Scania 16 litre engine - Work Description


поиск по сайту            


содержание   ..  16  17  18  19   ..


Scania 16 litre engine. Work Description - part 18


0110w14b.mkr

©

69

5

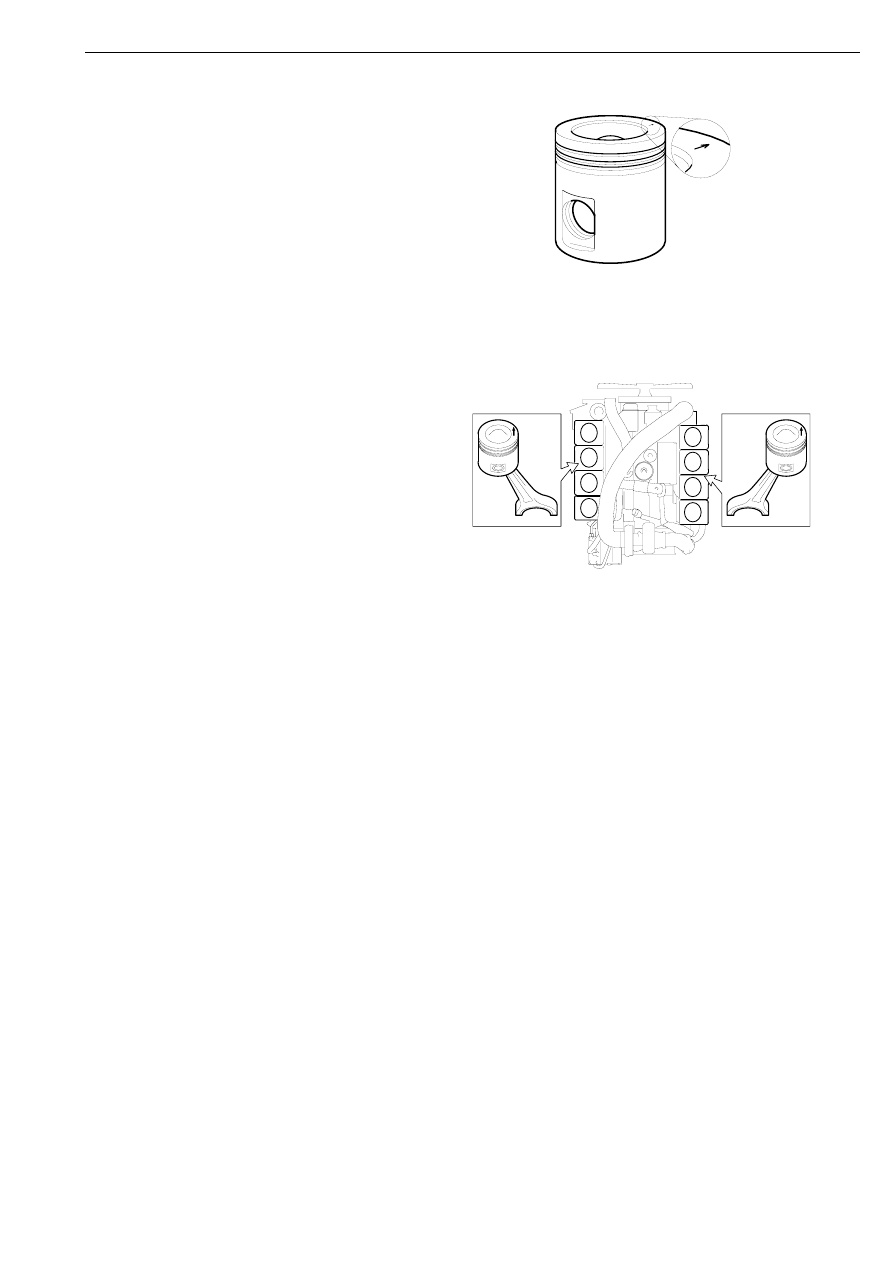
Fit the connecting rod and piston. The arrow 
on the piston must be facing the front of the 
engine. Applies to aluminium pistons only, 
steel pistons are symmetrical. Clamp the 
piston ring compressor 98 212 and push the 
piston into the cylinder.

The arrow must be facing the front of the engine

116 033

116 085

6

Fit the connecting rod bearing shell into the 
cap and lubricate the bearing surface. Fit the 
cap. Lubricate the bolts, fit them and torque 
tighten to 50 Nm+90°.

7

Fit the piston cooling nozzle. Tightening 
torque 23Nm.

IMPORTANT! The piston cooling nozzle must 
not be damaged. The oil jet must hit the piston 
precisely. If it does not, the piston will become 
too warm and result in engine breakdown. 
Damaged nozzles must not be re-aligned, renew 
them instead.

8

Fit the oil sump. Torque tighten the bolts to 
32 Nm.

9

Fit the cylinder head. Tighten the cylinder 
head bolts as described in Cylinder head, 
fitting.

Piston and connecting rod

70

©

0110w14b.mkr

Renewing a piston

Specifications

Turn the rings marked "TOP" with the mark face 
up.

Special tools

Other tools

Piston rings

Number of compression rings

2

Gap

1st ring

0.35 - 0.60 mm

2nd ring

0.45 - 0.65 mm

Maximum play in groove, 2nd ring

0.25 mm

Number of oil scraper rings

1

Gap

0.40 - 0.65 mm

Maximum play in groove

0.25 mm

Number

Designation

Illustration

Tool board

87 362

Drift

D3

Number

Designation

Illustration

Tool board

587 309

Piston ring expander

D3

87 362

11

0

 3

1

5

106 796

Piston

0110w14b.mkr

©

71

1

Place the connecting rod in a vice with soft 
jaws. Remove the retaining rings for the 
gudgeon pin.

100 209

2

Push out the gudgeon pin using drift 87 362.

100 210

87 362

3

Remove the piston rings using tool 587 309. 
Take care not to scratch the surface of the 
piston skirt with the piston rings.

587 309

4

It is possible that the graphite coating will 
disappear after washing graphite coated 
pistons in a washer. This does not matter 
after they have been in use for a while. New 
pistons, however, should be washed with 
care e.g. in white spirit.

5

Clean the piston and its rings thoroughly 
without scratching the sides of the ring 
grooves. Clean the oil holes in the piston 
using a suitable drill bit.

Piston

72

©

0110w14b.mkr

6

Make sure the piston ring gaps do not 
exceed the permitted limit. Place the piston 
rings inside the cylinder liner and measure 
the gap with a feeler gauge. Permitted gap, 
refer to Specifications.

7

Fit the piston rings using tool 587 309. The 
oil scraper ring has an expander. Pistons 
rings marked with TOP must be turned with 
TOP face up.

8

Oil all the bushings, the gudgeon pin hole 
and the gudgeon pin before assembling.

9

Fit the piston skirt to the piston crown and 
fit one of the gudgeon pin retaining rings.

10 Put the piston onto the connecting rod so 

that the arrow marks on the piston will face 
the front of the engine. Applies to 
aluminium pistons only, steel pistons are 
symmetrical.

The arrow on the piston must be facing the front 
of the engine

116 033

116 085

11 Insert the gudgeon pin using tool 87 362 and 

fit the second gudgeon pin retaining ring.

Piston


содержание   ..  16  17  18  19   ..