Peugeot 807 Dag (2007.5). Instruction - part 10


  Index      Peugeot     Peugeot 807 Dag 2007.5 - instruction in english


Search            


Content   ..  8  9  10  11   ..


Peugeot 807 Dag (2007.5). Instruction - part 10


Child safety

SA

FET

Y

14

3

5

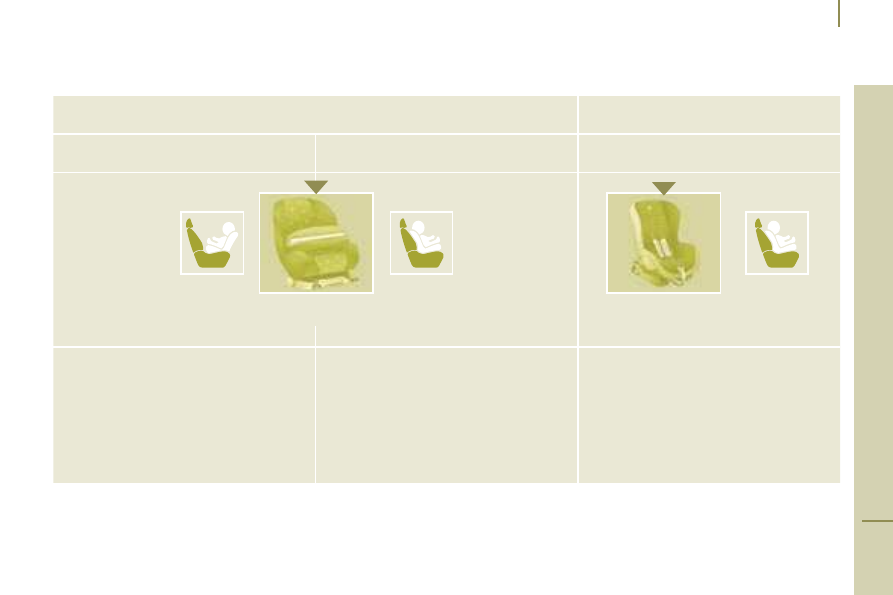
ISOFIX CHILD SEATS RECOMMENDED BY PEUGEOT AND APPROVED FOR YOUR VEHICLE

These child seats can also be used on seats which are not fitted with ISOFIX mountings. In this case, it is essential that they are secured to 

the vehicle's seat by means of the three point seat belt.
Follow the instructions for fitting the child seat indicated in the seat manufacturer's installation guide.

ISOFIX KIDDY

ISOFIX RÖMER Duo Plus

Group 0+: from birth to 13 kg

Group 1: from 9 to 18 kg

Group 1: from 9 to 18 kg

Installed in the rear facing position.

Installed in the forwards facing position.

Installed in the forwards facing position only.

The body of the child seat must be in 

contact with the back of the vehicle's front 

seat.

It is essential that the vehicle's front seat 

is adjusted to the intermediate longitudinal 

position.

Secured without the top strap.

Three child seat body angles: sitting, 

reclining and lying positions.

Adjust the vehicle's front seat so that the 

child's feet do not touch the seat back.

The ISOFIX KIDDY seat is installed in row 2 only.

Child safety

14

4

Group 0: from birth to 10 kg

Group 0+: from birth to 13 kg


L1 "BRITAX 

Babysure" 

Installed in the rear-

facing position.

L2 "ROMER  

Baby-Safe Plus" 

Installed in the rear-

facing position.

Groups 1, 2 and 3: from 9 to 36 kg

L3 "KIDDY Life"

For the safety of young children  

(from 9 to 18 kg), PEUGEOT recommends 

use of the restraining cushion.

Groups 2 and 3: from 15 to 36 kg


L4 "RECARO Start"


L5 "KLIPPAN 

Optima"

From the age of 

6 years (approximately 

22 kg), the booster is 

used on its own.

CHILD SEATS RECOMMENDED BY PEUGEOT

PEUGEOT offers a complete range of recommended child seats which are secured using a 

three point seat belt:

INSTALLING CHILD SEATS 

ATTACHED USING THE SEAT BELT

In accordance with the European regulation 

(Directive 2000/3), the table presented on 

the following page indicates the options for 

installing child seats secured using a seat 

belt and universally approved in accordance 

with the weight of the child and the seat in 

the vehicle.

Child safety

SA

FET

Y

14

5

5

Seat

Weight of the child and indicative age

Under 13 kg

(groups 0 (a) and 0+)

Up to approx 1 year

From 9 to 18 kg

(group 1)

1 to 3 years approx

From 15 to 25 kg

(group 2)

3 to 6 years approx

From 22 to 36 kg

(group 3)

6 to 10 years approx

Front passenger seat 

(

b)

U

U

U

U

Side seats of row 2

U

U

U

U

Centre seat of row 2

U

U

U

U

Side seats of row 2, 

placed in row 3

L1, L2

L3

L3, L4, L5

L3, L4, L5

Centre seat of row 2, 

placed in row 3

U

U

U

U

3-seat bench seat, 

placed in row 3

L1, L2

L3

L3, L4, L5

L3, L4, L5

X

L3

L3, L4, L5

L3, L4, L5

a: Group 0: from birth to 10 kg.

b: consult the legislation in force in your country before installing your child on this seat. 

U: seat suitable for the installation of a child seat secured using a seat belt and universally approved, "rear facing" and/or "forward facing".

L-: only the child seats indicated can be installed on the seat concerned (according to country).

X: seat not suitable for the installation of a child seat of the weight group indicated.

Child safety

14

ADVICE ON CHILD SEATS

Otherwise, the child would risk being 

seriously injured or killed if the air bag were 

to inflate.

Installing a booster seat

The chest part of the seat belt must be 

positioned on the child's shoulder without 

touching the neck.

Ensure that the lap part of the seat belt 

passes correctly over the child's thighs.

PEUGEOT recommends the use of a 

booster seat which has a back, fitted with a 

seat belt guide at shoulder level.

As a safety precaution, do not leave:

 one or more children alone and 

unsupervised in a vehicle,

 

a child or an animal in a vehicle which 

is exposed to the sun, with the windows 

closed,

 

the keys within reach of children inside 

the vehicle.

To prevent accidental opening of the doors, 

use the "Child lock" if fitted on your vehicle.

Take care not to open the rear windows by 

more than one third if fitted on your vehicle.

The incorrect installation of a child seat in a 

vehicle compromises the child's protection in 

the event of an accident.

Remember to fasten the seat belts or the 

child seat harnesses 

keeping the slack in 

relation to the child's body 

to a minimum

even for short journeys.

For optimum installation of the "forward 

facing" child seat, ensure that the back of 

the child seat is in contact with the back of 

the vehicle's seat and that the head restraint 

does not cause any discomfort.

If the head restraint has to be removed, 

ensure that it is stored or attached securely 

to prevent it from being thrown around the 

vehicle in the event of sharp braking.

Children under the age of 10 must not travel 

in the "forward facing" position on the front 

passenger seat, unless the rear seats are 

already occupied by other children, cannot 

be used or are absent.

If fitted on your vehicle, disarm the 

passenger air bag when a "rear facing" child 

seat is installed on the front seat. 

To protect young children from the rays 

of the sun, fit side blinds on the rear 

windows.

CHILD MONITORING MIRROR

This mirror enables the driver or front 

passenger to observe all the rear seats.

Fitted on its own ball joint and able to retract 

into its housing in the roof, it provides a 

panoramic view of the rear interior of the 

vehicle.

Towing a trailer

A

C

C

ESSO

R

IES

6

14

7

TOWING A TRAILER, CARAVAN, BOAT, ETC...

Refer to the administrative documents 

(V5, ...) or to the Petrol or Diesel 

"Dimensions, weights and towed loads" 

section of chapter 9.

Driving advice

A towed vehicle must free wheel: gearbox in 

neutral.

Distribution of loads: distribute the load in 

the trailer so that the heaviest loads are as 

close as possible to the axle and the nose 

weight is close to the maximum authorised 

without, however, exceeding it.

Cooling: towing a trailer on a slope 

increases the coolant temperature.

As the fan is electrically controlled, its 

cooling capacity is not dependent on the 

engine speed.

Dimension A = 0.96 m

Towing a trailer

14

8

On the contrary, use a high gear to lower the 

engine speed and reduce your speed.

In all cases, pay attention to the coolant 

temperature.

Brakes: towing increases the braking 

distance. Drive at a moderate speed, 

change down early and brake gradually.

Side wind: sensitivity to side wind is 

increased. Drive smoothly and at a 

moderate speed.

Towbar
We recommend the use of original 

PEUGEOT towbars, which have been tested 

for endurance from the design stage of your 

vehicle.

Towing equipment must be fitted in 

accordance with the manufacturer’s 

instructions, with particular attention to the 

towing capacities of your vehicle, the load 

towed, the nose weight and the electrical 

connection. As this fitting should be carried 

out by a professional, we recommend that 

you entrust the fitting of this equipment to a 

PEUGEOT dealer.

In accordance with the general instructions 

referred to above, we draw your attention 

to the risk connected with fitting a towbar 

or other electrical accessory which is not 

recommended by PEUGEOT.

Fitting such equipment could result in a 

failure of your vehicle’s electronic system.

Please contact a PEUGEOT dealer first for 

further information.

Automatic adjustment 
For vehicles with Xenon bulbs, this system 

automatically corrects the height of the 

beam, whatever the load of the vehicle. The 

driver is then assured of having optimum 

lighting and not causing a nuisance to other 

road users.

In certain cases of particularly arduous 

use (towing the maximum load up 

a steep slope in high temperatures), the 

engine automatically limits its power. In this 

case, cutting off the air conditioning allows 

the engine power to be recovered, and 

therefore the towing speed to be significantly 

increased (approximately 12 mph [20 km/h] 

more). Sequential control of the gearbox 

may also become unavailable.

If the coolant temperature warning light 

comes on, stop the vehicle and switch off 

the engine as soon as possible.

Tyres: check the tyre pressures of the 

towing vehicle and of the trailer, observing 

the recommended pressure.

Lighting

Manual adjustment
Adjust your headlamps so as not to dazzle 

other road users. Check the electrical 

signalling of the trailer. 

Bicycle carrier

If you fit a bicycle carrier on the 

tailgate, deactivate the rear wiper 

from the display’s configuration 

menu.

Refer to the "Identification features" 

section of chapter 9.

Refer to the "Steering wheel controls" 

section of chapter 3. 

When using a trailer connection, 

you must add a fuse. Refer to the 

"Changing a fuse" section of chapter 8.

Roof bars

A

C

C

ESSO

R

IES

6

14

9

USING ROOF BARS

To use the transverse roof bars, release the 

four locking levers provided for this purpose. 

From the left-hand side, slide them in their 

rails to the required notch.

Lock the four locking levers located at the 

base of the feet of each bar.

When the roof bars are not in use, 

position them at the rear stop to avoid 

excess consumption. 

Use accessories recommended by 

Automobiles PEUGEOT and follow the fitting 

instructions in the manual provided by the 

manufacturer of the load-carrying roof bars.

Maximum authorised weight on the roof 

rack: 220 lbs. (100 kg)

Removal and refitting of the roof 

bars

- Remove the bolt, the stop and the two 

washers at each location

 A.

- Move the bars to the locations 

A.

- Lift the two bars to remove them.

Imperative: refit the bolt, the stop and the 

two washers at each location 

A.

To refit, proceed in the reverse order.

Direction of use

Snow screen

15

0

VERY COLD CLIMATE 

SCREEN

If fitted on your vehicle, this is a removable 

part which permits complete or partial 

covering of the front air intake 

(grille, ...) to favour the increase in the 

engine temperature when driving in very low 

temperatures and to prevent the entry of 

snow into the engine compartment.

When the snow has cleared, do not forget to 

remove the very cold climate screen.

FITTING

 Offer up the screen facing its centring pin 

A on the front bumper.

 Put it in place by pressing at each clip 

B 

located in the four corners.

REMOVAL

 Pass a screwdriver into the hole located 

near each of the clips.

 Use the screwdriver as a lever to unclip 

the four clips 

B in turn.

Other accessories

A

C

C

ESSO

R

IES

6

15

1

OTHER ACCESSORIES

These accessories and parts, after being 

tested and approved for reliability and 

safety, are all adapted to your 807. A wide 

choice of accessories recommended by 

PEUGEOT and original parts is available 

from "PEUGEOT Accessories", the 

catalogue and on line at a PEUGEOT dealer.

PEUGEOT Accessories

A further range is also available from 

PEUGEOT Accessories, structured 

around 5 categories: 

To avoid any jamming under the 

pedals:

- ensure that the mat is positioned correctly,

- never place one mat on top of another.

Compatible portable equipment

For the RD4, the fitting of an RCA 

auxiliary socket is offered specifically by the 

Network.

The audio cable for connection to the 

auxiliary socket (RCA yellow-red located in 

the glove box) is also offered by the Network.

Following connection of the cable and 

selection of the AUX mode, via the source 

button, your portable equipment is ready to 

operate.

Set the portable equipment to half volume 

to avoid saturating the audio system sound. 

Then use the audio system volume button.

"Protection": anti-theft alarm, 

window engraving, first aid 

kit, safety jacket, rear parking 

assistance, warning triangle, ...

"In-Car Technology": audio 

systems, telephone, hands-

free kit, speakers, CD changer, 

navigation system, DVD player, ....

"Styling": alloy wheels, trims, 

aluminium interior trim kit, mud 

flaps, ...

"Touring": seat covers 

compatible with side air bags, 

mats, boot tray, sunroof, luggage 

net, door deflectors, cool box 

secured on the slides, clip 

armrest, load carrying roof bars, 

roof box, snow chains, ski carrier, tailgate 

bicycle carrier, interior bicycle carrier, 

booster seats and child seats, Isofix seats, 

side sun blinds and rear blind, ...

Trailer towbar which must be fitted by a 

PEUGEOT dealer.

The fitting of electrical equipment 

or accessories which are not 

recommended by PEUGEOT may result in a 

failure of your vehicle’s electronic system. 

Please note this specific warning. You 

are advised to contact a representative 

of the Marque to be shown the range of 

recommended equipment or accessories.

Depending on the country in which the 

vehicle is sold, it is compulsory to have 

a safety jacket, warning triangle and 

replacement bulbs available in the vehicle.

"Universal": screenwash, interior 

and exterior maintenance and 

cleaning products, replacement 

bulbs, ...

When using a tailgate bicycle 

carrier, deactivate the rear wiper 

from the display configuration 

menu.

15

3

Fuel

C

H

EC

K

S

7

LOW FUEL LEVEL

The tank must be filled with fuel with 

the 

engine off.

 Open the fuel filler flap.

 Insert the key then turn it to the left.

 Remove the cap and attach it to the clip 

located on the inside of the flap.

A label on the inside of the flap indicates 

which type of fuel to use.

If you fill your tank, do not continue after the 

third cut-off of the pump nozzle. This could 

result in vehicle malfunctions.

The capacity of the tank is approximately  

18 gallons (80 litres). 

 After filling the tank, lock the cap and 

close the flap.

FILLING THE FUEL TANK

When the fuel filler flap is open, a 

system limits the opening of the rear 

left sliding side door.

The key cannot be removed from the cap’s 

lock until the cap is refitted on the tank. 

FUEL CIRCUIT DISARMED

In a serious collision, a mechanism 

automatically prevents fuel from reaching 

the engine.

The flashing of this warning light 

is accompanied by a message on 

the display.

Check that there is no odour or 

leakage of fuel outside the vehicle and re-

establish the fuel supply:

 switch off the ignition (STOP

 position).

 remove the key.

 put the key back in the ignition.

 switch on the ignition and start.

When the tank’s minimum level is 

reached, this warning light comes 

on, accompanied by the message 

"Fuel level low" on the display.

You have enough fuel left

 to cover 

approximately 30 miles (50 km), depending 

on driving conditions and the engine.

If the warning light flashes, this indicates a 

fuel gauge malfunction.

Contact a PEUGEOT dealer.

DIESEL REPRIMING PUMP

If you should run out of fuel, it is necessary 

to re-prime the circuit:

- fill the fuel tank with at least five litres of 

diesel,

- squeeze and release the manual  

re-priming pump, under the bonnet under 

the protective cover, until fuel appears  

in the transparent pipe,

- operate the starter until the engine starts.

Environment

15

4

ENVIRONMENT

With you, PEUGEOT acts to protect the 

environment.

On the 

www.peugeot.com site, you are 

invited to consult, 

the "Tradition & Innovation" 

tab, the "Environnement" item and then 

specifically to visit the nursery of "Opération 

Carbone".

the "Tradition & Innovation" tab, 

the "Environment" item and then specifically 

to visit the nursery of the Fazenda via 

"Opération Carbone" (the carbon sink 

project).

PEUGEOT’s clean HDi Diesel engines 

(Common Rail diesel direct injection) 

have the characteristic of offering low 

consumption and minimising emissions of 

CO

2.

 In addition to this contribution, these 

engines provide a highly acclaimed level of 

driving pleasure.

As the driver, you also can contribute to 

protecting the environment by following 

certain rules:

- adopt a preventive style of driving, without 

frequent and sharp acceleration,

- observe the service intervals; we 

recommend that services are carried out by 

a PEUGEOT dealer authorised to collect 

used batteries and fluids,

- in order to preserve the reliability of the 

engine and emission control system, do not 

use engine oil additives.

Refer to the starting and stopping 

"good practice" advice in this handbook 

at the end of chapter 2.

15

5

Opening the bonnet

C

H

EC

K

S

7

OPENING THE BONNET

From inside: 
  

lift the cover located at the left foot of the 

driver’s seat.

 

pull the control upwards.

"Bonnet open" warning 
This warning is linked to the 

alarm option 

only.

With the engine running or the vehicle 

moving, a diagram on the display 

accompanied by an audible signal, warns 

you that the bonnet is not properly closed. 

From outside: 
lift the catch and raise the bonnet.

Bonnet strut

Secure the strut to hold the bonnet open.

Before closing the bonnet, replace the strut 

in its housing.

To close

Lower the bonnet and release it at the 

end of its travel. Check that the bonnet is 

properly locked. 

Under the bonnet

15

6

PETROL ENGINES

5 -  Brake and clutch fluid reservoir.

6 -  Jack housing.

7 -  Air filter.

8 -  Removable towing eye.

9 -  Dipstick.

10 - Engine oil filler cap.

11 - Power steering reservoir.

UNDER THE BONNET

1 -  Windscreen/headlamp wash reservoir. 

2 -  Fuse box.

3 -  Coolant reservoir.

4 -  Wheelbrace.

15

7

Under the bonnet

C

H

EC

K

S

7

DIESEL ENGINES

5 -  Brake and clutch fluid reservoir.

6 -  Jack housing.

7 -  Air filter.

8 -  Removable towing eye.

9 -  Engine oil filler cap.

10 - Dipstick. 


(

a: 2.2 HDi; b: 2.0 HDi).

11 - Power steering reservoir.

12 - Repriming pump (2.0 HDi).

1 -  Windscreen/headlamp wash reservoir. 

2 -  Fuse box.

3 -  Coolant reservoir.

4 -  Wheelbrace.

Levels

15

8

These regular maintenance operations 

will keep your vehicle in good running 

order. Consult the instructions at PEUGEOT 

dealerships, on the Infotec site or in the 

servicing booklet enclosed in the handbook 

pack.

reliability of engines and emission control 

systems, the use of additives in engine oil is 

prohibited.

Oil change

It is imperative that this is carried out at the 

intervals specified and the viscosity grade of 

the oil selected must fulfil the requirements 

in accordance with the manufacturer’s 

servicing schedule. Consult the instructions 

at PEUGEOT dealerships or on the Infotec 

site.

Remove the dipstick before filling.

Check the level after filling (never exceed 

the max mark).

Screw the cap back onto the sump before 

closing the bonnet.

Viscosity selection
In all cases, the oil selected must meet the 

manufacturer’s requirements.

Changing the brake fluid

The brake fluid must be changed at 

the intervals stated, according to the 

manufacturer’s servicing schedule.

Use fluids recommended by the 

manufacturer, which fulfil DOT4 standards.

The level must be between the MIN and 

MAX marks on the reservoir.

If fluid has to be added frequently, this 

indicates a failure which must be checked by 

a PEUGEOT dealer as soon as possible.

LEVELS

If you have to remove / refit the engine 

style cover, handle it with care to avoid 

damaging the fixing clips.

Oil level

Check the level regularly and top up 

between changes. The maximum 

consumption is 0.5 litre per 600 miles  

(1 000 km).

Check the level with the vehicle level, 

engine cold, using the dipstick. 

Dipstick

There are two marks on 

the dipstick:

A = maximum

If you fill past this mark, 

contact a PEUGEOT 

dealer.

B = minimum

Never allow the level to 

fall below this mark.

To maintain the 

Warning lights

Checking by means of the warning 

lights on the instrument panel is 

described in chapter 2, "Instruments and 

controls" section.


Content   ..  8  9  10  11   ..