Peugeot 406 Break Dag (2003 year). Instruction - part 10

44
MAINTENANCE OF YOUR 406
Engine compartment fuses
The electrical system of
Fuse box
your vehicle is designed
to operate with standard
To access the fuse box in the engine
or optional equipment.
compartment
(beside the battery),
Before installing other electrical
unclip the cover.
equipment or accessories on your
Carefully close the cover when
vehicle, contact a PEUGEOT
you have finished.
dealer.
Some electrical accessories or the
way in which they are fitted can
have damaging effects on the
operation of your vehicle; the
electronic control circuits, the
audio circuit and the battery
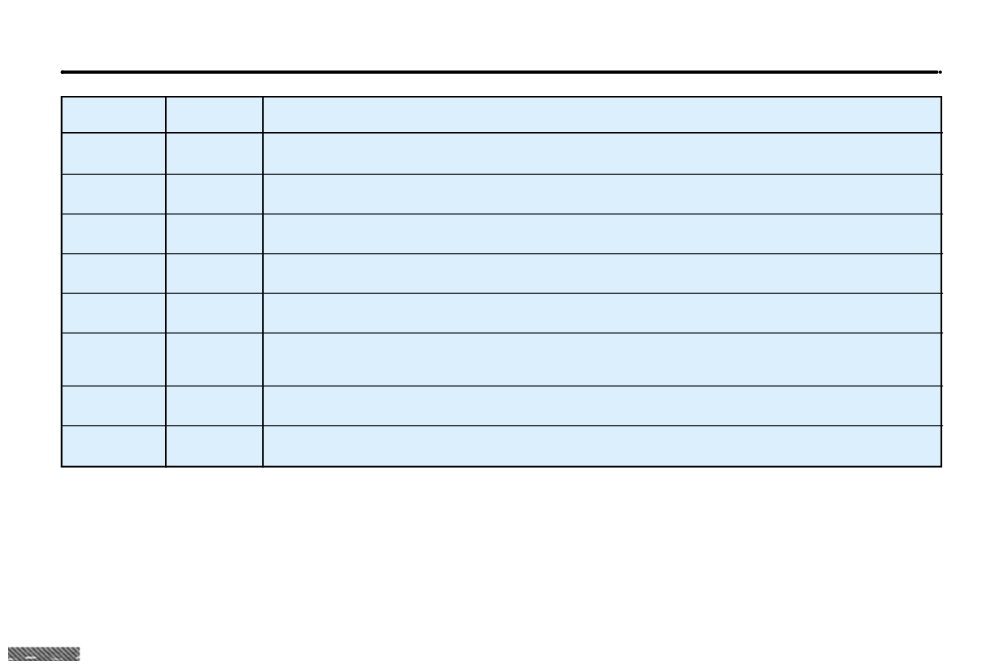
Fuse N°
Rating
Functions
charging circuit.
PEUGEOT will not accept respon-
1*
10 A
Reversing lights - Double injection relay -
sibility for the cost incurred in
Engine oil temperature - Oil level -
repairing your vehicle or for recti-
Air conditioning compressor.
fying the malfunctions resulting
2*
15 A
Fuel pump - Canister solenoid valve.
from the installation of acces-
sories not supplied and not rec-
3*
10 A
Electronic Control unit.
ommended by PEUGEOT and not
installed in accordance with its
4*
10 A
Engine control unit and automatic gearbox.
instructions, in particular where
the equipment in question con-
5
10 A
Particulate Emission Filter control unit -
sumes more than
10 mil-
Rear windscreen relay.
liamperes.
* The maxi-fuses provide addition-
6
15 A
Front fog lamps.
al protection for the electrical sys-
tems. All work must be carried out
7
20 A
Headlamp wash.
by a PEUGEOT dealer.
8*
20 A
Direct petrol injection engine control unit - Clutch pedal.
9*
15 A
Left-hand dipped beam lights.
10*
15 A
Right-hand dipped beam lights.
17-02-2003
45
MAINTENANCE OF YOUR 406
Fuse N°
Rating
Functions
11*
10 A
Left-hand main beam.
12*
10 A
Right-hand main beam.
13*
15 A
Horn.
14
10 A
Front and rear screen wash pump.
15*
30 A
Ignition coil - Windscreen wiper - Oxygen sensor - Oil pressure - Injection system.
16*
30 A
Air pump and oil temperature - Oil level - Brake lights function - Alternator - Water in diesel
detector - Injection relay control.
17*
30 A
Passenger's electric seat.
18
40 A
Heater blower - Starter - Windscreen wiper slow speed.
17-02-2003

169
PETROL/LPG TWIN FUEL VERSION
– carry out the same operation with
the second can, then drive imme-
diately, at a moderate speed
, to
the nearest garage.
The cans enable you to carry out
a temporary repair.
After use, the tyre must be
changed.
As the cans are pressurized, they
must not be exposed to a temper-
ature above 50 °C.
Store them away from heat in the
insulated storage compartment.
Puncture
Using the repair cans
(Refer to the directions on the cans
Insulated storage compartment
also)
This is located in the boot and con-
- if possible, remove the object
tains:
which caused the puncture,
- the temporary tyre repair cans 1
- rotate the wheel so that the valve
(your 406 LPG does not have a
is in the same position as the
spare wheel),
figures 2 or 10 on a clock,
- the adaptors
2 necessary for
- shake the cans vigorously before
filling the LPG tank in some
use. In very cold weather, warm
countries,
the cans between your hands for
- the towing eye 3.
few minutes,
- hold the valve with one hand and
with the other press the injection
nozzle on the can firmly onto the
valve, holding it straight,
Fuses
- maintain the pressure firmly for
one minute,
The LPG functions are protected
by the two fuses A in the fuse box
located in the engine compartment.
17-02-2003

41
MAINTENANCE OF YOUR 406
Removing and changing a fuse
Before changing a fuse you must find out the cause of the fault and have it put
right. The fuse numbers are indicated on the fuse box.
Use the special pliers A attached to the box.
Always change a faulty fuse for one of the same rating.
Correct
Incorrect
Pliers A
CHANGING A FUSE
The fuse boxes are under the fascia
and in the engine compartment.
Fuse n o.
Rating
Functions
Fascia fuse box
A
20 A
Locking/Unlocking.
B
10 A
Rear fog lamps.
Turn the three screws a quarter turn
with a coin. Pull at A and tilt the
C
40 A
Demisting of mirrors.
cover to access the fuses.
D
15 A
Rear screen wiper.
E
30 A
Electric windows.
F
15 A
Supply to: Instrument panel,
Display, Audio equipment,
Satellite navigation system,
Air conditioning.
Remove the fascia panel lower trim to access the built-in systems interface.
17-02-2003

42
MAINTENANCE OF YOUR 406
Fascia fuse box
Fuse N°
Rating
Functions
1
shunt
Central air bag.
2
5 A
Ventilation controls.
3
10 A
Instrument panel.
4
5 A
Ignition +ve signal for Built-in Systems Interface.
5
-
Not used.
6
10 A
Steering wheel controls.
7
15 A
Alarm siren.
8
10 A
Satellite navigation system.
9
5 A
Battery +ve signal for Built-in Systems Interface.
10
15 A
Audio equipment.
11
10 A
Third brake light.
12
10 A
Right-hand brake light.
13
20 A
Driver's electric window.
14
30 A
Rear window power.
15
-
Battery +ve towing socket.
16
20 A
Memorisation of seats.
17
20 A
Passenger's electric seat.
18
10 A
Lighter lighting - Display - Lighting for switches and ash tray - Automatic gearbox selector lever.
17-02-2003

43
MAINTENANCE OF YOUR 406
Fuse N°
Rating
Functions
19
10 A
Rear fog lamps.
20
10 A
Rear right and front left side light.
21
10 A
Rear left and front right side light.
22
10 A
Glove box lighting - Map reading light - Courtesy mirror light - Front and rear courtesy
lights - Lighting for electric windows pad and Electrochrome rear view mirror.
23
20 A
Lighter.
24
-
Not used.
25
20 A
Audio equipment.
26
-
Not used.
27
5 A
Rear window relay.
28
15 A
Heated seats.
R
5 A
Replacement fuse.
R2
10 A
Replacement fuse.
R3
30 A
Replacement fuse.
R4
20 A
Replacement fuse.
R5
15 A
Replacement fuse.
17-02-2003

46
MAINTENANCE OF YOUR 406
BATTERY
Economy mode
To charge the battery using a battery charger:
With the engine switched off and the
ignition key in the "running" or
- Disconnect the battery,
"accessories" position for about half
- Follow the instructions for use given by the battery charger manufacturer,
an hour, certain electrical equipment
- Reconnect starting with the negative (-) terminal,
(displays, instrument panel, warning
lights, courtesy lights, electric win-
- Check that the terminals and connectors are clean. If they are covered with sul-
dows, wipers etc.) will switch off
phate (white or greenish deposit), disconnect them and clean them.
automatically to avoid draining the
battery.
To start the vehicle from another battery:
Once the electrical equipment goes
- Connect the red cable to the positive (+) terminals of the two batteries,
into economy mode, it is necessary
to start the engine to enable the
- Connect one end of the green or black cable to the negative (-) terminal of the
equipment to work again.
slave battery,
- Connect the other end of the green or black cable to an earth point on the bro-
ken down vehicle, as far as possible from the battery,
Operate the starter, let the engine run.
Wait for the engine to return to idle, then disconnect the cables.
It is advisable to disconnect the battery if the vehicle
is not to be used for a period of more than one month.
- Never disconnect a terminal when the engine is running.
- Never charge a battery without first disconnecting the terminals.
- Close the sunroof before disconnecting the battery. If it does not
operate normally following re-connection of the battery, you must
re-initialise it by turning the control to the maximum tilt position and pressing
it for a few seconds.
- After every reconnection of the battery, switch on the ignition and wait
1 minute before starting to allow the electronic systems to be initialised. If
slight difficulties are experienced after this, please contact a PEUGEOT deal-
er.
17-02-2003

47
MAINTENANCE OF YOUR 406
FITTING AUDIO EQUIPMENT
B1
:
(+ve) Rear right loud-speaker.
Your vehicle is equipped with certain
B2
:
(-ve) Rear right loud-speaker.
factory-fitted audio equipment:
B3
:
(+ve) Front right loud-speaker
- roof aerial,
and tweeter.
- coaxial aerial cable,
B4
:
(-ve) Front right loud-speaker
- basic interference suppression,
and tweeter.
- supply to front speakers,
B5
:
(+ve) Front left loud-speaker
- supply to rear speakers and
and tweeter.
tweeters,
B6
:
(-ve) Front left loud-speaker
- two 8-way connectors.
and tweeter.
B7
:
(+ve) Rear left loud-speaker.
B8
:
(-ve) Rear left loud-speaker.
FITTING THE SPEAKERS
The factory-fitted equipment allows
you to fit:
Wiring positions
- 165 mm diameter speakers to the
and functions
front doors,
A1
: Spare.
- 55 mm diameter tweeters to the
fascia,
A2
: Do not use.
- special elliptical-shaped speakers
A3
: Do not use.
at the rear of the saloon,
- 100 mm diameter speakers at the
A4
: Do not use.
rear of the estate.
A5
: Spare.
Contact your PEUGEOT dealer.
A6
:
(+ve) Accessories.
A7
:
(+ve) Permanent.
A8
: Earth.
17-02-2003

48
MAINTENANCE OF YOUR 406
Special features of the
automatic gearbox
When towing with four wheels on the
ground, the following rules must be
obeyed:
- gear lever in position N,
- tow the vehicle at less than
30 m.p.h. (50 km/h) over a maxi-
mum distance of 30 miles (50 km).
- do not add oil to the gearbox.
TOWING YOUR VEHICLE
Without lifting (4 wheels on the road)
You should always use a tow bar.
The towing eye is inside the spare wheel.
From the front:
Lift the cover using the flat part of the towing eye.
Screw in the towing eye until it locks.
From the rear:
Unclip the cover by passing your hand behind the bumper and pushing.
Screw in the towing eye until it locks.
Lifting (2 wheels on the road only)
It is preferable to raise the vehicle by the wheels.
Never use the radiator crossmember.
17-02-2003

49
MAINTENANCE OF YOUR 406
TOWING A TRAILER,
Cooling: Towing a trailer on a slope
Tyres: Check the tyre pressures of
CARAVAN, BOAT ETC.
increases the temperature of the
the towing vehicle and the trailer,
coolant.
observing the recommended pres-
Only use original PEUGEOT tow
sures.
As the fan is electrically controlled,
bars that have been tested and
its cooling capacity is not dependent
approved from the design stage of
Brakes: Towing increases the braking
on the engine speed.
your vehicle.
distance.
On the contrary, use a high gear to
The tow bar must be fitted by a
lower the engine speed, and reduce
Lights: Check the electrical sig-
PEUGEOT dealer.
your speed.
nalling on the trailer.
Your vehicle is basically designed for
The maximum towing speed on a
transporting people and luggage but
long slope depends on the gradient
Side wind: Take into acount the
it may also be used for towing a
and the outside temperature.
increased sensitivity to side wind.
trailer.
For vehicles fitted with a direct injec-
tion petrol engine, after towing or dri-
Driving with a trailer subjects the
ving at high speed for a long period
towing vehicle to more significant
of time, the fan may operate for
stress and its driver must be particu-
approximately 6 minutes.
larly careful.
In all cases, pay attention to the
Air density decreases with altitude,
coolant temperature.
thus reducing engine performance.
If the warning light comes on, stop
The maximum towing load must
the vehicle and switch off the engine
be reduced by
10 % for every
as soon as possible.
1 000 metres of altitude.
Driving advice
Distribution of loads: Distribute the
load in the trailer so that the heaviest
items are as close as possible to the
axle and the nose weight approach-
es the maximum permitted without
exceeding it.
17-02-2003

50
MAINTENANCE OF YOUR 406
Removing the mat
When removing the mat on the dri-
ver's side, move the seat as far back
as possible and remove the fixings.
When refitting the mat, position it
and replace the fixings by turning
them a quarter of a turn.
FITTING ROOF BARS
Use accessories approved by Auto-
mobiles PEUGEOT and follow the
When fitting transverse roof bars to
manufacturer's fitting instructions.
the estate, ensure that they are posi-
tioned correctly.
The correct positions are shown by
marks on each of the longitudinal
bars.
Maximum authorised weight
on the roof rack
Saloon: 165 lbs. (75 kg)
Estate: 220 lbs. (100 kg)
17-02-2003

51
MAINTENANCE OF YOUR 406
FRONT POSITION
REAR POSITION
HEAVY DUTY LUGGAGE NET (Estate)
The heavy duty luggage net may be installed behind the front seats (in the front position) or behind the rear seats (in the
rear position)
Luggage net fixings in the front position
Luggage net fixings in the rear position
- Fold down the rear seats (see section on 'Rear seats,
- Remove the rear parcel shelf.
Estate').
- Open the corresponding top fixings.
- Open the corresponding top fixings.
- Detach the anchor points.
- Detach the anchor points.
- Locate the ends of the metal bar in these fixings.
- Locate the ends of the metal bar in these fixings.
- Fix the two hooks of the inside straps of the net in the
- Fix the two hooks of the inside straps of the net in the
stowing holes on the floor.
stowing holes provided on the frame brackets of the rear
- Tighten the two straps.
seats.
- Tighten the two straps.
Note: The stowing rings are located perpendicular to the
corresponding top fixings.
17-02-2003

52
MAINTENANCE OF YOUR 406
406 ACCESSORIES
For your PEUGEOT only use accessories and original parts approved by the manufacturer.
These accessories and parts are all adapted to your PEUGEOT, after being tested and approved for reliability and safety,
which PEUGEOT cannot guarantee for other products.
Awide choice of original accessories, approved by PEUGEOT, is available through the dealer network. They all carry the
PEUGEOT guarantee.
- Security
: Alarms, window engraving, wheel anti-theft devices, first aid kit etc.
– Protection
:
Covers compatible with side air bags, mats, door sill protector, styling strips.
– Communication
:
Telephone, satellite navigation, audio equipment, CD changer, speakers.
– Customising
:
Alloy wheels, wheel trims, spoiler, sports exhaust.
– Comfort
: Air conditioning, sun roofs*, storage facilities, portable refrigerator, luggage net, telephone
console, armrest, door sill protector, boot storage, door deflectors.
- Leisure pursuits
:
Tow bar, roof bars, carriers (for bicycles and skis), roof boxes, snow chains etc.
– Children
: Booster seats and child seats, side blinds, rear blinds.
– Maintenance products : Windscreen washer fluid, internal and external cleaning and maintenance products.
*As the fitting of a sun roof may require cutting of the roof strengthener, it is essential to use original PEUGEOT
products only.
17-02-2003

156
TECHNICAL DATA
PETROL ENGINES
MODELS:
Model codes
8B6FZ
8BRFN
8E6FZ
8ERFN
8F6FZ
8FRFN
ENGINES
1.8 Litre 16V
2 Litre 16V
Capacity (cm3)
1 749
1 997
Bore x stroke
82.7 x 81.4
85 x 88
Number of valves
16
16
Max. power: EU standard (KW)
85
100
Max. power at engine speed (r.p.m)
5 500
6 000
Max. torque: EU standard (Nm)
160
190
Max. torque at engine speed (r.p.m)
4 000
4 100
Fuel
Unleaded
Unleaded
Catalytic converter
Yes
Yes
Electronic injection
Yes
Yes
GEARBOX
Manual
Automatic
Manual
Automatic
(5-speed)
(4-speed)
(5-speed)
(4-speed)
CAPACITIES (in litres)
Engine (with filter replacement)
4.25
4.25
4.25
4.25
Gearbox - Final drive
1.9
-
1.9
-
17-02-2003

157
TECHNICAL DATA
PETROL ENGINES
MODELS:
Model codes
8BR6F
8BRLZ
8ER6F
8ERLZ
8FRLZ
ENGINES
2 Litre 16V
2 litre HPI
16V
Capacity (cm3)
1 997
1 997
Bore x stroke
85 x 88
85 x 88
Number of valves
16
16
Max. power: EU standard (KW)
100
103
Max. power at engine speed (r.p.m)
6 000
6 000
Max. torque: EU standard (Nm)
190
192
Max. torque at engine speed (r.p.m)
4 100
4 000
Fuel
Leaded
Unleaded
Catalytic converter
Yes
Yes
Electronic injection
Yes
Yes
GEARBOX
Manual
Manual
(5-speed)
(5-speed)
CAPACITIES (in litres)
Engine (with filter replacement)
4.25
4.25
Gearbox - Final drive
1.9
1.9
17-02-2003

158
TECHNICAL DATA
PETROL ENGINES
MODELS:
Model codes
8B3FZ
8BXFX
8E3FZ
8EXFX
8F3FZ
ENGINES
2.2 Litre 16V
24V V6 Injection
Capacity (cm3)
2 230
2 946
Bore x stroke
86 x 96
87 x 82.6
Number of valves
16
24
Max. power: EU standard (KW)
116
152
Max. power at engine speed (r.p.m)
5 650
6 000
Max. torque: EU standard (Nm)
217
285
Max. torque at engine speed (r.p.m)
3 900
3 750
Fuel
Unleaded
Unleaded
Catalytic converter
Yes
Yes
Electronic injection
Yes
Yes
GEARBOX
Manual
Manual
Automatic
(5-speed)
(5-speed)
(4-speed)
CAPACITIES (in litres)
Engine (with filter replacement)
4.25
4.75
4.75
Gearbox - Final drive
1.85
1.85
-
17-02-2003

159
TECHNICAL DATA
DIESEL ENGINES
MODELS:
Model codes
8BRHY
8BRHZ/S
8BRHS
8B4HX
8ERHY
8ERHZ/S
8ERHS
8E4HX
8FRHY
8FRHZ/S
8FRHS
8F4HX
ENGINES
Diesel Turbo
Diesel Turbo
Diesel Turbo
2 Litre HDI
2 Litre HDI
2.2 litre 16V HDI
Capacity (cm3)
1 997
1 997
2 179
Bore x stroke
85 x 88
85 x 88
85 x 96
Number of valves
8
8
16
Max. power: EU standard (KW)
66
80/79
79
98
Max. power at engine speed (r.p.m)
4 000
4 000
4 000
Max. torque: EU standard (Nm)
205
250
314
Max. torque at engine speed (r.p.m)
1 900
1 750
2 000
Fuel
Diesel
Diesel
Diesel
Catalytic converter
Yes
Yes
Yes
Electronic injection
Electronic
Electronic
Electronic
Particulate emission filter (PEF)
No
No
Yes
Yes
Yes
GEARBOX
Manual
Manual
Automatic
Manual
Manual
(5-speed)
(5-speed)
(4-speed)
(5-speed)
(5-speed)
CAPACITIES (in litres)
Engine (with filter replacement)
4.5
4.5
4.5
4.5
4.5
Gearbox - Final drive
1.9
1.85
-
-
1.85
17-02-2003