Peugeot 406 Break Dag (2003 year). Instruction - part 9

28
MAINTENANCE OF YOUR 406
2.2 litre 16 valve petrol engine
3 - Windscreen and headlamp*
6 - Brake and clutch fluid reservoir.
wash reservoir.
7 - Engine oil filler cap.
1 - Power steering reservoir.
4 - Battery.
8 - Dipstick.
2 - Coolant reservoir.
5 - Air filter.
* According to destination.
17-02-2003

29
MAINTENANCE OF YOUR 406
3 litre 24 valve V6 petrol
3 - Windscreen and headlamp*
6 - Brake and clutch fluid reservoir.
injection engine
wash reservoir.
7 - Engine oil filler cap.
1 - Power steering reservoir.
4 - Battery.
8 - Dipstick.
2 - Coolant reservoir.
5 - Air filter.
* According to destination.
17-02-2003

30
MAINTENANCE OF YOUR 406
2 litre turbo diesel HDI engine
3 - Windscreen and headlamp*
6 - Brake and clutch fluid reservoir.
wash reservoir.
(90 bhp/110 bhp)
7 - Engine oil filler cap.
4 - Battery.
8 - Dipstick.
1 - Power steering.
2 - Coolant reservoir.
5 - Air filter.
* According to destination.
17-02-2003

31
MAINTENANCE OF YOUR 406
2.2 litre 16V turbo diesel HDI
3 - Windscreen and headlamp* wash
6 - Brake and clutch fluid reservoir.
engine
reservoir.
7 - Engine oil filler cap.
1 - Power steering reservoir.
4 - Battery.
8 - Dipstick.
2 - Coolant reservoir.
5 - Air filter.
* According to destination.
17-02-2003

32
MAINTENANCE OF YOUR 406
CHECKING THE LEVELS
Brakes and clutch level:
To avoid any risk of burns, slacken
the cap to the first notch to release
Oil level
- The level should always be
the pressure. When the pressure has
between the DANGER and MAX
dropped, remove the cap and top up
Check the level regularly and top up
marks on the reservoir.
the level.
between changes. Maximum con-
- If the level drops substantially, con-
sumption is 0.5 litres per 600 miles
tact a PEUGEOT dealer imme-
Used products
(1 000 km).
diately.
Do not dispose of used oil, brake
The oil level should be checked with
Fluid change:
fluid or coolant down drains or on the
the vehicle level and the engine cold
ground.
- must be carried out according to
using the oil gauge or the dipstick.
the
manufacturer's
servicing
schedule.
Dipstick
Power steering fluid level
- use fluids recommended by the
There are two marks on
manufacturer, which fulfil DOT
4
Open the reservoir with the engine
the dipstick:
standards.
cold. The level should always be
A = maximum
above the MINI mark, close to the
Note: the brake fluid is noxious and
Never fill past this mark.
MAXI mark.
very corrosive. Avoid any contact
B = minimum
with the skin.
To maintain the reliability
of the engines and of the
Windscreen and headlamp*
emission control systems,
Coolant level
wash fluid level
the use of additives in the
engine oil is prohibited.
Use the fluid recommended by the
For best quality cleaning and for your
manufacturer.
safety, we recommend that you use
When the engine is warm, the tem-
products recommended by PEUGEOT.
perature of the coolant is controlled
by the engine fan. Because this fan
Oil change
can operate with the ignition off and
because the cooling system is pres-
According to the information given in
surised, wait for at least one hour
"PEUGEOT SERVICING" .
after the engine has stopped before
Note: avoid any prolonged contact of
carrying out any work.
used oil with the skin.
Viscosity selection
In all cases, the oil selected must
meet the manufacturer's require-
ments.
* According to destination.
17-02-2003

33
MAINTENANCE OF YOUR 406
CHECKS
Manual gearbox
Only use products recom-
This does not need an oil change.
mended by Automobiles
Check the level according to the
PEUGEOT.
Battery
manufacturer's servicing schedule.
To ensure best perfor-
At the start of winter, have your bat-
mance from components as impor-
tery checked by a PEUGEOT dealer.
tant as the power steering and the
Automatic gearbox
braking
system,
PEUGEOT
selects and offers quite specific
This does not need an oil change.
Air filter
products.
Have the level checked by a PEU-
GEOT dealer according to the manu-
Regular replacement of the filter ele-
facturer's servicing schedule.
ment is essential. If you drive in
very dusty conditions, change it
twice as often
Oil filter
Replace the cartridge regularly in
Brake pads
accordance with the servicing sched-
ule.
Brake pad wear depends on the
style of driving, in particular for vehi-
cles that are used in town, for short
journeys.
It may be necessary to check the
thickness of the pads even between
services.
Handbrake
Where the handbrake travel is too
great or there is a reduction in the
performance of the system, the
handbrake should be adjusted, even
between services. Have the system
checked by a PEUGEOT dealer.
17-02-2003

34
MAINTENANCE OF YOUR 406
CHANGING A WHEEL
Tools
Removal
1 - Wheel brace.
- Park the vehicle on level, stable
Access to the spare wheel
and non-slippery ground.
and jack
2 - Centralising tool.
- Apply the handbrake, engage first
Saloon: lift the boot carpet using the
3 - Trim remover/wheel brace
or reverse gear (position P for the
lifting hook. Secure the hook behind
extension.
automatic gearbox).
the boot seal.
4 - Jack.
- Remove the wheel trim using the
Estate:
unscrew the two carpet
wheelbrace by pulling next to the
5 - Removable towing eye.
retaining screws a quarter turn using
valve. For vehicles fitted with alloy
the ignition key or a coin. Lift the car-
6 - Alloy wheel trim remover.
wheels 8 , remove the centre
pet and secure the retaining hook
trim by using tool 6 in one of the
7 - Trim cap tool.
behind the tailgate seal.
holes.
The tool holder supports the boot
- Loosen the wheel bolts.
7-seater estate: fold back the third
floor.
row seat, then lift the carpet to gain
For vehicles with alloy wheels
8,
Reposition it to prevent any deforma-
access to the spare wheel.
remove the chrome trim caps before-
tion of the floor when loaded.
hand (see page on 'special features
Tighten the spare wheel securing
of alloy wheels' in this section).
strap to prevent noise and for your
safety in the event of a frontal
impact.
17-02-2003

35
MAINTENANCE OF YOUR 406
For your safety, always
change the wheel:
- on level, stable, non-slippery
ground,
- with the handbrake applied,
- with first or reverse gear
engaged
(position P for the
automatic gearbox).
- Never go underneath a vehicle
which is supported only by a
jack (use a ramp).
- The jack is fitted with a system
Fitting a wheel
After changing the wheel
which enables it to be folded or
- Position the wheel using the cen-
- have the tightening of the bolts
unfolded rapidly. Take the jack
tralising tool to assist you.
and the tyre pressure checked
from the toolkit and fold it by press-
ing the ends A. Place the jack at
- Tighten the bolts by hand, and
by a PEUGEOT dealer as soon
one of the locations E underneath
remove the centralising tool.
as possible,
the vehicle (as close as possible to
- have the punctured tyre
- Partly tighten the bolts using the
the wheel to be changed) and
repaired and refit it to the vehi-
wheelbrace.
unfold it by pulling the ends A.
cle as soon as possible.
- Fold the jack and remove it.
- Extend the jack using the wheel-
brace 1 and the extension 3.
- Fully tighten the wheel bolts using
7 seater Estate model
the wheelbrace.
- Take out a wheel bolt at the top
The space-saver spare wheel fit-
and fit the centralising tool 2.
- Replace the wheel trim, except in
ted with a
125/80R15 tyre must
the case of a space-saver wheel,
- Loosen the wheel bolts and
only be used as a short-term mea-
by starting with the valve and
remove the wheel.
sure. Tyre pressure is
61 lb in2
pressing on using the palm of your
(4.2 bars), maximum speed is
hand.
50 mph (80 km/h).
17-02-2003

36
MAINTENANCE OF YOUR 406
Special features of alloy
Fitting the spare wheel
Anti-theft bolts*
wheels
If your vehicle is fitted with a steel
If your wheels are fitted with an anti-
spare wheel, when fitting it, it is
theft bolt
(one per wheel), the
Bolt covers
normal to notice when tightening the
chrome trim and then the plastic
Alloy wheel bolts are covered by
bolts that the washers do not come
cover must be removed using tool 7,
chrome trims.
into contact with the rim. The spare
before unscrewing the bolt using one
wheel is secured by the cone-shape
of the two anti-theft sockets (which
Use tool 7 to remove the trims before
of each bolt.
were given to you on delivery of your
slackening the bolts.
vehicle along with the duplicate keys
and the confidential card) and the
Fitting snow tyres
wheel brace 1.
If you fit snow tyres mounted on steel
wheels to your vehicle, it is essential
Note: make a careful note of the
to use special bolts available from
code number engraved on the head
your PEUGEOT dealer.
of the anti-theft socket. This will
enable you to obtain duplicate anti-
theft sockets from a Peugeot dealer.
* According to model and destination.
17-02-2003
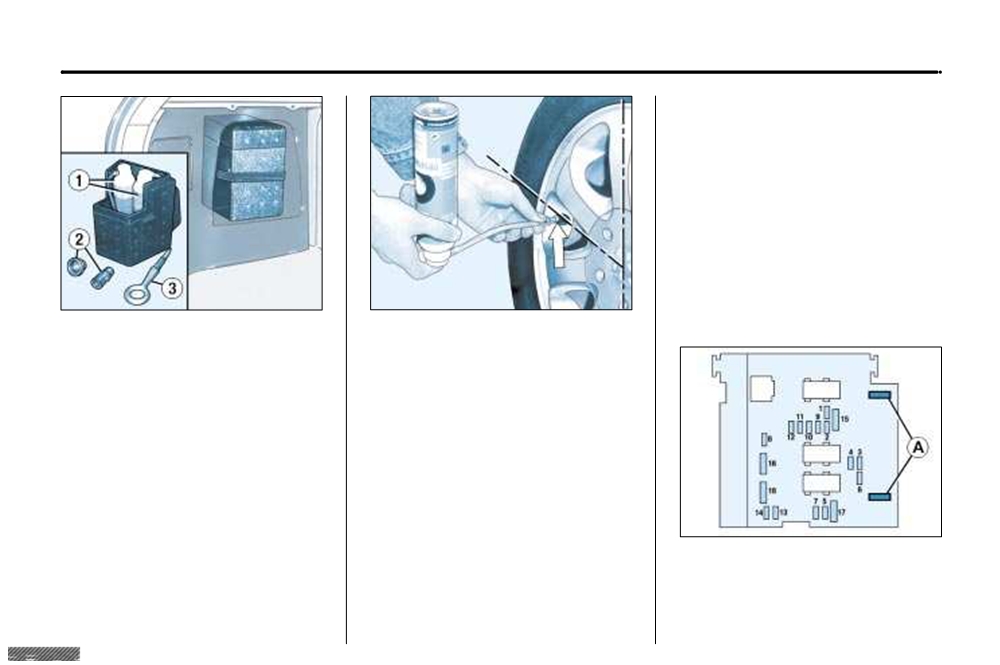
169
PETROL/LPG TWIN FUEL VERSION
– carry out the same operation with
the second can, then drive imme-
diately, at a moderate speed
, to
the nearest garage.
The cans enable you to carry out
a temporary repair.
After use, the tyre must be
changed.
As the cans are pressurized, they
must not be exposed to a temper-
ature above 50 °C.
Store them away from heat in the
insulated storage compartment.
Puncture
Using the repair cans
(Refer to the directions on the cans
Insulated storage compartment
also)
This is located in the boot and con-
- if possible, remove the object
tains:
which caused the puncture,
- the temporary tyre repair cans 1
- rotate the wheel so that the valve
(your 406 LPG does not have a
is in the same position as the
spare wheel),
figures 2 or 10 on a clock,
- the adaptors
2 necessary for
- shake the cans vigorously before
filling the LPG tank in some
use. In very cold weather, warm
countries,
the cans between your hands for
- the towing eye 3.
few minutes,
- hold the valve with one hand and
with the other press the injection
nozzle on the can firmly onto the
valve, holding it straight,
Fuses
- maintain the pressure firmly for
one minute,
The LPG functions are protected
by the two fuses A in the fuse box
located in the engine compartment.
17-02-2003

37
MAINTENANCE OF YOUR 406
CHANGING A BULB
Direction indicator (WY 5 W)
1 - Dipped beam headlamps
- Pull the rear section of the trans-
parent cover and release the
2 - Main beam headlamps
assembly.
2 bulbs (H7-55 W)
- Turn the connector a quarter turn
- Press the tab and remove the protective cover corresponding to the faulty bulb.
and remove it.
- Disconnect the connector.
- Change the bulb.
- Press the end of the securing clip to remove it. Change the bulb.
- When fitting, ensure that the direction notches are positioned correctly and that
the securing clip is corrrectly fixed.
Amber bulbs must be
- Reconnect the connector.
replaced by bulbs of iden-
- Refit the protective cover.
tical
specification and
colour.
3 - Side lights (W 5 W)
In certain weather conditions (low
Turn the socket using the lever and remove it. Change the bulb.
temperatures, humidity), the
4 - Direction indicators (P 21 W)
presence of condensation on
the inside of the headlamp
Turn the bulb holder a quarter turn and remove it. Change the bulb.
glass is normal; it disappears a
Note: only handle H7 bulbs using a dry cloth.
few minutes after the lights have
been switched on.
To replace the left-hand bulbs, remove the protective battery cover.
17-02-2003

38
MAINTENANCE OF YOUR 406
Third brake light - saloon
Rear lights, saloon
(5 W5W bulbs)
1 - Direction indicators (P 21 W).
Lower the two metal clips on either
2 - Reversing lights (P 21 W).
side of the light and slide the cover
3 - Brake lights/Side lights (P 21/5 W).
towards the rear.
4 - Side lights (P 21/5 W).
Remove the bulb-holder.
5 - Fog lamp (P 21 W).
Change the faulty bulb.
These 5 bulbs are changed from inside the boot:
- remove the retaining clips then release the carpet,
- remove the connector by pressing the tab A,
- remove the bulb holder by squeezing the tabs,
- change the faulty bulb.
17-02-2003

40
MAINTENANCE OF YOUR 406
Tailgate lights
Extract the bulb holder by pressing
Number plate lights (W 5 W)
the tabs C.
Open the flap using the cut-out pro-
Remove the translucent protector.
vided.
Change the faulty bulb.
Change the faulty bulb.
Disconnect the connector by releas-
1 - Side lights (P 21/5 W).
ing tab A.
2 - Reversing lights (P 21 W).
Unscrew the two nuts.
3 - Fog lamp (P 21 W).
Remove the light by squeezing the
two tabs B.
17-02-2003

39
MAINTENANCE OF YOUR 406
Rear lights, estate
Open the flap using the ignition key.
To gain access to the bulbs, press
the tabs and release the bulb holder.
Remove the connector by pressing
the metal bar A.
1 - Brake/side lights (P 21/5 W).
Wing lights
2 - Direction indicators (P 21 W).
Unscrew the wing nut B.
To remove the trim, pull the handle
Change the faulty bulb.
towards you and release the panel
Release the light.
upwards.
17-02-2003

40
MAINTENANCE OF YOUR 406
Tailgate lights
Extract the bulb holder by pressing
Number plate lights (W 5 W)
the tabs C.
Open the flap using the cut-out pro-
Remove the translucent protector.
vided.
Change the faulty bulb.
Change the faulty bulb.
Disconnect the connector by releas-
1 - Side lights (P 21/5 W).
ing tab A.
2 - Reversing lights (P 21 W).
Unscrew the two nuts.
3 - Fog lamp (P 21 W).
Remove the light by squeezing the
two tabs B.
17-02-2003

41
MAINTENANCE OF YOUR 406
Removing and changing a fuse
Before changing a fuse you must find out the cause of the fault and have it put
right. The fuse numbers are indicated on the fuse box.
Use the special pliers A attached to the box.
Always change a faulty fuse for one of the same rating.
Correct
Incorrect
Pliers A
CHANGING A FUSE
The fuse boxes are under the fascia
and in the engine compartment.
Fuse n o.
Rating
Functions
Fascia fuse box
A
20 A
Locking/Unlocking.
B
10 A
Rear fog lamps.
Turn the three screws a quarter turn
with a coin. Pull at A and tilt the
C
40 A
Demisting of mirrors.
cover to access the fuses.
D
15 A
Rear screen wiper.
E
30 A
Electric windows.
F
15 A
Supply to: Instrument panel,
Display, Audio equipment,
Satellite navigation system,
Air conditioning.
Remove the fascia panel lower trim to access the built-in systems interface.
17-02-2003