Peugeot 308 SW BL Dag (2009.5). Instruction - part 3
 

  Index      Peugeot     Peugeot 308 SW BL Dag 2009.5 - instruction in english


Search            


Content   ..  1  2  3  4   ..


Peugeot 308 SW BL Dag (2009.5). Instruction - part 3


i

53

MULTIFUNCTION SCREENS

   -   The  current  information 

tab with: 

       the range, 

      the current fuel 

consumption, 

      the distance remaining 

to be travelled.   

  Monochrome screen C  

  Data displays 
  With  the  monochrome  screen  C  or 

the instrument panel large screen  

  Instrument panel PC Com 3D 

16/9 large screen 

   -   The trip  "1"  tab with: 

       the distance travelled, 

      the average fuel 

consumption, 

       the average speed,   

  for the fi rst trip.   

   -   The trip  "2"  tab with: 

       the distance travelled, 

      the average fuel 

consumption, 

       the average speed,   
  for the second trip.   

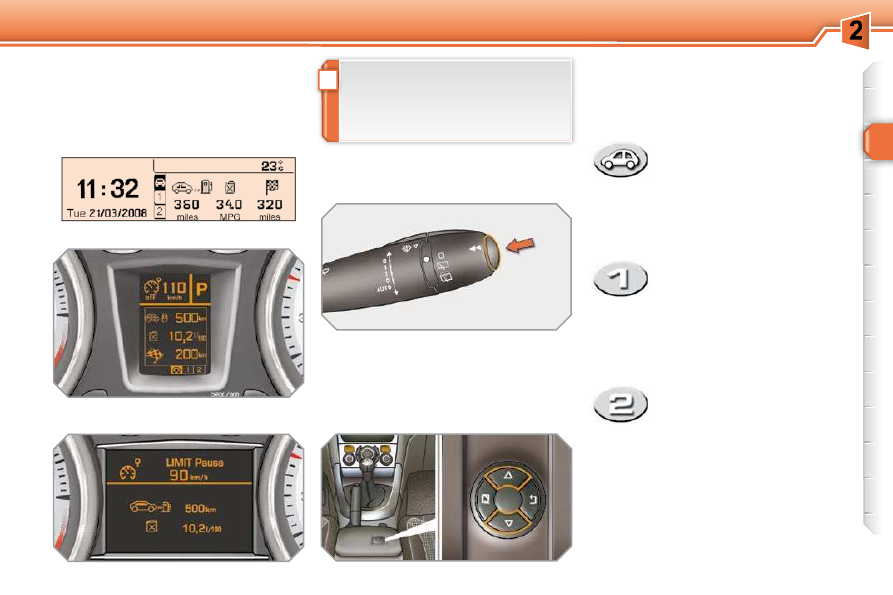
TRIP COMPUTER 

 System  which  provides  current  infor-
mation  concerning  the  route  travelled 
(range, fuel consumption…). 

  Instrument panel large screen  

 Depending on your vehicle's equip-
ment,  the  trip  computer  informa-
tion  appears  on  the  multifunction 
screen or on the large screen in the 
instrument panel. 

      Pressing the button again takes you 

to a black screen.  


A  further  press  returns  you  to  the 
normal display.   

      Press  the  button,  located  at  the 

end  of  the   wiper  stalk ,  to  display 
the  various  trip  computer  tabs  in 
succession.  

  With  the  instrument  panel    PC  Com 
3D
  

 16/9 large screen  

      Press  the  up  and  down  arrows  on 

the  navigator,  associated  with  the 
PC  Com  3D,  to  display  the  various 
trip computer tabs in succession.  

!

i

i

54

MULTIFUNCTION SCREENS

  Route zero reset 
  With  the  monochrome  screen  C  or 

the instrument panel large screen  

      When the trip required is displayed, 

press the control for more than two 
seconds.  

  With  the  instrument  panel    PC  Com 
3D
  

 16/9 large screen  

      A few definitions… 

 When  the  range  falls  below  20  miles 

(30 km), dashes are displayed. After fi ll-

ing with at least 5 litres of fuel, the range 
is recalculated and is displayed when it 
exceeds 60 miles (100 km). 

 If  dashes  are  displayed  continu-
ously  while  driving  in  place  of  the 
digits, contact a PEUGEOT dealer.  

 This function is only displayed from 
20 mph (30 km/h).  

 This  value  may  vary  following  a 
change  in  the  style  of  driving  or 

the  relief,  resulting  in  a  signifi cant 

change  in  the  current  fuel  con-
sumption. 

  Range 
 (miles or km) 
 This  indicates  the  distance 
which  can  still  be  travelled 

with  the  fuel  remaining  in  the  tank  in 
relation  to  the  average  fuel  consump-
tion over the last few miles (kilometres) 
travelled. 

  Current fuel consumption 
 (mpg or l/100 km or km/l) 
 This  is  the  average  fuel  con-
sumption  during  the  last  few 
seconds. 

  Average fuel 

consumption 
 (mpg or l/100 km or km/l) 
 This is the average fuel con-
sumption  since  the  last  trip 
computer zero reset.  

Distance travelled
 (miles or km) 
 This  indicates  the  distance 
travelled  since  the  last  trip 
computer zero reset.  


  Average speed 
 (mph or km/h) 
 This is the average speed calcu-
lated since the last trip computer 
zero reset (ignition on).   

   Distance remaining to 

destination 
 (miles or km) 
 This  is  the  distance  remaining 

to be travelled to the fi nal destination. It 

is either calculated instantly by the navi-
gation system, if guidance is activated, 
or entered by the user. 
 If  the  distance  is  not  entered,  dashes 
are displayed in place of the digits.   

      When  the  required  trip  is  displayed, 

press  the   "OK"   button  on  the 
navigator,  associated  with  the  PC 
Com 3D, for more than two seconds.  

 Trips   "1"   and   "2"   are  independent  but 
their use is identical. 
 Trip  "1"  permits, for example, daily calcula-
tions, and trip  "2"  monthly calculations.   

55

COMFORT

VENTILATION 

  Air treatment 

 The incoming air follows various routes 
depending  on  the  controls  selected  by 
the driver: 
   -  

direct  arrival  in  the  passenger 
compartment (air intake), 

  -  

passage  through  a  heating  circuit 
(heating), 

  -  

passage  through  a  cooling  circuit 
(air conditioning).  

 The temperature control enables you to 
obtain  the  level  of  comfort  required  by 
mixing the air of the various circuits. 

 The air distribution control enables you 
to diffuse the air in the passenger com-
partment combining several air vents. 
 The  air  fl ow  control  enables  you  to  in-

crease or reduce the speed of the venti-
lation blower.  

  Air intake 

 The air circulating in the passenger com-

partment is fi ltered and originates either 

from the outside via the grille located at 
the base of the windscreen or from the 
inside in air recirculation mode.  

  Control panel 

 The controls of this system are grouped 
together on control panel  A  on the centre 
console.  Depending  on  the  model,  the 
functions offered are: 
   -  

level of comfort required, 

  -   air fl ow, 
  -  

air distribution, 

  -  

demisting and defrosting, 

  -  

manual or automatic air conditioning 
controls.   

  Air diffusion 

   1.   Windscreen demisting vents. 
  2.   Front side window demisting/defrost-

ing vents. 

  3.   Side adjustable air vents. 
  4.   Central adjustable air vents. 
  5.   Air outlets to the front footwells. 
  6.   Adjustable air vents for the rear pas-

sengers. 

  7.   Air outlets to the rear footwells.   

i

i

56

COMFORT

  If after an extended stop in sunshine, 
the interior temperature is very high, 

fi rst  ventilate  the  passenger  com-

partment for a few moments.  
Put  the  air  fl ow  control  at  a  setting 

high  enough  to  quickly  change  the 
air in the passenger compartment. 
 The air conditioning system does not 
contain chlorine and does not present 
any danger to the ozone layer.  

 In order for these systems to be fully effective, follow the operation and main-
tenance guidelines below: 
      To obtain an even air distribution, take care not to obstruct the exterior air 

intake grilles located at the base of the windscreen, the nozzles, the vents 
and the air outlets, as well as the air extractor located in the boot. 

     Do not cover the sunshine sensor, located on the dashboard; this is used 

for regulation of the air conditioning system. 

     Operate the air conditioning system for at least 5 to 10 minutes, once or 

twice a month to keep it in perfect working order. 

  

   Ensure  that  the  passenger  compartment  fi lter  is  in  good  condition  and 

have the fi lter elements replaced regularly (refer to the "Checks" section).  


We  recommend  the  use  of  a  combined  passenger  compartment  fi lter. 

Thanks  to  its  special  active  additive,  it  contributes  to  the  purifi cation  of 

the  air  breathed  by  the  occupants  and  the  cleanliness  of  the  passenger 
compartment  (reduction  of  allergic  symptoms,  bad  odours  and  greasy 
deposits). 

     To guarantee correct operation of the air conditioning system, you are also 

advised to have it checked regularly as recommended in the Warranty and 
Maintenance Record. 

     If  the  system  does  not  produce  cold  air,  deactivate  it  and  contact  a 

PEUGEOT dealer.  

 When  towing  the  maximum  load  on  a  steep  gradient  in  high  temperatures, 
switching off the air conditioning increases the available engine power and so 
improves the towing ability.  

  The  condensation  created  by  the 
air  conditioning  results  in  a  dis-
charge  of  water  under  the  vehicle 
which is perfectly normal.   

i

57

COMFORT

  2. Air fl ow adjustment 

     Turn the dial from position  1  

to  position   5   to  obtain  a 

comfortable air fl ow. 

 Windscreen, side windows and 
footwells. 

 Footwells. 

 Central and side vents. 

     Turn  the  dial  from  blue 

(cold) to red (hot) to adjust 
the  temperature  to  your 
requirements.   

 Windscreen and side windows. 

  1. Temperature adjustment 

 The  air  distribution  can  be 
adapted by placing the dial in 
an intermediate position.  

           The heating/ventilation or air conditioning 
systems can only operate with the engine 
running.  

  4. Air intake/Air recirculation 
 The  intake  of  exterior  air  prevents  the 
formation of mist on the windscreen and 
side windows. 
 The  recirculation  of  interior  air  isolates 
the passenger compartment from exte-
rior odours and smoke. 
 Return  to  exterior  air  intake  as  soon 
as  possible  to  prevent  deterioration  of 
the  the  air  quality  and  the  formation  of 
mist. 

  

   If  you  place  the  air  fl ow  control 

in  position   0   (deactivation  of  the 
system),  the  temperature  is  no 
longer maintained at a comfortable 

level.  However,  a  slight  fl ow  of 

air,  due  to  the  movement  of  the 
vehicle, can still be felt.   

  3. Air distribution adjustment 

     Press  the  button  to  recir-

culate  the  interior  air.  The 
indicator lamp comes on to 

confi rm this. 

     Press the button again to permit the 

intake  of  exterior  air.  The  indicator 

lamp switches off to confi rm this.    

 HEATING/VENTILATION 

 MANUAL AIR CONDITIONING 

58

COMFORT

   5. Air conditioning On/Off 

 The  air  conditioning  is  de-
signed to operate effectively in 
all seasons, with the windows 
closed. 

 It enables you to: 
   -  

lower the temperature, in summer, 

  -  

increase  the  effectiveness  of  the 
demisting in winter, above 3 °C.   

  Switching off 
      Press  the   "A/C"   button  again,  the 

associated  green  indicator  lamp 
switches off.    

  Switching on 
      Press 

the 

 "A/C"  

button, 

the 

associated  green  indicator  lamp 
comes on.  


The  air  conditioning  does  not  op-

erate  when  the  air  fl ow  adjustment 

control 2 is in position "0".   

 FRONT DEMIST - DEFROST 

  These markings on the control 
panel  indicate  the  control  po-
sitions  for  rapid  demisting  or 
defrosting  of  the  windscreen 
and side windows.  

  With the heating/ventilation 

system 

   

   Put  the  temperature  and  air  fl ow 

controls  to  the  dedicated  marked 
position. 

     Put  the  air  intake  control  to  the 

"Exterior air intake" position   


(control indicator lamp off). 

     Put the air distribution control to the 

"Windscreen" position.   

  With the manual air 

conditioning system 

   

   Put  the  temperature  and  air  fl ow 

controls  to  the  dedicated  marked 
position. 

     Put  the  air  intake  control  to  the 

"Exterior air intake" position   


(indicator lamp on the control off). 

     Put the air distribution control to the 

"Windscreen" position. 

     Switch  on  the  air  conditioning  by 

pressing  the   "A/C"   button;  the 
associated  green  warning  lamp 
comes on.   

58

COMFORT

   5. Air conditioning On/Off 

 The  air  conditioning  is  de-
signed to operate effectively in 
all seasons, with the windows 
closed. 

 It enables you to: 
   -  

lower the temperature, in summer, 

  -  

increase  the  effectiveness  of  the 
demisting in winter, above 3 °C.   

  Switching off 
      Press  the   "A/C"   button  again,  the 

associated  green  indicator  lamp 
switches off.    

  Switching on 
      Press 

the 

 "A/C"  

button, 

the 

associated  green  indicator  lamp 
comes on.  


The  air  conditioning  does  not  op-

erate  when  the  air  fl ow  adjustment 

control 2 is in position "0".   

 FRONT DEMIST - DEFROST 

  These markings on the control 
panel  indicate  the  control  po-
sitions  for  rapid  demisting  or 
defrosting  of  the  windscreen 
and side windows.  

  With the heating/ventilation 

system 

   

   Put  the  temperature  and  air  fl ow 

controls  to  the  dedicated  marked 
position. 

     Put  the  air  intake  control  to  the 

"Exterior air intake" position   


(control indicator lamp off). 

     Put the air distribution control to the 

"Windscreen" position.   

  With the manual air 

conditioning system 

   

   Put  the  temperature  and  air  fl ow 

controls  to  the  dedicated  marked 
position. 

     Put  the  air  intake  control  to  the 

"Exterior air intake" position   


(indicator lamp on the control off). 

     Put the air distribution control to the 

"Windscreen" position. 

     Switch  on  the  air  conditioning  by 

pressing  the   "A/C"   button;  the 
associated  green  warning  lamp 
comes on.   

i

59

COMFORT

 The control button is located on 
the  heating  or  air  conditioning 
system control panel. 

REAR SCREEN DEMIST - 

DEFROST 

      Switch 

off 

the 

demisting/

defrosting  of  the  rear  screen 
and  door  mirrors  as  soon  as 
appropriate  as  lower  current 
consumption results in reduced 
fuel consumption.   

 If  the  engine  is  switched  off  before 
the demisting/defrosting is switched 
off  automatically,  demisting/defro-
sting  will  resume  next  time  the  en-
gine is switched on. 

  Switching on 

 The  rear  screen  demisting/defrosting 
can  only  operate  when  the  engine  is 
running. 
      Press  this  button  to  demist/defrost 

the  rear  screen  and  (depending 
on  version)  the  door  mirrors.  The 
indicator  lamp  associated  with  the 
button comes on.   

  Switching off 

 The  demisting/defrosting  switches  off 
automatically  to  prevent  an  excessive 
consumption of current. 
      It  is  possible  to  stop  the  demisting/

defrosting  operation  before  it  is 
switched off automatically by pressing 
the  button  again.  The  indicator  lamp 
associated  with  the  button  switches 
off.  

i

i

60

COMFORT

 When the engine is cold, to prevent 
too  great  a  distribution  of  cold  air, 

the  air  fl ow  will  reach  its  optimum 

level gradually. 
 In  cold  weather,  it  favours  the  dis-
tribution  of  warm  air  to  the  wind-
screen, side windows and footwells 
only.  

 On  entering  the  vehicle,  if  the  in-
terior  temperature  is  much  colder 
or  warmer  than  the  comfort  value, 
there is no need to change the val-
ue displayed in order to obtain the 
comfort  required.  The  system  cor-
rects the difference in temperature 
automatically  and  as  quickly  as 
possible.  

 The air conditioning only operates when 
the engine is running. 

 The  driver  and  his  front  pas-
senger  can  each  adjust  the 
temperature  to  their  require-
ments. 

      Turn  control   2   or   3   to  the  left  or  to 

the right respectively to decrease or 
increase this value.  

 A setting around the value 21 provides 
optimum  comfort.  However,  depend-
ing on your requirements, a setting be-
tween 18 and 24 is normal. 
 You are advised to avoid a left/right set-
ting difference of more than 3. 

  4. Automatic visibility programme 

 The  automatic  comfort  pro-

gramme may not be suffi cient 

to  quickly  demist  or  defrost 
the  windscreen  and  side  win-
dows  (humidity,  several  pas-
sengers, ice, etc.). 

  Automatic operation 

     Press  the   "AUTO"   button. 

The  indicator  lamp  on  the 
button comes on.  

  2. Driver's side adjustment  

DUAL-ZONE DIGITAL AIR 

CONDITIONING 

 We recommend the use of this mode: it 
permits automatic and optimised adjust-
ment  of  all  of  the  functions,  passenger 

compartment  temperature,  air  fl ow,  air 

distribution  and  air  recirculation,  in  ac-
cordance with the comfort value that you 
have chosen. 
 This  system  is  designed  to  operate  ef-
fectively in all seasons, with the windows 
closed. 

 The value indicated on the display cor-
responds  to  a  level  of  comfort  and  not 
to a temperature in degrees Celsius or 
Fahrenheit. 

      To switch it off, press the  

"visibility"  

button  again  or  press  the   "AUTO"  
button,  the  indicator  lamp  on  the 
button switches off and the indicator 
lamp on the  "AUTO"  button comes 
on.    

  1. Automatic comfort programme 

  3. Passenger side adjustment 

      In  this  case,  select  the  automatic 

visibility programme.  

 The  system  automatically  controls  the 

air conditioning, the air fl ow and the air 

intake  and  provides  optimum  distribu-
tion of the ventilation to the windscreen 
and side windows. 

!

i

61

COMFORT

  Manual operation 

 If  you  wish,  you  can  make  a  different 
choice  from  that  offered  by  the  system 
by  changing  a  setting.  The  other  func-
tions  will  still  be  controlled  automati-
cally. 
      Pressing the  "AUTO"  button returns 

the system to completely automatic 
operation.  

     Press  this  button  to  switch 

off the air conditioning.  

  6. Air distribution adjustment 

     Press one or more buttons to 

direct the air fl ow towards: 

  7. Air fl ow adjustment 

     Turn  this  control  to  the  left 

to  decrease  the  air  fl ow  or 

to  the  right  to  increase  the 

air fl ow.  

  8. Air intake/Air recirculation 

  Switching the system off 

   

   Turn  the  air  fl ow  control  to  the  left 

until all of the indicator lamps switch 
off.  

 This  action  switches  off  the  air  condi-
tioning and the ventilation. 
 Temperature related comfort is no longer 

guaranteed  but  a  slight  fl ow  of  air,  due 

to the movement of the vehicle, can still 
be felt. 
   

   Turn  the  air  fl ow  dial  to  the  right 

or  press  the   "AUTO"   button  to 
reactivate the system with the values 
set before it was switched off.  

     Press 

this 

button 

for 

recirculation  of  the  interior 
air.  The  indicator  lamp  on 
the button comes on.  

  5. Air conditioning On/Off 

 Avoid  prolonged  operation  in  inte-
rior air recirculation mode or driving 
for long periods with the system off 
(risk  of  condensation  and  deterio-
ration of the air quality).  

   -  

the  windscreen  and  side  windows 
(demisting or defrosting), 

  -  

the  windscreen,  the  side  windows 
and the vents, 

  -  

the  windscreen,  the  side  windows, 
the vents and the footwells, 

  -  

the vents and the footwells, 

  -  

the vents, 

  -  

the footwells, 

  -  

the  windscreen,  the  side  windows 
and the footwells.    

 The  air  fl ow  indicator  lamps,  between 

the two fans, come on progressively in 
relation to the value requested.  

      As  soon  as  possible,  press  this 

button again to permit the intake of 
outside air and prevent the formation 
of condensation. The indicator lamp 
on the button switches off.   

 For  maximum  cooling  or  heating 
of  the  passenger  compartment,  it 
is  possible  to  exceed  the  minimum 
value 14 or the maximum value 28. 
      Turn  control   2   or   3   to  the  left 

until  "LO"  is displayed or to the 
right until  "HI"  is displayed.  

  9. Mono-zone/Dual-zone 

     Press this button to equalise 

the  comfort  value  on  the 
passenger  side  with  that 
on  the  driver's  side  (mono 
zone).  The  indicator  lamp 
on the button comes on.    

 Air recirculation enables the passenger 
compartment  to  be  isolated  from  exte-
rior odours and smoke. 

 Switching the system off could result in 
discomfort (humidity, condensation). 
      Press  this  button  again  to  return 

to  automatic  operation  of  the  air 
conditioning. The  indicator  lamp  on 
the  "A/C"  button comes on.   

62

COMFORT

FRONT SEATS 

 Seat consisting of a seat cushion, a seat 
back and a head restraint which can all 
be  adjusted  to  adapt  your  position  for 
ease of driving and comfort. 

  Forwards-backwards adjustment 
      Raise the control and slide the seat 

forwards or backwards.   

  Driver's or passenger's seat height 

adjustment 
      Pull  the  control  upwards  to  raise 

or  push  it  downwards  to  lower,  as 
many times as necessary, to obtain 
the position required.   

  Seat back angle adjustment 
      Push the control rearwards.    

  Manual adjustments 

i

63

COMFORT

FRONT SEATS 

 Seat consisting of a seat cushion, a seat 
back and a head restraint which can all 
be  adjusted  to  adapt  your  position  for 
ease of driving and comfort.  

  Forwards-backwards adjustment 
      Push 

the 

control 

forwards 

or 

rearwards to slide the seat.   

  Seat cushion height and angle 

adjustment 
      Tilt  the  rear  part  of  the  control 

upwards or downwards to obtain the 
required height. 

     Tilt  the  front  part  of  the  control 

upwards or downwards to obtain the 
required angle.   

  Seat back angle adjustment 
      Tilt the control forwards or rearwards 

to adjust the angle of the seat back.    

  Driver's seat electric 

adjustments 

  The electrical functions of the driv-
er's  seat  are  deactivated  approxi-
mately one minute after the ignition 
is switched off. 
 To  reactivate  them,  switch  on  the 
ignition.   

!

i

64

COMFORT


Access to the rear seats (3-door) 
      Pull  the  control  upwards  to  fold 

the  seat  back  and  move  the  seat 
forward.   


When  put  back  in  place,  the  seat 
returns to its initial position.  

  Head restraint height adjustment 

      To  raise  the  head  restraint,  pull  it 

forwards  and  upwards  at  the  same 
time. 

     To remove the head restraint, press 

the lug  A  and pull the head restraint 
upwards. 

     To  put  the  head  restraint  back  in 

place,  engage  the  head  restraint 
stems in the openings keeping them 
in line with the seat back. 

     To  lower  the  head  restraint,  press 

the  lug   A   and  the  head  restraint  at 
the same time.  

 The  head  restraint  is  fi tted  with  a 

frame with notches which prevents 
it from lowering; this is a safety de-
vice in case of impact. 
  

The adjustment is correct when 

the  upper  edge  of  the  head  re-

straint is level with the top of the 

head.  
 Never drive with the head restraints 
removed; they must be in place and 
adjusted correctly.   

   Lumbar adjustment 
      Turn  the  dial  to  obtain  the  correct 

lumbar position.    


Additional adjustments 

 Ensure  that  no  person  or  object 
prevents the seat slide from return-
ing to its initial position; the return to 
this position is necessary for longi-
tudinal locking.   

i

65

COMFORT

           Table position for front 
passenger seat 

 Placing this seat in the table position, with 
the rear seats also in the table position, 
allows you to transport long objects. 
      Pull  the  control  upwards  to  fold  the 

seat back onto the seat cushion.  


To  lower  the  seat  back  fully,  tilt  the 
seat back angle adjustment control. 

     Pull the control again to release the 

seat back and raise it.  


When  put  back  in  place,  the  seat 
back returns to its initial position.  

 Do  not  forget  to  fold  the  "aircraft" 

type table fi xed on the back of the 

seat fi rst.   

           Heated seats control 
 With the engine running, the front seats 
can be heated separately. 

      Use  the  adjustment  dial,  placed  on 

the side of each front seat, to switch 
on  and  select  the  level  of  heating 
required:  

  0  :    Off. 
  1  :  Low. 
  2  :  Medium. 
  3  :  High.   

i

!

66

COMFORT


Storing driving positions 

 System  which  takes  into  account  the 
electrical  settings  of  the  driver's  seat 
and  exterior  mirrors.  It  enables  you  to 
store up to two positions using the but-
tons on the side of the driver's seat and 
two  further  driving  positions  using  the 
two remote control keys. 

  Recalling a stored position 
 When the vehicle is unlocked, the driv-
er's seat and the door mirrors return to 
the  position  stored  by  the  remote  con-
trol key.  

  Storing a position  

 Storing a new position cancels the 
previous position.  

 When the ignition is off, after a few 
consecutive  position  recalls,  the 
function  will  be  deactivated  until 
the  engine  is  started,  to  prevent 
discharging of the battery.   

  Using the remote control keys 
 When the vehicle is locked, the remote 
control  key  stores  the  position  of  the 
driver's seat and door mirrors. 
 Each remote control key can store one 

specifi c setting. 

  Ignition on 
   

   Briefl y press button  1  or  2  to recall 

the corresponding position.  


 An audible signal is heard indicating 
the end of the adjustment.  

  Vehicle moving 
      Press  and  hold  button   1   or   2   until 

the audible signal is heard indicating 
the end of the adjustment.  

  Using buttons M/1/2 
      Switch on the ignition. 
     Adjust  your  seat  and  the  door 

mirrors. 

     Press button  M , then press button  1  

or  2  within four seconds.   


An audible signal is heard indicating 
that the position has been stored.   

i

65

COMFORT

           Table position for front 
passenger seat 

 Placing this seat in the table position, with 
the rear seats also in the table position, 
allows you to transport long objects. 
      Pull  the  control  upwards  to  fold  the 

seat back onto the seat cushion.  


To  lower  the  seat  back  fully,  tilt  the 
seat back angle adjustment control. 

     Pull the control again to release the 

seat back and raise it.  


When  put  back  in  place,  the  seat 
back returns to its initial position.  

 Do  not  forget  to  fold  the  "aircraft" 

type table fi xed on the back of the 

seat fi rst.   

           Heated seats control 
 With the engine running, the front seats 
can be heated separately. 

      Use  the  adjustment  dial,  placed  on 

the side of each front seat, to switch 
on  and  select  the  level  of  heating 
required:  

  0  :    Off. 
  1  :  Low. 
  2  :  Medium. 
  3  :  High.   


Content   ..  1  2  3  4   ..