Peugeot 206 S Dag (2008 year). Instruction - part 2
 

  Index      Peugeot     Peugeot 206 S Dag - instruction 2008 year in english


Search            


Content   ..   1  2  3   ..


Peugeot 206 S Dag (2008 year). Instruction - part 2


INSTRUMENTS and CONTROLS

20 -

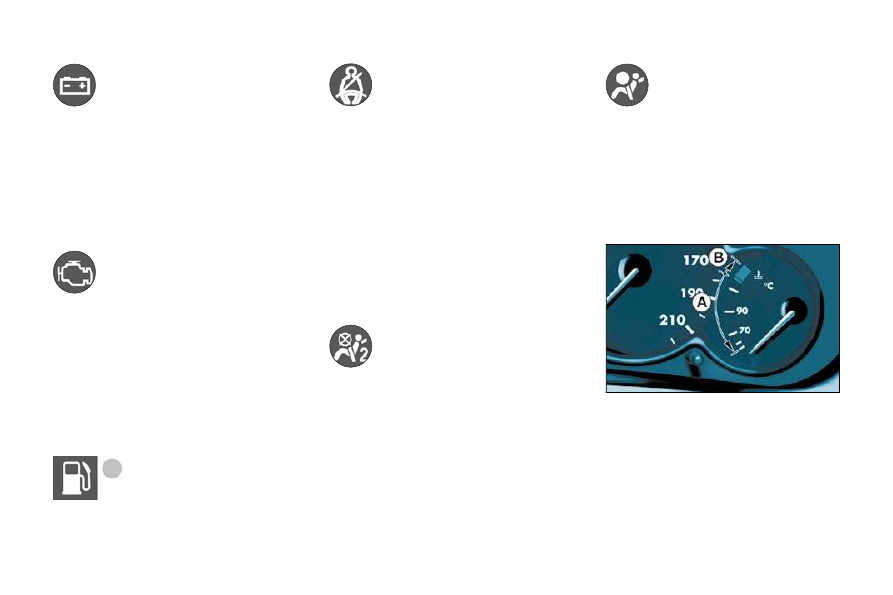
  Battery charge warning 
light 

 This indicates one of the following: 
   -   faulty operation of the charging 

circuit, 

  -  

slack battery or starter terminals, 

  -   a cut or slack alternator belt, 

  -   an alternator failure.  

  Consult a PEUGEOT dealer.   

  Emission control 
system warning light 
(according to model) 

 This  comes  on  for  a  few  seconds 
each  time  the  ignition  is  switched 

on. 

 If it comes on with the engine running, 

this  indicates  incorrect  operation  of 
the  injection,  ignition  or  emission 

control system. 

 If  the  warning  light  fl ashes,  there 

is  a  risk  of  damage  to  the  catalytic 

converter on petrol engines. 

  Consult a PEUGEOT dealer.   

  Low fuel level 
warning light 

 When  this  light  fi rst 

comes  on,  you  have  enough  fuel  to 

drive at least 30 miles (50 km). The tank 

capacity is approximately 50 litres.  

  Seat belt not fastened 
warning light *  

 When the ignition is switched 

on, this indicator light comes on if the 

driver has not fastened his seat belt. 
 Above 12 mph (20 km/h), the warning 

light  fl ashes  for  about  two  minutes 

accompanied  by  an  increasingly 

audible signal and a message on the 

multifunction  display.  This  warning 

light remains lit until the driver"s seat 

belt is fastened. 

 The  driver  must  ensure  that  all 

passengers  fasten  their  seat  belt 

correctly.  

  Passenger air bag 
disarmed warning light 

 Illumination  of  this  warning 

light accompanied by a message on 

the  multifunction  display,  indicates 

that  the  passenger  air  bag  is 

disarmed. 
 The  warning  light  remains  lit  as 
long  as  the  passenger  air  bag  is 

disarmed. 

 Always consult a  PEUGEOT  dealer if 

the warning light fl ashes.  

  Air bags warning light 

 The  light  will  come  on  for 
a  few  seconds  when  the 

ignition is switched on. 

 With the engine running, illumination 

of this warning light, accompanied by 

an audible signal and a message on 

the multifunction display, indicates a 

fault in the air bags. 

  Consult a PEUGEOT dealer.   

  Coolant temperature indicator 

   -  

needle in zone  (A) , the 

temperature is correct, 

  -  

needle in zone  (B) , the 

temperature is too high. The 

central  STOP  warning light 

fl ashes.  

  You must stop.  
  Consult a PEUGEOT dealer.   

  *   According to country.  

21

INSTRUMENTS and CONTROLS -

  Display screen showing the 
positions of the automatic 
gearbox selector lever 

  Automatic gearbox indicator 
lights 

  Park  

  Reverse  

  Neutral  

  Drive  

  Manual mode:  

  1st gear engaged  

  2nd gear engaged  

  3rd gear engaged  

  4th gear engaged   

  "SPORT" Indicator light 
 This comes on when the  "SPORT"  

programme is selected.  

  "SNOW" Indicator light 
 This  comes  on  when  the 
 "SNOW"  

programme 

is 

selected.  

  Operating abnormality 
 If  the  Sport  and  Snow  indicator 

lights  fl ash,  accompanied  by  an 

audible  signal  and  a  message  on 

the  multifunction  display,   consult  a 

PEUGEOT dealer.    

INSTRUMENTS and CONTROLS

20 -

  Battery charge warning 
light 

 This indicates one of the following: 
   -   faulty operation of the charging 

circuit, 

  -  

slack battery or starter terminals, 

  -   a cut or slack alternator belt, 

  -   an alternator failure.  

  Consult a PEUGEOT dealer.   

  Emission control 
system warning light 
(according to model) 

 This  comes  on  for  a  few  seconds 
each  time  the  ignition  is  switched 

on. 

 If it comes on with the engine running, 

this  indicates  incorrect  operation  of 
the  injection,  ignition  or  emission 

control system. 

 If  the  warning  light  fl ashes,  there 

is  a  risk  of  damage  to  the  catalytic 

converter on petrol engines. 

  Consult a PEUGEOT dealer.   

  Low fuel level 
warning light 

 When  this  light  fi rst 

comes  on,  you  have  enough  fuel  to 

drive at least 30 miles (50 km). The tank 

capacity is approximately 50 litres.  

  Seat belt not fastened 
warning light *  

 When the ignition is switched 

on, this indicator light comes on if the 

driver has not fastened his seat belt. 
 Above 12 mph (20 km/h), the warning 

light  fl ashes  for  about  two  minutes 

accompanied  by  an  increasingly 

audible signal and a message on the 

multifunction  display.  This  warning 

light remains lit until the driver"s seat 

belt is fastened. 

 The  driver  must  ensure  that  all 

passengers  fasten  their  seat  belt 

correctly.  

  Passenger air bag 
disarmed warning light 

 Illumination  of  this  warning 

light accompanied by a message on 

the  multifunction  display,  indicates 

that  the  passenger  air  bag  is 

disarmed. 
 The  warning  light  remains  lit  as 
long  as  the  passenger  air  bag  is 

disarmed. 

 Always consult a  PEUGEOT  dealer if 

the warning light fl ashes.  

  Air bags warning light 

 The  light  will  come  on  for 
a  few  seconds  when  the 

ignition is switched on. 

 With the engine running, illumination 

of this warning light, accompanied by 

an audible signal and a message on 

the multifunction display, indicates a 

fault in the air bags. 

  Consult a PEUGEOT dealer.   

  Coolant temperature indicator 

   -  

needle in zone  (A) , the 

temperature is correct, 

  -  

needle in zone  (B) , the 

temperature is too high. The 

central  STOP  warning light 

fl ashes.  

  You must stop.  
  Consult a PEUGEOT dealer.   

  *   According to country.  

INSTRUMENTS and CONTROLS

22 -

      Service indicator 

 This  is  a  visual  reminder  of  when 

the next service is due. This service 

is to be carried out according to the 

manufacturer"s servicing schedule. 

 5 seconds after the ignition is switched 
on,  the  total  distance  recorder  re-

sumes  normal  operation  and  the  dis-

play shows the total or trip distances.    

The distance remaining before the 
next service is less than 500 miles 
(1,000 km). 
  Example:  400 miles (900 km) remain 

before the next service is due. 
 When  switching  on  the  ignition  and 
for 5 seconds, the display shows: 

 5 seconds 

after 

the 

ignition 

is 

switched  on,  the  total  distance  re-

corder  resumes  normal  operation 

and the spanner remains lit. 

 This  indicates  that  a  service  should 

be  carried  out  shortly.  The  display 

shows the total or trip distances.    

     INSTRUMENT PANEL 
DISPLAY 

 After  switching  on  the  ignition,  three 

functions are shown in succession: 
   -  

service indicator, 

  -  

engine oil level indicator, 

  -  

total distance recorder, it remains 
displayed for 30 seconds when 
the ignition is switched off, on 

opening the driver"s door, as 

well as on locking and unlocking 

the vehicle.  

  Operation 
 As  soon  as  the  ignition  is  switched 
on  and  for  5  seconds,  the  spanner 

symbolising service operations is lit. 

The  trip  recorder  display  shows  the 

distance remaining (in round fi gures) 

before the next service. 
  Example:  

4,800 miles/km 

remain 

before  the  next  service  is  due.  When 

the ignition comes on and for 5 seconds 
the display shows: 

The service is overdue. 
 Each time the ignition is switched on 
and  for  5  seconds,  the  spanner  and 

the excess distance fl ash. 
  Example:

  the service is overdue by 

300 miles/km. The service should be 

carried out very shortly. 
 When the ignition is switched on and 
for 5 seconds, the display shows: 

 5 seconds 

after 

the 

ignition 

is 

switched  on,  the  total  distance  re-

corder resumes normal operation and 

the spanner remains lit. The display 

shows the total or trip distances.   

23

INSTRUMENTS and CONTROLS -

   Resetting the service indicator 

   Your   PEUGEOT   dealer  carries  out 

this operation after each service. 

 The reset procedure is as follows: 

   -   Switch off the ignition. 

  -   Press and hold button  1 . 

  -   Switch on the ignition.  
 The  display  begins  a  10 second 

countdown. 

   -   Keep button  1  pressed for 

10  seconds.  

 The  display  shows   [=0]   and  the 

spanner disappears.       

  Engine oil level indicator 

 When  the  ignition  is  switched  on, 
the  engine  oil  level  is  indicated  for 
approximately  10  seconds,  after  the 

service information. 

  Oil level gauge fault 
 Flashing of the six segments indicates 

a malfunction of the oil level gauge. 
 There  is  a  risk  of  damage  to  the 

engine. 

  Consult a PEUGEOT dealer.  

  Surplus of oil 
 Flashing  of  the  six  squares  and 

displaying  of  "max"  indicate  a 

surplus  of  oil  which  could  damage 

the engine. 

   If  the  surplus  of  oil  is  confi rmed  by 

a check using the dipstick, contact a 

 PEUGEOT  dealer without delay.  

  Lack of oil 
 Flashing  of  the  six  segments  and 

displaying of "min" indicate a lack of 

oil which could damage the engine. 

 If  the  lack  of  oil  is  confi rmed  by  a 

check using the dipstick, it is essential 

that the level is topped up.  

  The  level  read  on  the 
gauge will only be correct 
if  the  vehicle  is  on  level 
ground  and  the  engine 
has  been  off  for  more 
than 15 minutes.
   

INSTRUMENTS and CONTROLS

24 -

  Total distance recorder 

 Briefl y  pressing  button   1   alternates 

between  the  total  and  trip  distance 

displays.  

     LIGHTING RHEOSTAT 

 With  the  lights  on,  press  the  button 

to vary the intensity of the lighting of 

the  instruments  and  controls.  When 

the lighting reaches the minimum (or 

maximum) setting, release the button 

then  press  it  again  to  increase  (or 

reduce) the brightness. 
 As  soon  as  the  lighting  is  of  the 

required  brightness,  release  the 

button. 

 HAZARD WARNING 
LIGHTS 

  Automatic lighting of hazard 
warning lights 

 Equipment  conditioned  according  to 

country: when braking in an emergen-

cy, depending on the deceleration, the 

hazard  warning  lights  come  on  auto-

matically. They switch off automatically 

the fi rst time you accelerate. 
 It  is  also  possible  to  switch  them  off 

by pressing the button.  

  Trip recorder 

 To  reset  the  trip  recorder  to  zero, 

when  it  is  displayed  press  button   1  

until zeros appear.  

 Press  the  button,  the  direction 

indicators fl ash. 
 They  can  operate  with  the  ignition 

off. 

25

INSTRUMENTS and CONTROLS -

  Adjusting the parameters 
 Press  and  hold  button   1   for  two 

seconds  to  access  the  settings;  the 

data fl ashes, indicating it is ready to 

be modifi ed. 

 Then, each press of button  1  scrolls 

through  the  various  data  in  the 

following order: 
   -   language of information 

displayed, 

  -   hours (12 then 24 hour mode), 

  -   minutes, 
  -  

year, 

  -  

month, 

  -  

day, 

  -   unit of temperature (degrees 

Celsius or Fahrenheit).  

 Pressing button   allows modifi cation 

of the data selected. Press and hold 

for rapid advance (return to start after 

the last possible value). 
 After  7  seconds  with  no  action,  the 

main  display  returns;  the  modifi ed 

data are now recorded. 
  Note:

   Pressing  button   2   briefl y 

displays the outside temperature for 

a few seconds.   

 This displays the following information: 
   -  

the time, 

  -  

the date, 

  -   the  outside  temperature  (this 

fl ashes if there is a risk of ice), 

  -   the audio system displays, 

  -   a door check (e.g.: ‘"left front door 

open"), 

  -   warning messages (e.g. ‘"remote 

control battery fl at") or information 

messages  (e.g.  "economy  mode 

active"), displayed temporarily.   

AUDIO EQUIPMENT

26 -

   Stalk movement   

   Function   

  1  - Press (behind) 

 Increase volume. 

  2  - Press (behind) 

 Decrease volume. 

  1 + 2  - Simultaneous press 

 Sound cut-off (mute); restoring of the sound by pressing any button. 

  3  - Press 

 Automatic search of higher frequencies (radio) - Selection of the next track (CD). 

  4  - Press 

 Automatic search of lower frequencies (radio) - Selection of the previous track (CD). 

  5  - Press the end 

 Change of source (radio/CD/CD changer). 

  6  - Rotation (clockwise) 

 Selection of next station stored in the memory (radio) - Selection of following CD. 

  7  -  Rotation 

(anti-clockwise) 

 Selection of previous station stored in the memory (radio) - Selection of previous CD. 

27

AUDIO EQUIPMENT -

   Button   

   Function   

  A  

  Radio on/off.  

  B  

  -  

 Decrease volume. 

  C  

  +  

 Increase volume. 

  D  

  RDS  

 RDS function on/off.   
Press for more than 2 seconds: regional following mode on/off. 

  E  

  TA  

 Traffi c information priority on/off.   

Press for more than 2 seconds: PTY function on/off. 

  H  


 Selection of bass, treble, loudness, sound distribution and automatic volume correction. 

  I  


 Increase setting of functions associated with button  H . 

  J  


 Decrease setting of functions associated with button  H . 

  L  


 Manual and automatic search of higher frequency.   
Selection of next CD track and PTY (radio). 

  M  

  MAN  

 Manual/automatic operation of buttons  L  and  N . 

  N  


 Manual and automatic search of lower frequency.   
Selection of previous CD track and PTY (radio). 

  P  

  CH.CD  

 Selection of the CD changer.   

Press for more than 2 seconds: shuffl e. 

  Q  

  CD  

 Selection of the CD.   

Press for more than 2 seconds: shuffl e. 

  R  

  Radio  

 Radio Selection of the radio. Selection of FM1, FM2, FMast, AM wavebands.  
Press for more than 2 seconds: automatic storing of stations in the memory (autostore). 

  S  


 


 Ejection of the CD. 

  1 to 6  

  1 2 3 4 5 6  

 Selection of station stored in the memory.   
Press for more than 2 seconds: storing of a station in the memory. 

  1 to 5  

  1 2 3 4 5  

 Selection of a CD changer disc. 

AUDIO EQUIPMENT

28 -

 GENERAL FUNCTIONS  

 AUDIO SETTINGS 

  Adjusting the loudness 
 This  function  automatically  empha-
sises  bass  and  treble  tones.  Press 
button  I  or  J  to switch the function on 
or off.  

  On/off 
 With  the  ignition  key 
in  the  accessories  or 
ignition position, press 
button  A  to switch the 
set on or off. 
  The  set  can  oper-
ate  for  30  minutes 

without  the  vehicle  ignition  being 
switched on.
   

  Anti-theft system 
 The audio system is coded in such a 
way that it can operate only on your 

vehicle. It would not function if fi tted 

to another vehicle. 
  The anti-theft system is automatic 
and  requires  no  action  on  your 
part.
    

 ADJUSTING THE VOLUME 

 Press  button   C   to  increase  the  vol-
ume, or button  B  to decrease it. 
 Continuous  pressure  on  buttons   C  
and  B  allows a gradual adjustment of 
the volume. 

  Adjusting the bass 

  Adjusting the treble 
 When   "TREB"   is  displayed,  press 
button  I  or  J  to vary the setting. 
   -  

 "TREB -9"  for a minimum treble 
setting, 

  -  

 "TREB 0"  for a normal setting, 

  -  

 "TREB +9"  for a maximum 
treble setting.   

  Press  button   H   sev-
eral  times  in  succes-
sion  to  access  the 
bass   (BASS) ,  treble 
 (TREB) , 

loudness 

 (LOUD) ,  fader   (FAD) , 
balance   (BAL)   and 
automatic volume cor-
rection settings. 

 Exit  from  audio  mode  is  automatic 
after a few seconds without pressing 
any  button,  or  by  pressing  button  H 

after  confi guration  of  the  automatic 

volume correction. 
  Note:  bass, treble and loudness set-

tings  are  specifi c  to  each  source.  It 

is possible to set them differently for 
radio, cassette  (RB3) , CD  (RD3)  and 
CD changer.  

 When   "BASS"   is  dis-
played,  press  button 
 I   or   J   to  vary  the  set-
ting. 
   -    "BASS -9"  for a 

minimum bass 
setting, 

  -    "BASS 0"  for a 

normal setting, 

  -  

 "BASS +9"  for a maximum bass 
setting.   

29

AUDIO EQUIPMENT -

 RADIO  

  Selecting radio mode 

  Selecting a waveband 

  Adjusting the front/rear sound 
distribution (Fader) 
 When  "FAD"  is displayed, press but-
ton  I  or  J . 
 Button  I  increases the volume in the 
front. 
 Button  J  increases the volume in the 
rear.  

  Adjusting the right/left sound 
distribution (Balance) 
 When  "BAL"  is displayed, press but-
ton  I  or  J . 
 Button  I  increases the volume on the 
right-hand side. 
 Button  J  increases the volume on the 
left-hand side.  

  Automatic volume correction 
 This  function  enables  the  volume  to 
be automatically adjusted depending 
on the level of noise produced by the 
speed of the vehicle. 
 Press  buttons   I   or   J   to  switch  the 
function on or off.   

 Press button  R .  

 Press  button   R   brief-
ly  to  select  the  FM1, 
FM2  FMast  and  AM 
wavebands.  

  Notes on radio reception 
 Your car radio is subject to phenome-
na which do not affect domestic radio 
sets.  Both AM  (MW/LW)  and  FM  re-
ception  are  subject  to  various  forms 

of  interference.  This  is  no  refl ection 

on  the  quality  of  the  equipment,  but 
is due to the nature of the signals and 
the  way  in  which  they  are  transmit-
ted. 
 On  MW/LW,  interference  may  be 
noticed  when  passing  under  high 
voltage power lines or bridges, or in 
tunnels. 
 On FM, interference may be the result 
of increasing distance from the trans-

mitter, defl ection of the signals by ob-

stacles  (mountains,  hills,  buildings, 
etc.),  or  of  being  in  an  area  which  is 
not covered by a transmitter.  

29

AUDIO EQUIPMENT -

 RADIO  

  Selecting radio mode 

  Selecting a waveband 

  Adjusting the front/rear sound 
distribution (Fader) 
 When  "FAD"  is displayed, press but-
ton  I  or  J . 
 Button  I  increases the volume in the 
front. 
 Button  J  increases the volume in the 
rear.  

  Adjusting the right/left sound 
distribution (Balance) 
 When  "BAL"  is displayed, press but-
ton  I  or  J . 
 Button  I  increases the volume on the 
right-hand side. 
 Button  J  increases the volume on the 
left-hand side.  

  Automatic volume correction 
 This  function  enables  the  volume  to 
be automatically adjusted depending 
on the level of noise produced by the 
speed of the vehicle. 
 Press  buttons   I   or   J   to  switch  the 
function on or off.   

 Press button  R .  

 Press  button   R   brief-
ly  to  select  the  FM1, 
FM2  FMast  and  AM 
wavebands.  

  Notes on radio reception 
 Your car radio is subject to phenome-
na which do not affect domestic radio 
sets.  Both AM  (MW/LW)  and  FM  re-
ception  are  subject  to  various  forms 

of  interference.  This  is  no  refl ection 

on  the  quality  of  the  equipment,  but 
is due to the nature of the signals and 
the  way  in  which  they  are  transmit-
ted. 
 On  MW/LW,  interference  may  be 
noticed  when  passing  under  high 
voltage power lines or bridges, or in 
tunnels. 
 On FM, interference may be the result 
of increasing distance from the trans-

mitter, defl ection of the signals by ob-

stacles  (mountains,  hills,  buildings, 
etc.),  or  of  being  in  an  area  which  is 
not covered by a transmitter.  

AUDIO EQUIPMENT

30 -

  Manual station search 
 Press the  "MAN"  button. 
 Briefl y  press  button   L   or   N   to  in-

crease  or  decrease  the  frequency 
displayed. 
 By  continuing  to  press  the  button  in 
the direction selected, you will obtain 
continuous scrolling of the frequency. 
 The  scrolling  stops  as  soon  as  the 
button is released. 
 Pressing  the   "MAN"   button  again 
returns  you  to  automatic  station 
search.  

  Automatic storing of FM stations 
in the memory (autostore) 

 Your radio automatically stores the 6 
stations  with  the  strongest  signal  in 
 FM . These stations are stored in the 
FMast waveband. 
 If it is not possible to fi nd 6 stations, 

the remaining memories are empty.  

  Automatic station search 

  Manual storing of stations in the 
memory 
 Select the station required. 
 Press  one  of  the  buttons   "1"   to   "6"  
for more than two seconds. 
 The sound stops then becomes audi-

ble again, confi rming that the station 

has been stored in the memory.  

  Recalling stations stored in the 
memory 
 For  each  waveband,  briefl y  press 

buttons   "1"   to   "6"   to  recall  the  cor-
responding station.   

 Briefl y press button  L  or  N  to search 

for  the  station  immediately  above  or 
below.  By  continuing  to  press  the 
button  in  the  direction  selected,  you 
will obtain continuous scrolling of the 
frequency. 
 The  scrolling  stops  at  the  fi rst  sta-

tion  found  as  soon  as  the  button  is 
released. 
 If the  TA

  traffi c programme is select-

ed,  only  stations  broadcasting  this 
type of programme are selected. 
 Searching for a station occurs fi rst in 

 "LO"  sensitivity (selection of the most 
powerful  transmitters)  during  scan-
ning  of  the  waveband,  then  in   "DX"  
sensitivity  (selection  of  the  weakest 
and most distant transmitters). 
 To make a direct search in  "DX"  sen-
sitivity, press button  L  or  N  twice.  

 Press and hold button 
 R   for  more  than  two 
seconds. 

31

AUDIO EQUIPMENT -

 RDS  

  Traffi c information programme 

  Regional following mode 
 When they are part of a network, cer-
tain  stations  broadcast  regional  pro-
grammes  in  the  various  areas  they 
serve.  With  regional  following  mode 
you  can  keep  listening  to  the  same 
programme. 
 Press  the   "RDS"   button  for  more 
than two seconds to switch the func-
tion on or off.  

  RDS station following 
 The display indicates the name of the 
station selected. The radio is contin-
ually  searching  for  the  station  which 
has  the  best  reception  and  which  is 
transmitting the same programme.  

 Press the  "TA"  button 
to  switch  the  function 
on or off. 

 Briefl y press the  "RDS"  

button  to  switch  the 
function on or off. 

 The multifunction display will show: 
   -  

 "RDS"  if the function is selected. 

  -  

 "(RDS)"  if the function is 
selected but not available.   

  Using the RDS (Radio Data 
System) function on FM 
 Radio  Data  System    allows  you  to 
continue  listening  to  the  same  sta-
tion,  whatever  frequency  it  is  using 
for the region you are going through. 

 The multifunction display will show: 
   -  

 "TA"  if the function is selected, 

  -  

 "(TA)"  if the function is selected 
but not available.  

 Any  traffi c  information  fl ash  will  be 

given  priority,  whatever  source  you 
are listening to (radio, cassette or CD 
changer). 
 If  you  wish  to  interrupt  a  message, 
press the  "TA"  button; this switches 
the function off. 


Note: the volume of traffi c informa-

tion  announcements  is  independ-
ent of the volume of normal radio 
listening.  You  can  adjust  it  using 
the volume button. The setting will 
be  stored  and  will  be  used  when 
the next messages are broadcast.
   

AUDIO EQUIPMENT

32 -

  EON system 
 This connects stations which are part 
of  the  same  network.  It  enables  the 

broadcast  of  traffi c  information  or  a 

 PTY  programme, by a station that is 
part of the same network as the sta-
tion to which you are listening. 
 This  service  is  available  when  you 
have selected the  TA

  traffi c informa-

tion programme or the  PTY  function.   

  PTY function 
 This allows you to listen to stations broad-

casting  a  specifi c  type  of  programme 

(news, culture, sport, rock, etc.). 

 To search for a  PTY  programme: 

  With 

 FM  

selected, 

press  the   "TA"   but-
ton for two seconds to 
switch this function on 
or off. 

   -  

select the  PTY  function, 

  -   briefl y press button  L  or  N  to 

scroll down the list of the various 
types of programmes offered. 

  -  

when the programme of your 
choice is displayed, keep button 
 L  or  N  pressed for two seconds 
to carry out an automatic search 
(after an automatic search the 
 PTY  function is switched off).  

 In   PTY   mode  the  different  types  of 
programmes  can  be  stored  in  the 
memory. To do this, press the prese-
lection  buttons   "1"   to   "6"   for  two 

seconds.  Briefl y  press  the  corre-

sponding button to recall the type of 
programme stored in the memory.  

33

AUDIO EQUIPMENT -

  Ejection of a disc 

  Selecting a track 

  Shuffl e (RDM) 
 When  the  CD  player  is  selected, 
press and hold button  Q  for two sec-
onds.  The  tracks  will  be  played  in 
random sequence. Pressing the but-
ton  again  for  two  seconds  returns 
you to   normal play. 
 Shuffl e  mode  is  de-activated  each 

time the set is switched off. 

 After  insertion  of  a 
disc, 

printed 

face 

upwards,  the  player 
starts automatically. 

 If  a  disc  is  already  inserted,  press 
button  Q .  

 COMPACT DISC  

 Press  button   L   to  select  the  next 
track. 
 Press  button   N   to  return  to  the  start 
of  the  current  track  or  to  select  the 
previous track.  

 The  use  of  copied  com-
pact  discs  may  cause 
faults. 
  Insert  circular  compact 
discs only.   

 Press  button   S   to 
eject the disc from the 
player.  

  Accelerated play 
 Press  and  hold  button   L   or   N   for 
forwards  or  backwards  accelerated 
play. 
 Accelerated  play  stops  as  soon  as 
the button is released.  

  Selecting CD mode 


Content   ..   1  2  3   ..