Opel Movano (2018 year). Manual - part 8


  Index      Opel     Opel Movano (2018 year) - manual in english


Search            copyright infringement  


Content      ..     6      7      8      9     ..


Opel Movano (2018 year). Manual - part 8


Climate control

119

● Cooling A/C on.
● Air recirculation system u on.
● Set air distribution control to M.
● Set temperature control to

coldest level.

● Set fan speed to highest level.
● Open all air vents.

Demisting and defrosting the

windows

● Switch cooling A/C on.
● Set temperature control to

warmest level.

● Set fan speed to highest level.
● Set air distribution control to V.
● Switch on heated rear window Ü.
● Open side air vents as required

and direct them towards door

windows.

● For simultaneous warming of the

foot well, set air distribution

control to J.

Note

If V is pressed while the engine is

running, an Autostop will be inhibited

until V is pressed again.
If V is pressed while the engine is

in an Autostop, the engine will restart

automatically.

Stop-start system 3 137.

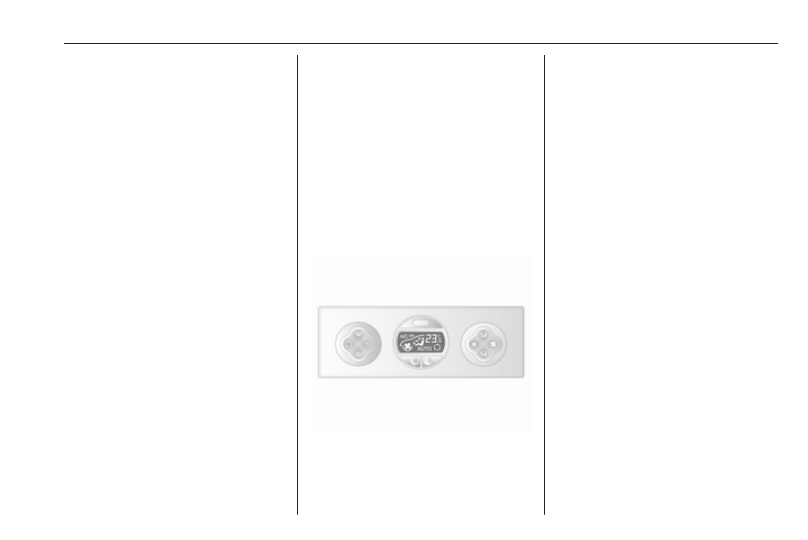
Electronic climate control

system

Controls for:

● temperature
● air distribution (ï or î) and

menu selection

● fan speed x

AUTO

: automatic mode

u

: air recirculation

V

: demisting and defrosting

Ü

: heated rear window,

heated exterior mirrors

A/C OFF : switch off air conditioning
Heated rear window, heated exterior

mirrors Ü 3 41, 3 37.
Heated seats ß 3 50.
The preselected temperature is

automatically regulated. In automatic

mode, the fan speed and air

distribution automatically regulate the

air flow.
The system can be manually adapted

by use of air distribution and air flow

controls.
The electronic climate control system

is only fully operational when the

engine is running.
For correct operation, do not cover

the sensor on the instrument panel.

-------------------------------------------------------------------------------------------------------------------------------------------------------------

120

Climate control

Automatic mode

Basic setting for maximum comfort:

● Press AUTO ("AUTO" appears in

the display).

● Set desired temperature (the

temperature appears in the

display).

● Open all air vents.

During automatic mode, the settings

for fan speed, air distribution, air

conditioning and air recirculation are

automatically regulated by the system

and are not shown on the display.

Temperature preselection

Temperatures can be set to the

desired value with the two buttons

below the display.
For reasons of comfort, change

temperature only in small increments.
red : warm

blue : cold
Heating will not be fully effective until

the engine has reached normal

operating temperature.

If the minimum temperature of 15 ℃

is set, the electronic climate control

system runs at maximum cooling.
If the maximum temperature of 27 ℃

is set, the electronic climate control

system runs at maximum heating.

Note

If the temperature is to be reduced

for climate comfort reasons, an

Autostop can be inhibited or the

engine will restart automatically

when cooling is switched on.
Stop-start system 3 137.

Fan speed

Fan speed can be increased or

decreased with the x buttons.
The selected fan speed is indicated

with x in the display.
If the fan is switched off, the air

conditioning is also deactivated.
To return to automatic mode: Press

AUTO.

Demisting and defrosting the

windows

Press V; LED illuminates.

Temperature and air distribution are

set automatically, air conditioning is

switched on and the fan runs at a high

speed.
Heated rear window, heated exterior

mirrors are also switched on

automatically. Press Ü to switch off

without deactivating demisting/

defrosting of the windows. The fan

speed can also be decreased.
To return to automatic mode: press

V

 or AUTO.

Note

If V is pressed while the engine is

running, an Autostop will be inhibited

until V is pressed again.
If V is pressed while the engine is

in an Autostop, the engine will restart

automatically.

Stop-start system 3 137.

Air distribution

Press ï or î repeatedly.

-------------------------------------------------------------------------------------------------------------------------------------------------------------

Climate control

121

Arrows shown in the display indicate

the distribution settings:
ï

: to windscreen and front door

windows

: to windscreen, front door

windows and foot well

²

: to head area

³

: to head area and foot well

î

: to foot well

To return to automatic mode: Press

AUTO.

Cooling

The air conditioning system cools and

dehumidifies (dries) when outside

temperature is above a specific level.

Therefore condensation may form

and drip from under the vehicle.
If no cooling or drying is required,

press A/C OFF to switch the cooling

system off, thus saving fuel.

"A/C OFF" appears in the display.

Manual air recirculation mode

Press u to switch on air recirculation;

u

 appears in the display.

9 Warning

The exchange of fresh air is

reduced in air recirculation mode.

In operation without cooling the air

humidity increases, so the

windows may mist up. The quality

of the passenger compartment air

deteriorates, which may cause the

vehicle occupants to feel drowsy.

To return to automatic mode: press

u

 or AUTO.

Rear heating system

If the engine is switched off, the rear

compartment can be heated by the

additional heating, through low level

vents.
By programming values using the

control panel, the user can adjust the

time, day and temperature settings.
Heating will cease to operate if the

vehicle fuel level drops too low.
During operation, power from the

vehicle battery is used. For short

journey times, check the vehicle

battery regularly and recharge if

necessary.

Note

If the rear heating system is

activated while the engine is

running, an Autostop will be

inhibited.

To ensure efficient performance, the

low level air vents in the rear

passenger compartment must not be

obstructed.

-------------------------------------------------------------------------------------------------------------------------------------------------------------

122

Climate control

9 Warning

Do not operate the system when

refuelling, when dust or

combustible vapours are present

or in enclosed spaces (e.g.

garage).

Timer

1 Display

: Displays preset,

weekday or preset

day, current time or

preset time,

temperature, Z and

Y

2 Temperature : Selects

temperature

3 l

: Adjusts values up

4 k

: Adjusts values

down

5 Y

: Selects heat

settings

6 P

: Selects preset

settings

7 Þ

: Selects time and

weekday settings

Operation

Heating Y

Press Y, the predetermined heating

duration, e.g. 30 is displayed.
To temporarily adjust the heating

duration, adjust using k or l. The

value can be set from 10 to

120 minutes. Due to the power

consumption, note the heating

duration.
To switch off, press Y.

To change the default predetermined

heating duration, ensure the heater is

switched off, press and hold k until

the display flashes and adjust using

k

 or l.

Programming P

Up to three preset departure times

during one day, or one preset

departure time over one week can be

programmed.

● Press P once to select preset

memory number 1.

● Press P twice to select preset

memory number 2.

● Press P three times to select

preset memory number 3.

● Press P again to exit the preset

memory.

Start heating within 24 hours

● Press P to select desired preset

memory number 1, 2 or 3.

● Briefly press k or l; the preset

time flashes.

-------------------------------------------------------------------------------------------------------------------------------------------------------------

Climate control

123

● Adjust the preset time using k or

l

.

● Press P to confirm and exit the

preset memory.

Start heating up to seven days

● Press P to select desired preset

memory number 1, 2 or 3.

● Briefly press k or l; the preset

time flashes.

● Adjust the preset time using k or

l

.

● After five seconds the preset day

flashes.

● Adjust the preset day using k or

l

.

● The preset time and day are set

once the display changes to the

current time.

Set time and weekday Þ

If the vehicle battery is disconnected

or its voltage is too low, the unit will

need to be reset.

● Press Þ until the time flashes.
● Press k or l to change the

current time.

● Time is stored when the display

stops flashing.

● Wait for weekday to flash.
● Press k or l to change the

weekday.

● Weekday is stored when the

display stops flashing.

Heating level

The preferred heating level for

programmed departure times can be

set between 10 to 30℃.
To adjust the temperature of the

heating, turn the rotary knob located

on the control panel.
turn clockwise : increase

temperature

turn anti-clock‐

wise

: decrease

temperature

Rear air conditioning

system

The rear air conditioning system is

activated in conjunction with the front

passenger compartment air

conditioning system.

Bus

Rear air vents

Additional air conditioning is supplied

to the rear passenger compartment

via the overhead air vents.

-------------------------------------------------------------------------------------------------------------------------------------------------------------

124

Climate control

Fan speed

Adjust the air flow to select the

desired speed.
turn clockwise : increase air flow

turn anti-clock‐

wise

: decrease air flow

Note

Rear air conditioning cannot be

switched on during an Autostop.
Stop-start system 3 137.

Combi

Additional air conditioning is supplied

to the rear passenger compartment

via the air vents located above the

driver and front passenger

compartment.
With the front passenger

compartment air conditioning system

switched on, adjust the air flow to

select the desired speed.
Ensure the air vents are open when in

use, to prevent ice forming in the

system due to lack of air movement.

Auxiliary heater

Coolant heater

The engine-independent, fuel-

powered coolant heater provides

rapid heating of the engine coolant to

enable heating of the vehicle interior

without the engine running.

Note

Depending on version, an additional

coolant heater may be switched on

automatically to speed up heating

when the ignition is on and the

outside temperature is below 5 ℃.

9 Warning

Do not operate the system when

refuelling, when dust or

combustible vapours are present

or in enclosed spaces (e.g.

garage).

Before starting or programming the

system to start, turn the vehicle's

climate control system to heat, set the

air distribution to V and turn the fan

on.
Switch off when not required. Heating

stops automatically after the

programmed runtime. It will also

cease to operate if the vehicle fuel

level drops too low.
During operation, power from the

vehicle battery is used. The driving

time should therefore be at least as

long as the heating time. For short

journey times, check the vehicle

battery regularly and recharge if

necessary.
To ensure efficient performance,

briefly operate the auxiliary heater

once a month.

-------------------------------------------------------------------------------------------------------------------------------------------------------------

Climate control

125

Control units

The timer or remote control unit turns

the system on and off, and is used to

programme specific departure times.

Timer (Type A)

1 Display : Displays preset, current

time or preset time,

temperature, Y, Ö and x

2 l

: Adjusts values up

3 7

: Long press: switch

heater on, short press:

turns display on or

confirms selection

4 k

: Adjusts values down

5 d

: Long press: switch

heater off, short press:

turns display on or exit

menu

Remote control (Type A)

1 Display : Displays preset, current

time or preset time,

temperature, Z, Ü, Y,

Ö

 and x

2 7 : Long press: switch heater on,

short press: turns display on

or confirms selection

3 l : Adjusts values up

4 d : Long press: switch heater off,

short press: turns display on

or exit menu

5 k : Adjusts values down
If no buttons are pressed within

ten seconds the display automatically

turns off.

Remote control (Type A) fault

displays

INIT

: automatic detection –

wait until automatic

detection is finished

NO

SIGNAL

: no signal –

check heater fuse

Z

: poor signal –

move closer

Ü

: battery low –

replace battery

Y

: heater fault –

consult workshop

Add, AddE : system in learning

mode

Teach remote control (Type A)

If the vehicle battery is reconnected,

the LED in the instrument panel

button illuminates and the system

-------------------------------------------------------------------------------------------------------------------------------------------------------------

126

Climate control

configures the remote control menu

automatically. If the LED flashes,

select Add or AddE and confirm.
Additional remote control units may

also be configured. Press the button

until LED flashes, switch on the

remote control, select Add and

confirm.
AddE teaches the current remote

control unit exclusively and blocks all

previously configured units. Add

teaches up to four remote control

units, but only one unit can operate

the system at any one time.

Remote control (Type B)

1 Display : Displays preset, current

time or preset time,

temperature, Z, Ü, Y,

Ö

 and x

2 l : Adjusts values up
3

OFF

: Switch heater off, or press

Y and OFF simultaneously

to confirm selection

4 Y : Switch heater on, or press Y

and OFF simultaneously to

confirm selection

5 k : Adjusts values down
If no buttons are pressed within

30 seconds the display automatically

turns off.

9 Warning

When refuelling, switch off the

remote control unit as well as the

heater!

The remote control has a maximum

range of 1000 metres. The range may

be reduced due to environmental

conditions and as the battery

becomes weaker.

Remote control (Type B) fault

displays
Z

: poor signal – adjust position

FAIL : error during signal

transmission –

move closer or check heater

fuse

Ü

: battery low – replace battery

Teach remote control (Type B)

Up to four additional remote control

units may also be configured. During

additional teaching processes, the

oldest transmitter will be deleted each

time.
Remove the heater fuse for

five seconds, then refit the fuse.

Within two - six seconds press OFF

for one second. Teaching is

completed.
If the remote has not been used for a

long period, press the OFF button six

times at intervals of two seconds,

then press and hold for another

two seconds, then wait two minutes.

-------------------------------------------------------------------------------------------------------------------------------------------------------------

Climate control

127

Manual control

Depending on version, the auxiliary

heater can also be switched on for the

last duration time or the default

duration 30 minutes, or cut-off

immediately, using the button on the

instrument panel. The LED in the

button confirms operation.

Battery replacement

Replace the battery when the range

of the remote control is reduced or

when the battery charge symbol

flashes.

Open the cover and replace the

battery (Type A: CR 2430, Type B:

2CR 11108, or equivalent), ensuring

the new battery is correctly installed

with the positive (<) side facing the

positive terminals. Replace the cover

securely.
Dispose of old batteries in

accordance with environmental

regulations.

Batteries do not belong in household

waste. They must be disposed of at

an appropriate recycling collection

point.

Operation (Type A)

Heating Y

Select Y in the menu bar and press

G

 to confirm. The predetermined

heating duration, e.g. L 30, flashes in

the display. The factory setting is

30 minutes.

Adjust the heating duration using k

or l and confirm. The value can be

set from ten to 120 minutes. Due to

the power consumption, note the

heating duration.
To switch off, select Y in the menu bar

again and press d.

Ventilation x

Select x in the menu bar and press

G

 to confirm.

Adjust the ventilation duration using

k

 or l and confirm. The value can

be set from ten to 120 minutes. Due

to the power consumption, note the

heating duration.
To switch off, select x in the menu bar

again and press d.

Programming P

Up to three preset departure times

can be programmed, either during

one day or over one week.

● Select P in the menu bar and

press G to confirm.

● Select desired preset memory

number P1, P2 or P3 and

confirm.

-------------------------------------------------------------------------------------------------------------------------------------------------------------

128

Climate control

● Select F and confirm.
● Select weekday or weekday

group and confirm.

● Select hour and confirm.
● Select minutes and confirm.
● Select Y or x and confirm.
● Select ECO or HIGH and confirm.
● Select duration and confirm.
● Press d to exit.

Repeat the procedure to programme

the other preset memory numbers if

required.
To activate a desired preset memory

number select P1, P2 or P3, then

select On and confirm.
When a program is activated P and

Y will be displayed together.
To deactivate a preset memory,

select P1, P2 or P3, then select Off

and confirm.
Heating stops automatically

five minutes after the programmed

departure time.

Note

The remote control system features

a temperature sensor which

calculates the runtime according to

the ambient temperature and the

desired heating level (ECO or

HIGH). The system starts

automatically between five and

60 minutes prior to the programmed

departure time.

Set time and weekday Þ

If the vehicle battery is disconnected

or its voltage is too low, the unit will

need to be reset.

● Select F in the menu bar and

confirm.

● Select Þ in the menu bar and

confirm.

● Adjust using k or l to change

the hour and confirm.

● Adjust using k or l to change

the minutes and confirm.

● Press d to exit.
● Select F in the menu bar and

confirm.

● Select Mo in the menu bar and

confirm.

● Adjust using k or l to change

the weekday and confirm.

● Press d to exit.

Heating level

The preferred heating level for

programmed departure times can be

set to either ECO or HIGH.

● Select Y in the menu bar and

confirm.

● Select ECO or HIGH and confirm.
● Press d to exit.

Operation (Type B)

Heating Y or Ventilation x

Select the operating mode Y or x, if

necessary.

● Press l three times.
● Press Y and OFF

simultaneously, Y or x flashes.

● Adjust using k or l to select Y

or x.

● Press Y and OFF simultaneously

to confirm.

-------------------------------------------------------------------------------------------------------------------------------------------------------------

Climate control

129

To switch on, press Y for

one second. The predetermined

heating duration, e.g. 30, is

displayed. The factory setting is

30 minutes.
The heating duration can be set in

increments of ten minutes. Due to the

power consumption, note the heating

duration.

● Press l four times.
● Press Y and OFF

simultaneously, Y/x flashes.

● Adjust using k or l to select the

desired heating duration.

● Press Y and OFF simultaneously

to confirm.

To switch off, press OFF.

Programming y

The system calculates the operating

time of the heater depending on the

temperature inside the vehicle.

● Press k twice.
● Press Y and OFF

simultaneously, y flashes.

● Adjust using k or l to select the

departure time.

● Press Y and OFF simultaneously

to confirm.

To switch on, press Y for one second,

HTM is displayed.
Heating stops automatically after the

programmed departure time, or can

be manually switched off.

● Press k twice.
● Press OFF for one second, HTM

goes out.

Set time

If the vehicle battery is disconnected

or its voltage is too low, the time will

need to be reset.

● Press l once.
● Press Y and OFF

simultaneously, Ö flashes.

● Adjust using k or l to set the

time.

● Press Y and OFF simultaneously

to confirm.

Heating level

The preferred heating level for

programmed departure times can be

set to between C1 and C5.

● Press k three times.
● Press Y and OFF

simultaneously, Y flashes.

● Adjust using k or l to set the

heating level.

● Press Y and OFF simultaneously

to confirm.

To display the passenger

compartment temperature, press l

twice.

-------------------------------------------------------------------------------------------------------------------------------------------------------------

130

Climate control

Air vents

Adjustable air vents

At least one air vent must be open

while cooling is on in order to prevent

the evaporator from icing up due to

lack of air movement.

Centre air vents

Press the vent to open.
Direct the flow of air by swivelling the

vent.
Push vent to close.

Side air vents

Press the vent to open.
Direct the flow of air by swivelling the

vent.
Depending upon the position of the

temperature control, air will be

directed into the vehicle via the side

air vents.

9 Warning

Do not attach any objects to the

slats of the air vents. Risk of

damage and injury in the event of

an accident.

Combi

Adjustable air vents may be located in

the roof frame. To open, press air

vent. Hold air vent and turn it to the

required position to direct the airflow.

-------------------------------------------------------------------------------------------------------------------------------------------------------------

Climate control

131

Bus

Adjustable air vents may be located in

the roof frame above the seats. Turn

adjuster to increase/decrease airflow

to the appropriate seat.

Fixed air vents

Additional air vents are located

beneath the windscreen and door

windows and in the foot wells.

Glovebox cooler

The air conditioning system can also

keep the contents of the glovebox

cool.

Maintenance

Air intake

The air intake in front of the

windscreen in the engine

compartment must be kept clear to

allow air intake. Remove any leaves,

dirt or snow.

Pollen filter

The pollen filter cleans dust, soot,

pollen and spores from the air

entering the vehicle through the air

intake.

Air conditioning regular

operation

In order to ensure continuously

efficient performance, cooling must

be operated for a few minutes once a

month, irrespective of the weather

and time of year. Operation with

cooling is not possible when outside

temperature is too low.

Service

For optimal cooling performance, it is

recommended to annually check the

climate control system, starting

three years after initial vehicle

registration, including:

● functionality and pressure test
● heating functionality
● leakage check
● check of drive belts
● cleaning of condenser and

evaporator drainage

● performance check

-------------------------------------------------------------------------------------------------------------------------------------------------------------

132

Climate control

Note

Refrigerant R-134a may contain

fluorinated greenhouse gases with a

global warming potential of 1430.
Front air conditioning system is filled

with 0.58 kg and has a CO

2

equivalent of 0.83 tonnes, the front

and rear air conditioning system in

Combi variants is filled with 1.1 kg

and has a CO

2

 equivalent of

1.57 tonnes and the front and rear air

conditioning system in Bus variants

is filled with 1.7 kg and has a CO

2

equivalent of 2.43 tonnes.

Depending on vehicle, information

regarding air conditioning refrigerant

appears on a label located in the

engine compartment.

-------------------------------------------------------------------------------------------------------------------------------------------------------------

Driving and operating

133

Driving and

operating

Driving hints ............................... 134

Driving economically ............... 134

Control of the vehicle ............... 134

Steering ................................... 134

Starting and operating ............... 135

New vehicle running-in ............ 135

Ignition switch positions ........... 135

Starting the engine .................. 136

Idle speed control .................... 137

Overrun cut-off ........................ 137

Stop-start system .................... 137

Parking .................................... 140

Air suspension ......................... 141

Engine exhaust .......................... 143

Diesel particle filter .................. 143

Catalytic converter ................... 143

AdBlue ..................................... 144

Manual transmission .................. 151
Manual transmission automa‐

ted .............................................. 151

Transmission display ............... 151

Starting the engine .................. 152

Selector lever .......................... 152

Manual mode ........................... 153

Electronic driving programmes 153

Fault ........................................ 154

Interruption of power supply .... 155

Brakes ........................................ 155

Antilock brake system ............. 155

Parking brake .......................... 156

Brake assist ............................. 157

Hill start assist ......................... 157

Ride control systems ................. 157

Traction Control system .......... 157

Electronic stability program ..... 158

Limited-slip rear axle ............... 160

Driver assistance systems ......... 160

Cruise control .......................... 160

Speed limiter ........................... 164

Parking assist .......................... 164

Rear view camera ................... 166

Lane departure warning .......... 168

Fuel ............................................ 169

Fuel for diesel engines ............ 169

Refuelling ................................ 170

Fuel consumption - CO

2

-

Emissions ............................... 171

Trailer hitch ................................ 172

General information ................. 172

Driving characteristics and

towing tips .............................. 172

Trailer towing ........................... 172

Towing equipment ................... 173

Trailer stability assist ............... 173

Auxiliary features ....................... 173

Power take-off ......................... 173

-------------------------------------------------------------------------------------------------------------------------------------------------------------

134

Driving and operating

Driving hints

Driving economically

ECO mode

ECO mode is a function that

optimises fuel consumption. It affects

engine power and torque,

acceleration, gear shift indication,

heating, air conditioning and electrical

consumers.

Activation

Press ECO. Control indicator

illuminates when activated and a

corresponding message appears in

the Driver Information Centre 3 103.
During driving, it is possible to

temporarily disable ECO mode, e.g.

to increase engine performance, by

depressing the accelerator pedal

firmly.
ECO mode is reactivated when

pressure is reduced on the

accelerator pedal.

Deactivation

Press ECO again. Control indicator

extinguishes.

Control of the vehicle

Never coast with engine not

running (except during Autostop)

Many systems will not function in this

situation (e.g. brake servo unit, power

steering). Driving in this manner is a

danger to yourself and others. All

systems function during an Autostop,

but there may be a controlled

reduction in power steering assist and

vehicle speed is reduced.

Stop-start system 3 137.

Pedals

To ensure the pedal travel is

uninhibited, there must be no mats in

the area of the pedals.
Use only floor mats which fit properly

and are fixed by the retainers on the

driver's side.

Driving downhill

Engage a gear when driving downhill

to ensure that sufficient brake

pressure is available.

Steering

If power steering assist is lost

because the engine stops or due to a

system malfunction, the vehicle can

be steered but may require increased

effort.

-------------------------------------------------------------------------------------------------------------------------------------------------------------


Content      ..     6      7      8      9     ..