Nissan Pathfinder Hybrid (2015 year). Instruction - part 15


  Index      Nissan     Nissan Pathfinder Hybrid - instruction 2015 year in english


Search            


Content   ..  13  14  15  16   ..


Nissan Pathfinder Hybrid (2015 year). Instruction - part 15


HOW TO USE THE SETTING
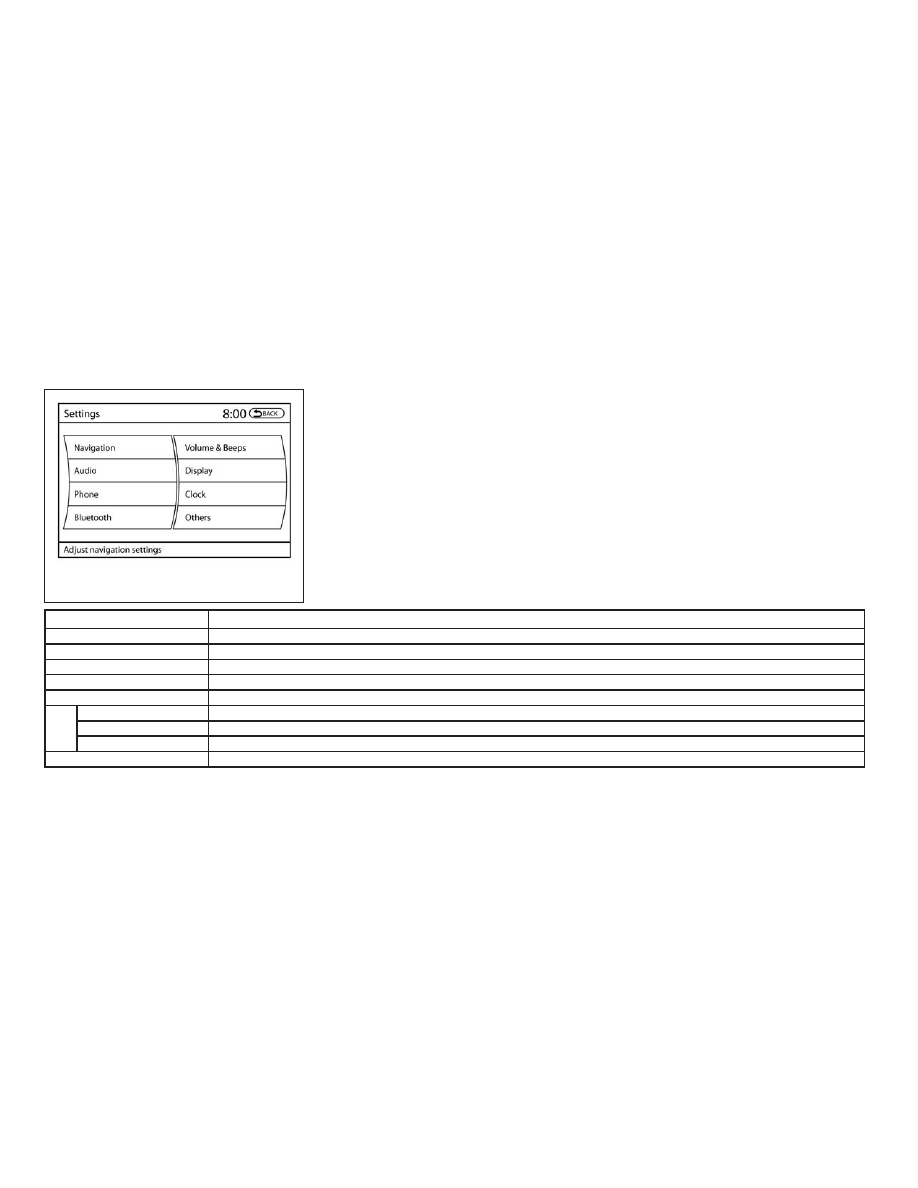
BUTTON

Press the SETTING button. This screen displays
and adjusts various settings and functions that
are available for your vehicle. When the amber
indicator next to an item is illuminated, the feature
is enabled.

Menu Item

Result

Navigation

For additional information, refer to the separate Navigation System Owner’s Manual.

Audio

For additional information, refer to “Audio system” in this section.

Phone

For additional information, refer to “Bluetooth® Hands-Free Phone System with Navigation System” in this section.

Bluetooth

For additional information, refer to “Bluetooth® Hands-Free Phone System with Navigation System” in this section.

Volume & Beeps

Adjusts the volume and beep settings.

Navigation volume

For additional information, refer to the separate Navigation System Owner’s Manual.

Phone Volume

For additional information, refer to “Bluetooth® Hands-Free Phone System with Navigation System” in this section.

Switch Beeps

Toggles on or off the beep sound that is heard when a control panel button is pressed.

Rear Display (if so equipped)

Adjusts the settings for the rear displays.

LHA1236

4-16

Monitor, climate, audio, phone and voice recognition systems

Menu Item

Result

Display Control

Select the “ON” key for either the left of right display to alternately enable or disable the display to the left or right rear passengers. If the display
is enabled, select the key (DVD, USB, front AUX or rear AUX) that you wish to have displayed on the corresponding screen. The front AUX set-
ting is for devices plugged into the AUX jacks in the center console. The rear AUX setting is for the devices plugged into the AUX jacks on the
back of the center console.

Auto Display

Toggles ON or OFF the Auto Display option. When the Auto Display is ON, the rear displays will automatically turn on when a movie is played
from a DVD or USB device.

Rear Speaker

Toggles ON or OFF the rear speaker volume.

Display

Adjusts the settings for the display screen

Brightness/Contrast

Adjusts the brightness or contrast of the map background.

Display off

Toggles the display screen on and off. The amber indicator is illuminated when the display is set to “On”. When the display is set to “Off” and a
control panel, audio or heater and air conditioner button is pressed, the display will resume until that operation is finished. To turn the display back

on, press and hold the

OFF button for approximately 2 seconds or return to the display setting screen and adjust the setting.

Background Color

Adjusts the display screen between day and night mode.

Color Theme

Changes the color of the background, arrows and bars on the screen.

Clock

Adjusts the clock settings.

On-screen Clock

Toggles on or off the clock in the upper right corner of the display.

Clock Format

Toggles between a 12-hour and 24-hour clock.

Offset (hour), Offset (min)

Manually adjusts the hours and minutes of the clock.

Daylight Savings Time

Toggles on or off the daylight savings time.

Time Zone

Adjusts the time zone. Choose a time zone from the available list.

Others

Select the “Others” key using the NISSAN controller. Voice Recognition, language and units setting screen will be displayed.

Language & Units

Adjusts the language and unit settings shown on the display.

Select Language

Changes the language of the menus on the display screen. If you touch the “Francais” key, French language screens will be displayed, so please
use the French Owner’s Manual. To obtain a French Owner’s Manual, refer to “Owner’s Manual/Service Manual Order Information” in the “Techni-
cal and consumer information” section.

Select Units

Changes the units used to “US” (mi, °F, MPG) or “Metric” (km, °C, L/100km).

Monitor, climate, audio, phone and voice recognition systems

4-17

Menu Item

Result

Voice Recognition

For additional information, refer to “NISSAN Voice Recognition system” in this section.

Camera Settings

Touching the Camera key will bring up the Camera settings screen.

Image Viewer

For additional information, refer to “Image viewer” in this section.

OFF BUTTON

To

change

the

display

brightness,

press

the

OFF button. Pressing the button again

will change the display to the day

or the

night

display. The brightness can then be

adjusted using the NISSAN controller.

If no operation is performed within 5 seconds, the
display will return to the previous display.

Press and hold the

OFF button for more

than 2 seconds to turn the display off. Press the
button again to turn the display on.

4-18

Monitor, climate, audio, phone and voice recognition systems

USING THE IMAGE VIEWER

When a compatible portable storage device is
plugged into the USB connection port located in
the center console, compatible image files stored
on the device can be viewed on the control panel
display.

Connecting the portable storage
device

To connect a portable storage device to the sys-
tem so that images stored on it can be viewed,
insert the device into the USB connection port
located in the center console.

Viewing images

To view an image, press the SETTING button and
then select the “Image Viewer” key with the
NISSAN controller. The Image Viewer screen will
be displayed.

A list of compatible images on the storage device
is displayed on the left side of the screen, while
the selected image is displayed on the right side
of the screen. To choose a different picture from
the list, use the NISSAN controller to scroll
through the list once the desired image is high-
lighted.

Select the “Full Screen Display” key and press
the ENTER button to view a full screen version of
the image.

Image requirements:

● Image type: JPEG
● File extensions: *.jpg, *.jpeg
● Maximum resolution: 2048 x 1536
● Maximum size: 2 MB
● Colors: 32,768 (15-bit)
● Maximum file name length: 253 bytes (dis-

play only shows first 8 characters)

● Maximum folders: 500
● Maximum images per folder: 1,024

LHA1309

IMAGE VIEWER (if so equipped)

Monitor, climate, audio, phone and voice recognition systems

4-19

Viewing images in a slideshow

To view all of the images on the device in a
slideshow, first enter the full screen mode while
viewing one of the images. The slideshow control
buttons are located on the right side of the
screen.

Select the play key

to begin the slideshow.

The images shown on the screen will periodically
change at a given interval of time. To skip through
the images without waiting for them to change
automatically, select the

key to skip back-

ward or the

key to skip forward. Select the

stop key

to end the slideshow and return

to the full screen display of the image currently on
the screen.

Slideshow settings

While in slideshow mode, the following settings
can be accessed:

Settings

Slideshow Speed

Changes the frequency at which images are changed during a slideshow. Choose one of the options on the screen or “No Auto Change” to
have the images not change automatically.

Slideshow Order

Random

Changes images in a random order when selected.

Order List

Changes images in the order in which they are saved on the USB device.

LHA1310

4-20

Monitor, climate, audio, phone and voice recognition systems

When the shift lever is shifted into the R (Re-
verse) position, the monitor display shows the
view to the rear of the vehicle.

WARNING

Failure to follow the warnings and instruc-
tions for proper use of the RearView
Monitor could result in serious injury or
death.

● The RearView Monitor is a convenience

but it is not a substitute for proper back-
ing. Always turn and look out the win-
dows, and check mirrors to be sure that
it is safe to move before operating the
vehicle. Always back up slowly.

● The system is designed as an aid to the

driver in showing large stationary ob-
jects directly behind the vehicle, to help
avoid damaging the vehicle.

● The system cannot completely elimi-

nate blind spots and may not show ev-
ery object.

● Underneath the bumper and the corner

areas of the bumper cannot be viewed
on the RearView Monitor because of its
monitoring range limitation. The system
will not show small objects below the
bumper, and may not show objects
close to the bumper or on the ground.

● Objects viewed in the RearView Moni-

tor differ from actual distance because
a wide-angle lens is used.

● Objects in a RearView Monitor will ap-

pear

visually

opposite

than

when

viewed in the rear view and outside
mirrors.

● Make sure that the trunk is securely

closed when backing up.

● Do not put anything on the rearview

camera. The rearview camera is in-
stalled above the license plate.

● When washing the vehicle with high

pressure water, be sure not to spray it
around the camera. Otherwise, water
may enter the camera unit causing wa-
ter condensation on the lens, a mal-
function, fire or an electric shock.

● Do not strike the camera. It is a preci-

sion instrument. Otherwise, it may mal-
function or cause damage resulting in a
fire or an electric shock.

CAUTION

There is a plastic cover over the camera.
Do not scratch the cover when cleaning
dirt or snow from the cover.

REARVIEW MONITOR (if so
equipped)

Monitor, climate, audio, phone and voice recognition systems

4-21

HOW TO READ THE DISPLAYED
LINES

Guiding lines which indicate the vehicle width
and distances to objects with reference to the
vehicle body line

A

are displayed on the monitor.

Distance guide lines:

Indicate distances from the vehicle body.

● Red line

1

: approx. 1.5 ft (0.5 m)

● Yellow line

2

: approx. 3 ft (1 m)

● Green line

3

: approx. 7 ft (2 m)

● Green line

4

: approx. 10 ft (3 m)

Vehicle width guide lines

5

:

Indicate the vehicle width when backing up.

Predictive course lines

6

:

Indicate the predictive course when backing up.
The predictive course lines will be displayed on
the monitor when the shift lever is in the R (Re-
verse) position and the steering wheel is turned.
The predictive course lines will move depending
on how much the steering wheel is turned and
will not be displayed while the steering wheel is in
the neutral position.

The vehicle width guide lines and the width of the
predictive course lines are wider than the actual
width and course.

HOW TO PARK WITH PREDICTED
COURSE LINES

WARNING

● Always turn and check that it is safe to

do so before backing up. Always back
up slowly.

● If the tires are replaced with different

sized tires, the predictive course lines
may be displayed incorrectly.

● On a snow-covered or slippery road,

there may be a difference between the
predictive course line and the actual
course line.

● The distance guide line and the vehicle

width line should be used as a reference
only when the vehicle is on a level
paved surface. The distance viewed on
the monitor is for reference only and
may be different than the actual dis-
tance between the vehicle and dis-
played objects.

● When backing up the vehicle up a hill,

objects viewed in the monitor are fur-
ther than they appear. When backing up
the vehicle down a hill, objects viewed
in the monitor are closer than they ap-
pear. Use the inside mirror or glance
over your shoulder to properly judge
distances to other objects.

LHA1196

4-22

Monitor, climate, audio, phone and voice recognition systems

1. Visually check that the parking space is safe

before parking your vehicle.

2. The rear view of the vehicle is displayed on

the screen

A

when the shift lever is moved

to the R (Reverse) position.

3. Slowly back up the vehicle adjusting the

steering wheel so that the predicted course
lines

B

enter the parking space

C

.

4. Maneuver the steering wheel to make the

vehicle width guide lines

D

parallel to the

parking space

C

. When the back of the

vehicle enters the parking space

C

, maneu-

ver the steering wheel to make the vehicle
width guide lines

D

parallel to the parking

space

C

.

5. When the vehicle is parked in the space

completely, move the shift lever to the P
(Park) position and apply the parking brake.

DIFFERENCE BETWEEN
PREDICTED AND ACTUAL
DISTANCES

The distance guide line and the vehicle width
guide line should be used as a reference only
when the vehicle is on a level, paved surface. The
distance viewed on the monitor is for reference
only and may be different than the actual distance
between the vehicle and displayed objects.

LHA1197

LHA1198

Monitor, climate, audio, phone and voice recognition systems

4-23

Backing up on a steep uphill

When backing up the vehicle up a hill, the dis-
tance guide lines and the vehicle width guide
lines are shown closer than the actual distance.
For example, the display shows 1.0 m (3 ft) to the
place

A

, but the actual 1.0 m (3 ft) distance on

the hill is the place

B

. Note that any object on

the hill is further than it appears on the monitor.

Backing up on a steep downhill

When backing up the vehicle down a hill, the
distance guide lines and the vehicle width guide
lines are shown farther than the actual distance.
For example, the display shows 3 ft (1.0 m) to the
place

A

, but the actual 3 ft (1.0 m) distance on

LHA3145

LHA3146

4-24

Monitor, climate, audio, phone and voice recognition systems

the hill is the place

B

. Note that any object on

the hill is closer than it appears on the monitor.

Backing up near a projecting object

The predicted course lines

A

do not touch the

object in the display. However, the vehicle may hit
the object if it projects over the actual backing up
course.

Backing up behind a projecting object

The position

C

is shown farther than the position

B

in the display. However, the position

C

is

actually at the same distance as the position

A

.

The vehicle may hit the object when backing up to

LHA1201

LHA3147

Monitor, climate, audio, phone and voice recognition systems

4-25

the position

A

if the object projects over the

actual backing up course.

PREDICTED COURSE LINE
SETTINGS

To turn on or off the predicted course line display,
press the SETTING button, select the “Camera”
key and press the ENTER button.

Predicted Course Lines:

When this item is turned on, the predicted course
lines will be displayed on the monitor when the
shift lever is the R (Reverse) position.

HOW TO ADJUST THE SCREEN

To adjust the Display ON/OFF, Brightness, Tint,
Color, Contrast and Black Level of the RearView
Monitor, press the SETTING button with the
RearView Monitor on and select the “Display”
key. Select one of the items and change the value
by touching the “+” or “-” key or by turning the
NISSAN controller.

Do not adjust the Brightness, Tint, Color, Con-
trast and Black Level of the RearView Monitor
while the vehicle is moving. Make sure the park-
ing brake is firmly applied.

PARKING SENSOR / REAR CENTER
SONAR

The sonar (parking sensor) sounds a tone to
inform the driver of obstacles near the bumper.

WARNING

● The sonar (parking sensor) is a conve-

nience feature. It is not a substitute for
proper parking.

● The system is deactivated at speeds

above 6 mph (10km/h). It is reactivated
at lower speeds.

● The driver is always responsible for

safety

during

parking

and

other

maneuvers.

● Always look around and check that it is

safe to move before parking.

● Read and understand the limitations of

the sonar (parking sensor) as contained
in this section.

● The colors of the sonar indicators and

the distance guide lines in the front,
front-wide, rear and rear-wide views in-
dicate different distances to the object.

● Inclement

weather

or

ultrasonic

sources such as an automatic car wash,
a truck’s compressed-air brakes or a
pneumatic drill may affect the function
of the system; this may include reduced
performance or a false activation.

● This function is designed as an aid to

the driver in detecting large stationary
objects to help avoid damaging the
vehicle.

● The system is not designed to prevent

contact with small or moving objects.

LHA2549

4-26

Monitor, climate, audio, phone and voice recognition systems

● The system will not detect small objects

below the bumper, and may not detect
objects close to the bumper or on the
ground.

● The system may not detect the follow-

ing objects:

– Fluffy objects such as snow, cloth,

cotton, glass or wool.

– Thin objects such as rope, wire or

chain.

– Wedge-shaped objects.

● If your vehicle sustains damage to the

bumper fascia, leaving it misaligned or
bent, the sensing zone may be altered
causing inaccurate measurement of ob-
jects or false alarms.

CAUTION

● Excessive noise (such as audio system

volume or an open vehicle window) will
interfere with the tone and it may not be
heard.

● Keep the surface of the sonar sensors

(located on the rear bumper fascia) free
from accumulations of snow, ice and
dirt. Do not scratch the surface of the
sonar sensors when cleaning. If the
sensors are covered, the accuracy of the
sonar function will be diminished.

The system gives the tone for rear objects when
the shift lever is in the R (Reverse) position.

When the camera image is shown on the display,
the system shows the sonar indicator regardless
of the shift selector position.

The system is deactivated at speeds above
6 mph (10 km/h). It is reactivated at lower
speeds.

When the objects are detected, the indicator
(green) appears and blinks and the tone sounds
intermittently. When the vehicle moves closer to
the object, the color of the indicator turns yellow
and the rate of the blinking and the rate of the
tone increase. When the vehicle is very close to
the object, the indicator stops blinking and turns
red, and the tone sounds continuously.

The intermittent tone will stop after 3 seconds
when an object is detected by only the corner
sonar and the distance does not change.

The tone will stop when the object is no longer
near the vehicle.

Monitor, climate, audio, phone and voice recognition systems

4-27

In the below cases, the sonar will be turned back
on automatically:

● When the shift lever is in the R (Reverse)

position.

● When the CAMERA button is pressed and a

screen other than the camera view is shown
on the display.

● When vehicle speed decreases below ap-

proximately 6 mph (10 km/h).

● When the ignition switch is placed in the

OFF position and turned back to the ON
position again.

OPERATING TIPS

● When the shift lever is shifted to the R (Re-

verse) position, the display screen automati-
cally changes to the RearView Monitor
mode. However, the radio can be heard.

● When the view is switched, the display im-

ages on the screen may be displayed with
some delay.

● When the temperature is extremely high or

low, the screen may not clearly display ob-
jects. This is not a malfunction.

● When strong light is directly coming on the

camera, objects may not be displayed
clearly. This is not a malfunction.

● Vertical lines may be seen in objects on the

screen. This is due to strong reflected light
from the bumper. This is not a malfunction.

● The screen may flicker under fluorescent

light. This is not a malfunction.

● The colors of objects on the RearView Moni-

tor may differ somewhat from those of the
actual color of the objects. This is not a
malfunction.

● Objects on the monitor may not be clear in a

dark environment. This is not a malfunction.

● If dirt, rain or snow accumulates on the cam-

era, the RearView Monitor may not display
objects clearly. Clean the camera.

● Do not use wax on the camera window.

Wipe off any wax with a clean cloth damp-
ened with mild detergent diluted with water.

CAUTION

● Do not use alcohol, benzine or thinner

to clean the camera. This will cause
discoloration. To clean the camera,
wipe with a cloth dampened with di-
luted mild cleaning agent and then wipe
with a dry cloth.

● Do not damage the camera as the moni-

tor screen may be adversely affected.

With the ignition switch in the ON position, press
the CAMERA button or move the shift lever to the
R (Reverse) position to operate the Around View
Monitor. The monitor displays various views of
the position of the vehicle in a split screen format.

WARNING

● The Around View Monitor is a conve-

nience feature. It is not a substitute for
proper vehicle operation because it has
areas where objects cannot be viewed.
The four corners of the vehicle in par-
ticular are blind spots where objects do
not appear in the bird’s-eye, front or
rear views. Always look out the win-
dows and check with your own eyes to
be sure that it is safe to move before
operating the vehicle. Always operate
the vehicle slowly.

● The driver is always responsible for

safety

during

parking

and

other

maneuvers.

● Do not use the Around View Monitor

with the outside mirror in the stored
position, and make sure that the liftgate
is securely closed when operating the
vehicle using the Around View Monitor.

AROUND VIEW® MONITOR (if so
equipped)

4-28

Monitor, climate, audio, phone and voice recognition systems

● The distance between objects viewed

on the Around View Monitor differs
from the actual distance.

● The cameras are installed on the front

grille, the outside mirrors and above the
rear license plate. Do not put anything
on the cameras.

● When washing the vehicle with high-

pressure water, be sure not to spray it
around the cameras. Otherwise, water
may enter the camera unit causing wa-
ter condensation on the lens, a mal-
function, fire or an electric shock.

● Do not strike the cameras. They are

precision instruments. Doing so could
cause a malfunction or cause damage
resulting in a fire or an electric shock.

Available views

● Bird’s-Eye View

The surrounding view of the vehicle from
above.

● Front-Side View

The view around and ahead of the front
passenger’s side wheel.

● Front View

An approximately 150–degree view of the
front of the vehicle.

● Front-Wide View

An approximately 180–degree view of the
front of the vehicle.

● Rearview

An approximately 130.5-degree view of the
rear of the vehicle.

● Rear-Wide View

An approximately 180–degree view of the
rear of the vehicle.

The system is designed as an aid to the driver in
situations such as slot parking or parallel parking.

There are some areas where the system will not
show objects and the system does not warn of
moving objects. When in the front or rear view
display, an object below the bumper or on the
ground may not be viewed

1

. When in the

LHA3148

Monitor, climate, audio, phone and voice recognition systems

4-29

bird’s-eye view, a tall object near the seam

3

of

the camera viewing areas will not appear in the
monitor

2

.

WARNING

● The Around View Monitor is a conve-

nience features. It is not a substitute for
proper vehicle operation because it has
areas where objects cannot be viewed.
Always look out the windows and check
to be sure that it is safe to move.

● The driver is always responsible for

safety

during

parking

and

other

maneuvers.

● Do not use the Around View Monitor

with the outside mirror in the stored
position, and make sure that the liftgate
is securely closed when operating the
vehicle using the Around View Monitor.

● The distance between objects viewed

on the Around View Monitor differs
from the actual distance.

● The cameras are installed on the front

grille, the outside mirrors and above the
rear license plate. Do not put anything
on the cameras.

● When washing the vehicle with high-

pressure water, be sure not to spray it
around the cameras. Otherwise, water
may enter the camera unit causing wa-
ter condensation on the lens, a mal-
function, fire or an electric shock.

● Do not strike the cameras. They are

precision instruments. Doing so could
cause a malfunction or cause damage
resulting in a fire or an electric shock.

CAUTION

Do not scratch the camera lens when
cleaning dirt or snow from the front of the
camera.

AVAILABLE VIEWS

WARNING

● The distance guide line and the vehicle

width line should be used as a reference
only when the vehicle is on a paved,
level surface. The distance viewed on
the monitor may be different than the
actual distance between the vehicle and
displayed objects.

● The distance between objects viewed in

the rearview differs from the actual dis-
tance because a wide-angle lens is
used.

● Use the displayed lines and the bird’s-

eye view as a reference. The lines and
the bird’s-eye view are greatly affected
by the number of occupants, fuel level,
vehicle position, road condition and
road grade.

● If the tires are replaced with different

sized tires, the predictive course lines
and the bird’s-eye view may be dis-
played incorrectly.

● When driving the vehicle up a hill, ob-

jects viewed in the monitor are further
than they appear. When driving the ve-
hicle down a hill, objects viewed in the
monitor are closer than they appear.
Use the mirrors or actually look to prop-
erly judge distances to other objects.

● Use the mirrors or actually look to prop-

erly judge distances to other objects.

● Objects in the monitor will appear visu-

ally opposite than when viewed in the
rearview and outside mirrors.

4-30

Monitor, climate, audio, phone and voice recognition systems

● On a snow-covered or slippery road,

there may be a difference between the
predictive course lines and the actual
course line.

● The displayed lines on the rearview will

appear slightly off to the right, because
the rearview camera is not installed in
the rear center of the vehicle.

● The vehicle width and predictive course

lines are wider than the actual width
and course.

Front and rear view

Guiding lines, which indicate the vehicle width
and distance to objects with reference to the
vehicle body line

A

, are displayed on the moni-

tor.

Distance guide lines

Indicate distances from the vehicle body:

● Red line

1

: approximately 0.5 m (1.5 ft)

● Yellow line

2

: approximately 1 m (3 ft)

● Green line

3

: approximately 2 m (7 ft)

● Green line

4

: approximately 3 m (10 ft)

Vehicle width guide lines

5

Indicate the vehicle width when backing up.

Predictive course lines

6

Indicate the predictive course when operating
the vehicle. The predictive course lines will be
displayed on the monitor when the steering
wheel is turned. The predictive course lines will
move depending on how much the steering
wheel is turned and will not be displayed while
the steering wheel is in the straight ahead posi-
tion.

Front view

SAA1840

Rear view

SAA1896

Monitor, climate, audio, phone and voice recognition systems

4-31


Content   ..  13  14  15  16   ..