Nissan Pathfinder. Manual - part 409


  Index      Nissan     Nissan Pathfinder (2014 year) - Service and Repair Manual


Search            


Content   ..  407  408  409  410   ..


Nissan Pathfinder. Manual - part 409


DLN-78

< UNIT DISASSEMBLY AND ASSEMBLY >

[TRANSFER: TY21C]

TRANSFER COVER

Disassembly

INFOID:0000000009177776

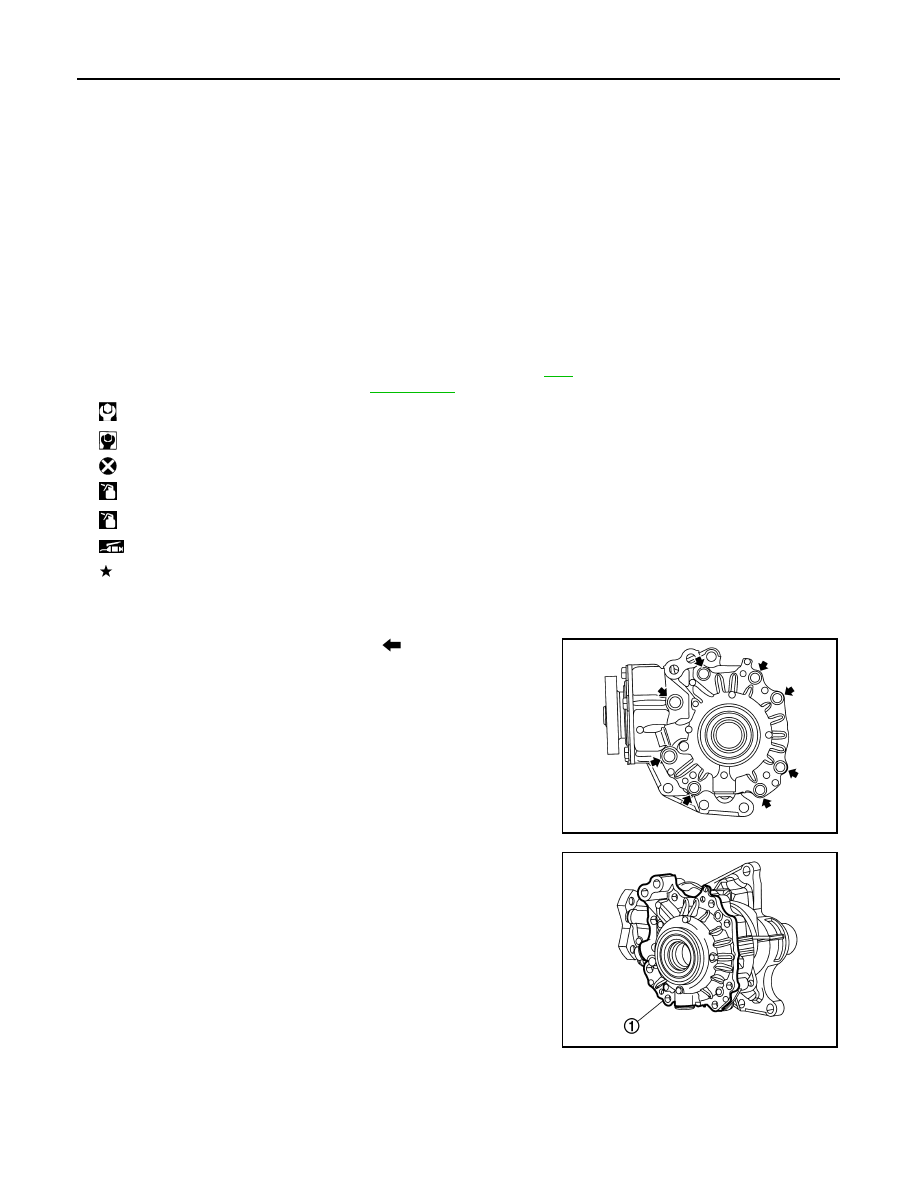
1. Remove transfer cover mounting bolts (

).

2. Lightly tap transfer cover (1) with a plastic hammer to remove

transfer cover.

3. Remove O-ring from transfer cover.

CAUTION:

• Never use a tool.

• Never damage transfer cover.

1.

Oil seal

2.

Transfer cover

3.

Filler plug

4.

Gasket

5.

Drain plug

6.

Oil seal

7.

O-ring

8.

Ring gear bearing adjusting shim 
(transfer cover side)

9.

Ring gear bearing (transfer cover 
side)

10. Drive shaft oil seal

11. Ring gear shaft

12. Ring gear bearing (transfer case 

side)

13. Ring gear bearing adjusting shim 

(transfer case side)

14. Ring gear

15. Baffle plate

16. Transfer case

17. Plug

18. O-ring

19. Oil seal

20. Dowel pin

21. Drive pinion

22. Drive pinion adjusting shim

23. O-ring

24. Pinion bearing assembly

25. Oil seal

26. Dust cover

27. Companion flange

28. Pinion lock nut
A.  Oil seal lip

B.  Comply with the assembly proce-

dure when tightening. Refer to 

DLN-

79, "Assembly"

.

: N·m (kg-m, ft-lb)

: N·m (kg-m, in-lb)

: Always replace after every disassembly.

: Apply gear oil.

*

: Apply anti-corrosive oil.

: Apply multi-purpose grease.

: Select with proper thickness.

JSDIA3949ZZ

JSDIA3950ZZ

TRANSFER COVER

DLN-79

< UNIT DISASSEMBLY AND ASSEMBLY >

[TRANSFER: TY21C]

C

E

F

G

H

I

J

K

L

M

A

B

DLN

N

O

P

4. Lightly tap the metal part of oil seals (1) with punch from back

side of transfer cover to remove oil seals.

CAUTION:

When removing, never damage the transfer cover by scoop-

ing it out with a tool.

5. Remove the ring gear bearing adjusting shim (transfer cover

side) (1) and ring gear bearing outer race (transfer cover side)

(2) using drift (commercial service tool).

6. Remove drain plug and gasket.
7. Remove filler plug and gasket.
8. Perform inspection after disassembly. Refer to 

DLN-80, "Inspec-

tion"

.

Assembly

INFOID:0000000009177777

1. Select the ring gear bearing adjusting shim (transfer cover side). Refer to 

DLN-89, "Adjustment"

.

2. Install the selected ring gear bearing adjusting shim (transfer

cover side) (1) and ring gear bearing outer race (transfer cover

side) (2) using drift (commercial service tool).

CAUTION:

• Never reuse ring gear bearing.

• Apply gear oil to the ring gear bearing.

3. Install gasket onto drain plug and install them to transfer cover.

CAUTION:

Never reuse gasket.

4. Install the transfer cover to the transfer case, and apply anti-cor-

rosive oil onto thread and seats on the mounting bolts. Then

tighten mounting bolts to the specified torque.

NOTE:

At this timing, O-ring installing to transfer cover is not necessary.

Install O-ring after tooth contact is checked.

5. Check backlash, tooth contact, total preload and companion

flange runout. Refer to 

DLN-89, "Adjustment"

.

CAUTION:

Measure the total preload without oil seals of transfer cover and transfer case.

6. Remove transfer cover to install O-ring.
7. Apply multi-purpose grease lightly and evenly onto an O-ring, and install it to the transfer cover.

CAUTION:

• Never reuse O-ring.

• When installing O-ring, never use a tool.

• Never damage O-ring.

JSDIA3990ZZ

JSDIA3992ZZ

JSDIA3992ZZ

A

: M10 bolt

B

:  M8  bolt

JSDIA4065ZZ

DLN-80

< UNIT DISASSEMBLY AND ASSEMBLY >

[TRANSFER: TY21C]

TRANSFER COVER

8. Install the transfer cover to the transfer case, and apply anti-cor-

rosive oil onto thread and seats on the mounting bolts. Then

tighten mounting bolts to the specified torque.

9. Using drift (commercial service tool), drive the transfer cover oil

seals.

CAUTION:

• When checking the total preload torque, measure it with-

out the oil seal, then install the oil seal.

• Never reuse the oil seal.

• When installing, never incline oil seal.

• Apply multi-purpose grease onto oil seal lips, and gear oil

onto the circumference of the oil seal.

10. Install gasket onto filler plug and install them to transfer cover.

CAUTION:

• Never reuse gasket.

• Install filler plug after oil is filled.

Inspection

INFOID:0000000009177778

INSPECTION AFTER DISASSEMBLY

Check items below. If necessary, replace them with new ones.

Transfer cover

Check the bearing mounting surface for wear, cracks and damages.

A

: M10 bolt

B

:  M8  bolt

JSDIA4065ZZ

A

: 10.3 +0.6/-0 mm (0.406 +0.024/-0 in)

B

: 0 +0.6/-0 mm (0 +0.024/-0 in)

JSDIA3993ZZ

RING GEAR SHAFT

DLN-81

< UNIT DISASSEMBLY AND ASSEMBLY >

[TRANSFER: TY21C]

C

E

F

G

H

I

J

K

L

M

A

B

DLN

N

O

P

RING GEAR SHAFT

Exploded View

INFOID:0000000009177779

1.

Oil seal

2.

Transfer cover

3.

Filler plug

4.

Gasket

5.

Drain plug

6.

Oil seal

JSDIA4191GB


Content   ..  407  408  409  410   ..