Nissan Pathfinder. Manual - part 407


  Index      Nissan     Nissan Pathfinder (2014 year) - Service and Repair Manual


Search            


Content   ..  405  406  407  408   ..


Nissan Pathfinder. Manual - part 407


DLN-70

< PERIODIC MAINTENANCE >

[TRANSFER: TY21C]

TRANSFER OIL

PERIODIC MAINTENANCE

TRANSFER OIL

Inspection

INFOID:0000000009177767

TRANSFER OIL LEAKS

Check that oil is not leaking from transfer assembly or around it.
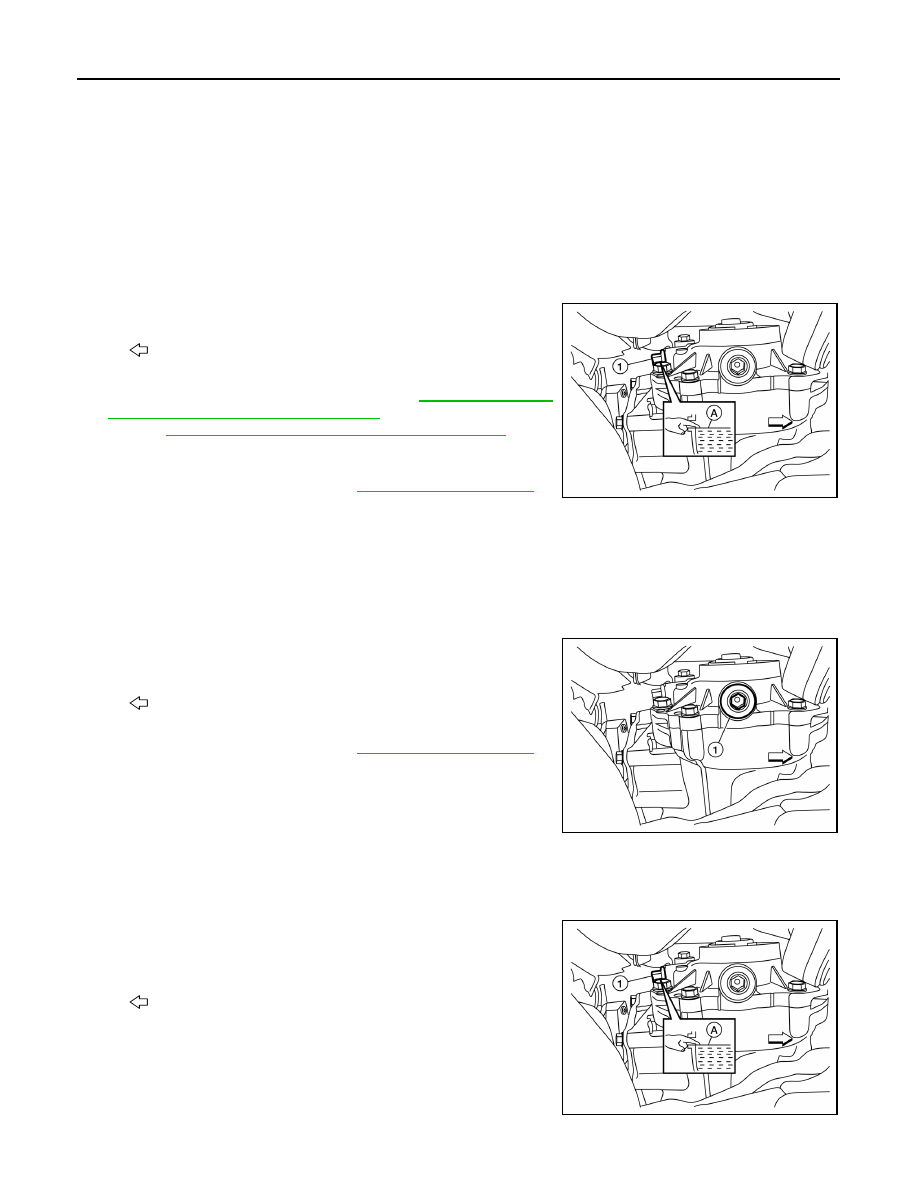
TRANSFER OIL LEVEL

CAUTION:

Do not start engine while checking transfer oil level.
1. Remove filler plug (1) and gasket. 

2. Transfer oil level (A) should be level with bottom of filler plug

hole. Add transfer oil if necessary. Refer to 

MA-15, "FOR USA

AND CANADA : Fluids and Lubricants"

 (United States and Can-

ada) or 

MA-16, "FOR MEXICO : Fluids and Lubricants"

 (Mex-

ico).

3. Set a new gasket onto filler plug, and install it in the transfer and

tighten to specified torque. Refer to 

DLN-94, "Exploded View"

.

CAUTION:

Do not reuse gasket.

Draining

INFOID:0000000009177768

CAUTION:

Do not start engine while working.
1. Run the vehicle to warm up the transfer unit sufficiently.
2. Stop the engine and remove drain plug (1) and gasket and drain

the transfer oil.

3. Set a new gasket onto filler plug, and install it in the transfer and

tighten to specified torque. Refer to 

DLN-94, "Exploded View"

.

CAUTION:

Do not reuse gasket.

Refilling

INFOID:0000000009177769

CAUTION:

Do not start engine while checking transfer oil level.
1. Remove filler plug (1).
2. Fill with new transfer oil to the specified level near the filler plug

hole.

: Front

ALDIA0383ZZ

: Front

ALDIA0382ZZ

: Front

ALDIA0383ZZ

TRANSFER OIL

DLN-71

< PERIODIC MAINTENANCE >

[TRANSFER: TY21C]

C

E

F

G

H

I

J

K

L

M

A

B

DLN

N

O

P

3. Set a new gasket onto filler plug, and install it in the transfer and tighten to specified torque. Refer to 

DLN-

94, "Exploded View"

.

CAUTION:

Do not reuse gasket.

Transfer oil grade and 
viscosity

: Refer to 

MA-15, "FOR USA 

AND CANADA : Fluids and 
Lubricants"

 (United States 

and Canada) or 

MA-16, "FOR 

MEXICO : Fluids and Lubri-
cants"

 (Mexico).

Transfer oil capacity

: Refer to 

DLN-98, "General 

Specifications"

.

DLN-72

< REMOVAL AND INSTALLATION >

[TRANSFER: TY21C]

4WD CONTROL UNIT

REMOVAL AND INSTALLATION

4WD CONTROL UNIT

Removal and Installation

INFOID:0000000009177770

REMOVAL

1. Disconnect the negative battery terminal. Refer to 

PG-90, "Exploded View"

.

2. Remove storage box. Refer to 

INT-30, "Exploded View"

.

3. Remove 4WD control unit bolts (

).

4. Disconnect 4WD control unit harness connector.
5. Remove 4WD control unit (1).

INSTALLATION

Installation is in the reverse order of removal.

• Tighten 4WD control unit bolts to specified torque. 

CAUTION:

Do not drop or shock 4WD control unit.

Reset electronic systems as necessary. Refer to 

PG-89, "ADDITIONAL SERVICE WHEN REMOVING BAT-

TERY NEGATIVE TERMINAL : Special Repair Requirement"

.

: Front

ALDIA0278ZZ

4WD control unit bolts

: 10.1 N·m (1.0 kg-m, 7 ft-lb)

4WD SHIFT SWITCH

DLN-73

< REMOVAL AND INSTALLATION >

[TRANSFER: TY21C]

C

E

F

G

H

I

J

K

L

M

A

B

DLN

N

O

P

4WD SHIFT SWITCH

Removal and Installation

INFOID:0000000009177771

REMOVAL

1. Remove the CVT shift selector finisher. Refer to 

IP-18, "Exploded View"

.

2. Remove the 4WD lock switch finisher (1).

3. Remove the front seat climate control switch bracket screws (1)

and the CVT shift selector indicator lamp screws (2). Refer to 

IP-

18, "Exploded View"

.

4. Separate the CVT shift selector indicator lamp from the CVT

shift selector finisher by pressing down on the pawls.

: Pawls

5. Remove the 4WD lock switch from the CVT shift selector indicator lamp.

INSTALLATION

Installation is in the reverse order of removal.

ALDIA0387ZZ

ALDIA0384ZZ

ALDIA0386ZZ


Content   ..  405  406  407  408   ..