Mitsubishi ASX (2018 year). Instruction - part 5


  Index      Mitsubishi     Mitsubishi ASX - instruction 2018 year in english


Search            


Content   ..  3  4  5  6   ..


Mitsubishi ASX (2018 year). Instruction - part 5


NOTE

l

Close the sunshade when parking the vehicle
for a long time. Parking in the hot sun with
the sunshade open will make the vehicle in-
side extremely hot.

The  sunshade  can  only  be  operated  with  the
ignition switch or the operation mode in ON.
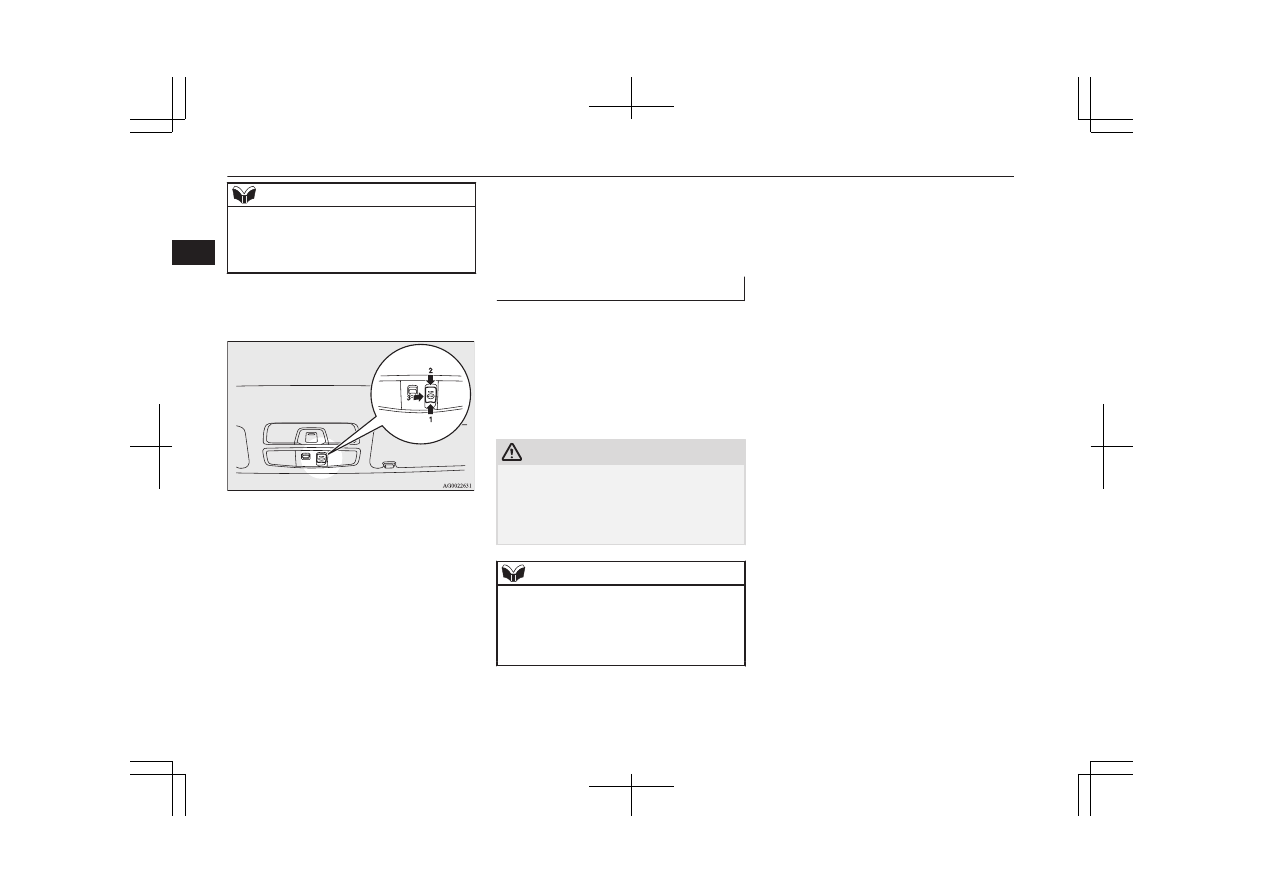
1- Open
2- Close
3- Stop

To open, press the switch (1).
Press  and  hold  the  switch  (1),  the  sunshade
automatically opens. Release the switch once
the sunshade starts moving automatically.
To  stop  the  moving  sunshade,  press  the
switch (1), (2) or (3).
 
To close, press the switch (2).

Press  and  hold  the  switch  (2),  the  sunshade
automatically closes. Release the switch once
the sunshade starts moving automatically.
To  stop  the  moving  sunshade,  press  the
switch (1), (2) or (3).

Safety mechanism

If  a  hand  or  head  is  trapped  in  the  closing
sunshade, it will reopen automatically.
Nonetheless,  make  sure  that  nobody  brings
their  head  or  hand  near  the  sunshade  when
opening or closing.
The opened sunshade will become operation-
al after a few seconds.

CAUTION

l

The  safety  mechanism  is  cancelled  just  be-
fore the sunshade is fully closed. This allows
the sunshade to close completely.
Therefore  be  especially  careful  that  no  fin-
gers are trapped in the sunshade.

NOTE

l

The safety mechanism can be activated if the
driving  conditions  or  other  circumstances
cause the sunshade to be subjected to a phys-
ical shock similar to that caused by a trapped
hand or head.

Sunshade*

3-42

OGAE18E1

Locking and unlocking

3

Seat adjustment

E00400302073

Adjust the driver’s seat so that you are com-
fortable  and  that  you  can  reach  the  pedals,
steering  wheel,  switches  etc.  while  retaining
a clear field of vision.

WARNING

l

Do  not  attempt  to  adjust  the  seat  while
driving. This can cause loss of vehicle con-
trol  and  result  in  an  accident.  After  ad-
justments are made, ensure the seating is
locked  in  position  by  attempting  to  move
the  seat  forward  and  rearward  without
using the adjusting mechanism.

l

Do not let children or adults ride in areas
of  the  vehicle  that  are  not  equipped  with
seats or seat belts. Also, make sure that all
occupants  are  sitting  in  their  seats  and
wearing their seat belts, and that children
are sitting in child restraints.

l

To minimize the risk of personal injury in
the event of a collision or sudden braking,
the  seatbacks  should  always  be  in  the  al-
most  upright  position  while  the  vehicle  is
in motion. The protection provided by the
seat  belts  may  be  reduced  significantly
when  the  seatback  is  reclined.  There  is
greater  risk  that  the  passenger  will  slide
under the seat belt, resulting in serious in-
jury, when the seatback is reclined.

WARNING

l

Do not place objects under the seats. This
could  prevent  the  seat  from  locking  se-
curely, and it could lead to an accident. It
may also cause damage to the seat or oth-
er parts.

CAUTION

l

Make sure the seat is adjusted by an adult or
with  adult  supervision  for  correct  and  safe
operation.

l

Do  not  place  a  cushion  or  the  like  between
your  back  and  the  seatback  while  driving.
The effectiveness of the head restraints will
be reduced in the event of an accident.

l

When  sliding  the  seat  rearward,  be  careful
not to catch your hand or foot.

Front seat

E00400400142

To adjust forward or back-

ward

E00400501951

Manual type

Pull  the  seat  adjusting  lever  and  adjust  the
seat forward or backward to the desired posi-
tion, and release the adjusting lever.

WARNING

l

To  ensure  the  seat  is  locked  securely,  try
to  move  the  seat  forward  or  backward
without using the adjusting lever.

Seat adjustment

4-03

OGAE18E1

Seat and seat belts

4

Power type

Adjust the seat by operating the switch as in-
dicated by the arrows.

1- Adjustment forward
2- Adjustment backward

NOTE

l

To prevent the battery from discharging, use
the power seat while the engine is on.

To recline the seatback

E00400602164

Manual type

In order to recline the seatback, lean forward
slightly, pull the seatback lock lever up, and
then  lean  backward  to  the  desired  position
and release the lever. The seatback will lock
in that position.

CAUTION

l

The  reclining  mechanism  of  the  seatback  is
spring loaded, causing it to return to the ver-
tical position when the lock lever is operat-
ed.  When  using  the  lever,  sit  close  to  the
seatback or hold it with your hand to control
its return motion.

Power type

Adjust  the  seatback  angle  by  operating  the
switch as indicated by the arrows.

1- To move to forward direction
2- To recline rearward

NOTE

l

To prevent the battery from discharging, use
the power seat while the engine is on.

Front seat

4-04

OGAE18E1

Seat and seat belts

4

To adjust seat height (driver’s

seat only)

E00400702279

Manual type

To adjust the seat height, operate the lever re-
peatedly to adjust.

1- Raise
2- Lower

Power type

To  adjust  the  seat  height,  operate  the  switch
as indicated by arrows.

NOTE

l

To prevent the battery from discharging, use
the power seat while the engine is on.

1- To  move  the  front  of  the  seat  up  and

down

2- To  move  the  rear  of  the  seat  up  and

down

3- To move the whole seat up and down

Front seat

4-05

OGAE18E1

Seat and seat belts

4

Heated seats*

E00401102528

The heated seats can be operated with the ig-
nition  switch  or  the  operation  mode  in  ON.
The indication lamp (A) will illuminate while
the heater is on.

1 (HI)

- Heater high (for quick heating).

2

- Heater off.

3 (LO)

-  Heater  low  (to  keep  the  seat
warm).

CAUTION

l

Switch off seat heaters when not in use.

CAUTION

l

Operate in the high position for quick heat-
ing. Once the seat is warm, set the heater to
low to keep it warm. Slight variations in seat
temperature  may  be  felt  while  using  the
heated seats. This is caused by the operation
of  the  heater’s  internal  thermostat  and  does
not indicate a malfunction.

l

If  the  following  types  of  persons  use  the
heated  seats,  they  might  become  too  hot  or
receive  minor  burns  (red  skin,  heat  blisters,
etc.):

Children, elderly or ill people

People with sensitive skin

Excessively tired people

People  under  the  influence  of  alcohol  or
sleep inducing medication (cold medicine,
etc.)

l

Do  not  place  heavy  objects  on  the  seat  or
stick  pins,  needles,  or  other  pointed  objects
into it.

l

Do not use a blanket, cushion, or other mate-
rial  with  high  heat  insulation  properties  on
the  seat  while  using  the  heater;  this  might
cause the heater element to overheat

l

Do not use benzine, kerosene, petrol, alcohol
or other organic solvents when cleaning the
seats.  Doing  so  could  damage  not  only  the
seat cover, but also the heater element.

l

If water or any other liquid is spilled on the
seat,  allow  it  to  dry  thoroughly  before  at-
tempting to use the heater.

l

Turn the heater off immediately if it appears
to be malfunctioning during use.

Rear seat

E00401300412

WARNING

l

When  a  person  sits  in  the  rear  seat,  pull
up the head restraint to a height at which
it  locks  in  position.  Be  sure  to  make  this
adjustment  before  starting  to  drive.  Seri-
ous injuries could otherwise be suffered as
the result of an impact.

Armrest*

E00401700650

To use the armrest, fold it down.
To  return  to  the  original  position,  push  it
backward level with the seat.

NOTE

l

Do not climb or sit on the armrest. Doing so
could damage the armrest.

Rear seat

4-06

OGAE18E1

Seat and seat belts

4

NOTE

l

The top surface of the armrest contains a cup
holder for rear seat occupants.
Refer to “Cup holder” on page 7-79.

Head restraints

E00403301439

WARNING

l

Driving  without  the  head  restraints  in
place  can  cause  you  and  your  passengers
serious injury or death in an accident. To
reduce  the  risk  of  injury  in  an  accident,
always make sure the head restraints are
installed  and  properly  positioned  when
the seat is occupied.

l

Never place a cushion or similar device on
the  seatback.  This  can  adversely  affect
head restraint performance by increasing
the  distance  between  your  head  and  the
restraint.

To adjust height

Adjust  the  head  restraint  height  so  that  the
centre of the head restraint is as close as pos-
sible to eye level to reduce the chances of in-
jury in the event of collision. Any person too
tall for the head restraint to reach their seated
eye  level,  should  adjust  the  restraint  as  high
as possible.

To  raise  the  head  restraint,  move  it  upward.
To  lower  the  restraint,  move  it  downward
while  pushing  the  height  adjusting  knob  (A)
in  the  direction  of  the  arrow.  After  adjust-
ment,  push  the  head  restraint  downward  and
make sure that it is locked.

To remove

To  remove  the  head  restraints,  lift  the  head
restraint  with  the  height  adjusting  knob  (A)
pushed in.

Installation

To  install  the  head  restraints,  first  confirm
that they are facing the correct direction, and
then  insert  them  into  the  seatback  while
pressing the height adjusting knob (A) in the
direction indicated by the arrow.

CAUTION

l

Confirm  that  the  height  adjusting  knob  (A)
is correctly adjusted as shown in the illustra-
tion,  and  also  lift  the  head  restraints  to  en-
sure  that  they  do  not  come  out  of  the  seat-
back.

Head restraints

4-07

OGAE18E1

Seat and seat belts

4

CAUTION

l

The  head  restraints  for  the  seats  differ  in
shape  and  size.  When  installing  head  re-
straints, make sure the head restraints are fit-
ted in their respective seats and do not install
the head restraints in the wrong direction.

Making a luggage
compartment

E00403400231

WARNING

l

When  making  a  luggage  compartment,
never  arrange  the  seats  while  the  vehicle
is  being  driven  or  is  on  an  incline.  The
seats  could  move  unexpectedly  or  more
than  required  and  cause  a  serious  acci-
dent.

l

If required, always operate the seating be-
fore the vehicle is in motion.

WARNING

l

Do not allow anyone to ride in the luggage
compartment  while  the  vehicle  is  in  mo-
tion.  People  who  are  not  properly  seated
and restrained can be seriously injured or
killed in an accident.

l

The  luggage  compartment  in  the  rear  of
the vehicle should never be used as a play
area by children.
Children  should  be  seated  with  seat  belts
fastened when the vehicle is in motion.

l

Confirm  that  the  seatback  locks  securely
when it is returned.

CAUTION

l

Do  not  stack  luggage  in  the  vehicle  higher
than the seatback height. Also, firmly secure
the luggage.
Serious  accidents  could  result  due  to  unre-
strained objects entering the passenger com-
partment during sudden braking.

l

Make  sure  that  the  seat  is  operated  by  an
adult.  If  it  is  operated  by  a  child,  an  unex-
pected accident might occur.

l

Be  careful  not  to  catch  your  hands  or  feet
when  arranging  the  seat.  Personal  injury
could result.

Folding the rear seatbacks for-

ward

E00403501675

The  passenger  and  luggage  compartments
can  be  joined  by  folding  the  seatback  for-
ward. This is useful for carrying long objects.
The  seatbacks  can  be  folded  with  the  rear
seat release button.

NOTE

l

The  seatbacks  can  be  folded  one  side  at  a
time.

To fold the seatbacks

Push  the  rear  seat  release  button  (A)  to  fold
the seatback forward.

Making a luggage compartment

4-08

OGAE18E1

Seat and seat belts

4

To return the seatbacks

1. If the seat belt is removed from the seat

belt  guide  (B),  pass  it  through  the  seat
belt guide.

2. Fold back the seatback until it is locked

properly in position.

NOTE

l

When the seat belts cannot be pulled out in a
locked  condition,  pull  the  belts  once  force-
fully and then return them.
After  that,  pull  the  belts  out  slowly  once
again.

3. Make sure the seatback is locked firmly

in  place  and  the  seat  belt  is  passed
through the seat belt guide (B).

CAUTION

l

If  the  red  part  (C)  on  the  back  of  the  rear
seat release button can be seen, the seatback
is not locked firmly in place. Push and pull
lightly  on  the  seatback  to  lock  it  firmly  in
place.

Seat belts

E00404800636

To  protect  you  and  your  passengers  in  the
event of an accident, it is most important that
the seat belts be worn correctly while driving.
The  front  seat  belts  have  a  pretensioner  sys-
tem. These belts are used the same way as a
conventional seat belt.
Refer  to  “Seat  belt  pretensioner  system  and
force limiter system” on page 4-14.

WARNING

l

Always  place  the  shoulder  belt  over  your
shoulder and across your chest. Never put
it behind you or under your arm.

l

One seat belt should be used by only one
person.  Doing  otherwise  can  be  danger-
ous.

WARNING

l

The seat belt will provide its wearer with
maximum  protection  if  the  recliner  seat-
back  is  placed  in  fully  upright  position.
When  the  seatback  is  reclined,  there  is
greater  risk  that  the  passenger  will  slide
under the belt, especially in a forward im-
pact accident, and may be injured by the
belt or by striking the instrument panel or
seatbacks.

l

Seat belts should always be worn by every
adult  who  drives  or  rides  in  this  vehicle,
and by all children who are tall enough to
wear seat belts properly.
Other  children  should  always  use  proper
child restraint systems.

l

Remove any twists when using the belt.

l

No  modifications  or  additions  should  be
made  by  the  user  which  will  either  pre-
vent  the  seat  belt  adjusting  devices  from
operating to remove slack, or prevent the
seat belt assembly from being adjusted to
remove slack.

l

Never  hold  a  child  in  your  arms  or  on
your lap when riding in this vehicle, even
if you are wearing your seat belt. To do so
risks severe or fatal injury to the child in
a collision or sudden stop.

l

Always adjust the belt to a snug fit.

l

Always  wear  the  lap  portion  of  the  belt
over your hips.

Seat belts

4-09

OGAE18E1

Seat and seat belts

4

3-point type seat belt (with

emergency locking mechanism)

E00404902947

This  type  of  belt  requires  no  length  adjust-
ment. Once worn, the belt adjusts itself to the
movement of the wearer, but in the event of a
sudden or strong shock, the belt automatical-
ly locks to hold the wearer’s body.

NOTE

l

You can check if the belt locks by pulling it
forward quickly.

To fasten

1. Pull the seat belt out slowly while hold-

ing the latch plate.

NOTE

l

When the seat belts cannot be pulled out in a
locked  condition,  pull  the  belts  once  force-
fully  and  then  return  them.  After  that,  pull
the belts out slowly once again.

2. Insert the latch plate into the buckle until

a “click” is heard.

WARNING

l

Never  wear  the  lap  portion  of  the  belt
across your abdomen. During accidents it
can  press  sharply  against  the  abdomen
and increase the risk of injury.

l

The  seat  belts  must  not  be  twisted  when
worn.

3. Pull  the  belt  slightly  to  adjust  slackness

as desired.

To unfasten

Hold  the  latch  plate  and  push  the  button  on
the buckle.

NOTE

l

As the belt retracts automatically, keep hold-
ing the latch plate while retracting so that the
belt  stows  slowly.  Failure  to  do  this  could
damage the vehicle.

Seat belts

4-10

OGAE18E1

Seat and seat belts

4

NOTE

l

If the seat belt (A) or ring (B) becomes dirty,
the belt may not retract smoothly. If the seat
belt  and  ring  are  dirty,  clean  them  with  a
mild soap or detergent solution.

Driver’s seat belt warning

lamp and display

E00409800833

Warning lamp

Warning display type 1

Warning display type 2

A tone and warning lamp are used to remind
the driver to fasten the seat belt.
If  the  ignition  switch  is  turned  to  the  “ON”
position  or  the  operation  mode  is  put  in  ON
while a seat belt is not fastened, the warning
lamp  illuminates  and  the  tone  sounds  for
about 6 seconds to remind the driver to fasten
the seat belt.

If the vehicle is driven without fastening the
seat  belt,  the  warning  lamp  comes  on  and
flashes  repeatedly,  and  the  tone  sounds  con-
tinuously. At the same time, the warning dis-
play is displayed on the information screen in
the multi-information display.
The warning lamp goes off and the tone stops
after approximately 90 seconds.
Subsequently,  if  the  seat  belt  is  still  not  fas-
tened, the warning lamp and tone will be acti-
vated  to  remind  the  driver  to  fasten  the  seat
belt whenever the vehicle is stopped and star-
ted  again.  The  warning  will  operate  in  the
same  way  if  the  seat  belt  is  removed  while
driving  the  vehicle.  The  warning  will  stop
when the seat belt is fastened.

Front passenger seat belt warn-

ing lamp*

E00411601327

The front passenger seat belt warning lamp is
located on the instrument panel.

Seat belts

4-11

OGAE18E1

Seat and seat belts

4

The lamp comes on when a person sits on the
front  passenger  seat  but  does  not  fasten  the
seat belt. It goes off when the seat belt is sub-
sequently fastened.

WARNING

l

Do  not  install  any  accessory  or  sticker
that makes the lamp difficult to see.

Adjustable seat belt anchor

(front seats)

E00405000329

The seat belt anchor height can be adjusted.
Raise or lower the seat belt anchor (A) while
pressing the lock knob (B).

Down

Up

WARNING

l

When adjusting the seat belt anchor, set it
at  a  position  that  is  sufficiently  high  so
that  the  belt  will  make  full  contact  with
your  shoulder  but  will  not  touch  your
neck.

3-point type seat belt with 2

buckles

E00414700117

3-point type seat belt with 2 buckles is fitted
in the rear centre seating position.

NOTE

l

You can check if the belt locks by pulling it
forward quickly.

To fasten

1. Pull  the  seat  belt  out  slowly  and  pass  it

through the seat belt guide (A).

NOTE

l

When the seat belts cannot be pulled out in a
locked condition, pull the belt once forceful-
ly and then return it.
After  that,  pull  the  belt  out  slowly  once
again.

2. After  making  sure  that  the  seat  belt  is

not twisted, insert the latch plate (B) into
the buckle (C) aligning the marks (D) on
the  plate  and  buckle  until  a  “click”  is
heard.

WARNING

l

When using the seat belt, make sure to se-
curely connect the latch plate (B) with the
buckle  (C).  Failing  to  do  so  could  signifi-
cantly  reduce  the  amount  of  protection
and cause serious injures in a collision or
a sudden stop.

Seat belts

4-12

OGAE18E1

Seat and seat belts

4

3. Insert the latch plate (E) into the buckle

(F) until a “click” is heard.

4. Make  sure  the  lap  belt  is  positioned  as

low as possible on the hips and pull the
shoulder  belt  to  adjust  the  slackness  of
the lap belt.

To unfasten

1. Hold  the  latch  plate  (E)  and  push  the

button on the buckle (F).

2. Push  the  button  (G)  on  the  buckle  (C)

using  the  latch  plate  (E)  to  disconnect
the seat belt from the buckle.

3. Retract the seat belt and remove it from

the seat belt guide (A).

Seat belts

4-13

OGAE18E1

Seat and seat belts

4

4. After the seat belt is retracted complete-

ly, insert the latch plate (E) into the up-
per  slit  (H)  and  the  latch  plate  (B)  into
the lower slit (I).

Pregnant women restraint

E00405600077

WARNING

l

Seat  belts  work  for  everyone,  including
pregnant women. Pregnant women should
use  the  available  seat  belts.  This  will  re-
duce  the  likelihood  of  injury  to  both  the
woman and the unborn child. The lap belt
should  be  worn  across  the  thighs  and  as
snug  against  the  hips  as  possible,  but  not
across  the  waist.  Consult  your  doctor  if
you have any additional questions or con-
cerns.

Seat belt pretensioner
system and force limiter
system

E00405700166

The  driver’s  seat  and  front  passenger’s  seat
each have a seat belt equipped with a preten-
sioner system.

Pretensioner system

E00405801135

When  the  ignition  switch  or  the  operation
mode  is  under  the  following  conditions,  if
there is a frontal impact or a side impact (ve-
hicles  equipped  with  SRS  side  airbags  and
SRS curtain airbags) severe enough to injure
the driver and/or front passenger, the preten-
sioner system will retract their respective seat
belts  instantaneously,  thus  maximizing  the
seat belt’s effectiveness.
[Except  for  vehicles  equipped  with  keyless
operation system]
The  ignition  switch  is  in  the  “ON”  or
“START” position.
[Vehicles  equipped  with  keyless  operation
system]
The operation mode is in ON.

WARNING

l

To obtain the best results from your pre-
tensioner  seat  belt,  make  sure  you  have
adjusted  your  seat  correctly  and  wear
your seat belt properly.

CAUTION

l

Installation of audio equipment or repairs in
the vicinity of the pretensioner seat belts or
floor console must be performed in line with
MITSUBISHI  MOTORS  guidelines.  It  is
important  to  do  so  because  the  work  could
affect the pretensioner systems.

l

If you need to scrap the vehicle, please con-
sult  a  MITSUBISHI  MOTORS  Authorized
Service Point.
It is important to do so because unexpected
activation  of  the  pretensioner  seat  belts
could cause injuries.

NOTE

l

The pretensioner seat belts will be activated
if the vehicle suffers a severe frontal impact
or  a  severe  side  impact  (vehicles  equipped
with  SRS  side  airbags  and  SRS  curtain  air-
bags), even if the seat belts are not worn.

l

The  pretensioner  seat  belts  are  designed  to
work  only  once.  After  the  pretensioner  seat
belts  have  been  activated,  we  recommend
you  have  it  replaced  by  a  MITSUBISHI
MOTORS Authorized Service Point.

Pregnant women restraint

4-14

OGAE18E1

Seat and seat belts

4

SRS warning

E00405900243

The same warning lamp/display is shared by
the  SRS  airbags  and  the  pretensioner  seat
belts.
Refer  to  “SRS  warning  lamp/display”  on
page 4-36.

Force limiter system

E00406000209

In the event of a collision, each force limiter
system  will  effectively  absorb  the  load  ap-
plied to the seat belt to minimize the impact
to the passenger.

Child restraint

E00406403464

When  transporting  children  in  your  vehicle,
some type of child restraint system should al-
ways  be  used  according  to  the  size  of  the
child.  This  is  required  by  law  in  most  coun-
tries.
The regulations concerning driving with chil-
dren in the front seat may differ from country
to  country.  You  are  advised  to  comply  with
the relevant regulations.

WARNING

l

When  possible,  put  children  in  the  rear
seat. Accident statistics indicate that chil-
dren  of  all  sizes  and  ages  are  safer  when
properly restrained in the rear seat rather
than in the front seat.

l

Holding a child in your arms is no substi-
tute for a restraint system. Failure to use
a proper restraint system can result in se-
vere or fatal injury to the child.

l

Each child restraint device or fixing is to
be used only by one child.

l

When  attaching  a  child  restraint  system
to  the  rear  seat,  prevent  the  front  seat-
backs  from  touching  the  child  restraint
system.
Otherwise, the child could be seriously in-
jured  in  the  event  of  hard  braking  or  a
collision.

Caution for installing the child

restraint on vehicles with a

front passenger airbag

The label shown here is attached on vehicles
with a front passenger airbag.

WARNING

l

Extreme Hazard!
NEVER  use  a  rearward  facing  child  re-
straint on a seat protected by an ACTIVE
AIRBAG in front of it, DEATH or SERI-
OUS INJURY to the CHILD can occur.

NOTE

l

The labels may be in different positions de-
pending on the vehicle model.

Child restraint

4-15

OGAE18E1

Seat and seat belts

4


Content   ..  3  4  5  6   ..