Mitsubishi Lancer Evolution IX. Manual - part 374
 

  Index      Mitsubishi     Mitsubishi Lancer Evolution IX - service repair manual


Search            


Content   ..  372  373  374  375   ..


Mitsubishi Lancer Evolution IX. Manual - part 374


SIDE AIR DAM

EXTERIOR

51-9

REMOVAL SERVICE POINT
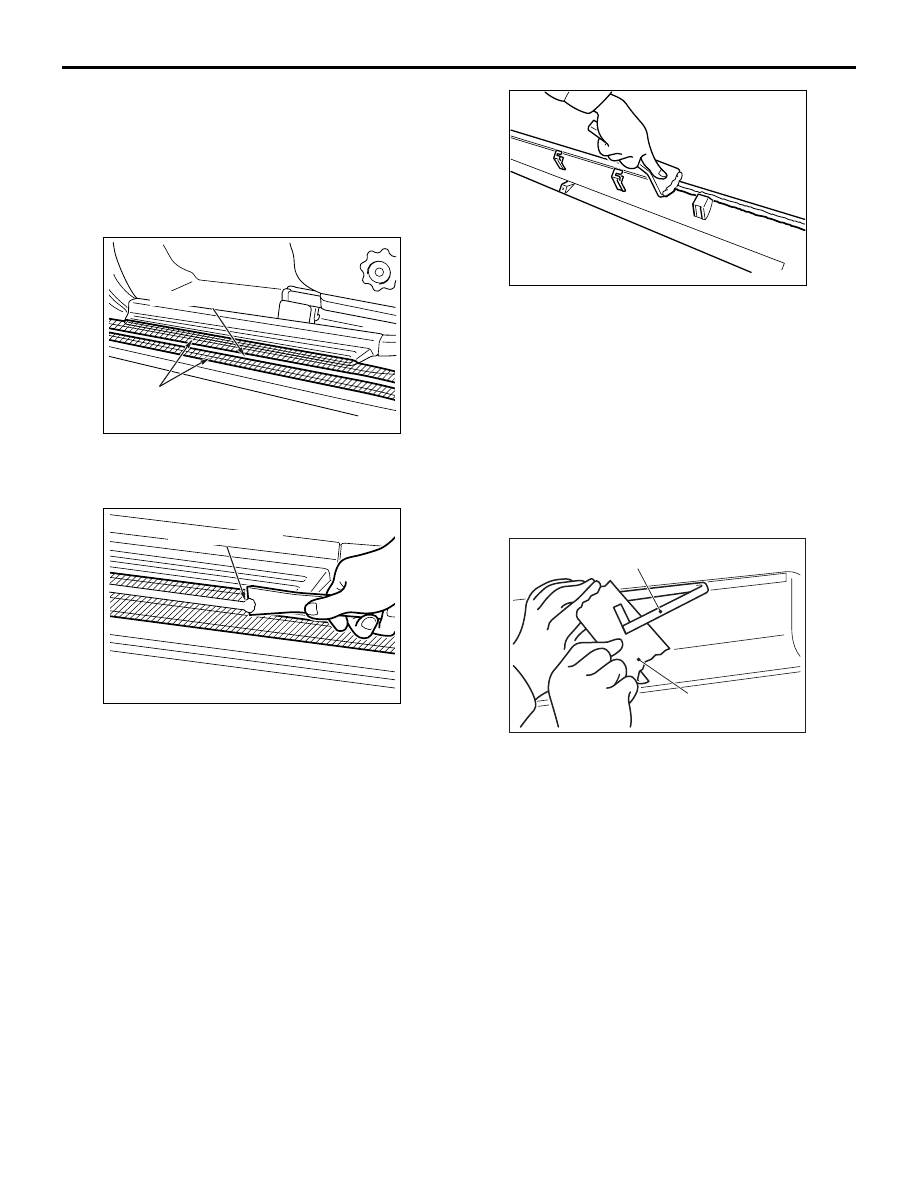
<<A>> SIDE AIR DAM REMOVAL

Gently lift and remove the side air dam. If there is 
any double-sided tape remaining on the side air dam, 
remove according to the following instructions.
<Remove double-sided tape remaining on the body 
surface>

AC304143

AB

Protection tape

Double-sided tape

1. Attach protection tape all the way along the edges 

of the double-sided tape which is still adhering to 
the body. 

AC304144

AB

Double-sided tape

2. Scrape off the double-sided tape with a resin 

spatula as possible.

3. Peel off the protection tape.
4. Wipe the body surface and clean it with a rag 

moistened with isopropyl alcohol.

<Remove double-sided tape remaining on side air 
dam and adhere double-sided tape (when re-using 
side air dam)>

AC304145

1. Scrape off the double-sided tape on the side air 

dam with a resin spatula as possible.

2. Wipe the side sill garnish surface and clean it with 

a rag moistened with isopropyl alcohol.

3. Remove only a small portion of the residual 

adhesive.

4. Adhere the double-sided tape as specified on the 

side air dam.

INSTALLATION SERVICE POINT
>>A<< SIDE AIR DAM INSTALLATION.

AC310126

Backing paper

Adhesive tape

AB

1. Tear off the double-sided tape backing paper.

NOTE: If you attach the adhesive tape to the edge 
of the backing paper, it will be easy to tear off.

2. Install the side air dam.

NOTE: If the double-sided tape is difficult to affix 
in cold temperature, etc., warm the bonding sur-
faces of the body and side air dam to about 40 


60

°

C before affixing the tape.

3. Firmly press in the side air dam.

GARNISHES AND MOULDINGS

EXTERIOR

51-10

GARNISHES AND MOULDINGS

SPECIAL TOOL

M1511000601136

Tool

Number

Name

Use

MB990449

MB990449

Window moulding remover Removal of drip moulding

REMOVAL AND INSTALLATION

M1511004400238

AC310124

Y0622AU

Y0624AU

Y0623AU

Y0729AU

W0740AU

W0772AQ

2

2

2

2

2

1

AB

Section A – A

Section E – E

Section F – F

Section B – B

Section C – C

Section D – D

Clip

Clip

Clip

Clip

Clip

Clip

3

A

A

B

B

1

2

4

N

N

5

N

8

N

7

N

10

N

9

N

6

N

C

C

F

F

E

E

D

D

Removal 
1. Delta outer garnish
Roof drip moulding removal steps 

<<

A

>> >>

C

<< 2. Roof drip moulding

>>

B

<< 3. Front drip moulding clip A

>>

B

<< 4. Front drip moulding clip B

>>

B

<< 5. Front drip moulding clip C

>>

B

<< 6. Rear drip moulding clip

>>

A

<< 7. Drip moulding clip A

>>

A

<< 8. Drip moulding clip B

>>

A

<< 9. Drip moulding clip C

10. Roof drip moulding clip

Roof drip moulding removal steps 

GARNISHES AND MOULDINGS

EXTERIOR

51-11

REMOVAL SERVICE POINT
<<A>> ROOF DRIP MOULDING REMOVAL

CAUTION

If the moulding has become warped, it should not 
be reused.

AC003626AB

MB990449

Use special tool window moulding remover 
(MB990449) to pry out the moulding.

INSTALLATION SERVICE POINTS

>>A<< DRIP MOULDING CLIP C/DRIP 
MOULDING CLIP B/DRIP MOULDING 
CLIP A INSTALLATION

1. The drip moulding clips A, B and C differ 

according to where they are used, so check the 
identification colour before installation.

Applicable location

Identification colour

Drip moulding clip A

Yellow

Drip moulding clip B

Blue

Drip moulding clip C

Milky white

AC003629

Front pillar outer

Portion B

Portion A

AD

2. After installing the clip to the front pillar outer in 

alignment with its portion A, cut from portion B.

>>B<< REAR DRIP MOULDING 
CLIP/FRONT DRIP MOULDING CLIP 
C/FRONT DRIP MOULDING CLIP 
B/FRONT DRIP MOULDING CLIP A 
INSTALLATION

The front drip moulding clips A, B, C and rear drip 
moulding clip differ according to where they are 
used, so check the identification colour before instal-
lation.

Applicable location

Identification colour

Front drip moulding clip A

Orange

Front drip moulding clip B

Purple

Front drip moulding clip C

Blue

Rear drip moulding clip

Grey

>>C<< ROOF DRIP MOULDING 
INSTALLATION

Install the clips to the roof drip moulding before 
installing the moulding to the vehicle body.

DOOR SASH TAPE

EXTERIOR

51-12

DOOR SASH TAPE

SPECIAL TOOL

M1511000601664

Tool

Number

Name

Use

MB990528

MB990528

Stripe tape spatula Installation of door sash tape

DOOR SASH TAPE

REMOVAL AND INSTALLATION

M1511024100176

Pre-removal and Post-installation Operation
• Door Trim Assembly Removal and Installation (Refer to 

GROUP 52A 

P.52A-12

).

• Door Beltline Weatherstrip Inner Removal and Installation 

(Refer to GROUP 42 

P.42-33

).

• Door Opening Weatherstrip Outer Removal and Installa-

tion (Refer to GROUP 42 

P.42-33

).

• Door Window Glass Runchannel Removal and Installation 

(Refer to GROUP 42 

P.42-33

).

• Door Beltline Moulding Removal and Installation (Refer to 

GROUP 42 

P.42-33

).

  Y1897AU 

AC403531

1

2

4

3

N

N

N

N

AB

Removal steps 

<<

A

>>

>>

A

<<

1.

Front door sash tape upper

<<

A

>>

>>

A

<<

2.

Front door sash tape rear

<<

A

>>

>>A<<

3.

Rear door sash tape upper

<<

A

>>

>>

A

<<

4.

Rear door sash tape front


Content   ..  372  373  374  375   ..