Mitsubishi Lancer Evolution IX. Manual - part 281
 

  Index      Mitsubishi     Mitsubishi Lancer Evolution IX - service repair manual


Search            


Content   ..  279  280  281  282   ..


Mitsubishi Lancer Evolution IX. Manual - part 281


HEADLAMP

CHASSIS ELECTRICAL

54A-61

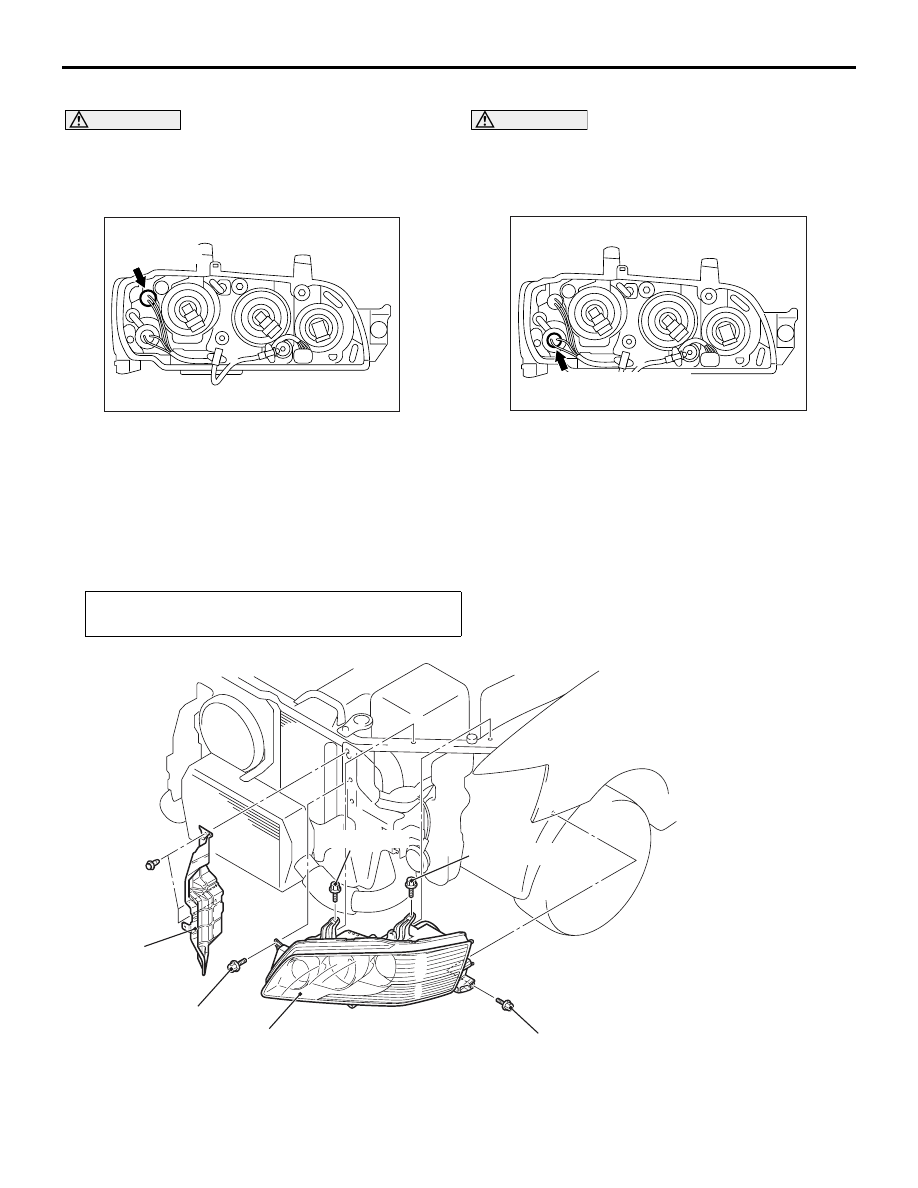
POSITION LAMP BULB

CAUTION

Do not touch the bulb surface bare-handed or 
with dirty gloves. If dirt is attached on surface of 
the bulb, immediately use alcohol or thinner to 
remove dirt, and install the bulb after well dried.

AC310336

Position lamp

AB

1. Remove the splash shield.
2. Screw out the position lamp socket to pull out the 

position lamp bulb.

FRONT TURN-SIGNAL LAMP BULB

CAUTION

Do not touch the bulb surface bare-handed or 
with dirty gloves. If dirt is attached on surface of 
the bulb, immediately use alcohol or thinner to 
remove dirt, and install the bulb after well dried.

AC310337

Front turn-signal lamp

AB

1. Remove the splash shield.
2. Screw out the front turn-signal lamp socket to pull 

out the front turn-signal lamp bulb.

HEADLAMP

REMOVAL AND INSTALLATION

M1542001800299

Post-installation Operation
Headlamp Aiming Adjustment (Refer to 

P.54A-59

).

AC310338AB

2.5± 0.4 N·m

4.9 ± 0.9 N·m 

1

2

4.9 ± 0.9 N·m 

4.9 ± 0.9 N·m 

Removal steps 

1.

Air guide panel

2.

Headlamp assembly

HEADLAMP

CHASSIS ELECTRICAL

54A-62

HEADLAMP LEVELING SWITCH

REMOVAL AND INSTALLATION

M1542013700084

AC310339AB

2

1

Removal steps 

1. Switch panel 
2. Headlamp levelling switch

INSPECTION

M1542011201127

HEADLAMP LEVELING SWITCH RESIST-
ANCE CHECK

AC305186AB

Terminal No.

Switch 
position

Resistance

4 - 6

0

750 ohms

1

1050 ohms

2

1410 ohms

3

1710 ohms

4

2010 ohms

5 - 6

0, 1, 2, 3, 4

2830 ohms 

REAR FOG LAMP

CHASSIS ELECTRICAL

54A-63

REAR FOG LAMP

TROUBLESHOOTING

M1542000701623

If the rear fog lamp switch is turned ON when the 
headlamp is turned ON, the rear fog lamp is switched 
ON and OFF alternatively.
If the headlamp and the rear fog lamp is turned OFF 
at the same time.

The rear fog lamp is controlled by the Smart Wiring 
System (SWS). For Troubleshooting, refer to respec-
tive Groups below.

• Not using SWS monitor: GROUP 54B, SWS 

Troubleshooting 

P.54B-33

.

• Using SWS monitor: GROUP 54C, SWS Trouble-

shooting 

P.54C-20

.

SPECIAL TOOL

M1542000601176

Tool

Number

Name

Use

MB990784

MB990784

Ornament remover Removal of switch panel

REAR FOG LAMP

REMOVAL AND INSTALLATION

M1542009800118

AC310340

2

4

3

1

AB

4.9 ± 0.9 N·m

Removal steps 

1. Rear combination lamp assembly
2. Rear combination lamp body

3. Rear fog lamp socket
4. Bulb

Removal steps (Continued)

REAR FOG LAMP

CHASSIS ELECTRICAL

54A-64

REAR FOG LAMP SWITCH

REMOVAL AND INSTALATION

M1542014200026

AC310880AB

2

1

Removal steps 

1. Switch panel 
2. Rear fog lamp switch

INSPECTION

M1542011201138

REAR FOG LAMP SWITCH CONTINUITY 
CHECK

AC305187AB

Switch position Tester 

connection

Specified 
condition

Pressed

− 6

Less than 2 
ohms

Released

− 6

Open circuit


Content   ..  279  280  281  282   ..