Mazda CX-5 (2022 year). Manual in english - page 38
 

  Index      Manuals     Mazda CX-5 (2022 year). Manual in english


Search            copyright infringement  


Content      ..     36      37      38      39     ..


Mazda CX-5 (2022 year). Manual in english - page 38


your hand until the jack head is
inserted into the jack-up position.
 

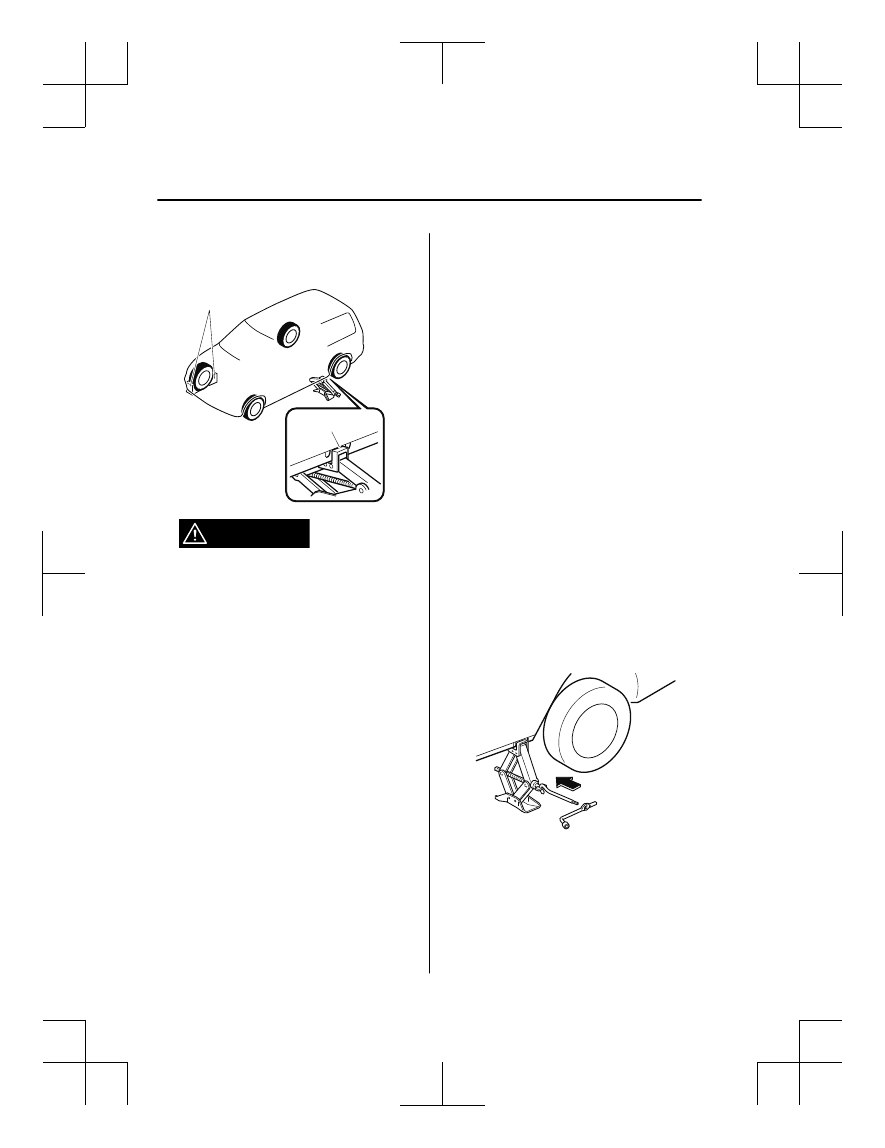
Tire blocks

Jacking position

WARNING

Use only the front and rear jacking
positions recommended in this manual:

Attempting to jack the vehicle in
positions other than those
recommended in this manual is
dangerous. The vehicle could slip off
the jack and seriously injure or even kill
someone. Use only the front and rear
jacking positions recommended in this
manual.

Do not jack up the vehicle in a position
other than the designated jack-up
position or place any objects on or
under the jack:

Jacking up the vehicle in a position
other than the designated jack-up
position or placing objects on or under
the jack is dangerous as it could deform
the vehicle body or the vehicle could fall
off the jack resulting in an accident.

Use only the jack provided with your
Mazda:

Using a jack that is not designed for
your Mazda is dangerous. The vehicle
could slip off the jack and seriously
injure someone.

Never place objects under the jack:

Jacking the vehicle with an object
under the jack is dangerous. The jack
could slip and someone could be
seriously injured by the jack or the
falling vehicle.

NOTE

When raising the jack head into the
jacking position and aligning the
groove in the jack head with the rail
under the vehicle body, the top of the
jack head contacts the vehicle's
underbody without the rail contacting
the bottom of the groove.

6. Insert the jack lever and attach the lug

wrench to tire jack.
 

7. Turn the jack handle clockwise and

raise the vehicle high enough so that
the spare tire can be installed. Before
removing the lug nuts, make sure your

If Trouble Arises

Flat Tire

7-8

Mazda is firmly in position and that it
cannot slip or move.
 

WARNING

Do not jack up the vehicle higher than
is necessary:

Jacking up the vehicle higher than is
necessary is dangerous as it could
destabilize the vehicle resulting in an
accident.

Do not start the engine or shake the
vehicle while it is jacked up:

Starting the engine or shaking the
vehicle while it is jacked up is
dangerous as it could cause the vehicle
to fall off the jack resulting in an
accident.

Never go under the vehicle while it is
jacked up:

Going under the vehicle while it is
jacked up is dangerous as it could result
in death or serious injury if the vehicle
were to fall off the jack.

8. Remove the lug nuts by turning them

counterclockwise; then remove the
wheel and center cap.

Locking Lug Nuts

If your vehicle has Mazda optional
antitheft wheel lug nuts, each wheel will
have one locking lug nut that locks the
wheel and tire, and you must use a special
key to unlock the locking lug nut. This key
is stored in the glove compartment.
Register the key and lug nuts with the lock
manufacturer by filling out the card
provided in the glove compartment and
mailing it in the accompanying envelope.
If you lose this key, consult an Authorized
Mazda Dealer or use the lock
manufacturer's order form, which is with
the registration card.
Accessory wheel locks cannot be used on
steel wheels. This includes situations when
the spare tire is installed. When installing
a spare tire, original lug nut must be used
in place of the wheel lock.

Special key

Antitheft lug nut

To remove an antitheft lug nut

1. Obtain the special key for the antitheft

lug nut.

2. Place the special key on top of the

antitheft lug nut, and be sure to hold
the key square to it. If you hold the key
at an angle, you may damage both key
and nut. Do not use a power impact
wrench.

3. Place the lug wrench on top of the key

and apply pressure. Turn the wrench
counterclockwise.

If Trouble Arises

Flat Tire

7-9

To install the antitheft lug nut

1. Place the special key on top of the nut,

and be sure to hold the key square to it.
If you hold the key at an angle, you
may damage both key and nut. Do not
use a power impact wrench.

2. Place the lug wrench on top of the

special key, apply pressure, and turn it
clockwise.

Nut tightening torque

N

m (kgf

m, ft

lbf)

108

147 (12

14,

80

108)

Mounting the Spare Tire

1. Remove dirt and grime from the

mounting surfaces of the wheel and
hub, including the hub bolts, with a
cloth.
 

WARNING

Make sure the mounting surfaces of the
wheel, hub and lug nuts are clean
before changing or replacing tires:

When changing or replacing a tire, not
removing dirt and grime from the
mounting surfaces of the wheel, hub
and hub bolts is dangerous. The lug
nuts could loosen while driving and
cause the tire to come off, resulting in
an accident.

2. Mount the spare tire.
3. Install the lug nuts with the beveled

edge inward; tighten them by hand.
 

WARNING

Do not apply oil or grease to lug nuts
and bolts and do not tighten the lug
nuts beyond the recommended
tightening torque:

Applying oil or grease to lug nuts and
bolts is dangerous. The lug nuts could
loosen while driving and cause the tire
to come off, resulting in an accident. In
addition, lug nuts and bolts could be
damaged if tightened more than
necessary.

4. Turn the lug wrench counterclockwise

and lower the vehicle.

If Trouble Arises

Flat Tire

7-10

5. Use the lug wrench to tighten the nuts

in the order shown.
 

If you are unsure of how tight the nuts
should be, have them inspected at an
Authorized Mazda Dealer.

Nut tightening torque

N

m (kgf

m, ft

lbf)

108

147 (12

14,

80

108)

WARNING

Always securely and correctly tighten
the lug nuts:

Improperly or loosely tightened lug
nuts are dangerous. The wheel could
wobble or come off. This could result in
loss of vehicle control and cause a
serious accident.

Be sure to reinstall the same nuts you
removed or replace them with metric
nuts of the same configuration:

Because the wheel studs and lug nuts
on your Mazda have metric threads,
using a non-metric nut is dangerous.
On a metric stud, it would not secure
the wheel and would damage the stud,
which could cause the wheel to slip off
and cause an accident.

6. Remove the center cap by tapping it

from the backside of the wheel using
the lug wrench.

7. Store the damaged tire, using the flat

tire hold-down bolt to hold it in place.

(With sub-woofer)


Flat tire 
hold-down bolt

Sub-woofer

(Without sub-woofer)


Flat tire 
hold-down bolt

If Trouble Arises

Flat Tire

7-11

8. Place the luggage board on the

damaged tire.
 

Luggage board

9. Remove the tire blocks and store the

tools and jack.

10. Check the inflation pressure. Refer to

Tires on page 9-7.

11. Have the flat tire repaired or replaced

as soon as possible.

WARNING

Do not drive with any tires that have
incorrect air pressure:

Driving on tires with incorrect air pressure
is dangerous. Tires with incorrect pressure
could affect handling and result in an
accident. When you check the regular tires'
air pressure, check the spare tire, too.

NOTE

To prevent the jack and tool from rattling,
store them properly.

If Trouble Arises

Flat Tire

7-12

Jump-Starting

Jump-starting is dangerous if done incorrectly. So follow the procedure carefully. If you feel
unsure about jump-starting, we strongly recommend that you have a competent service
technician do the work.

WARNING

 Follow These Precautions Carefully:

To ensure safe and correct handling of the battery, read the following precautions carefully
before using the battery or inspecting it.

 Keep flames and sparks away from open battery cells and do not allow metal tools to

contact the positive ( ) or negative ( ) terminal of the battery when working near a battery.
Do not allow the positive ( ) terminal to contact the vehicle body:

Flames and sparks near open battery cells are dangerous. Hydrogen gas, produced during
normal battery operation, could ignite and cause the battery to explode. An exploding battery
can cause serious burns and injuries. Keep all flames including cigarettes and sparks away
from open battery cells.

 Keep all flames and sparks away from open battery cells because hydrogen gas is

produced from open battery cells while charging the battery or adding battery fluid:

Flames and sparks near open battery cells are dangerous. Hydrogen gas, produced during
normal battery operation, could ignite and cause the battery to explode. An exploding battery
can cause serious burns and injuries. Keep all flames including cigarettes and sparks away
from open battery cells.

Do not jump-start a frozen battery or one with a low fluid level:

Jump-starting a frozen battery or one with a low fluid level is dangerous. It may rupture or
explode, causing serious injury.

Connect the negative cable to a good ground point away from the battery:

Connecting the end of the second jumper cable to the negative ( ) terminal of the discharged
battery is dangerous.
A spark could cause the gas around the battery to explode and injure someone.

If Trouble Arises

Battery Runs Out

7-13

Route the jumper cables away from parts that will be moving:

Connecting a jumper cable near or to moving parts (cooling fans, belts) is dangerous. The
cable could get caught when the engine starts and cause serious injury.

CAUTION

Use only a 12 V booster system. You can damage a 12 V starter, ignition system, and other
electrical parts beyond repair with a 24 V power supply (two 12 V batteries in series or a 24 V
motor generator set).

1. Move the booster vehicle so that its battery is as close as possible to your vehicle's

battery.

2. Make sure that the power such as for the headlights and air conditioner is turned off.
3. Remove the battery cover.

4. Turn off the booster vehicle's engine and connect the jumper cables in the following

order.
Make sure that the jumper cables are securely connected so that they do not disconnect
due to engine vibrations.

1st lead

Positive (+) terminal on the discharged battery
Positive (+) terminal on booster vehicle's battery

2nd lead

Negative (-) terminal on booster vehicle's battery

If Trouble Arises

Battery Runs Out

7-14

Location shown in the figure (do not connect to the negative (-) terminal of the

battery)

Booster battery

Discharged battery

Jumper cables

Connect cables in numerical order 
and disconnect in reverse order.

5. Start the booster vehicle's engine and rev the engine.
6. Start the engine of your vehicle. Run the engines for about 3 minutes to temporarily

charge the battery of your vehicle.

7. Disconnect the jumper cables in the reverse order of their connection.
8. Install the battery cover.
9. Have your vehicle inspected by an Authorized Mazda Dealer as soon as possible.

NOTE

Verify that the covers are securely installed.

If Trouble Arises

Battery Runs Out

7-15

Starting a Flooded Engine

If the engine fails to start, it may be
flooded (excessive fuel in the engine).
 
Follow this procedure:
 
1. If the engine does not start within 5

seconds on the first try, wait 10
seconds and try again.

2. Make sure the parking brake is on.
3. Depress the accelerator all the way and

hold it there.

4. Depress the brake pedal, then press the

push button start. If the engine starts,
release the accelerator immediately
because the engine will suddenly rev
up.

5. If the engine fails to start, crank it

without depressing the accelerator.

 
If the engine still does not start using the
previous procedure, have your vehicle
inspected by an Authorized Mazda Dealer.

Push-Starting

Do not push-start your Mazda.

WARNING

Never tow a vehicle to start it:

Towing a vehicle to start it is dangerous.
The vehicle being towed could surge
forward when its engine starts, causing the
2 vehicles to collide. The occupants could
be injured.

NOTE

You cannot start a vehicle with an
automatic transaxle by pushing it.

If Trouble Arises

Emergency Starting

7-16

Overheating

If the temperature gauge indicates
overheating or the high engine coolant
temperature warning light turns on, the
vehicle loses power, or you hear a loud
knocking or pinging noise, the engine is
probably too hot.

WARNING

Pull over to a safe location, then switch

the ignition off and make sure the fan is
not running before attempting to work
near the cooling fan:

Working near the cooling fan when it is
running is dangerous. The fan could
continue running indefinitely even if the
engine has stopped and the engine
compartment temperature is high. You
could be hit by the fan and seriously
injured.

Do not remove either cooling

system cap when the engine and radiator
are hot:

When the engine and radiator are hot,
scalding coolant and steam may shoot out
under pressure and cause serious injury.

Open the hood ONLY after steam is no
longer escaping from the engine:

Steam from an overheated engine is
dangerous. The escaping steam could
seriously burn you.

If the temperature gauge indicates
overheating or the high engine coolant
temperature warning light turns on:
 
1. Drive safely to the side of the road and

park off the right-of-way.

2. Shift into park (P).
3. Apply the parking brake.
4. Turn off the air conditioner.
5. Check whether coolant or steam is

escaping from the engine
compartment.
 

If steam is coming from the engine
compartment:

Do not go near the front of the vehicle.
Stop the engine.
Wait until the steam dissipates, then
open the hood and start the engine.
 

If neither coolant nor steam is
escaping:

Open the hood and idle the engine
until it cools.

CAUTION

If the cooling fan does not operate
while the engine is running, the engine
temperature will increase. Stop the
engine and call an Authorized Mazda
Dealer.

6. Make sure the cooling fan is operating,

then turn off the engine after the
temperature has decreased.

7. When cool, check the coolant level.

If Trouble Arises

Overheating

7-17

If it is low, look for coolant leaks from
the radiator and hoses.


If you find a leak or other damage, or if
coolant is still leaking:

Stop the engine and call an Authorized
Mazda Dealer.

SKYACTIV-G 2.5

Cooling system 
cap

Coolant 
reservoir

Cooling fan

SKYACTIV-G 2.5T

Cooling system cap

Coolant reservoir

Cooling fan

If you find no problems, the engine is
cool, and no leaks are obvious:

Carefully add coolant as required (page
6-22).

CAUTION

If the engine continues to overheat or
frequently overheats, have the cooling
system inspected. The engine could be
seriously damaged unless repairs are
made. Consult an Authorized Mazda
Dealer.

If Trouble Arises

Overheating

7-18

Towing Description

We recommend that towing be done only
by an Authorized Mazda Dealer or a
commercial tow-truck service.
 
Proper lifting and towing are necessary to
prevent damage to the vehicle. Particularly
when towing an AWD vehicle, where all
the wheels are connected to the drive train,
proper transporting of the vehicle is
absolutely essential to avoid damaging the
drive system. Government and local laws
must be followed.

Wheel dollies

 
A towed FWD vehicle should have its
drive wheels (front wheels) off the ground.
If excessive damage or other conditions
prevent this, use wheel dollies.
 
When towing a FWD vehicle with the rear
wheels on the ground, release the parking
brake.
Refer to Electric Parking Brake (EPB) on
page 4-95.
 
A towed AWD vehicle must have all its
wheels off the ground.

WARNING

Always tow an AWD vehicle with all four
wheels off the ground:

Towing an AWD vehicle with either the
front or rear wheels on the ground is
dangerous as the drive train could be
damaged, or the vehicle could trail away
from the tow truck and cause an accident.
If the drive train has been damaged,
transport the vehicle on a flatbed truck.

CAUTION

Do not tow the vehicle pointed backward
with driving wheels on the ground. This
may cause internal damage to the
transaxle.

If Trouble Arises

Emergency Towing

7-19

Do not tow with sling-type equipment.
This could damage your vehicle. Use
wheel-lift or flatbed equipment.

If the parking brake cannot be released
when towing the vehicle, transport the
vehicle with all front and rear wheels
raised off the ground as shown in the
figure. If the vehicle is towed without
raising the wheels off the ground, the
brake system could be damaged.

Wheel dollies

Tiedown Hooks

*

CAUTION

Do not use the front and rear tiedown
eyelets for towing the vehicle.
They have been designed only for securing
the vehicle to a transport vessel during
shipping.
Using the eyelets for any other purpose
could result in the vehicle being damaged.

Tiedown Hooks

1. Remove the tiedown eyelet and the lug

wrench from the luggage compartment
(page 7-3).

2. Wrap a flathead screwdriver or similar

tool with a soft cloth to prevent
damage to a painted bumper, and open
the cap located on the front or rear
bumper.

Front

If Trouble Arises

Emergency Towing

7-20

*Some models.

Rear

Jack lever

CAUTION

Do not use excessive force as it may
damage the cap or scratch the painted
bumper surface.

NOTE

Remove the cap completely and store it
so as not to lose it.

3. Securely install the tiedown eyelet

using the lug wrench.

Front

Lug wrench

Tiedown 
eyelet

Rear

Tiedown eyelet

Lug wrench

4. Hook the tying rope to the tiedown

eyelet.

CAUTION

If the tiedown eyelet is not securely
tightened, it may loosen or disengage
from the bumper when tying the
vehicle. Make sure that the tiedown
eyelet is securely tightened to the
bumper.

If Trouble Arises

Emergency Towing

7-21

If a Warning Light Turns On or Flashes

If any warning light turns on/flashes, take appropriate action for each light. There is no
problem if the light turns off, however if the light does not turn off or turns on/flashes again,
consult an Authorized Mazda Dealer.
The details for some warnings can be viewed on the center display or multi-information
display (Type A/Type B) in the instrument cluster.

Center display

Mazda Connect (Type A)

1. If the warning light is turned on, select the   icon on the home screen to display the

Applications screen.

2. Select “Vehicle Status Monitor”.
3. Select “Warning Guidance” to display the current warnings.
4. Select the applicable warning to view the warning details.

Mazda Connect (Type B)

1. Select “Information” on the home screen.
2. Select “Vehicle Status Monitor”.
3. Select the applicable warning to view the warning details.

NOTE

You can also display the currently occurring warning by sliding the commander knob to the
left while on the home screen of the center display.

Multi-information display (Type A/Type B)

1. Press the INFO switch on the steering switch to display the warning indication screen.

Refer to Multi-information Display (Type A) on page 4-13.
Refer to Multi-information Display (Type B) on page 4-31.

Stop Vehicle in Safe Place Immediately

If any of the following warning lights turns on, the system may have a malfunction. Stop the
vehicle in a safe place immediately and contact an Authorized Mazda Dealer.

If Trouble Arises

Warning/Indicator Lights and Warning Sounds

7-22

Signal

Warning

Brake System Warning

Indication/Warning

Light

This warning has the following functions:

Parking brake warning/Warning light inspection

The light illuminates when the parking brake is applied with the ignition switched to
START or ON. It turns off when the parking brake is released.

When the light turns on

If the brake system warning light remains turned on even though the parking brake is
released, the brake fluid may be low or there could be a problem with the brake sys

tem. Park the vehicle in a safe place immediately and contact an Authorized Mazda
Dealer.

When the light is flashing

The light flashes if the Electric Parking Brake (EPB) has a malfunction.
If the light remains flashing even if the Electric Parking Brake (EPB) switch is oper

ated, consult an Authorized Mazda Dealer as soon as possible.

WARNING

Do not drive with the brake system warning light illuminated. Contact an Authorized
Mazda Dealer to have the brakes inspected as soon as possible:

Driving with the brake system warning light illuminated is dangerous. It indicates that
your brakes may not work at all or that they could completely fail at any time. If this
light remains illuminated, after checking that the parking brake is fully released, have
the brakes inspected immediately.

CAUTION

In addition, the effectiveness of the braking may diminish so you may need to depress
the brake pedal more strongly than normal to stop the vehicle.

Electronic Brake Force

Distribution System

Warning

If the electronic brake force distribution control unit determines that some compo

nents are operating incorrectly, the control unit may illuminate the brake system
warning light and the ABS warning light simultaneously. The problem is likely to be
the electronic brake force distribution system.

WARNING

Do not drive with both the ABS warning light and brake warning light illuminated.
Have the vehicle towed to an Authorized Mazda Dealer to have the brakes inspected as
soon as possible:

Driving when the brake system warning light and ABS warning light are illuminated
simultaneously is dangerous.
When both lights are illuminated, the rear wheels could lock more quickly in an emer‐
gency stop than under normal circumstances.

If Trouble Arises

Warning/Indicator Lights and Warning Sounds

7-23


Content      ..     36      37      38      39     ..