Mazda B3000 (2002 year). Instruction - part 13
 

  Index      Mazda     Mazda B3000 - instruction 2002 year in english


Search            


Content   ..  11  12  13  14   ..


Mazda B3000 (2002 year). Instruction - part 13


Location of the spare tire and tools

The spare tire and tools for your vehicle are stowed in the following
locations:

Tool

Location

Spare tire

Under the vehicle, just forward of
the rear bumper

Jack, jack handle, wheel nut

wrench

Regular Cab: behind seats and
underneath the jack and tools
cover

SuperCab: stowed in the passenger
side rear cab compartment or
behind the jump seat in a separate
tool bag

Four-door models: stowed behind
the front seats, between jump
seats and underneath jack and
tools cover.

Key, spare tire lock (if equipped)

In the glove box

Removing the spare tire

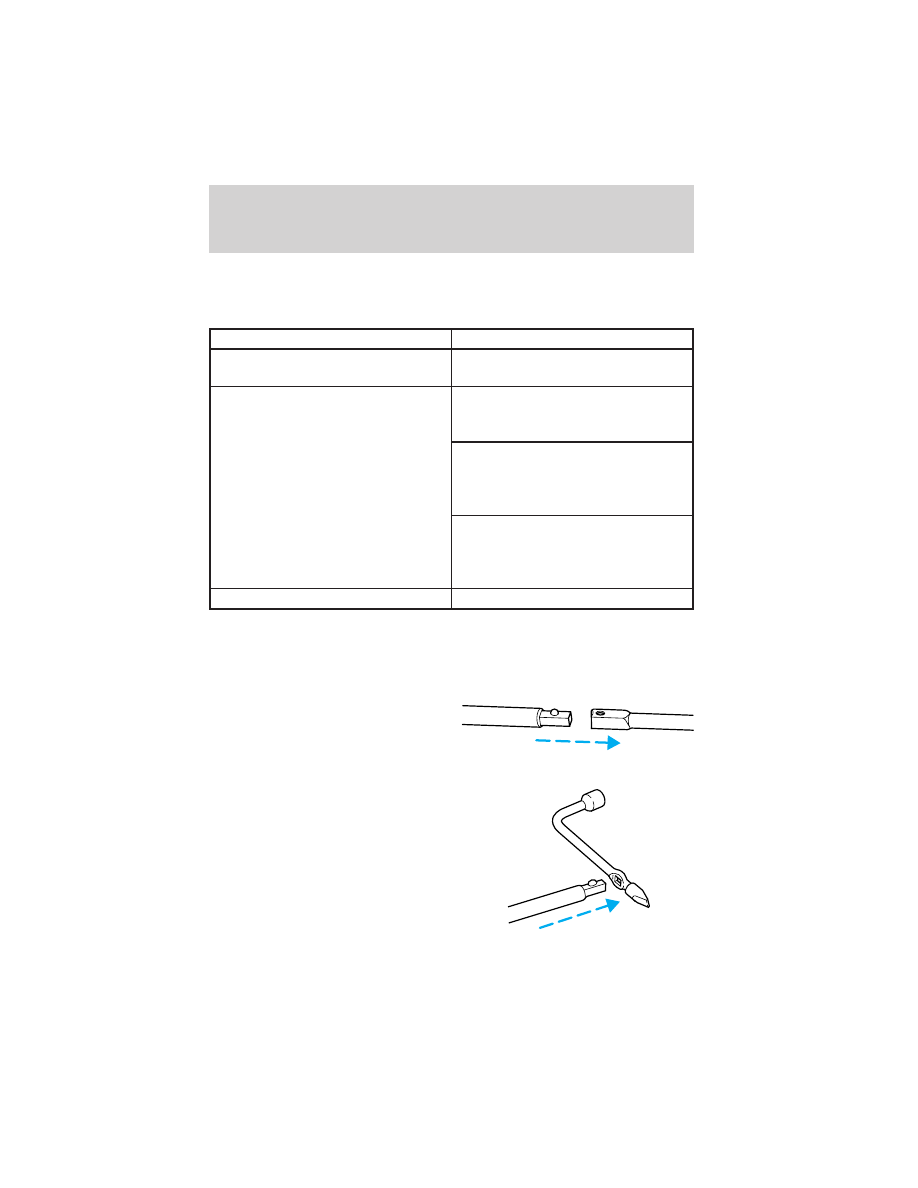
1. Assemble the jack handle to the lug wrench as shown in the

illustrations.

When connecting the jack handle, assemble the following:
• one handle extension and one

typical extension. To assemble,
slide parts together. To
disconnect, depress button and
pull apart.

• one wheel nut wrench. Depress

button and slide together.

Roadside Emergencies

196

2. If equipped, unlock and remove

the spare tire carrier lock from
the rear access hole located just
above the rear bumper and
below the tailgate.

3. Insert the straight end of the

jack handle into the rear access
hole located just above the rear
bumper and below the tailgate.

Forward motion will stop and
resistance to turning will be felt
when properly engaged.

4. Turn the handle

counterclockwise until tire is
lowered to the ground and the cable is slightly slack.

5. Remove the retainer from the spare tire.

Stowing the spare tire

1. Lay the tire on the ground with the valve stem facing up.

2. Install the retainer through the

wheel center and slide the
wheel under the vehicle.

3. Turn the spare handle clockwise

until the tire is raised to its
original position underneath the
vehicle. The spare handle
ratchets when the tire is raised
to the stowed position. It will
not allow you to overtighten.

Roadside Emergencies

197

4. If your vehicle is equipped with P265/75 R15 AT tires, do not stow a

flat or inflated full size spare tire in the spare tire carrier. The flat
full size tire should be stowed and tied down in the pickup box bed
until it can be repaired.

5. If removed, install the spare tire carrier lock on the access hole

above the bumper.

Tire change procedure

WARNING: When one of the front wheels is off the ground, the
transmission alone will not prevent the vehicle from moving or
slipping off the jack, even if the vehicle is in P (Park)
(automatic transmission) or R (Reverse) (manual
transmission).

WARNING: To prevent the vehicle from moving when you
change a tire, be sure the parking brake is set, then block (in
both directions) the wheel that is diagonally opposite (other
side and end of the vehicle) to the tire being changed.

WARNING: If the vehicle slips off the jack, you or someone
else could be seriously injured.

1. Park on a level surface, activate

hazard flashers and place
gearshift lever in P (Park)
(automatic transmission) or 1
(First) (manual transmission).

2. Set the parking brake and turn

engine OFF.

Roadside Emergencies

198

3. Block the diagonally opposite

wheel.

4. Insert tapered end of the lug

wrench behind hub caps and
twist them off.

5. Loosen each wheel lug nut

one-half turn counterclockwise
but do not remove them until
the wheel is raised off the
ground.

6. Position the jack according to

the following guides and turn
the jack handle clockwise until the tire is a maximum of 25 mm (1
inch) off the ground.

• Front

Roadside Emergencies

199

• Rear

WARNING: To lessen the risk
of personal injury, do not put
any part of your body under
the vehicle while changing a
tire. Do not start the engine
when your vehicle is on the
jack. The jack is only meant
for changing the tire.

Never use the differential as a jacking point. It is too easy for the
vehicle to tilt or fall and you can be injured.

7. Remove the wheel lug nuts with the lug wrench.

8. Replace the flat tire with the spare tire, making sure the valve stem

is facing outward. Reinstall the lug nuts until the wheel is snug
against the hub. Do not fully tighten the lug nuts until the wheel has
been lowered.

9. Lower the wheel by turning the jack handle counterclockwise.

Roadside Emergencies

200

10. Remove the jack and fully

tighten the lug nuts in the order
shown.

11. Stow the flat tire. Refer to

Stowing the spare tire.

12. Stow the jack and lug wrench.

Make sure the jack is fastened
so it does not rattle when you
drive.

13. Unblock the wheels.

JUMP STARTING YOUR VEHICLE

WARNING: The gases around the battery can explode if
exposed to flames, sparks, or lit cigarettes. An explosion could
result in injury or vehicle damage.

WARNING: Batteries contain sulfuric acid which can burn skin,
eyes and clothing, if contacted.

Do not attempt to push-start your vehicle. Automatic
transmissions do not have push-start capability; also, the
catalytic converter may become damaged.

Preparing your vehicle

When the battery is disconnected or a new battery is installed, the
transmission must relearn its shift strategy. As a result, the transmission
may have firm and/or soft shifts. This operation is considered normal and
will not affect function or durability of the transmission. Over time, the
adaptive learning process will fully update transmission operation.

1. Use only a 12–volt supply to start your vehicle.

2. Do not disconnect the battery of the disabled vehicle as this could

damage the vehicle’s electrical system.

3. Park the booster vehicle close to the hood of the disabled vehicle

making sure the two vehicles do not touch. Set the parking brake on
both vehicles and stay clear of the engine cooling fan and other
moving parts.

1

4

3

2

5

Roadside Emergencies

201

4. Check all battery terminals and remove any excessive corrosion

before you attach the battery cables. Ensure that vent caps are tight
and level.

5. Turn the heater fan on in both vehicles to protect any electrical

surges. Turn all other accessories off.

Connecting the jumper cables

1. Connect the positive (+) booster cable to the positive (+) terminal of

the discharged battery.

Note: In the illustrations, lightning bolts are used to designate the
assisting (boosting) battery.

2. Connect the other end of the positive (+) cable to the positive (+)

terminal of the assisting battery.

+

+

+

+

Roadside Emergencies

202

3. Connect the negative (-) cable to the negative (-) terminal of the

assisting battery.

4. Make the final connection of the negative (-) cable to an exposed

metal part of the stalled vehicle’s engine, away from the battery and
the carburetor/fuel injection system. Do not use fuel lines, engine
rocker covers or the intake manifold as grounding points.

WARNING: Do not connect the end of the second cable to the
negative (-) terminal of the battery to be jumped. A spark may
cause an explosion of the gases that surround the battery.

5. Ensure that the cables are clear of fan blades, belts, moving parts of

both engines, or any fuel delivery system parts.

+

+

+

+

Roadside Emergencies

203

Jump starting

1. Start the engine of the booster vehicle and run the engine at

moderately increased speed.

2. Start the engine of the disabled vehicle.

3. Once the disabled vehicle has been started, run both engines for an

additional three minutes before disconnecting the jumper cables.

Removing the jumper cables

Remove the jumper cables in the reverse order that they were
connected.

1. Remove the jumper cable from the ground metal surface.

Note: In the illustrations, lightning bolts are used to designate the
assisting (boosting) battery.

2. Remove the jumper cable on the negative (-) connection of the

booster vehicle’s battery.

+

+

+

+

Roadside Emergencies

204

3. Remove the jumper cable from the positive (+) terminal of the

booster vehicle’s battery.

4. Remove the jumper cable from the positive (+) terminal of the

disabled vehicle’s battery.

After the disabled vehicle has been started and the jumper cables
removed, allow it to idle for several minutes so the engine computer can
relearn its idle conditions.

+

+

+

+

Roadside Emergencies

205

WRECKER TOWING

If you need to have your vehicle towed, contact a professional towing
service or, if you are a member, your roadside assistance center.

It is recommended that your vehicle be towed with a wheel lift or flatbed
equipment. Do not tow with a slingbelt. Mazda Motor Corporation has
not approved a slingbelt towing procedure.

On 4x2 vehicles, it is acceptable to tow the vehicle with the front wheels
on the ground and the rear wheels off the ground.

On 4x4 vehicles, it is recommended that your vehicle be towed with a
wheel lift and dollies or flatbed equipment with all the wheels off the
ground.

If the vehicle is towed by other means or incorrectly, vehicle
damage may occur.

Mazda Motor Corporation produces a towing manual for all authorized
tow truck operators. Have your tow truck operator refer to this manual
for proper hook-up and towing procedures for your vehicle.

Roadside Emergencies

206

CUSTOMER ASSISTANCE (U.S.A.)

Your complete and permanent satisfaction is our business. We are here to
serve you. All Authorized Mazda Dealers have the knowledge and the
tools to keep your Mazda vehicle in top condition.

If you have any questions or recommendations for improvement
regarding the service of your Mazda vehicle or servicing by Mazda Dealer
personnel, we recommend that you take the following steps:

STEP 1: Contact Your Mazda Dealer

Discuss the matter with an Authorized Mazda Dealer. This is the quickest
and best way to address the issue. If your concern has not been resolved
by the CUSTOMER RELATIONS, SALES, SERVICE, or PARTS
MANAGER, then please contact the GENERAL MANAGER of the
dealership or the OWNER.

STEP 2: Call the Mazda National Customer Assistance Center

If for any reason you feel the need for further assistance after contacting
your dealership management, call Mazda North American Operations’
Customer Assistance Center toll-free at: 1 (800) 222–5500

In order to serve you efficiently and effectively, please help us by
providing the following information:

1. Your name, address, and telephone number

2. Year and model of vehicle

3. Vehicle Identification Number (17 digits, noted on your registration

or title or located on the upper driver’s side corner of the dash)

4. Purchase date and current mileage

5. Your dealer’s name and location

6. Your question(s)

If you would like to write a letter, please address it to the following,
Attn: Customer Assistance.

Mazda North American Operations
7755 Irvine Center Drive
Irvine, CA 92618–2922
P.O. Box 19734
Irvine, CA 92623–9734

This way, we can be sure to respond to you as efficiently as possible.
That is our goal.

If you live outside the U.S.A., please contact your nearest Mazda
Distributor.

Customer Assistance

207

CUSTOMER ASSISTANCE (CANADA)

Your complete and permanent satisfaction is our business. We are here to
serve you. All Authorized Mazda Dealers have the knowledge and the
tools to keep your Mazda vehicle in top condition.

In our experience, any questions, problems or complaints regarding the
operation of your Mazda or any other general service transactions are
most effectively resolved by your dealer. If the cause of your
dissatifaction cannot adequately be addressed by normal dealership
procedures, we recommend that you take the following steps:

STEP 1: Contact Your Mazda Dealer

Discuss the matter with a member of dealership management. If the
Service Manager has already reviewed your concerns, contact the owner
of the dealership or its General Manager

STEP 2: Call the Mazda Regional Office

If you feel that you still require assistance, ask the dealer Service
Manager to arrange for you to meet the local Mazda Service
Representative. If more expedient, contact Mazda Canada Inc. Regional
Office nearest you for such arrangements.

STEP 2: Contact the Mazda Customer Relations Department

If still not substantially satisfied, contact the Customer Relations
Department, Mazda Canada Inc., 305 Milner Avenue, Suite 400
Scarborough, Ontario M1B 3V4 Canada TEL: 1 (800) 263–4680.

Provide the Department with the following information:

1. Your name, address, and telephone number

2. Year and model of vehicle

3. Vehicle Identification Number (VIN). Refer to the “Vehicle

Identification Labels” page of section 10 of this manual for the
location of the VIN.

4. Purchase date.

5. Present odometer reading.

6. Your dealer’s name and location

7. The nature of your problem and/or cause of dissatisfaction.

The Department, in cooperation with the local Mazda Service
Representative, will review the case to determine if everything possible
has been done to ensure your satisfaction.

Customer Assistance

208

Please recognize that the resolution of service problems in most cases
requires the use of your Mazda dealer’s service facilities. personnel and
equipment. We urge you to follow the above three steps in sequence
therefore for most effective results.

MEDIATION/ARBITRATION PROGRAM

Occasionally a customer concern cannot be resolved through Mazda’s
Customer Satisfaction Program. If after exhausting procedures in this
manual, your concern is still not resolved, you have another option.

Mazda Canada Inc. participates in an arbitration program administered
by the Canadian Motor Vehicle Arbitration Plan (CAMVAP). CAMVAP will
advise you about how your concern may be reviewed and resolved by an
independent third party through binding arbitration.

Your complete satisfaction is the goal of Mazda Canada Inc. and our
dealers. Mazda’s participation in CAMVAP makes a valuable contribution
to our achieving that goal. There is no charge for using CAMVAP.
CAMVAP results are fast, fair and final as the award is binding on both
you and Mazda Canada Inc.

CANADIAN MOTOR VEHICLE ARBITRATION PLAN (CAMVAP)

If a specific item of concern arises, where a solution cannot be reached
between an owner, Mazda, and/or one of it’s dealers (that all parties
cannot agree upon), the owner may wish to use the services offered by
the Canadian Motor Vehicle Arbitration Plan (CAMVAP).

CAMVAP uses the services of Provincial Administrators to assist
consumers in scheduling and preparing for their arbitration hearings.
However, before you can proceed with CAMVAP you must follow your
Mazda dispute resolution process as outlined previously.

CAMVAP is fully implemented in all provinces and territories. Consumers
wishing to obtain further information about the Program can obtain an
information booklet from their dealer, the Provincial Administrator of the
Canadian Motor Vehicle Arbitration Plan Office at the following address
or telephone number.

Canadian Motor Vehicle Arbitration Office
235 Yorkland Boulevard, Suite 300
North York, Ontario
M2J 4Y8
1 (800) 207–0685

Customer Assistance

209

Provincial Administrators may be reached locally as listed below:

Province/Territory

CAMVAP Number

British Columbia & Yukon

Territories

(604) 681–0312

Alberta & Northwest Territories

(403) 426–0650

Saskatchewan

(306) 352–9259

Manitoba

(204) 942–7166

Ontario

(416) 596–8824

Atlantic Canada

(902) 422–5413

Quebec

(418) 649–1330

REGIONAL OFFICES

Regional Offices

Areas Covered

Mazda Canada Inc.

Western Region

8171 Ackroyd Road

Suite 2000

Richmond, B.C.

V6X 3K1

(604) 303–5670

Alberta,

British Columbia,

Manitoba,

Saskatchewan,

Yukon

Mazda Canada Inc.

Central/Atlantic Region

305 Milner Avenue

Suite 400

Scarborough, Ontario.

M1B 3V4

1 (800) 263–4680

Ontario,

New Brunswick,

Nova Scotia,

Prince Edward Island,

Newfoundland

Mazda Canada Inc.

Quebec Region

6111 Route Trans

Canadienne

Pointe Claire, Quebec

H9R 5A5

(514) 694–6390

Quebec

Customer Assistance

210

CUSTOMER ASSISTANCE (PUERTO RICO)

Your complete and permanent satisfaction is our business. That is why all
Authorized Mazda Dealers have the knowledge and the tools to keep
your Mazda vehicle in top condition.

If you have any questions or recommendations for improvement
regarding the service of your Mazda vehicle or servicing by Mazda Dealer
personnel, we recommend that you take the following steps:

STEP 1

Discuss the matter with an Authorized Mazda Dealer. This is the quickest
and best way to address the issue. If your concern has not been resolved
by the CUSTOMER RELATIONS, SALES, SERVICE, or PARTS
MANAGER, then please contact the GENERAL MANAGER of the
dealership or the OWNER.

STEP 2

If, after following STEP 1, you feel the need for further assistance, please
contact your area’s Mazda representative (Indicated on the next page).

Please help us by providing the following information:

1. Your name, address, and telephone number

2. Year and model of vehicle

3. Vehicle Identification Number (17 digits, noted on your registration

or title or located on the upper driver’s side corner of the dash)

4. Purchase date and current mileage

5. Your dealer’s name and location

6. Your question(s)

If you would like to write a letter, please address it to the following,
Attn: Customer Assistance

Plaza Motors Corp.

Mazda de Puerto Rico
P.O. Box 362722
San Juan, Puerto Rico
00936–2722
Tel: (787) 788–9300

This way, we can be sure to respond to you as efficiently as possible.
That is our goal.

If you live outside the U.S.A., please contact your nearest Mazda
Distributor.

Customer Assistance

211


Content   ..  11  12  13  14   ..