Mazda B3000 (2002 year). Instruction - part 11


  Index      Mazda     Mazda B3000 - instruction 2002 year in english


Search            


Content   ..  9  10  11  12   ..


Mazda B3000 (2002 year). Instruction - part 11


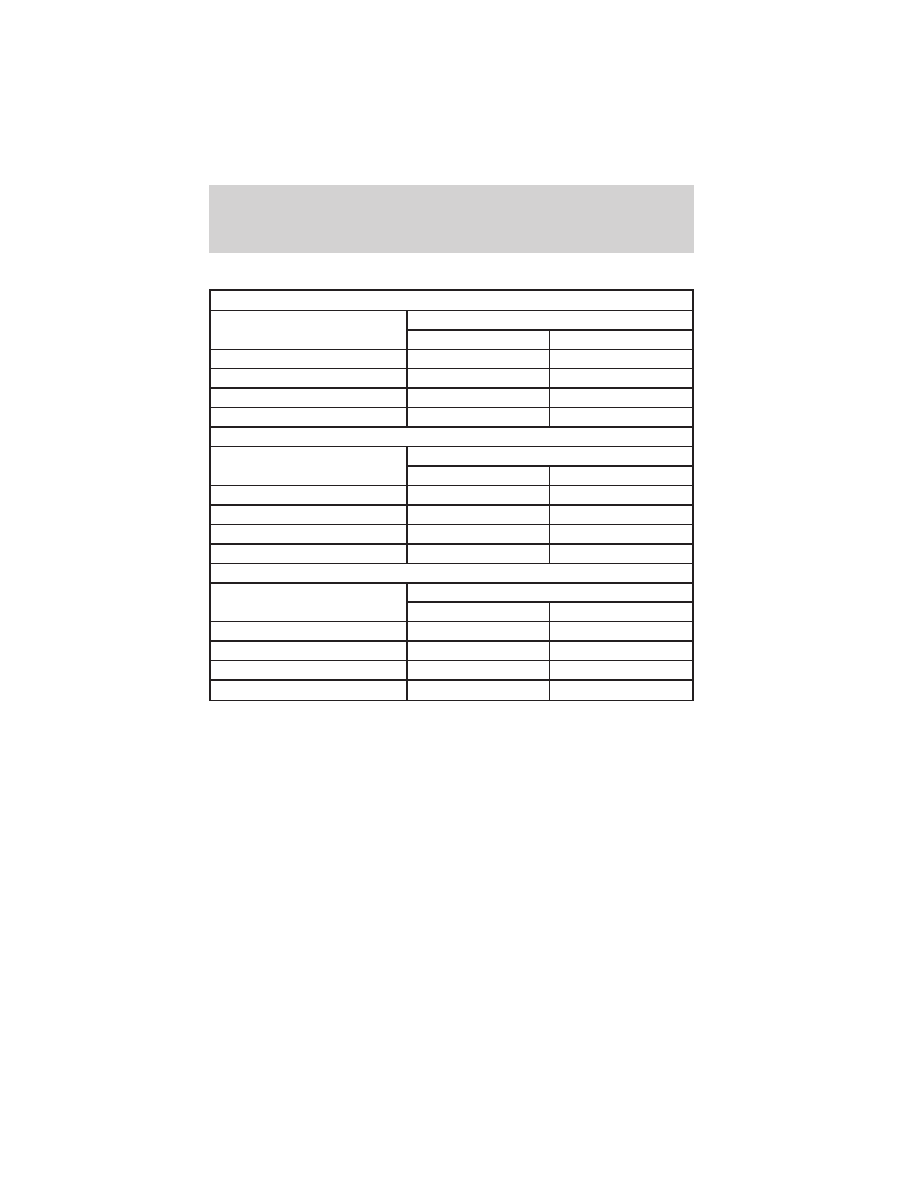
RECOMMENDED SHIFT SPEEDS

Upshifts when accelerating (for best fuel economy)

Shift from:

Transfer case position (if equipped)

4H

4L

1 - 2

14 km/h (10 mph)

5 km/h (4 mph)

2 - 3

32 km/h (22 mph)

11 km/h (9 mph)

3 -4

50 km/h (33 mph)

19 km/h (13 mph)

4 - 5 (Overdrive)

71 km/h (41 mph)

27 km/h (17 mph)

Upshifts when cruising (recommended for best fuel economy)

Shift from:

Transfer case position (if equipped)

4H

4L

1 -2

16 km/h (10 mph)

6 km/h (4 mph)

2 - 3

26 km/h (19 mph)

10 km/h (8 mph)

3 - 4

43 km/h (28 mph)

16 km/h (12 mph)

4 - 5 (Overdrive)

68 km/h (40 mph)

26 km/h (16 mph)

Maximum downshift speeds

Shift from:

Transfer case position (if equipped)

4H

4L

5 (Overdrive) - 4

88 km/h (55 mph)

34 km/h (22 mph)

4 - 3

72 km/h (45 mph)

27 km/h (18 mph)

3 - 2

56 km/h (35 mph)

21 km/h (14 mph)

2 - 1

32 km/h (20 mph)

11 km/h (8 mph)

REVERSE

Ensure that the vehicle is at a complete stop before shifting into R
(Reverse). Failure to do so may damage the transmission.

Put the gearshift lever into N and wait at least several seconds before
shifting into R.

You can shift into R (Reverse) only by moving the gearshift lever from
left of 3 (Third) and 4 (Fourth) gears before you shift into R (Reverse).
This is a special lockout feature that protects you from accidentally
shifting into R (Reverse) when you downshift from 5 (Overdrive).

Driving

164

FOUR-WHEEL DRIVE (4WD) OPERATION (IF EQUIPPED)

WARNING: For important information regarding safe operation
of this type of vehicle, see Preparing to drive your vehicle in
this chapter.

When four–wheel drive (4WD) is engaged, power is supplied to all four
wheels through a transfer case. 4WD can be selected when additional
driving power is desired.

If equipped with the Electronic Shift 4WD System, and 4WD Low
is selected while the vehicle is moving, the 4WD system will not
engage. This is normal and should be no reason for concern.
Before 4WD Low can be engaged, the vehicle must be brought to
a complete stop, the brake pedal depressed and the transmission
placed in neutral (or the clutch pedal depressed on manual
transmissions).

4WD operation is not recommended on dry pavement. Doing so could
result in difficult disengagement of the transfer case, increased tire wear
and decreased fuel economy.

4WD system indicator lights

The 4WD system indicator lights illuminate only under the following
conditions. If these lights illuminate when driving in 2WD, contact your
Mazda dealer as soon as possible.
• 4WD -momentarily illuminates

when the vehicle is started.
Illuminates when 4H (4WD High)
is engaged.

• 4WD LOW –momentarily

illuminates when the vehicle is
started. Illuminates when 4L
(4WD Low) is engaged.

Using the electronic shift 4WD system (if equipped)

Positions of the electronic shift system

2WD (2WD High) – Power to rear axle only.

4X4 HIGH (4WD High) – Power delivered to front and rear axles for
increased traction.

4X4 LOW (4WD Low) – Power to front and rear axles at low speeds.

4WD

LOW

Driving

165

Shifting from 2WD (2WD high) to 4X4 HIGH (4WD high)

Move the 4WD control to the 4X4
HIGH position.

Do not shift into 4X4 HIGH with
the rear wheels slipping.

Shifting from 4X4 HIGH (4WD high) to 2WD (2WD high)

Move the 4WD control to 2WD
position at any forward speed.
• You do not need to operate the

vehicle in R (Reverse) to
disengage your front hubs.

Shifting from 2WD (2WD high) to 4X4 LOW (4WD low)

1. Bring the vehicle to a stop.

2. Depress the brake.

3. Place the gearshift in N (Neutral) (automatic transmission) or

depress the clutch (manual transmission).

4. Move the 4WD control to the

4X4 LOW position.

4X4

HIGH

2WD

4X4

LOW

4X4

HIGH

2WD

4X4

LOW

4X4

HIGH

2WD

4X4

LOW

Driving

166

Shifting from 4X4 LOW (4WD low) to 2WD (2WD high)

1. Bring the vehicle to a stop.
2. Depress the brake.
3. Place the gearshift in N (Neutral) (automatic transmission) or

depress the clutch (manual transmission).

4. Move the 4WD control to the

2WD position.

Shifting between 4X4 HIGH (4WD high) and 4X4 LOW (4WD low)

1. Bring the vehicle to a stop.
2. Depress the brake.
3. Place the gearshift in N (Neutral) (automatic transmission) or

depress the clutch (manual transmission).

4. Move the 4WD control to the

4X4 HIGH or 4X4 LOW position.

Driving off-road with 4WD

Your vehicle is specially equipped for driving on sand, snow, mud and
rough terrain and has operating characteristics that are somewhat
different from conventional vehicles, both on and off the road.
Maintain steering wheel control at all times, especially in rough terrain.
Since sudden changes in terrain can result in abrupt steering wheel
motion, make sure you grip the steering wheel from the outside. Do not
grip the spokes.

4X4

HIGH

2WD

4X4

LOW

2WD

4X4

LOW

4X4

HIGH

Driving

167

Drive cautiously to avoid vehicle damage from concealed objects such as
rocks and stumps.

You should either know the terrain or examine maps of the area before
driving. Map out your route before driving in the area. For more
information on driving off-road, read the “Four Wheeling” supplement in
your owner’s portfolio.

If your vehicle gets stuck

If the vehicle is stuck it may be rocked out by shifting from forward and
reverse gears, stopping between shifts, in a steady pattern. Press lightly
on the accelerator in each gear.

Do not rock the vehicle if the engine is not at normal operating
temperature or damage to the transmission may occur.

Do not rock the vehicle for more than a few minutes or damage
to the transmission and tires may occur or the engine may
overheat.

WARNING: Do not spin the wheels at over 56 km/h (35 mph).
The tires may fail and injure a passenger or bystander.

Sand

When driving over sand, try to keep all four wheels on the most solid
area of the trail. Do not reduce the tire pressures but shift to a lower
gear and drive steadily through the terrain. Apply the accelerator slowly
and avoid spinning the wheels.

Mud and water

If you must drive through high water, drive slowly. Traction or brake
capability may be limited.

When driving through water, determine the depth; avoid water higher
than the bottom of the hubs (if possible) and proceed slowly. If the
ignition system gets wet, the vehicle may stall.

Once through water, always try the brakes. Wet brakes do not stop the
vehicle as effectively as dry brakes. Drying can be improved by moving
your vehicle slowly while applying light pressure on the brake pedal.

After driving through mud, clean off residue stuck to the driveshafts and
tires. Excess mud stuck on tires and rotating driveshafts causes an
imbalance that could damage drive components.

If the transmission, transfer case or front axle are submerged in water,
their fluids should be checked and changed, if necessary.

Driving

168

Driving through deep water may damage the transmission.

Replace rear axle lubricant any time the axle has been submerged in
water. The rear axle does not normally require a lubricant change for the
life of the vehicle. Rear axle lubricant quantities are not to be checked or
changed unless a leak is suspected or repair is required.

Driving on hilly or sloping terrain

When driving on a hill, avoid driving crosswise or turning on steep
slopes. You could lose traction and slip sideways. Drive straight up,
straight down or avoid the hill completely. Know the conditions on the
other side of a hill before driving over the crest.

When climbing a steep hill, start in a lower gear rather than downshifting
to a lower gear from a higher gear once the ascent has started. This
reduces strain on the engine and the possibility of stalling.

When descending a steep hill, avoid sudden braking. Shift to a lower gear
when added engine braking is desired.

When speed control is on and you are driving uphill, your vehicle speed
may drop considerably, especially if you are carrying a heavy load.

If vehicle speed drops more than 16 km/h (10 mph), the speed control
will cancel automatically. Resume speed with accelerator pedal.

If speed control cancels after climbing the hill, reset speed by pressing
and holding the SET ACCEL button (to resume speeds over 50 km/h [30
mph]).

Automatic transmissions may shift frequently while driving up steep
grades. Eliminate frequent shifting by shifting out of

(Overdrive) into

a lower gear.

Driving on snow and ice

A 4WD vehicle has advantages over 2WD vehicles in snow and ice but
can skid like any other vehicle.

Avoid sudden applications of power and quick changes of direction on
snow and ice. Apply the accelerator slowly and steadily when starting
from a full stop.

When braking, apply the brakes as you normally would. In order to allow
the anti-lock brake system (ABS) to operate properly, keep steady
pressure on the brake pedal.

Allow more stopping distance and drive slower than usual. Consider
using one of the lower gears.

Driving

169

DRIVING THROUGH WATER

Do not drive quickly through standing water, especially if the depth is
unknown. Traction or brake capability may be limited and if the ignition
system gets wet, your engine may stall. Water may also enter your
engine’s air intake and severely damage your engine.

If driving through deep or standing water is unavoidable, proceed very
slowly. Never drive through water that is higher than the bottom of the
hubs (for trucks) or the bottom of the wheel rims (for cars).

Once through the water, always try the brakes. Wet brakes do not stop
the vehicle as effectively as dry brakes. Drying can be improved by
moving your vehicle slowly while applying light pressure on the brake
pedal.

Driving through deep water where the transmission vent tube is
submerged may allow water into the transmission and cause
internal transmission damage. Have the fluid checked and, if
water is found, replace the fluid.

VEHICLE LOADING

Before loading a vehicle, familiarize yourself with the following terms:
• Base Curb Weight: Weight of the vehicle including any standard

equipment, fluids, lubricants, etc. It does not include occupants or
aftermarket equipment.

• Payload: Combined maximum allowable weight of cargo, occupants

and optional equipment. The payload equals the gross vehicle weight
rating minus base curb weight.

• GVW (Gross Vehicle Weight): Base curb weight plus payload

weight. The GVW is not a limit or a specification.

• GVWR (Gross Vehicle Weight Rating): Maximum permissible total

weight of the base vehicle, occupants, optional equipment and cargo.
The GVWR is specific to each vehicle and is listed on the Safety
Certification Label on the driver’s door pillar.

• GAWR (Gross Axle Weight Rating): Carrying capacity for each axle

system. The GAWR is specific to each vehicle and is listed on the
Safety Certification Label on the driver’s door pillar.

• GCW (Gross Combined Weight): The combined weight of the

towing vehicle (including occupants and cargo) and the loaded trailer.

• GCWR (Gross Combined Weight Rating): Maximum permissible

combined weight of towing vehicle (including occupants and cargo)
and the loaded trailer

Driving

170

• Maximum Trailer Weight Rating: Maximum weight of a trailer the

vehicle is permitted to tow. The maximum trailer weight rating is
determined by subtracting the vehicle curb weight for each
engine/transmission combination, any required option weight for trailer
towing and the weight of the driver from the GCWR for the towing
vehicle.

• Maximum Trailer Weight: Maximum weight of a trailer the loaded

vehicle (including occupants and cargo) is permitted to tow. It is
determined by subtracting the weight of the loaded trailer towing
vehicle from the GCWR for the towing vehicle.

• Trailer Weight Range: Specified weight range that the trailer must

fall within that ranges from zero to the maximum trailer weight rating.

Remember to figure in the tongue load of your loaded trailer when
figuring the total weight.

WARNING: Do not exceed the GVWR or the GAWR specified on
the certification label.

Do not use replacement tires with lower load carrying capacities than the
originals because they may lower the vehicle’s GVWR and GAWR
limitations. Replacement tires with a higher limit than the originals do
not increase the GVWR and GAWR limitations.

The Safety Certification Label, found on the driver’s door pillar, lists
several important vehicle weight rating limitations. Before adding any
additional equipment, refer to these limitations. If you are adding weight
to the front of your vehicle, (potentially including weight added to the
cab), the weight added should not exceed the front axle reserve capacity
(FARC). Additional frontal weight may be added to the front axle reserve
capacity provided you limit your payload in other ways (i.e. restrict the
number of occupants or amount of cargo carried).

Always ensure that the weight of occupants, cargo and equipment being
carried is within the weight limitations that have been established for
your vehicle including both gross vehicle weight and front and rear gross
axle weight rating limits. Under no circumstance should these limitations
be exceeded.

WARNING: Exceeding any vehicle weight rating limitation
could result in serious damage to the vehicle and/or personal
injury.

Driving

171

Special loading instructions for owners of pickup trucks and
utility-type vehicles

WARNING: For important information regarding safe operation
of this type of vehicle, see the Preparing to drive your vehicle
section in this chapter.

WARNING: Loaded vehicles, with a higher center of gravity,
may handle differently than unloaded vehicles. Extra
precautions, such as slower speeds and increased stopping
distance, should be taken when driving a heavily loaded vehicle.

Your vehicle has the capability to haul more cargo and people than most
passenger cars. Depending upon the type and placement of the load,
hauling cargo and people may raise the center of gravity of the vehicle.

Calculating the load your vehicle can carry/tow

1. Use the appropriate maximum gross combined weight rating

(GCWR) chart (in the Trailer Towing section) to find the maximum
GCWR for your type engine and rear axle ratio.

2. Weigh your vehicle as you customarily operate the vehicle without

cargo. To obtain correct weights, try taking your vehicle to a
shipping company or an inspection station for trucks.

3. Subtract your loaded vehicle weight from the maximum GCWR on

the following charts. This is the maximum trailer weight your vehicle
can tow and must fall below the maximum shown under maximum
trailer weight on the chart.

TRAILER TOWING

Your vehicle may tow a class I, II or III trailer provided the maximum
trailer weight is less than or equal to the maximum trailer weight listed
for your engine and rear axle ratio on the following charts.

Your vehicle’s load capacity is designated by weight, not by volume, so
you cannot necessarily use all available space when loading a vehicle.

Towing a trailer places an additional load on your vehicle’s engine,
transmission, axle, brakes, tires and suspension. Inspect these
components carefully after any towing operation.

Driving

172

4x2 w/manual transmission

Engine

Rear axle

ratio

Maximum

GCWR - kg

(lbs.)

Maximum

trailer weight

- kg (lbs.)

Maximum

frontal area

of trailer -

m

2

(ft

2

)

Regular Cab

2.3L

All

2,177 (4,800)

744 (1,640)

Equal to

frontal area

of vehicle

3.0L Dual

Sport

All

2,722 (6,000)

1,161 (2,560)

4.64 (50)

Cab Plus

3.0L Dual

Sport

All

2,722 (6,000)

1,070 (2,360)

4.64 (50)

4.0L Dual

Sport

All

3,175 (7,000)

1,488 (3,380)

4.64 (50)

For high altitude operation, reduce GCW by 2% per 300 meters (1, 000 ft.)
elevation.

For definition of terms used in this table see Vehicle Loading earlier in
this chapter.

To determine maximum trailer weight designed for your particular vehicle,
see Calculating the load earlier in this chapter.

Maximum trailer weight is shown. The combined weight of the completed
towing vehicle (including hitch, passengers and cargo) and the loaded
trailer must not exceed the Gross Combined Weight Rating (GCWR).

4x4 w/manual transmission

Engine

Rear axle

ratio

Maximum

GCWR - kg

(lbs.)

Maximum

trailer

weight - kg

(lbs)

Maximum

frontal area

of trailer -

m

2

(ft

2

)

Regular Cab

3.0L

All

2,722 (6,000)

1,070 (2,360)

4.64 (50)

Cab Plus

3.0L

All

2,722 (6,000)

980 (2,160)

4.64 (50)

4.0L

All

3,175 (7,000)

1,388 (3,060)

4.64 (50)

For high altitude operation, reduce GCW by 2% per 300 meters (1, 000 ft.)
of elevation.

Driving

173

4x4 w/manual transmission

For definition of terms used in this table, see Vehicle loading earlier in
this chapter.

To determine maximum trailer weight designed for your vehicle, see
Calculating the load earlier in this chapter.

Maximum trailer weight is shown. The combined weight of the completed
towing vehicle (including hitch, passengers and cargo) and the loaded
trailer must not exceed the Gross Combined Weight Rating (GCWR).

4x2 w/automatic transmission

Engine

Rear axle

ratio

Maximum

GCWR - kg

(lbs.)

Maximum

trailer weight

- kg (lbs.)

Maximum

frontal area

of trailer -

m

2

(ft

2

)

Regular Cab

2.3L

All

2,495 (5,500)

1,025 (2,260)

Equal to

frontal area

of vehicle

3.0L Dual

Sport

All

3,402 (7,500)

1,823 (4,020)

4.64 (50)

Cab Plus

3.0L Dual

Sport

All

3,402 (7,500)

1,733 (3,820)

4.64 (50)

4.0L Dual

Sport

All

4,309 (9,500)

2,604 (5,740)

4.64 (50)

For high altitude operation, reduce GCW by 2% per 300 meters (1, 000 ft.)
elevation.

For definition of terms used in this table see Vehicle Loading earlier in
this chapter.

To determine maximum trailer weight designed for your particular vehicle,
see Calculating the load earlier in this chapter.

Maximum trailer weight is shown. The combined weight of the completed
towing vehicle (including hitch, passengers and cargo) and the loaded
trailer must not exceed the Gross Combined Weight Rating (GCWR).

Driving

174

4x4 w/automatic transmission

Engine

Rear axle

ratio

Maximum

GCWR - kg

(lbs.)

Maximum

trailer

weight - kg

(lbs.)

Maximum

frontal area

of trailer -

m

2

(ft

2

)

Regular Cab

3.0L

All

3,402 (7,500)

1,742 (3,840)

4.64 (50)

Cab Plus

3.0L

All

3,402 (7,500)

1,651 (3,640)

4.64 (50)

4.0L

All

4,309 (9,500)

2,504 (5,520)

4.64 (50)

For high altitude operation, reduce GCW by 2% per 300 meters (1, 000
ft.) of elevation.

For definition of terms used in this table, see Vehicle loading earlier
in this chapter.

To determine maximum trailer weight designed for your vehicle, see
Calculating the load earlier in this chapter.

Maximum trailer weight is shown. The combined weight of the completed
towing vehicle (including hitch, passengers and cargo) and the loaded
trailer must not exceed the Gross Combined Weight Rating (GCWR).

WARNING: Do not exceed the GVWR or the GAWR specified on
the certification label.

WARNING: Towing trailers beyond the maximum recommended
gross trailer weight could result in engine damage,
transmission/axle damage, structural damage, loss of control
and personal injury.

Preparing to tow

Use the proper equipment for towing a trailer, and make sure it is
properly attached to your vehicle. See your dealer or a reliable trailer
dealer if you require assistance.

Hitches

For towing trailers up to 907 kg (2,000 lb), use a weight carrying hitch
and ball which uniformly distributes the trailer tongue loads through the
underbody structure. Use a frame-mounted weight distributing hitch for
trailers over 907 kg (2,000 lb).

Driving

175

Do not install a single or multi-clamp type bumper hitch, or a hitch
which attaches to the axle. Underbody mounted hitches are acceptable if
they are installed properly. Follow the towing instructions of a reputable
rental agency.

Whenever a trailer hitch and hardware are removed, make sure all
mounting holes in the underbody are properly sealed to prevent noxious
gases or water from entering.

Safety chains

Always connect the trailer’s safety chains to the frame or hook retainers
of the vehicle hitch. To connect the trailer’s safety chains, cross the
chains under the trailer tongue and allow slack for turning corners.

If you use a rental trailer, follow the instructions that the rental agency
gives to you.

Do not attach safety chains to the bumper.

Trailer brakes

Electric brakes and manual, automatic or surge-type trailer brakes are
safe if installed properly and adjusted to the manufacturer’s
specifications. The trailer brakes must meet local and Federal
regulations.

WARNING: Do not connect a trailer’s hydraulic brake system
directly to your vehicle’s brake system. Your vehicle may not
have enough braking power and your chances of having a
collision greatly increase.

The braking system of the tow vehicle is rated for operation at the
GVWR not GCWR.

Trailer lamps

Trailer lamps are required on most towed vehicles. Make sure your
trailer lamps conform to local and Federal regulations. See your dealer or
trailer rental agency for proper instructions and equipment for hooking
up trailer lamps.

Using a step bumper

The optional step bumper is equipped with an integral hitch and requires
only a ball with a 19 mm (3/4 inch) shank diameter. The bumper has a
907 kg (2,000 lb.) trailer weight and 91 kg (200 lb.) tongue weight
capability.

Driving

176

The rated capacities (as shown in this guide) for trailer towing with the
factory bumper are only valid when the trailer hitch ball is installed
directly into the ball hole in the bumper. Addition of bracketry to either
lower the ball hitch position or extend the ball hitch rearward will
significantly increase the loads on the bumper and its attachments. This
can result in the failure of the bumper or the bumper attachments. Use
of any type of hitch extensions should be considered abuse.

Trailer tow connector

The trailer tow connector is located
under the rear bumper, on the
driver’s side of the vehicle.

Refer to the following chart for information regarding the
factory-equipped trailer tow connector:

Trailer tow connector

Color

Function

Comment

1. Dark Green

Trailer right-hand
turn signal

Circuit activated when brake
pedal is depressed or when
ignition is on and right-hand
turn signal is applied.

2. Yellow

Trailer left-hand turn
signal

Circuit activated when brake
pedal is depressed or when
ignition is on and left-hand
turn signal is applied.

3. Tan/White

Tail lamp

Relay controlled circuit
activated when the park
lamps/headlamps are on.

4. White

Ground

Matching vehicle circuit
returns to battery’s negative
ground.

1

2

3

4

Driving

177

Driving while you tow

When towing a trailer:
• Turn off the speed control. The speed control may shut off

automatically when you are towing on long, steep grades.

• Consult your local motor vehicle speed regulations for towing a trailer.
• To eliminate excessive shifting, use a lower gear. This will also assist

in transmission cooling. (For additional information, refer to the
Driving with a 4–speed automatic transmission section in this
chapter.

• Anticipate stops and brake gradually.
• Do not exceed the GCWR rating or transmission damage may occur.

Servicing after towing

If you tow a trailer for long distances, your vehicle will require more
frequent service intervals. Refer to your service maintenance section for
more information.

Trailer towing tips

• Practice turning, stopping and backing up before starting on a trip to

get the feel of the vehicle trailer combination. When turning, make
wider turns so the trailer wheels will clear curbs and other obstacles.

• Allow more distance for stopping with a trailer attached.
• The trailer tongue weight should be 10–15% of the loaded trailer

weight.

• After you have traveled 80 km (50 miles), thoroughly check your

hitch, electrical connections and trailer wheel lug nuts.

• To aid in engine/transmission cooling and A/C efficiency during hot

weather while stopped in traffic, place the gearshift lever in P (Park)
(automatic transmission) or N (Neutral) (manual transmissions).

• Vehicles with trailers should not be parked on a grade. If you must

park on a grade, place wheel chocks under the trailer’s wheels.

Driving

178

Launching or retrieving a boat

Disconnect the wiring to the trailer before backing the trailer
into the water. Reconnect the wiring to the trailer after the
trailer is removed from the water.

When backing down a ramp during boat launching or retrieval:
• do not allow the static water level to rise above the bottom edge of

the rear bumper.

• do not allow waves to break higher than 15 cm (6 inches) above the

bottom edge of the rear bumper.

Exceeding these limits may allow water to enter vehicle components:
• causing internal damage to the components.
• affecting driveability, emissions and reliability.
Replace the rear axle lubricant any time the axle has been submerged in
water. Rear axle lubricant quantities are not to be checked or changed
unless a leak is suspected or repair required.

RECREATIONAL TOWING

Follow these guidelines if you have a need for recreational towing. An
example of recreational towing would be towing your vehicle behind a
motorhome. These guidelines are designed to ensure that your
transmission is not damaged.

4x2 and 4x4 vehicles equipped with manual transmissions:

Before you have your vehicle towed:
• Release the parking brake.
• Move the gearshift to the neutral position.
• Turn the key in the ignition to the OFF/UNLOCKED position.
• The maximum recommended speed is 88 km/h (55 mph).
• The maximum recommended distance is unlimited.
In addition, it is recommended that you follow the instructions
provided by the after market manufacturer of the towing
apparatus if one has been installed.

Driving

179


Content   ..  9  10  11  12   ..