Mazda 2 (2017 year). Instruction - part 26
 

  Index      Mazda     Mazda 2 - instruction 2017 year in english


Search            


Content   ..  24  25  26  27   ..


Mazda 2 (2017 year). Instruction - part 26


5–54

Interior Features

Audio Set [Type A (non-touchscreen)]

           Bluetooth 

®

   Audio  Preparation

    Bluetooth 

®

  audio device set-up

    Bluetooth 

®

  audio pairing, changes, 

deletions, and display of paired device 
information can be performed.


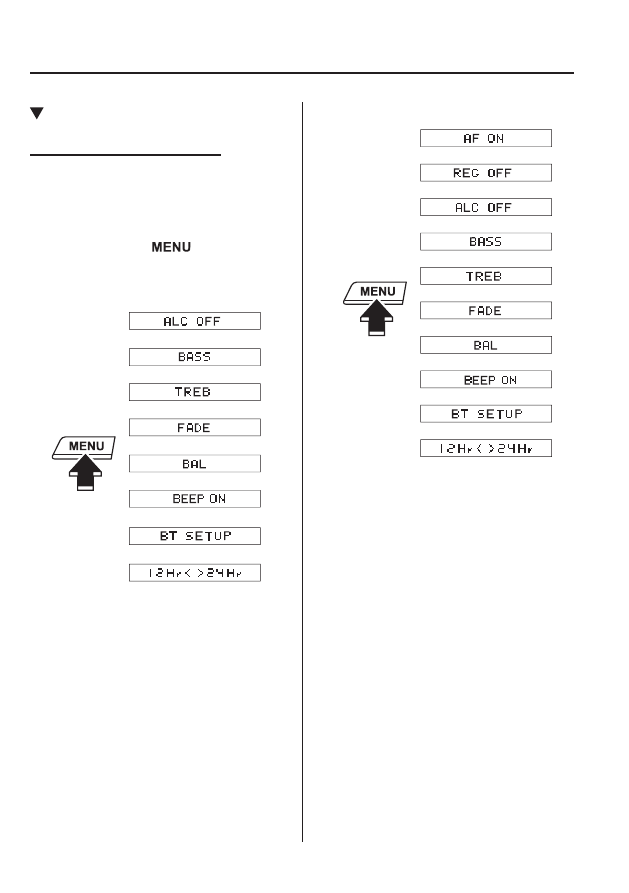
   1.   The mode changes as follows each time 

the menu button ( 

 ) is pressed. 

Select “ BT SETUP ”.


 Without Radio Data System (RDS) 


*

*


 With Radio Data System (RDS) 


*

*

*

*


*  Depending on the mode selected, the 

indication changes.

5–55

Interior Features

Audio Set [Type A (non-touchscreen)]

   2.   Turn the audio control dial and select a 

desired mode.


 Display 

 Mode 

 Function 

  PAIR 
DEVICE  

 Pairing  mode 

 Bluetooth 

®

   audio 

device pairing 

  LINK 
CHANGE  

 Link  change 
mode 

 Changing link to 
Bluetooth 

®

   audio 

device 

  PAIR 
DELETE  

 Pairing 
deletion 
mode 

 Deleting link to 
Bluetooth 

®

   audio 

device 

  DEVICE 
INFO  

 Device 
information 
display mode 

 Displaying  vehicle's 
Bluetooth 

®

   unit 

information 

   
   3.   Press the audio control dial to 

determine the mode.


           Bluetooth 

®

  audio device pairing 

(Bluetooth 

®

   Audio)

    Any  Bluetooth 

®

  audio device must be 

paired to the vehicle's Bluetooth 

®

   unit 

before it can be listened to over the 
vehicle's speakers.
  A maximum of seven devices including 
Bluetooth 

®

  audio devices and hands-

free mobile phones can be paired to one 
vehicle.

 NOTE


  If a Bluetooth 

®

  device has already 

been paired to the vehicle as a hands-
free mobile phone, it does not need 
to be paired again when using the 
device as a Bluetooth 

®

  audio device. 

Conversely, it does not need to be 
paired again as a hands-free mobile 
phone if it has already been paired as 
a Bluetooth 

®

  audio device. 


  Device registration can also be done 

using voice recognition. 

  Concerning the operation of a Bluetooth 

®


audio device itself, refer to its instruction 
manual.
  Some  Bluetooth 

®

  audio devices have PIN 

codes (four digits). Refer to the audio 
device's instruction manual because the 
pairing procedure differs depending on 
whether it has a PIN code or not.

5–56

Interior Features

Audio Set [Type A (non-touchscreen)]

  Pairing  a  Bluetooth 

®

  audio device which 

has a four-digit PIN code

     1.   Using  the  audio  control  dial,  select 

the pairing mode “ PAIR DEVICE ” 
in the “ BT SETUP ” mode. (Refer to 
“Bluetooth 

®

  audio device set-up” for 

details.)

   2.   Press the audio control dial to 

determine the mode.


After “ ENTER PIN ” is displayed on 
the audio display for three seconds, 
“ PIN 0000 ” is displayed and the PIN 
code can be input.

   3.   Input the PIN code of your Bluetooth 

®


audio device by pressing channel preset 
buttons 1 to 4 while “ PIN 0000 ” is 
displayed.


Press channel preset button 1 to input 
the 

¿ rst digit, 2 for the second, 3 for the 

third, and 4 for the forth. For example, 
if the PIN code were “4213”, press 
channel preset button 1 four times 
(1, 2, 3, 4), button 2 twice (1, 2), button 
3 once (1), and button 4 three times 
(1, 2, 3). If the “ PIN 0000 ” display 
disappears before 

¿ nishing the PIN 

code input, repeat the procedure from 
Step 1.

 NOTE

 Some devices accept only a particular 
pairing code (Usually, “0000” or 
“1234”). 
 If pairing cannot be completed, refer 
to the owner's manual of your mobile 
device, and try those numbers if 
necessary. 

   4.   Press the audio control dial while the 

input PIN code is displayed.


“ PAIRING ” 

À ashes on the display.

   5.   Operate  the  Bluetooth 

®

  audio device 

and set it to the pairing mode while 
“ PAIRING ”  is 

À ashing.

   6.   When the pairing is completed, “   ”  and 

“ PAIR SUCCESS ” are displayed after 
about 10-30 seconds, after which 
“ PAIR SUCCESS ” continues to be 
displayed for three seconds, and then 
the unit returns to the normal display.

 NOTE


 Some Bluetooth 

®

  audio devices need 

a certain amount of time before the 
“   ” symbol is displayed. 


  If the pairing failed, “ Err ” 

À ashes for 

three seconds. 


  Pairing cannot be performed while 

the vehicle is moving. If you attempt 
to perform pairing while the vehicle 
is moving, “ PAIR DISABLE ” is 
displayed. 


  If seven Bluetooth 

®

  audio devices 

have already been paired to the 
vehicle, pairing cannot be performed 
and “ MEMORY FULL ” is displayed. 
Delete one paired device to pair 
another one. 

    Pairing  a  Bluetooth 

®

  audio device which 

does not have a four-digit PIN code

     1.   Using  the  audio  control  dial,  select 

the pairing mode “ PAIR DEVICE ” 
in the “ BT SETUP ” mode. (Refer to 
“Bluetooth 

®

  audio set up” for details.)

   2.   Press the audio control dial to 

determine the mode. After “ ENTER 
PIN ” is displayed on the audio display 
for three seconds, “ PIN 0000 ” is 
displayed and the PIN code can be 
input.

5–57

Interior Features

Audio Set [Type A (non-touchscreen)]

   3.   Press the audio control dial while “ PIN 

0000 ” is displayed.


“ PAIRING ” 

À ashes on the audio 

display.

   4.   Operate  the  Bluetooth 

®

  audio device 

and set it to the pairing mode while 
“ PAIRING ”  is 

À ashing.

   5.   As  the  Bluetooth 

®

  audio device 

requires a PIN code, input “0000”.

   6.   When the pairing is completed, “   ”  and 

“ PAIR SUCCESS ” are displayed after 
about 10-30 seconds, after which 
“ PAIR SUCCESS ” continues to be 
displayed for three seconds, and then 
the unit returns to the normal display.

 NOTE


  If pairing cannot be completed, try 

“1234” instead. Refer to the owner's 
manual of your mobile device for the 
right PIN code. 


 Some Bluetooth 

®

  audio devices need 

a certain amount of time before the 
“   ” symbol is displayed. 


  If the pairing failed, “ Err ” 

À ashes for 

three seconds. 


  Pairing cannot be performed while 

the vehicle is moving. If you attempt 
to perform pairing while the vehicle 
is moving, “ PAIR DISABLE ” is 
displayed. 


  If seven Bluetooth 

®

  audio devices 

have already been paired to the 
vehicle, pairing cannot be performed 
and “ MEMORY FULL ” is displayed. 
Delete one paired device to pair 
another one. 

             Device selection (Bluetooth 

®

   Audio)

    If several devices have been paired, the 
Bluetooth 

®

  unit links the device last 

paired. If you would like to link a different 
paired device, it is necessary to change the 
link. The order of device priority after the 
link has been changed is maintained even 
when the ignition is switched off.


   1.   Using the audio control dial, select the 

link change mode “ LINK CHANGE ” 
in the “ BT SETUP ” mode. (Refer to 
“Bluetooth 

®

  audio device set-up” for 

details.)

   2.   Press the audio control dial to 

determine the mode.

   3.   The name of the currently linked 

Bluetooth 

®

  audio device is displayed.


If  no  Bluetooth 

®

  audio device is 

currently linked, the name of the 

¿ rst 

device among the paired devices is 
displayed.

   4.   Turn the audio control dial to select the 

name of the device you would like to 
link.


Device name 1

Device name 2

Device name 3

Device name 4

Device name 5

Device name 6

Device name 7


5–58

Interior Features

Audio Set [Type A (non-touchscreen)]

   5.   Press the audio control dial to select the 

device you would like to link.


The  “   ” symbol disappears, and 
“ PAIRING ” 

À ashes in the audio 

display.

 NOTE

 When “ GO BACK ” is selected and the 
audio control dial is pressed, the display 
returns to “ LINK CHANGE ”. 

   6.   If the link to the desired device is 

successful, the “   ” symbol is displayed 
again, together with “ LINK 
CHANGED ”.  “ LINK  CHANGED ”  is 
displayed for three seconds, then it 
returns to the normal display.

 NOTE


 Some Bluetooth 

®

  audio devices need 

a certain amount of time before the 
“   ” symbol is displayed. 


  If a hands-free type mobile phone has 

been the most recently paired device, 
the Bluetooth 

®

  unit links this device. 

If you would like to use a Bluetooth 

®


audio type device which has been 
previously paired to the Bluetooth 

®


unit, the link must be changed to this 
device. 


  If an error occurs while trying to link 

a device, “ Err ” 

À ashes in the display 

for three seconds, and the display 
returns to “ LINK CHANGE ”. If this 
occurs, check the pairing status of 
the Bluetooth 

®

  audio device and the 

location of the device in the vehicle 
(not in the luggage compartment/
boot or a metal-type box), and then 
try the link operation again. 


  Device selection can also be done 

using voice recognition. 

    How to con

¿ rm the device currently 

linked

    Switch to the link-change mode. (Refer to 
“Changing the link to a Bluetooth 

®

   audio 

device”)
  The device name displayed 

¿ rst is the 

device which is currently linked.

           Deleting a device (Bluetooth 

®


Audio)

     1.   Using  the  audio  control  dial,  select  the 

pairing delete mode “ PAIR DELETE ” 
in the “ BT SETUP ” mode. (Refer to 
“Bluetooth 

®

  audio device set-up” for 

details.)

   2.   Press the audio control dial to 

determine the mode.

   3.   The  name  of  the 

¿ rst device among the 

paired devices is displayed.

   4.   Rotate the audio control dial and select 

the name of the paired device you 
would like to delete.


Device name 1

Device name 2

Device name 3

Device name 4

Device name 5

Device name 6

Device name 7


5–59

Interior Features

Audio Set [Type A (non-touchscreen)]

 NOTE

 Only the names of paired devices can 
be displayed. If only one device is 
paired, only the name for this device is 
displayed. 

   5.   If a selection other than “ GO BACK ” 

is made and the audio control dial is 
pressed, “ SURE ? NO ” is displayed.

   6.   Rotate the audio control dial clockwise 

and switch the display to “ SURE ? 
YES ”.

 NOTE

 The display changes as follows 
depending on whether the audio 
control dial is rotated clockwise or 
anticlockwise. 
 -Clockwise:  “ SURE  ?  YES ”  displayed 
 -Anticlockwise: “ SURE ? NO ” 
displayed 

   7.   Press the audio control dial to delete 

the selected device.

 NOTE

 Select “ GO BACK ” and press the audio 
control dial to return to the “ PAIR 
DELETE ”  display. 

   8.   “ PAIR  DELETED ”  is  displayed  for 

three seconds after the deletion is 
completed, and then it returns to the 
normal display.

 NOTE

 If an error occurs while trying to delete 
the paired device, “ Err ” 

À ashes in the 

display for three seconds and the display 
returns to “ LINK DELETE ”. 

             Bluetooth 

®

  audio device 

information display

     1.   Using  the  audio  control  dial,  select  the 

pair device information display mode 
“ DEVICE INFO ” in the “ BT SETUP ” 
mode. (Refer to “Bluetooth 

®

   audio 

device set-up” for details.)

   2.   Press the audio control dial to 

determine the mode.

   3.   The  name  of  the  Bluetooth 

®

  unit device 

is displayed.

   4.   Rotate the audio control dial to select 

the information for the Bluetooth 

®

   unit 

which you would like to view.


Device name

BT address


 NOTE

 When “ GO BACK ” is selected and the 
audio control dial is pressed, the display 
returns to “ DEVICE INFO ”. 

5–60

Interior Features

Audio Set [Type A (non-touchscreen)]

*Some models.

 Available  Language 

*


    The  available  languages  are  English, 
French, Spanish, Italian, German, Dutch, 
and Portuguese. If the language setting 
is changed, all of the voice guidance and 
voice input commands are done in the 
selected language.

 NOTE


  If the language setting is changed, 

device registration is maintained. 


  Phonebook records are not cleared, 

but each language has a separate 
phonebook. Therefore, entries 
created in one language will need to 
be re-entered in the phonebook of the 
new language. 


  Do these steps before you start 

driving. These less used functions 
are too distracting to undertake while 
driving until you are fully familiar 
with the system. 

  (Method  1)

     1.   Press  the  pick-up  button  or  talk  button 

with a short press.

   2.    Say:  [Beep] “Setup”
   3.    Prompt:  “Select one of the following: 

Pairing options, con

¿ rmation prompts, 

language, password, select phone or 
select music player.”

   4.    Say:  [Beep] “Language”
   5.    Prompt:  “Select a language: English, 

French, Spanish, Italian, German, 
Dutch, or Portuguese.”

   6.    Say:  [Beep] “French” (Speak the 

desired language: “English”, “French”, 
“Spanish”, “Italian”, “German”, 
“Dutch”, or “Portuguese”)

 NOTE

 Other language settings can also be 
made while in the current setting by 
saying the name of the language in the 
native pronunciation. 

   7.    Prompt:  “French (Desired language) 

selected. Is this correct?”

   8.    Say:  [Beep] “Yes”
   9.    Prompt:  “Please wait. Switching to 

French phonebook. French selected.” 
(Spoken in the newly selected 
language).


  (Method  2)

     1.   Press  the  pick-up  button  or  talk  button 

with a short press.

   2.    Say:  [Beep] “French” (Say the desired 

language: “English”, “French”, 
“Spanish”, “Italian”, “German”, 
“Dutch”, or “Portuguese”). (Change 
the desired language by saying the 
language name.)

 NOTE

 Other language settings can also be 
made while in the current setting by 
saying the name of the language in the 
native pronunciation. 

   3.    Prompt:  “Would you like to change 

the language to French (Desired 
language)?”

   4.    Say:  [Beep] “Yes”
   5.    Prompt:  “Please wait. Switching to 

French phonebook. French selected.” 
(Spoken in the newly selected 
language).


5–61

Interior Features

Audio Set [Type A (non-touchscreen)]

*Some models.

 Security  Setting 

*


    If a password is set, the system cannot be 
activated unless the password is input.

 NOTE

 Do this function only when parked. It is 
too distracting to attempt while driving 
and you may make too many errors to 
be effective. 

  Password  setting

     1.   Press  the  pick-up  button  or  talk  button 

with a short press.

   2.    Say:  [Beep] “Setup”
   3.    Prompt:  “Select one of the following: 

Pairing options, con

¿ rmation prompts, 

language, password, select phone or 
select music player.”

   4.    Say:  [Beep] “Password”
   5.    Prompt:  “Password is disabled. Would 

you like to enable it?”

   6.    Say:  [Beep] “Yes”
   7.    Prompt:  “Please say a 4-digit 

password. Remember this password. It 
will be required to use this system.”

   8.    Say:  [Beep] “XXXX” (Say a desired 

4-digit password, “PCode”.)

   9.    Prompt: “Password XXXX (Password, 

PCode). Is this correct?”

   10.   Say:  [Beep] “Yes”
   11.   Prompt: “Password is enabled.”


  Using  Bluetooth 

®

  Hands-Free with a 

password

     1.   Press  the  pick-up  button  or  talk  button 

with a short press.

   2.    Prompt:  “Hands-Free system 

is locked. State the password to 
continue.”

   3.    Say:  [Beep] “XXXX” (Say the set 

password “PCode”.)

   4.   If the correct password is input, voice 

guidance “XXXXXX... (Ex. “Mary's 
device”) (Device tag) is connected” is 
announced.


If the password is incorrect, voice 
guidance “XXXX (4-digit password, 
Pcode) incorrect password, please try 
again” is announced.


  Cancelling  the  password

 NOTE

 Do this function only when parked. It is 
too distracting to attempt while driving 
and you may make too many errors to 
be effective. 

   1.   Press the pick-up button or talk button 

with a short press.

   2.    Say:  [Beep] “Setup”
   3.    Prompt:  “Select one of the following: 

Pairing options, con

¿ rmation prompts, 

language, password, select phone or 
select music player.”

   4.    Say:  [Beep] “Password”
   5.    Prompt: “Password is enabled. Would 

you like to disable it?”

   6.    Say:  [Beep] “Yes”
   7.    Prompt: “Password is disabled.”


5–62

Interior Features

Audio Set [Type A (non-touchscreen)]

*Some models.

  Con

¿ rmation Prompts

    The  con

¿ rmation prompt con¿ rms the 

command content to the user before 
advancing to the operation requested by 
the user. When this function is turned 
on, the system reads out the voice 
input command previously received 
and con

¿ rms whether the command is 

correct before advancing to the command 
execution.
  When  the  con

¿ rmation prompt function is 

turned on:
  (Ex. “Calling John's device. Is this 
correct?”)
  When  the  con

¿ rmation prompt function is 

turned off:
  (Ex. “Calling John's device.”)

 NOTE

 If the con

¿ rmation prompt function is 

turned off when making an emergency 
call, the system reads out and con

¿ rms 

the command before executing it. 

   1.   Press the pick-up button or talk button 

with a short press.

   2.    Say:  [Beep] “Setup”
   3.    Prompt:  “Select one of the following: 

Pairing options, con

¿ rmation prompts, 

language, password, select phone or 
select music player.”

   4.    Say:  [Beep] “Con

¿ rmation prompts”

   5.    Prompt:   “Con

¿ rmation prompts 

are on/off. Would you like to turn 
con

¿ rmation prompts off/on?”

   6.    Say:  [Beep] “Yes”
   7.    Prompt:   “Con

¿ rmation prompts are 

off/on.”


 Bluetooth 

®

   Audio 

*


             Applicable Bluetooth 

®

   speci

¿ cation 

(Recommended) 
  Ver.  2.0
  
   Response pro

¿ le 


 A2DP (Advanced Audio Distribution 

Pro

¿ le) Ver. 1.0/1.2


 AVRCP (Audio/Video Remote Control 

Pro

¿ le) Ver. 1.0/1.3


  A2DP is a pro

¿ le which transmits only 

audio to the Bluetooth 

®

  unit. If your 

Bluetooth 

®

  audio device corresponds 

only to A2DP, but not AVRCP, you 
cannot operate it using the control panel 
of the vehicle's audio system. In this 
case, only the operations on the mobile 
device are available the same as when a 
portable audio device for a non-compliant 
Bluetooth 

®

  device is connected to the 

AUX terminal.
  

 Function 

 A2DP 

 AVRCP 

 Ver.  1.0   Ver.  1.3 

 Playback 

 — 

 X 

 X 

 Pause 

 — 

 X 

 X 

 File  (Track)  up/down 

 — 

 X 

 X 

 Reverse 

 — 

 — 

 X 

 Fast-forward 

 — 

 — 

 X 

 Text  display 

 — 

 — 

 X 

    X:  Available
  —:  Not  available


5–63

Interior Features

Audio Set [Type A (non-touchscreen)]

 NOTE


  The battery consumption of 

Bluetooth 

®

  audio devices increases 

while Bluetooth 

®

  is connected. 


  If a general mobile phone device 

is USB connected during music 
playback over the Bluetooth 

®


connection, the Bluetooth 

®


connection is disconnected. For 
this reason, you cannot have 
music playback over a Bluetooth 

®


connection and music playback using 
a USB connection at the same time. 


  The system may not operate 

normally depending on the 
Bluetooth 

®

  audio device. 

          Switching to Bluetooth 

®

   audio 

mode

    To listen to music or voice audio recorded 
to a Bluetooth 

®

  audio device, switch to 

the Bluetooth 

®

  audio mode to operate 

the audio device using the audio system 
control panel. Any Bluetooth 

®

   audio 

device must be paired to the vehicle's 
Bluetooth 

®

  unit before it can be used.

  Refer  to  Bluetooth 

®

  Preparation (Type A) 

on page  5-49 .


   1.   Turn  on  the  Bluetooth 

®

  audio device's 

power.

   2.   Switch the ignition to ACC or ON.
   

Make sure that the “    ” symbol is 
displayed in the audio display. The 
symbol is not displayed if an un-paired 
Bluetooth 

®

  audio device is being used 

or the vehicle's Bluetooth 

®

  unit has a 

malfunction.

 NOTE

 Some  Bluetooth 

®

  audio devices need a 

certain amount of time before the “   ” 
symbol is displayed. 

   3.   Press  the  media  button  ( 

 )  to 

switch to the Bluetooth 

®

  audio mode 

and start playback.


   If the current device version is lower 
than AVRCP Ver. 1.3:
   “ BT  Audio ”  is 
displayed.
   If the current device is AVRCP Ver. 1.3:  
The playback time is displayed.

 NOTE


  If the Bluetooth 

®

  audio device does 

not begin playback, press the Play/
Pause button (4). 


  If a call is received on a hands-free 

mobile phone during playback from 
the Bluetooth 

®

  audio device, the 

playback is stopped. Playback from 
the Bluetooth 

®

  audio device resumes 

after the call ends. 

           Playback

     1.   To  listen  to  a  Bluetooth 

®

  audio device 

over the vehicle's speaker system, 
switch the mode to Bluetooth 

®


audio mode. (Refer to “Switching to 
Bluetooth 

®

  audio mode”)

   2.   To stop playback, press the Play/Pause 

button (4).

   3.   Press the button again to resume 

playback.


5–64

Interior Features

Audio Set [Type A (non-touchscreen)]

  Selecting  a 

¿ le (track)

    Selects  the  next 

¿ le (track)

    Short-press the track up button ( 

 ).

  Selects the beginning of the current 

¿ le 

(track)

    Short-press the track down button ( 

 ).

  Fast-forward/Reverse  (AVRCP  Ver.  1.3)

    Fast-forward

    Press and hold the fast-forward button 

 ).

  Reverse

    Press and hold the reverse down button 

 ).

           Switching the display (only AVRCP 

Ver. 1.3)

    The information displayed on the audio 
display changes as follows each time the 
text button ( 3 ) is pressed during playback.
  

 Button 

 Information  displayed 

on audio display 


 Elapsed  time 

 Album  name 

 Song  name 

 Artist  name 


 NOTE


  If title information is not available, 

“ NO  TITLE ”  is  displayed. 


  This unit cannot display some 

characters. Characters which cannot 
be displayed are indicated by an 
asterisk (   ). 

  Display  scroll

    Only 13 characters can be displayed at one 
time. To display the rest of the characters 
of a long title, press and hold the text 
button (3). The display scrolls the next 
13 characters. Press and hold the text 
button (3) again after the last 13 characters 
have been displayed to return to the 
beginning of the title.

           Bluetooth 

®

  audio device 

information display

    If  a  Bluetooth 

®

  audio device is connected, 

the following information is displayed in 
the audio display.
  

 AVRCP  Ver. 

lower than 1.3 

 AVRCP 

Ver. 1.3 

 Device  name 

 X 

 X 

 Title 

 — 

 X 

 Artist  name 

 — 

 X 

 Album  name 

 — 

 X 

 File  number 

 — 

 X 

 Playback  time 

 — 

 X 

 Folder  number 

 — 

 — 

    X:  Available
  —:  Not  available


 NOTE

 Some information may not display 
depending on the device, and if the 
information cannot be displayed, “ NO 
TITLE ” is indicated. 

5–65

Interior Features

Audio Set [Type A (non-touchscreen)]

*Some models.

 Bluetooth 

®

   Hands-Free 

*


                Making a Call

    Phonebook  Usage

    Telephone calls can be made by saying 
the name of a person (voice tag) whose 
phone number has been registered in 
Bluetooth 

®

  Hands-Free in advance. Refer 

to Phonebook registration.


   1.   Press the pick-up button or talk button 

with a short press.

   2.    Say:  [Beep] “Call”
   3.    Prompt:  “Name please.”
   4.    Say:  [Beep] “XXXXX... (Ex. “John's 

phone”)” (Say a voice tag registered in 
the phonebook.)

   5.    Prompt:  “Calling XXXXX... (Ex. 

“John's phone”) XXXX (Ex. “at 
home”). Is this correct?” (Voice tag and 
phone number location registered in 
phonebook).

   6.    Say:  [Beep] “Yes”
   7.    Prompt:   “Dialing”


 NOTE

 The “Call” command and the voice tag 
can be combined. 
 Ex. In Step 2, say, “Call John's phone”, 
then, Steps 3 and 4 can be skipped. 

  Phonebook  registration

    Phone numbers can be registered to the 
Bluetooth 

®

  Hands-Free phonebook.

 NOTE

 Do this function only when parked. It is 
too distracting to attempt while driving 
and you may make too many errors to 
be effective. 

   1.   Press the pick-up button or talk button 

with a short press.

   2.    Say:  [Beep] “Phonebook”
   3.    Prompt:  “Select one of the following: 

New entry, edit, list names, delete, 
erase all or import contact.”

   4.    Say:  [Beep] “New entry”
   5.    Prompt:  “Name please.”
   6.    Say:  [Beep] “XXXXX... (Ex. “Mary's 

phone”)” (Say a voice tag for the name 
registered.)

   7.    Prompt:  “Adding XXXXX... (Ex. 

“Mary's phone”) (Registered voice tag). 
Is this correct?”

   8.    Say:  [Beep] “Yes”
   9.    Prompt:  “Home, Work, Mobile, or 

Other?”

   10.   Say:  [Beep] “Mobile” (Say “Home” , 

“Work”, “Mobile”, or “Other”, for the 
desired location to be registered.)

   11.   Prompt:  “Mobile (Location to be 

registered). Is this correct?”

   12.   Say:  [Beep] “Yes”
   13.   Prompt:  “Number, please.”
   14.   Say:  [Beep] “XXXXXXXXXXX” 

(Say the phone number to be 
registered.)

   15.   Prompt:  “XXXXXXXXXXX (Phone 

number registration). After the beep, 
continue to add numbers, or say 
Go-Back to re-enter the last entered 
numbers, or press the Pick-Up button to 
save the number.”

5–66

Interior Features

Audio Set [Type A (non-touchscreen)]

   16.   (Registration) 
   

Press the pick-up button or say “Enter”, 
then go to Step 17.


 (Adding/inputting telephone 
number)


Say, “XXXX” (desired telephone 
number), then go to Step 15.


 (Telephone number correction) 


Say, “Go Back”. The prompt replies, 
“Go Back. The last entered numbers 
have been removed.”. Then go back to 
Step 13.

   17.   Prompt:  “Number saved. Would you 

like to add another number for this 
entry?”

   18.   Say:  [Beep] “Yes” or “No”.
   19.  If “Yes”, an additional phone number 

registration can be made for the same 
entry.


If “No”, the system returns to standby 
status.


  (Import  contact)

    Phonebook data from your device (Mobile 
phone) can be sent and registered to your 
Bluetooth 

®

  Hands-Free phonebook using 

Bluetooth 

®

 .


   1.   Press the pick-up button or talk button 

with a short press.

   2.    Say:  [Beep] “Phonebook”
   3.    Prompt:  “Select one of the following: 

New entry, edit, list names, delete, 
erase all or import contact.”

   4.    Say:  [Beep] “Import contact”

   5.    Prompt:  “The hands free system is 

ready to receive a contact from the 
phone; only a home, work, mobile 
number can be imported into the 
hands free system. The import contact 
process requires the user to operate the 
phone. Refer to the phone's manual 
for information on how to operate 
the phone to perform the import 
operation.”

   6.    Prompt:  “X (Number of locations 

which include data) numbers have been 
imported. What name would you like to 
use for these numbers?”

   7.    Say:  [Beep] “XXXXX... (Ex. “Mary's 

phone”)” (Say a voice tag for the name 
registered.)

   8.    Prompt:  “Adding XXXXX... (Ex. 

“Mary's phone”) (Voice tag). Is this 
correct?”

   9.    Say:  [Beep] “Yes”
   10.   Prompt:  “Number saved. Would you 

like to import another contact?”

   11.   Say:  [Beep] “Yes” or “No”
   12.  If “Yes”, the procedure proceeds to 

Step 5.


If “No”, the system returns to standby 
status.


  Editing  phonebook

    The data registered to the Bluetooth 

®


Hands-Free phonebook can be edited.

 NOTE

 Do this function only when parked. It is 
too distracting to attempt while driving 
and you may make too many errors to 
be effective. 

   1.   Press the pick-up button or talk button 

with a short press.

   2.    Say:  [Beep] “Phonebook”

5–67

Interior Features

Audio Set [Type A (non-touchscreen)]

   3.    Prompt:  “Select one of the following: 

New entry, edit, list names, delete, 
erase all or import contact.”

   4.    Say:  [Beep] “Edit”
   5.    Prompt:  “Please say the name of the 

entry you would like to edit or say, 
“List names”.”

   6.    Say:  [Beep] “XXXXX... (Ex. “Mary's 

phone”)” (Say the voice tag for the 
registered name to be edited in the 
phonebook.)

   7.    Prompt:  “Home, Work, Mobile, or 

Other?”

   8.    Say:  [Beep] “Home” (Say the 

registered location to be edited: 
“Home”, “Work”, “Mobile”, or 
“Other”.)

   9.    Prompt:  “XXXXX... (Ex. “Mary's 

phone”) (Registered voice tag) XXXX 
(Ex. “Home”) (Registered location). Is 
this correct?”

   10.   Say:  [Beep] “Yes”
   11.   Prompt:  “The current number is 

XXXXXXXXXXX (Ex. “555-1234”) 
(Currently registered number). New 
number, please.”

 NOTE

 If there was no previous phone number 
registered to a location (Ex. “Work”), 
the prompt will only read out “Number, 
please”  

   12.   Say:  [Beep] “XXXXXXXXXXX (Ex. 

“555-5678”)” (Say the new phone 
number to be registered.)

   13.   Prompt:  “XXXXXXXX (Telephone 

number) After the beep, continue to add 
numbers, or say Go-Back to re-enter 
the last entered numbers, or press the 
Pick-Up button to save the number.”

   14.   (Number Change) 
   

Press the pick-up button, then go to 
Step 15.


 (Adding/inputting telephone 
number)


Say, “XXXX” (desired telephone 
number), then go to Step 13.


 (Telephone number correction) 


Say, “Go Back”. The prompt replies, 
“Go Back. The last entered numbers 
have been removed. Number, please.”. 
Then go back to Step 12.

   15.   Prompt:  “Number changed.”


  Phonebook  data  deletion

    (Erasing  individual  phonebook  data)

    Individual  data  registered  to  the 
Bluetooth 

®

  Hands-Free phonebook can be 

cleared.

 NOTE

 Do this function only when parked. It is 
too distracting to attempt while driving 
and you may make too many errors to 
be effective. 

   1.   Press the pick-up button or talk button 

with a short press.

   2.    Say:  [Beep] “Phonebook”
   3.    Prompt:  “Select one of the following: 

New entry, edit, list names, delete, 
erase all or import contact.”

   4.    Say:  [Beep] “Delete”
   5.    Prompt:  “Please say the name of the 

entry you would like to delete or say, 
“List names”. ”

   6.    Say:  [Beep] “XXXXX... (Ex. “John's 

phone”) ” (Say the registered voice tag 
to be deleted from the phonebook.)

5–68

Interior Features

Audio Set [Type A (non-touchscreen)]

   7.    Prompt:  “Deleting XXXXX... (Ex. 

“John's phone”) (Registered voice tag) 
Home (Registered location). Is this 
correct?”

   8.    Say:  [Beep] “Yes”
   9.    Prompt:  “XXXXX... (Ex. “John's 

phone”) (Registered voice tag) Home 
(Registered location) deleted.”


  (Complete deletion of the phonebook 
data)

    All data registered to the Bluetooth 

®


Hands-Free phonebook can be erased.

 NOTE

 Do this function only when parked. It is 
too distracting to attempt while driving 
and you may make too many errors to 
be effective. 

   1.   Press the pick-up button or talk button 

with a short press.

   2.    Say:  [Beep] “Phonebook”
   3.    Prompt:  “Select one of the following: 

New entry, edit, list names, delete, 
erase all or import contact.”

   4.    Say:  [Beep] “Erase all”
   5.    Prompt:  “Are you sure you want to 

delete everything from your Hands 
Free system phonebook?”

   6.    Say:  [Beep] “Yes”
   7.    Prompt:  “You are about to delete 

everything from your Hands Free 
system phonebook. Do you want to 
continue?”

   8.    Say:  [Beep] “Yes”
   9.    Prompt:  “Please wait, deleting the 

Hands Free system phonebook.”

   10.   Prompt:  “Hands-Free system 

phonebook deleted.”


  Read-out of names registered to the 
Bluetooth 

®

  Hands-Free phonebook

    Bluetooth 

®

  Hands-Free can read out the 

list of names registered to its phonebook.


   1.   Press the pick-up button or talk button 

with a short press.

   2.    Say:  [Beep] “Phonebook”
   3.    Prompt:  “Select one of the following: 

New entry, edit, list names, delete, 
erase all or import contact.”

   4.    Say:  [Beep] “List names”
   5.    Prompt:  “XXXXX..., XXXXX..., 

XXXXX... (Ex. “John's phone”, Mary's 
phone, Bill's phone)” (Voice guidance 
reads out the voice tags registered to 
the phonebook.)


Press the talk button with a short press 
during the read-out at the desired name, 
and then say one of the following voice 
commands to execute it.


 “Continue”: Continues the list 

readout.


 “Call”: Calls the registered 

phonebook data when the talk button 
is short-pressed.


 “Edit”: Edits the registered 

phonebook data when the talk button 
is short-pressed.


 “Delete”: Deletes the registered 

phonebook data when the talk button 
is short-pressed.


 “Previous”: Returns to the previous 

phonebook data in read-out when the 
talk button is short-pressed.


   6.    Prompt:  “End of list, would you like to 

start from the beginning?”

   7.    Say:  [Beep] “No”


5–69

Interior Features

Audio Set [Type A (non-touchscreen)]

  Redial  Function

    Redialing the number of the person 
previously dialed using the phone is 
possible.


   1.   Press the pick-up button or talk button 

with a short press.

   2.    Say:  [Beep] “Redial”
   3.    Prompt:   “Dialing”


  Telephone  Number  Input

 NOTE

 Practice this while parked until you are 
con

¿ dent you can do it while driving in 

a non-taxing road situation. If you are 
not completely comfortable, make all 
calls from a safe parking position, and 
only start driving when you can devote 
your full attention to driving. 

   1.   Press the pick-up button or talk button 

with a short press.

   2.    Say:  [Beep] “Dial”
   3.    Prompt:  “Number, please”
   4.    Say:  [Beep] “XXXXXXXXXXX 

(Telephone number)”

   5.    Prompt:   “XXXXXXXXXXX. 

(Telephone number) After the beep, 
continue to add numbers, or say 
Go-Back to re-enter the last entered 
numbers, or press the Pick-Up button to 
execute dialing.”

   6.    (Dialing) 
   

Press the pick-up button or say “Dial”, 
then go to Step 7.


 (Adding/inputting telephone 
number)


Say, “XXXX” (desired telephone 
number), then go to Step 5.


 (Telephone number correction) 


Say, “Go Back”. The prompt replies, 
“Go Back. The last entered numbers 
have been removed.”. Then go back to 
Step 3.

   7.    Prompt:   “Dialing”


 NOTE

 The “Dial” command and a telephone 
number can be combined. 
 Ex. In Step 2, say, “Dial 123-4567” 
then, Steps 3 and 4 can be skipped. 

  Emergency  calls

    A call can be made to the emergency 
phone number (112) using the voice input 
command.


   1.   Press the pick-up button or talk button 

with a short press.

   2.    Say:  [Beep] “Emergency”
   3.    Prompt:  “Dialing “112”, is this 

correct?”

   4.    Say:  [Beep] “Yes”
   5.    Prompt:   “Dialing”


           Receiving an Incoming Call

     1.    Prompt:  “Incoming call, press the 

pick-up button to answer”

   2.   To accept the call, press the pick-up 

button.


To reject the call, press the hang-up 
button.


Content   ..  24  25  26  27   ..