Lexus TX500H (2024 year). Manual in english - page 15
 

  Index      Manuals     Lexus TX500H (2024 year). Manual in english


Search            copyright infringement  


Content      ..     13      14      15      16     ..


Lexus TX500H (2024 year). Manual in english - page 15


472

6-3. Do-it-yourself maintenance

Scheduled maintenance of the air 

intake vent is necessary when

In some situations such as when the vehicle 

is used frequently or in heavy traffic or dusty 

areas, the air intake vent may need to be 

cleaned more regularly. For details, refer to 

the “Warranty and Service Guide”, 

“Owner’s Manual Supplement” or “Sched-

uled Maintenance”.

Cleaning the air intake vent

Improper handling of the air intake vent 

cover and filter may result in damage to 

them. If you have any concerns about clean-

ing the filter, contact your Lexus dealer.

1

Turn the power switch off.

2

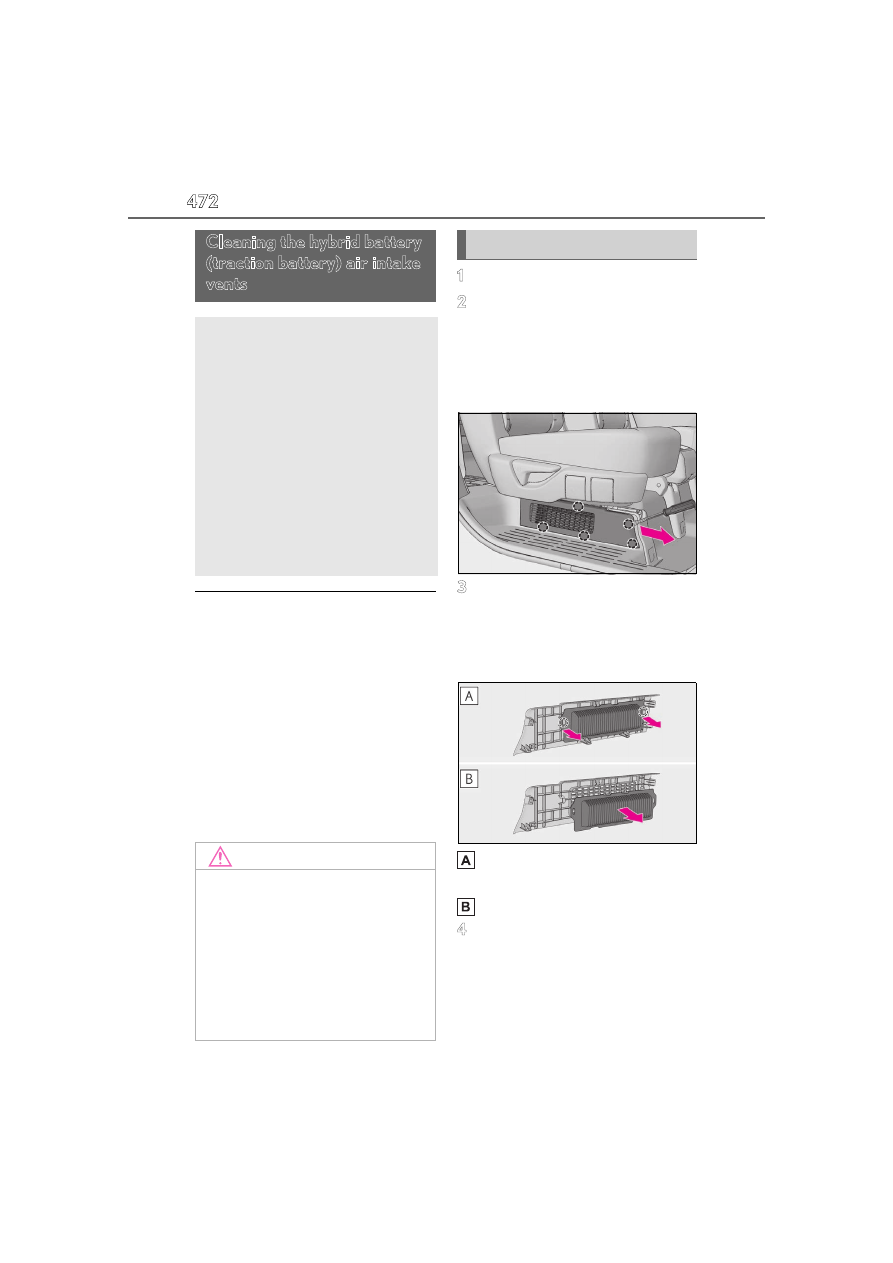
Remove the air intake vent cover.

Disengage the 5 claws as shown in the 

illustration, and pull the cover toward the 

front of the vehicle to remove it.
To prevent damage, cover the tip of the 

screwdriver with a rag.

3

Remove the filter from the air intake 
vent cover.

If dust has accumulated on the air intake 

vent cover, remove the dust with a vacuum 

cleaner, etc.

Disengage the 2 claws as shown in 
the illustration.
Remove the filter from the cover.

4

Remove the dust and sand from the 
filter.

Using a vacuum cleaner, etc., absorb dust 

and sand from the filter by profiling the 

Cleaning the hybrid battery 
(traction battery) air intake 
vents

To prevent the fuel economy from 
being affected, visually inspect the 
hybrid battery (traction battery) air 
intake vents periodically for dust 
and clogs.

If it is dusty or clogged or if “Main-
tenance Required for Traction Bat-
tery Cooling Parts See Owner’s 
Manual” is displayed on the 
multi-information display, clean the 
air intake vent using the following 
procedures:

NOTICE

If “Maintenance Required for Trac-

tion Battery Cooling Parts See 

Owner’s Manual” is displayed on the 

multi-information display

Clean the air intake vent immediately.

If the vehicle is continuously driven with 

the warning message displayed, it may 

cause a malfunction or output restriction 

of the hybrid battery (traction battery).

Cleaning procedure

473

6-3. Do-it-yourself maintenance

6

Mai
nte

na

nc

e a

nd

 c

are

nozzle lightly along the fold.

5

Hold the filter to the light and check 
if it is not clogged.

If the dust or sand cannot be removed 

completely, contact your Lexus dealer.

6

Reinstall the filter to the cover.

Install the filter to the cover.
Engage the filter to the 2 claws as 
shown in the illustration.

7

Install the air intake vent cover.

Insert the tab of the cover as shown 
in the illustration.
Push the cover to engage the 5 
claws.

If “Maintenance Required for Trac-
tion Battery Cooling Parts See 
Owner’s Manual” is displayed on 
the multi-information display

8

Start the hybrid system and check 
that the warning message is no lon-
ger displayed.

It may be necessary to drive the vehicle for 

approximately 20 minutes before the 

warning message is displayed again then 

disappears.
If the warning message does not disappear 

after some time, have the vehicle inspected 

by your Lexus dealer.

If the dust or sand on the filter cannot be 

removed

It is recommended to use a vacuum cleaner 

with plastic brushes.

WARNING

When cleaning the air intake vent

Do not use water or other liquids to 

clean the air intake vent. If water is 

applied to the hybrid battery (traction 

battery) or other components, a mal-

function or fire may occur.

474

6-3. Do-it-yourself maintenance

WARNING

Before cleaning the air intake vents, 

make sure to turn the power switch off 

to stop the hybrid system.

Do not put a hand or leg in the air 

intake vent. If it is caught in a cooling 

fan, or if it touches a high voltage part 

that results in an electric shock, death 

or serious injuries may result.

NOTICE

When cleaning the air intake vent

Do not use an air blow gun, etc.

Dust may be blown out, possibly causing 

a malfunction or output restriction of the 

hybrid battery (traction battery).

To prevent damage to the vehicle

Observe the following precautions:

Do not allow liquid or foreign matter to 

enter the air intake vent.

Make sure to reinstall the filter and 

cover to their original positions after 

cleaning.

Do not install anything to the air intake 

vent other than the exclusive filter for 

this vehicle or use the vehicle without 

the filter installed.

To prevent damage to the filter

Observe the following precautions.

If the filter is damaged, have it replaced 

with a new filter by your Lexus dealer.

Do not use an air blow gun, etc.

Do not press hard a vacuum cleaner, 

etc. against the filter.

Do not use a hard brush, such as a 

metal brush.

Do not break the fold of the filter.

475

6-3. Do-it-yourself maintenance

6

Mai
nte

na

nc

e a

nd

 c

are

If the electronic key battery is depleted

The following symptoms may occur:

The smart access system with push-but-

ton start and wireless remote control will 

not function properly.

The operational range will be reduced.

When the card key battery needs to be 

replaced (if equipped)

The battery for the card key is available only 

at your Lexus dealer can replace the bat-

tery for you.

Flathead screwdriver

Small flathead screwdriver

Lithium battery CR2032

Use a CR2032 lithium battery

Batteries can be purchased at your Lexus 

dealer, local electrical appliance shops or 

camera stores.

Replace only with the same or equivalent 

type recommended by the manufacturer.

Dispose of used batteries according to 

the local laws.

1

Take out the mechanical key.

2

Remove the cover.

To prevent damage to the key, cover the tip 

of the flathead screwdriver with a tape.

3

Remove the depleted battery.

Insert a new battery with the “+” terminal 

facing up.

Electronic key battery

Replace the battery with a new one 
if it is depleted.
As the key may be damaged if the 
following procedure is not per-
formed properly, it is recom-
mended that key battery 
replacement be performed by your 
Lexus dealer.

You will need the following items:

Replacing the battery

476

6-3. Do-it-yourself maintenance

WARNING

Battery precautions

Observe the following precautions.

Failure to do so may result in death or 

serious injury.

Do not swallow the battery. Doing so 

may cause chemical burns.

A coin battery or button battery is 

used in the electronic key. If a battery is 

swallowed, it may cause severe chemi-

cal burns in as little as 2 hours and may 

result in death or serious injury.

Keep away new and removed batteries 

from children.

If the cover cannot be firmly closed, 

stop using the electronic key and stow 

the key in the place where children 

cannot reach, and then contact your 

Lexus dealer.

If you accidentally swallow a battery or 

put a battery into a part of your body, 

get emergency medical attention 

immediately.

To prevent battery explosion or leak-

age of flammable liquid or gas

Replace the battery with a new battery 

of the same type. If a wrong type of 

battery is used, it may explode.

Do not expose batteries to extremely 

low pressure due to high altitude or 

extremely high temperatures.

Do not burn, break or cut a battery.

NOTICE

When replacing the battery

Use a flathead screwdriver of appropri-

ate size. Applying excessive force may 

deform or damage the cover.

For normal operation after replacing 

the battery

Observe the following precautions to 

prevent accidents:

Always work with dry hands.

Moisture may cause the battery to 

rust.

Do not touch or move any other com-

ponent inside the remote control.

Do not bend either of the battery ter-

minals.

477

6-3. Do-it-yourself maintenance

6

Mai
nte

na

nc

e a

nd

 c

are

1

Turn the power switch off.

2

Open the fuse box cover.

Engine compartment

Push in the claw and remove the lid.
• Type  A

• Type  B

Driver’s side instrument panel

Remove the lid.

Luggage compartment

Open the deck board (

P.406) and dis-

engage the 7 claws and pull the side deck 
board to remove it.

Push in the claw and remove the lid.

3

Remove the fuse with the pullout 
tool.

Checking and replacing 
fuses

If any of the electrical components 
do not operate, a fuse may have 
blown. If this happens, check and 
replace the fuses as necessary.

Checking and replacing fuses

478

6-3. Do-it-yourself maintenance

Only some fuses can be removed 
using the pullout tool.

4

Check if the fuse is blown.

Replace the blown fuse with a new fuse of 

an appropriate amperage rating. The 

amperage rating can be found on the fuse 

box lid.
Many types of fuse are used on this vehicle. 

This illustration shows a common type of 

fuse used on this vehicle.

Type A

Normal fuse
Blown fuse

Type B

Normal fuse
Blown fuse

Type C

Normal fuse
Blown fuse

Type D

Normal fuse
Blown fuse

After a fuse is replaced

When installing the lid, make sure that the 

tab is installed securely.

If the lights do not turn on even after the 

fuse has been replaced, a bulb may need 

replacement. (

P.480)

If the replaced fuse blows again, have the 

vehicle inspected by your Lexus dealer.

If there is an overload in a circuit

The fuses are designed to blow, protecting 

the wiring harness from damage.

479

6-3. Do-it-yourself maintenance

6

Mai
nte

na

nc

e a

nd

 c

are

When replacing light bulbs

Lexus recommends that you use genuine 

Lexus products designed for this vehicle.

Because certain bulbs are connected to cir-

cuits designed to prevent overload, 

non-genuine parts or parts not designed for 

this vehicle may be unusable.

Adjustment bolt A
Adjustment bolt B

1

Make sure the vehicle has a full 
tank of gasoline and the area 
around the headlight is not 
deformed.

2

Park the vehicle on level ground.

3

Make sure the tire inflation pres-
sure is at the specified level.

4

Have someone sit in the driver’s 
seat.

5

Bounce the vehicle several times.

1

Using a Phillips-head screwdriver, 
turn bolt A in either direction.

Remember the turning direction and the 

WARNING

To prevent system breakdowns and 

vehicle fire

Observe the following precautions.

Failure to do so may cause damage to 

the vehicle, and possibly a fire or injury.

Never use a fuse of a higher amperage 

rating than that indicated, or use any 

other object in place of a fuse.

Always use a genuine Lexus fuse or 

equivalent.

Never replace a fuse with a wire, even 

as a temporary fix.

Do not modify the fuses or fuse boxes.

Fuse box near the power control unit

Never check or replace the fuses as 

there are high voltage parts and wiring 

near the fuse box.

Doing so may cause electric shock, 

resulting in death or serious injury.

NOTICE

Before replacing fuses

Have the cause of electrical overload 

determined and repaired by your Lexus 

dealer as soon as possible.

Headlight aim

Vertical movement adjusting 
bolts

Before checking the headlight 
aim

Adjusting the headlight aim

480

6-3. Do-it-yourself maintenance

number of turns.

2

Turn bolt B the same number of 
turns and in the same direction as 
step 

1

.

If the headlight cannot be adjusted using 

this procedure, take the vehicle to your 

Lexus dealer to adjust the headlight aim.

LED Lights

The lights consist of a number of LEDs. If 

any of the LEDs burn out, take your vehicle 

to your Lexus dealer to have the light 

replaced.

Condensation build-up on the inside of 

the lens

Temporary condensation build-up on the 

inside of the lens of any light does not indi-

cate a malfunction. Contact your Lexus 

dealer for more information in the following 

situations:

Large drops of water have built up on the 

inside of the lens.

Water has built up inside the headlight.

Light bulbs

If any lights burn out, have it 
replaced by your Lexus dealer.

481

7

7

When trouble

 ari

ses

When trouble arises

.

7-1. Essential information

Emergency flashers..................

482

If your vehicle has to be stopped in 

an emergency..........................

482

If the vehicle is submerged or 

water on the road is rising ..

483

7-2. Steps to take in an emergency

If your vehicle needs to be towed

........................................................

485

If you think something is wrong

........................................................

486

If a warning light turns on or a 

warning buzzer sounds .......

488

If a warning message is displayed

........................................................

498

If you have a flat tire..................

505

If the hybrid system will not start

.........................................................

513

If you lose your keys..................

514

If the fuel filler door cannot be 

opened.........................................

515

If the electronic key does not 

operate properly .....................

516

If a door cannot be opened using 

the door opener switch.........

518

If the 12-volt battery is discharged

........................................................

520

If your vehicle overheats ........

526

If the vehicle becomes stuck

........................................................

529

482

7-1. Essential information

7-1.Essential information

Press the switch.

All the turn signal lights will flash. To turn 
them off, press the switch once again.

Emergency flashers

If the emergency flashers are used for a 

long time while the hybrid system is not 

operating (while the “READY” indicator 

is not illuminated), the 12-volt battery may 

discharge.

If any of the SRS airbags deploy (inflate) 

or in the event of a strong rear impact, the 

emergency flashers will turn on automati-

cally.

The emergency flashers will turn off auto-

matically after operating for approxi-

mately 20 minutes. To manually turn the 

emergency flashers off, press the switch 

twice. (The emergency flashers may not 

turn on automatically depending on the 

force of the impact and conditions of the 

collision.)

1

Steadily step on the brake pedal 
with both feet and firmly depress it.

Do not pump the brake pedal repeatedly 

as this will increase the effort required to 

slow the vehicle.

2

Shift the shift position to N.

If the shift position is shifted to N

3

After slowing down, stop the vehi-
cle in a safe place by the road.

4

Stop the hybrid system.

If the shift position cannot be shifted 
to N

3

Keep depressing the brake pedal 
with both feet to reduce vehicle 
speed as much as possible.

4

To stop the hybrid system, press 
and hold the power switch for 2 
consecutive seconds or more, or 

Emergency flashers

The emergency flashers are used to 
warn other drivers when the vehicle 
has to be stopped on the road due 
to a breakdown, etc.

Operating instructions

If your vehicle has to be 
stopped in an emergency

Only in an emergency, such as if it 
becomes impossible to stop the 
vehicle in the normal way, stop the 
vehicle using the following proce-
dure:

Stopping the vehicle

483

7-1. Essential information

7

W

he

n t

ro

ub

le

 a

ris

es

press it briefly 3 times or more in 
succession.

5

Stop the vehicle in a safe place by 
the road.

If the door can be opened, open the 
door and exit the vehicle.

If the door cannot be opened, open 
the window using the power window 
switch and ensure an escape route.

If the window can be opened, exit 
the vehicle through the window.

If the door and window cannot be 
opened due to the rising water, 
remain calm, wait until the water 
level inside the vehicle rises to the 
point that the water pressure inside 
of the vehicle equals the water pres-
sure outside of the vehicle and then 
open the door after waiting for the 
rising water to enter the vehicle, and 
exit the vehicle. When the outside 
water level exceeds half the height 
of the door, the door cannot be 
opened from the inside due to water 
pressure.

Water level exceeds the floor

When the water level exceeds the floor and 

time has passed, the electrical equipment 

will get damaged, the power windows will 

WARNING

If the hybrid system has to be turned 

off while driving

Power assist for the steering wheel will 

be lost, making the steering wheel 

heavier to turn. Decelerate as much as 

possible before turning off the hybrid sys-

tem.

If the vehicle is submerged 
or water on the road is rising

This vehicle is not designed to be 
able to drive on roads that are 
deeply floodedwith water. Do not 
drive on roads where the roads may 
be submerged or the water may be 
rising. It is dangerous to remain in 
the vehicle, if it is anticipated that 
the vehicle will be flooded or set 
adrift. Remain calm and follow the 
following.

484

7-1. Essential information

not operate, the engine and motor stop, and 

the vehicle may not be able to get moving.

Using an emergency escape hammer

*1

Laminated glass

*2

 is used in the windshield 

and the windows on this vehicle.
Laminated glass cannot be shattered with 
an emergency hammer

*1

.

*1

: Contact your Lexus dealer or aftermar-

ket accessory manufacturer for further 
information about an emergency ham-
mer.

*2

: If equipped

How to distinguish laminated glass

When looking from the cross-sectional 

view point, laminated glass is two sheets of 

glass pasted together.

Laminated glass
Tempered glass

WARNING

Caution while driving

Do not drive on roads where the roads 

may be submerged or the water may be 

rising. Otherwise the vehicle may be 

damaged and cannot move, as well as 

become flooded and set adrift, which 

may lead to death.

485

7-2. Steps to take in an emergency

7

W

he

n t

ro

ub

le

 a

ris

es

7-2.Steps to take in an emergency

From the front

Use a towing dolly under the rear 
wheels.

From the rear

Use a towing dolly under the front 
wheels.

If your vehicle needs to be 
towed

If towing is necessary, we recom-
mend having your vehicle towed by 
your Lexus dealer or commercial 
towing service, using a wheel-lift 
type truck or flatbed truck.

Use a safety chain system for all 
towing, and abide by all state/pro-
vincial and local laws.

Towing with a wheel-lift type 
truck

WARNING

Observe the following precautions. Fail-

ure to do so may result in death or seri-

ous injury.

When towing the vehicle

Be sure to transport the vehicle with all 

four wheels raised off the ground. If the 

vehicle is towed with the tires contacting 

the ground, the drivetrain or related 

parts may be damaged, the vehicle may 

fly off the truck, or electricity generated 

by the operation of the motor may cause 

a fire to occur depending on the nature 

of the damage or malfunction.

NOTICE

To prevent damage to the vehicle 

when towing using a wheel-lift type 

truck

Do not tow the vehicle from the rear 

when the power switch is off. The 

steering lock mechanism is not strong 

enough to hold the front wheels 

straight.

When raising the vehicle, ensure ade-

quate ground clearance for towing at 

the opposite end of the raised vehicle. 

Without adequate clearance, the vehi-

cle could be damaged while being 

towed.

486

7-2. Steps to take in an emergency

When using a flat-bed truck to trans-
port the vehicle, use tire strapping 
belts. Refer to the owner’s manual of 
the flat-bed truck for the tire strapping 
method.
In order to suppress vehicle movement 
during transportation, set the parking 
brake and turn the power switch off.

Fluid leaks under the vehicle
(Water dripping from the air condi-
tioning after use is normal.)

Flat-looking tires or uneven tire 
wear

Engine coolant temperature gauge 
continually points higher than nor-
mal

Changes in exhaust sound

Excessive tire squeal when corner-
ing

Strange noises related to the sus-
pension system

Pinging or other noises related to 
the hybrid system

Engine missing, stumbling or run-
ning roughly

Appreciable loss of power

Vehicle pulls heavily to one side 
when braking

NOTICE

Towing with a sling-type truck

Do not tow with a sling-type truck to pre-

vent body damage.

Using a flatbed truck

NOTICE

To prevent damage to the vehicle 

during emergency towing

Do not secure cables or chains to the 

suspension components.

If you think something is 
wrong

If you notice any of the following 
symptoms, your vehicle probably 
needs adjustment or repair. Con-
tact your Lexus dealer as soon as 
possible.

Visible symptoms

Audible symptoms

Operational symptoms

487

7-2. Steps to take in an emergency

7

When trouble

 ari

ses

Vehicle pulls heavily to one side 
when driving on a level road

Loss of brake effectiveness, spongy 
feeling, pedal almost touches the 
floor

488

7-2. Steps to take in an emergency

Brake system warning light (warning buzzer)

Brake system warning light (warning buzzer)

High coolant temperature warning light

*

 (warning buzzer)

*

: This light illuminates on the multi-information display.

If a warning light turns on or a warning buzzer sounds

Calmly perform the following actions if any of the warning lights comes on or 
flashes. If a light comes on or flashes, but then goes off, this does not necessar-
ily indicate a malfunction in the system. However, if this continues to occur, 
have the vehicle inspected by your Lexus dealer.

Actions to the warning lights or warning buzzers

Warning light

Details/Actions

(U.S.A.)

or

(red)

(Canada)

Indicates that:

The brake fluid level is low; or

The brake system is malfunctioning

Immediately stop the vehicle in a safe place and contact your Lexus 
dealer. Continuing to drive the vehicle may be dangerous.

Warning light

Details/Actions

(yellow)

Indicates a malfunction in:

The regenerative braking system;

The electronically controlled brake system; or

The parking brake system

Have the vehicle inspected by your Lexus dealer immediately.

Warning light

Details/Actions

Indicates that the engine coolant temperature is too high

Immediately stop the vehicle in a safe place.
Handling method (

P.526)

489

7-2. Steps to take in an emergency

7

When trouble

 ari

ses

Hybrid system overheat warning light

*

(warning buzzer)

*

: This light illuminates on the multi-information display.

Charging system warning light

*

(warning buzzer)

*

: This light illuminates on the multi-information display.

Low engine oil pressure warning light

*

 (warning buzzer)

*

: This light illuminates on the multi-information display.

Malfunction indicator lamp

Warning light

Details/Actions

Indicates the hybrid system has overheated

Stop the vehicle in a safe place.
Handling method (

P.526)

Warning light

Details/Actions

Indicates a malfunction in the vehicle’s charging system

Immediately stop the vehicle in a safe place and contact your Lexus 
dealer.

Warning light

Details/Actions

Indicates that the engine oil pressure is too low

Immediately stop the vehicle in a safe place and contact your Lexus 
dealer.

Warning light

Details/Actions

(U.S.A.)

or

(Canada)

Indicates a malfunction in:

The hybrid system;

The electronic engine control system;

The electronic throttle control system; or

The electronic automatic transmission control system

Immediately stop the vehicle in a safe place and contact your Lexus 
dealer.

490

7-2. Steps to take in an emergency

SRS warning light

ABS warning light

Inappropriate pedal operation warning light

*

 (warning buzzer)

*

: This light illuminates on the multi-information display.

Electric power steering system warning light (warning buzzer)

Warning light

Details/Actions

Indicates a malfunction in:

The SRS airbag system;

The front passenger occupant classification system; or

The seat belt pretensioner system

Have the vehicle inspected by your Lexus dealer immediately.

Warning light

Details/Actions

(U.S.A.)

or

(Canada)

Indicates a malfunction in:

The ABS; or

The brake assist system

Have the vehicle inspected by your Lexus dealer immediately.

Warning light

Details/Actions

When a buzzer sounds:

Brake Override System is malfunctioning;

Drive-Start Control is malfunctioning; or

Drive-Start Control is operating;

Follow the instructions displayed on the multi-information display.

When a buzzer does not sound:
Brake Override System is operating

Release the accelerator pedal and depress the brake pedal.

Warning light

Details/Actions

(red/yellow)

Indicates a malfunction in the EPS (Electric Power Steering) system

Have the vehicle inspected by your Lexus dealer immediately.

491

7-2. Steps to take in an emergency

7

When trouble

 ari

ses

Low fuel level warning light

Driver’s and front passenger’s seat belt reminder light (warning buzzer)

*

*

: Driver’s seat belt warning buzzer:

The driver’s seat belt warning buzzer sounds to alert the driver that his or her seat belt is not 
fastened. Once the power switch is turned to ON, the buzzer sounds. If the seat belt is still 
unfastened, the buzzer sounds intermittently for a certain period of time after the vehicle 
reaches a certain speed.
Front passenger’s seat belt warning buzzer:
The front passenger’s seat belt warning buzzer sounds to alert the front passenger that his 
or her seat belt is not fastened. If the seat belt is unfastened, the buzzer sounds intermit-
tently for a certain period of time after the vehicle reaches a certain speed.

Rear passengers’ seat belt reminder light (warning buzzer)

*

*

: Rear passengers’ seat belt warning buzzer:

The rear passengers’ seat belt warning buzzer sounds to alert the rear passenger that his or 
her seat belt is not fastened. If the seat belt is unfastened, the buzzer sounds intermittently 
for a certain period of time, after the seat belt is fastened and unfastened and the vehicle 
reaches a certain speed.

Warning light

Details/Actions

Indicates that remaining fuel is approximately 2.5 gal. (9.7 L, 2.1 Imp. 
gal.) or less

Refuel the vehicle.

Warning light

Details/Actions

Warns the driver and/or front passenger to fasten their seat belts

Fasten the seat belt. 
If the front passenger’s seat is occupied, the front passenger’s seat 
belt also needs to be fastened to make the warning light (warning 
buzzer) turn off.

Warning light

Details/Actions

Warns the second and/or third seat passengers to fasten their seat belts. 
An indicator corresponding to an unfastened second or third seat seat 
belt will illuminate.

Fasten the seat belt.

492

7-2. Steps to take in an emergency

Tire pressure warning light (warning buzzer)

PCS warning light (warning buzzer)

LTA indicator (warning buzzer)

LDA indicator (warning buzzer)

Warning light

Details/Actions

When the light comes on (a buzzer sounds):

Low tire inflation pressure from natural causes

After the temperature of the tires has lowered sufficiently, check 
the inflation pressure of each tire and adjust them to the specified 
level.

Low tire inflation pressure from flat tire

Immediately stop the vehicle in a safe place and perform the nec-
essary actions. (

P.495)

When the light comes on after blinking for approximately 1 minute (a 
buzzer does not sounds):
Malfunction in the tire pressure warning system

Have the system checked by your Lexus dealer.

Warning light

Details/Actions

Indicates a malfunction in the PCS (Pre-Collision System).

Follow the instructions displayed on the multi-information display.

If the PCS (Pre-Collision System) or VSC (Vehicle Stability Control) 
system is disabled, the PCS warning light will illuminate.

Warning light

Details/Actions

(yellow)

Indicates a malfunction in the LTA (Lane Tracing Assist)

Follow the instructions displayed on the multi-information display.

Warning light

Details/Actions

(yellow)

Indicates a malfunction in the LDA (Lane Departure Alert).

Follow the instructions displayed on the multi-information display.

493

7-2. Steps to take in an emergency

7

When trouble

 ari

ses

PDA indicator (warning buzzer)

Dynamic radar cruise control indicator (warning buzzer)

Cruise control indicator (warning buzzer)

Driving assist information indicator

Warning light

Details/Actions

(yellow)

Indicates a malfunction in the PDA (Proactive Driving Assist).

Follow the instructions displayed on the multi-information display.

Warning light

Details/Actions

(yellow)

Indicates a malfunction in the dynamic radar cruise control.

Follow the instructions displayed on the multi-information display.

Warning light

Details/Actions

(yellow)

Indicates a malfunction in the cruise control.

Follow the instructions displayed on the multi-information display.

Warning light

Details/Actions

Indicates either of the following systems may be malfunctioning.

PCS (Pre-Collision System)

LDA (Lane Departure Alert)

Follow the instructions displayed on the multi-information display.

Indicates one of the following systems is malfunctioning or disabled.

PKSB (Parking Support Brake)

RCD (Rear Camera Detection)

BSM (Blind Spot Monitor)

RCTA (Rear cross traffic alert)

Safe Exit Assist (with door opening control)

Follow the instructions displayed on the multi-information display.

494

7-2. Steps to take in an emergency

Intuitive parking assist OFF indicator (warning buzzer)

Slip indicator

*

: If  equipped

Parking brake indicator

Warning light

Details/Actions

When a buzzer sounds:
Indicates a malfunction in the intuitive parking assist function

Have the vehicle inspected by your Lexus dealer immediately.

When a buzzer sounds:
Indicates that the system is temporarily unavailable, possibly due to a 
sensor being dirty or covered with ice, etc.

Follow the instructions displayed on the multi-information display. 
(

P.503)

Warning light

Details/Actions

(illuminates)

Indicates a malfunction in:

The VSC system;

The TRAC system;

The Trail Mode function;

The Trailer Sway Control

*

; or

The hill-start assist control system

Have the vehicle inspected by your Lexus dealer immediately.

Warning light

Details/Actions

(flashes)

(U.S.A.)

or

(flashes)

(Canada)

It is possible that the parking brake is not fully engaged or released

Operate the parking brake switch once again.

This light comes on when the parking brake is not released. If the light 
turns off after the parking brake is fully released, the system is operating 
normally.

495

7-2. Steps to take in an emergency

7

When trouble

 ari

ses

Brake hold operated indicator

Warning buzzer

In some cases, the buzzer may not be heard 

due to being in a noisy location or audio 

sound.

Front passenger detection sensor, seat 

belt reminder and warning buzzer

If luggage is placed on the front passen-

ger seat, the front passenger detection 

sensor may cause the warning light to 

flash and the warning buzzer to sound 

even if a passenger is not sitting in the 

seat.

If a cushion is placed on the seat, the sen-

sor may not detect a passenger, and the 

warning light may not operate properly.

SRS warning light

This warning light indicates problems with 

the following:

Airbag sensor assembly

Front impact sensors

Side impact sensors (front door)

Side impact sensors (front)

Side impact sensors (rear door)

Front passenger occupant classification 

sensors

Driver’s seat position sensor

Front passenger’s seat belt buckle switch

“AIR BAG ON” indicator light

“AIR BAG OFF” indicator light

Seat belt pretensioners

SRS airbags

SRS system related wiring harnesses and 

power sources

If the malfunction indicator lamp comes 

on while driving

First check the following:

Is the fuel tank empty?

If it is, fill the fuel tank immediately.

Is the fuel tank cap loose?

If it is, tighten it securely.

The light will go off after several driving 

trips.
If the light does not go off even after several 

trips, contact your Lexus dealer as soon as 

possible.

Electric power steering system warning 

light (warning buzzer)

When the 12-volt battery charge becomes 

insufficient or the voltage temporarily 

drops, the electric power steering system 

warning light may come on and the warning 

buzzer may sound.

When the tire pressure warning light 

comes on

Inspect the tires to check if a tire is punc-

tured.
If a tire is punctured: 

P.505

If none of the tires are punctured:

Turn the power switch off then turn it to ON. 

Check if the tire pressure warning light 

comes on or blinks.

If the tire pressure warning light blinks for 

1 minute then stays on

There may be a malfunction in the tire 

pressure warning system. Have the vehicle 

inspected by your Lexus dealer immedi-

ately.

If the tire pressure warning light comes 

on

1

After the temperature of the tires has 

lowered sufficiently, check the inflation 

pressure of each tire and adjust them to 

the specified level.

2

If the warning light does not turn off 

even after several minutes have 

elapsed, check that the inflation pres-

Warning light

Details/Actions

(flashes)

Indicates a malfunction in the brake hold system

Have the vehicle inspected by your Lexus dealer immediately.

496

7-2. Steps to take in an emergency

sure of each tire is at the specified level 

and perform the tire inflation pressure 

setting procedure.. (

P.462)

If the warning light does not turn off even 

after several minutes have elapsed since 

performing the tire inflation pressure setting 

procedure, have the vehicle inspected by 

your Lexus dealer immediately.

The tire pressure warning light may 

come on due to natural causes

The tire pressure warning light may come 

on due to natural causes such as natural air 

leaks and tire inflation pressure changes 

caused by temperature. In this case, adjust-

ing the tire inflation pressure will turn off the 

warning light (after a few minutes).

When a tire is replaced with a spare tire

The compact spare tire is not equipped with 

a tire pressure warning valve and transmit-

ter. If a tire goes flat, the tire pressure warn-

ing light will not turn off even though the flat 

tire has been replaced with the spare tire. 

Replace the spare tire with the repaired tire 

and adjust the tire inflation pressure. The 

tire pressure warning light will go off after a 

few minutes.

Conditions that the tire pressure warn-

ing system may not function properly

P.460

WARNING

If both the ABS and the brake system 

warning lights remain on

Stop your vehicle in a safe place immedi-

ately and contact your Lexus dealer.

The vehicle will become extremely 

unstable during braking, and the ABS 

system may fail, which could cause an 

accident resulting in death or serious 

injury.

When the electric power steering 

system warning light comes on

When the light comes on yellow, the 

assist to the power steering is restricted. 

When the light comes on red, the assist 

to the power steering is lost and handling 

operations of the steering wheel become 

extremely heavy.

When steering wheel operations are 

heavier than usual, grip the steering 

wheel firmly and operate it using more 

force than usual.

If the tire pressure warning light 

comes on

Be sure to observe the following precau-

tions.

Failure to do so could cause a loss of 

vehicle control and result in death or 

serious injury.

Stop your vehicle in a safe place as 

soon as possible. Adjust the tire infla-

tion pressure immediately.

If the tire pressure warning light comes 

on even after tire inflation pressure 

adjustment, it is probable that you have 

a flat tire. Check the tires. If a tire is flat, 

change it with the spare tire and have 

the flat tire repaired by the nearest 

Lexus dealer.

Avoid abrupt maneuvering and brak-

ing.

If the vehicle tires deteriorate, you 

could lose control of the steering 

wheel or the brakes.

If a blowout or sudden air leakage 

should occur

The tire pressure warning system may 

not activate immediately.

497

7-2. Steps to take in an emergency

7

W

he

n t

ro

ub

le

 a

ris

es

WARNING

Maintenance of the tires

Each tire, including the spare (if pro-

vided), should be checked monthly when 

cold and inflated to the inflation pressure 

recommended by the vehicle manufac-

turer on the vehicle placard or tire infla-

tion pressure label (tire and load 

information label). (If your vehicle has 

tires of a different size than the size indi-

cated on the vehicle placard or tire infla-

tion pressure label [tire and load 

information label], you should determine 

the proper tire inflation pressure for 

those tires.)

As an added safety feature, your vehicle 

has been equipped with a tire pressure 

monitoring system (TPMS-tire pressure 

warning system) that illuminates a low 

tire pressure telltale (tire pressure warn-

ing light) when one or more of your tires 

is significantly under-inflated. Accord-

ingly, when the low tire pressure telltale 

(tire pressure warning light) illuminates, 

you should stop and check your tires as 

soon as possible, and inflate them to the 

proper pressure. Driving on a signifi-

cantly under-inflated tire causes the tire 

to overheat and can lead to tire failure. 

Under-inflation also reduces fuel effi-

ciency and tire tread life, and may affect 

the vehicle’s handling and stopping abil-

ity.

Please note that the TPMS (tire pressure 

warning system) is not a substitute for 

proper tire maintenance, and it is the 

driver’s responsibility to maintain correct 

tire pressure, even if under-inflation has 

not reached the level to trigger illumina-

tion of the TPMS low tire pressure telltale 

(tire pressure warning light).

Your vehicle has also been equipped with 

a TPMS (tire pressure warning system) 

malfunction indicator to indicate when 

the system is not operating properly. The 

TPMS (tire pressure warning system) 

malfunction indicator is combined with 

the low tire pressure telltale (tire pres-

sure warning light). When the system 

detects a malfunction, the telltale will 

flash for approximately one minute and 

then remain continuously illuminated. 

This sequence will continue upon subse-

quent vehicle start-ups as long as the 

malfunction exists. When the malfunction 

indicator is illuminated, the system may 

not be able to detect or signal low tire 

pressure as intended.

TPMS (tire pressure warning system) 

malfunctions may occur for a variety of 

reasons, including the installation of 

replacement or alternate tires or wheels 

on the vehicle that prevent the TPMS 

(tire pressure warning system) from func-

tioning properly. Always check the 

TPMS (tire pressure warning system) 

malfunction telltale after replacing one 

or more tires or wheels on your vehicle to 

ensure that the replacement or alternate 

tires and wheels allow the TPMS (tire 

pressure warning system) to continue to 

function properly.

NOTICE

To ensure the tire pressure warning 

system operates properly

Do not install tires with different specifi-

cations or makers, as the tire pressure 

warning system may not operate prop-

erly.

498

7-2. Steps to take in an emergency

If a warning message is dis-
played

The multi-information display 
shows warnings for system malfunc-
tions and incorrectly performed 
operations, and messages that indi-
cate a need for maintenance. 
When a message is displayed, per-
form the appropriate corrective 
action for the message.

Additionally, if a warning light 
comes on or flashes at the same 
time that a warning message is dis-
played, take the appropriate cor-
rective action for the warning light. 
(

P.488)

If a warning message is displayed 
again after the appropriate actions 
have been performed, contact your 
Lexus dealer.

499

7-2. Steps to take in an emergency

7

When trouble

 ari

ses

The warning lights and warning buzzers operate as follows depending on the con-
tent of the message. If a message indicates the need for inspection by a dealer, have 
the vehicle inspected by your Lexus dealer immediately.

*

: A buzzer sounds the first time a message is shown on the multi-information display.

Warning messages

The warning messages explained below 

may differ from the actual messages 

according to operation conditions and vehi-

cle specifications.

Warning buzzer

In some cases, the buzzer may not be heard 

due to being in a noisy location or audio 

sound.

If “Engine Oil Level Low Add or 

Replace” is displayed

The engine oil level is low. Check the level 

of the engine oil, and add if necessary. 

(

P.451)

This message may appear if the vehicle is 

stopped on a slope. Move the vehicle to a 

level surface and check to see if the mes-

sage disappears.

If “Hybrid System Stopped Steering 

Power Low” is displayed

This message is displayed if the hybrid sys-

tem is stopped while driving.
When steering wheel operations are 

heavier than usual, grip the steering wheel 

firmly and operate it using more force than 

usual.

If “Power Reduced to Lower Engine 

Temp” is displayed

This message may be displayed when the 

engine coolant temperature is high.
At that time, the engine power output is 

reduced until the temperature decreases to 

the specified level. It is still possible to con-

tinue driving normally, meanwhile the 

acceleration performance or vehicle speed 

may be lowered. After driving for a while 

and the engine coolant temperature is 

dropped, this message will disappear and 

Messages and warnings

Warning light

Warning buzzer

*

Warning

-

Sounds

Indicates an important situation, such as when a 
system related to driving is malfunctioning or that 
danger may result if the correction procedure is 
not performed

Indicates a situation, such as when damage to the 
vehicle or danger may result

Comes on or 

flashes

Sounds

Indicates an important situation, such as when the 
systems shown on the multi-information display 
may be malfunctioning

-

Does not sound

Indicates a condition, such as malfunction of elec-
trical components, their condition, or indicates 
the need for maintenance

Indicates a situation, such as when an operation 
has been performed incorrectly, or indicates how 
to perform an operation correctly

500

7-2. Steps to take in an emergency

engine power output will resume once the 

engine coolant temperature has decreased 

to normal.
If after driving for a while the message does 

not disappear or it comes on and off fre-

quently, contact your Lexus dealer.

If “Hybrid System Overheated Output 

Power Reduced” is displayed

This message may be displayed when driv-

ing under severe operating conditions. (For 

example, when driving up a long steep hill.) 

Handling method: 

P.526

If “Shift to P Before Exiting Vehicle” is 

displayed

This message is displayed when the driver’s 

door is opened without turning the power 

switch off with the shift lever in any position 

other than P. Change the shift lever to P.

If “Shift is in N Release Accelerator 

Before Shifting” is displayed

The accelerator pedal has been depressed 

when the shift position is in N.
Release the accelerator pedal and change 

the shift position to D, M or R.

If “Press brake when vehicle is stopped 

Hybrid system may overheat” is dis-

played

The message may be displayed when the 

accelerator pedal is depressed to hold the 

vehicle while the vehicle is stopped on an 

incline, etc. The hybrid system may over-

heat. Release the accelerator pedal and 

depress the brake pedal.

If “Auto Power OFF to Conserve Bat-

tery” is displayed

Power was cut off due to the automatic 

power off function. Next time when starting 

the hybrid system, operate the hybrid sys-

tem for approximately 5 minutes to 

recharge the 12-volt battery.

If “Headlight System Malfunction Visit 

Your Dealer” is displayed

The following systems may be malfunction-

ing. Have the vehicle inspected by your 

Lexus dealer immediately.

The LED headlight system

The automatic headlight leveling system 

(if equipped)

AHB (Automatic High Beam)

AHS (Adaptive High-beam System) (if 

equipped)

If “System Malfunction Visit Your 

Dealer” is displayed

Indicates one of the following systems is dis-

abled.

PCS (Pre-Collision System)

LDA (Lane Departure Alert)

LTA (Lane Tracing Assist)

 LCA (Lane Change Assist) (if 

equipped)

AHB (Automatic High Beam)

AHS (Adaptive High-beam System) (if 

equipped)

Dynamic radar cruise control

 RSA (Road Sign Assist) (if equipped)

PDA (Proactive Driving Assist)

 BSM (Blind Spot Monitor)

 RCTA (Rear Cross Traffic Alert)

 Safe Exit Assist

 Intuitive Parking Assist

 PKSB (Parking Support Brake)

 RCD (Rear camera detection)

Have the vehicle inspected by your Lexus 

dealer immediately.

If “System Stopped See Owner's Man-

ual” is displayed

Indicates one of the following systems is dis-

abled.

PCS (Pre-Collision System)

LDA (Lane Departure Alert)

LTA (Lane Tracing Assist)

 LCA (Lane Change Assist) (if 

equipped)

AHB (Automatic High Beam)

AHS (Adaptive High-beam System) (if 

501

7-2. Steps to take in an emergency

7

When trouble

 ari

ses

equipped)

Dynamic radar cruise control

 RSA (Road Sign Assist) (if equipped)

PDA (Proactive Driving Assist)

 BSM (Blind Spot Monitor)

 RCTA (Rear Cross Traffic Alert)

 Safe Exit Assist

 Intuitive Parking Assist

 PKSB (Parking Support Brake)

 RCD (Rear camera detection)

Follow the following correction methods.
• Check the voltage of the 12-volt battery
• Check the sensors that the Lexus Safety 

System+ 3 uses for foreign matter cover-

ing them. Remove them if any. (

P.225)

• Check if the back door is open.
Indicates the sensors may not be operating 

properly.

Intuitive Parking Assist (

P.303)

PKSB (static objects front and rear of the 

vehicle) (

P.325)

PKSB (moving vehicles rear of the vehi-

cle) (

P.327)

PKSB (pedestrians rear of the vehicle) 

(

P.329)

PKSB (pedestrians rear of the vehicle) 

(

P.329)

PKSB (static objects around the vehicle) 

(if equipped) (

P.325)

RCD (

P.317)

BSM (Blind Spot Monitor) (

P.295)

RCTA (Rear Cross Traffic Alert) 

(

P.313)

Safe Exit Assist (

P.300)

Check the rear bumper around the sensors 

(

P.292) used by the BSM, RCTA, Safe 

Exit Assist for foreign matter covering them. 

Remove them if any.
Check the sensors including camera sen-

sors used by the Intuitive Parking Assist, and 

PKSB, for foreign matter covering them. 

Remove them if any.
When problems are solved and the sensors 

are operational, this indication may disap-

pear by itself.

If “System Stopped Front Camera Low 

Visibility See Owner's Manual” is dis-

played

Indicates one of the following systems is dis-

abled.

PCS (Pre-Collision System)

LDA (Lane Departure Alert)

LTA (Lane Tracing Assist)

 LCA (Lane Change Assist) (if 

equipped)

AHB (Automatic High Beam)

AHS (Adaptive High-beam System) (if 

equipped)

Dynamic radar cruise control

 RSA (Road Sign Assist) (if equipped)

PDA (Proactive Driving Assist)

Follow the following correction methods.
• Using the windshield wipers, remove the 

dirt or foreign matter from the wind-

shield.

• Using  the  air  conditioning system, defog 

the windshield.

• Close  the  hood,  remove any stickers, etc. 

to clear the obstruction in front of the 

front camera.

If “System Stopped Front Camera Out 

of Temperature Range Wait until Nor-

mal Temperature” is displayed

Indicates one of the following systems is dis-

abled.

PCS (Pre-Collision System)

LDA (Lane Departure Alert)

LTA (Lane Tracing Assist)

 LCA (Lane Change Assist) (if 

equipped)

AHB (Automatic High Beam)

AHS (Adaptive High-beam System) (if 

equipped)

502

7-2. Steps to take in an emergency

Dynamic radar cruise control

 RSA (Road Sign Assist) (if equipped)

PDA (Proactive Driving Assist)

Follow the following correction methods.
• If the front camera is hot, such as after the 

vehicle is parked in the sun, use the air 

conditioning system to decrease the tem-

perature around the front camera

• If a sunshade was used when the vehicle 

was parked, depending on its type, the 

sunlight reflected from the surface of the 

sunshade may cause the temperature of 

the front camera to become excessively 

high

• If the front camera is cold, such after the 

vehicle is parked in an extremely cold 

environment, use the air conditioning sys-

tem to increase the temperature around 

the front camera

If “System Stopped Front Radar Sensor 

Blocked Clean Radar Sensor” is dis-

played

Indicates one of the following systems is dis-

abled.

PCS (Pre-Collision System)

LDA (Lane Departure Alert)

LTA (Lane Tracing Assist)

 LCA (Lane Change Assist) (if 

equipped)

AHB (Automatic High Beam)

AHS (Adaptive High-beam System) (if 

equipped)

Dynamic radar cruise control

PDA (Proactive Driving Assist)

Follow the following correction methods.
• Check if there is any foreign matter 

attached to the radar sensor or radar 

sensor cover and clean them if necessary 

(

P.226)

• This message may be displayed when 

driving in an open area with few nearby 

vehicles or structures, such as a desert, 

grasslands, suburbs, etc. The message 

may be cleared by driving the vehicle in 

an area with structures, vehicles, etc. 

nearby.

If “System Stopped Front Radar Sensor 

Out of Temperature Range Wait until 

Normal Temperature” is displayed

Indicates one of the following systems is dis-

abled.

PCS (Pre-Collision System)

LDA (Lane Departure Alert)

LTA (Lane Tracing Assist)

 LCA (Lane Change Assist) (if 

equipped)

AHB (Automatic High Beam)

AHS (Adaptive High-beam System) (if 

equipped)

Dynamic radar cruise control

PDA (Proactive Driving Assist)

The temperature of the radar sensor is out-

side of the operating range. Wait for the 

temperature to become appropriate.

If “System Stopped Front Radar In Self 

Calibration See Owner's Manual” is dis-

played

Indicates one of the following systems is dis-

abled.

PCS (Pre-Collision System)

LDA (Lane Departure Alert)

LTA (Lane Tracing Assist)

 LCA (Lane Change Assist) (if 

equipped)

AHB (Automatic High Beam)

AHS (Adaptive High-beam System) (if 

equipped)

Dynamic radar cruise control

PDA (Proactive Driving Assist)

Follow the following correction methods.
• Check if there is any foreign matter 

attached to the radar sensor or radar 

sensor cover and clean them if necessary 

(

P.226)

• The radar sensor may be misaligned and 

will be adjusted automatically while driv-

ing. Continue driving for a while.

503

7-2. Steps to take in an emergency

7

When trouble

 ari

ses

If “Unavailable Activation Condition not 

Satisfied See Owner's Manual” is dis-

played

 The LCA function cannot be used as 

the operating conditions have not been 

met.
Operate the turn signal lever again after all 

of the operating conditions are met.

If “Cruise Control Unavailable See 

Owner's Manual” is displayed

Indicates one of the following systems is dis-

abled.

Dynamic radar cruise control

Cruise control

A message is displayed when the driving 

assist switch is pushed repeatedly.
Press the driving assist switch quickly and 

firmly.

If “Driver Monitor Out of Temperature 

Range Wait until Normal Temperature” 

is displayed

Indicates one of the following systems is dis-

abled.

Driver monitor (if equipped)

Traffic Jam Assist (if equipped)

The temperature of the driver monitor cam-

era is outside of the operating range. Wait 

for the temperature to become appropri-

ate.

If “Driver Monitor Unavailable See 

Owner's Manual” is displayed

The lens of the driver monitor camera may 

be dirty.
When there is dirt on the camera lens, clean 

it with a dry, soft cloth so as to not damage 

it.

If “Parking Assist Unavailable Sensor 

Blocked” is displayed

A sensor may be covered with water drops, 

ice, snow, dirt, etc. Remove the water drops, 

ice, snow, dirt, etc., from the sensor to return 

the system to normal.
Also, due to ice forming on a sensor at low 

temperatures, a warning message may be 

displayed or the sensor may not be able to 

detect an object. Once the ice melts, the 

system will return to normal.
If a sensor is dirty, the position of the dirty 

sensor will be shown on the display.
If an abnormality is displayed even though 

there are no water drops, ice, snow or dirt, 

the sensor may be operating abnormally. 

Have the vehicle inspected by your Lexus 

dealer.

If “Parking Assist Unavailable Low Visi-

bility See Owner's Manual” is displayed

Indicates one of the following systems is dis-

abled.

 RCD (Rear camera detection)

 PKSB (Parking Support Brake)

Remove any dirt or foreign matter from the 

rear camera.

If “Shift System Malfunction Shifting 

Unavailable Drive to a Safe Place and 

Stop” or “Shift System Malfunction 

Driving Unavailable” is displayed

There is a malfunction in the shift control 

system. Have the vehicle inspected by your 

Lexus dealer immediately.

If a message that indicates the need for 

the shift lever operation is displayed

To prevent the shift lever from being oper-

ated incorrectly or the vehicle from moving 

unexpectedly, a message that requires shift-

ing the shift position may be displayed on 

the multi-information display. In that case, 

follow the instruction of the message and 

shift the shift position.

If “Check Fuel Cap” is displayed

The fuel tank cap is not properly installed. 

Correctly install the fuel tank cap.

If “Maintenance Required Soon” is dis-

played

Indicates that all maintenance according to 

the driven distance on the maintenance 
schedule

*

 should be performed soon.

Comes on approximately 4500 miles 

(7200 km) after the message has been 

reset. If necessary, perform maintenance. 

Please reset the message after the mainte-

nance is performed. (

P.440)


Content      ..     13      14      15      16     ..