Lexus NX450H+ (2022 year). Manual in english - page 12
 

  Index      Manuals     Lexus NX450H+ (2022 year). Manual in english


Search            copyright infringement  


Content      ..     10      11      12      13     ..


Lexus NX450H+ (2022 year). Manual in english - page 12


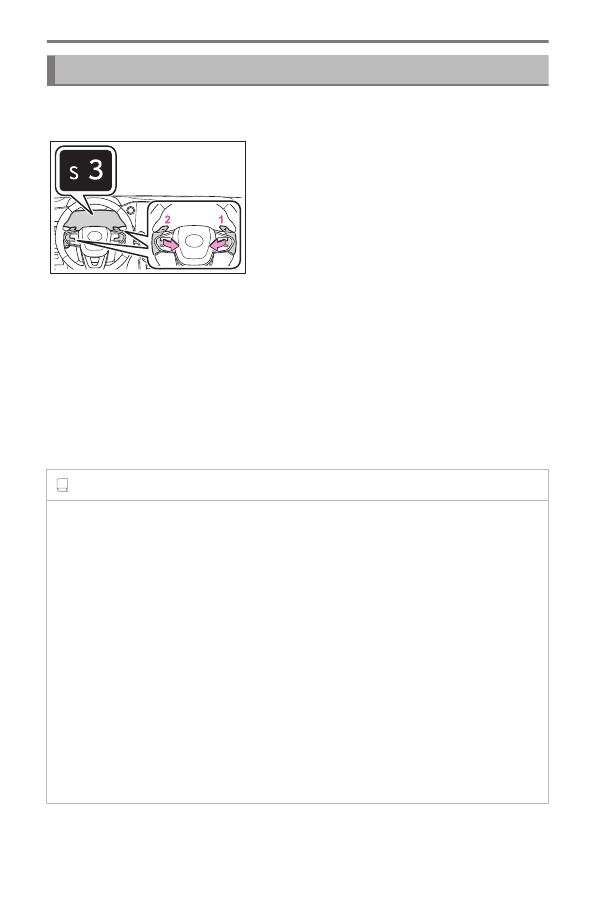
Selecting shift ranges in the S position

To enter S mode, change the shift position to S.
The shift range can be selected by operating the [-] and [+] paddle shift switches.


1

Upshift

2

Downshift

The selected shift range, from S1 to S6, will be displayed on the multi-information
display.
The initial shift range in S position is set automatically to S4 or S5 according to
vehicle speed.

Shift ranges and their functions

You can choose from 6 levels of accelerating force and engine braking force.

A lower shift range will provide greater accelerating force and engine braking force
than a higher shift range, and the engine revolutions will also increase.

INFORMATION

S mode

To prevent the engine from over-revving, upshifting may automatically occur when the
shift range is S4 or lower.

When in S4 or lower, if the paddle shift switch is held toward [

] the shift range will be

set to S6.

Downshifting restriction warning buzzer

To help ensure safety and driving performance, downshift operations may be restricted.
In some circumstances, downshifting may not be possible even when the paddle shift
switch is operated. (A buzzer will sound twice.)

If the "S" indicator does not come on or the "D" indicator is displayed even after
changing the shift position to S position

This may indicate a malfunction in the hybrid transmission system. Have the vehicle
inspected by your Lexus dealer immediately. (In this situation, the hybrid transmission will
operate in the same manner as when the shift position is in D.)

2-2. Driving procedures

202

Parking the vehicle

When parking the vehicle

Precautions for when the vehicle is stopped or parked

WARNING

When the vehicle is parked

Always apply the parking brake, shift the shift position to P, stop the hybrid system and
lock the vehicle. Do not leave the vehicle unattended while the "READY" indicator is
illuminated.
If the vehicle is parked with the shift position in P but the parking brake is not set, the
vehicle may start to move, possibly leading to an accident.

Never leave a child unattended in the vehicle. A child may accidentally release the
parking brake and the vehicle may move, possibly leading to an accident.

Do not leave glasses, cigarette lighters, spray cans or carbonated drink cans in the
vehicle when it is parked in the sun. If left in the vehicle, the following may occur:

Gas may leak from a cigarette lighter or spray can, and may lead to a fire.

The temperature inside the vehicle may cause the plastic lenses and plastic material
of glasses to deform or crack.

Soft drink cans may explode, dirtying the interior and possibly causing a short in
electronic components.

Do not store cigarette lighters in the vehicle storage features or leave them inside the
vehicle.
When luggage is loaded or a seat is adjusted, a lighter may be unintentionally lit,
possibly leading to a fire.

Do not attach suction cups to the glass parts of the vehicle. Also, do not place air
fresheners or other clear containers on the instrument panel or dashboard. Suction
cups and clear containers may act as a lens, possibly leading to a fire inside the vehicle.

Do not leave a door or window open if the curved glass is coated with a metallized film
such as a silver-colored one.
Reflected sunlight may cause the glass to act as a lens, causing a fire.

Do not touch the exhaust pipes while the "READY" indicator is illuminated or immedi-
ately after turning the hybrid system off. Doing so may cause burns.

When taking a nap in the vehicle

Always turn the hybrid system off. If the "READY" indicator remains illuminated while
taking a nap, you may unintentionally operate the shift lever or accelerator pedal, possibly
leading to an accident or a fire from the hybrid system overheating. Additionally, if the
vehicle is parked in a poorly ventilated area, exhaust gases may accumulate and enter the
vehicle.

2-3. Parking the vehicle

203

2

Driving the v

ehicle

Exhaust gas precautions

Harmful substance to the human body is contained in exhaust gases if inhaled.

WARNING

Exhaust gases contain harmful carbon monoxide (CO), which is colorless and odorless.
Observe the following precautions.
Failure to do so may cause exhaust gases to enter the vehicle. This may cause light-head-
edness, possibly leading to an accident, death or a serious health hazard.

Keep the back door closed while driving.
If you smell exhaust gases in the vehicle even when the back door is closed, open the
windows and have the vehicle inspected by your Lexus dealer as soon as possible.

If the vehicle is in a poorly ventilated area or a closed area, such as a garage, stop the
hybrid system.

Do not leave the vehicle with the hybrid system on for a long time. If such a situation
cannot be avoided, park the vehicle in an open space and ensure that exhaust fumes
do not enter the vehicle interior.

Do not leave the hybrid system operating in an area with snow build-up, or where
it is snowing. If snowbanks build up around the vehicle while the hybrid system is
operating, exhaust gases may collect and enter the vehicle.

The exhaust system needs to be checked periodically. Check for the following. If any
are found, have the vehicle inspected by your Lexus dealer.

Holes or cracks in the exhaust pipes due to corrosion

Damage at the joining parts of the exhaust pipes

Abnormal noise from the exhaust

2-3. Parking the vehicle

204

Stopping

1

Depress the brake pedal.

WARNING

Drive more carefully than normal when the brakes are wet. When the brakes are
wet, the braking distance will increase. Also, the brakes will be difficult to apply
and, depending on the situation, braking performance may differ between the left
and right sides. Additionally, the parking brake may not be able to be securely
applied.

If the electronically controlled brake system does not operate, do not follow other
vehicles closely and avoid hills or sharp turns that require braking.In this case,
braking is still possible, but the brake pedal should be depressed more firmly than
usual. Also, the braking distance will increase. Have your brakes fixed immediately.

If the brake hydraulic system malfunctions, have it repaired immediately. The brake
system consists of 2 or more independent systems and if 1 hydraulic system fails,
the other systems will operate. In this situation, it will be necessary to depress the
brake pedal more than normal and braking distance will be increased.

NOTICE

Do not use the accelerator pedal or depress the accelerator and brake pedals at the
same time to hold the vehicle on a hill.    

2

If necessary, set the parking brake.

If the vehicle is to be stopped for an extended period of time, shift the shift position to P.

WARNING

When the vehicle is stopped

Do not depress the accelerator pedal unnecessarily.
If the vehicle is in any gear other than P or N, the vehicle may accelerate suddenly
and unexpectedly, causing an accident.

In order to prevent accidents due to the vehicle rolling away, always keep depress-
ing the brake pedal while stopped with the "READY" indicator is illuminated, and
apply the parking brake as necessary.

If the vehicle is stopped on an incline, in order to prevent accidents caused by the
vehicle rolling forward or backward, always depress the brake pedal and securely
apply the parking brake as needed.

Avoid revving or racing the engine. Running the engine at high speed while the
vehicle is stopped may cause the exhaust system to overheat, which could result in
a fire if combustible material is nearby.  

2-3. Parking the vehicle

205

2

Driving the v

ehicle

Parking the vehicle

1

Depress the brake pedal to stop the vehicle completely.

2

If the parking brake is released, set the parking brake.

3

Shift the shift position to P.

Check that the shift position indicator shows P and the parking brake indicator is
illuminated.

WARNING

Always set the parking brake, and shift the shift position to P. Failure to do so may
cause the vehicle to move or the vehicle may accelerate suddenly if the accelerator
pedal is accidentally depressed.

4

Press the power switch to stop the hybrid system.

5

Slowly release the brake pedal.

6

Lock the door, making sure that you have the electronic key on your person.

If parking on a hill, block the wheels as needed.

 Related Links 

Manual applying/releasing of the parking brake (manual mode)(P. 209)
Changing the shift position(P. 194)

Parking brake operation

The parking brake can be applied or released automatically (automatic mode)
or manually (manual mode). In automatic mode, the parking brake is applied
or released automatically according to the operation of the shift lever. Also, in
automatic mode the parking brake can be applied or released manually.

WARNING

When parking the vehicle

Do not leave a child in the vehicle alone. The parking brake may be released unintention-
ally by a child and there is the danger of the vehicle moving that may lead to an accident
resulting in death or serious injury.

Parking brake switch

Do not set any objects near the parking brake switch. Objects may interfere with the
switch and may lead the parking brake to unexpectedly operate.

2-3. Parking the vehicle

207

2

Driving the v

ehicle

NOTICE

When the vehicle is parked

Always apply the parking brake, shift the shift position to P, stop the hybrid system and
lock the vehicle. Do not leave the vehicle unattended while the "READY" indicator is
illuminated.
If the vehicle is parked with the shift position in P but the parking brake is not set, the
vehicle may start to move, possibly leading to an accident.

When the system malfunctions

Stop the vehicle in a safe place and check the warning messages.

When the vehicle 12-volt battery is discharged

The parking brake system cannot be activated.

When the parking brake cannot be released due to a malfunction

Driving the vehicle with the parking brake set will lead to brake components overheating,
which may affect braking performance and increase brake wear. Have the vehicle
inspected by your Lexus dealer a immediately if this occurs.

INFORMATION

Parking brake automatic release function

When all of the following conditions are met, the parking brake can be released by
depressing the accelerator pedal.

The driver’s door is closed

The driver is wearing the seat belt

The shift lever is in a forward driving position or reverse driving position

The malfunction indicator lamp and brake system warning light are not illuminated

When depressing the accelerator pedal, depress it slowly. If the parking brake is not
released when the accelerator pedal is depressed, release the parking brake manually.
Automatic mode: When the shift position is shifted from P, the parking brake will be
released automatically.

Parking brake operation sound

When the parking brake operates, a motor sound (whirring sound) may be heard. This
does not indicate a malfunction.

Parking brake indicator light

Depending on the power switch mode, the parking brake indicator light will turn on
and stay on as described below:
ON: Comes on until the parking brake is released.

2-3. Parking the vehicle

208

Not in ON: Stays on for approximately 15 seconds.

When the power switch is turned off with the parking brake set, the parking brake
indicator light will stay on for about 15 seconds. This does not indicate a malfunction.

When the parking brake switch malfunctions

Automatic mode (automatic brake setting and releasing) will be turned on automatically.

Parking brake engaged warning buzzer

A buzzer will sound if the vehicle is driven with the parking brake engaged. "Parking
Brake ON" is displayed on the multi-information display (with the vehicle reaching a
speed of 3 mph [5 km/h]).

Automatic applying/releasing of the parking brake (auto mode)

While the vehicle is stopped, pull and hold the parking brake switch until "EPB Shift
Interlock Function Activated" will be displayed on the multi-information display.
When the automatic mode is turned on, the parking brake operates as follows.

When the shift position is shifted from P: The parking brake will be released, and
the parking brake indicator light will turn off.

When the shift position is shifted to P: The parking brake will be set, and the
parking brake indicator light will turn on.

Operate the shift lever with the brake pedal depressed.
The auto function may not operate if the shift lever is moved extremely quickly. In
this situation, apply the parking brake manually.
With the vehicle stopped, press and hold the parking brake switch until a buzzer
sounds and "EPB Shift Interlock Function Deactivated" is displayed. Automatic
mode will be turned off.

INFORMATION

Parking brake operation

When the power switch is not in ON, the parking brake cannot be released using the
parking brake switch.

When the power switch is not in ON, automatic mode (automatic brake setting and
releasing) is not available.

Manual applying/releasing of the parking brake (manual mode)

The parking brake can be set and released manually.

2-3. Parking the vehicle

209

2

Driving the v

ehicle


A

Parking brake indicator (U.S.A.)

B

Parking brake indicator (Canada)

1

Pull the switch to set the parking brake.

The parking brake indicator light will turn on.
Pull and hold the parking brake switch if an emergency occurs and it is necessary to
operate the parking brake while driving.

2

Press the switch to release the parking brake.

Operate the parking brake switch while depressing the brake pedal.

The parking brake can be released by depressing the accelerator pedal,
through the parking brake automatic release function.

Parking brake automatic release function
Make sure that the parking brake indicator light and the parking brake switch
indicator turn off.
If the parking brake indicator light flash, operate the switch again.

Garage door opener and its performance

The garage door opener can be programmed using the HomeLink

®

 to operate

garage doors, gates, entry doors, door locks, home lighting systems, security
systems, and other devices.

INFORMATION

HomeLink

®

 programming procedure

The programming procedures can also be found at the following URL.

2-3. Parking the vehicle

210

Website: 

www.homelink.com/lexus

For support, contact customer support at the follow-
ing.
Help Line: 1-800-355-3515

System components

The HomeLink

®

 wireless control system in your vehicle has 3 buttons which can

be programmed to operate 3 different devices.


▶ 

Vehicles with auto anti-glare inside rear view mirror

A

HomeLink

®

 indicator light

B

Garage door operation indicators

C

HomeLink

®

 icon

Illuminates while HomeLink

®

 is operating.

D

Buttons


▶ 

Vehicles with Digital Rearview Mirror

A

HomeLink

®

 logo

Appears while HomeLink

®

 is operating. When

the menu button is pressed, the logo disappears
even while the HomeLink

®

 is operating.

B

Garage door operation indicators

C

HomeLink

®

 indicator lights

Illuminates above each button selected.

D

Buttons

WARNING

Do not use the HomeLink

®

 compatible transceiver with any garage door opener or

device that lacks safety stop and reverse features as required by federal safety standards.
This includes any garage door that cannot detect an interfering object. A door or device
without these features increases the risk of death or serious injury.

2-3. Parking the vehicle

211

2

Driving the v

ehicle

INFORMATION

Codes stored in the HomeLink

®

 memory

The registered codes are not erased even if the 12-volt battery cable is disconnected.

If learning fails when registeing a code to a previously registered HomeLink

®

 button,

the registered code will not be erased.

Program the HomeLink

®

Before programming the HomeLink

®

, perform the following:

During programming, it is possible that garage doors, gates, or other devices
may operate. For this reason, make sure that people and objects are clear of the
garage door or other devices to prevent injury or other potential harm.

It is recommended that a new battery be placed in the remote control transmit-
ter for more accurate programming.

The battery side of the transmitter must be pointed away from the HomeLink

®

 buttons.

Garage door opener motors manufactured after 1995 may be equipped with
rolling code protection. If this is the case, you may need a stepladder or other
sturdy, safe device to reach the “learn” or “smart” button on the garage door
opener motor.

WARNING

The garage door or other device may operate, so ensure people and objects are out
of danger to prevent potential harm.

Never allow a child to operate or play with the HomeLink

®

 buttons.

Steps 

1

 through 

3

 must be performed within 60 seconds. Otherwise the indicator

light will stop flashing and programming will not be able to be completed.

1

Press and release the HomeLink

®

 button you want to program and check that

the HomeLink

®

 indicator light flashes orange.

2-3. Parking the vehicle

212

2

Point the remote control transmitter for the
device at the rear view mirror, 1 to 3 in. (25 to
75 mm) from the HomeLink

®

 buttons.

Keep the HomeLink

®

 indicator light in view while

programming.

3

Program a device.

Programming a device other than an entry gate (for U.S.A. owners):

▶ 

Vehicles with auto anti-glare

inside rear view mirror

▶ 

Vehicles with Digital Rearview

Mirror

▶ 

Vehicles with auto anti-glare

inside rear view mirror

▶ 

Vehicles with Digital Rearview

Mirror

2-3. Parking the vehicle

213

2

Driving the v

ehicle

Press and hold the remote control transmitter button until the HomeLink

®

 indicator

light changes from slowly flashing orange to rapidly flashing green (rolling code) or
continuously lit green (fixed code), then release the button.

Programming an entry gate (for U.S.A. owners)/Programming a device in the
Canadian market:
Press and release the remote control transmitter button at 2 second intervals, re-
peatedly, until the HomeLink

®

 indicator light changes from slowly flashing (orange)

to rapidly flashing (green) (rolling code) or continuously lit (green) (fixed code).

4

Test the HomeLink

®

 operation by pressing the newly programmed button and

observing the indicator light:

HomeLink

®

 indicator light illuminates: Programming of a fixed code device has

completed. The garage door or other device should operate when a HomeLink

®

button is pressed and released.

HomeLink

®

 indicator light flashes rapidly: The garage door opener motor or other

device is equipped with a rolling code. To complete programming, firmly press and
hold the HomeLink

®

 button for 2 seconds then release it.

If the garage door or other device does not operate, proceed to 

Programming a

rolling code system(

 P.214)

.

5

Repeat the steps above to program another device for any of the remaining
HomeLink

®

 buttons.

Programming a rolling code system

Two or more people may be necessary to complete rolling code programming.

1

Locate the “Learn” or “Smart” button on the
garage door opener motor in the garage.

This button can usually be found where the hang-
ing antenna wire is attached to the unit. The name
and color of the button may vary by manufacturer.
Refer to the owner's manual supplied with the
garage door opener motor for details.

2

Press and release the “Learn” or “Smart” but-
ton.

Perform 

3

 within 30 seconds after performing 

2

.

2-3. Parking the vehicle

214

3

Press and hold the desired HomeLink

®

 but-

ton (inside the vehicle) for 2 seconds and re-
lease it. Repeat this sequence (press/hold/
release) up to 3 times to complete program-
ming.

If the garage door opener motor operates when
the HomeLink

®

 button is pressed, the garage

door opener motor recognizes the HomeLink

®

signal.

2-way communication with a garage door and its performance

When enabled, 2-way communication allows you to check the status of the open-
ing and closing of a garage door through indicators in your vehicle.
2-way communication is only available if the garage door opener motor used is a
compatible device.
To check device compatibility, refer to 

www.HomeLink.com

.

Enable 2-way communication with a garage door

1

Within 5 seconds after programming the garage door opener has been com-
pleted, if the garage door opener motor is trained to HomeLink

®

, both garage

door operation indicators will flash rapidly green and the light on the garage
door opener motor will blink twice, indicating that 2-way communication is
enabled.

If the indicators do not flash, perform 

2

 and 

3

 within the first 10 presses of the

HomeLink

®

 button after programming has been completed.

2

Press a programmed HomeLink

®

 button to operate a garage door.

3

Within 1 minute of pressing the HomeLink

®

 button, after the garage door

operation has stopped, press the “Learn” or “Smart” button on the garage door
opener motor.

▶ 

Vehicles with auto anti-glare

inside rear view mirror

▶ 

Vehicles with Digital Rearview

Mirror

2-3. Parking the vehicle

215

2

Driving the v

ehicle

Within 5 seconds of the establishment of 2-way communication, both garage door
operation indicators will flash rapidly in green. Additionally, the light on the garage door
opener motor will blink twice, indicating that 2-way communication is enabled.

Operate the HomeLink

®

This function is only available if the garage door opener motor used is a compatible
device. To check device compatibility, refer to 

www.HomeLink.com

.


▶ 

Vehicles with auto anti-glare inside rear view mirror

A

Opening

B

Closing


▶ 

Vehicles with Digital Rearview Mirror

A

Opening

B

Closing

Press the appropriate HomeLink

®

 button.

The HomeLink

®

 indicator light will turn on. The status

of the opening and closing of a garage door is shown
by the indicators as follows.

Orange (flashing): Currently opening/closing

Green: Opening/closing has completed

Red (flashing): Feedback signals cannot be received

INFORMATION

The indicators can operate within approximately 820 ft. (250 m) of the garage door.
However, if there are obstructions between the garage door and the vehicle, such as
houses and trees, feedback signals from the garage door may not be received.

To recall the previous door operation status, press and release either HomeLink

®

buttons 

  and 

  or 

  and 

  (vehicles with auto anti-glare inside rear

view mirror), 

  and 

  or 

  and 

 (vehicles with Digital Rearview Mirror),

simultaneously.
The last recorded status will be displayed for 3 seconds.

2-3. Parking the vehicle

216

Reprogram the HomeLink

®

When the following procedure is performed, buttons which already have devices
registered to them can be overwritten:

1

Press and hold the desired HomeLink

®

 button.

2

When the HomeLink® indicator starts flashing orange, release the Home-
Link

®

 button.

3

Press and release the HomeLink

®

 button you want to program and check that

the HomeLink

®

 indicator light flashes orange.

It takes 20 seconds for the HomeLink

®

 indicator to start flashing.

Erase the entire HomeLink

®

 memory

When selling your vehicle, be sure to erase the registered codes from the Home-
Link

®

 memory.

Press and hold the 2 outer HomeLink

®

 buttons

for 10 seconds. Check that the HomeLink

®

 indi-

cator light changes from continuously lit in or-
ange to rapidly flashing in green.
All codes registered to memory will be erased.

▶ 

Vehicles with auto anti-

glare inside rear view mirror

▶ 

Vehicles with Digital Rear-

view Mirror

2-3. Parking the vehicle

217

2

Driving the v

ehicle

Refueling

Refueling

NOTICE

For plug-in hybrid electric vehicles, fuel may remain in the tank for a long time and
undergo changes in quality depending on the how the vehicle is used. Refuel at least 20 L
(5.3 gal., 4.4 Imp.gal.) of fuel every 12 months (refuel a total of at least 20 L [5.3 gal., 4.4
Imp.gal.] over a 12-month period), as this may affect components of the fuel system or the
gasoline engine.

INFORMATION

Running out of fuel

When the vehicle has run out of fuel and the hybrid system cannot be started, refuel the
vehicle with at least enough gasoline to make the low fuel level warning light go off.

*1

 If

there is only a small amount of fuel, the hybrid system may not be able to start.

Opening the fuel tank cap

The fuel tank of your vehicle has a special structure, which requires a reduction in fuel tank
pressure before refueling. After the opener switch has been pressed, it will take several
seconds until the vehicle is ready for refueling.

1

Press the opener to open the fuel filler door.

The fuel filler door will open within about 10 sec-
onds of the switch being pressed. Before refueling
is possible, a message will be shown on the mul-
ti-information display in the instrument cluster to
indicate the progress of the fuel filler door opener.
The fuel filler door will open.

2

Turn the fuel tank cap slowly and remove it,
then put it into the holder on the fuel filler
door.

*1 : 

The specified refueling volume to cause the warning light to turn off when the vehicle

is level is approximately 2.6 gal. [10.0 L, 2.2 Imp.gal.]. This value may vary when the

vehicle is on a slope. Add extra fuel when the vehicle is inclined.

2-4. Refueling

218


Content      ..     10      11      12      13     ..